
TA-400MIC - Receiver Taga Harmony - Free user manual and instructions
Find the device manual for free TA-400MIC Taga Harmony in PDF.


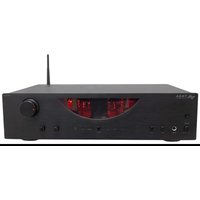
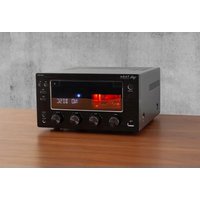
| Product Type | Custom Install A/B Speaker Stereo Amplifier (Receiver) |
| Model | TA-400MIC |
| Brand | Taga Harmony |
| Power Output (RMS) | 2 x 60W @ 8 ohms; 2 x 90W @ 4 ohms |
| Total Harmonic Distortion (THD) | ≤ 2% (30 Hz - 20 kHz) |
| Signal-to-Noise Ratio | ≥ 80 dB (A-weighted) |
| Frequency Response | 30 Hz - 20 kHz |
| Inputs | USB (MP3/WMA/WAV/APE), 2x RCA (CD, AUX), 3.5 mm stereo (MP3), Microphone (1/4") |
| Outputs | RCA REC, Headphone (1/4"), Speaker A & B (banana compatible, up to 10 AWG) |
| Microphone Input Sensitivity | 7 mV (THD 1%, 200 Hz - 15 kHz) |
| Headphone Output | 20 mW @ 32 ohms (THD 0.5%, 100 Hz - 15 kHz) |
| Power Supply | 220-240 V AC, 50/60 Hz, 250 W max |
| Dimensions (H x W x D) | 9.1 x 42 x 31.7 cm (3.6 x 16.5 x 12.5 in) |
| Net Weight | 6.2 kg (13.7 lbs) |
| Speaker Impedance | A or B only: 4-8 ohms; A+B: 8-16 ohms |
| Controls | Volume, Bass, Treble, Balance, Input Selector, Speaker Selector (A/B/A+B), Microphone Volume, Echo |
| Features | Built-in headphone output, microphone mixing with echo, USB playback, A/B speaker zones, REC output, removable IEC power cable |
| Cleaning | Use a damp, soft cloth; do not use strong or abrasive cleaners |
| Safety | Do not expose to rain or moisture; do not remove chassis; refer servicing to qualified personnel |
| Kit Contents | Amplifier unit, Power cable, Instruction manual |
Frequently Asked Questions - TA-400MIC Taga Harmony
User questions about TA-400MIC Taga Harmony
0 question about this device. Answer the ones you know or ask your own.
Ask a new question about this device
Download the instructions for your Receiver in PDF format for free! Find your manual TA-400MIC - Taga Harmony and take your electronic device back in hand. On this page are published all the documents necessary for the use of your device. TA-400MIC by Taga Harmony.
USER MANUAL TA-400MIC Taga Harmony
natural_image
Abstract wavy pattern with black and white vertical stripes (no text or symbols)TAGA
HARMONY
TA-400MIC
CUSTOM INSTALL
A/B SPEAKER STEREO AMPLIFIER

Instruction manual
Introduction
Thank you for purchasing this TAGA Harmony amplifier. The TA-400MIC is an efficient, cost-effective choice for home hi-fi systems and commercial installations in restaurants, pubs, shops, conferencing rooms, fitness clubs for both background music, voice playback or karaoke systems.
The TA-400MIC integrated amplifier offers the finest music performance at this price level and perfect matching with most speakers available in the market. It utilizes advanced materials, state of the art engineering and innovate design by an international team of professional designers.
It delivers pure and distortion-limited power as well as rich sound performance with stunning accuracy, soundstage and sensational dynamics.
A variety of features and wired connections makes the TA-400MIC a very versatile device with ability to work in different applications:
• Built-in headphone output is a perfect choice for those who prefer discrete listening
- Built-in microphone input with a mixing and echo control is a perfect solution for voice playback.
- USB input to quickly and easily play music from USB flash drivers (supports MP3 / WMA / WAV / APE files) for almost endless playback.
- MP3 (3.5 mm stereo jack) input on the front panel to quickly connect a smartphone, tablet or laptop.
- Two RCA stereo inputs at the rear to hook additional equipment like a CD player, radio tuner or other analog devices.
- REC output for external power amplifier or powered speakers.
- Two speaker outputs (A and B) to build a simple and cost-effective two-zone sound system.
- The removable IEC power cable gives you an option to upgrade your system with a premium power cable in any time.
Cleaning
Do not use strong or abrasive cleaners. Use a damp, soft cloth for cleaning.
Specifications
Full technical specifications are available on the www.Tagaharmony.com website.
Contents
Safety Instructions 4
Important Safety Instruction 5
Front and Rear Panel 6
Hooking up speaker cable 7
Hooking up the amplifier 7
Operation 9
Operation - Connecting Additional Devices 10
Troubleshooting 12
Specifications 12
Safety Instructions
IMPORTANT
READ THIS SECTION CAREFULLY BEFORE PROCEEDING!
CAUTION
RISK OF ELECTRIC SHOCK DO NOT OPEN

WARNING: TO REDUCE THE RISK OF FIRE OR ELECTRIC SHOCK, DO NOT EXPOSE THIS PRODUCT TO RAIN OR MOISTURE. DO NOT REMOVE CHASSIS (OR BACK). NO USER-SERVICEABLE PARTS INSIDE. REFER SERVICING TO QUALIFIED SERVICE PERSONNEL.

The triangle containing a lightning symbol is intended to alert the user to the presence of uninsulated dangerous voltages within the product's enclosure that may be of sufficient magnitude to constitute a risk of electric shock to persons.

An exclamation mark in a triangle is intended to alert the user to the presence of important operating and maintenance (servicing) instructions in the literature accompanying the appliance.
WARNING: TO REDUCE THE RISK OF FIRE OR ELECTRIC SHOCK, DO NOT EXPOSE THIS APPARATUS TO RAIN OR MOISTURE, AND OBJECTS FILLED WITH LIQUIDS, SUCH AS VASES, SHOULD NOT BE PLACED ON THIS APPARATUS.
CAUTION: TO PREVENT ELECTRIC SHOCK, MATCH WIDE BLADE OF PLUG TO WIDE SLOT, FULLY INSERT.
CAUTION: FOR CONTINUED PROTECTION AGAINST RISK OF FIRE, REPLACE THE FUSE ONLY WITH THE SAME AMPERAGE AND VOLTAGE TYPE. REFER REPLACEMENT TO QUALIFIED SERVICE PERSONNEL.
WARNING: UNIT MAY BECOME HOT. ALWAYS PROVIDE ADEQUATE VENTILATION TO ALLOW FOR COOLING. DO NOT PLACE NEAR A HEAT SOURCE, OR IN SPACES THAT CAN RESTRICT VENTILATION.
Important Safety Instructions
- Read Instructions – All the safety and operating instructions should be read before the product is operated.
- Retain Instructions – The safety and operating instructions should be retained for future reference.
- Heed Warnings – All warnings on the product and in the operating instructions should be adhered to.
- Follow Instructions - All operating and use instructions should be followed.
- Cleaning - Unplug this product from the wall outlet before cleaning. Do not use liquid cleaners or aerosol cleaners. Use a damp, soft cloth for cleaning.
- Water and Moisture - Do not use this product near water - for example, near a bath tub, wash bowl, kitchen sing or laundry tub; in a wet basement; or near a swimming pool; and the like.
- Accessories - Do not place this product on an unstable cart, stand, tripod, bracket or table. The product may fall, causing serious injury to a child or adult, and serious damage to the product. Use only with a cart, stand, tripod, bracket or table recommended by the manufacture, or sold with the product. Any mounting of the product should follow manufacture's instructions and should use a mounting accessory recommended by the manufacture.
- Ventilation - Slots and openings in the cabinet are provided for ventilation and to ensure reliable operation of the product and to protect it from overheating, and these openings must not be blocked or covered. The openings should never be blocked by placing the product on a bed, sofa, rug, or other similar surface. This product should not be placed in a built-in installation such as a bookcase or rack unless proper ventilation is provided or the manufacture's instructions have been adhered to.
- Power Sources - This product should be operated only from the type of power source indicated on the marking label. If you are not sure of the type of power supply to your home, consult your product dealer or local power company. For products intended to operate from battery power, or other sources, refer to the operating instructions.
- Grounding and Polarization - This product may be equipped with a polarized alternating-current line plug (a plug having one blade wider than the other). This plug will fit into the power outlet only one way. This is safety feature. If you are unable to insert the plug fully into the outlet, try reversing the plug. If the plug should still fail to fit, contact your electrician to replace your obsolete outlet. Do not defeat the safety purpose of the polarized plug.
- Power-Cord Protection - Power supply cords should be routed so that they are not likely to be walked on or pinched by items placed upon or against them, paying particular attention to cords at plugs, convenience receptacles, and the point where they exit from the product.
-
Lightning - For added protection for this product during a lightning storm, or when it is left unattended and unused for long periods of time, unplug it from the wall outlet and disconnect the antenna or cable systems. This will prevent damage to the product due to lightning and power-line surges.
-
Overloading - Do not overload wall outlets, extensions cords, or integral convenience receptacles as this can result in a risk of fire or electric shock.
- Object and Liquid Entry - Never push objects of any kind into this product through openings as they may touch dangerous voltage points or short-out parts that could result in a fire or electric shock. Do not expose this apparatus to dripping or splashing, and ensure that no objects filled with water, such as vases, are placed on the apparatus.
- Servicing - Do not attempt to service this product yourself as opening or removing covers may expose you to dangerous voltage or other hazards. Refer all servicing to qualified service personnel.
-
Damage Requiring Service - Unplug this product from wall outlet and refer servicing to qualified personnel under the following conditions:
-
When power supply cord or plug is damaged;
- If liquid has been spilled, or objects have fallen into product;
- If the product does not operate normally by following the operating instructions. Adjust only those controls that are covered by the operating instructions as an improper adjustment of other controls may result in damage and will require extensive work by a qualified technician to restore the product to its normal operation;
• If the product has been dropped or damaged in any way; -
If the product exhibits a distinct change in performance - this indicates a need for service.
-
Replacement Parts - When replacement parts are required, be sure the technician has used replacement parts specified by the manufacturer or have the same characteristics as the original part. Unauthorized substitutions may result in fire, electric shock, or other hazards.
- Safety Check - Upon completion of any service or repairs to this product, ask the service technician to perform safety checks to determine that the product is in proper operating condition.
- Wall or Ceiling Mounting - The product should be mounted to a wall or ceiling only as recommended by the manufacturer.
- Heat - The product should be situated away from heat sources such as radiators, heat registers, stoves, or other products (including amplifiers) that produce heat.
- [Refers to products equipped with vacuum tubes] Tube Cage - For your safety and to protect the vacuum tubes this product may be equipped with the factory installed vacuum tube cage.
It is not recommended to remove the cage unless it is required to change the vacuum tubes.
When the cage is removed - do not touch the vacuum tubes - they may be hot and burn the skin!
Front and Rear Panel

Front Panel
- Power Switch and Power Status Indicator (around the Power Switch)
- Headphone 1/4" Jack Output
- Treble Regulator
- Bass Regulator
- Balance Regulator
- Speaker Selector (A, B, A+B)
- Volume Regulator
- Input Selector (USB, CD, AUX, MP3)
- Microphone Level Regulator
- Microphone Echo Regulator
- USB Input Status LED Indicator
- USB Stick Input
- USB Knob (Play/Pause, Next/Previous)
- MP3 3.5 mm Mini Jack Stereo Input
- MP3 3.5 mm Mini Jack Stereo In
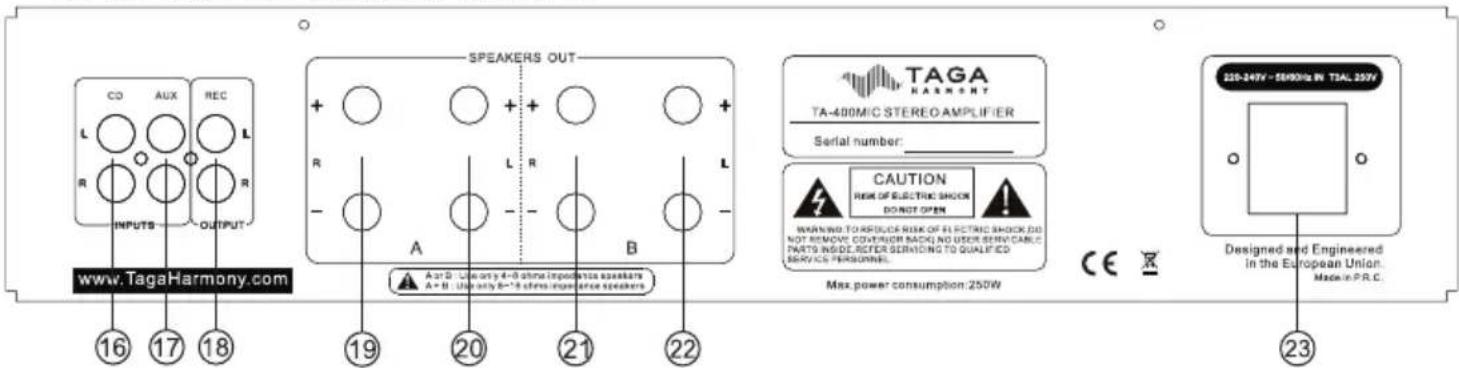
Rear Panel
- CD Stereo RCA Input
- AUX Stereo RCA Input
- REC OUT Stereo RCA Output
- Speaker Group A Right Channel Output (Speaker Connectors)
- Speaker Group A Left Channel Output (Speaker Connectors)
- Speaker Group B Right Channel Output (Speaker Connectors)
- Speaker Group B Left Channel Output (Speaker Connectors)
- Power Cable Input and Fuse Box
Note! A blown fuse should be only exchanged for exactly the same type as indicated on the rear amplifier panel. The Power Cable should be disconnected!
Hooking up Speaker Cables
The Speaker Connectors can accommodate up to 10AWG speaker cables as well as most of popular plugs (banana etc.). A 10AWG cable is recommended for longer connections (greater than 20 meters / 66 feet). For shorter lengths you can use 12/14 or 18 AWG cables. It is recommended to leave about 150 cm (5 feet) of extra cable at the amplifier end to facilitate positioning and installation of the amplifier. Do not use staples, nails or other metal objects to secure the cables. You will get the best sound quality and least amount of hum by keeping the cables away from other electrical wires and cables.
Pay attention to connecting the polarity of the amplifier correctly with the speakers in each speaker group (speakers should be connected RED + with RED + amplifier connector, BLACK – with BLACK – amplifier connector). Before connecting make sure that your amplifier is switched off.
Please refer to your speaker instruction manual for more information.
Hooking up the Amplifier

flowchart
graph TD
    A["CD Player, Satellite tuner, etc."] --> B["RCA interconnect cable"]
    C["CD Player, Satellite tuner, etc."] --> B
    D["TAPE, CD Recorder"] --> B
    E["www. TagaHarmony.com"] --> F["Speaker cable"]
    G["Group A"] --> F
    H["Group B"] --> F
    I["TA-400MIC STEREO AMPLIFIER"] --> J["Serial number:"]
    K["CAUTION"] --> L["WARNING TO REDUCE RISK OF ELECTRIC SHOCK DO NOT REMOVE COOPER AIRBACK NO UDR SPECABLE PARTS AND/OR REFLECT SERVICE NOT TO QUALIFIED SERVICE PERSONNEL"]
    L --> M["Max power consumption: 250W"]
    N["Designed and Engineered in the European Union, Meta x P.R.C"] --> O["226-249V - 53/95Hz IN TAL 250V"]
    style A fill:#f9f,stroke:#333
    style C fill:#f9f,stroke:#333
    style D fill:#f9f,stroke:#333
    style E fill:#ccf,stroke:#333
    style F fill:#cfc,stroke:#333
    style G fill:#cfc,stroke:#333
    style H fill:#cfc,stroke:#333
    style I fill:#cfc,stroke:#333
    style J fill:#fcc,stroke:#333
    style K fill:#fcc,stroke:#333
    style L fill:#fcc,stroke:#333
    style M fill:#fcc,stroke:#333
    style N fill:#fcc,stroke:#333
    style O fill:#fcc,stroke:#333
    style P fill:#fcc,stroke:#333
- Make sure the amplifier is switched off (the Power Switch is in the top position and the Power Cable is removed).
- Turn the Volume Regulator to MIN (max counter clockwise).
- Using speaker cables (not supplied with this product) connect your speakers to SPEAKERS OUT (A or B, A and B) connectors located on the rear of the amplifier (check Hooking Up Speaker Cables for more details).
- If you want to play analog audio source devices (CD player, satellite or FM tuner, video console etc.): using RCA interconnect cables (not supplied with this product) connect them to the analog inputs (CD, AUX).
Hooking up the Amplifier
- If you want to record audio from this amplifier on an external recorder with an analog input (Tape/CD recorder etc.): using RCA interconnect cables (not supplied with this product) connect it to the analog REC output.
- Your amplifier is ready for operation.
Note! Avoid to short-circuit of cables – it can damage this amplifier or speakers. This may void your warranty.

A or B: Use only 4\~8 ohms impedance speakers
A + B: Use only 6\~16 ohms impedance speakers
NOTE! When using A or B speakers only, you can connect 4 – 8ohm speakers. When using A and B speakers, you can connect 8 – 16ohm speakers - connecting speakers with the impedance less than 8ohm can damage this amplifier or speakers. This may void your warranty.
Operation
- Plug the Power Cable to the amplifier and into the electrical outlet.
- Switch on the amplifier – press the Power Switch (the Power Switch should be in the down position). The status LED around the Power Switch should turn blue in a few seconds. If it does not, it means that the amplifier is working under an abnormal condition (a protection mode) – turn off the power, unplug the Power Cable and check whether some of the cables are not short circuited. After fixing the cables turn the amplifier on.
- Using the Speaker Selector knob select which group of speakers (A or B or A+B) you want to use. If you want to use 2 pairs of speakers choose the A+B option.
- Using the Input Selector knob select which audio source you want to play (corresponding to the selected input).
- Switch on your audio source and start playback.
- Regulate volume on the amplifier to adjust the level of sound.
Note! High volume levels can damage this amplifier or speakers. This may void your warranty.
Volume Regulator:
You can adjust the sound volume from minimum (the knob – max counterclockwise) to maximum (the knob – max clockwise). Distortion and sound quality worsening may occur when the knob is in the maximum position. It may damage the amplifier or speakers. This may void your warranty.
Bass Regulator:
You can adjust bass output of the amplifier. The default: the knob is in the center position : the marker on the knob in the vertical position. Turn the knob counterclockwise (-) to decrease the amount of low frequencies. Turn the knob clockwise (+) to increase the amount of low frequencies (+).Treble Regulator:You can adjust treble output of the amplifier. The default: the knob is in the center position : the marker on the knob in the vertical position. Turn the knob counterclockwise (-) to decrease the amount of high frequencies. Turn the knob clockwise to increase the amount of high frequencies (+).
Balance Regulator:
If the center of the soundstage is off-center, rotate the Balance Regulator knob in the direction that the soundstage needs to be moved. The default: the knob is in the center positio: the marker on the knob in the vertical position.
REC Output:
This output is used to record audio from the amplifier on an external device. The output audio signal level is fixed (is not regulated by the Volume Regulator).
Operation - Connecting Additional Devices

Note! Turn the Volume Regulator to MIN (max counter clockwise) before connecting or disconnecting any additional device.
Headphones:
When headphones (not supplied with this product) are plugged to the headphone input (Phones) the transmission of sound to the speakers is switched off. The speakers are again active after you disconnect the headphones. The volume of the headphones is regulated by the Volume Regulator.
Note! Listening at high volume can cause hearing damage.
Play from USB Stick:
This amplifier can play music from most USB sticks and supports most MP3 / WMA / WAV / APE audio files.
- Using the Input Selector knob select the USB input.
- If the USB stick is not inserted then the USB Input Status LED will blink blue.
- Insert the USB stick (not supplied with this product) into the USB Input socketlocated on the front of the amplifier.
- When compatible music files are detected then the USB Input Status LED will turnblue and the playback will start automatically.
- Press the USB Knob▶ III once to pause the playback. Press it again to resume the playback.
- Rotate the USB Knob ▶▶■ clockwise to play the next song. If the last song is detected the playback will start from the first one on the USB stick (check order of file playback).
- Rotate the USB Knob ▪◀ counterclockwise to play the previous song. If the first songis detected the playback will start from the last one on the USB stick (check order of file playback).
Order of file playback:
The music files are always played in accordance with their alphabetical order on theUSB stick and its folders. Usually the playback starts from the files stored directly onthe USB stick (which are not placed in the folders) and then the playback is continuedfor the files stored in the folders according to a folder order on the USB stick.
Operation - Connecting Additional Devices
Note! Depending on a USB stick type, format and number or arrangements of foldersand files some music files will be played differently or will not be recognized by the amplifier.
Note! We recommend to change input to other one before removing the USB stick.
Microphone:
This amplifier allows a connection of a wired microphone (not supplied with this product) and easy voice mixing with the background music.
MIC VOL:
You can adjust the sound level of the microphone relative to the currently played background music. To make the microphone sound more audible turn the MIC VOL knob clockwise (+) and to make it less audible rotate the knob counterclockwise (-). The master volume level for both the microphone and background music is regulated by the Volume Regulator. The MIC VOL control is also active without the background music (only microphone is working). The default: the knob is in the center position : the marker on the knob in the vertical position.
ECHO:
You can adjust the level of reverberation of the microphone. To increase the reverberation turn the ECHO knob clockwise (+) and to decrease it rotate the knob counterclockwise (-). The default: the knob is in the center position: the marker on the knob in the vertical position.
Note! High volume levels can damage this amplifier or speakers. This may void your warranty.
MP3 Input:
This amplifier can play music from most modern audio devices equipped with 3.5 mm stereo analog audio output (or compatible).
- Using the Input Selector knob select the MP3 input.
- Using the stereo analog interconnect cable with 3.5 mm mini jack (not supplied with this product) connect an audio device like a smartphone, tablet, laptop etc. and start the playback.
Note! High volume levels can damage this amplifier or speakers. This may void your warranty.
Troubleshooting
If the amplifier is not operating properly, make a check of the items in the table below. If the problem still resists, a malfunction may be assumed. Disconnect the power immediately and contact the store where the amplifier was purchase.
| Problem Causes | Corrections |
| No sound | · Insecure speaker cable connection.· Power plug & AC jack connected insecurely.· Volume control set to minimum.· Speaker output not in right position |
| Disortion | · The volume is too loud. |
| Sound only from one channel | · Incomplete speaker connection line.· Incomplete input/output cable connection.· Left/right balance is offset one sid. |
Specifications
| Type CI 4-zone stereo amplifier with MIC mixing | |
| Power Output 2 x 60W RMS @ 8ohm | 2 x 90W RMS @ 4ohm |
| THD Less or equal 2% (30-20kHz) | |
| Signal/Noise ratio =>80dB (A-weighted) | |
| Frequency Response 30Hz – 20kHz | |
| Inputs USB (MP3 / WMA / WAV / APE audio files)RCA stereo CD, AUX3.5 mm stereo MP3 (front) | |
| Output RCA stereo REC | |
| Microphone Input Sensitivity 7mV; THD 1%; Frequency resp. 200Hz – 15kHz (+/-3dB) | |
| Headphone Output 20mW(32ohm); THD 0.5%; Frequency resp. 100Hz – 15kHz (+/-3dB) | |
| AC Power, Power Consumption 220-240V 50/60Hz, 250W | |
| Dimensions (H x W x D) 9.1 x 42 x 31.7 cm | |
| Weight (net.) 6.2 kg / pc | |
We reserve the right to change the technical data and the design of the product without notice as a result of further development
We strongly advise to contact a professional installer or dealer in order to install TAGA Harmony products.
We recommend using high quality TAGA Harmony cables and other installation accessories.
Kit Content:
Amplifier 1EA
Power Cable 1EA
Instruction Manual 1EA

Your product is marked with the symbol as showed on the left. For EU (European Union) member users:
This product has been tested and found in compliance with requirements of the European Community 2014/30/EU (EMC) & 2014/35/EU (LVD) directives.
natural_image
Pure electrical circuit lines without any symbolsIMPORTANT!
Your product is marked with the symbol as showed on the left. For EU (European Union) member users:
According to the WEEE (Waste electrical and electronic equipment) Directive, do not dispose of this product as household waste or commercial waste. Waste electrical and electronic equipment should be appropriately collected and recycled as required by practices established for your country. For information on recycling of this product, please contact your local authorities, your household waste disposal service or the shop where you purchased the product.
TAGA EUROPE
POLPAK POLAND Sp. z o.o.
AL.JEROZOLIMSKIE 331A
05-816 REGUŁY k/WARSZAWY, POLAND
Email: sales@TagaHarmony.com

- TAGA
- HARMONY
- TA-400MIC
- Introduction
- Cleaning
- Specifications
- Contents
- Safety Instructions
- IMPORTANT
- CAUTION
- RISK OF ELECTRIC SHOCK DO NOT OPEN
- Important Safety Instructions
- Front and Rear Panel
- Front Panel
- Rear Panel
- Hooking up Speaker Cables
- Hooking up the Amplifier
- Operation
- Volume Regulator:
- Bass Regulator:
- Balance Regulator:
- REC Output:
- Operation - Connecting Additional Devices
- Headphones:
- Play from USB Stick:
- Order of file playback:
- Microphone:
- MIC VOL:
- ECHO:
- MP3 Input:
- Troubleshooting
- Kit Content:
- IMPORTANT!
Brand : Taga Harmony
Model : TA-400MIC
Category : Receiver