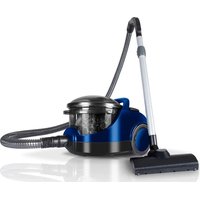
Acquapur II AR-2400 - Vacuum Cleaner Koblenz - Free user manual and instructions
Find the device manual for free Acquapur II AR-2400 Koblenz in PDF.


| Product Type | Vacuum Cleaner |
| Brand | Koblenz |
| Model | Acquapur II AR-2400 |
| Category | Vacuum Cleaner |
| Dimensions (L x W x H) | Approx. 40 x 30 x 25 cm |
| Weight | Approx. 5.5 kg |
| Power Supply | AC 220-240V, 50/60Hz |
| Power Consumption | 1200 W |
| Suction Power | Adjustable |
| Dust Capacity | 2.5 L (bagless) |
| Filter Type | HEPA washable |
| Cord Length | 7 m |
| Noise Level | Approx. 78 dB |
| Operating Radius | 10 m |
| Accessories Included | Crevice tool, brush, floor nozzle |
| Maintenance | Clean filter monthly, empty dust container after each use |
| Safety Features | Thermal overload protection |
| Repairability | Spare parts available; replaceable filters and brush roll |
| Warranty | 1 year |
Frequently Asked Questions - Acquapur II AR-2400 Koblenz
User questions about Acquapur II AR-2400 Koblenz
0 question about this device. Answer the ones you know or ask your own.
Ask a new question about this device
Download the instructions for your Vacuum Cleaner in PDF format for free! Find your manual Acquapur II AR-2400 - Koblenz and take your electronic device back in hand. On this page are published all the documents necessary for the use of your device. Acquapur II AR-2400 by Koblenz.
USER MANUAL Acquapur II AR-2400 Koblenz
Vacuum cleaner with water filter
You have just purchased a Koblenz® Vacuum Cleaner. Please read this manual carefully before operating machine. Model and serial number may be found on the back of your vac. You should record both model and serial numbers and keep them in a safe place for future use. Keep this manual.
¡Felicidades!
Read all instructions before using this vacuum cleaner.
Important safety instructions....2
Polarized outlet ....3
Your vacuum cleaner components....3
Vacuum cleaner assemble....4
Usage....5
Turbo Brush accessory....5
Combination floor/rug tool....5
Power control....6
Pull out line cord....6
Water tank level....6
Cleaning and maintenance....6
Troubleshooting....7
Warranty....8
IMPORTANT SAFETY INSTRUCTIONS
• This vacuum cleaner is for household use only
Read all instructions before using this vacuum cleaner. Save this manual.
WARNING
To reduce risk of fire, electric shock or injury:
-
Do not use to pick up flammable or combustible liquids, such as gasoline or use in areas where such items may be present.
-
Only connect appliance to a 120 V electric source.
-
Use products only as described in this manual, use only manufacturer's recommended attachments.
-
Do not pick up anything that is burning or smoking; such as cigarettes, matches or hot ashes.
-
Do not use to pick up liquids.
-
Do not leave vacuum plugged in. Unplug from outlet when not in use and before servicing.
-
Turn unit off before unplugging.
-
Do not put any object into openings. Do not use with any opening blocked. Keep free of dust, lint, hair and anything that may reduce airflow.
-
Do not use without filters in place.
-
Do not allow vacuum to be used as a toy, or to run unattended at any time. If used by children or near them, close supervision is necessary.
-
Do not store outdoors.
-
Do not use with a damaged cord or plug. If vacuum is not working as it should, or if it has been dropped, damaged, or submerged into water, return it to an authorized service center.
-
Do not pull or carry by cord, use cord as a handle, close a door on cord or pull cord around sharp edges or corners, do not run vacuum over cord. Keep away from heated surfaces.
-
Do not unplug by pulling on cord. To unplug, grasp the plug, not the cord.
-
A double-insulated appliance is marked with one or more of following: The words "DOUBLE INSULATION" or "DOUBLE INSULATED" or the doble insulation symbol (square with a square): ☐
-
Do not unplug or vacuum with wet hands. Use extra care when cleaning stairs.
-
Keep hair, loose clothing, fingers and all parts of body away from openings and moving parts.
-
Never use vacuum cleaner as a pump
-
If the line cord is damaged, it must be replaced by the manufacturer or an authorized service center.
POLARIZED OUTLET
This appliance is for use on a 120 V\~ circuit, and has a polarized plug as shown in figure A. A temporary adapter may be used to connect this plug to non-polarized outlet. Temporary adapter should be used only until a properly polarized outlet can be installed by a qualified electrician.
NOTE:
In Canada, the use of a temporary adapter is not permitted by the Canadian Electrical Code.

Figure A
YOUR VACUUM CLEANER COMPONENTS
A VACUUM CLEANER
A1. ON-OFF switch
A2. Cord rewinder button
A3. Suction power control knob
A4. Sponge Filter
A5. HEPA filter
A6. HEPA filter housing cover
A7. Suction port
A8. Body handle
A9. Wheels
A10. Motor protection filter nest
A11. Motor protection filter
A12. Cable Plug
B CONTAINER GROUP
B1. Transparent water tank
B2. Transparent water tank cover
B3. Transparent water tank handle
B4. Water filter body
B5. Air inlet grill
C HOSE GROUP
C1. Flexible hose
C2. Telescopic wand
C3. Floor Turbo Brush
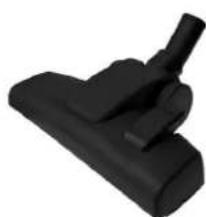
C4. Combination floor/rug tool
D ACCESSORIES GROUP
D1. Accessory holder
D2. Crevice nozzle
D3. Dusting brush
D4. Pick up tool and texturized walls tool
D5. Defoamer
D6. Mini Turbo Brush
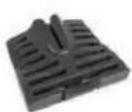
A6
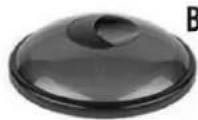
B2

A5
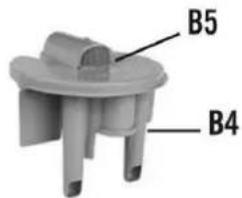

A4

D5

A11

natural_image
Coiled black rubber hose with a black handle and label 'C1' on the side (no other text or symbols)C2

D6

D1

D2

D3

D4

natural_image
Black rubber clip with handle and spout (no text or symbols visible)C4

VACUUM ASSEMBLE

CAUTION: Unplug power cord before performing any maintenance on it.
WATER FILTER USE

natural_image
Black and white photo of a hand placing a lid onto a vacuum cleaner's air vent, with an upward arrow indicating motion (no text or symbols visible)
natural_image
Close-up of a hand using a vacuum cleaner to handle a glass container with a straw, showing an upward arrow (no text or symbols visible)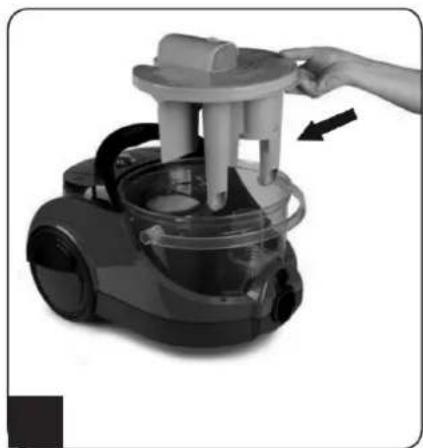
natural_image
Close-up of a hand operating a vacuum cleaner with a handle and control panel (no visible text or symbols)-
Open reservoir cover. Fig. 1
-
Remove transparent reservoir by holding it from handle and put it a side. Fig. 2
-
Pull out water filter body. Fig. 3
-
Compare parts and accessories in the instruction manual with those on the package. Check if any of them is missing or damaged.
-
If you are going to use your vacuum cleaner, put water inside transparent water tank until maximum level specified (Max 1.2 L). Do not put water into below or above this level.
-
To ensure a pleasant scent on room, and that dirty water doesn't produce foam, drip 2-3 drops of given defoamer with vacuum cleaner into water.
-
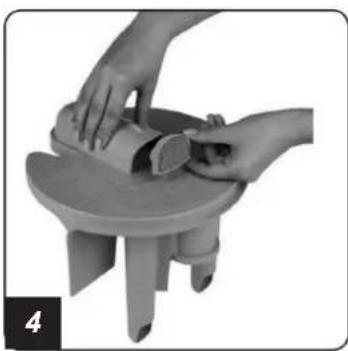
Slot water filter body onto it's place on water tank. Fig. 4
-
Make sure air inlet grill is inserted into water filter body. Insert it, if it is not. Close the reservoir cover. Fig. 5
-
Insert motor protection's filter into it's slot on the main body. If the motor protection's filter is not inserted, vacuum cleaner cannot make sufficient suction. Please make sure motor protection's filter is inserted into its slot.
-
Insert transparent reservoir set into the main body tightly.
-
In order to connect hose to the main body, press locking buttons on vacuum head of hose and place it in the vacuum head on tank. Fig. 6
natural_image
Close-up of hands operating a small mechanical device on a circular base (no visible text or symbols)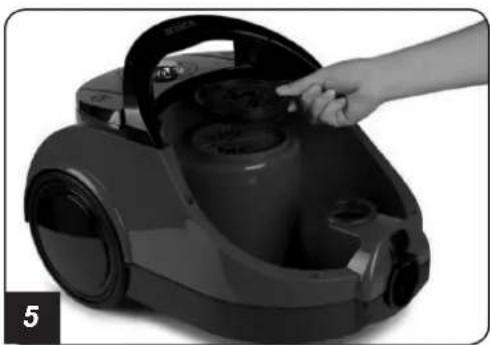
natural_image
Hand placing a black vacuum cleaner into a black housing (no visible text or symbols)
natural_image
Close-up of a hand holding a black vacuum cleaner with a hose, no visible text or symbols
CAUTION:
Never make water suction with it on wet floor. Only make dry sweeping with your vacuum cleaner.
USAGE
1- Make installation and initialization process. Fig. 7
2- Accessories can be placed directly in hose or telescopic wand. Choose accessory and connect. Connection is done when you hear a click.
3- Use telescopic wand to reach hard places.
4- Plug in your vacuum cleaner and start it by pressing on On-Off button.

natural_image
Close-up of a hand placing a component into a black vacuum cleaner (no visible text or symbols)For an efficient cleaning, use the following accessories:

natural_image
Five different types of black vacuum cleaner components, shown from left to right with no visible text or symbols.a. Floor Turbo Brush: for all kind of floors. Great for pet hair
b. Combination floor tool: to sweep floors, carpets, rugs, etc.
c. Pick up tool and textured walls tool: to clean surfaces like shelves, book cases, clothes, electronic instruments, lamp-shade, furniture, curtain etc.
d. Turbo Brush Mini: Cleans pet hair on furniture.
e. Dusting brush: Brush for processes of curtain cleaning and removing dust.
f. Crevice nozzle: to clean dust, crumb etc. in such narrow spaces as radiator, drawer etc.
TURBO BRUSH TOOL

natural_image
Close-up of a black vacuum cleaner with a white handle and black body (no text or symbols visible)
natural_image
Close-up of a mechanical component with spiral grooves and gears (no visible text or symbols)Rotating Turbo Brush propels dirt and debris into the vacuum, and cleans at a much faster rate than an ordinary attachment.
COMBINATION FLOOR/RUG TOOL


- Press down on pedal to clean up hard floors. 2. Lift up brush to clean up carpeted surfaces.
HOW TO USE
For best cleaning performance even on hard floors or carpets.
Before using combination floor tool, make sure that floor tool button position is correct for the type of surface you want to clean.
- Use brush for hard floors.
- For carpeting, use accessory without brush.
Note: Maintain accessory brush always clean.
POWER CONTROL
natural_image
Close-up of a hand pressing down on a black vacuum cleaner's air vent (no visible text or symbols)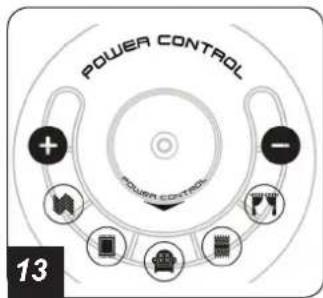
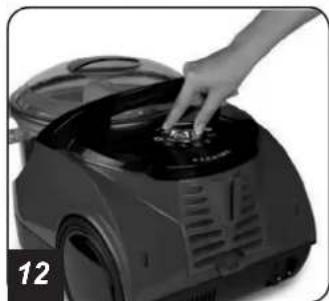
This vacuum cleaner has a rotary knob for suction control. Turn knob according to suction power needed. Fig.12
You may increase or decrease suction power of your vacuum cleaner by turning suction power control knob to the right or to the left. Fig.13
PULL OUT LINE CORD
natural_image
Close-up of hands installing or adjusting a black vacuum cleaner's lid and vent, no visible text or symbols1. LINE CORD
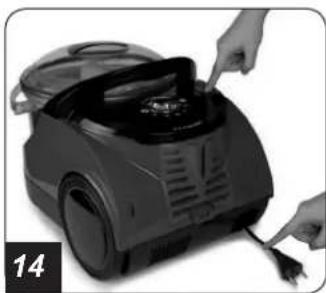
Pull out line cord and plug until yellow mark. Fig. 14. Press the ON/OFF switch to start motor.
2. CORD REWIND
After sweeping process is completed, turn it off by pressing on to On-Off button. Unplug vacuum cleaner from outlet, then press rewind button with one hand and guide cable with the other hand to ensure that it does not whip causing damage. Fig.14
Note: Never exceed the red mark.
WATER TANK LEVEL
Fill the tank with water up to the MAX level. NOTE: Before and after each use, tank must be cleaned for better performance of your vacuum cleaner. Fig.15

natural_image
Close-up of a glass container with a black arrow pointing to a small object inside, labeled '15' in the corner (no readable text or symbols on the object itself)CLEANING AND MAINTENANCE

CAUTION: Unplug power cord before performing any maintenance on it.
Prior to cleaning always disconnect appliance from electrical supply. The vacuum cleaner, specially water tank and all accessories, can be cleaned using a damp cloth or a non abrasive domestic cleaner and then should be wiped dry. To keep underside of the appliance clean, vacuum it at regular intervals.
WATER TANK
Always drain water inside transparent water tank. After each use; clean and dry the tank. Fig.16-17
To prolong your vacuum cleaner's life and due to hygienical reasons, do not leave your vacuum cleaner full of liquid and dirt. Pull off the water filter body. The water filter body can be washed in warm or soapy water or in flowing water (under the tap). After washing, dry it first, then insert it.

natural_image
Black vacuum cleaner with a hand pouring liquid into a container (no text or symbols visible)
natural_image
Person pouring liquid from a transparent container into a larger cylindrical tank (no text or symbols visible)FILTER
Cleaning of motor protections filter placed under the transparent water tank on the main body must be checked periodically and must be cleaned with warm water, if necessary. Before using it again, make sure the filter is dry. It must be cleaned every month at least depending on the frequency of usage.
HEPA FILTER
- Open air outlet plate and remove filter. Fig.18
- Clean up filter by shaking it.
For best performance, replace filter every 6 months.
WARNING:
Never use appliance without water tank and motor protection filters installed.

natural_image
Hand inserting a bag into a vacuum cleaner's air vent (no text or symbols visible)
natural_image
Hand placing a white card into a black vacuum cleaner's air vent (no text or symbols visible)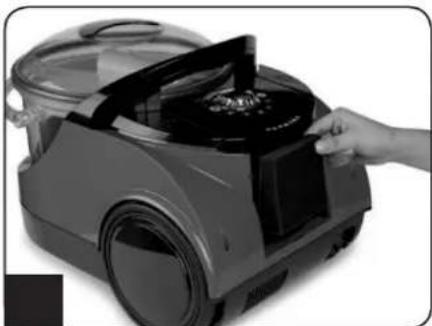
natural_image
Close-up of a hand holding a vacuum cleaner's lid and vent, no visible text or symbolsCarry your vacuum cleaner by holding it from its handle.
Using only original accessories and parts is essential for an efficient cleaning and for device life. Supply accessories and parts only from the nearest authorized service if neccessary.

CAUTION:
- Only make dry sweeping with your vacuum cleaner.
- If the line cord is damaged, it must be replaced by the manufacturer or an authorized service center.
- Absolutely make the certificate of warranty confirmed by an authorized dealer beginning from date of sale (title stamp and date of sale).
STORAGE
Before storing your vacuum cleaner, the water tank should be emptied and cleaned. Accessories may be stored with vacuum cleaner. The vacuum should be stored indoors. Do not use to vacuum toxic materials. Review frequently, do not use vacuum with a saturated water tank.
Always use the unit with the filters when vacuuming.
IMPORTANT
After cleaning the filter, check for holes. If any holes are found replace the filter immediately. Even small holes will permit dust to come out of the vac.
TROUBLESHOOTING
| ISSUE FIX | PROBABLE CAUSE | |
| Motor doesn’t start. | There’s no voltage. | Verify cable and power source. |
| Suction power is decreasing. | Filter or hose obstructed.Inadequate level in power reader. | Remove object.Position at desired suction level. |
| Dust filtration | Water tank level is low or inadequate. | Verify water level.See page 6. |
| Cable does not rewind completely. | Verify that cable is not bent or knotted. | Pull out cable 3 feet.Pull down cable and press rewind switch. |
WARRANTY
This warranty gives you specific legal rights, and you may also have other rights that vary from state to state.
This product is warranted against malfunctions and defects in material and workmanship for a period of one year for household use only.
THIS WARRANTY SHALL NOT APPLY to any products or parts there of which have been damaged by tampering, misuse or abuse or which have been altered or repaired by an unauthorized person or service center.
THIS WARRANTY SHALL NOT APPLY to brushes or accessories since their life depends upon the amount of use.
FOR REPAIR the inoperative machine must be delivered with shipping and delivery charges prepaid together with satisfactory evidence of the purchase date to an authorized service center or Thorne Electric Company at the address that appears below. Koblenz will either repair or replace, at its election, all defective machines during the warranty period.
Some states do not allow the exclusion or limitation of incidental or consequential damages, so the above limitation or exclusion may not apply to you.
| Thorne Electric, Co. | Koblenz Eléctrica, S.A. de C.V. |
| P.O. BOX 18363,San Antonio, TX.78218-0363 U.S.A.Tel: (210) 590-1226Fax: (210) 590-12581 (800) 548-5741 | Av. Ciencia No. 28,Parque Industrial CuamatlaCuautitlán Izcalli, Edo. de México,México, C.P. 54730Tel. (55) 5864-0300 |
CONTENIDO
Advertencias....9
natural_image
Coiled black rubber hose with a handle, labeled C1 (no text or symbols on the hose itself)
D6

D1
D2

D3

D4
C4
natural_image
Black rubber clip with handle and spout (no text or symbols)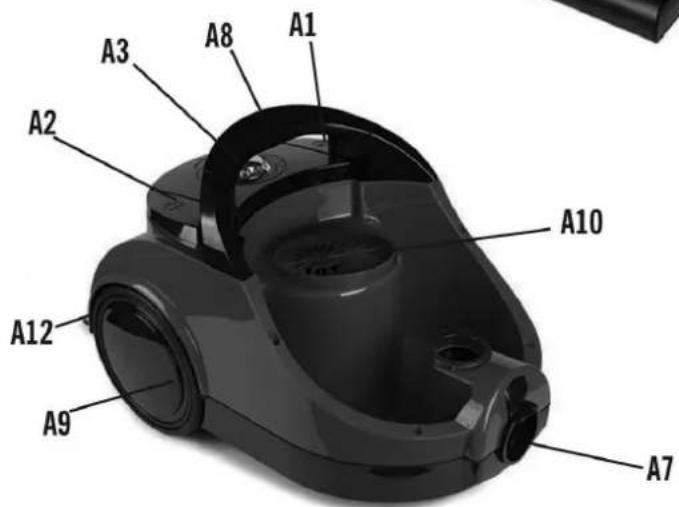
natural_image
Close-up of a black vacuum cleaner with a lid and upward arrow indicating motion (no text or symbols)
natural_image
Close-up of a hand using a vacuum cleaner to handle a glass container with a straw, showing an upward arrow (no text or symbols visible)
natural_image
Close-up of a hand operating a vacuum cleaner with a handle and control panel (no visible text or symbols)natural_image
Close-up of hands assembling a small wooden table with a curved handle (no text or symbols visible)
natural_image
Hand placing a black vacuum cleaner into a housing component (no visible text or symbols)
natural_image
Close-up of a hand holding a black vacuum cleaner with a hose, no visible text or symbols
PRECAUCIÓN:
natural_image
Close-up of a hand pressing down on a black vacuum cleaner's air vent (no text or symbols visible)
natural_image
Five different types of black vacuum cleaner components, shown from left to right with no visible text or labels.natural_image
Close-up of a black vacuum cleaner with a white handle and black base, labeled with number 8 (no text or symbols on the device itself)
natural_image
Close-up of a mechanical drill bit assembly with helical spring and gears (no visible text or symbols)natural_image
Close-up of a hand pressing down on a black vacuum cleaner's air vent (no visible text or symbols)
natural_image
Close-up of hands installing or adjusting a black vacuum cleaner's air vent (no text or symbols visible)natural_image
Close-up of a glass beaker with liquid and an arrow pointing to it, no visible text or symbolsLIMPIEZA Y MANTENIMIENTO

natural_image
Black and white photo of a hand pouring liquid into a vacuum cleaner (no text or symbols visible)
natural_image
Close-up of hands pouring liquid from a transparent container (no text or symbols visible)FILTRO DEL MOTOR
natural_image
Close-up of a hand inserting a vacuum cleaner into a device, no visible text or symbols on the device itself.
natural_image
Hand placing a white cloth into a black vacuum cleaner's air vent (no text or symbols visible)
natural_image
Hand placing a black lid onto a gray vacuum cleaner (no visible text or symbols)PRECAUCIÓN:
Thorne Electric, Co.
P.O. BOX 18363,
San Antonio, TX.
78218-0363 U.S.A.
Tel: (210) 590-1226
Fax: (210) 590-1258
1 (800) 548-5741
Discover more products: www.koblenz.com
PRINTED IN TURKEY / IMPRESO EN TURQUÍA
- ¡Felicidades!
- IMPORTANT SAFETY INSTRUCTIONS
- Read all instructions before using this vacuum cleaner. Save this manual.
- WARNING
- To reduce risk of fire, electric shock or injury:
- POLARIZED OUTLET
- NOTE:
- YOUR VACUUM CLEANER COMPONENTS
- A VACUUM CLEANER
- B CONTAINER GROUP
- C HOSE GROUP
- D ACCESSORIES GROUP
- VACUUM ASSEMBLE
- CAUTION: Unplug power cord before performing any maintenance on it.
- CAUTION:
- USAGE
- TURBO BRUSH TOOL
- COMBINATION FLOOR/RUG TOOL
- HOW TO USE
- POWER CONTROL
- PULL OUT LINE CORD
- LINE CORD
- CORD REWIND
- WATER TANK LEVEL
- CLEANING AND MAINTENANCE
- WATER TANK
- FILTER
- HEPA FILTER
- WARNING:
- STORAGE
- IMPORTANT
- WARRANTY
- CONTENIDO
- PRECAUCIÓN:
- LIMPIEZA Y MANTENIMIENTO
- FILTRO DEL MOTOR
Brand : Koblenz
Model : Acquapur II AR-2400
Category : Vacuum Cleaner