ES10044US - Deep fryer COSTWAY - Free user manual and instructions
Find the device manual for free ES10044US COSTWAY in PDF.

| Product Type | Deep Fryer |
| Brand | Costway |
| Model | ES10044US |
| Capacity | 2.5 L (approx. 2.6 qt) |
| Power | 1500 W |
| Voltage | 120 V, 60 Hz |
| Temperature Control | Adjustable thermostat (150°C - 190°C) |
| Heating Element | Immersion heating element |
| Frying Basket | Removable with cool-touch handle |
| Oil Container | Non-stick coated, removable |
| Viewing Window | Yes, for monitoring food |
| Safety Features | Auto shut-off, overheat protection, cool-touch exterior |
| Dimensions (L x W x H) | 30 x 25 x 28 cm (11.8 x 9.8 x 11 in) |
| Weight | 2.2 kg (4.85 lbs) |
| Material | Stainless steel body, plastic handles |
| BPA Free | Yes |
| Cleaning | Removable parts are dishwasher safe; wipe exterior with damp cloth |
| Spare Parts Availability | Basket, oil container, and thermostat available via Costway support |
| Repairability | Modular design; user-serviceable parts (heating element, thermostat) with tools |
| Warranty | 1 year limited |
| Certifications | ETL, FDA (food safe) |
Frequently Asked Questions - ES10044US COSTWAY
User questions about ES10044US COSTWAY
0 question about this device. Answer the ones you know or ask your own.
Ask a new question about this device
Download the instructions for your Deep fryer in PDF format for free! Find your manual ES10044US - COSTWAY and take your electronic device back in hand. On this page are published all the documents necessary for the use of your device. ES10044US by COSTWAY.
USER MANUAL ES10044US COSTWAY
Please give us a chance to make it right and do better!
Contact our friendly customer service department for help first. Replacements for missing or damaged parts will be shipped ASAP!
US office: Fontana UK office: Ipswich AU office: Truganina DE office: Hamburg FR office: Saint Vigor d'Ymonville PL office: Gdańsk


natural_image
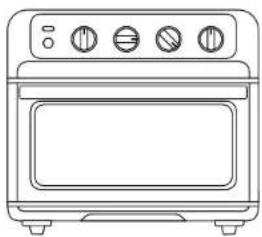
Line drawing of a microwave oven with three control knobs (no text or symbols)Contact Us!
Do NOT return this item. Contact our friendly customer service department for help first.

US:cs.us@costway.com UK:cs.uk@costway.com AU:cs.au@costway.com
USER'S MANUAL
Air Fryer Toaster Oven ES10044US
THIS INSTRUCTION BOOKLET CONTAINS IMPORTANT SAFETY INFORMATION. PLEASE READ AND KEEP FOR FUTURE REFERENCE.

Before You Start
⚠️ Please read all instructions carefully.
⚠️ Retain instructions for future reference.
Separate and count all parts and hardware.
Read through each step carefully and follow the proper order.
⚠️ We recommend that, where possible, all items are assembled near to the area in which they will be placed in use, to avoid moving the product unnecessarily once assembled.
Always place the product on a flat, steady and stable surface.
⚠️ Keep all small parts and packaging materials for this product away from babies and children as they potentially pose a serious choking hazard.
USER GUIDE
natural_image
Line drawing of a microwave oven with control knobs and a blank front panel (no text or symbols)- Safety Instructions
- Features
- Operating Instructions
- Cooking Tips
- Trouble Shooting / FAQs
• Cleaning and Maintenance - Notes
COOKING FORWARD
The Air Fryer Toaster Oven is a multifunctional appliance that cooks food quicker than a conventional oven. Family sized for convenience, it can easily toast 4 slices of bread at one time, bake a 10-inch pizza, or air fry 2 pounds of chicken wings. Made of sleek stainless steel, the toaster looks great on any counter, and cleaning it is a breeze, too.
Please take a few minutes to read safety instructions carefully. Then get started with the delicious recipes we've included as a bonus.

READ ALL INSTRUCTIONS BEFORE USE
For your safety and continued enjoyment of this product, always read the instruction manual before using.
SAFETY INSTRUCTIONS
IMPORTANT SAFEGUARDS
WARNING
When using electrical appliances, basic safety precautions should always be followed including the following:
- Read all instructions.
- Do NOT touch hot surfaces. Use handle or dials.
- To protect against electric shock do NOT immerse cord or plug in water or other liquid.
- Close supervision is necessary when any appliance is used by or near children.
- Unplug from outlet when not in use and before cleaning. Allow to cool before putting on or taking off parts.
- Do NOT operate any appliance with a damaged cord or plug or after the appliance malfunctions or has been damaged in any manner. Contact Our Customer Support.
- The use of accessory attachments not recommended by the manufacturer may cause injuries.
- Do NOT use outdoors.
- Do NOT let cord hang over edge of table or counter or touch hot surfaces.
- Do NOT place on or near a gas or electric burner, or in an oven.
-
Extreme caution must be used while moving the oven when it contains hot oil or other hot liquids.
-
Always plug cord into the wall outlet first. To disconnect, turn off the oven by turning the timer dial to the Off position, then remove plug from wall outlet.
- Do NOT use the oven for other than intended use.
- Oversize foods or metal utensils must NOT be inserted in the oven as they may create a fire or risk of electric shock.
- A fire may occur if the oven is covered with or touching flammable material, including curtains, draperies, walls, and the like, when in operation. Do NOT store any item on top of the oven when in operation.
- Do NOT clean with metal scouring pads. Pieces can break off the pad and touch electrical parts involving a risk of electric shock.
- Extreme caution should be exercised when using containers constructed of anything other than metal or glass.
- Do NOT store any materials, other than recommended accessories, in this oven when not in use.
- Do NOT place cardboard or plastic in the oven.
- Do NOT cover crumb tray or any part of the oven with metal foil. This will cause overheating.
SHORT CORD INSTRUCTIONS
A short power supply cord is provided to reduce the hazards of entanglement or tripping over a longer cord. Longer detachable power-supply cords or extension cords are available and may be used if care is exercised in their use. If a longer detachable power-supply extension cord is used:
- The marked electrical rating of the extension cord should be at least as great as the electrical rating of the appliance.
- The cord should be arranged so that it will not drape over the countertop ortabletop where it can be pulled on by children or tripped over.
COSTWAY
COSTWAY
California Proposition 65: (Applicable for California Residents only)

WARNING
Cancer and Reproductive Harm
www.P65Warnings.ca.gov.

Do not place the appliance on a stovetop
or any other heatable surface.
POWER CORD SAFETY TIPS
- Never pull or yank on cord or the appliance.
- To insert plug, grasp it firmly and guide it into outlet.
- To disconnect appliance, grasp plug and remove it from outlet.
- Before each use, inspect the power cord for cuts and/or abrasion marks. If any are found, this indicates that the appliance should be serviced, and the power cord replaced. Please contact Customer Support for assistance.
- Never wrap the cord tightly around the appliance, as this could place undue stress on the cord where it enters the appliance and cause it to fray and break.
DO NOT OPERATE APPLIANCE IF THE POWER CORD SHOWS ANY DAMAGE OR IF APPLIANCE WORKS INTERMITTENTLY OR STOPS WORKING ENTIRELY.
FEATURES
text_image
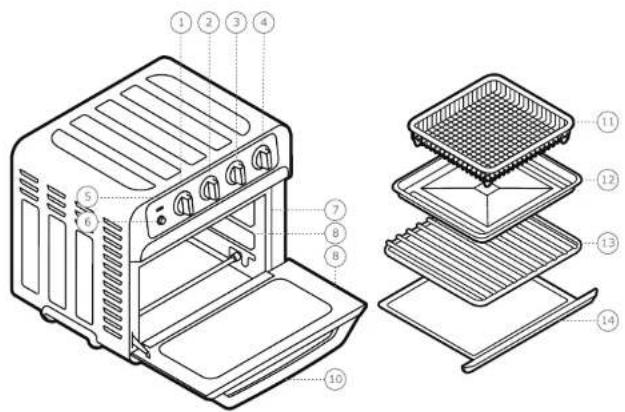
Technical diagram of a toaster oven with numbered components for identification① Oven Timer/On-Off Dial
② Temperature Dial
③ Cook Function Dial
④ Toast Timer/On-Off Dial
⑤ Power Light
⑥ Oven Light Button
⑦ Easy-to-clean Interior
⑧ Rack Insert Positions
⑨ Safety Auto-Shutoff Door
⑩ Cool-Touch Door Handle
⑪ Air Fry Basket
⑫ Broil/Bake Pan
⑬ Removable Wire Rack
⑭ Pull Out Crumb Tray
COSTWAY
COSTWAY
OPERATING INSTRUCTIONS
BEFORE FIRST USE
- Read and remove all packing materials and stickers from the inside and outside of the Air fryer toaster oven unit except for rating label on bottom, which should remain on unit. Be sure that all accessories are accounted for before throwing away any packaging.
- Gently wipe the exterior of the oven with a clean, damp cloth and dry thoroughly. Wipe the interior with a mild liquid soap and a damp cloth or sponge.
NOTE: Do NOT use abrasive cleaners, like steel wool pads, as they may damage the finish.
- Hand wash the removable crumb tray and broil/bake pan and dry thoroughly; the crumb tray and broil pan are NOT dishwasher safe.
- Hand wash and dry the wire rack and basket. These accessories are also top-rack dishwasher safe.
- Place the Air fryer toaster oven on a flat, heat-resistant surface positioned at least 2 inches away from the wall or any other objects.
- Ensure that crumb tray is inserted into bottom of unit. Do not operate unit without crumb tray in place.
HOW TO COOK IN THE AIR FRYER + OVEN
The Air fryer toaster oven has multiple cooking functions, so you can customize your cooking for perfect results every time. Metal, ovenproof glass, or ceramic bakeware without glass lids
can be used in the oven. However, the top of the container must be at least 1½-inch away from the upper heating element. What follows is how to cook using the different settings
NOTE: On first use, unit may emit a slight odor, which is normal and will dissipate with use. AIR FRY
Air frying uses fast-moving hot air to cook food to crisp perfection without the need for oil. It's a great choice for cooking many frozen prepared foods as well as french fries, chicken wings, and more.
- Ensure the crumb tray is inserted in its position below the oven door and plug in unit.
- Place food in basket and place basket on bake pan. Alternatively, place food directly on wire rack and place bake pan in bottom position in oven as a drip tray.
- Slide pan with basket or rack into oven.
- Set Cook Function Dial to Air Fry.
- Set the Temperature Dial to desired temperature.
- Turn the Timer Dial to desired time; the Power Light will turn on and air frying will begin.
NOTE: To set a time of less than 20 minutes, you must first turn the dial past the 20-minute mark, then turn it back to the lower time desired.
To pause cooking, open the oven door. The timer will continue to countdown, but air frying will stop (the oven will still be hot, however). When door is closed, air frying will continue. To stop air frying before timer ends, turn the timer dial to Off.
NOTE: The interior light does not come on when you open the oven door. To turn it on, press the Oven Light button on the control panel; press it again to turn it off.
- Cook until timer ends. A bell will ring and the Air fryer toaster oven will turn off.
- Using oven mitts, carefully remove food from the oven. Check for doneness, serve, and enjoy!
COSTWAY
COSTWAY
BROIL OR CONVECTION BROIL
Broiling cooks via intense heat generated from the upper heating elements and is a good choice for cooking meat or fish. It's also good for browning foods like cheesy gratins and casseroles. Convection broil does the same while blowing the hot air around for even cooking.
- Ensure the crumb tray is inserted in its position below the oven door and plug in unit.
- Place food on broil pan or in basket on broil pan.
NOTE: Using foil with Convection Broil function can significantly affect the cook temperature and time.
- Slide broil pan into the oven's top rack position.
NOTE: Be sure that food is not directly touching the heating elements; lower pan if so.
-
Set Cook Function Dial to Broil or Convection Broil.
-
Set the Temperature Dial to Broil.
-
Turn the Timer Dial to desired time; the Power Light will turn on and broiling will begin
NOTE: To set a time of less than 20 minutes, you must first turn the dial past the 20-minute mark, then turn it back to the lower time desired.
To pause cooking, open the oven door. The timer will continue to countdown, but broiling will stop (the heating elements and oven will still be hot, however). When door is closed, broiling will continue. To stop broiling before timer ends, turn the timer dial to Off.
NOTE: The interior light does not come on when you open the oven door. To turn it on, press the Oven Light button on the control panel; press it again to turn it off.
-
Keep an eye on foods while broiling as they brown quickly. When timer ends, a bell will ring and the Air fryer toaster oven will turn off.
-
Using oven mitts, carefully remove food from the oven. Check for doneness, serve, and enjoy!
BAKE OR CONVECTION BAKE
Baking is a general cooking method that works just like your regular oven. Use it to make small-batch cookies, brownies, or to bake a cake. You can also roast meats and chicken using the Bake function. Convection Bake moves the air around with a fan to cook foods faster and hotter and is great for pizza.
- Ensure the crumb tray is inserted in its position below the oven door and plug in unit.
- Place food on bake pan or rack.
NOTE: Using foil with Convection Bake function can significantly affect the cook temperature and time.
- Slide food into the oven.
(NOTE: For baked goods, it's wise to preheat empty oven for 5 minutes or so before adding food.)
-
Set Cook Function Dial to Bake or Convection Bake.
-
Set the Temperature Dial to desired temperature.
Turn the Timer Dial to desired time; the Power Light will turn on and baking will begin.
NOTE: To set a time of less than 20 minutes, you must first turn the dial past the 20-minute mark, then turn it back to the lower time desired.
- To pause cooking, open the oven door. The timer will continue to countdown, but cooking will stop (the oven will still be hot, however). When door is closed, cooking will continue. To stop cooking before timer ends, turn the timer dial to Off.
COSTWAY
NOTE: The interior light does not come on when you open the oven door. To turn it on, press the Oven Light button on the control panel; press it again to turn it off.
- Cook until timer ends. A bell will ring and the Air fryer toaster oven will turn off.
- Using oven mitts, carefully remove basket or rack from the oven. Check food for doneness, serve, and enjoy!
TOAST
The Air fryer toaster oven can toast multiple slices of bread or bagels to the perfect brownness. And you can keep an eye on your toast through the window.
- Ensure the crumb tray is inserted in its position below the oven door and plug unit in if necessary.
- Place food on the wire rack and slide rack into the Air fryer toaster oven.
NOTE: If toasting one or two pieces of food, center them in the middle of the rack for the best results.
- Set the Cooking Function Dial to Toast.
- Set the Temperature Dial to Toast.
- Set the Toast Timer Dial to the desired shade: Light, Medium, or Dark or anywhere in between. This will begin the timer and the toasting, and the red Power Light will come on.
- To pause toasting, open the oven door. The timer will continue to count down, but the toasting will stop. (Oven will still be hot, however.) When oven door is closed, toasting will continue. To stop toasting before timer ends, turn the Toast Timer Dial to Off.
-
Toast until timer ends. A bell will ring, the Power Light will turn off, and toasting will end.
-
Using oven mitts, carefully remove the food from the oven, serve, and enjoy!
WARM
The warm function heats the oven to 200^ F, perfect for reheating leftovers without drying them out.
- Ensure the crumb tray is inserted in its position below the oven door and plug in unit.
- Place food on bake pan or rack.
- Slide food into the oven.
- Set Cook Function Dial to Warm.
- Set the Temperature Dial to Warm.
- Turn the Timer Dial to desired time; the Power Light will turn on and warming will begin NOTE: To set a time of less than 20 minutes, you must first turn the dial past the 20-minute mark, then turn it back to the lower time desired.
To pause warming, open the oven door. The timer will continue to countdown but warming will stop (the oven will still be hot, however). When door is closed, warming will continue. To stop warming before timer ends, turn the timer dial to Off.
NOTE: The interior light does not come on when you open the oven door. To turn it on, press the Oven Light button on the control panel; press it again to turn it off.
- Warm until timer ends. A bell will ring and the Air fryer toaster oven will turn off.
- Using oven mitts, carefully remove basket or rack from the oven. Check food for doneness, serve, and enjoy!
COSTWAY
- If not cooking on the broil pan, consider inserting it in bottom rack position as a drip tray for easy cleanup.
- If warming leftover cooked meat using the Warm function, fill the broil pan with
1 cup of water and place below the food being warmed to keep it from drying out.
- When working with delicate food that can easily crumble, take the rack out of the Air fryer toaster oven and assemble your food directly on the rack.
- If using a pizza stone, preheat the stone in the oven for at least 20 minutes before baking your pizza. Place the stone in the Air fryer toaster oven and set to highest temperature. You can incorporate both preheating and cooking by setting the timer for 30-40 minutes to incorporate the preheating and baking times all in one cycle.
Why didn't my Air fryer toaster oven ring to alert me my food was finished cooking?
If you're cooking something for less than 20 minutes, be sure to turn the timer dial past the 20-minute mark first, then set it to the desired time.
Why isn't my food golden brown and crisp?
Try tossing food in a little oil before cooking to enhance brownness. Also, be sure to distribute foods evenly on pan, rack, or in basket; do not stack food.
Can I air fry foods that have a wet batter like tempura?
No. Foods dredged with a wet batter like tempura or beer batter should not be cooked in the Air fryer toaster oven as the batter will slough off the food. However, breaded foods like chicken nuggets cook up beautifully in the Air fryer toaster oven.
Do you have to preheat the Air fryer toaster oven?
COSTWAY
You do not have to, but when baking, food will cook faster and more evenly if the unit is preheated for at least 5 minutes. It's also helpful to preheat a baking stone if using one for pizza.
Can you cook raw meat and seafood in the Air fryer toaster oven?
Yes. Always check foods for doneness using proper food safety guidelines.
The Air fryer toaster oven is easy to clean. Simply follow the directions below.
-
Unplug the unit and allow to cool completely before cleaning.
-
Gently wipe the exterior with a clean, damp cloth and dry thoroughly.
-
Using a sponge, soft cloth, or nylon pad, wash the glass on the door with dish soap and warm water. Do NOT use a spray glass cleaner.
-
Using a mild liquid soap and a damp cloth or sponge, wipe the interior walls. Do NOT use abrasive cleaners like steel wool pads, as they may damage the finish. Be sure to clean the top interior of the Air fryer toaster oven. Removing grease on a regular basis will prevent smoke caused by a buildup of oils and will keep cooking consistent.
-
Slide out the crumb tray and toss out crumbs. Wipe clean. Remove any baked-on grease by soaking tray in hot, sudsy water. Use non-abrasive cleaners like a sponge, cloth, or brush. The crumb tray is NOT dishwasher safe.
-
Hand wash the broil pan, wire rack, and basket and dry thoroughly. The rack and basket are also top-rack dishwasher safe. The broil pan is not dishwasher safe.
-
Fully dry the Air fryer toaster oven and all accessories before storing.