
KDL-50W700A - Video projector SONY - Free user manual and instructions
Find the device manual for free KDL-50W700A SONY in PDF.


| Product Type | Video Projector |
| Brand | Sony |
| Model | KDL-50W700A |
| Display Technology | LCD (3LCD) |
| Resolution | 1920 x 1080 (Full HD) |
| Brightness | 2500 Lumens |
| Contrast Ratio | 3000:1 |
| Aspect Ratio | 16:9 |
| Power Consumption | 230W (typical) |
| Dimensions (W x D x H) | 365 x 285 x 130 mm |
| Weight | 5.2 kg |
| Lamp Life | 6000 hours (Eco mode) |
| Input Ports | HDMI, VGA, USB, Composite, Audio |
| Output Ports | Audio Out, Speaker |
| Noise Level | 29 dB (Eco mode) |
| Keystone Correction | Vertical: +/- 30 degrees |
| Projection Distance | 1.2 - 10 m |
| Screen Size | 40 - 300 inches |
| Built-in Speaker | 10W Mono |
| Maintenance & Cleaning | Clean lens with soft cloth; replace filter every 500 hours |
| Safety | Do not look into lens; keep away from water |
| Spare Parts & Repairability | Replaceable lamp and filter; service by qualified technician |
Frequently Asked Questions - KDL-50W700A SONY
User questions about KDL-50W700A SONY
0 question about this device. Answer the ones you know or ask your own.
Ask a new question about this device
Download the instructions for your Video projector in PDF format for free! Find your manual KDL-50W700A - SONY and take your electronic device back in hand. On this page are published all the documents necessary for the use of your device. KDL-50W700A by SONY.
USER MANUAL KDL-50W700A SONY
Operating Instructions GB
操作手册
CT
BRAVIA
Introduction
Thank you for choosing this Sony product. Before operating the TV, please read this manual thoroughly and retain it for future reference.
1
- Instructions about "Installing Wall Mount Bracket" are included within this TV's instructions manual.
- The illustrations used in this manual may differ depending on your TV model.
- The illustrations of the remote control used in this manual are of the RM-GD027 unless otherwise stated.
- Before operating the TV, please read page 28 (Safety Information). Retain this manual for future reference.
Trademark information
The terms HDMI and HDMI High-Definition Multimedia Interface, and the HDMI Logo are trademarks or registered trademarks of HDMI Licensing LLC in the United States and other countries.
DLNA®, the DLNA Logo and DLNA CERTIFIED® are trademarks, service marks, or certification marks of the Digital Living Network Alliance.
Manufactured under license from Dolby Laboratories.
"BRAVIA" and BARA trademarks of Sony Corporation.
TrackID is a trademark or registered trademark of Sony Mobile Communications AB.
Music and video recognition technology and related data are provided by Gracenote®. Gracenote is the industry standard in music recognition technology and related content delivery. For more information, please visit www.gracenote.com.
CD, DVD, Blu-ray Disc, and music and video-related data from Gracenote, Inc., copyright © 2000-present Gracenote. Gracenote Software, copyright © 2000-present Gracenote. One or more patents owned by Gracenote apply to this product and service. See the Gracenote website for a non-exhaustive list of applicable Gracenote patents.
Gracenote, MusicID, VideoID, Video Explore, the Gracenote logo and logotype, and the "Powered by Gracenote" logo are either registered trademarks or trademarks of Gracenote in the United States and/or other countries.
Opera® Devices SDK from Opera Software ASA. Copyright 1995-2013 Opera Software ASA. All rights reserved.
Wi-Fi, Wi-Fi Direct and Miracast are marks or registered marks of the Wi-Fi Alliance.
"Blu-ray Disc", "Blu-ray" and "Blu-ray Disc" logo are trademarks of Blu-ray Disc Association.
"Sony Entertainment Network logo" and "Sony Entertainment Network" are trademarks of Sony Corporation.
MHL, Mobile High-Definition Link and the MHL Logo are trademarks or registered trademarks of MHL Licensing, LLC.
Manufactured under license from DTS Licensing Limited. For U.S. and worldwide patent and trademark information, see www.dts.com/patents/legacy.aspx. (c) DTS Licensing Limited and DTS, Inc. 2012.
©2012 RealNetworks, Inc. Patents Pending. All rights reserved. RealNetworks logo is a trademark of RealNetworks, Inc.
The Bluetooth® word mark and logos are owned by the Bluetooth SIG, Inc. and any use of such marks by Sony Corporation is under license. Other trademarks and trade names are those of their respective owners.

HIGH-DEFINITION MULTIMEDIA INTERFACE



Mobile High-Definition Link
2.0 Channel
realnetworks

This television is designed for use in Hong Kong and ensured the usage in Hong Kong only.
Location of the identification label
Labels for Model No. and Power Supply rating (in accordance with applicable safety regulation) are located on the rear of the TV.
GB
About this manual
(Operating Instructions)
This manual explains how to set up your TV. For more information on how to use BRAVIA TV, refer to the “Electronic manual”.
Operating Instructions
Explains how to set up your TV such as connections, initial set-up, and basic operations.
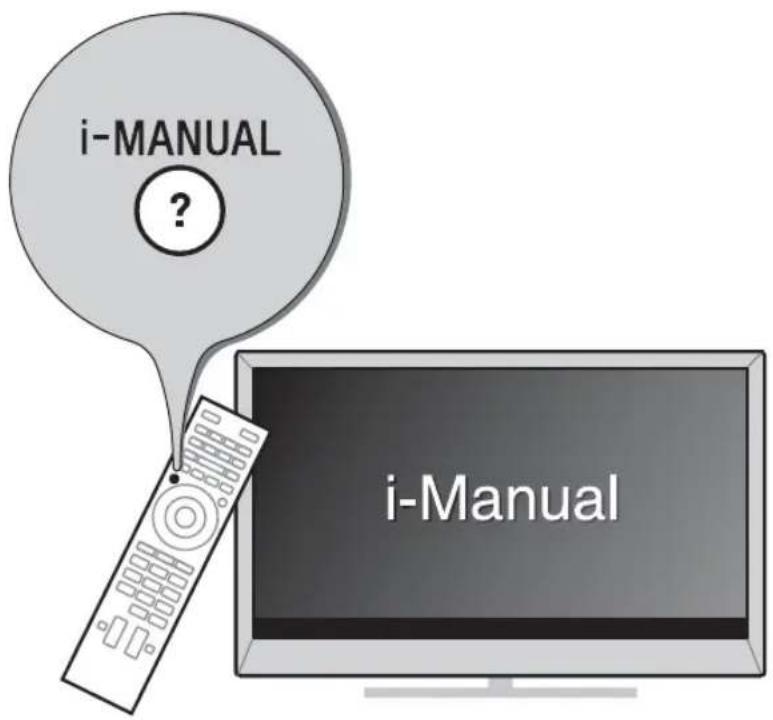
For more information, press the i-MANUAL button

Electronic manual (i-Manual)
Explains how to use all the features. See page 19 on how to use the i-Manual.
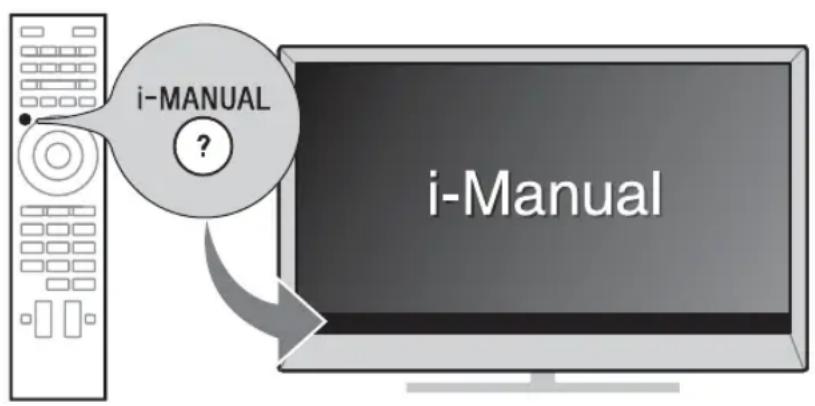
Images and illustrations used in this manual may differ from the actual screen.
Table of Contents
Getting Started
Checking the accessories....6
Inserting batteries into the remote control....6
1: Attaching the Table-Top Stand 7
2: Adjusting the viewing angle of the TV 8
3: Connections 8
4: Preventing the TV from toppling over.... 11
5: Bundling the cables 11
6: Connecting the TV to the Internet.... 12
7: Performing the initial set-up.... 13
Using Your BRAVIA TV
Watching TV ▶...... 14
Selecting various functions and settings (Home Menu).... 16
Watching Internet Video ....18
Looking for Instructions
Looking for instructions in the electronic manual
(i-Manual) ▶ 19
Additional Information
Troubleshooting....21
Specifications 22
Installing the Accessories (Wall-Mount Bracket)....24
Safety Information....28
Precautions....29
Checking the accessories
Remote Control (1)
Size AAA batteries (R03 type) (2)
Table-Top Stand (1)*
Fixing screws for Table-Top Stand
(M5 × 16) (4)
Assembling screws for Table-Top Stand
(M5 × 16) (3)
Passive 3D Glasses (4)
(KDL-55/47/42W800A only)
Operating Instructions (this manual) and other documents
* Refer to the supplied Table-Top Stand leaflet to assemble the Table-Top Stand.
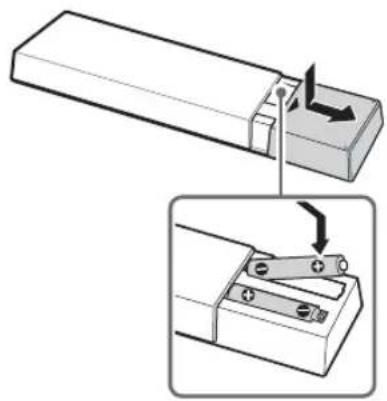
Inserting batteries into the remote control
natural_image
Diagram showing a mechanical assembly with an arrow indicating direction, no text or symbols present1 Remove the protection sheet.
2 Push and slide the cover to open.
1: Attaching the Table-Top Stand
Refer to the supplied Table-Top Stand leaflet for proper attachment.
1 Place the TV set on the Table-Top Stand.
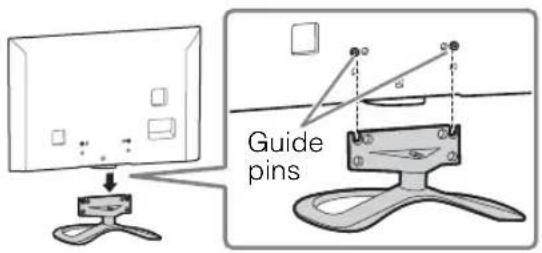
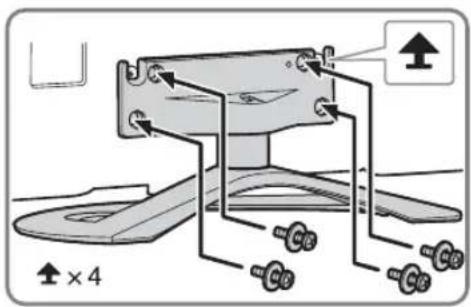
2 Fix the TV to the Table-Top Stand using the supplied screws. The arrow marks indicate the location of the screw holes used for securing the Table-Top Stand.
[NO TEXT]
- If using an electric screwdriver, set the torque at approximately 1.5 N·m {15 kgf·cm}.
Detaching the Table-Top Stand from the TV
To detach the Table-Top Stand from the TV, remove the screws 4 fixed in step 2.
[NO TEXT]
- Do not remove the Table-Top Stand for any reason other than to install corresponding accessories on the TV.
- When removing the Table-Top Stand from the TV, lay the display face down on a stable work surface that is larger than the TV.
- To prevent damaging the surface of the LCD display, make sure to place a soft cloth on the work surface.
2: Adjusting the viewing angle of the TV
This TV can be adjusted within the angles as illustrated.
■ Angle adjustment (Swivel)

- When adjusting the angle, hold the stand with one hand to avoid having the stand slip or TV tip over.
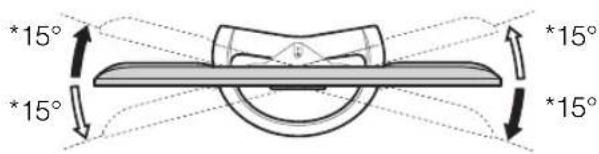
* The angle is approximate value.

- Ensure that there are no objects in front of the TV.
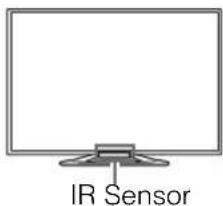
3: Connections

- Use an antenna (aerial) cable connector no greater than 14 mm in thickness.
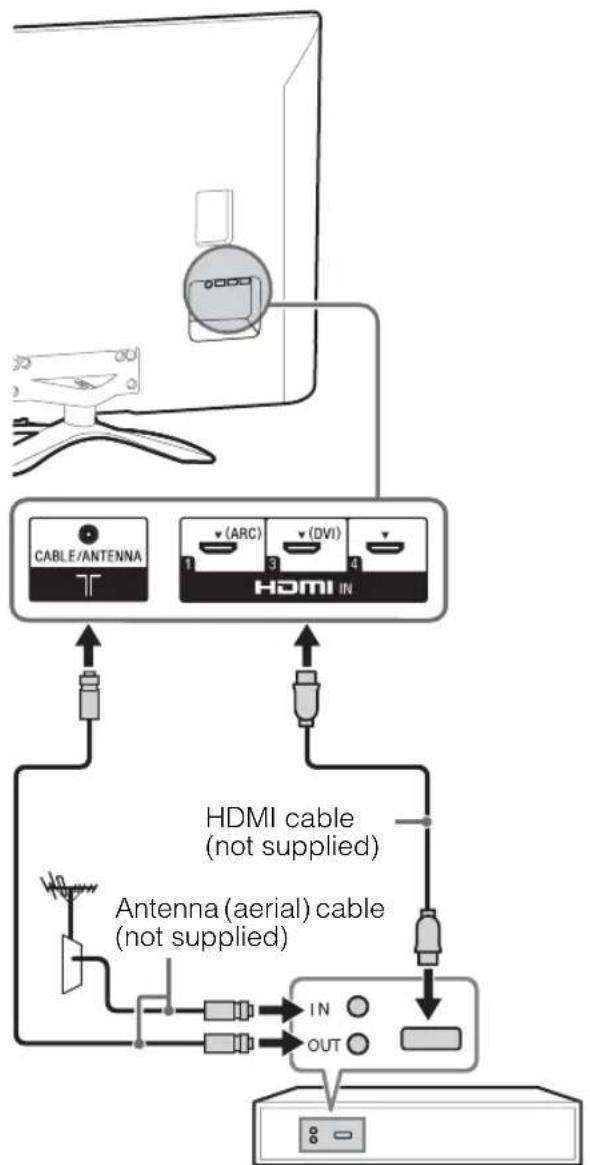
- Use an HDMI cable connector within 12 mm (thickness) × 21 mm (width).
- For more information on connections, refer to the i-Manual.
Connecting an antenna (aerial)/cable/VCR
■To connect an antenna (aerial)/cable
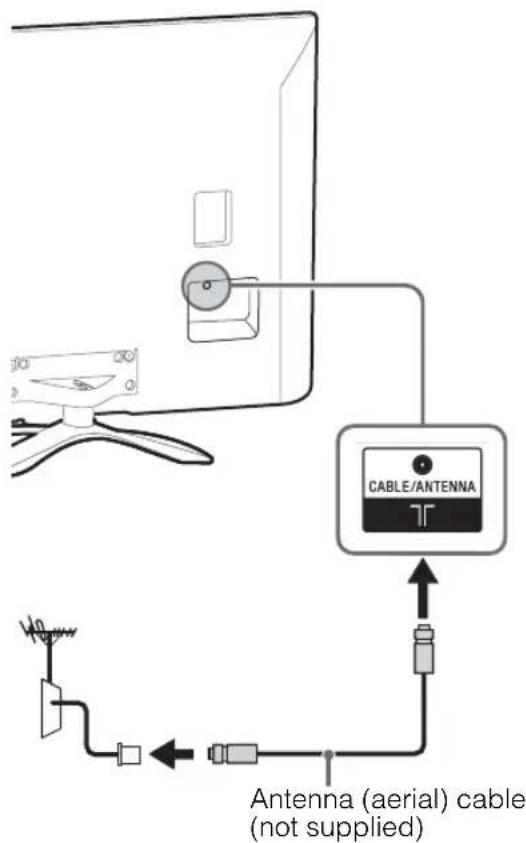
■To connect a Set Top Box/recorder (e.g. DVD recorder) with HDMI
flowchart
graph TD
    A[" fan "] --> B[" HDMI IN "]
    B --> C[" Cable/Antenna "]
    B --> D[" (ARC) "]
    B --> E[" (DVI) "]
    B --> F[" 1 3 4 "]
    C --> G[" Antenna (aerial) cable (not supplied) "]
    D --> G
    E --> G
    F --> G
    G --> H[" In OUT "]
    H --> I[" 8 20+"]
Set Top Box/recorder (e.g. DVD recorder)
■ Connecting an antenna (aerial)/cable and VCR
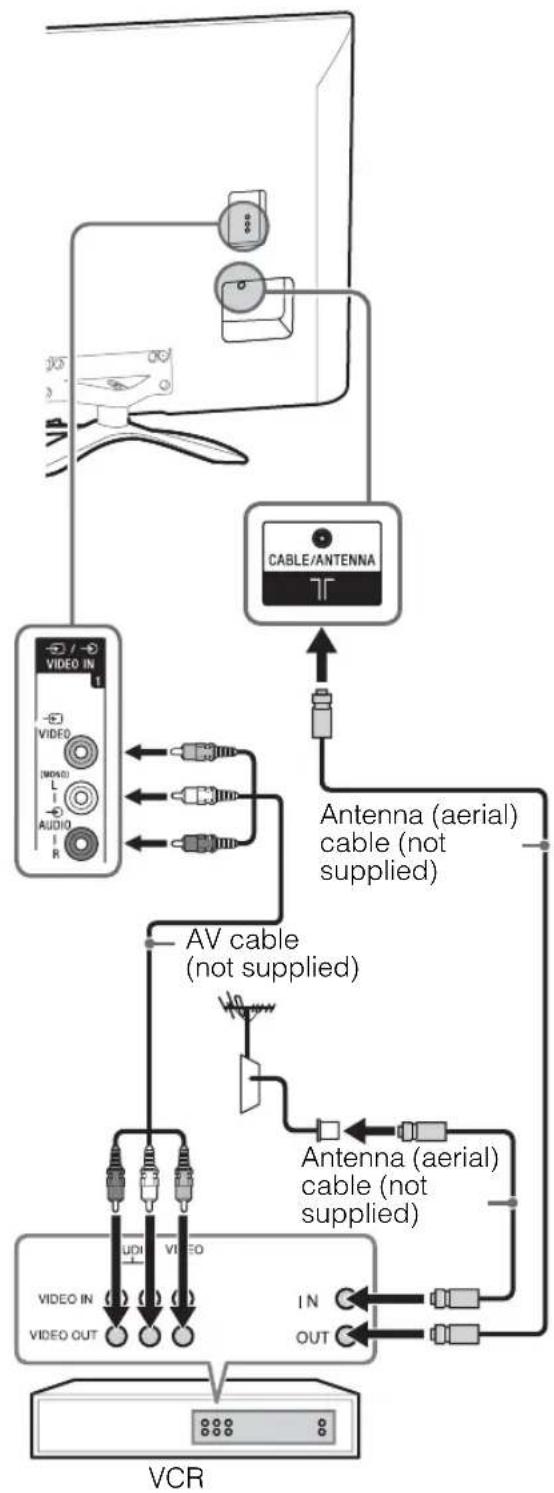
flowchart
graph TD
    A["Video IN"] --> B["CABLE/ANTENNA"]
    B --> C["Antenna (aerial) cable (not supplied)"]
    C --> D["AV cable (not supplied)"]
    D --> E["Antenna (aerial) cable (not supplied)"]
    E --> F["VCR"]
    G["VIDEO OUT"] --> H["UN"]
    G --> I["OUT"]
    J["VIDEO IN"] --> K["UDI"]
    J --> L["VIDEO"]
    M["VIDEO OUT"] --> N["UN"]
    M --> O["OUT"]
Connecting audio/video devices
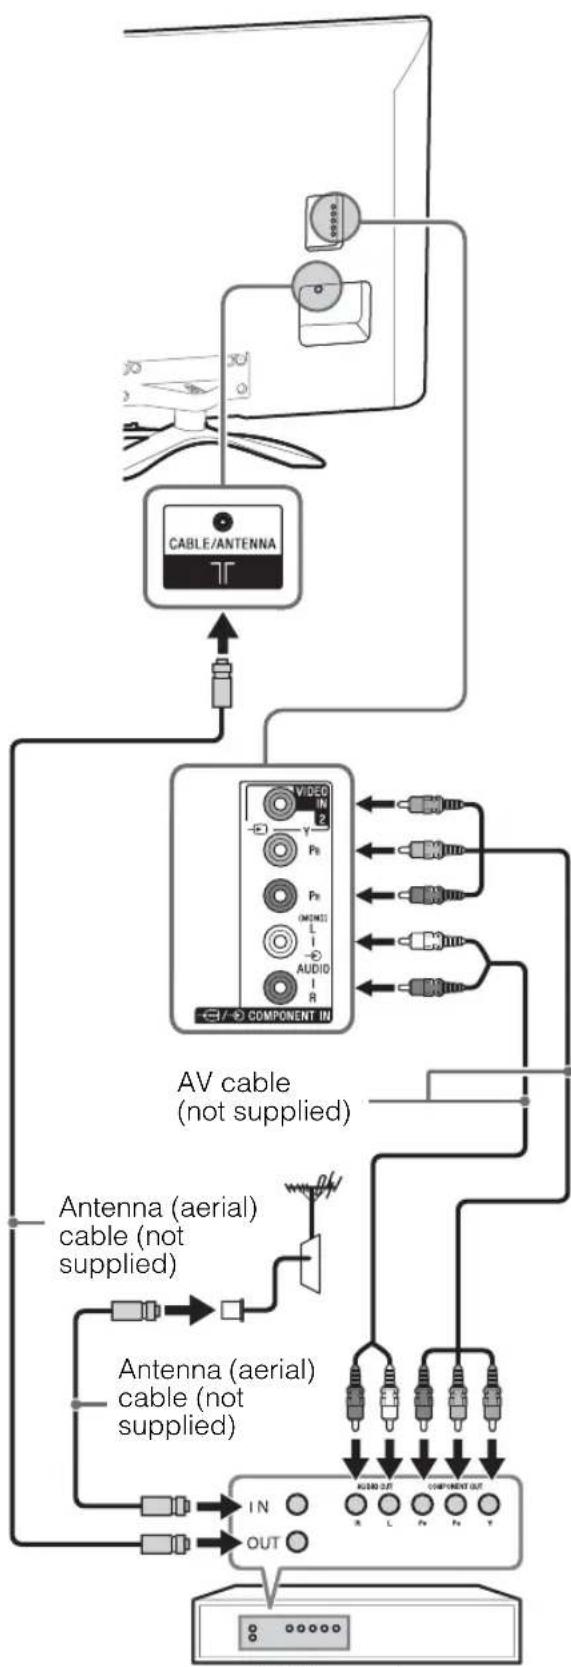
flowchart
graph TD
    A["CABLE/ANTENNA"] --> B["AV cable (not supplied)"]
    B --> C["Component IN"]
    C --> D["Antenna (aerial) cable (not supplied)"]
    D --> E["Antenna (aerial) cable (not supplied)"]
    E --> F["IN"]
    E --> G["OUT"]
    F --> H["AUD OUT"]
    G --> I["COMPONENT OUT"]
    H --> J["R L Pn Pn Y"]
    I --> K["R L Pn Pn Y"]
DVD recorder
Connecting MHL device
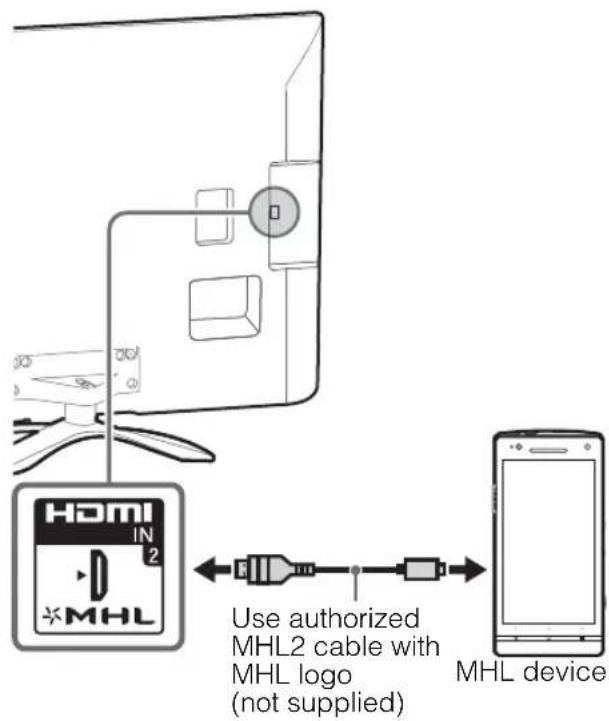
The MHL (Mobile High-Definition Link) enables the TV to communicate with a connected MHL-compatible device. The TV can charge the connected MHL-compatible device while playing photo/music/video from it. You can use the TV remote control to control the connected MHL-compatible device.
4
- If "Auto Input Change (MHL)" is set to "On", the TV automatically switches to HDMI IN 2/MHL from other input when MHL-compatible device is connected to HDMI IN 2/MHL jack. The availability of "Auto Input Change (MHL)" depends on whether the MHL-compatible device can support this feature.
- You can continue normal usage of the connected MHL-compatible device (such as receiving calls) depending on its capability.
- Some remote control functions may not be available depending on features of the connected MHL-compatible device. Please refer to the device manual for details.
- If "MHL Charging during Standby" is set to "On", you can continue charging the MHL-compatible device even when the TV is in standby mode.
- This product is officially MHL-certified for operation with other MHL-certified devices. If you encounter any problems when using the MHL function, please consult the device manufacturer for support.
4: Preventing the TV from toppling over
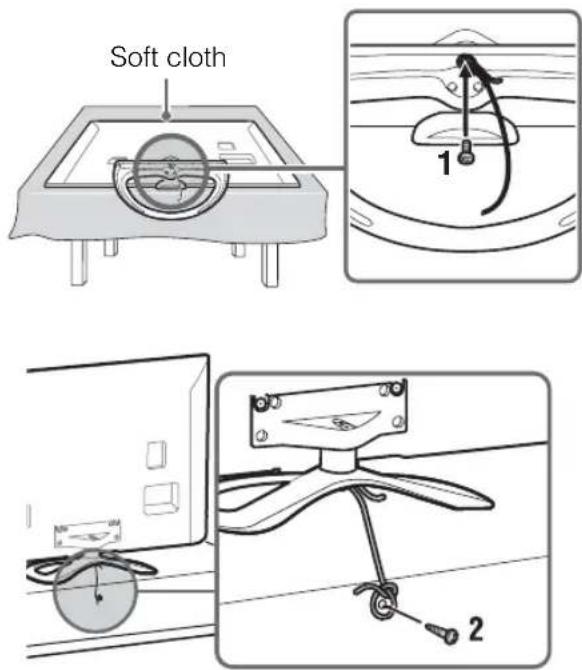
4
- Before install the machine screw, lay the display face down on a stable work surface that is larger than the TV.
• To prevent damaging the surface of the LCD display, make sure to place a soft cloth on the work surface.
1 Install a machine screw (M4, not supplied) into the screw hole of the TV and tie with a strong cord (not supplied).
2 Install a wood screw (not supplied) in the TV stand. Then, tie the strong cord to the wood screw.
The length of the M4 machine screw differs depending on the cord diameter. Please see below illustration.
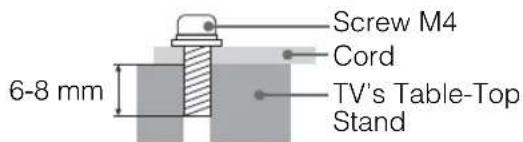
5: Bundling the cables
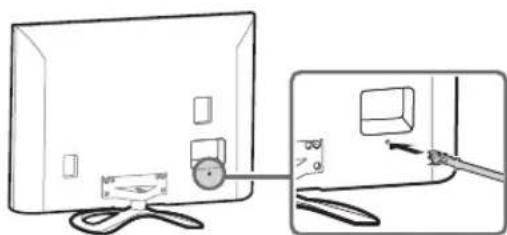
Before bundling the cables, remove the cable holder from the AC cover. Reuse the cable holder to bundle the other cables.
[NO TEXT]
- Do not bundle the AC power cord (mains lead) together with other cables.
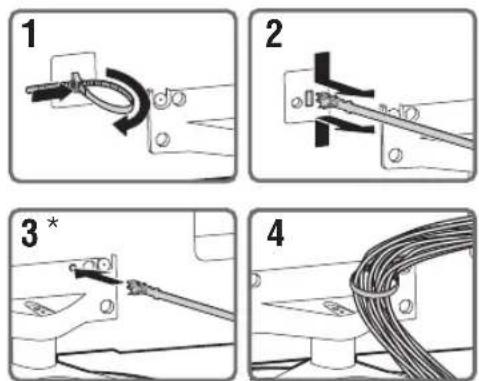
* When installing on the wall, attach the cable holder under the terminals.
natural_image
Diagram showing a computer monitor connected to a cable with a magnified view of its screen (no text or symbols present)6: Connecting the TV to the Internet
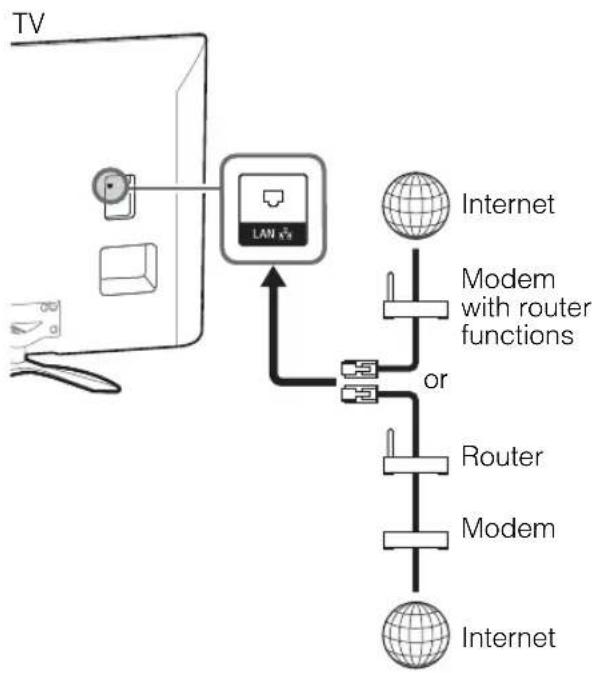
When you connect this TV to the Internet, you can enjoy multiple functions. For details on the functions, refer to the i-Manual.

- You will need to contract with an Internet service provider to connect to the Internet.
Preparing a wired network
flowchart
graph TD
    TV["TV"] --> LAN["LAN"]
    LAN --> Modem1["Modem with router functions"]
    LAN --> Modem2["Modem"]
    LAN --> Modem3["Modem"]
    LAN --> Modem4["Modem"]
    Modem1 --> Internet1["Internet"]
    Modem2 --> Internet2["Internet"]
    Modem3 --> Internet3["Internet"]
    Modem4 --> Internet4["Internet"]

- For LAN connections, use a Category 7 cable (not supplied).
Preparing a wireless LAN
The built-in wireless LAN device allows you to access the Internet and your home network. With this feature, you can connect to a wireless LAN and enjoy the benefits of networking in a cable-free environment. Before setting up the wireless LAN function of the TV, be sure to set up a wireless LAN router.
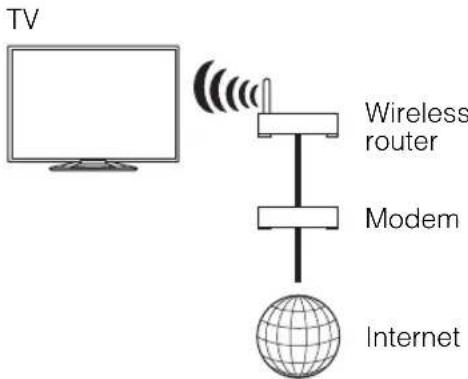
7: Performing the initial set-up
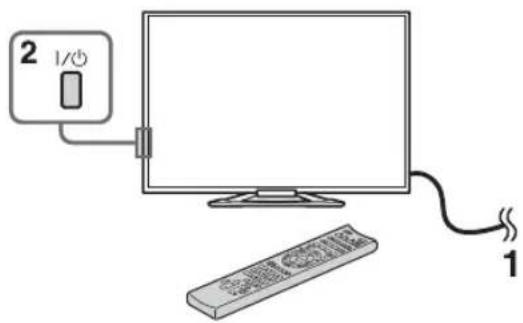
1 Connect the TV to your AC power outlet (mains socket).
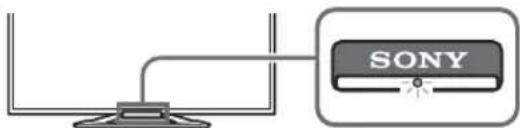
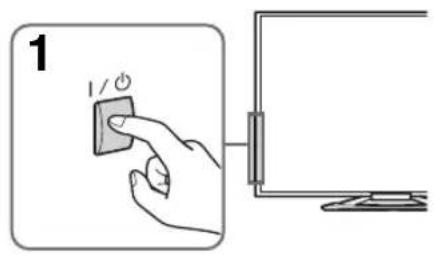
2 Press I/⏻ on the TV. The illumination LED will light up in white.
When you switch on the TV for the first time, the Language menu appears on the screen.
4
- When you turn on the TV for the first time, the TV requires some internal processing for optimisation before you can perform the initial setup. There will be no picture and sound, and the illumination LED on the front of the TV blinks white for about 40 seconds. Do not turn off the TV during this process. This process has been completed at the factory for some TVs.
- LED lights up in different colours according to the status of the TV. If you do not wish to light up the illumination LED, you can turn it off later. Press HOME, then select "Settings" → "System Settings" → "General Set-up" → "Illumination LED" → "Off". You can also press OPTION, then select "Illumination LED" → "Off".
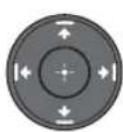
3 Press /// to select an item, then press . Follow the instructions on the screen.
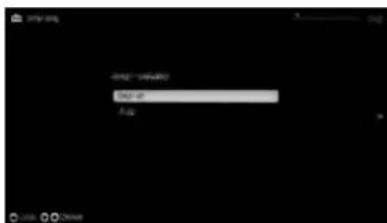
Programme Sorting: Changes the order of analogue channels stored in the TV.
① Press ♦/▼ to select the channel you want to move to a new position, then press ⊕
2 Press ↑/↓ to select the new position for the channel, then press ⊕
[NO TEXT]
- You can also tune channels manually.
Network Set-up: Sets up the Internet settings. If you do not access the Internet, or to set up later, select "Skip". After you select "Continue" or "Start" (depending on model) at the Internet setup confirmation screen, select "Auto" to connect to the network automatically. Select "Custom" to connect manually.
- If you use WEP security, select "Custom" → "Wireless Set-up" → "Scan". Then, select the network name (SSID) you want to connect. If you cannot find the required network name, select "[Manual Entry]" and press ⊕ to enter network name.
- To set "Network Set-up" later, press HOME, then select "Settings" → "Network" → "Network Set-up".
- Use the optional USB Wireless LAN Adapter to connect with your wireless router (or access point) at 5GHz. Insert USB Wireless LAN Adapter and set "Wi-Fi Direct" to "Off". Press HOME, then select "Settings" → "Network" → "Wi-Fi Direct" → "Off".
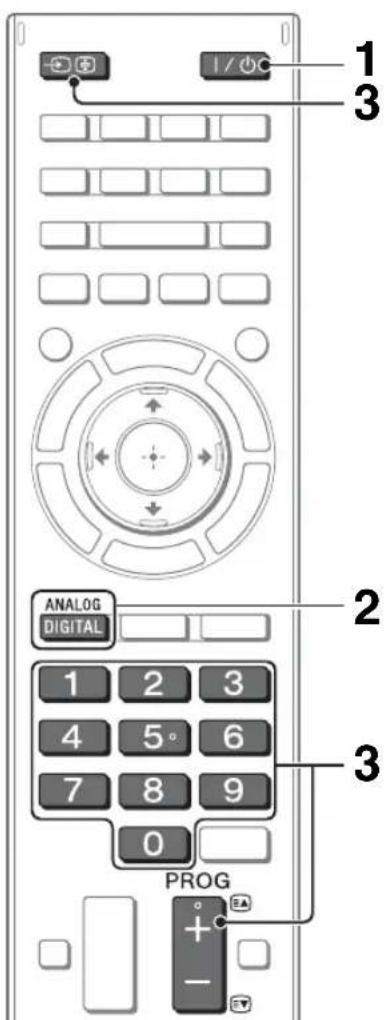
1 Turn on the TV.
Press I/⏻ on the TV or remote control to turn on the TV.
2 Select a mode.

3 Select a TV channel or select an input.
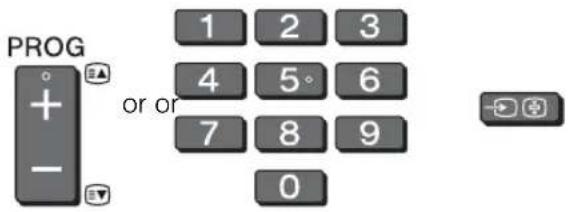
■To select digital channels
Use 0-9. For channel numbers 10 and above, press the next digit quickly.
4
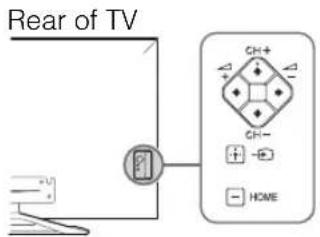
- See below illustration for location of the CH+/-, △+/-, ↑/↓/↔/→, →, + and HOME buttons on the TV.
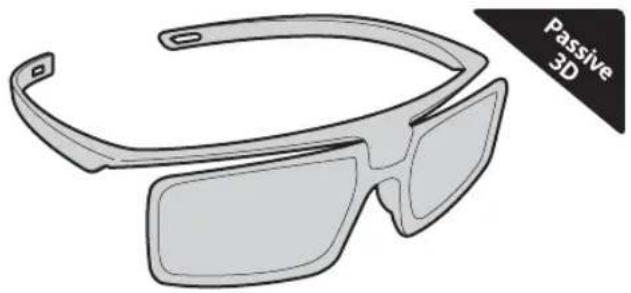
Watching 3D contents (KDL-55/47/42W800A only)
This feature lets you experience powerful 3D entertainment, such as stereoscopic 3D games and 3D Blu-ray Disc. Refer to the i-Manual on how to set the 3D settings or watch the 3D contents.
natural_image
Illustration of a pair of 3D glasses with a label pointing to 'Passive 3D' on the right (no other text or symbols)GB
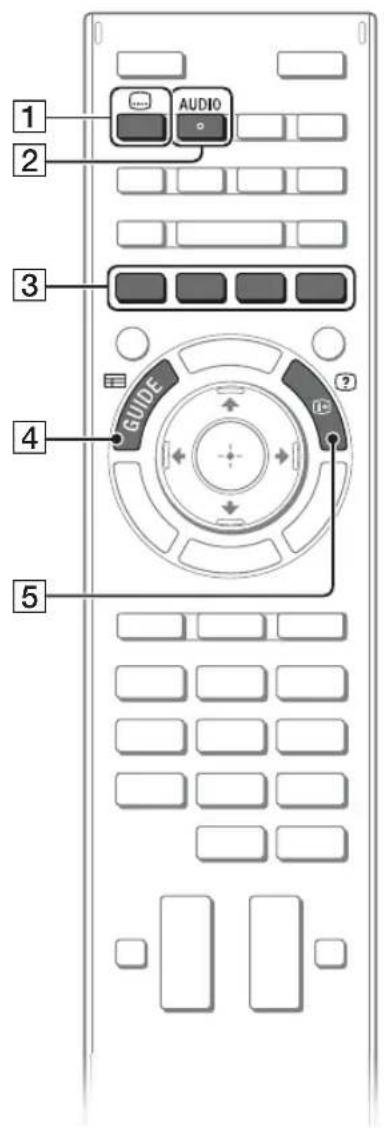
Frequently used buttons
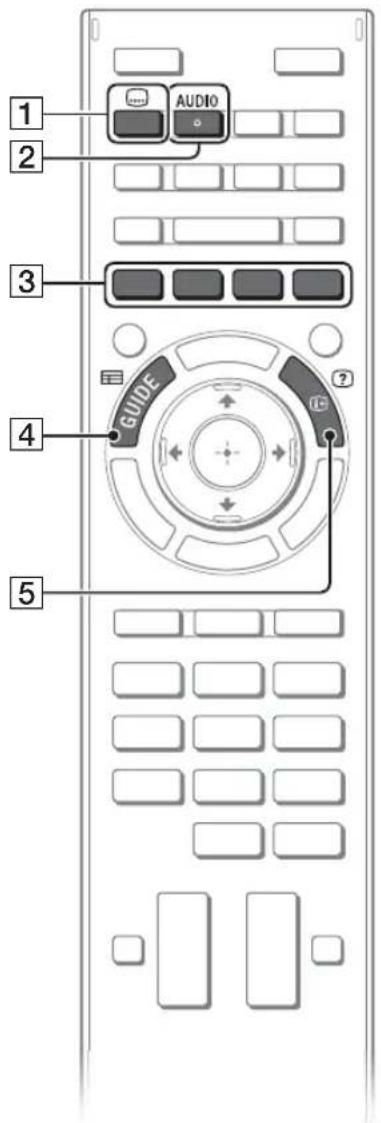
1 Subtitle setting
You can turn subtitle on/off while watching digital broadcasting.
2 AUDIO
You can select the sub sound or secondary language while watching multiplex broadcasts.
3 Colour buttons
When the colour buttons are available, an operation guide appears on the screen.
4 GUIDE
Displays the digital programme guide.
5/Info/Text reveal
Displays channel number, details of programmes, and the clock.
Selecting various functions and settings (Home Menu)
You can select the features of your TV from the Home menu.
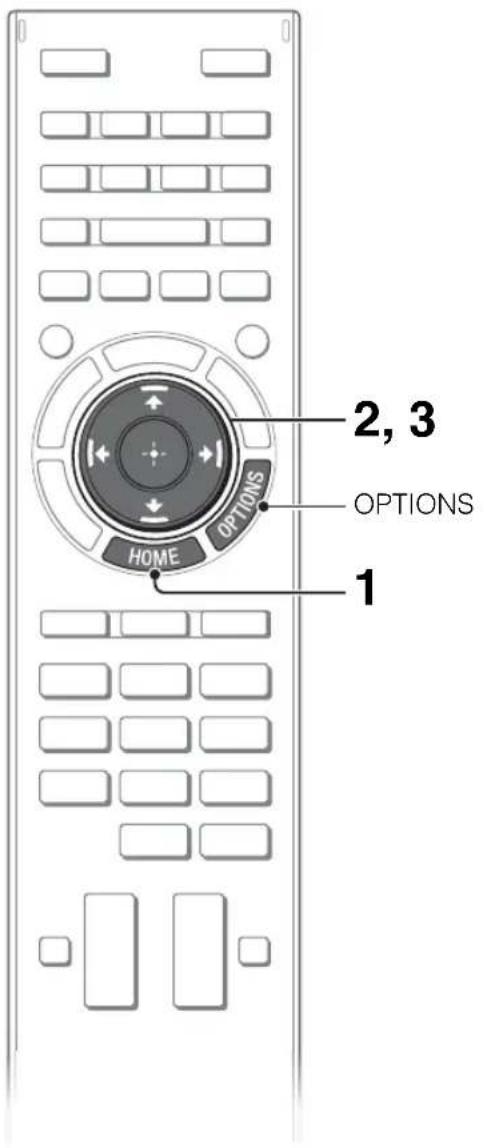
Here is an example on how to select an item and modify the TV settings.
1 Press HOME.
2 Press / to select "Settings" category.
The contents of "Settings" are displayed horizontally.
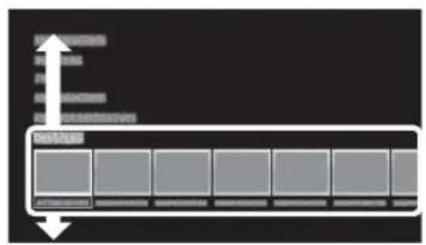
See page 17 (Category list) for all categories.
3 Press ←/→ to select a desired setting item, then press ⏻
4 Modify the settings.
■ To exit the Home menu
Press HOME.
■To select using the OPTIONS button
Press OPTIONS.
A list of convenient functions and menu shortcuts are displayed. The menu items vary based on the current input and/or content.
Category list
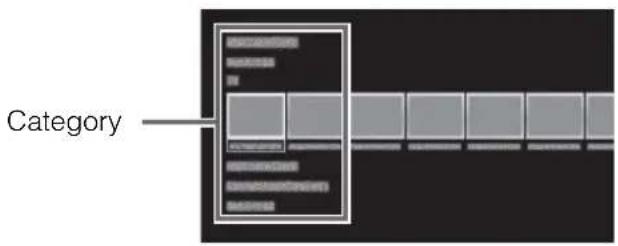
The categories are available depending on your TV model, region and country.
| Featured | Provides information on available applications and content. If there is no network connection, or the “Featured Display” setting is set to “Off”, the “Featured” category will not be displayed. |
| History | Displays recently viewed items. |
| TV | Allows you to select a list of TV channels, or a programme guide. Programme guide is available depending on your TV model or region. A list of channels registered as favourites in the “TV” category are displayed. |
| Applications | Launches applications that require an Internet connection, including Media Player which does not require an Internet connection. A list of applications registered as favourites in the “Applications” category are displayed. |
| Connected Devices | Enables selection of devices connected to the TV. |
| Settings | Provides settings (e.g. picture settings, sound settings, key tone setting) that allow you to customise your TV. |
Watching Internet Video
This feature serves as a gateway to Internet content, delivering a variety of on-demand entertainment straight to your TV. You can enjoy video content, including movies and cartoons. You will need to make a broadband Internet connection. For details, see page 12 (6: Connecting the TV to the Internet).
1 Press HOME.
2 Press / to select "Applications" category.
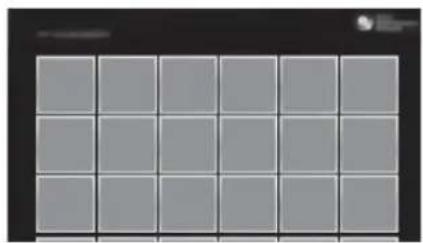
3 Press "All Applications", then press ⊕.
4 Press /// to select the desired service, then press
natural_image
Grid of 16 gray squares arranged in 4 rows and 5 columns, no text or symbols visible[NO TEXT]
- If you experience difficulties with this feature, check that the Internet connection is set up properly.
- The interface to Internet content depends on the Internet content providers.
- Services block video content based on the "Parental Lock" setting of the TV. Some service providers do not support this function.
- To update Internet Video content services, press HOME, then select "Settings" → "Network" → "Refresh Internet Content".
Looking for instructions in the electronic manual (i-Manual)
Operating instructions are built into your BRAVIA TV and can be displayed on the screen. To learn more about your TV features, access your i-Manual with the touch of a button.
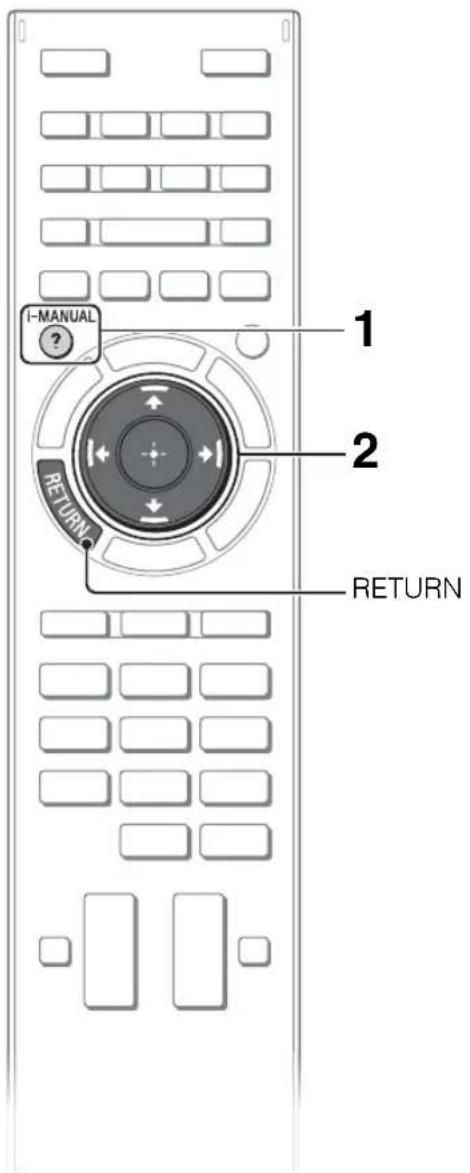
1 Press i-MANUAL.

2 Select an item.
① Press ←/→ to select an item.
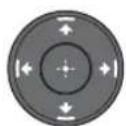
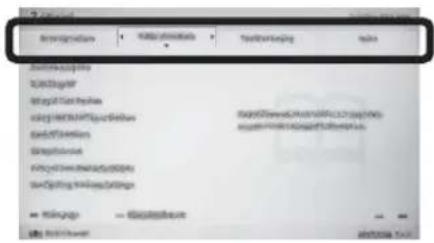
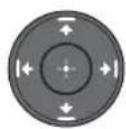
② Press ↑/↓/←/→ to select an item, then press ⏻.
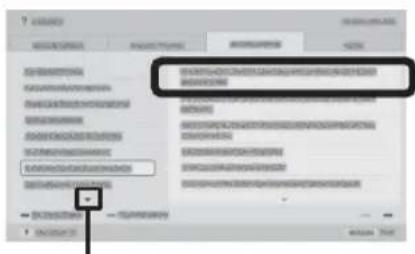
Arrow mark*
* If an arrow mark appears, press ↓ repeatedly to display more items.
The page of the selected item appears.
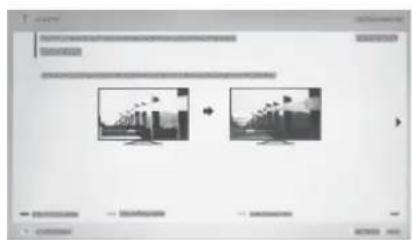

- You can step through pages using / . Press RETURN to return to the previous page.
Saving frequently viewed pages (Bookmark)
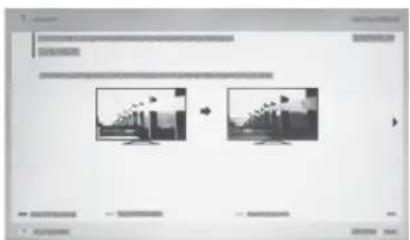
You can save frequently viewed pages for easy access anytime.
To save a page
In the page to bookmark, press the yellow button on the remote control.
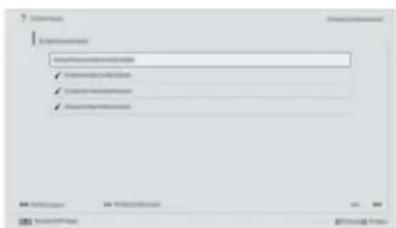
■ To access the bookmarked page
When displaying the i-Manual, press the green button on the remote control to display the bookmark list.
Press ↑/↓ to select the desired item, then press ⊕.
A
• To return to the previous screen, press RETURN.
■To remove a bookmark
When the bookmarked page is displayed, press the yellow button on the remote control.
Displaying the page again while operating the TV
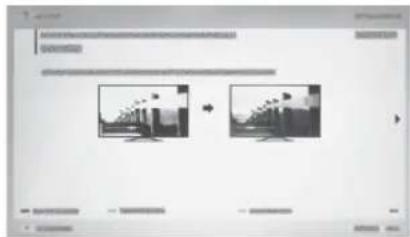
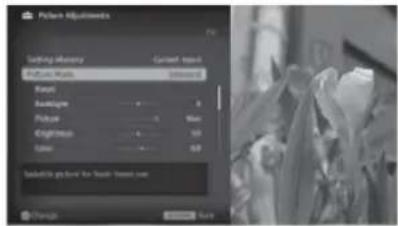
You can switch between the i-Manual screen and the TV screen. This feature allows you to refer to the instructions in the i-Manual while using your BRAVIA TV. Press i-MANUAL to switch between the i-Manual screen previously displayed and the TV screen.
natural_image
Two grayscale images showing a bridge over a bridge, connected by an arrow (no text or symbols visible)i-Manual screen previously displayed

i-MANUAL


BRAVIA TV screen
4
- To jump to the top page of i-Manual, press the red button on the remote control. You can also press HOME, then select "Settings" → "i-Manual" to jump to the top page of i-Manual.
- Once you turn off the TV or the TV goes to standby mode, the i-Manual will be displayed from the top page when you select "i-Manual".
Troubleshooting
When the illumination LED is flashing in red, count how many times it flashes (interval time is three seconds).
Press I/⏻ on the TV to turn it off, disconnect the AC power cord (mains lead), and inform your dealer or Sony service centre of how the indicator flashes (number of flashes).
When the illumination LED is not flashing, check the items in the tables as follows.
Also refer to “Troubleshooting” in the i-Manual. If the problem persists, have your TV serviced by qualified service personnel.
Condition Explanation/Solution
| There is no picture (screen is dark) and no sound. | ·Check the antenna (aerial)/cable connection.·Connect the TV to the AC power (mains), and press I/⏻ on the TV or remote control. |
| Some programmes cannot be tuned. | ·Check the antenna (aerial). |
| The remote control does not function. | ·Replace the batteries.·Your TV may be in SYNC mode.Press SYNC MENU, select “TV Control” and then select “Home (Menu)” or “Options” to control the TV. |
| The “Parental Lock” password has been forgotten. | ·Enter 9999 for the PIN code. (PIN code 9999 is always accepted.) |
| The TV surrounds become warm. | ·When the TV is used for an extended period, the TV surrounds become warm.You may feel hot when touching there by the hand. |
| Frozen audio or video, a blank screen, or the TV does not respond to TV or remote control buttons. | ·Perform a simple reset of the TV by unplugging the AC power cord (mains lead) for two minutes, then plug it in again. |
| System | |
| Panel system | LCD (Liquid Crystal Display) Panel |
| TV system | Analogue: B/G, I, D/K, M, LDigital: DTMB |
| Colour/video system | Analogue: PAL, SECAM, NTSC3.58, NTSC4.43Digital: Refer to the i-Manual |
| Channel coverage | Analogue:B/G: VHF: E2-E12/UHF: E21-E69/CATV: S01-S03, S1-S41I: UHF: B21-B69/CATV: S01-S03, S1-S41D/K: VHF: C1-C12, R1-R12/UHF: C13-C57, R21-R60/CATV: S01-S03,S1-S41M: VHF: A2-A13/UHF: A14-A79L: VHF: F2-F10/UHF: F21-F69/CATV: B-QDigital: UHF |
| Sound output | 10 W + 10 W |
| Input/Output jacks | |
| Antenna (aerial)/cable | 75 ohm external terminal for VHF/UHF |
| -/VIDEO IN 1 | Video/Audio input (phono jacks) |
| -/C O M PVIDEO IN 2 | YR@PR (NompEnentNvided): 1080p (50, 60Hz), 1080i (50, 60Hz), 720p (50, 60Hz), 576p, 576i, 480p,480iAudio input (phono jacks)Video input (common phono pin with Y input) |
| HDMI IN1, 2, 3, 4(KDL-55/47/42W800A)HDMI 3 AUDIO IN | Video(2D): 1080p (30, 50, 60Hz), 1080/24p, 1080i (50, 60Hz), 720p (30, 50, 60Hz),720/24p, 576p, 576i, 480p, 480i, PC FormatsVideo(3D):Frame Packing 1080p (30Hz), 1080/24p, 1080i (50, 60Hz), 720p (30, 50, 60Hz), 720/24pSide-by-Side 1080p (50, 60Hz), 1080/24p, 1080i (50, 60Hz), 720p (50, 60Hz)Over-Under 1080p (30, 50, 60Hz), 1080/24p, 1080i (50, 60Hz), 720p (50, 60Hz)ARC (Audio Return Channel) (HDMI IN 1 only)Analogue audio input (stereo minijack) |
| HDMI IN1, 2, 3, 4(KDL-50/46W700A)HDMI 3 AUDIO IN | Video: 1080p (30, 50, 60Hz), 1080/24p, 1080i (50, 60Hz), 720p (30, 50, 60Hz), 720/24p,576p, 576i, 480p, 480i, PC FormatsAudio: Two channel linear PCM 32, 44.1 and 48 kHz, 16, 20 and 24 bits, Dolby DigitalARC (Audio Return Channel) (HDMI IN 1 only)Analogue audio input (stereo minijack) |
| MHL(common with HDMI IN 2)(KDL-55/47/42W800A) | Video (2D):1080p (30Hz), 1080/24p, 1080i (50, 60Hz), 720p (30, 50, 60Hz), 720/24p, 576p,576i, 480p, 480iVideo (3D):Side-by-Side 1080/24p, 1080i (50, 60Hz), 720p (50, 60Hz)Over-Under 1080p (30Hz), 1080/24p, 1080i (50, 60Hz), 720p (50, 60Hz)Audio: Two channel linear PCM: 32, 44.1 and 48kHz, 16, 20 and 24 bits, Dolby Digital |
| MHL(common with HDMI IN 2)(KDL-50/46W700A) | Video (2D):1080p (30Hz), 1080/24p, 1080i (50, 60Hz), 720p (30, 50, 60Hz),720/24p, 576p, 576i,480p, 480iAudio: Two channel linear PCM: 32, 44.1 and 48kHz, 16, 20 and 24 bits, Dolby Digital |
| DIGITAL AUDIO OUT(OPTICAL) | Digital optical jack (Two channel linear PCM, Dolby Digital) |
| AUDIO OUT/Ω | Audio output (stereo minijack)Headphones jack |
| 1, 2, 3 (KDL-55/47/42W800A) | USB port |
| 1, 2 (KDL-50/46W700A) | USB port |
| LAN | 10BASE-T/100BASE-TX connector (Depending on the operating environment of the network,connection speed may differ. 10BASE-T/100BASE-TX communication rate and communicationquality are not guaranteed for this TV.) |
| Others | |
| Supplied accessories | See “Checking the accessories” (page 6). |
| Optional accessories | Wall-Mount Bracket: SU-WL400USB Wireless LAN Adapter: UWA-BR100One-touch Remote Control: RMF-ED003Camera and Microphone Unit: CMU-BR200/CMU-BR100Passive 3D Glasses: TDG-500P (KDL-55/47/42W800A only) SimulViewTM Passive Glasses: TDG-SV5P (KDL-55/47/42W800A only) SimulViewTM Passive Glasses: TDG-SV5P (KDL-55/47/42W800A only) |
| Operating temperature | 0 °C – 40 °C |
| Operating humidity | 10 % – 80 % RH (non-condensing) |
| Model name KDL- 55W800A 50W700A 47W800A | |||
| Power and others | |||
| Power requirements | 220 V – 240 V AC, 50 Hz | ||
| Screen size (measured diagonally) | Approx. 138.8cm/ 55 inches Approx. 125.7cm / 50 inches Approx. 119.3cm/ 47 inches | ||
| Display resolution | 1,920 dots × 1,080 lines (vertical) | ||
| Power consumption | Indicated on the rear of the TV | ||
| Dimensions (Approx.) (w × h × d) | |||
| with Table-Top Stand (mm) | 1253 × 768 × 298 1137 × 701 × 298 1083 × 672 × 298 | ||
| without Table-Top Stand (mm) | 1253 × 735 × 64 1137 × 669 × 64 1083 × 639 × 64 | ||
| Mass (Approx.) | |||
| with Table-Top Stand (kg) | 20.7 17.9 16.7 | ||
| without Table-Top Stand (kg) | 18.4 15.8 14.6 | ||
| Model name KDL- 46W70 | 0A 42W800A | |
| Power and others | ||
| Power requirements | 220 V – 240 V AC, 50 Hz | |
| Screen size (measured diagonally) | Approx. 116.8cm / 46 inches Approx. 106.7cm/42 inches | |
| Display resolution | 1,920 dots × 1,080 lines (vertical) | |
| Power consumption | Indicated on the rear of the TV | |
| Dimensions (Approx.) (w × h × d) | ||
| with Table-Top Stand (mm) | 1059 × 659 × 298 971 × 609 × 298 | |
| without Table-Top Stand (mm) | 1059 × 626 × 64 971 × 577 × 63 | |
| Mass (Approx.) | ||
| with Table-Top Stand (kg) | 16.3 14.4 | |
| without Table-Top Stand (kg) | 14.2 12.3 | |
Optional accessories availability depends on countries/region/TV model/stock. Design and specifications are subject to change without notice.
Installing the Accessories (Wall-Mount Bracket)
To Customers:
For product protection and safety reasons, Sony strongly recommends that installing of your TV be performed by Sony dealers or licensed contractors. Do not attempt to install it yourself.
■To Sony Dealers and Contractors:
Provide full attention to safety during the installation, periodic maintenance and examination of this product.
Your TV can be installed using the SU-WL400 (page 25) Wall-Mount Bracket (sold separately).
• Refer to the Instructions supplied with the Wall-Mount Bracket to properly carry out the installation.
Sufficient expertise is required for installing this product, especially to determine the strength of the wall for withstanding the TV's weight. Be sure to entrust the attachment of this product to the wall to Sony dealers or licensed contractors and pay adequate attention to safety during the installation. Sony is not liable for any damage or injury caused by mishandling or improper installation.
Precautions
Detach the Table-Top Stand from the TV. See "Detaching the Table-Top Stand from the TV" (page 7) for details.
SU-WL400
When installing the TV on the wall, remove the screws from the rear of the TV. Be sure to store the removed screws in a safe place, keeping them away from children.
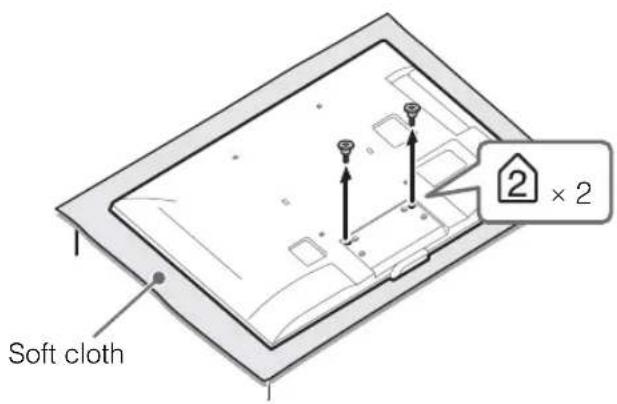
[NO TEXT]
- When removing the Table-Top Stand from the TV, lay the display face down on a stable work surface that is larger than the TV.
• To prevent damaging the surface of the LCD display, make sure to place a soft cloth on the work surface.
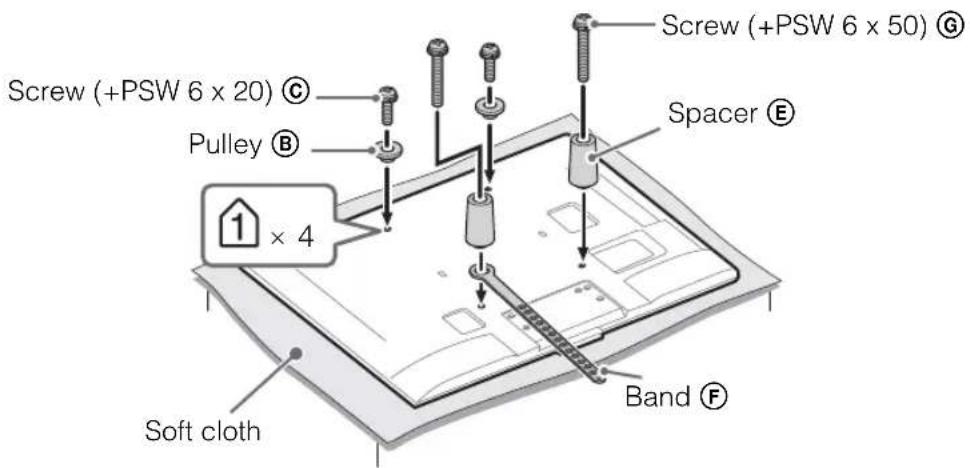
GB
A
- With the screen of the TV facing down, attach the SU-WL400 accessories. For more details of Ⓑ, Ⓒ, Ⓔ, Ⓕ and Ⓙ, refer to Instruction Guide provided with Wall-Mount Bracket.
- Attach the Pulleys and Screws (+PSW6 x 20) to the upper rear of the TV.
- Attach the Band and Spacers with Screws (+PSW6 x 50) to the lower rear of the TV.
- If using an electric screwdriver, set the torque at approximately 1.5 N·m {15 kgf·cm}.
- Screw (+PSW 4 x 20) Ⓓ, Bush (M4) Ⓗ and Screw (+PSW 4 x 50) Ⓘ will not be used depends on model. Be sure to store the unused parts in a safe place for future use. Retain this manual for future reference.
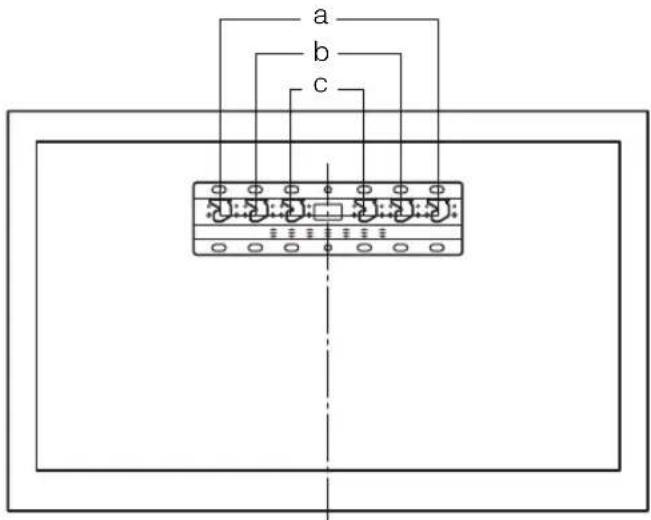
Hook locations diagram/table
| Model Name KDL- | Hook location |
| SU-WL400 | |
| 55W800A | a |
| 50W700A | |
| 47W800A | |
| 46W700A | |
| 42W800A |
SU-WL400
Hook location
When installing the TV onto the Base Bracket.
TV installation dimensions table
SU-WL400
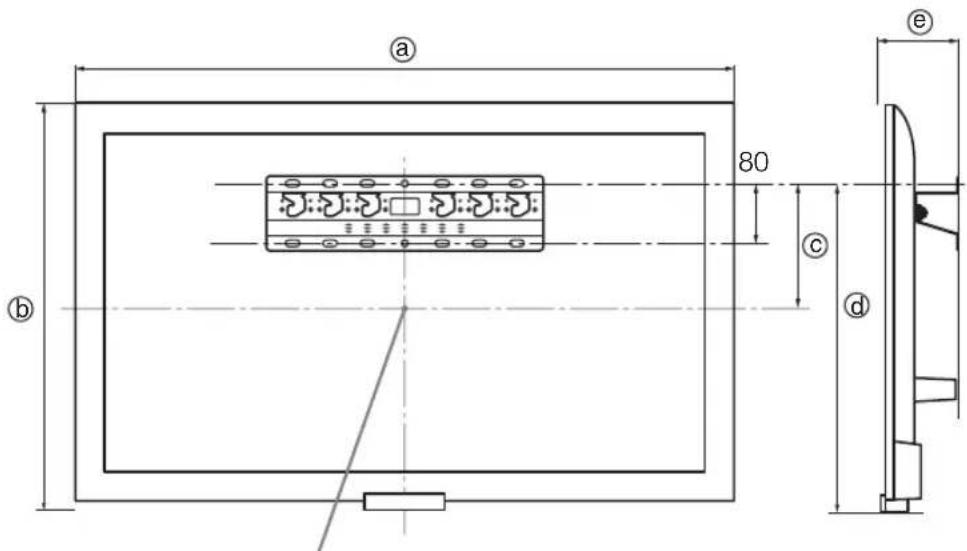
Screen centre point
Unit: mm
| Model NameKDL- | Display dimensions | Screen centredimension | Length for mounting | ||
| a | b | c | d | e | |
| SU-WL400 | |||||
| 55W800A | 1253 735 | 150 526 116 | |||
| 50W700A | 1137 669 | 182 526 116 | |||
| 47W800A | 1083 639 | 198 526 116 | |||
| 46W700A | 1059 626 | 204 526 116 | |||
| 42W800A | 971 577 | 230 526 116 | |||
Figures in the table may differ slightly depending on the installation.
When your TV is installed on the wall, the upper side of the TV slightly leans forward.
WARNING
The wall that the TV will be installed should be capable of supporting a weight of at least four times that of the TV. See page 22-23 (Specifications) for its weight.

Refer to the instructions supplied with the Wall-Mount Bracket for your model to install the TV on the wall.
Safety Information
WARNING
Batteries must not be exposed to excessive heat such as sunshine, fire or the like.
Installation/Set-up
Install and use the TV set in accordance with the instructions below in order to avoid any risk of fire, electrical shock or damage and/or injuries.
Installation
- The TV set should be installed near an easily accessible AC power outlet (mains socket).
- Place the TV set on a stable, level surface to avoid it from falling down and cause personal injury or damage to the TV.
- Only qualified service personnel should carry out wall installations.
- For safety reasons, it is strongly recommended that you use Sony accessories, including:
- Wall-Mount Bracket: SU-WL400
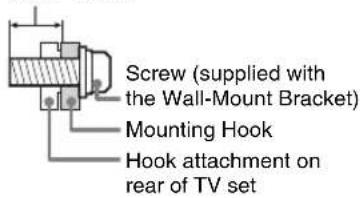
- Be sure to use the screws supplied with the Wall-Mount Bracket when attaching the mounting hooks to the TV set. The supplied screws are designed as indicated by illustration when measured from the attaching surface of the mounting hook.
The diameter and length of the screws differ depending on the Wall-Mount Bracket model.
Use of screws other than those supplied may result in internal damage to the TV set or cause it to fall, etc.
8mm - 12mm
Transporting
- Before transporting the TV set, disconnect all cables.
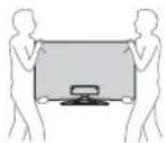
- Two or three people are needed to transport a large TV set.
- When transporting the TV set by hand, hold it as shown below. Do not put stress on the LCD panel and the frame around the screen.
- When transporting the TV set, do not subject it to jolts or excessive vibration.
- When transporting the TV set for repairs or when moving, pack it using the original carton and packing material.
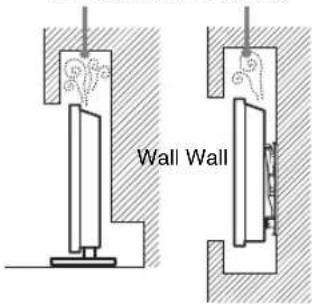
Ventilation
- Never cover the ventilation holes or insert anything in the cabinet.
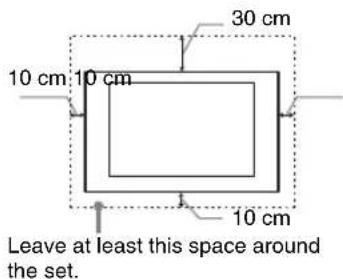
- Leave space around the TV set as shown below.
- It is strongly recommended that you use a Sony wall-mount bracket in order to provide adequate air-circulation.
Installed on the wall
Installed with stand
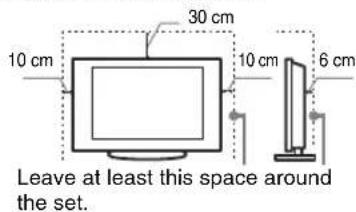
• To ensure proper ventilation and prevent the collection of dirt or dust:
- Do not lay the TV set flat, install upside down, backwards, or sideways.
- Do not place the TV set on a shelf, rug, bed or in a closet.
- Do not cover the TV set with a cloth, such as curtains, or items such as newspapers, etc.
- Do not install the TV set as shown below.
Air circulation is blocked.
AC power cord (mains lead)
Handle the AC power cord (mains lead) and outlet (mains socket) as follows in order to avoid any risk of fire, electrical shock or damage and/or injuries:
– Use only Sony supplied AC power cords (mains lead), not those of other brands.
- Insert the plug fully into the AC power outlet (mains socket).
- Operate the TV set on a 220-240 V AC supply only.
- When wiring cables, be sure to unplug the AC power cord (mains lead) for your safety and take care not to catch your feet on the cables.
- Disconnect the AC power cord (mains lead) from the AC power outlet (mains socket) before working on or moving the TV set.
- Keep the AC power cord (mains lead) away from heat sources.
- Unplug the AC power plug and clean it regularly. If the plug is covered with dust and it picks up moisture, its insulation may deteriorate, which could result in a fire.
Notes
- Do not use the supplied AC power cord (mains lead) on any other equipment.
- Do not pinch, bend, or twist the AC power cord (mains lead) excessively. The core conductors may be exposed or broken.
- Do not modify the AC power cord (mains lead).
- Do not put anything heavy on the AC power cord (mains lead).
- Do not pull on the AC power cord (mains lead) itself when disconnecting the AC power cord (mains lead).
- Do not connect too many appliances to the same AC power outlet (mains socket).
- Do not use a poor fitting AC power outlet (mains socket).
Prohibited Usage
Do not install/use the TV set in locations, environments or situations such as those listed below, or the TV set may malfunction and cause a fire, electrical shock, damage and/or injuries.
Location:
- Outdoors (in direct sunlight), at the seashore, on a ship or other vessel, inside a vehicle, in medical institutions, unstable locations, near water, rain, moisture or smoke.
- If the TV is placed in the changing room of a public bath or hot spring, the TV may be damaged by airborne sulfur, etc.
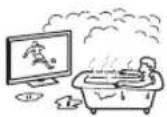
- For best picture quality, do not expose the screen to direct illumination or sunlight.
- Avoid moving the TV from a cold area to a warm area. Sudden room temperature changes may cause moisture condensation. This may cause the TV to show poor picture and/or poor colour. Should this occur, allow moisture to evaporate completely before powering the TV on.
- Never spray water or detergent directly on the TV set. It may drip to the bottom of the screen or exterior parts and enter the TV set, and may cause damage to the TV set.
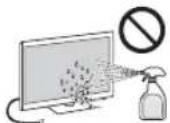
Environment:
- Places that are hot, humid, or excessively dusty; where insects may enter; where it might be exposed to mechanical vibration, near flammable objects (candles, etc). The TV set shall not be exposed to dripping or splashing and no objects filled with liquids, such as vases, shall be placed on the TV.
- Do not place the TV in a humid or dusty space, or in a room with oily smoke or steam (near cooking tables or humidifiers). Fire, electric shock, or warping may result.
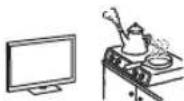
- Do not install the TV in places subject to extreme temperature, such as in direct sunlight, near a radiator or a heating vent. The TV may overheat in such conditions which can cause deformation of the enclosure and/or TV malfunction.
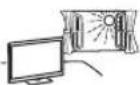
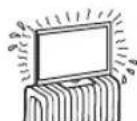
Situation:
- Do not use when your hands are wet, with the cabinet removed, or with attachments not recommended by the manufacturer. Disconnect the TV set from AC power outlet (mains socket) and antenna during lightning storms.
- Do not install the TV so that it sticks out into an open space. Injury or damage from a person or object bumping into the TV may result.
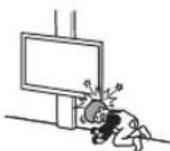
Broken pieces:
- Do not throw anything at the TV set. The screen glass may break by the impact and cause serious injury.
- If the surface of the TV set cracks, do not touch it until you have unplugged the AC power cord (mains lead). Otherwise electric shock may result.
When not in use
- If you will not be using the TV set for several days, the TV set should be disconnected from the AC power (mains) for environmental and safety reasons.
- As the TV set is not disconnected from the AC power (mains) when the TV set is just turned off, pull the plug from the AC power outlet (mains socket) to disconnect the TV set completely.
• However, some TV sets may have features that require the TV set to be left in standby to work correctly.
For children
- Do not allow children to climb on the TV set.
- Keep small accessories out of the reach of children, so that they are not mistakenly swallowed.
If the following problems occur...
Turn off the TV set and unplug the AC power cord (mains lead) immediately if any of the following problems occur.
Ask your dealer or Sony service centre to have it checked by qualified service personnel.
When:
- AC power cord (mains lead) is damaged.
– Poor fitting of AC power outlet (mains socket).
– TV set is damaged by being dropped, hit or having something thrown at it.
– Any liquid or solid object falls through openings in the cabinet.
About LCD Monitor Temperature
When the LCD Monitor is used for an extended period, the panel surrounds become warm.
You may feel hot when touching there by the hand.
Precautions
Viewing the TV
- Some people may experience discomfort (such as eye strain, fatigue, or nausea) while watching 3D video images or playing stereoscopic 3D games. Sony recommends that all viewers take regular breaks while watching 3D video images or playing stereoscopic 3D games. The length and frequency of necessary breaks will vary from person to person. You must decide what works best. If you experience any discomfort, you should stop watching the 3D video images or playing stereoscopic 3D games until the discomfort ends; consult a doctor if you believe necessary. You should also review (i) the instruction manual of any other device or media used with this television and (ii) our website (http://www.sony-asia.com/support) for the latest information. The vision of young children (especially those under six years old) is still under development. Consult your doctor (such as a pediatrician or eye doctor) before allowing young children to watch 3D video images or play stereoscopic 3D games. Adults should supervise young children to ensure they follow the recommendations listed above.
- Do not use, store, or leave the 3D Glasses or battery near a fire, or in places with a high temperature, e.g., in direct sunlight, or in sun-heated cars.
- When using the simulated 3D function, please note that the displayed image is modified from the original due to the conversion done by this television.
• View the TV in moderate light, as viewing the TV in poor light or during long period of time, strains your eyes.
- When using headphones, adjust the volume so as to avoid excessive levels, as hearing damage may result.
LCD Screen
- Although the LCD screen is made with high-precision technology and 99.99% or more of the pixels are effective, black dots may appear or bright points of light (red, blue, or green) may appear constantly on the LCD screen. This is a structural property of the LCD screen and is not a malfunction.
-
Do not push or scratch the front filter, or place objects on top of this TV set. The image may be uneven or the LCD screen may be damaged.
-
If this TV set is used in a cold place, a smear may occur in the picture or the picture may become dark. This does not indicate a failure. These phenomena disappear as the temperature rises.
- Ghosting may occur when still pictures are displayed continuously. It may disappear after a few moments.
- The screen and cabinet get warm when this TV set is in use. This is not a malfunction.
- The LCD screen contains a small amount of liquid crystal. Follow your local ordinances and regulations for disposal.
Handling and cleaning the screen surface/cabinet of the TV set
Be sure to unplug the AC power cord (mains lead) connected to the TV set from AC power outlet (mains socket) before cleaning.
To avoid material degradation or screen coating degradation, observe the following precautions.
• To remove dust from the screen surface/cabinet, wipe gently with a soft cloth. If dust is persistent, wipe with a soft cloth slightly moistened with a diluted mild detergent solution.
- Never spray water or detergent directly on the TV set. It may drip to the bottom of the screen or exterior parts and enter the TV set, and may cause damage to the TV set.
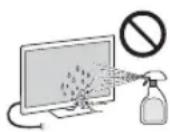
- Never use any type of abrasive pad, alkaline/acid cleaner, scouring powder, or volatile solvent, such as alcohol, benzene, thinner or insecticide. Using such materials or maintaining prolonged contact with rubber or vinyl materials may result in damage to the screen surface and cabinet material.
- Periodic vacuuming of the ventilation openings is recommended to ensure to proper ventilation.
- When adjusting the angle of the TV set, move it slowly so as to prevent the TV set from moving or slipping off from its table stand.
Optional Equipment
Keep optional components or any equipment emitting electromagnetic radiation away from the TV set. Otherwise picture distortion and/or noisy sound may occur.
Wireless Function of the unit
- Do not operate this unit near medical equipment (pacemaker, etc.), as malfunction of the medical equipment may result.
- Although this unit transmits/receives scrambled signals, be careful of unauthorised interception. We cannot be responsible for any trouble as a result.
(Caution about handling the remote control) Notes
- Observe the correct polarity when inserting batteries.
- Do not use different types of batteries together or mix old and new batteries.
- Dispose of batteries in an environmentally friendly way. Certain regions may regulate the disposal of batteries. Please consult your local authority.
- Handle the remote control with care. Do not drop or step on it, or spill liquid of any kind onto it.
- Do not place the remote control in a location near a heat source, a place subject to direct sunlight, or a damp room.
簡介
Opera® Devices SDK from Opera Software ASA. Copyright 1995-2013 Opera Software ASA. All rights reserved.
Mobile High-Definition Link
dts®
2.0 Channel
realnetworks
Bluetooth®
natural_image
Technical illustration of a mechanical component with an arrow indicating direction, showing a close-up of a disassembled part (no text or symbols present)*該角度是近似值。

- 確定電視機前沒有障礙物。
3: 連接
[NO TEXT]
[NO TEXT]
natural_image
Diagram showing a mechanical assembly with a spring-loaded component and a curved arrow indicating rotation (no text or symbols)![SONY KDL-50W700A - [NO TEXT] - 1](/content/2026/05/1063974/images/1ddb9875ccba5611502df9d5337ed4ef4342a667f17de0cbf5360134baba15d9.jpg)
natural_image
Mechanical assembly diagram showing a lever mechanism with no visible text or symbols
![SONY KDL-50W700A - [NO TEXT] - 3](/content/2026/05/1063974/images/65174e08183e73d72dfbdc60f4538c8127bb511f7db8bd56db0098898024e3da.jpg)
natural_image
Close-up of a cable being inserted into a mechanical component (no text or symbols visible)6: 連接電視機至網際網絡
natural_image
Illustration of a pair of 3D glasses with a labeled 'Passive 3D' on the right (no other text or symbols)CT
經常使用的按鈕
natural_image
Grid of 16 gray squares arranged in 4 rows and 5 columns, no text or symbols visible[NO TEXT]
箭頭標記 *

■存取標籤的頁面
natural_image
Two grayscale images showing a landscape with trees and hills, connected by a transformation arrow (no text or symbols)先前顯示的功能操作教學螢幕

i-MANUAL


BRAVIA 電視機螢幕
[NO TEXT]
Instructions about "Installing Wall Mount Bracket" are included within this TV's instructions manual.
- BRAVIA
- Introduction
- Trademark information
- Location of the identification label
- About this manual
- (Operating Instructions)
- Operating Instructions
- Electronic manual (i-Manual)
- Table of Contents
- Getting Started
- Using Your BRAVIA TV
- Watching TV ▶...... 14
- Looking for Instructions
- Looking for instructions in the electronic manual
- Additional Information
- Checking the accessories
- Inserting batteries into the remote control
- 1: Attaching the Table-Top Stand
- Detaching the Table-Top Stand from the TV
- 2: Adjusting the viewing angle of the TV
- ■ Angle adjustment (Swivel)
- 3: Connections
- Connecting an antenna (aerial)/cable/VCR
- ■To connect an antenna (aerial)/cable
- Connecting audio/video devices
- Connecting MHL device
- 4
- 4: Preventing the TV from toppling over
- 5: Bundling the cables
- 6: Connecting the TV to the Internet
- Preparing a wired network
- Preparing a wireless LAN
- 7: Performing the initial set-up
- [NO TEXT]
- Turn on the TV.
- Select a mode.
- Select a TV channel or select an input.
- ■To select digital channels
- Watching 3D contents (KDL-55/47/42W800A only)
- Frequently used buttons
- Subtitle setting
- AUDIO
- Colour buttons
- GUIDE
- 5/Info/Text reveal
- Selecting various functions and settings (Home Menu)
- Press HOME.
- Press / to select "Settings" category.
- Press ←/→ to select a desired setting item, then press ⏻
- Modify the settings.
- ■ To exit the Home menu
- ■To select using the OPTIONS button
- Category list
- Watching Internet Video
- Looking for instructions in the electronic manual (i-Manual)
- Press i-MANUAL.
- Select an item.
- Saving frequently viewed pages (Bookmark)
- To save a page
- ■ To access the bookmarked page
- ■To remove a bookmark
- Displaying the page again while operating the TV
- Troubleshooting
- Installing the Accessories (Wall-Mount Bracket)
- To Customers:
- ■To Sony Dealers and Contractors:
- Precautions
- SU-WL400
- A
- Hook locations diagram/table
- Hook location
- TV installation dimensions table
- WARNING
- Safety Information
- Installation/Set-up
- Installation
- Transporting
- Ventilation
- AC power cord (mains lead)
- Notes
- Prohibited Usage
- Location:
- Environment:
- Situation:
- Broken pieces:
- When not in use
- For children
- If the following problems occur...
- When:
- About LCD Monitor Temperature
- Viewing the TV
- LCD Screen
- Handling and cleaning the screen surface/cabinet of the TV set
- Optional Equipment
- Wireless Function of the unit
- (Caution about handling the remote control) Notes
- 簡介
- 3: 連接
- 6: 連接電視機至網際網絡
- 經常使用的按鈕
- ■存取標籤的頁面
Brand : SONY
Model : KDL-50W700A
Category : Video projector