Lo-Fi - Uncategorized Source Audio - Free user manual and instructions
Find the device manual for free Lo-Fi Source Audio in PDF.

| Brand | Source Audio |
| Model | Lo-Fi |
| Product Type | Guitar Effects Pedal |
| Category | Uncategorized |
| Dimensions (W x H x D) | 4.4 x 2.4 x 2.0 inches (11.2 x 6.1 x 5.1 cm) |
| Weight | 0.6 lbs (272 g) |
| Power Supply | 9V DC, center negative, 2.1mm barrel, 100mA minimum |
| Current Draw | 80 mA |
| Input Impedance | 1 MΩ |
| Output Impedance | 100 Ω |
| Controls | Volume, Tone, Rate, Depth, Mode switch |
| Main Functions | Lo-fi modulation (vibrato/chorus), bit crusher, noise gate, compression, sample rate reduction |
| Connectivity | 1/4" instrument input, 1/4" output |
| Bypass | True bypass (relay) |
| Construction | Aluminum chassis, powder-coated finish |
| Cleaning | Wipe with dry cloth; avoid solvents |
| Safety | Use only specified power adapter; do not immerse in water |
| Spare Parts | Contact Source Audio or authorized dealers |
| Repairability | User-replaceable fuse; otherwise service by qualified technician |
| Warranty | 2 years limited warranty |
Frequently Asked Questions - Lo-Fi Source Audio
User questions about Lo-Fi Source Audio
0 question about this device. Answer the ones you know or ask your own.
Ask a new question about this device
Download the instructions for your Uncategorized in PDF format for free! Find your manual Lo-Fi - Source Audio and take your electronic device back in hand. On this page are published all the documents necessary for the use of your device. Lo-Fi by Source Audio.
USER MANUAL Lo-Fi Source Audio
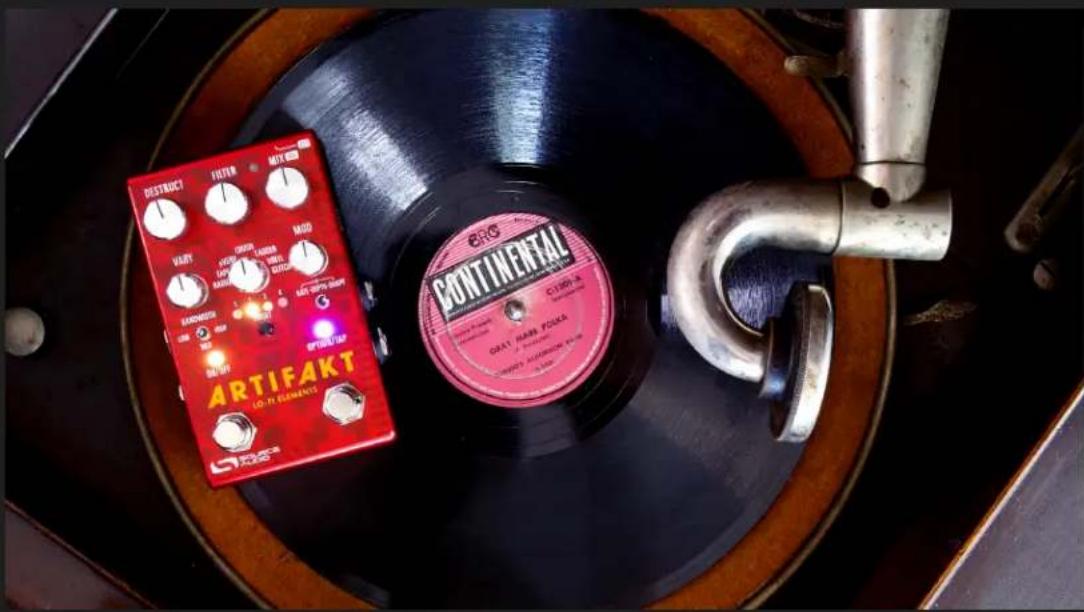
ARTIFAKT Lo-Fi Elements User Guide
Welcome
Thank you for purchasing the Artifakt Lo-Fi Elements. Artifakt was inspired by a collective experience of love, passion, and nostalgia with old machines, dated sound processing techniques, and vintage audio devices. We wanted to give you everything destructive, distorted, modulated, warped, mangled, and otherwise "imperfect" all in one place. So, welcome to Artifakt Lo-Fi Elements.
At Artifakt's core is a 7-way Effect Selector Switch that loads a unique engine at each position. Each of the seven onboard engines is a love letter to an old or bygone device or technique, and is composed of multiple low fidelity "elements" (such as noise, modulation, randomness, time-based effects) that make up what we know to be "that sound".
To make the most of your collection of tones, we've armed Artifakt with 128 user preset slots, 12 of which are pre-loaded with some of our creators' favorite sounds. Use these Factory Presets to explore both the inner workings & the outer limits of Artifakt, or as inspiration to create your own. Artifakt comes with its own Sound Editor, our all-new Neuro 3 application (iOS, Android, Windows, Mac) via a USB-C connection, so you can create, explore, and interface with other community members at ease. On the surface are five other control knobs and two 3-way toggle switches that will help you further craft your perfect "new old" sound. We hope you enjoy exploring the future of the past.
—The Source Audio Team
Contents
Welcome ....1
Contents 2
Feature Overview....3
Connections....4
Controls 8
7-Way Effect Selector Switch 10
LFOs 17
Presets....18
LED Behaviors & Hardware Shortcuts 23
Stereo Operation & Signal Routing....25
External Control 30
The Neuro 3 App....31
Neuro 3....32
Neuro 3 for Mobile 34
Specifications....37
Troubleshooting 38
Frequently Asked Questions 39
Warranty 41
Version History 43
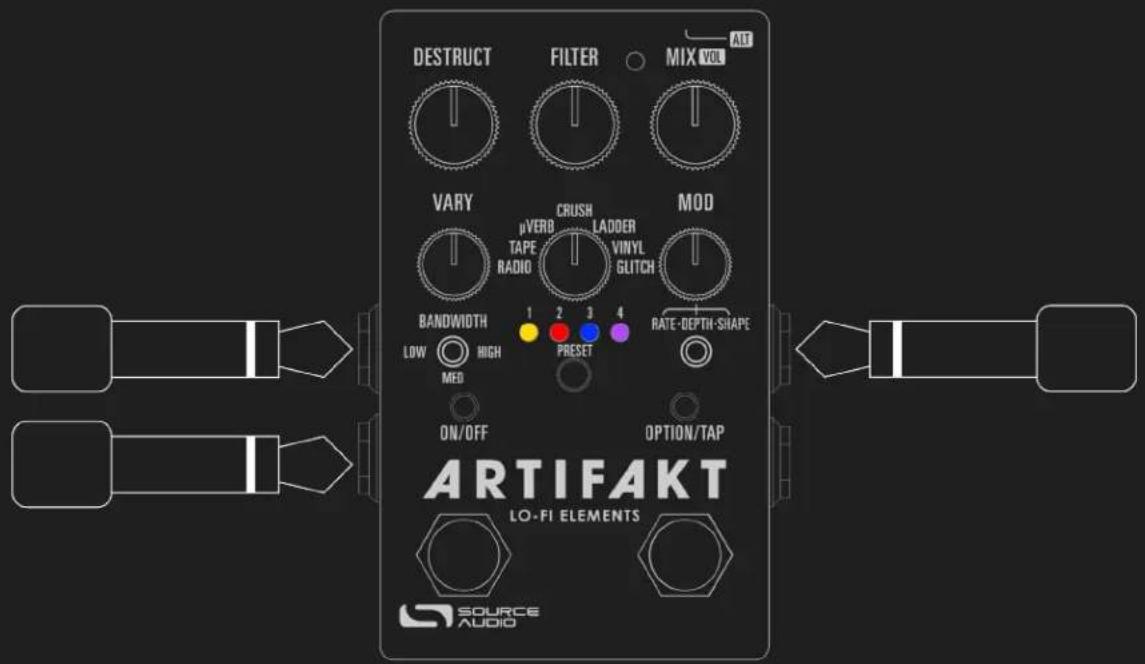
Feature Overview
Growing Library of Published Presets: For quick and easy access to a world of great tones, try sampling sounds from a vast collection of published presets created by the Source Audio team and the ever-growing Neuro Community.
Dual Footswitch Design: Utilize the OPTION/TAP footswitch to access auxiliary engine functions as well as alternate modes such as Preset Scroll Mode.
Unprecedented Sound Sculpting Options: The powerful Neuro 3 App (iOS, Android, Windows, Mac) offers maximum sound exploration possibilities. Use Neuro's DAW-inspired editor to create custom Artifakt presets that can be burned directly to the pedal, saved to a private cloud-based library, or shared publicly with other members of the Neuro Community.
128 MIDI Accessible Presets: The addition of a third-party MIDI controller provides access to any of the pedal's 128 Preset slots.
Compact Design: The extruded anodized aluminum housing, with its slim profile and small footprint, is built for the rigors of the road.
Full MIDI TRS Support: Connect the Artifakt to a MIDI Controller via its 3.5mm TRS MIDI In & Thru and access up to 128 preset slots with MIDI Program Change (PC) messages. Control many of the pedal's parameters with MIDI Continuous Controller (CC) messages.
USB-C Port: Class compliant USB-MIDI allows the Artifakt to work as a plug-and-play device with recording software running on Mac and Windows. The USB-C port offers connectivity to the Neuro Mobile and Desktop App, providing access to deep editing possibilities and pedal firmware updates.
Universal Bypass™: Select between analog buffered and relay-based True Bypass.
External Expression Pedal Control: Make simultaneous, on-the-fly changes of up to three parameters with an external expression pedal.
7-Way Effect Selector: Artifakt has been engineered with seven starting sounds, meticulously curated using a variety of lo-fi elements to create the ultimate sound discovery experience.
12 Onboard Factory Presets: In addition to the seven effect engines, our team has prepared Artifakt with 12 additional presets in slots #5-#16 to create an even more in-depth sampling of what Artifakt is capable of under-the-hood, created by a number of talented sound creators within Source Audio's inner circle.
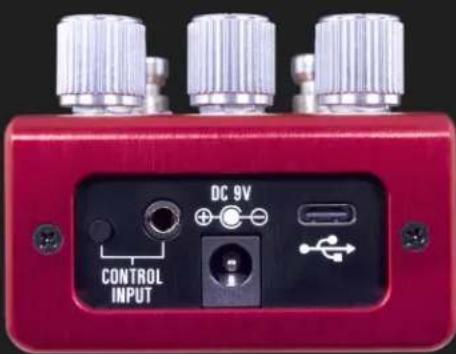
Connections

Power
To power the unit, connect a 9V DC negative-tipped power supply to the jack labeled DC 9V on the back panel. The Artifakt needs at least 200mA of current to operate as intended. Please note that your Artifakt does not include a power supply.
Warning: Using an unregulated supply could damage the unit. A power supply with insufficient current levels may also cause noise or other unpredictable behavior. Please be very cautious when using 3rd-party power supplies and refer to the power supply requirements in the Specifications section of this guide.
Guitar/Audio Connections
Using standard 14 " mono (TS) cables, connect your guitar, bass, or other instrument to the Input 1 jack and your amp (or the next audio device in the signal chain) to the Output 1 jack. If you have a second amp or stereo effects chain, connect it to Output 2.
When the power and audio connections have been made, Artifakt is ready for use.
Input Side Connections
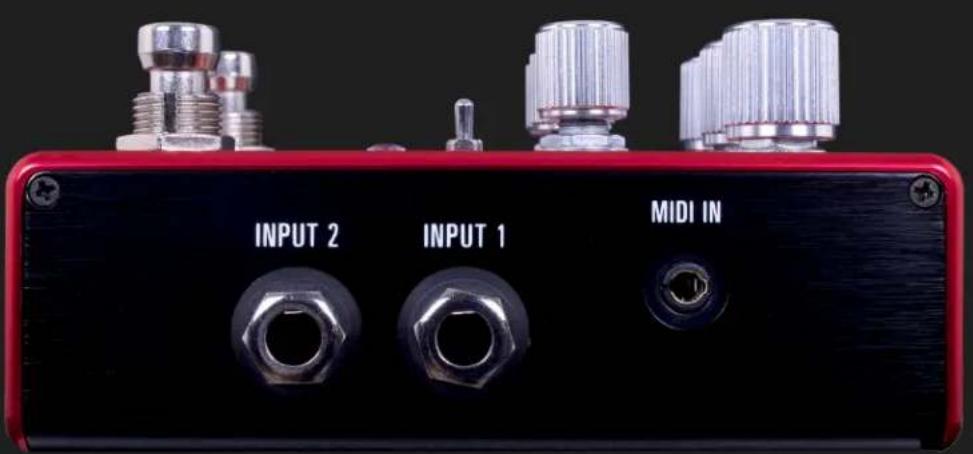
INPUT 1
INPUT 1 is the primary input for guitar, bass, or other instruments. It can also accept line-level inputs and will work in your amp's effect loop. Connect it to your instrument or other audio source using a mono (TS) 1/4" cable. Details about the appropriate signal levels are available in the Specifications section.
INPUT 2
Use the secondary audio input for stereo sources if you plan on connecting more than one instrument to your Artifakt, or if your Artifakt is not the first pedal in your stereo signal path.
INPUT 2 as an Audio Input: The tip contact on INPUT 2 acts as a secondary input for guitar, bass, or other instruments. Connect your instrument (or the previous effect in the signal chain) using a mono (TS) 1/4 cable. The Artifakt will automatically configure itself for stereo audio input. Other routing options are available using the Neuro App. For more information about stereo routing, refer to the Stereo Operation section.
MIDI INPUT (3.5mm TRS)
Here is where you'll connect your favorite MIDI controller or upstream MIDI Devices to the Artifakt. The Artifakt uses class compliant TRS "Type A" pinout for MIDI connectivity. If your previous device uses a full-sized MIDI DIN cable, you'll likely need a DIN to 3.5mm (1/8 inch) passive adaptor.
Output Side Connections
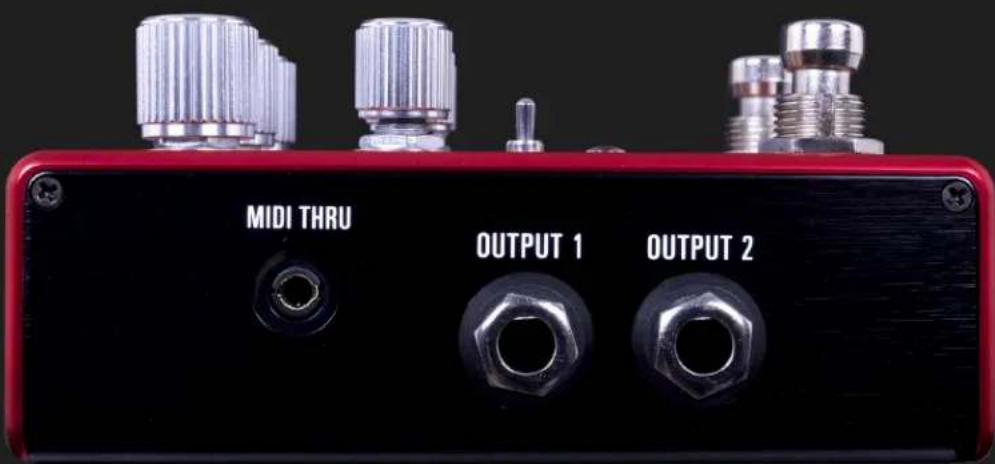
OUTPUT 1
This is the primary audio output. Connect it to your amplifier, recording interface, or the next device in your effects signal chain using a mono (TS) 1/4" cable.
OUTPUT 2
OUTPUT 2 can act as a second, stereo audio output. Be sure to continue to use TS cables. Artifakt outputs a stereo image using two unbalanced (TS) outputs, not one TRS output.
OUTPUT 2 as an Audio Output: The tip contact on OUTPUT 2 acts as the secondary audio output. It carries an audio signal when the Artifakt is configured with a signal routing that uses stereo outputs. Connect it to your amplifier, recording interface, or the next device in your effects signal chain using a mono (TS) 1/4'' cable.
MIDI THRU (3.5mm TRS)
Here is where you'll connect any downstream MIDI devices to the Artifakt. The Artifakt uses class compliant TRS "Type A" pinout for MIDI connectivity. If your next device uses a full-sized MIDI DIN cable, you'll likely need a 3.5mm (1/8 inch) to DIN passive adaptor.
Power and Control Connections
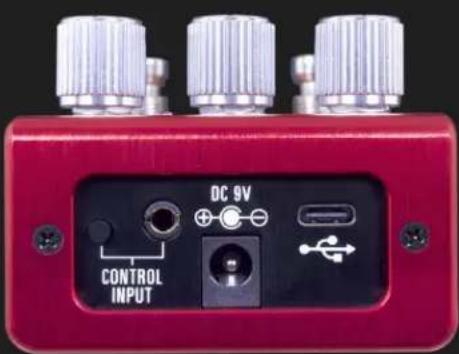
DC 9V (Power)
Connect to a 9 Volt DC power supply. The power supply must be regulated at 9 Volts DC (direct current), able to source at least 200 mA (milliamps) of current, and the plug should have a tip-negative, barrel-positive polarity. Please note, Artifakt does not come stock with a PSU, you will have to source your own power.
Note: Please use 9 Volts only. Artifakt is not meant to run on higher (e.g., 12V or 18V) voltages.
USB-C
Connect to your computer (Windows or Mac) or mobile device (Android or iOS) to the Artifakt's USB-C port (denoted by the icon) using a standard USB-C cable. Artifakt is a class compliant USB device, meaning that it does not require any custom drivers.
CONTROL INPUT
The 3.5 mm CONTROL INPUT port connects to external control devices such as the Source Audio Tap Tempo Switch and Source Audio Dual Expression Pedal. For more information, refer to the Expression Pedal Input section of the User's Guide.
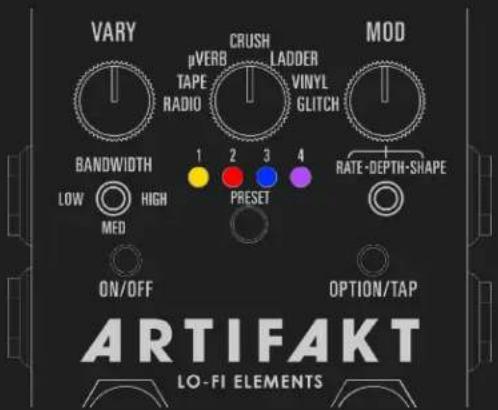
Controls

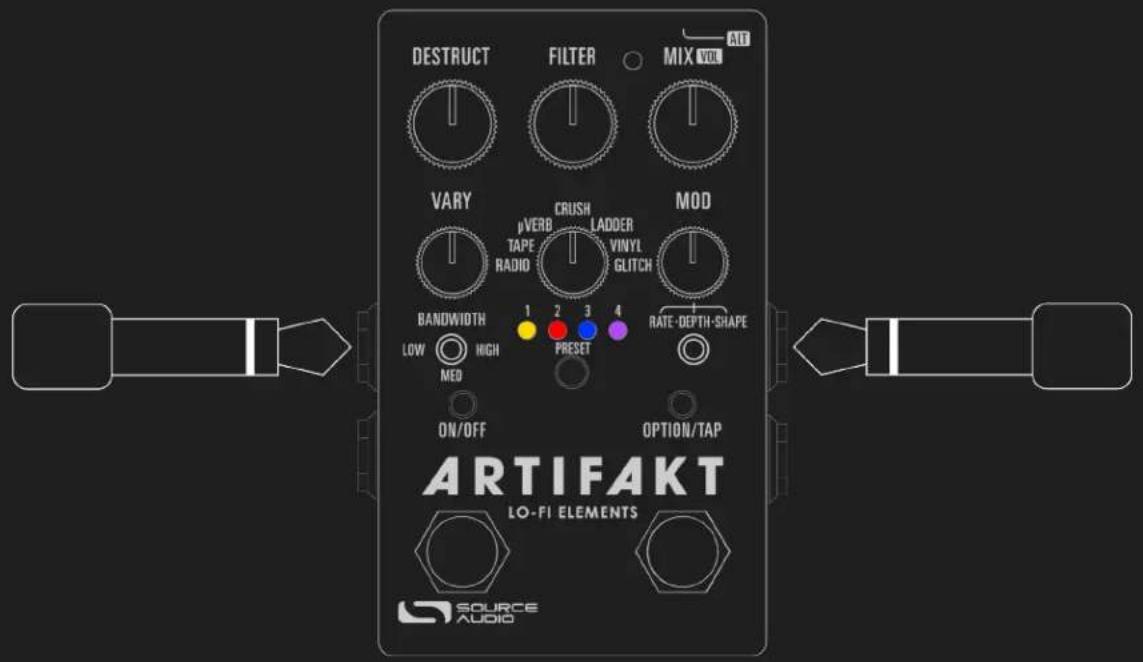
ON/OFF Footswitch
Click the footswitch to engage or bypass the pedal. Press + hold the footswitch down while the pedal is bypassed to bank to Red LED (ALT) Mode for more presets.
OPTION Footswitch
Function varies per engine and can be changed using the Neuro desktop and mobile App.
Control Input / ALT Button
This small button located at the top of the pedal is used to enable or disable external control. It also is used to control the ALT parameters/functions on the surface of the pedal. Press + hold the ALT knob while turning a knob or hitting a switch to access that knob or switch's ALT function (if applicable - not every bit and bob has an ALT function!)
ON/OFF LED
The Engage/Bypass LED indicates whether the effect is bypassed or engaged.
OPTION LED
This LED indicates whether the Artifakt's OPTION mode is in use. Please note, while all 7 factory engines on the Effect Selector Switch utilize a Tap OPTION function, not every engine uses a Hold OPTION function, and not every Factory or Community Preset will have an OPTION function.
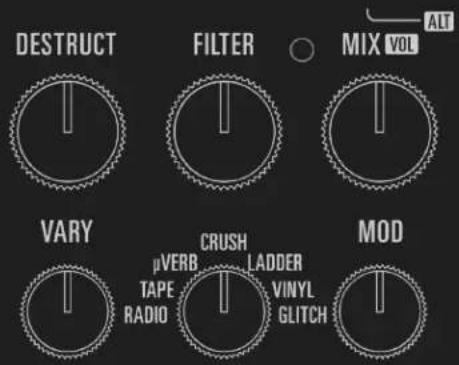
DESTRUCT Knob
Destroys, mangles, or distorts your signal in some way. Actual function varies by effect engine and by user preset. Please see 7-Way Effect Selector Switch section for further details about how the DESTRUCT control interacts with each factory sound.
FILTER Knob
Acts as a Tone control or Ladder Filter Center-point control, depending on whether the engine/preset utilizes the Ladder Filter or a passive high-cut Treble control.
MIX Knob
Adjusts the wet/dry mix of the effect. Occasionally, a preset will comprise both "dry" elements with time-based (reverb, delay, modulation, glitch) effects. In those cases, the MIX knob may affect only the time-based signal, OR it will affect the overall combined level of the entire engine
VARY Knob
Explore the inner workings and outer bounds of each engine or preset. True to its name, the VARY knob varies by nature and has a different function depending on the base sound. See 7-Way Effect Selector Switch section for further details about how the VARY control interacts with each factory sound.
Effect Selector Knob
This is a 7-way rotary switch that allows you to select one of our 7 base sounds to work from.
MOD Knob
Adjusts the rate, depth, and shape of one of the two onboard LFOs used per engine/preset. The function of the MOD Knob is determined by the Rate/Depth/Shape 3-way toggle switch.
MOD Rate/Depth/Shape Toggle Switch
Use this 3-way toggle in conjunction with the MOD knob to change the function of that knob, turning it into 3 knobs in one!
BANDWIDTH Toggle Switch
Adjusts the voicing or auxiliary components of each effect. Precise function slightly differs per engine.
ALT VOLUME Control
Adjusts the overall output level (wet/dry mix) of the Artifakt. Accessible by pressing the ALT button while rotating the MIX knob.
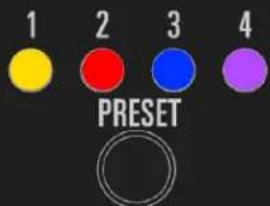
PRESET Button
Push to cycle forward through preset slots. Push + Hold to Save a preset in its current configuration. You will see the Preset LED flash twice to indicate the preset has been saved. The Preset LED will flash once every 2-3 seconds to indicate a preset has been edited and has unsaved changes. See Presets for more details on selecting, saving, and recalling presets as well as details about the 16 onboard Factory Presets.
7-Way Effect Selector Switch
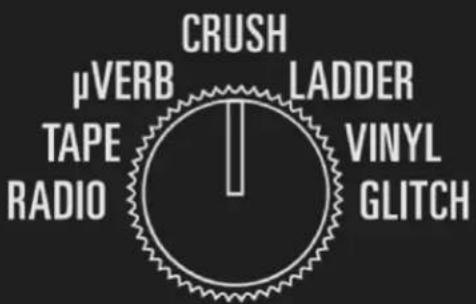
Even machines have brains. We've armed the Artifakt with a 7-Way Effect Selector Switch as an efficient and easy way to explore multiple lo-fi elements, the controller of the out-of-box experience and the key to exploring the depths of Artifakt's collection of lo-fi elements.
The seven engines on the Effect Selector Switch are not presets and are independent from the Artifakt's presets. Turning the Effect Selector Switch after selecting a preset will override those preset settings and load the engine on the dial instead. Additionally, the RADIO, TAPE, μVERB, CRUSH, LADDER, VINYL, and GLITCH positions can be overwritten with new settings, but only by using the Neuro 3 App.
On the next page is a description of each of the seven engines and a comprehensive breakdown of their engine-specific controls.
RADIO

Tune from failing, signal dropping, AM static to FM fidelity and everything in between. Think "Wish You Were Here" as a starting point with enough range in the controls to go from AM to FM. Features the effect blocks: Signal Failure, Compression, Equalization and Voicing. RADIO combines these elements with added effects for crackle noise and a simple pitch vibrato available in the MOD controls.
DESTRUCT: Controls the frequency of the signal dropouts. Left = a clearer signal, Right = a poor signal that frequently drops in & out.
VARY: Controls the level of compression applied to the signal. Left = no compression, Right = full compression.
FILTER: Adjusts the level of Treble in the signal. Noon on the dial is a flat treble response.
Bandwidth Switch: Limits the frequency response, altering the overall voicing of the effect. Right = full bandwidth (no limiting), Center = some high-cut & low-cut, Left = extreme high-cut & low-cut.
OPTION Footswitch: Tap to switch the Noise ON/OFF.
TAPE

A "two-deck" Tape emulation including Saturation, Compression, and Wow & Flutter Modulation. Adjust the delay time between the fixed and variable tape heads (VARY knob) to get from tape flange and chorus sounds all the way to a slap-back effect. The BANDWIDTH toggle switch sets the mode: Thru-Zero, Ping-Pong, Dual Delay. OPTION footswitch can be used for Tap Tempo or press and hold for feedback oscillation. Mod Depth controls the age of the tape and is quite sensitive. Turn up for mangled, garbled tape noise as crinkle and imperfections start to develop.
DESTRUCT: Sets the amount of tape saturation, which is a combination of compression and light overdrive. Turning DESTRUCT left to right will simultaneously increase the compression and overdrive gain.
VARY: Controls the delay time; the amount of time in milliseconds of which the tape-modulated signal is delayed after the initial (dry) signal. Also known as "lag time". Adjusting the delay time control in a delay line sweeps through a variety of possible effects. From shortest delay time to longest delay time:
Thru-Zero Flange > Flanger > Chorus > Doubler > Slapback > Delay
FILTER: Adjusts the level of Treble in the signal. Noon on the dial is a flat treble response. Dial back the FILTER knob for true Tape warmth. Use in conjunction with the DESTRUCT (Saturation) control. You may want to turn FILTER further to the left as you increase Saturation to maintain Tape warmth.
Bandwidth Switch: Changes the delay line configuration. Left = through-zero tape flange, Center = tape chorus-doubler, Right = a short tape delay.
OPTION Footswitch: Tap to switch in rhythm for tap tempo. Hold to oscillate the tape deck.
Tape Tricks
You may want to know quickly how to set up a conventional tape flange or through-zero flange tone. Consider these "suggested settings".
For a flange sound on the TAPE setting:
• BANDWIDTH toggle in the HIGH position.
• VARY knob (Delay Time) to minimum. You need a short delay time for flanging.
- MIX – set to 50/50 (12 o'clock) as a starting point.
- Note: TAPE engine does not include any feedback in the delay and that will make flangers sound more resonant. That parameter is available in the Neuro app and can be assigned to a knob if you'd like.
For thru-zero flanging:
- BANDWIDTH to LOW, this is subtractive mixing and will allow for full cancellation between the "dry" and modulated taps.
• VARY knob very low to start for a short delay.
• MIX - set to 50/50 (12 o'clock) - Set MOD DEPTH to 12 o'clock or lower
- Note: There is some interplay between the delay time (VARY) and the MOD DEPTH control that will set how often the modulation crosses the "zero"
μVERB

Pronounce it "me-YOU-verb". While the Artifakt is capable of more traditional reverb sounds, this is a more primitive reverb effect using delays plus diffusion. The internal construction of μVerb is similar to how reverb effects were simulated on 8-bit and 16-bit gaming systems. It is also very similar in concept to pedals that use "Belton Brick" chipset for a reverb-like effect. VARY will adjust the reverb decay time (Feedback). Use the DESTRUCT knob to add overdrive distortion or the Bandwidth toggle to lower the sample rate. Some delay modulation is included by default, adjust the amount with the MOD controls. Hold the OPTION footswitch for oscillation.
DESTRUCT: Adds distortion to the reverb engine. Left = no distortion, Right = maximum distortion.
VARY: Controls the Decay time of the reverb tail. Left = short reverb, Right = long reverb tail with massive feedback!
FILTER: Adjusts the level of Treble in the signal. Noon on the dial is a flat treble response.
Bandwidth Switch: Reduces the sample rate from High to Low of the effected signal for a truly low fidelity 1980s console effect.
OPTION Footswitch: Press+hold the OPTION Footswitch to maintain & oscillate the reverb tail for the duration of your tap.
CRUSH

This engine features the core bit-crushing effects: Bit-depth Quantizing and Sample Rate Reduction, all voiced with our Moog-style Ladder lowpass on the FILTER knob. Use the BANDWIDTH toggle for further voicing options. The Option footswitch enables/disables a chorusing effect for some added animation.
DESTRUCT: Adjusts the bit quantization, which increases in severity when the DESTRUCT knob is turned from left to right.
VARY: Adjusts the sample rate reduction, from left (maximum SRR) to right (maximum sampling rate).
FILTER: Adjusts the center-point frequency of the ladder LPF, which is fully closed when FILTER is turned all the way to the right, and fully open (no audible filtering) when Filter is turned to the left.
Bandwidth Switch: Limits the frequency response, altering the overall voicing of the effect. Right = full bandwidth (no limiting), Center = some high-cut & low-cut, Left = extreme high-cut & low-cut.
OPTION Footswitch: Tap to switch the Chorus effect ON/OFF.
LADDER
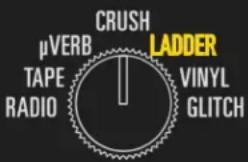
Our R-2R Ladder filter in full regalia. Adjust the frequency with the FILTER knob and resonance (Q) with the BANDWIDTH toggle. The Ladder filter can be modulated in two different ways:
- Use the VARY knob for envelope effects. Turn the VARY knob clockwise for positive motion on the filter (low to high), and counterclockwise to reverse the direction from high to low. Center the knob for no envelope control.
- Use the MOD controls for low frequency oscillator (LFO) control of the filter. Adjust the waveform with the SHAPE control.
DESTRUCT: Adds an asymmetric distortion to the dry signal.
VARY: Adjusts the envelope control of the ladder filter. Beyond noon on the VARY knob, the input signal opens the filter in direct response to the strength of your playing dynamics. From noon to fully left on the VARY knob, the filter reacts in the opposite way - it closes in response to your playing dynamics. Set VARY to 12 o'clock exactly for zero envelope involvement - a static or LFO-controlled filter.
FILTER: Adjusts the center-point frequency of the ladder LPF, which is fully closed when FILTER is turned all the way to the right, and fully open (no audible filtering) when Filter is turned to the left.
Bandwidth Switch: Switches between 3 pre-set Q (narrowness) options for the ladder filter. The narrower the Q, the more dramatic, resonant and "peaky" the filter will sound.
OPTION Footswitch: Tap to switch the Delay effect ON/OFF.
VINYL

Drop the needle on yesteryear. This classic vinyl emulation wouldn't be complete with scratches, surface noise, and an RPM selector (33RPM by default). Use the BANDWIDTH toggle to go from "180-gram vinyl through a hi-fi receiver" to "old school Gramophone from your parents' attic". Add some distortion and randomness with the VARY knob to get a more damaged sound. MOD controls adjust the amount of warping and the RPMs. Tap the OPTION footswitch to be reminded of what it sounds like to walk too close to your turntable.
The Vinyl engine is set to 100% wet MIX (for an effect similar to pitch vibrato) by default. However, a very unique sounding modulation tone can be discovered by turning the MIX control to somewhere near 50% (12 o'clock on the dial).
DESTRUCT: Adjusts the noise level of the scratch & surface noise. Turn right for deeper scratches and a dustier stylus.
VARY: Adjusts the amount of distortion and random quality of the modulated noise. Maybe your record is warped in a few different places and sat out in the sun too long, but you just can't stop playing it.
FILTER: Adjusts the level of Treble in the signal. Noon on the dial is a flat treble response.
Bandwidth Switch: Limits the frequency response, altering the overall voicing of the effect. Right = full bandwidth (no limiting), Center = some high-cut & low-cut, Left = extreme high-cut & low-cut.
OPTION Footswitch: Tap to cause a skip in the vinyl player. Maybe you walked too close to your turntable, or maybe your clumsy guest bumped into the tonearm.
GLITCH
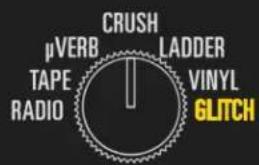
An envelope-controlled sample-repeat glitch and pitch-shifting effect. Start in "armed to record" mode. Playing your guitar will trigger the engine to start recording (red on the Option LED). Stop playing to hear your mangled playing spat back at you at a random
pitch-shifted rate, with the Option LED turning green. Adjust the on/off trigger threshold with the VARY knob. Add distortion and filtering with the DESTRUCT and FILTER knobs. The playback random rate, min and max pitch-shift, and pitch-shift pattern are set with the MOD Controls. Tap the option to end playback and re-arm. Hold the OPTION switch to wind the playback rate to zero.
An Ode to a Legend
The base architecture of the Glitch machine was modeled after an old piece of delay rack gear, which also featured an option to repeat the sampled input. When the delay time control was turned on the unit while sampling a note or chord, the "random" pitch jumping/playback speed effect can be heard.
DESTRUCT: Adds a "smooth diode" type distortion if the glitched signal isn't mangled enough for your taste.
VARY: Adjusts the input gain/sensitivity of the envelope used to record your playing. You will want to see the OPTION LED turn RED when you're playing and GREEN when you stop. If the LED is green the whole time, turn VARY down - it's not sensitive enough. If the LED is always red, turn VARY up - there is too much input gain!
FILTER: Adjusts the center-point frequency of the ladder LPF, which is fully closed when FILTER is turned all the way to the right, and fully open (no audible filtering) when Filter is turned to the left.
Bandwidth Switch: Reduces the sample rate from High to Low of the effected signal.
OPTION Footswitch: Tap to switch to clear the glitch engine playback & arm it to record a new sample. Hold the switch to wind the playback to zero.
The Glitch engine can also be configured to start playback manually with the trigger of the OPTION footswitch using the Neuro App.
LFOs
An LFO (low frequency oscillator) is a clock-driven waveform used to create all sorts of movement-based effects such as tremolo, phaser, flanger, vibrato, and chorus. Most of Artifakt's elements can be modulated by LFO.
There are two main LFOs in Artifakt, the Main LFO and the Time-Based LFO. Both LFOs can be run at once, and both LFOs have the option to be synced to a MIDI Clock.
Main LFO
The Main LFO is used to control "real time" effects that are processed in the "dry" domain. These elements can be modulated by the Main LFO: Signal Failure, Distortion Drive, Sample Rate, Tremolo, and Ladder Filter.
The Main LFO can be configured in many different shapes for interesting, unusual, and/or random sound design. Below is a list of the Main LFO shapes.
• Sine
• Pluck (Main LFO only)
- Triangle
• Square (Main LFO only)
• Opto (Main LFO only)
• Saw Up (Main LFO only)
• Saw Down (Main LFO only)
• Four Step (Main LFO only)
• Sample & Hold
- Random
• Random Clipped (Main LFO only)
Time-Based LFO
The Time-Based LFO controls all the "wet" time-based effects that use a delay line. This includes the Time-Based Block (Thru-Zero, Flange, Chorus, Delay, Reverb) and the Glitch Block. Please note, there is only one delay line available, so only one effect can be used at a time. Below is a list of time-based LFO shapes.
• Sine
- Triangle
• Vinyl Warping (Time-Based LFO only)
• Wow & Flutter (Time-Based LFO only)
- Random
• Sample & Hold
Presets
User Presets store all editable parameters. This includes the knob positions, parameter settings, routing options, external control, and the full list of Neuro/MIDI accessible parameters. After a preset is recalled, you can always tweak the top-level controls in a performance situation by turning the knob. The knob parameter will then "jump" to the current knob position as it is rotated.
Artifakt will "remember" your last recalled preset slot, even when power cycled. For example, if you are on preset #3 then need to unplug your pedal, the next time Artifakt is powered, it will boot on preset #3.
Artifakt comes stock with 128 preset slots. There are five different types of preset banks, which are color coordinated.
Bank #1 is Amber and contains preset slots #1-4, which are blank ("user defined") in the stock configuration.
Bank #2 is Red and contains preset slots #5-8, which are Factory presets in the Old Machines group, with a special focus on recreating vintage machinery and production techniques like tape flange and VHS players.
Bank #3 is Blue and contains preset slots #9-12, which are Factory presets in the "Modulation" group, which focuses on classic modulation tones that the Artifakt is capable of.
Bank #4 is Purple and contains preset slots #13-16, which are Factory presets in the "Animation" group, containing elements of glitch, sample rate reduction, filtering, and more destruction.
Presets #17-128 are also blank (user defined) in the stock configuration and are indicated by the Preset LEDs illuminated in white. Preset Extension Mode does not extend as far as these presets; you will need a MIDI Controller or to connect to Neuro 3 to recall these presets.
Preset Recall
Presets can be recalled in many ways, ranging from very simple to complicated (like a full MIDI setup). Below are descriptions of the ways Presets can be recalled.
Hardware (PRESET Select Button)
Push the PRESET Select Button to advance forward through preset slots. In Preset Extension Mode, pushing the PRESET Select Button will automatically advance forward to the next bank of presets. To enter Preset Extension Mode, press the ALT button + PRESET button. You will notice the Preset LEDs illuminating to display which banks can currently be selected. Continue pressing until only the Amber LED is lit to exit Preset Extension Mode.
Hardware (Scroll Mode w/ Footswitches)
Press both the ON/OFF and OPTION/TAP Footswitches together for about 500 milliseconds to enter Scroll Mode. There is a 500ms hold time so that Scroll Mode is not always activated each and every time both switches are (accidentally or otherwise) pressed.
In Scroll Mode, use the OPTION/TAP and ON/OFF Switches respectively to advance forward or backward through preset slots. When you've arrived at your desired preset slot, exit Scroll Mode by tapping both footswitches simultaneously.
Neuro 3
Connect your Artifakt to your phone or desktop using the supplied USB-C cable (passive adaptors may be needed if your device does not have a USB port). Then, load the Neuro 3 Application. If this is your first time using Neuro 3, you will be prompted to add the Artifakt to your Pedals collection. Click on the Artifakt in the left margin. Your preset slots will be displayed on the left side of the screen next to your Pedals collection, to the left of the Preset Editor.
MIDI
Each preset slot's MIDI PC (Program Change) number corresponds to its slot number. Please be aware that some MIDI controllers use a 0-127 numbering system while others use 1-128, so you may have to offset your MIDI PC message by 1 digit, accordingly.
The Artifakt's presets can also be recalled via MIDI CC (Continuous Control).
Sending CC#083 with a CC value (or On Data 1 value) of the preset slot will recall that preset in its bypassed state.
Sending CC#084 with a CC value (or On Data 1 value) of the preset slot will recall that preset in its engaged state.
Saving a Preset
Using the Hardware
Press & hold the PRESET button to enter Copy Mode. You will see the Preset LED flash rapidly. Continue holding the PRESET button to save your preset to the same location.
You can also save your preset to a different location by letting go of the PRESET button once the Artifakt is in Copy mode (indicated by the rapidly flashing LED). Press the PRESET button to select a different preset slot for your preset waiting in the wings. Then, hold down the PRESET button to save it in place. You will notice the Preset LED flash twice slowly to indicate a save.
Scroll Mode
It is possible to use Preset Scroll Mode (identified on p. 17) while copying a preset. Simply release the PRESET button once in Copy mode (rapid LED flashing) and use the left and right footswitches to advance backward or forward respectively through the preset slots.
MIDI
It is possible to save a preset using PC commands. First, you'll need to have made the changes you'd like, then enter Copy Mode on your device. Then, send a MIDI PC message to your desired preset slot destination. Then, press and hold the PRESET button to save that preset to the new PC.
Using Neuro
To access and Save a particular preset in Neuro, click on the Artifakt in the in the Pedals collection when the Artifakt is connected to your device via USB. Your pedal's presets will be on the left-hand side of the screen. Hit "Save" in the upper right corner of the Preset Editor window to save your preset. Hit "Save As" to rename before saving.
Artifakt Factory Presets
Artifakt has been loaded with 12 Factory Presets, organized in 3 banks: Old Machines, Modulation, and Animation. As a reminder, preset slots #1-4 are empty for user-defined sounds. These Factory Presets start at preset slot #5. Below is a list of each Factory Preset and a basic description.
- "VHS" - Many VHS tapes & VHS players have perfectly normal sounding audio, but not this one. This is a mangled VHS cassette being played through a player that only turns on half the time.
- "Analog Echo" – Chances are, you've heard something like this before. Prior to pristine digital delays were gritty, quirky echoes made using Bucket Brigade circuitry and have very limited delay time. Early BBD delays have extensive filtering prior to the feedback line due to the circuit causing unwanted clock and aliasing noise. We no longer need that filtering, but we've added it anyway.
- "Flange Deck" - This is an alternate take on the Tape setting. "Flange Deck" uses a Thru-Zero flange as its default modulation. Turn up the DESTRUCT control for warm saturation and low-gain overdrive.
- "Melted Wax" – a.k.a. "Bent Laser Disk" or "Mutilated Record", this preset captures the essence of a heavily warped LP that you just cannot let go of.
- "Fast Pitch Vibrato" - Indie Rock and hip-hop tunes love to use a pitch vibrato sound whenever the song is described as "lo-fi". So we're using it, too.
- "Doubler" - A pitch detune-like doubling effect, devoid of tape-related artifacts. This one sounds WIDE after some distortion!
- "Falling" - This is a haunting reverb coupled with a tremolo effect. It was created with the Twin Peaks Theme in mind. Thank you, David Lynch!
- "Viscosity" - Did we use old-sounding gear to invent a brand new modulation? Probably not, but we can't quite put our finger on whether this is a flange, a phase, or something else entirely. One thing we know for sure, it's viscous!
- "BOSSFIGHT" – Imagine the sounds blaring through the CRT TV built-in speakers as you're about to fight the final boss.
- "My Cousin Glitchy" – Imagine playing notes, and as you are playing, your notes are being spat back to you in a chromatic cycle. Then, you stop playing, and eventually it goes away. That is what the LFO is doing to the Glitch engine in "My Cousin Glitchy".
- "Bleep Bloop Supreme" - Perhaps "bleep bloop" is a divisive topic in effects pedals; we think you'll enjoy it with "Bleep Bloop Supreme".
- "Microtron" – Perhaps the closest Source Audio has come to a true "Tron" sound? It's yours to decide.
Factory Preset Controls
As with the engines on the Effect Selector Dial, Artifakt's Factory Presets are composed of different control mappings for many of the knobs.
Below is a chart outlining what each variable control knob does for each Factory Preset.
| Preset Name | DESTRUCT | FILTER | MIX | VARY | MOD SHAPE | MOD RATE | MOD DEPTH | BANDWIDTH | OPTION |
| VHS | Saturation | Treble | Mix | Feedback | Mod Noise | Mod Rate | Mod Depth | Voicing | Tap Tempo |
| Analog Echo | Feedback | Feedback Hi-Cut | Mix | Delay Time | Mod Shape | Mod Rate | Mod Depth | Saturation | Momentary Oscillation |
| Flange Deck | Drive + Compression | Treble | Mod Mix | Delay Time | Mod Noise | Mod Rate | Mod Depth | Delay Type | Delay LFO Tap Tempo |
| Melted Wax | Saturation | Old Gear Low Pass | Mix | Vinyl Noise | Mod Shape | Mod Rate | Mod Depth | Voicing | Vinyl Skip |
| Fast Pitch Vibrato | Saturation | Ladder Freq | Mix | Mod Noise | LFO Shape | LFO Rate | Mod Depth | Voicing | Tap Tempo |
| Doubler | Mod Noise | Treble | Mix | Delay Time | LFO Shape | Crinkle Rate | Crinkle Depth | Voicing | Momentary Oscillation |
| Falling | Saturation | Reverb Hi-Cut | Reverb Mix | Feedback | Tremolo Shape | Tremolo Rate | Tremolo Depth | Voicing | Tap Tempo |
| Viscosity | Saturation | Feedback Hi-Cut | Mix | Feedback | Diffusion | Mod Rate | Mod Depth | Mod Shape | Tap Tempo |
| BOSSFIGHT | Bit Error | Ladder Freq | Mix | Sample Rate | LFO Shape | LFO Rate | SRR Mod Depth | Voicing | Momentary Glitch |
| My Cousin Glitchy | Sample Rate | Ladder Freq | Glitch Mix | Glitch Duty Cycle | Glitch Shift Min | Glitch LFO Rate | SRR Mod Depth | Glitch Pattern | Tape Stop |
| Bleep Bloop Supreme | Trem Depth | Ladder Freq | Glitch Mix | LFO Rate | Glitch Pattern | Glitch LFO Rate | Envelope Sensitivity | Envelope Intensity | Glitch Clear |
| Microtron | Ladder Self-Mod | Ladder Freq | Mix | Ladder Q | Envelope Gain | Envelope Speed | Envelope Intensity | Envelope Type | Engage Delay |
LED Behaviors & Hardware Shortcuts
Artifakt is the first Source Audio pedal to utilize a new hardware platform, the SA28X platform, which features full RGB multicolor LEDs which are very useful for displaying different modes and behaviors. Artifakt utilizes a handful of different colors on its LEDs. Here is a guide to tell you all the relevant LED behaviors, as well as a few "shortcuts"; essentially hidden hardware options using a combination of knobs/switches.
LED Color Guide
White
Control LED: A white Control LED indicates a factory reset is taking place. Once the reset is successful, the Control LED will no longer be lit.
Preset LEDs: Presets #17-128 are indicated by the preset LEDS turning white.
ON/OFF & OPTION LEDs: When both these LEDs are illuminated, Artifakt is in Preset Scroll mode. Use the ON/OFF footswitch to scroll backward through presets, and the OPTION footswitch to scroll forward through presets. Press both switches to exit Scroll mode.
Amber
Control LED: An amber Control LED indicates ALT mode is in use. Tap the ALT button to enter ALT mode. The Control LED will flash amber while in ALT mode. If no controls are touched, Artifakt will automatically exit ALT mode within a second or two.
Preset LEDs: Preset slots #1-4 are indicated by the preset LEDs in amber. By default, these four slots are blank, but can be overwritten with any preset you'd like.
ON/OFF LED: When the ON/OFF LED is illuminated with amber, the Artifakt is engaged. Tap the ON/OFF footswitch to bypass the Artifakt.
OPTION LED: An amber OPTION LED indicates that the OPTION/TAP footswitch is being used for Tap Tempo.
Red
Preset LEDs: Preset slots #5-8 are indicated by the preset LEDs in red. By default, these four slots are loaded with four Factory Presets in the Old Machines group, but can be overwritten with any preset you'd like.
OPTION LED: The Option LED will turn red when the Glitch machine is being used. A red LED while Glitch is enabled means that the pedal is currently "recording" / capturing sound. By playing your instrument, you will be opening the envelope which triggers the Glitch machine to begin capturing playback.
CONTROL LED: When turning control knobs on a Factory engine or preset, the Control LED will flash red when you reach the knob position that is saved in that preset. This can be helpful for remembering / learning the knob positions when making on-the-fly edits to presets.
Blue
Preset LEDs: Preset slots #9-12 are indicated by the preset LEDs in blue. By default, these four slots are loaded with four Factory Presets in the Modulation group, but can be overwritten with any preset you'd like.
Purple
Preset LEDs: Preset slots #13-16 are indicated by the preset LEDs in red. By default, these four slots are loaded with four Factory Presets in the Animation group, but can be overwritten with any preset you'd like.
OPTION LED: The Option LED will turn purple when the OPTION/TAP switch is being used to access an auxiliary function. For example, the CRUSH engine utilizes a purple LED to indicate that the optional Chorus effect is enabled.
Hardware Shortcuts
Below are hardware processes that can be done using a combination of two buttons or a button & switch.
Preset Extension Mode - ALT button + PRESET button
This will allow selection of Preset Extension Modes. Press the ALT button once to get into ALT Mode. Once there, pressing the PRESET button will show the current extension mode by lighting the 1-4 LEDs with the respective bank color.
You can cycle through 1-4, 1-8, 1-12, 1-16 modes and select how many preset banks you want. Changing the Extension Mode won't actually change the preset and will revert back to the last presets when ALT mode turns off on its own or you press the ALT button again.
Factory Reset - OPTION/TAP Switch + Power Cycle
Need to revert back to factory settings? To perform a factory reset on your Artifakt, press & hold the OPTION/TAP footswitch while cycling power on the pedal.
OUTPUT Control - ALT button + MIX knob
As referenced in the Controls section, tapping the ALT button then turning the MIX knob will adjust the Output Volume of any preset. When sounds get unruly and too loud, you can use this alternate parameter to adjust levels quickly on-the-fly.
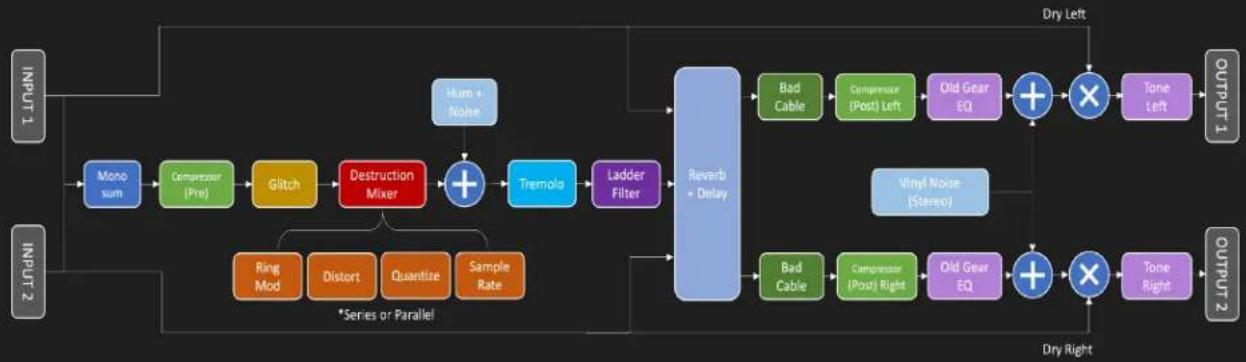
Stereo Operation & Signal Routing
flowchart
graph TD
    INPUT1["INPUT 1"] --> MONosum["Monosum"]
    MONosum --> Comparator["Comparator (Pre)"]
    Comparator --> Glitch["Glitch"]
    Glitch --> DestructionMixer["Destruction Mixer"]
    DestructionMixer --> Tremola["Tremola"]
    Tremola --> LadderFilter["Ladder Filter"]
    LadderFilter --> Reverb+Delay["Reverb + Delay"]
    Reverb+Delay --> BadCable["Bad Cable"]
    Reverb+Delay --> Compressor["Compressor (Post) Left"]
    Reverb+Delay --> OldGearEQ["Old Gear EQ"]
    Reverb+Delay --> ToneLeft["Tone Left"]
    Reverb+Delay --> DryLeft["Dry Left"]
    Reverb+Delay --> VinylNoise["Stereo"]
    VinylNoise --> Reverb+Delay
    Reverb+Delay --> ToneRight["Tone Right"]
    Reverb+Delay --> DryRight["Dry Right"]

    INPUT2["INPUT 2"] --> RingMod["Ring Mod"]
    RingMod --> DistortDistort
    DistortDistort --> QuantizeQuantize
    QuantizeQuantize --> SampleRateSampleRate
    SampleRateSampleRate --> RingMod
    RingMod --> DistortDistortDistort
    DistortDistortDistort --> QuantizeQuantize
    QuantizeQuantize --> SampleRateSampleRate

    INP1["INP 1"] --> MONosum
    INP2["INP 2"] --> RingMod
    INP1 --> Comparator
    INP2 --> Compressor
    INP1 --> Glitch
    INP2 --> Tremola
    INP1 --> LadderFilter
    INP2 --> ToneLeft
    INP1 --> ToneRight
    INP2 --> DryLeft
    INP1 --> DryRight
Each element in Artifakt has a discrete location in the signal path.
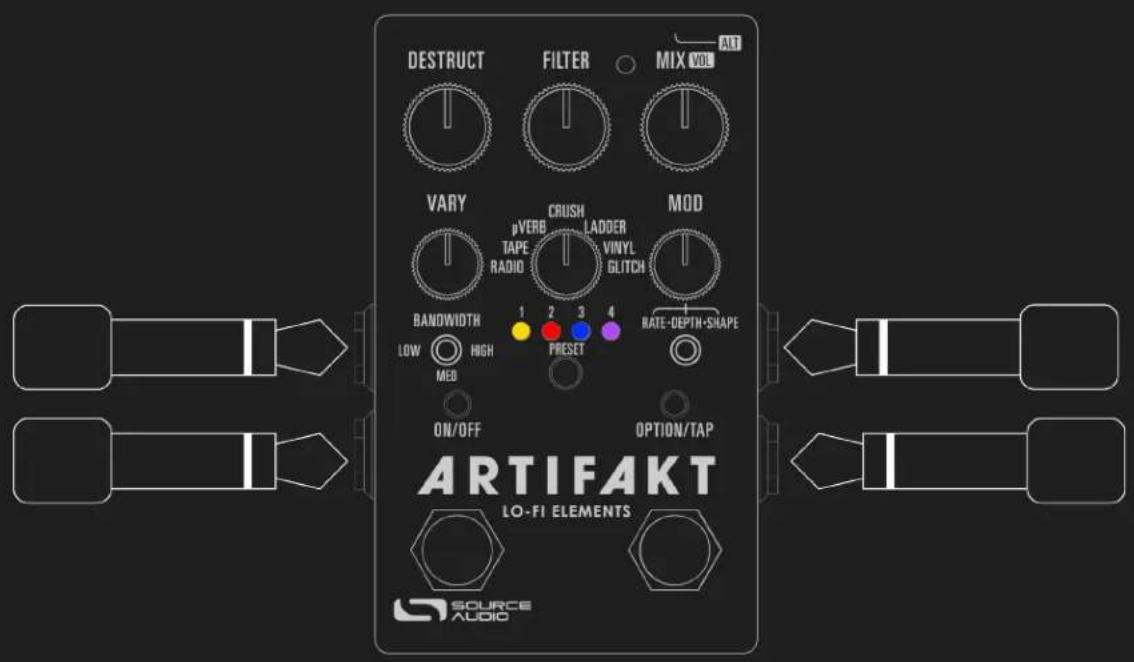
The Artifakt is flexible for several different use cases due to its stereo INPUT and OUTPUT jacks. By default, the Artifakt auto-detects the cables connected to INPUTS and OUTPUTS 1 & 2 and engages the appropriate Routing Mode. Stereo Routing can also be performed manually with the Neuro Editors, select between "Mono In, Stereo Out" or "Stereo In, Stereo Out."
There are four routing modes available when the Artifakt is in its default Auto Detect mode. See detailed descriptions of each Auto Detect mode in the sections below.
■ Mono In, Mono Out
■ Mono In, Stereo Out
■ Stereo In, Stereo Out
■ Stereo In, Mono Out
Mono In, Mono Out
This is the most common use case. Plugging the incoming signal into INPUT 1 with OUTPUT 1 connected to an amp (or the next device in the signal chain) produces a standard mono signal. Dual processing effects are also mixed down a single output.
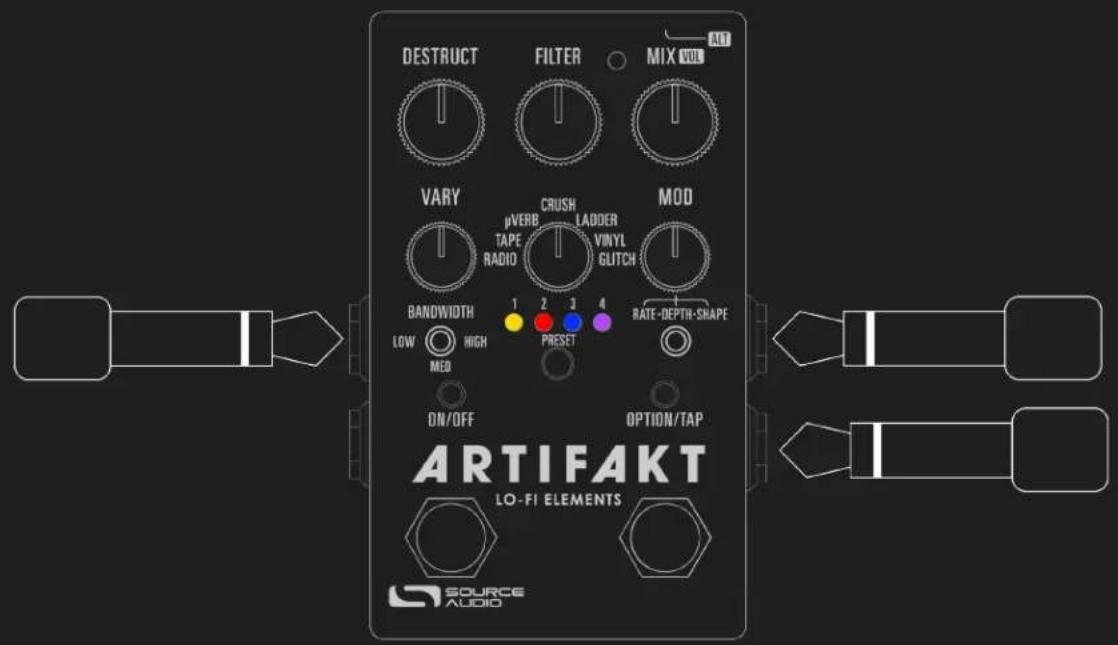
Mono In, Stereo Out
This is a very common use case that allows you to create some nice stereo imaging from a single mono instrument input or use your Artifakt as a splitter to send your signal to two separate outputs. When the unit is bypassed in this mode, it will automatically switch to Soft Bypass mode to maintain the bypass signal on the Channel 2 output. When Ch. 1 and Ch. 2 are linked, the output will be the same for both channels. When they are unlinked, you can configure separate settings for Channel 2.
Stereo In, Stereo Out
This mode should be your default selection for Stereo In, Stereo Out applications. Stereo In, Stereo Out allows you to continue your stereo chain of effects. When Ch. 1 and Ch. 2 are linked, the output will be the same for both channels. When they are unlinked, you can configure separate settings for Channel 2.
Stereo In, Mono Out
This mode will accept stereo input on jacks INPUT 1 and 2. Inputs 1 and 2 are sent to Channel 1 and 2 respectively. When Ch. 1 and Ch. 2 are linked, the output will be the same for both channels. When they are unlinked, you can configure separate settings for Channel 2. The outputs of the Channel 1 and Channel 2 equalizers are mixed and sent to OUTPUT 1.
External Control
There are two main ways the Artifakt's Control Input port is utilized. Below are the possible used for the Control Input port. Please note that External Switch Options is a global hardware setting.
Expression: Using the Source Audio Dual Expression pedal, or an expression pedal connected to the Neuro Hub, it is possible to map up to three parameters to be controlled via expression.
Expression Control
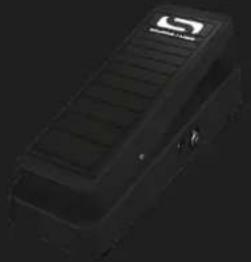
natural_image
Black foam roller with white logo (no visible text or symbols)Use a Source Audio Dual Expression pedal to control up to three different parameters on the Artifakt per preset.
Connecting the Expression Pedal
Connect a Source Audio Dual Expression pedal using a 3.5mm TRRS cable from the EXP pedal's Sensor Output to the Artifakt's CONTROL INPUT port on the pedal's top panel. Press the CONTROL INPUT button to enable External Control.
If you are not getting the desired results from your Expression pedal setup, go to the Hardware Options section of the Neuro software. You'll need to select "Neuro
Hub/Expression" under "Control Input Option", and you may also need to calibrate your Artifakt to your expression pedal using Neuro.
Mapping Parameters
The quickest way to map parameters to your expression pedal is by connecting your Artifakt to the Neuro App or Neuro Desktop Editor. The Expression Control section is at the bottom of the Artifakt's Sound Editor. Download the Neuro Desktop Editor and go to Devices > Show Offline Device Editor > Artifakt to view the full list of expressible parameters.
MIDI
The Artifakt can also receive expression signal over MIDI. To do this, you need a MIDI controller that has an expression input and is also compatible with the Artifakt (this will be most MIDI controllers). Connect your compatible expression pedal to your MIDI controller, and your MIDI controller to your Artifakt. You can also achieve this with the Neuro Hub.
Using a Third-Party Expression Pedal
The Artifakt's Control Input uses a specific wiring to communicate with both the Dual Expression pedal and the Neuro Hub. To use a third party expression pedal, please refer to the One Series Third Party Expression Pedal Guide.

natural_image
Abstract orange geometric shape with a central circle and four radiating arms on a dark background (no text or symbols)The Neuro 3 App
Like all pedals in the Source Audio One Series line, the Artifakt Lo-Fi Toolbox features access to more precise editing parameters, preset sharing, and added functionality via the Neuro Desktop Editor and Mobile App. The Neuro Desktop Editor is available as a free download for Mac or Windows on the Editors & Firmware page of the Source Audio website.
Neuro 3
The Neuro 3 App is an excellent tool for creating and organizing highly customized presets for your Artifakt. Neuro offers an advanced cataloging system for naming and storing Artifakt presets. Neuro is also a tool for installing the latest updates to your Artifakt's firmware.
Downloading and Connecting Neuro 3
Neuro 3 is a free download for Windows and Mac and is free on the App Store for iOS and the Google Play store for Android. To download the Neuro 3 for Desktop, go to the Source Audio Editors & Firmware page, where there are downloads for the most up-to-date versions of Neuro for both Windows and Mac.
After the download process, connect your Artifakt with a USB Type A male to type C male data cable (Must be data-capable, not solely a charger cable). There is one included in the box with your Artifakt. Connect the cable from the USB-C port on the pedal to the USB port on your computer. Once you've made the connection, Artifakt will appear on screen ready for you to add your Collection, indicating that the Artifakt is ready to be edited.
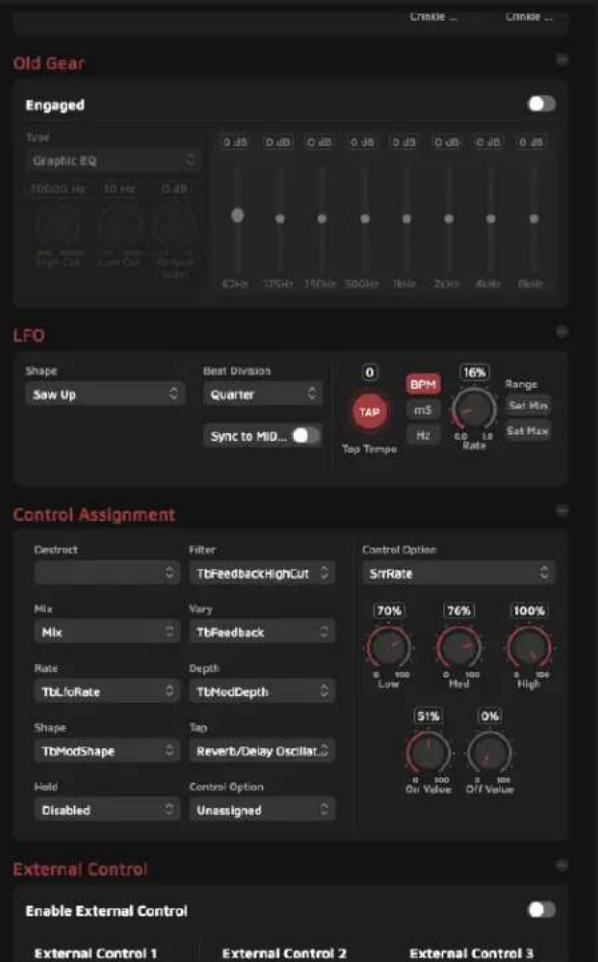
Neuro 3 User Interface
Here is where you'll view, create, save, and share presets you make or download using Neuro 3. The Preset Editor for Artifakt contains many editable parameters that are not found on the face of the pedal, as well as the ability to create custom mappings for the pedal's analog control surface.
Neuro 3 contains the same controls and features on both Desktop and Mobile, but the Mobile interface differs slightly due to screen size, dimensions, and mobile optimization. Below are screenshots of the Neuro 3 User Interface for Desktop and a brief overview of the software.


Neuro 3 for Mobile
Like all Source Audio One Series pedals, the Artifakt is fully supported in the Neuro Mobile app. The Neuro Mobile app is available for iOS and Android devices and allows access to all the preset parameters and hardware options described in the Neuro Desktop editor section above.
Connecting to the Neuro Mobile App (USB-MIDI)
The Artifakt is the ninth Source Audio pedal after the EQ2, Ultrawave, C4, Spectrum, Atlas, Nemesis, Ventris, and Collider to add two-way communication with the Neuro Mobile app using MIDI over USB. To connect the Artifakt to the mobile device you will need the proper cable adapters.
- iOS Devices - Any iOS device with a lightning connector is supported. A "Lightning to USB Camera Adapter" is required. Connect the adapter to the USB A/B-mini cable that was included with your Artifakt.

natural_image
White USB connector with metallic leads and a small terminal (no text or symbols visible)- Android Devices & iPhone 15 and up – Android devices may have either USB-micro or USB-C connectors that will support MIDI over USB communication with the Artifakt. You will need the appropriate USB B/C (male) to USB A (female) adapter to use with the included USB A/B-mini cable. Note that the USB B-micro to USB A adapter is sometimes called an OTG (On-The-Go) adapter. iPhone 15s have a USBC connection.
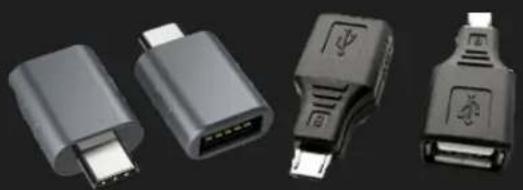
natural_image
Four black USB connectors with metallic pins, shown from different angles (no text or symbols visible)MIDI
Using a 3.5mm MIDI-TRS connection (Type A), the Artifakt can be controlled by generic MIDI Continuous Controller (CC) and Program Change (PC) messages. Many of the Artifakt's parameters (even those that are not assigned to a control knob) are directly accessible via MIDI continuous controller messages.
MIDI Channel
By default, the Artifakt responds to MIDI Channel 1. The Artifakt ignores all MIDI messages sent to it that are not on its channel. The input MIDI channel for the Artifakt can be changed in the Hardware Options menu of the Neuro Editors. Note that the MIDI Input Channel is a global setting that is NOT saved per preset. Note that some manufacturers begin counting MIDI channels at zero (from 0 to 15), while the Source Audio Neuro Editors use the convention of counting from 1 to 16.
Selecting Presets via Program Change (PC) Messages
The 128 user presets on the Artifakt can be recalled via program change messages.
Presets 1 to 128 are mapped to MIDI Program Change messages 1 to 128.
Note: Some MIDI controllers use a 0-127 numbering system, so you may need to offset your preset numbers by -1 in this case.
It is also possible to save presets with the Artifakt bypassed.
MIDI CLOCK
It is also possible to sync the time-based effects in Artifakt with your upstream MIDI Clock using the preset editor in Neuro 3. Please note, MIDI Clock is a preset-by-preset option for maximum flexibility, so it will need to be enabled for each preset that you wish to sync to your MIDI Clock.
Controlling the Artifakt with MIDI Continuous Controller (CC) Messages
The Artifakt responds to MIDI Continuous Controller (CC) messages, shown below. The pedal comes already mapped to a default set of CC numbers. For a complete list of default MIDI mappings and ranges, connect the Artifakt to the Neuro Desktop Editor via USB, select the Artifakt as a Device from the left margin, then go to Settings (Gear icon) > Edit Device MIDI Map.
Custom CC Mapping
The default MIDI map provides control over parameters using specific Continuous Controller messages. It is also possible to override the default map and create a custom mapping. Custom MIDI CC mappings are global, meaning they are not unique per preset. The CC mapping will apply in all situations, regardless of which preset is active.
To create a custom MIDI CC mapping, follow these steps:
■ Connect your Artifakt to the Neuro Desktop Editor.
- Select the Artifakt as a Device in the left margin
- In the top bar next to "Save" and "Info", select Settings (Gear icon) then Edit Device MIDI Map from the dropdown menu.
- The Artifakt's MIDI Map Editor window will open. Simply scroll to the MIDI CC value you wish to remap and click that CC's dropdown menu. A list of parameter choices will unfold.
- Select the parameter you wish to re-assign to the chosen CC. The process is complete.
USB
The Artifakt's USBC port is plug-and-play ready for Windows and Mac computers. The Artifakt uses class-compliant drivers, so no special drivers are needed. Just power up the Artifakt and connect it to the computer using a USB cable. The computer will automatically recognize the Artifakt, which will be identified as "One Series Artifakt Lo-Fi Elements" in the operating system.
The USB connectivity can also be used to connect to your mobile device and use the Neuro Mobile App with your Artifakt.
USB connectivity brings many benefits, such as the ability to connect with the Neuro 3 App and for downloading Artifakt firmware updates, accessing an advanced set of effect editing parameters, and downloading community presets. The USB port also supports MIDI connectivity to a DAW.
USB-MIDI
The Artifakt will appear as a MIDI device in your computer's operating system. As a result, the Artifakt can communicate with audio production software that utilizes MIDI, such as Pro Tools, Ableton Live, Logic Pro, and more. MIDI messages can be sent directly to the Artifakt using the USB connection, which allows for full automation of the Artifakt within host software such as a DAW.
Specifications
Dimensions
■ Length: 11.4 cm (4.5 inches)
■ Width: 7.00 cm (2.75 inches)
■ Height (not including knobs and footswitches): 3.71 cm (1.46 inches)
■ Height (including knobs and footswitches): 5.1 cm (2 inches)
Weight
■ 280 grams (0.625 pounds)
Power
200mA @ 9V DC
- Center negative, Barrel positive plug, 2.1 mm inner diameter, 5.5 mm outer diameter
Audio Performance
■ Maximum Input Level: +6.54 dBV = 8.76 dBu = 2.12 V RMS = 6.0 V p-p
Full Scale Output Level: +6.54 dBV = 8.76 dBu = 2.12 V RMS = 6.0 V p-p
■ Input Impedance: 1 Mega Ohm (1 MΩ)
■ Output Impedance: 600 Ohm (600 Ω)
■ 110 dB DNR Audio Path
■ 24-bit Audio Conversion
■ 56-bit Digital Data Path
■ Universal Bypass (relay-based true bypass or analog buffered bypass)
Troubleshooting
To revert the Artifakt to its factory settings, clearing all user data, presets, expression mappings, and changes to the MIDI mapping, use either the Neuro Mobile App or Neuro Desktop Editor and choose the Factory Reset option in the Hardware Options menus. It is also possible to perform a factory reset without the Neuro App by following these steps:
■ Press and hold the ON/OFF FOOTSWITCH.
■ Connect the power supply.
- The CONTROL LED will blink rapidly until the reset is complete. You can stop holding the FOOTSWITCH once the CONTROL LED starts to blink.
Noise & Hum
Power source: Ensure that the proper power supply is being used.
Near noise source: Move pedal away from power supplies and other equipment.
Other equipment: Remove other effects from signal chain; see if noise persists.
Bad cables: Swap out audio cables.
USB ground loop: When connected to a computer using a USB cable, noise can appear in the audio signal. This usually results from ground loop noise due to the Artifakt and computer running on separate power supplies. In the case of laptops, disconnecting the computer's power supply and running it on a battery can often mitigate the noise. External display monitors are often the primary source of noise and powering down monitors can also resolve noise issues.
Ground loop with amp: Make sure your Artifakt is running on the same power mains circuit as your guitar amplifier.
PRESET: Check your Artifakt preset. Many lo-fi element blocks in the Neuro editor contain purposeful noises & hums!
Unit Appears Dead / No LEDs Lit
Wrong power supply: Use correct power supply. See the DC 9V (Power) section for more details.
Frequently Asked Questions
What kind of instruments can I connect to Artifakt's inputs?
Artifakt's audio inputs are high impedance ( 1 MΩ) and they can accept high impedance signal sources like guitars/basses with passive pickups, as well as low impedance sources like line-level audio circuits, guitars/basses with active pickups, electronic keyboards, or mixer outputs. The input circuit can handle signals ranging up to 6.0 Volts, peak-to-peak.
Can I power Artifakt directly over USB, without using the 9 Volt supply?
No. USB provides 5 Volts, but Artifakt needs 9 Volts, so Artifakt cannot be powered directly from USB. Make sure that you have plugged in the included 9V DC power supply when connecting to the Artifakt's USB port.
When connecting Artifakt to a recording interface or mixer, should I use a Lo-Z (microphone) or Hi-Z (line / instrument) input?
Artifakt's output will be low impedance when the effect is active or in buffered bypass mode, but it will be high impedance when using true bypass mode and a guitar with passive pickups. Therefore, it is recommended that you use a high impedance (Hi-Z) input on your recording interface or mixer to avoid signal loss.
Why doesn't Artifakt respond to MIDI messages being sent to it?
By default, the Artifakt should respond to MIDI continuous controller messages on channel 1. The Artifakt's MIDI channel can be configured using the Neuro Editors. Channel numbers in MIDI use zero-based counting, so MIDI channel 1 is described as 0 in hexadecimal, MIDI channel 2 is described as 1 in hexadecimal, and so on, concluding with MIDI channel 16, which is described as F in hexadecimal. A continuous controller message starts with a hexadecimal B and is followed by the channel number (0 through F).
So, the command byte from your MIDI controller should be formatted as shown in the following table:
| MIDI Channel (Decimal) | 1 | 2 | 3 | 4 | 5 | 6 | 7 | 8 | 9 | 10 | 11 | 12 | 13 | 14 | 15 | 16 |
| CC Command Byte (Hex) | B0 | B1 | B2 | B3 | B4 | B5 | B6 | B7 | B8 | B9 | BA | BB | BC | BD | BE | BF |
Each continuous controller command byte is followed by two bytes: the CC number and the value. So, each CC message consists of a total of three bytes. If the Artifakt is not responding to MIDI, make sure that your MIDI controller is properly configured and sending messages in the format described above.
TRS Adaptor
Artifakt utilizes "Type A" convention for its 3.5mm TRS MIDI Input and Throughput. If you are using DIN-TRS adaptors, make sure they are Type A and not Type B.
Can I use Artifakt in my amp's effects loop?
Artifakt's audio inputs can handle up to 8.76 dBu or 6.0 Volts peak-to-peak, which allows it to work in most amp effects loops. Be sure to check your amp's documentation to verify that the maximum send level is less than Artifakt's maximum input level.
How do I update the firmware?
Firmware updates are available via the Neuro Desktop Editor using the USB port. Power the pedal and connect it to your computer using a USB-C cable. The Neuro Desktop Editor is available from Source Audio's website:
http://www.sourceaudio.net/editorsandfirmware.html. While the pedal is connected, right-click on the Artifakt icon in the left margin, then select "Firmware Update" from the resulting menu.
Mac isn't letting me download the Neuro 3 software?
Mac users may see this warning message when trying to open the Neuro Desktop software: "App can't be opened because it was not downloaded from the Mac App Store." In order to run the Neuro Desktop, please refer to the steps in this Apple support article: https://support.apple.com/en-us/HT202491.
Mac users may also get the warning "App cannot be opened because it cannot be checked for malicious software". If this message pops up after downloading & attempting to open Neuro for the first time, make sure to click "Show in Finder". This will bring you to Neuro's location in your directory. Then, CTRL + Click "Open" from the resulting menu to open the Neuro app. You will get the warning once more, but this time, there will be an "Open" button. Hit Open and you will be good to go.
Rubber Feet
The Artifakt comes standard with a flat aluminum bottom, making it easy to apply Velcro and mount to a pedalboard. Additionally, adhesive rubber feet are included in the Artifakt box. Applying the rubber feet to the Artifakt can help prevent it from sliding on flat surfaces such as a hardwood floor or a desktop.
Removing rubber feet is fairly easy as they can be peeled off without much issue if you decide you don't want them. Please contact us at contact@sourceaudio.net if you would like a new set of rubber feet.
Waste Disposal Notes

natural_image
Symbol of a trash bin crossing over a road, no text or numbers presentIf possible, dispose of the device at an electronics recycling center. Do not dispose of the device with the household waste.
For full compliance with EN 61000-4-6 standard, input cable must be less than 3 meters in length.
Warranty
Limited Transferrable Warranty
Source Audio, LLC (hereinafter "Source Audio") warrants that your new Source Audio Artifakt Lo-Fi Toolbox, when purchased at an authorized Source Audio dealer in the United States of America ("USA"), shall be free from defects in materials and workmanship under normal use for a period of two (2) years from the date of purchase by the original purchaser. Please contact your dealer for information on warranty and service outside of the USA.
Under this Limited Warranty, Source Audio's sole obligation and the purchaser's sole remedy shall be repair, replacement, or upgrade, at Source Audio's sole discretion, of any product that, if properly used and maintained, proves to be defective upon inspection by Source Audio. Source Audio reserves the right to update any unit returned for repair and to change or improve the design of the product at any time without notice. Source Audio reserves the right to use reconditioned parts and assemblies as warranty replacements for authorized repairs. Any product repaired, replaced, or upgraded pursuant to this Limited Warranty will be warranted for the remainder of the original warranty period.
This Limited Warranty is extended to the original retail purchaser. This Limited Warranty can be transferred to anyone who may subsequently purchase this product provided that such transfer is made within the applicable warranty period and Source Audio is provided with all of the following information: (i) all warranty registration information (as set forth on the registration card) for the new owner, (ii) proof of the transfer, within thirty (30) days of the transfer, and (iii) a photocopy of the original sales receipt. Warranty coverage shall be determined by Source Audio in its sole discretion. This is your sole warranty. Source Audio does not authorize any third party, including any dealer or sales representatives, to
assume any liability on behalf of Source Audio or to make any warranty on behalf of Source Audio.
Warranty Information
Source Audio may, at its option, require proof of the original purchase date in the form of a dated copy of the original authorized dealer's invoice or sales receipt. Service and repairs of Source Audio products are to be performed only at the Source Audio factory or a Source Audio authorized service center. Prior to service or repair under this Limited Warranty, the purchaser must request from Source Audio a return authorization, which is available at:
Source Audio LLC
120 Cummings Park, Woburn, MA 01801
(781) 932-8080 or at www.sourceaudio.net
Unauthorized service, repair, or modification will void this Limited Warranty.
Disclaimer and Limitation of Warranty
Do not open the effects pedal under any circumstance. This will void the warranty.
The foregoing limited warranty is the only warranty given by Source Audio and is in lieu of all other warranties. All implied warranties, including warranties of merchantability and fitness for any particular purpose, exceeding the specific provisions of this limited warranty, are hereby disclaimed and excluded from this limited warranty. Upon expiration of the applicable express warranty period, Source Audio shall have no further warranty obligation of any kind, express or implied. Source Audio shall in no event be liable for any special, incidental, or consequential damages suffered by the purchaser or any third party, including without limitation, damages for loss of profits or business or damages resulting from use or performance of the product, whether in contract or in tort. Source Audio shall not be liable for any expenses, claims, or suits arising out of or relating to any of the foregoing. Some states do not allow the exclusion or limitation of implied warranties so some of the above limitations and exclusions may not apply to you. This Limited Warranty gives you specific legal rights, and you may also have other rights, which vary, from state to state. This Limited Warranty only applies to products sold and used in the USA. Source Audio shall not be liable for damages or loss resulting from the negligent or intentional acts of the shipper or its contracted affiliates. You should contact the shipper for proper claims procedures in the event of damage or loss resulting from shipment.
Version History
June 26, 2024: Initial release

©Source Audio LLC | 120 Cummings Park, Woburn, MA 01801 | www.sourceaudio.net