Deep SUBD12EQ - Subwoofer Origin Acoustics - Free user manual and instructions
Find the device manual for free Deep SUBD12EQ Origin Acoustics in PDF.

User questions about Deep SUBD12EQ Origin Acoustics
0 question about this device. Answer the ones you know or ask your own.
Ask a new question about this device
Download the instructions for your Subwoofer in PDF format for free! Find your manual Deep SUBD12EQ - Origin Acoustics and take your electronic device back in hand. On this page are published all the documents necessary for the use of your device. Deep SUBD12EQ by Origin Acoustics.
USER MANUAL Deep SUBD12EQ Origin Acoustics
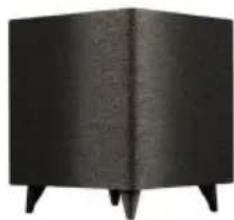
Deep Collection™ Subwoofers
natural_image
Black cube-shaped object with four legs, no visible text or symbolsSUBDD12EQ

natural_image
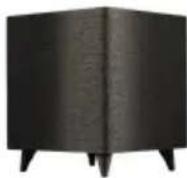
Black cube-shaped object with four legs, no visible text or symbolsSUBD12EQ
SUBD10EQ

SUBD8EQ
Table of Contents
| Introduction 1 |
| Safety Instructions 2 |
| Specifications 4 |
| In Preparation 5 |
| What's Included 5 |
| Bash Amplification 5 |
| Controls and Indicators 6 |
| Connecting The DeepTM Subwoofer 7 |
| DeepTM Subwoofer Placement 7 |
| DeepTM Subwoofer App 8 |
| Troubleshooting 12 |
| Technical Assistance 13 |
| Warranty 14 |
| Return Process 15 |

ORIGIN ACoustics
Introduction
Thank you for purchasing the Deep Collection™ Subwoofer. At Origin Acoustics, we take pride in providing you with a high quality product. All of Origin Acoustics' speakers are designed to have excellent sound quality, longevity, and a simple installation process.
This instruction booklet covers the necessary information for a smooth installation, including: the tools you will need, step-by-step instructions for installation, troubleshooting tips for any errors that may occur, and all warranty information. If for any reason you experience problems or if you have installation questions please call us at (844) 674-4461. Hours of operation are 8:00am to 5:00pm (Pacific Time), Monday through Friday.
IMPORTANT SAFETY INSTRUCTIONS
- Read these instructions.
- Keep these instructions.
- Heed all warnings.
- Follow all instructions.
- Do not use this apparatus near water.
- Clean only with dry cloth.
- Do not block any ventilation openings. Install in accordance with the manufacturer's instructions.
- Do not install near any heat sources such as radiators, heat registers, stoves, or other apparatus (including amplifiers) that produce heat.
- Do not defeat the safety purpose of the polarized or grounding-type plug. A polarized plug has two blades with one wider than the other. A grounding type plug has two blades and a third grounding prong. The wide blade or the third prong are provided for your safety. If the provided plug does not fit into your outlet, consult an electrician for replacement of the obsolete outlet.
- Protect the power cord from being walked on or pinched particularly at plugs, convenience receptacles, and the point where they exit from the apparatus.
- Only use attachments/accessories specified by the manufacturer.
- Use only with the cart, stand, tripod, bracket, or table specified by the manufacturer, or sold with the apparatus. When a cart is used, use caution when moving the cart/ apparatus combination to avoid injury from tip-over.
- Unplug this apparatus during lightning storms or when unused for long periods of time.
- Refer all servicing to qualified service personnel. Servicing is required when the apparatus has been damaged in any way, such as power-supply cord or plug is damaged, liquid has been spilled or objects have fallen into the apparatus, the apparatus has been exposed to rain or moisture, does not operate normally, or has been dropped.
- Do not expose this apparatus to dripping or splashing and ensure that no objects filled with liquids, such as vases, are placed on the apparatus.
- To completely disconnect this apparatus from the AC Mains, disconnect the power supply cord plug from the AC receptacle.
- The main plug of the power supply cord shall remain readily operable.
CAUTION
RISK OF ELECTRIC SHOCK DO NOT OPEN

CAUTION: WARNING: THE RISK OF ELECTRIC SHOCK, DO NOT REMOVE COVER OR BACK. NO USER-SERVICEABLE PARTS INSIDE, REFER SERVICING TO AUTHORIZED SERVICE PERSONNEL.
TO PREVENT FIRE OR SHOCK HAZARD, DO NOT EXPOSE THIS APPLIANCE TO RAIN OR MOISTURE. THE APPLIANCE SHALL NOT BE EXPOSED TO DRIPPING OR SPLASHING. NO OBJECTS FILLED WITH LIQUIDS SHALL BE PLACED ON THE APPLIANCE.
The lightning flash with arrowhead symbol, within an equilateral triangle, is intended to alert the user to the presence of uninsulated dangerous voltage within the product's enclosure that may be of sufficient magnitude to constitute a risk of electric shock to persons.

The exclamation point within an equilateral triangle is intended to alert the user to the presence of important operating and maintenance (servicing) instructions in the literature accompanying the appliance.
natural_image
Black textured cube-shaped object with four legs, no visible text or symbolsDEEP™ SUBWOOFER SPECIFICATIONS
MODEL SUBDD12EQ SUBD12EQ
PART SUBDDEQ1200 SUBDEQ12000
| Woofer | Dual 12" Custom Resin Coated Paper | 12" Custom Resin Coated Paper Active, 12" Passive |
| Feature 1 Complete bluetooth control via phone app Complete bluetooth control via phone app | ||
| Feature 2 | Cabinet Finish – Cloth wrapped, Aluminum Top | Cabinet Finish – Cloth wrapped, Aluminum Top |
| Feature 3 Input LFE RCA Input LFE RCA | ||
| Feature 4 Signal Sensing On/Off Signal Sensing On/Off | ||
| Frequency Response 17-180HZ 22-180Hz | ||
| Crossover Frequency | 50-150HZ | 50-150HZ |
| Amplifier Power | Bash 1200 Watts Peak | Bash 500 Watts Peak |
| Dimensions | 17 x 17 x 19" (432 x 432 x 483mm) | 17 x 17 x 18 3⁄4" (432 x 432 x 476mm) |
| Weight | 63 lbs. | 55 lbs. |
MODEL SUBD10EQ
SUBD8EQ
PART SUBDEQ10000 SUBDEQ8000
| Woofer | 10" Custom Resin Coated Paper Active, 10" Passive | 8" Custom Resin Coated Paper Active, 8" Passive |
| Feature 1 | Complete bluetooth control via phone app | Complete bluetooth control via phone app |
| Feature 2 Input LFE RCA | Input LFE RCA | |
| Feature 3 Signal Sensing On/Off | Signal Sensing On/Off | |
| Feature 4 | 115/230 Voltage Auto Switch | 115/230 Voltage Auto Switch |
| Frequency Response | 26-180Hz | 31-180Hz |
| Crossover Frequency | 50-150HZ | 50-150HZ |
| Amplifier Power | Bash 300 Watts Peak | Bash 150 Watts Peak |
| Dimensions | 1312 × 1312 × 1412" (344 × 344 × 370mm) | 11 × 11 × 13"(280 × 280 × 330mm) |
| Weight | 31 lbs. | 24 lbs. |
IN PREPARATION
Unbox the subwoofer and set box and packing material aside. Turn off the entire audio system before making any connections.
WHAT'S INCLUDED?

natural_image
Simple line drawing of a cube with four legs (no text or symbols)Subwoofer

AC Power Cord

Rubber Bottoms
(For Subwoofer Feet)

InstallationManual
BASH AMPLIFICATION
The amplifier in your Deep™ Subwoofer is a hybrid design utilizing the best of both digital and analog technologies. This allows for extreme high-quality bass output and dramatically reduced distortion. We have achieved this through an extraordinarily advanced A/B output stage powered by Bash. This gives you all of the warmth and musicality of an analog amplifier with the efficiency and power reserves of a digital amplifier.
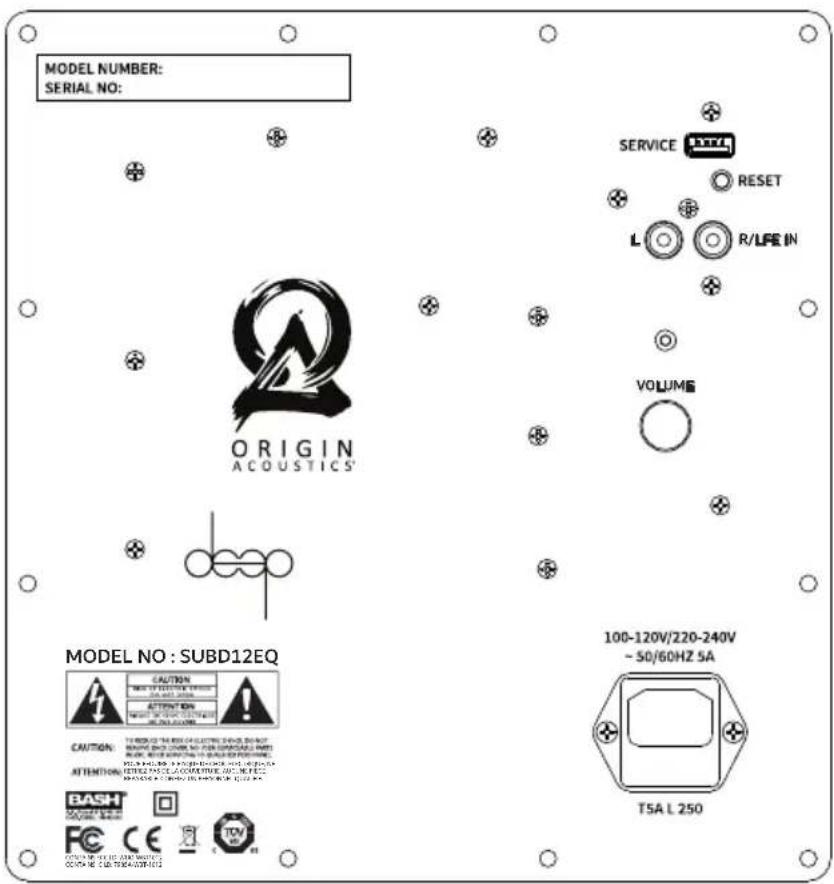
CONTROLS AND INDICATORS
Power Light – This blue light will be on in when the Deep ^™ subwoofer is powered on. The light will be off when the Deep ^™ subwoofer is either off or in standby mode.
Line In - The line level connection is used to connect the Deep™ subwoofer to your pre-amp/AV receiver. Use an RCA cable (not included) to connect your AV Receiver with a single Deep™ Subwoofer/LFE output to the LFE IN of the Deep™subwoofer or connect the full range outputs of your receiver or amp. Note, that are using L/R RCA inputs will require the use of crossover in the Deep™ subwoofers.
Reset - The reset button allows you to revert to the original default settings. To reset, press and hold the button for approximately 5 seconds until the light flashes, then let go. All settings within the phone app will be returned to the factory parameters.
Service - This connection is used for servicing the Deep ^™ subwoofer and is not used for normal operation.
AC Power Connection - This connection is a standard IEC power jack. Use the supplied power cord to connect the Deep™ subwoofer to an available AC outlet.
text_image
MODEL NUMBER: SERIAL NO: ORIGIN ACOUSTICS' SERVICE RESET L R/LFE IN VOLUME MODEL NO : SUBD12EQ CAUTION ATTENTION T5A L 250 100-120V/220-240V ~ 50/60HZ 5ACONNECTING THE DEEP™ SUBWOOFER
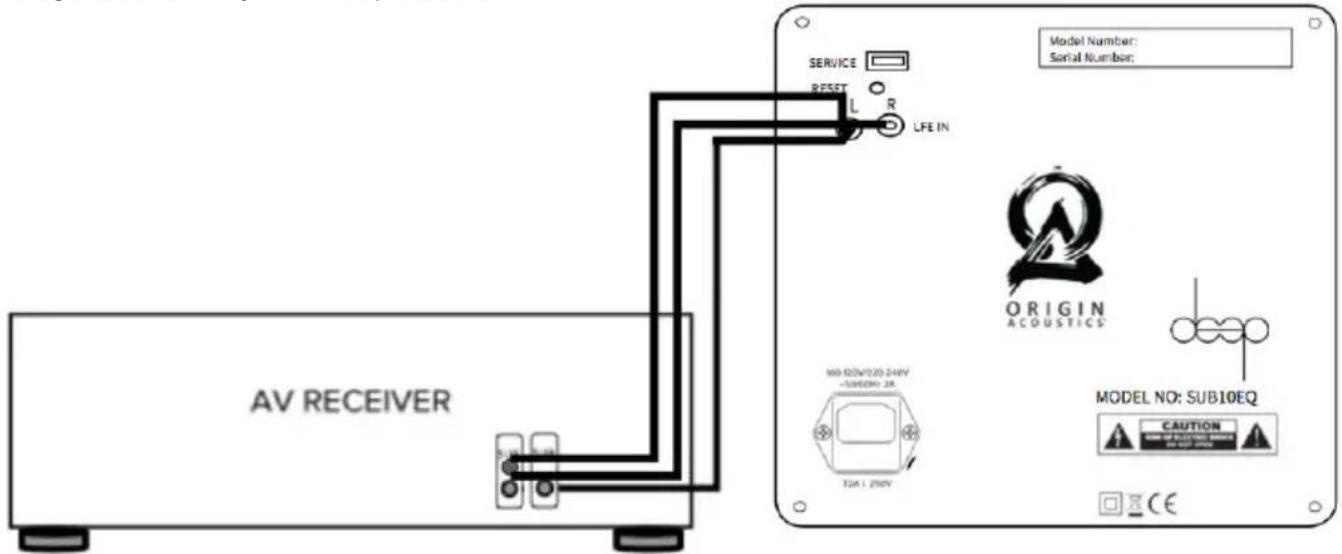
Connect the Deep ^™ subwoofer to a receiver or preamp using an RCA interconnect cable.
(Not included) The sub can either be connected to a dedicated LFE or subwoofer output using a single mono cable or, by using the included "Y" adapter, to a stereo, adjustable line level output. A fixed line level output is not appropriate as the subwoofer level will not change to follow the adjustments in system output level.
text_image
AV RECEIVER SERVICE RESET L R LFE IN Model Number: Serial Number: ORIGIN ACOUSTICS MODEL NO: SUB10EQ CAUTION CEDEEP™ SUBWOOFER PLACEMENT
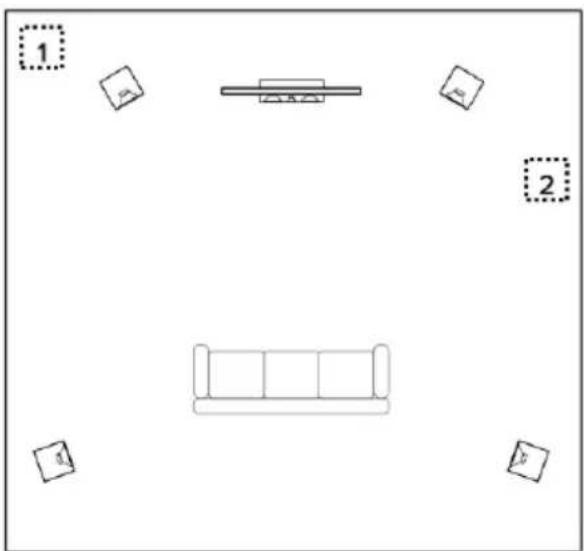
The location of the Deep™ subwoofer in your room is a critical decision that will affect the sound quality and balance of your audio system. This is a matter of both art and science and may require you to experiment with more than one location. Always test the sound from the primary listening position. Begin with a front corner of the room. This loads the Deep™ subwoofer between two perpendicular walls and will help in creating maximum output. If the output is too great, move the Deep™ subwoofer along the side wall and listen again. You will also be making adjustments on the phone app discussed below.
natural_image
Simple line drawing of a sofa with two boxes and a table, no text or symbols present©

text_image
ORIGIN ACOUSTICS VOLUME SETUP AUTO EQ ABOUT VOLUME 50 MODE NORMAL MUSIC MUSIC NIGHT 20Hz 50Hz 100Hz 200Hz 500Hz 1000Hz VOLUME SETUP AUTO EQ ABOUT 15dB 10dB 5dB 0dB -5dB -10dB -15dB 20Hz 50Hz 100Hz 200Hz 500Hz 1000Hz Cutoff Frequency 60Hz 40Hz 150HzADJUSTMENTS
VOLUME: To set the output volume of the Deep ^TM subwoofer, slide the slider on the volume line to the desired output level. The output setting of the Deep ^TM subwoofer should be balanced with the volume of your other stereo/surround speakers. Avoid setting the Deep ^TM subwoofer output too high where it overwhelms the overall sound. Too much bass will create a blurred sound image. It is best to set the level so the sound appears to be coming from the rest of the speakers and not directly from the Deep ^TM subwoofer.
MODE: The app offers four sound presets, which can be selected using the “MODE” buttons. “NORMAL” is the setting for most applications. “MUSIC” adds a subtle emphasis to the low bass range, while “CINEMA” slightly boosts the “dramatic” bass frequencies around 50 Hz. The “NIGHT” mode reduces the maximum volume so that you can still enjoy bass reinforcement when listening at night.
LOW PASS
This adjustment allows you to set the frequency at which the Deep™ subwoofer will begin to perform. Providing a variable cutoff frequency with a set roll-off allows you to adjust the frequency to match your full-range speakers. You can change the cutoff by sliding the circle along the frequency line. This will depend on your listening preference and how seamlessly you want the Deep™ subwoofer to blend with your other speakers. Below is a table you can use for setting your Deep™ subwoofer cutoff.
| Full Range Frequency | Cutoff Frequency |
| Dedicated LFE Channel | Highest Maximum Frequency |
| Small Full Range Speakers | 80Hz - Max |
| Sub/Sat System in Stereo | 80Hz - 100 Hz |
| Large Bookshelf or Tower Speakers | 50Hz - 70Hz |
text_image
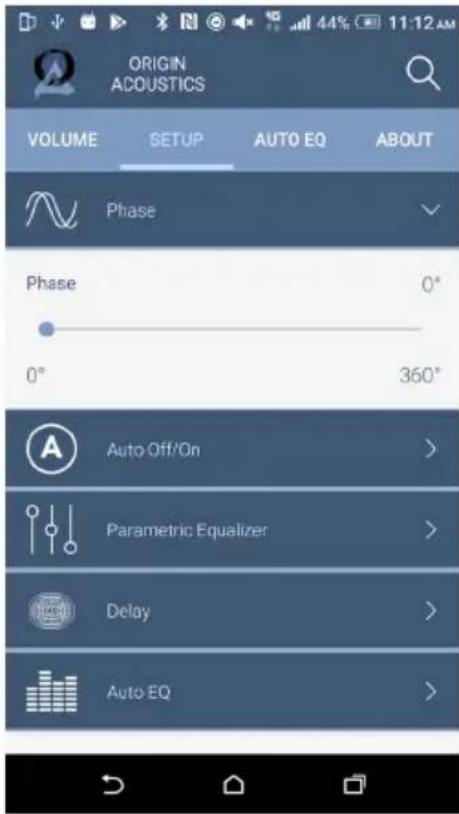
ORIGIN ACOUSTICS VOLUME SETUP AUTO EQ ABOUT Phase Phase 0° 0° 360° Auto Off/On > Parametric Equalizer > Delay > Auto EQ >PHASE
The blend of the sub and speakers is best when they are in phase with each other. The best way to adjust this is to sit in the listening position and listen to the bass response on a musical track as you make the adjustment. Pick a track that has substantial bass. As you move the slider in the app, listen for unwanted peaks and anomalies that sound unmusical. Remember, the Deep™ subwoofer will sound best when the bass it reproduces appears to come from the full-range loudspeakers.
AUTO ON/OFF
This feature automatically turns the Deep ^TM subwoofer on when signal is present and o when the signal is not detected for a period of time. The default setting is auto on, which is in a power-saving standby mode that continuously monitors the inputs for any signals. The LED will be very dimly lit. When a bass signal is detected through the RCA input, power is automatically turned on and the LED will become bright. If no bass signal is detected within a 15-minute period, the subwoofer will return to standby mode. Sensitivity of the auto-on function can be set from 1 - 10 mV. The correct sensitivity depends on the pre-amp or AVR used. However, a value between 3 and 6 is recommended. If AUTO ON/OFF is deactivated, the Deep ^TM subwoofer will remain on permanently.
text_image
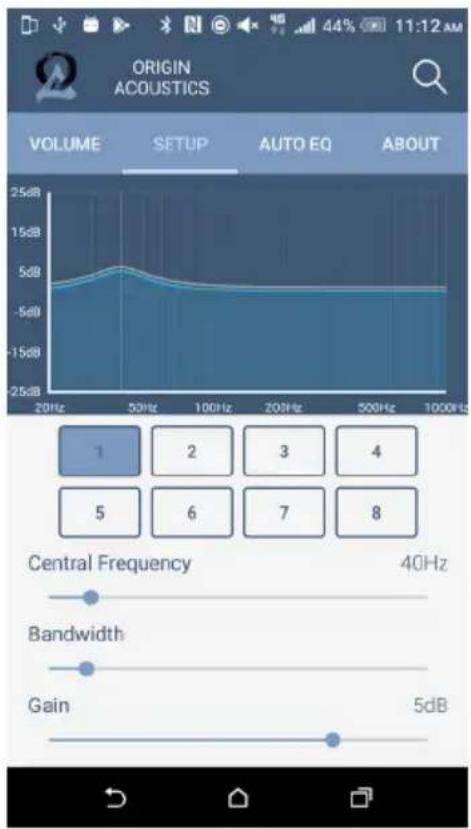
ORIGIN ACOUSTICS VOLUME SETUP AUTO EQ ABOUT 25dB 15dB 5dB -15dB 20Hz 50Hz 100Hz 200Hz 500Hz 1000Hz 1 2 3 4 5 6 7 8 Central Frequency 40Hz Bandwidth Gain 5dBPARAMETRIC EQUALIZER
The parametric equalizer gives you the ability to adjust the audio output (within the Deep™ subwoofer range) to your preference. The app lets you choose and adjust the center frequency, bandwidth, and gain. One of the most common challenges with a subwoofer is the natural resonance frequency of the room. The parametric EQ will allow you to address this problem. To reduce unpleasant resonance, identify the frequency causing it by using a test disc with test tones in the bass frequency range. Searching “audio test disc” on the internet will provide you with several options. Start by playing the bass notes in sequence. When a bass note sounds unnaturally loud, this is the room resonance that you can reduce with the help of the equalizer. To do this, set the CENTRAL FREQUENCY control to the frequency determined by the test disc. Select a “NARROW” bandwidth and reduce the GAIN control until the bass note is reproduced with the same apparent loudness as the other frequencies. To selectively boost a particular frequency range, you should increase the bandwidth slightly and then slowly adjust the GAIN, avoiding any unnatural droning effects.

text_image
ORIGIN ACOUSTICS VOLUME SETUP AUTO EQ ABOUT Phase Phase 0° 0° 360° Auto Off/On > Parametric Equalizer > Delay > Auto EQ >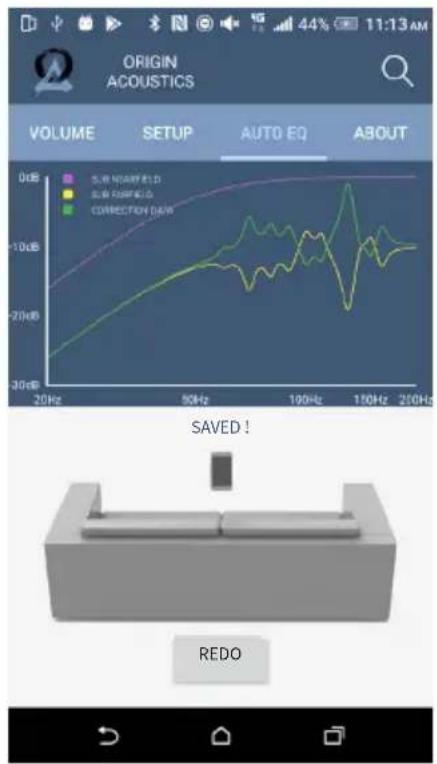
text_image
ORIGIN ACOUSTICS VOLUME SETUP AUTO EQ ABOUT 0dB 50Hz 20Hz 50Hz 100Hz 150Hz 200Hz SUN NARRED SUN RED CORRECTION DAW SAVED ! REDODELAY
The DELAY parameter enables you to delay playback of the Deep ^TM subwoofer audio signal. This is particularly helpful when the Deep ^TM subwoofer is placed closer to the listening position than the rest of your speakers. Increasing the delay time by 1 millisecond will have the same effect as moving the Deep ^TW subwoofer approximately 13 inches (33 cm) further away from the listening position. So, a setting of 20 milliseconds would be equivalent to increasing this distance by approximately 21.5 feet (6.6 meters). If you are using a surround-sound receiver or amplifier equipped with an automatic calibration function, its LFE output signal will automatically set the delay time internally so delay on the Deep ^TM subwoofer should be set to minimum.
AUTO EQ
Your Deep™ subwoofer is equipped with an easy-to-use and highly sophisticated automatic calibration function. This activates the Deep™ subwoofer via the APP and instructing it to play a measurement signal and uses the built-in microphone in your smartphone to show the measurement curve, within the range. Automatic room calibration is performed in two steps. Step 1 calibrates the measurement environment, which includes the microphone and the sound reproduction chain. Step 2 measures the actual room frequency response.
Follow the instructions in the APP to carry out a successful measurement. The Auto EQ measurement begins with you being asked to hold the smartphone close to the sound opening of the Deep ^™ subwoofer. The measurement can then be started.
Once the calibration step is completed, the actual room measurement can be performed. Do this by holding your smartphone at the listening position and start step 2. After a successful measurement, the app provides visual parameters of the measured room along with the automatically calculated filter recommendations and saves them to your subwoofer.
Press "Redo" to start another measurement from Step 1.
The equalization curve is retained until it is overwritten by a new measurement. You can deactivate the automatically calculated frequency response compensation at any time by switching off the AUTO EQ function in the SETUP menu.
Troubleshooting
If possible, it's often good to try to isolate the problem first. For example, if you're playing a DVD on a television and there's no sound, try connecting an MP3 player to the system to see if that works. If it does work, then the problem is with the television, DVD player, or the cables connecting them. If it doesn't work, the problem will be with the amplifier, speakers, or those cables.
| Problem | Possible Cause |
| No Sound | The volume may be turned down or muted. Check the volume settings on both the amplifier and the television/computer/CD player/etc. |
| No Sound | Make sure the proper source is selected on the amplifier or receiver. |
| No Sound | Check the cord connecting the amplifier with the source. The cord may be damaged or plugged into the wrong input or output. |
| No Sound | Check the wires connecting the amplifier with the speakers. Make sure they're connected properly and not damaged in any way. |
| Poor | If you hear something like static, or the sound is cutting in and out, |
| Sound | check the audio cables. If the problem increases when a cable is being moved, then the cable is most likely faulty or not connected properly. |
| Quality | |
| Poor | Today's audio systems may have several places to adjust the volume, for example your MP3 player may have a volume control, and your amplifier may also have one. Check to be certain that the volume isn't turned up past 80% on any device. |
| Sound | |
| Quality | |
| Poor | Try changing sources to be certain that the selection you've chosen is a good quality recording. |
| Sound | |
| Quality |
©
Requirements & Warranty Coverage
This warranty may not be valid if the product was purchased through an unauthorized dealer. This warranty only applies to the individual that made the original purchase, and it cannot be applied to other purchases. The purchaser must be prepared to provide proof of purchase (receipt). This warranty will not be valid if the identifying number or serial number has been removed, defaced, or altered.
2 Year Limited Warranty
Origin Acoustics warrants to the original retail purchaser only that this Origin Acoustics product will be free from defects in materials and workmanship, provided the speaker was purchased from an Origin Acoustics authorized dealer.
If the product is determined to be defective, it will be repaired or replaced at Origin Acoustics' discretion. If the product must be replaced yet it is no longer manufactured, it will be replaced with a model of equal to or greater value that is the most similar to the original. If this is the case, installing the replacement model may require mounting modifications; Origin Acoustics will not be responsible for any such related costs.
Return Process
Before making any return attempts, it is required that you first contact Origin Acoustics. Return product to Origin Acoustics or your dealer, either in person or by mail. It's preferable if the product is returned in the original packaging. If this isn't possible, the customer is responsible for insuring the shipment for the full value of the product.
This warranty is in lieu of all other expressed or implied warranties. Some states do not allow limitations on implied warranties, so this may not apply depending on the customer's location. (For more information, see Magnuson-Moss Warranty Act.)

ORIGIN ACoustics