
AN-777 - Radio Aconatic - Free user manual and instructions
Find the device manual for free AN-777 Aconatic in PDF.


| Product Type | Four-Band Portable Radio with Bluetooth, USB, and TF Card Playback |
| Brand | Aconatic |
| Model | AN-777 |
| Frequency Bands | FM (87-108 MHz), AM (520-1710 kHz), SW1 (2.3-10.0 MHz), SW2 (10.0-22.0 MHz) |
| Power Source AC | 220-240V ~50 Hz via detachable AC power cord |
| Power Source DC | 6V (4 x 1.5V D batteries) or built-in high capacity lithium polymer battery |
| Bluetooth | Yes, Bluetooth pairing with external devices (name: AN-777) |
| Audio Playback | USB flash drive, TF card, Bluetooth streaming |
| Output Power | 3W |
| Speaker | 5 inch |
| Headphone Jack | 3.5mm |
| Antenna | Telescopic antenna for FM/SW; AM uses internal ferrite bar |
| Controls | Volume/Power knob, Band selector, Tuning knob, Play/Pause, Prev, Next |
| Additional Features | Handle for portability, USB/TF/BT reading system |
| Safety | Do not open; risk of electric shock; keep away from rain and moisture |
| Maintenance | Clean with soft dry cloth; remove batteries if not used for long periods |
| Country of Origin | Made in China |
Frequently Asked Questions - AN-777 Aconatic
User questions about AN-777 Aconatic
0 question about this device. Answer the ones you know or ask your own.
Ask a new question about this device
Download the instructions for your Radio in PDF format for free! Find your manual AN-777 - Aconatic and take your electronic device back in hand. On this page are published all the documents necessary for the use of your device. AN-777 by Aconatic.
USER MANUAL AN-777 Aconatic
natural_image
Black triangular warning symbol with a lightning bolt inside, indicating electrical hazard (no text)natural_image
Black triangular warning symbol with exclamation mark (no text or numbers)natural_image
Concentric circles diagram with no text or symbolsOperating Instruction
MADE IN CHINA
FUNCTION


① Antenna
② Play indicator
③ USB interface
④ TF Card interface
⑤ 3.5mm Headphone jack
⑥ Speaker
⑦ Play/pause button
⑧ Prev button
⑨ Next button
⑩ USB/TF/BT reading system ■ Radio system
⑪ Band selection switch
⑫ Volume control
⑬ Tuning control
⑭ Battery compartment
⑮ Handle
⑯ AC socket
⑰ DC 6V Input
AC POWER :
You can power your portable system by plugging the detachable AC power cord into the AC inlet on the back of the unit and into a wall AC power outlet. Check that the rated voltage of your unit matches your local voltage. Make sure that the AC power cord is fully inserted into the unit.


natural_image
Black triangular warning symbol with a white lightning bolt inside, indicating electrical hazard (no text)The lightning flash and arrowhead within the triangle is a warning sign alerting you of "dangerous voltage" inside the product.
WARNING
RISK OF ELECTRIC SHOCK DO NOT OPEN
WARNING: TO REDUCE THE RISK OF ELECTRIC SHOCK, DO NOT REMOVE COVER (OR BACK) NO USER-SERVICEABLE PARTS INSIDE. REFER SERVICING TO QUALIFIED PERSONNEL.

natural_image
Black triangular warning symbol with exclamation mark (no text or numbers)The exclamation point within the triangle is a warning sign alerting you of important instructions accompanying the product.
WARNING: TO REDUCE THE RISK OF FIRE OR ELECTRIC SHOCK, DO NOT EXPOSE THIS APPLIANCE TO RAIN OR MOISTURE.
DC POWER :
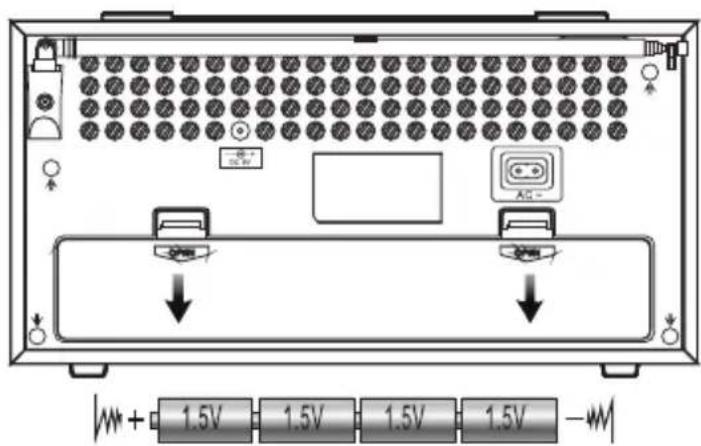
Open the battery cover, Insert 1.5V x 4 "D" size batteries into the battery compartment, ensure the batteries are inserted in designated order to avoid any damage cause to the unit. Always remove the batteries when the unit is not used for a long period of time, as this may cause leakage to the batteries and subsequently damage the unit.
Note
that this product is also built-in with high capacity battery as additional operation option.
Before You Begin
Thank you for choosing the AN-777 four band radio. This unit will give you hours of reliable service and listening pleasure. Before operating the Radio, please read these instructions thoroughly and retain them for future reference.
Charging
This unit is built-in with high capacity lithium polymer battery. For first time usage, charge the unit with equipped charging cable for 7-8 hours. After charged, "turn On/Off" switch to On position to start unit operation.
Installing the Batteries
1 Open the lid of the battery case.
2 Insert the batteries with correct polarity.
3 Close the lid.
Battery life
Using batteries R20 (size D) SUM-1(NS): FM\AM\SW1\SW2: Approx.20 hours.
Replacing batteries
When the sound becomes weak or distorted, replace all the batteries with new ones.
Note
When the unit is not to be used for a long period of time, remove the batteries to avoid damage caused by battery leakage and corrosion.
Playing Music
Insert a U Disk or TF Card into the "U DISK or TF Card Slot" with audio file. It will automatically content as default priority, Press prev/next to select to play previous or next audio content.
Operating the Radio
1 Turn the unit on by rotating the VOLUME knob clockwise.
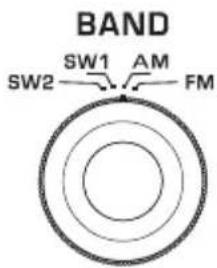
2 Set BAND to FM, AM, SW1 or SW2

3 Tune in a station using TUNING.
TUNING

natural_image
Concentric circles diagram with no text or symbols- To improve radio reception
- To turn off the radio, set VOLUME to "OFF".
FM: Extend the telescopic antenna and adjust the length and angle for the best reception.
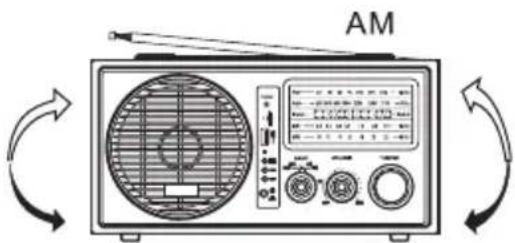
AM: Since the reception is affected by the direction of the radio, rotate the radio horizontally for optimum reception.
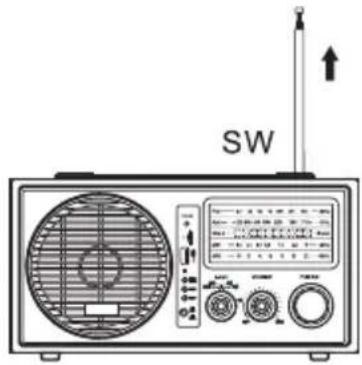
SW: Extend the telescopic antenna and adjust the length for the best reception.

SPECIFICATION
- Frequency Range:
FM: 87-108 MHz
AM: 520-1710 KHz
SW1: 2.3-10.0 MHz
SW2: 10.0-22.0 MHz
- General Specification
Voltage: AC 220-240V \~50 Hz
DC: 6V Batteries (UM-1)1.5 X 4
NOTE!
The product DC IN input voltage of 6V, Exceed 6V may cause
damage to the product.
-
Output power: 3W
-
Speaker: 5 Inch
BLUETOOTH FUNCTION
The Bluetooth connection: press the "" button, switch to Bluetooth mode, you can hear a "Bluetooth" sound, Switching on bluetooth in compatible device (e.g. mobile phone and computer etc.), then search the "AN-777" product name by connecting the bluetooth, hear sound of "Connected", then playing audio files/songs from the device. If the connection failed, turn on/off the unit and repeat the above steps.
Brand : Aconatic
Model : AN-777
Category : Radio