MPUREY30-BK - Ventilateur domestique MISTRAL - Free user manual and instructions
Find the device manual for free MPUREY30-BK MISTRAL in PDF.

| Type of product | Pedestal fan |
| Model | MPUREY30-BK |
| Brand | Mistral |
| Color | Black |
| Fan diameter | 30 cm (approx. 12 inches) |
| Height adjustable | Yes, telescopic pole |
| Number of speed settings | 3 speeds |
| Oscillation | Yes, wide area oscillation |
| Power supply | AC 220-240 V, 50 Hz |
| Power consumption | Approx. 50 W |
| Net weight | Approx. 4.5 kg |
| Dimensions (height base diameter) | 130 cm x 40 cm (approx.) |
| Base material | Plastic, weighted |
| Blade material | ABS plastic |
| Safety features | Overheat protection, stable base |
| Noise level | < 60 dB (depending on speed) |
| Cleaning | Wipe with damp cloth; do not immerse |
| Spare parts availability | Contact Mistral authorized service centers |
| Repairability | Modular design; some parts replaceable |
| Certifications | CE, RoHS |
| Warranty | 2 years |
Frequently Asked Questions - MPUREY30-BK MISTRAL
User questions about MPUREY30-BK MISTRAL
0 question about this device. Answer the ones you know or ask your own.
Ask a new question about this device
Download the instructions for your Ventilateur domestique in PDF format for free! Find your manual MPUREY30-BK - MISTRAL and take your electronic device back in hand. On this page are published all the documents necessary for the use of your device. MPUREY30-BK by MISTRAL.
USER MANUAL MPUREY30-BK MISTRAL
Designer 40cm Pedestal Fan

natural_image
Black outdoor fan with five blades mounted on a stand (no text or symbols visible)Instruction Manual
Model: MPUREY30-BK
Important Safeguards
When using electrical appliances, in order to reduce the risk of fire, electric shock and/or injury, these basic safety precautions should always be followed:
For Your Safety
Read all instructions carefully, even if you are familiar with the appliance.
- This appliance is not intended for use by persons (including children) with reduced physical, sensory and mental capabilities, or lack of experience and knowledge, unless they have been given supervision or instruction concerning use of the appliance by a person responsible for their safety.
- Children should be supervised to ensure that they do not play with the appliance.
- Switch off the power outlet and remove the plug when the appliance is not in use, when moving fan from one location to another and before cleaning.
- Do not operate any appliance with a damaged power cord or plug; if the appliance malfunctions; or if it is dropped or damaged in any manner.
- This appliance is intended for household use only and not for commercial, industrial or outdoor use. Other use not recommended may cause fire, electric shock or injury.
- Do not use any appliance for anything other than its intended use. This product is intended for household use only.
- This appliance is intended to be plugged in a 240V ac 50Hz power outlet only.
- Do not misuse the power cord. Never carry the appliance by the power cord or pull to disconnect it from the outlet. Instead, grasp the plug and pull to disconnect.
- Do not attempt to repair, disassemble or modify the appliance. There are no user serviceable parts.
- Arrange the power cord away from traffic areas where it will not be tripped over.
-
Ensure that the fan is unplugged before removing the guard.
-
Never insert foreign objects such as fingers, pencils, etc. through the grille when fan is running as this may cause damage to the appliance and/or injury to the user.
- To prevent fire or shock hazard, DO NOT expose this appliance to rain or moisture.
- Do not use fan near curtains, plants, window treatment, or where other objects can become caught in the blades.
- Do not operate fan in the presence of explosive and/or flammable fumes. Do not place the fan near an open flame, cooking or other heating appliance.
- Do not place the fan close to an open window. Rain splashing on the fan could cause an electric shock hazard.
- Do not leave the appliance running or operable in a place where young children or animals could have access to it without supervision.
• Always unplug the fan when moving from one location to another, when removing grilles or for cleaning. - Do not use the fan without fully assembled. The fan must operate standing upright.
- To protect against fire, electrical shock and injury to persons, do not immerse unit, plug or cord in water or spray with liquids.
- Ventilation should not be impeded by covering the ventilation openings. Slots and opening are provided for ventilation to ensure reliable operation of the product and to protect it from overheating.
- Place the fan on a stable level, even surface when operating to avoid overturning.
- DO NOT disassemble the fan and this fan cannot be disassembled.
Warning
Do not operate without the fan grilles properly in place. Do not use if grille becomes deformed, damaged or loosen to avoid injury to persons. Compulsory Warning If the supply power cord is damaged, the power cord must be replaced by the manufacturer, its service agent or similarly qualified persons in order to avoid a hazard.
This product has not been designed for any uses other than those specified in this booklet.
Save These Instructions
Getting to Know Your Designer Pedestal Fan
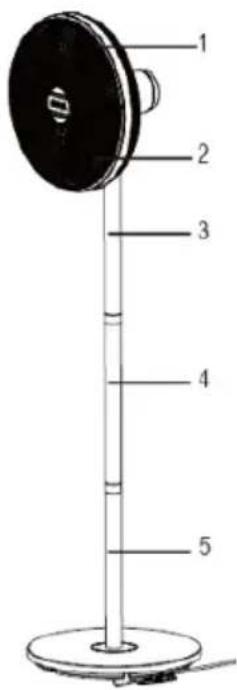

- Grille
- Blades
- Upper tube
- Middle tube
- Lower tube
-
Motor housing
-
Switch /Speed control knob
- Rim Light
- Base
- Counter weight
- Power cord (wire connection plug)
Getting to Know Your Pedestal Fan
Congratulations on the purchase of Your Designer Pedestal Fan.
Before first using your new Designer Pedestal Fan, it is important that you read and follow the instructions in this handbook, even if you feel you are familiar with this type of appliance.
Your attention is drawn particularly to the section dealing with IMPORTANT SAFEGUARDS. Find a safe and convenient place to keep this booklet handy for future reference.
This appliance has been designed to operate from a standard domestic power outlet. It is not intended for industrial or commercial use.
Your Designer Pedestal Fan is safe and easy to use. It has been designed to function quietly and safely under normal circumstances.
The heavy-duty motor is rated to allow continuous use.
Assembly of Pedestal Fan
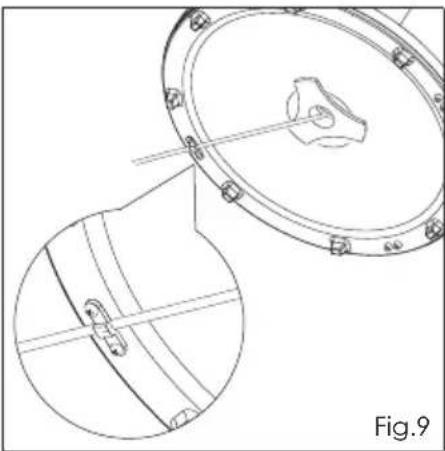
- Before securing counter weight to both decorative base plate and lower tube, you must undo the cord grip on the counter weight to position the supply cord first, as shown in Fig.9 (As you are unable to do this later, as supply cord plug and connectors cannot be fed through the cord grip when fixed in position).
Put the nuts into the slot in rear of counter weight, fix one screw in cord grip, position supply cord and then fix another screw in cord grip as shown Fig.1a & Fig.9.
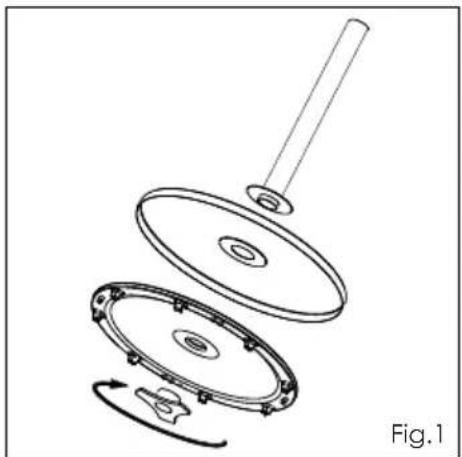
Now place the counter weight within the rim of the decorative base plate and secure lower tube to the base plate assembly with the retention knob by turning knob in clockwise direction and hand tighten as shown in Fig.1
natural_image
Exploded view diagram of a mechanical assembly showing internal components and motion arrows (no text or labels)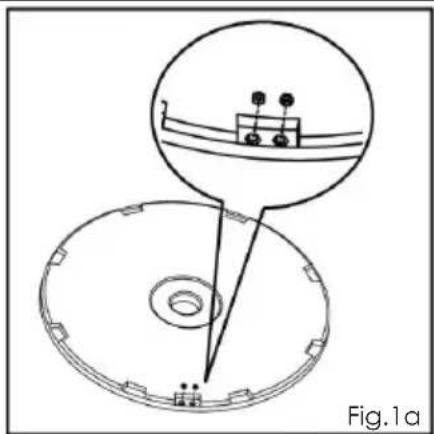
natural_image
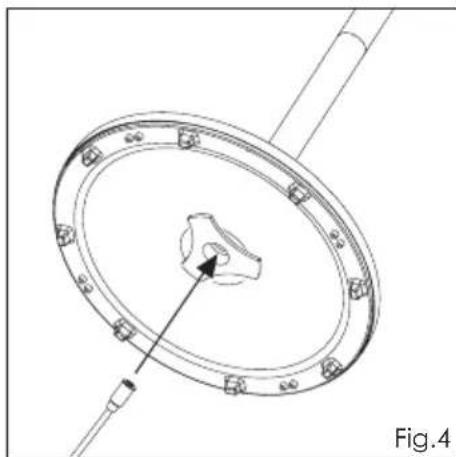
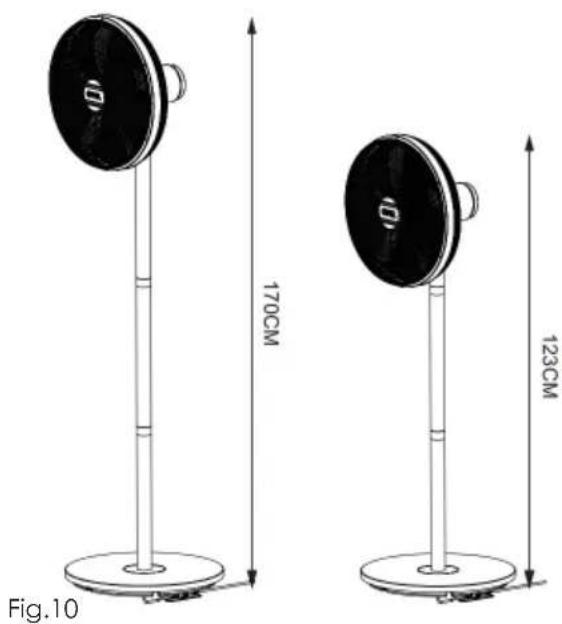
Technical diagram of a mechanical component with an inset showing a circular component and a base, labeled Fig.1a (no text or symbols on the diagram itself)Note: For ease of assembly it is beneficial at this stage of the assembly to route the power cord with connector end through the lower tube assembly as shown in Fig.4 and pull sufficient cable length through to extend beyond the total length of the three tube sections (If electing to assemble pedestal fan to 170cm height), or two tube sections (if electing to assemble pedestal fan to height of 123 cm) as shown in Fig.10 on page 6.
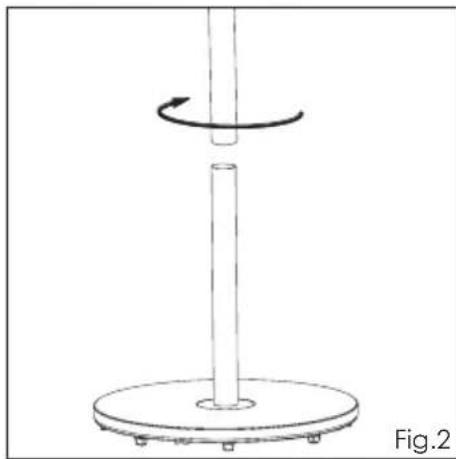
- Route the power supply cable through the middle tube and now screw middle tube to the lower tube in clockwise direction as shown in Fig.2
natural_image
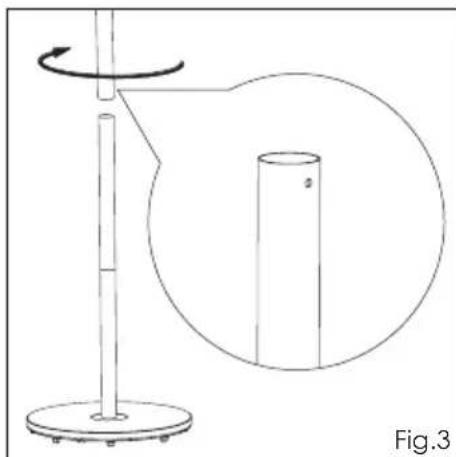
Diagram of a rotating mechanical component with a vertical shaft and base, labeled Fig.2 (no text or symbols on the diagram itself)- Repeat the process for middle tube to the upper tube as shown in Fig.3
Note: The upper tube is identifiable by the presence of the two holes, differentiating it from the middle tube.
natural_image
Diagram of a rotating stand with a cylindrical object inside, labeled Fig.3 (no text or symbols on the diagram itself)- Allow for enough of the power cord and connector to protrude through the upper tube so that connection can be made with the connector extending from the fan head.
natural_image
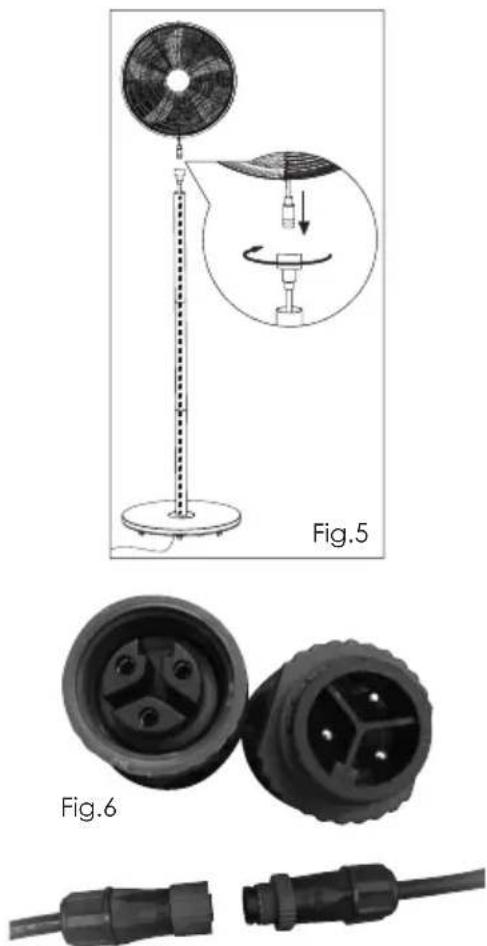
Technical line drawing of a circular mechanical component with bolt holes and a central hub, labeled Fig.4 (no text or symbols on the diagram itself)- You can now attached the fan head assembly, first completing the power cord connection to fan head by plugging in the female connector protruding from the tube to male connector extending from the fan head and securing together with the screw nut of the male connector by turning clockwise as depicted in Fig. 5, 6 and 7.
Note: As the fan head is relatively heavy, the easiest way to make the power cable connection and mount the fan head to post is to continue to leave base assembly laying down, rather than standing it upright at this stage. Standing upright to make the power cable connection and mounting the fan head would require 2 people to complete the same process.
natural_image
Technical illustration of a mechanical device with labeled parts, including a fan, pointer, and plug (no text or symbols present)Fig.7
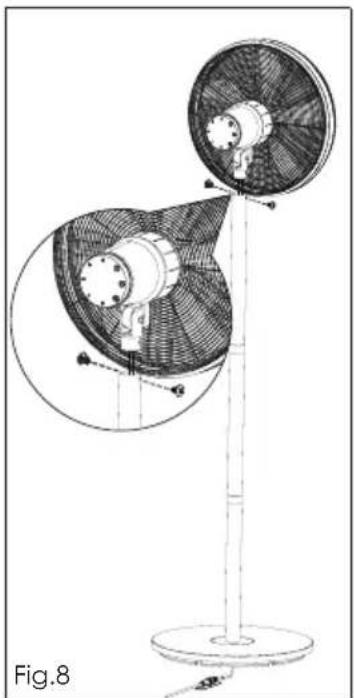
- Place the fan head mounting post onto the base assembly and align holes on mounting post with holes on the upper tube of the base assembly.
If too much of the power cable is protruding, simply pull on the power cord section exiting from the baseplate and than straighten cable through the cord grip.
You can secure the fan head to the base assembly upper tube with using the two screws provided, as shown in Fig.8
At completion you can stand the entire fan assembly upright.
Note: The fan head comes pre-assembled with fan blade and grilles all in place, so no assembly or dis-assembly required. Just mount direct to the base assembly.
natural_image
Technical line drawing of a two-tiered fan or fan assembly mounted on a stand, showing internal components and mounting base (no text or symbols)Note: The fan Head is heavy, if adopting the method of fitting the fan head with the base assembly in the upright position, this can only safely be done with the help of another person.
Note: The cord grip on the base plate does not act to fully tighten the cord so it cannot move, it acts as guide channel only, allowing for cord length adjustment when fitting fan head. (Ref. Fig.9)
natural_image
Technical line drawing of a mechanical component with cross-sectional and top views (no text or symbols)Important Note:
The pedestal fan can be assembled at 2 dedicated heights of either 123 cm or 170 cm respectively by excluding or including the middle tube section as part of the total assembly as shown in Fig.10
If electing to assemble the Pedestal Fan to the 123 cm height than simply omit step 2 (Assembling middle tube) on page 4.
Attention: Do not connect the fan to electrical supply until the unit is fully assembled.
Operation of Your Pedestal Fan
How To Use
Place the fan in a flat and stable surface. Make sure the fan Switch /Speed control knob is set in Off (0) position then connect the plug to main power outlet.
To select the desired speed, rotate the Switch/Speed control knob at back of the motor housing; the selected speed setting number must align with the indicator mark (white dot) on the motor housing.
The pedestal fan features 6 dedicated setting as shown in Fig.11 and table below:
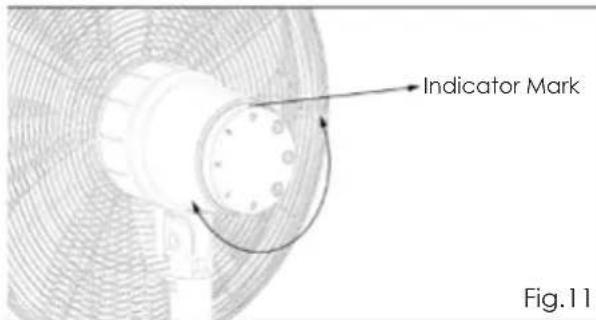
0 = Off
1 = Minimum speed
2 = Medium speed
3 = Maximum speed
① = Minimum speed with left/right oscillation
② = Medium speed with left/right oscillation
③ = Maximum speed with left/right oscillation
The pedestal fan features a blue illuminating rim light positioned between the motor housing and switch control panel.
This rim light illuminates when the pedestal fan is operating in any of the 3 Speed or Speed/Osc combo settings and extinguishes when switched to the OFF position.
Unplug the fan from the electrical outlet when it is not in use or is left unattended. Do not leave this fan unattended while it is in use.
Care And Cleaning
CAUTION: ALWAYS UNPLUG THE FAN FROM THE ELECTRICAL OUTLET PRIOR TO CLEANING IT. Always switch the fan off and unplug it before cleaning.
Unplug the fan and remove the front guard. DO NOT disassemble the fan, this fan cannot be disassembled.
Wipe blades with soft damp cloth, taking care not to alter the angle of the blades. Allow to dry. If necessary, use a soft brush to remove dust from the guards. Reassemble fan fully before use.
Clean other parts using a damp cloth and a mild detergent, and ensure that all detergent residues are removed.
Never use abrasive cleaning agents or solvents. Do not immerse in any form of liquid or splash with any other liquids.
Storage
If the fan will not be used for a long time, store in a cool dry safe place away from heat and the sunlight.
Technical Specifications
Supply Voltage: 220-240V\~50Hz
Power Consumption: 60W
NOTE: As a result of continual improvements, the design and specifications of the product within may differ slightly to the unit illustrated on the packaging.
Warranty Conditions for purchase in Australia & New Zealand
Any claim under this warranty must be made within 2 years of the date of purchase of the product. To make a claim under the warranty in Australia, take the product (with proof of purchase) to any Bunnings store (see www.bunnings.com.au in Australia or www.bunnings.co.nz in New Zealand for store locations).
GSM International Pty Ltd bears reasonable, direct, expenses of claiming under the warranty in Australia. You may submit details and proof to a Bunnings store for consideration or contact our service agent below.
This warranty is provided in addition to other rights and remedies you may have under law: our goods come with guarantees which cannot be excluded under the Australian Consumer Law (if purchased in Australia) or the Consumer Guarantees Act 1993 (if purchased in New Zealand). You are entitled to replacement or refund for a major failure and to compensation for other reasonably foreseeable loss or damage. You are also entitled to have the goods repaired or replaced if the goods fail to be of acceptable quality and the failure does not amount to a major failure.
The warranty excludes damage resulting from product misuse or product neglect. The warranty covers domestic use only and does not apply to commercial applications.
This warranty is given by GSM International Pty Ltd
ABN: 53007682475
For Warranty and technical queries: 1300 373 199 Aus Or 0800 200 037 NZ
Warranty Exclusions
Damage to the base or diffuser or any part through accident, misuse or negligence.

Gerard Sourcing & Manufacturing
GSM International Ltd.
Consumer Service Centre :
Aus: 1300 373 199
NZ: 0800 200 037
GSM International Ltd has a policy of continual improvement throughout the product range. As such the unit contained within may differ slightly from the unit illustrated on the pack.
MADE IN CHINA for GSM International Ltd.
Mistral is a registered trademark of GSM International Ltd.

Cat. No. MPUREY30-BK May 2020