
Mobius - Hard Drive Oyen Digital - Free user manual and instructions
Find the device manual for free Mobius Oyen Digital in PDF.


| Product Type | 5-Bay RAID System (hard drive enclosure) |
| Dimensions (Width x Depth x Height) | 10.5 x 5.1 x 7.4 inches |
| Interface Ports | eSATA, FireWire 800 (1394b), FireWire 400 (1394a), USB 3.0 |
| RAID Modes Supported | RAID 0 (Striping), RAID 1 (Mirroring), RAID 10 (Striping+Mirroring), RAID 3, RAID 5, JBOD (Clear RAID), Span (Combine) |
| Supported Drives | 3.5" SATA HDD (512e sector size only, enterprise or NAS recommended) |
| System Requirements | Windows, Mac OS 10.4 or higher |
| Package Contents | Mobius 5-Bay, USB 3.0 cable, FW800 cable, FW400 cable, eSATA cable, power cord, user guide, key set |
| Warranty | 2 years repair/replacement (non-transferable, original purchaser only) |
| Operating Temperature | 5°C to 50°C |
| LED Indicators | Solid blue (ready), rapid blinking purple (activity), solid red/purple (error), slow blinking purple (RAID 1 rebuilding), off (sleep/eject) |
Frequently Asked Questions - Mobius Oyen Digital
User questions about Mobius Oyen Digital
0 question about this device. Answer the ones you know or ask your own.
Ask a new question about this device
Download the instructions for your Hard Drive in PDF format for free! Find your manual Mobius - Oyen Digital and take your electronic device back in hand. On this page are published all the documents necessary for the use of your device. Mobius by Oyen Digital.
USER MANUAL Mobius Oyen Digital
After setting a new RAID mode, you must format the volume before it is accessible.
- Connect the RAID to the computer.
- Configure the desired mode as explained in section 4.
- After the RAID is configured, use Disk Management on the PC or Disk Utility on the Mac to format the volume *.

If using RAID 0 or RAID 5, we recommend performing a
low level format after setting the RAID.
Please refer to the following:
http://oyendigital.com/low-level-format
(7) Sleep Mode
If there is no HDD activity, the OS may put the Mobius to sleep (LEDs off, HDDs spin down). The Mobius will wake up when accessed.

To prevent conflict with the OS sleep commands, we recommend disabling hard drive sleep in your OS as follows:
Mac Users: Uncheck the option "Put Hard Disks to Sleep When Possible" in the Energy Saver settings in System Preferences.
Windows Users: Disable hard disk sleep and USB suspend in advanced power settings:
Control Panel > Power Options > Change Plan Settings > Change Advanced Power Settings > Hard Disk > Turn off hard disk after = Never. Control Panel > Power Options > Change Plan Settings > Change Advanced Power Settings > USB Settings > USB Selective Suspend = Disabled.
(8) Rebuilding Data
If one of the HDDs fails, the LED for the corresponding bay will turn red/purple and the sounder will beep. Press the SET button to stop the sound. A new HDD can be installed and it will automatically rebuild with data (if configured as RAID 1, 3, 5, 10). 1. Power down the Mobius.
- Remove the failed HDD.
- Install the new HDD and power on the Mobius with it connected to the computer. (The new HDD should be larger or equal to the previous one.)
- The LED will blink about 2-3 times per second, which indicates a rebuild in progress.
- You may disconnect the Mobius from the computer during the rebuild, if desired. This will not interrupt the rebuild.
Notes:
- To estimate the rebuild time, multiply one HDD by 2 to get the rebuild hours. For example, a 60TB RAID5 will take about 24 hours (12TB x 2). This is approximate and will vary based on drive model.
- The RAID can be accessed during the rebuild, however, it may increase the rebuild time.
(9) Ejecting the Mobius
Windows: Close all applications that are accessing the Mobius. Click the "Eject Hardware" (Safely Remove) icon in the system tray and select the Mobius. The LEDs will cycle off/on a few times and the HDDs will spin down. The LEDs and HDDs will remain off when it is fully dismounted. Note: In JBOD mode, individual drives cannot be ejected separately. All drives must be ejected.
Mac: Close all windows and applications that are accessing the drive. Drag the Mobius to the Trash/Eject icon to dismount it. The LEDs will cycle off/on a few times and the HDDs will spin down. The LEDs and HDDs will remain off when it is fully dismounted.
(10) Frequent Asked Questions (FAQs)
1) If the system experiences an HDD failure:
The LED for the HDD will be solid red/purple and the sounder will beep (press SET to silence).
2) Can I remove a drive from the RAID and install it in another enclosure for access to the files?
You can do so for RAID 1 or JBOD. In other modes, you cannot remove a single drive and access it outside of the RAID.
3) Can I create a RAID-5 and add additional drives later?
No. Once a RAID-5 set is created it must be cleared and re-created to add or subtract drives from the set. This will delete all data.
4) Which drives are recommended for use with the Mobius?
We recommend enterprise or NAS drives such as WD Red or Toshiba N300.
5) The Mobius' LEDs flicker on and then shut off when I turn on the system. Why?
This indicates the Mobius is not receiving a handshake from the computer. Check all connections making sure to connect directly to a computer with the included cable.
6) I connected via eSATA but I only see one hard drive. Why?
It is due to the eSATA host not supporting “port multiplier” which allows an eSATA port to communicate with more than one drive at a time. We recommend the Sonnet Tempo cards, which include port multiplier functionality.
(11) Warranty Information
This product includes a two (2) year repair/replacement warranty provided by Oyen Digital. This warranty is non-transferable and is limited to the original purchaser. Warranty service may be requested by completing the form at the following link: www.oyendigital.com/rma-request-form.html
For our complete warranty policy, visit:
www.oyendigital.com/warranty.html

natural_image
Black server rack unit with multiple ports and handles (no visible text or labels)Mobius 5-Bay RAID System User Guide
Table of Contents
1 Specifications
2 Detailed View
3 Inserting or Removing Drives
4 Setup
5 RAID Modes
6 Formatting
7 Sleep Mode
8 Rebuilding Data
9 Ejecting the Mobius
10 FAQs
11 Warranty Information
For more information, visit our website at www.oyendigital.com
(1) Specifications
| Supported Drives | 3.5° SATA HDD (NAS or Enterprise recommended, 512e only) |
| Interface/Ports | eSATAFireWire 800 1394bFireWire 400 1394aUSB 3.0 |
| RAID Modes | RAID 0 StripingRAID 1 MirroringRAID 10 Striping+MirroringRAID 3RAID 5CLEAR RAID (JBOD) |
| System Requirements | WindowsMac OS 10.4 or higher |
| Operating Environment | Temperature: 5°C ~ 50°C |
| Enclosure Size | 10.5 x 5.1 x 7.4 inches |
Package Includes: Mobius 5-Bay, USB 3.0 cable, FW800 cable, FW400 cable, eSATA cable, power cord, user guide, key set
(2) Detailed View
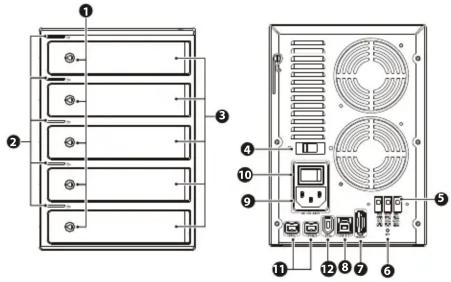
- Door Lock
2.LED-HDD Access
3.Drive Bay - Voltage Select Switch
5.RAID Switch
6.Set Button
7.eSAIA Port
8.USB 3.0 Port
9.Power Port
10.Power Switch
11.1394B port
12.1394a port
LEDs and Sound:
Condition Drive LED
| Powered & ready | Solid blue |
| Read/Write activity | Rapid blinking purple |
| Drive Error | Solid red/purple; Sounder will beep (press SET to silence) |
| HDD Sleep / Eject | Off |
| RAID 1 Rebuilding | Slow blinking purple (approximately 2-3 blinks per second) |
Note: The drive LEDs will be OFF when the unit is not connected to a computer.

Set the Mobius upright on its feet. The Mobius does not function properly when laying on its side.
(3) Inserting or Removing Drives
Inserting: Pull the lever to open the door. Insert/remove drive into bay. To close, pull the lever and push the door all the way closed. Release the lever when the door is closed.
Locking: Use the included key to lock the door if desired.


We recommend using only enterprise or NAS drives (512e only). The Mobius is not compatible with 4Kn hard drives.
(4) Setup
Perform a "Clear RAID" procedure when installing drives for the first time. This procedure conditions the drives for use in the Mobius. It does not delete the partition or data from individual drives.
Clear RAID Procedure:
Set the switches to Clear RAID (all switches down). Press and hold the SET button and turn on the power. Continue to hold the SET button until the 2nd beep occurs (approx. 10 seconds). Release the SET button. Any previous RAID mode is removed and the drives are now set for JBOD mode (individual drives).
You now may set a RAID mode, or leave in JBOD mode.


■ = Switch Position
RAID 1: Insert only 2 HDDs (Bay 1-2)
RAID 10: Insert 4 HDDs (Bay 1-4)
Set RAID Mode:
To configure a RAID, set the switches to the desired mode. Press and hold the SET button and turn on the power. Continue to hold the SET button until the 2nd beep occurs (approx. 10 seconds). Release the SET button. The RAID mode is now configured. Note: All previous data on the drives will be removed when setting a RAID mode.
(5) RAID Modes
RAID 0 (Striping) is a non-redundant data mapping technique. It combines data evenly across multiple drives simultaneously, increasing performance.
- In Striping mode, it will be viewed as one single storage unit. If one disk in the RAID System fails, all data in installed disks will be lost. - The total capacity = smallest drive x the total number of drives. For example, if the smallest drive is 1TB, the capacity will be 5 TB when 5 drives are installed.
RAID 1 (Mirroring) consists of two drives storing duplicate copies of the same data. In this mode, the data is simultaneously written to two disks. The speed of operation is slow in comparison to other RAID modes. • Only 2 HDDs (bay 1 and 2) are allowed for the function to perform properly.
RAID 5 uses block-level striping with parity data distributed across all disks (RAID 5) or one disk (RAID 3). RAID 5 is the most common mode due to the combination of redundancy and speed.
- A minimum of 3 drives is required. (See FAQ regarding adding additional drives later)
- The total capacity = all disks minus 1. The capacity is limited by the size of the smallest disk. For example, if three 2 TB and two 3 TB drives are installed, the total capacity will be 8 TB ((2 TB x 5 disks) - 1 disk).
RAID 10 combines RAID 0 and RAID 1 in one single system. It creates two sets of striped disks and then mirrors these sets.
- Only 4 HDDs are allowed for the function to perform. If 5 HDDs are inserted, the 5th drive will be used as a hotspare, meaning when a drive fails, the 5th drive will automatically be rebuilt to replace the failed drive.
Combine (Span) combines multiple hard drives into a single logical unit. Unlike Striping, it writes data to the first drive until it reaches full capacity. When the first disk reaches full capacity, data is written to the second disk. Spanning provides the maximum possible storage capacity, but does not increase performance or safety.
JBOD (Clear RAID) is not actually a RAID. It simply is a collection of drives that are recognized as individual drives by the OS. JBOD provides no performance increase or redundancy. This is the default setting.


Brand : Oyen Digital
Model : Mobius
Category : Hard Drive