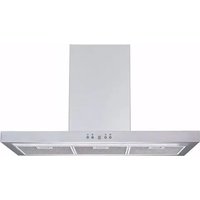
BRT90SS - Range hood BAUMATIC - Free user manual and instructions
Find the device manual for free BRT90SS BAUMATIC in PDF.


| Brand | Baumatic |
| Model | BRT90SS |
| Product Type | Range Hood |
| Installation Type | Wall-Mounted Canopy |
| Width | 90 cm (36 inches) |
| Depth | 50 cm |
| Height (min-max) | 60-100 cm |
| Weight | 14 kg |
| Power Supply | 220-240 V / 50 Hz |
| Motor Power | 250 W |
| Lighting Power | 2 x 20W Halogen |
| Number of Speeds | 3 |
| Max Airflow | 600 m³/h |
| Noise Level (max) | 65 dB(A) |
| Control Type | Slider with Push Buttons |
| Filter Type | Aluminum Grease Filter (dishwasher safe) |
| Charcoal Filter Option | Yes (sold separately) |
| Ducting Diameter | 150 mm |
| Exhaust Outlet | Top or Rear |
| Materials | Stainless Steel |
| Energy Class | A |
| Warranty | 2 years |
Frequently Asked Questions - BRT90SS BAUMATIC
User questions about BRT90SS BAUMATIC
0 question about this device. Answer the ones you know or ask your own.
Ask a new question about this device
Download the instructions for your Range hood in PDF format for free! Find your manual BRT90SS - BAUMATIC and take your electronic device back in hand. On this page are published all the documents necessary for the use of your device. BRT90SS by BAUMATIC.
USER MANUAL BRT90SS BAUMATIC
User Manual for your Baumatic
600/900mm Stainless Steel Box Canopy Rangehood
BRT60SS BRT90SS BRT90ISS
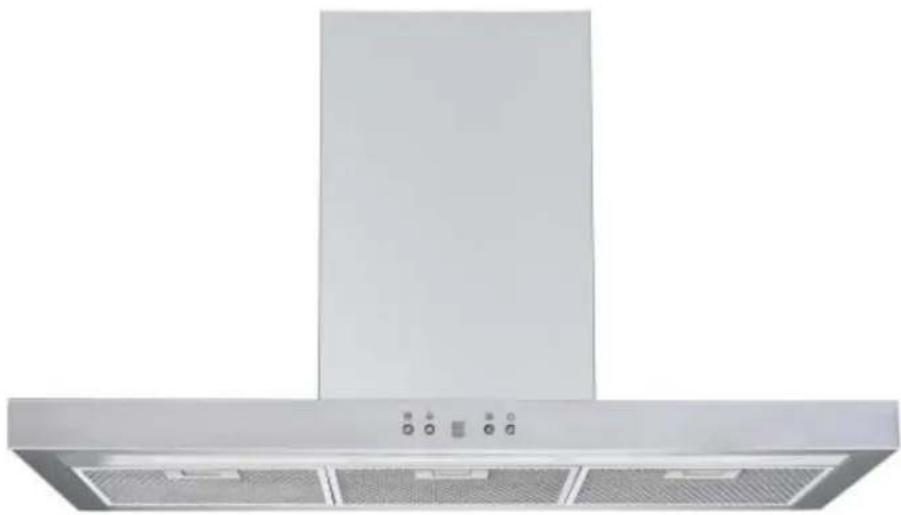
natural_image
Exterior view of a stainless steel kitchen air conditioner unit (no text or symbols visible)Baumatic
NOTE: This user manual contains important information including safety & installation points which will enable you to get the most out of your Baumatic appliance. Please keep it in a safe place so that it is readily available for future reference.
Contents
Environmental note 1
Important safety information 2
Specifications of your rangehood 5
Using your rangehood
Before first use 6
To use your rangehood 6
Cleaning your rangehood
The grease filter 8
Maintenance
Removing and cleaning the grease filter 9
Changing a light bulb 9
Fitting the carbon filter 10
Installation
Electrical connection 11
Before beginning installation 12
Installing your rangehood 13
Fitting the chimney 14
Connecting to external ducting 16
Island installation (BRT90ISS) 17
Completing the installation 19
Extraction mode or recirculation mode? 20
Troubleshooting 21
Environmental note
Note: Before discarding an old appliance, switch off and disconnect it from the power supply. Cut off and render any plug useless. Cut the cable off directly behind the appliance to prevent misuse. This should be undertaken by a competent person.
This appliance is marked according to the European directive 2002/96/EC on Waste electrical and Electronic Equipment (WEEE). By ensuring this product is disposed of correctly, you will help prevent potential negative consequences for the environment and human health, which could otherwise be caused by inappropriate waste handling of this product.
The symbol indicates that on the product or on the documents accompanying the product this appliance may not be treated as household waste. Instead it shall be handed over electronic equipment.

Disposal must be carried out in accordance with local environmental regulations for waste disposal. For more detailed information about treatment, recovery and recycling of this product, please contact your local city office or local waste management office.
- The packaging materials that we use are environmentally friendly and can be recycled.
- Please discard all packaging material with due regard for the environment.
Important safety information

natural_image
Illustration of an owl reading a book (no text or symbols present)Your safety is of the utmost importance to us. Please make sure that you read this instruction booklet before attempting to install or use the appliance. If you are unsure of any of the information contained in this booklet, please contact the Retailer where you purchased your unit from.

IMPORTANT: Any installation work must be carried out by a qualified electrician or competent person.
- The rangehood must be installed in accordance with the installation instructions and all measurements followed.
If the rangehood is installed for use above a gas appliance then the provision for ventilation must be in accordance with the Gas Installations standard AS/NZS 5601.1 & 2:2013, the Gas Safety and Measurement Regulations 2010, and the Building (Specified Systems, Change the Use, and Earthquake-prone Buildings) Regulations 2005 issued under the Building Act 2004. - It is dangerous to alter the specifications or to modify this product. Do not tamper with it or attempt to modify the appliance in any way.
- When installing the rangehood, ensure that the following recommended distances are observed between the highest point on the hob top (including the burners) and the bottom of the rangehood:
Electric cookers: 700 mm
Gas cookers: 700 mm
Coal/ oil cookers: 800 mm
IMPORTANT: Do not set your rangehood less than 700mm above your cooker.
- When installed between adjoining wall cabinets, the cabinets must not overhang the hob.
- The edges of the rangehood are sharp – be mindful of this as you handle your appliance, especially during installation and cleaning. DO NOT CLEAN IN BEHIND THE GREASE FILTERS!
- If the room where the rangehood is to be used contains a fuel burning appliance such as a central heating boiler then its flue must be of the sealed or balanced flue type.
- If other types of flue or appliances are fitted, ensure that there is an adequate supply of air in the room.
- When the rangehood is being used in its extractor function, ensure that the ducting is fire retardant and that there are no bends sharper than 90 degrees as this will reduce the efficiency of the rangehood.
- Ensure the ducting for the extractor function has the same diameter as the outlet hole all the way through.
- Keep young children from using, playing with or tampering with the rangehood.
- Your rangehood is for domestic use only.
- Please dispose of the packing material carefully – children are especially vulnerable to it.
- Dirty oil is an even greater fire risk.
- Always put lids on pots and pans when cooking on a gas cooker.
- The manufacturer refuses to accept any responsibility for damages arising to the rangehood, including it catching on fire, due to a failure to observe the fire safety advice contained in this instruction booklet.
o Remember that when in extraction mode, your rangehood is removing air from your room. Ensure that proper ventilation measures are being observed. -
Note that the rangehood removes odours from your room, not steam.
○ Warning - Always ensure that the rangehood has been switched off before carrying out any work, including replacing light bulbs. -
Do not connect the ducting system of this appliance to any existing ventilation system which is being used for any other purpose.
- Do not install above a cooker with a high level grill.
- Never leave frying pans unattended during use as overheated fats and oils might catch fire.
- The rangehood should not be exposed to a direct heat source from the cooking device underneath it, i.e. a naked flame from a gas burner or heat from electric hob zones without a pan on them.
Do not attempt to use the rangehood if it is damaged in any way. Never attempt to use it without the grease filters fitted or if the filters are excessively greasy! - Never flambé cook under this rangehood.
- The lights on this appliance should only be used during operation of the rangehood. They should not be left on permanently and used as a lighting source.
THE MANUFACTURER DECLINES ALL RESPONSIBILITY IN THE EVENT OF FAILURE TO OBSERVE THE INSTRUCTIONS GIVEN HERE FOR INSTALLATION, MAINTENANCE AND SUITABLE USE OF THE RANGEHOOD.

Specifications of your rangehood
BRT60SS / BRT90SS
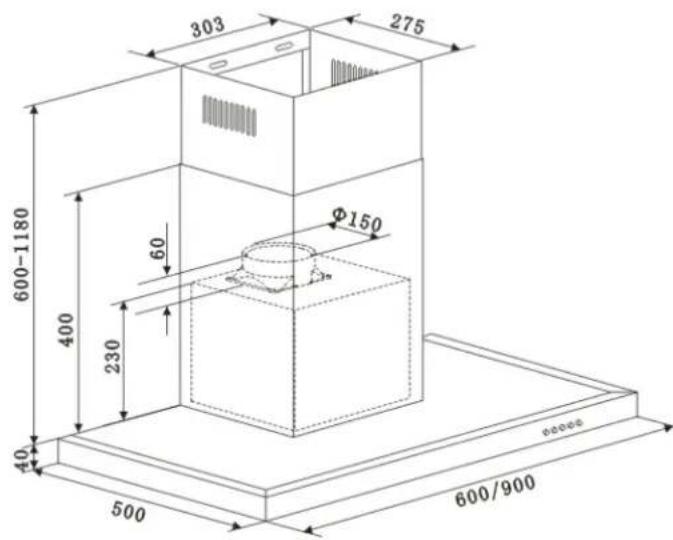
BRT90ISS

Product dimensions
Height: 640 – 1220mm (BRT60/90SS) 637 – 1137mm (BRT90ISS)
Width: 600mm (BRT60SS) 900mm (BRT90SS/BRT90ISS)
Depth: 500mm (BRT60/90SS)
600mm (BRT90ISS)
Rated Voltage: 220-240 Vac 50 Hz
Power Rating: 269W (BRT60SS) / 272W (BRT90SS) / 279W (BRT90ISS)
Your rangehood is fitted with:
- LED strip lighting SYKL34B (BRT60SS) /SYKL34 (BRT90SS/BRT90ISS)
- LED electronic controls
- 3 speed fan
- 2/3 honeycomb aluminium filters SYRSF353C60 / SYRSF353C90 / SYRSF353IS
- 150mm diameter ducting outlet
○ Extendable chimney flue
Extraction capacity: 1000 m³/hr
Noise level min/max: 52 - 62 dB
Optional extras: Recirculation possible with optional charcoal filter:
CF260 (BRT60SS and BRT90SS) / SQ1 (BRT90ISS)
Using your rangehood
Before first use
IMPORTANT: This process must be followed before the rangehood is used for the first time.
You should use a mild liquid detergent and a damp cloth on all the external areas of your rangehood before it is used for the first time. This will help to remove any residues from the manufacturing process.
To use your rangehood
IMPORTANT: Ideally you should switch on your rangehood ten minutes before you start to cook, or at the very least when you begin cooking. You should also run your rangehood for ten minutes after you have finished cooking.
1) Make sure it has been properly installed.
2) Find the CONTROL PANEL. It is located on the rangehood's front surface near the upper right corner of the unit.
3) The CONTROL PANEL contains switches as shown in the Figure below. These perform separate functions. You will need to understand what the switches do before you attempt to use your rangehood.
Your rangehood's control panel

Timer

Lamp

Speed

Power
- Power on: After you have connected the cooker hood to the main supply, the backlight of button will turn on. The backlight will turn off after 30s without any operation and the cooker hood will enter into stand-by mode.
- Press 📄 button once, lights will be on. Press 📄 button again; lights will be off.
- Turn on hood and select the speed, use button “☐”, the motor works at 3 speeds, low, mid and high, and the LED display will display “1”, “2”, “3”.
Press 📋 once, the motor starts to work at low speed and the LED display will display “1”,
Press 📋 again base on the low speed, the motor works at mid speed and the LED display will display “2”,
Press 📋 again base on the mid speed, the motor works at high speed and the LED display will display “3”.
Go on pressing 📋 button, the hood works at low speed again and it repeats: “low→mid→high→low→mid…”
- Press 📍 button once, the hood will work at the speed which it works last time.
Press ⏻ button again, the hood stop working.
- The time button Ⓤ works when the motor is working only.
Press 📊, the cooker hood enters into timer setting mode. The max delay time is 9 min, and the LED display will display “9”.
When the timer is set, the LED display will display “9”, “8”, “7”......decreasing by every minute, when it displays “0”, the motor will start working. Press once, the cooker hood will enter into timer setting mode, press once again, the cooker hood will exit the timer setting mode. Press
Once when the cooker hood is working at timer setting, the cooker hood will exit the timer setting mode automatically.
Please note that your rangehood can be used either in recirculation mode or in extraction mode. To use it in re-circulation mode, you will need to fit the Carbon foam.
Cleaning your rangehood

IMPORTANT: Before cleaning, always ensure that you have switched your rangehood off at the omni-polar switch, set at the wall from the cable.
Cleaning
- Clean the external parts of your rangehood with mild liquid detergent and a new damp cloth.
- Never use abrasive powder, corrosive solvents or brushes.
- Never insert pointed objects into the motor's protective grid.
- Only clean the control panel and grease filter grill with mild liquid detergents and a new damp cloth.
- If you are using the appliance in recirculation mode, then be sure to replace the carbon filters at the recommended interval (see section on “Fitting the carbon filter” on page 9). A build up of grease could cause a fire hazard.
- Never attempt to clean the area above the grease filter.
The Grease filter
- Your rangehood includes a grease filter which helps to absorb grease particles to protect your kitchen and furniture from greasy residues.
- Your rangehood includes a metal filter which can be periodically washed.
- The filter may become flammable if it becomes saturated with greasy residue.
To prevent this fire hazard, the metal filter should be cleaned regularly. Depending on use, this should be done every two months, using hot water and normal washing-up detergent.
IMPORTANT: Do not wash the grease filter in a dishwasher as the chemicals can cause damage.
Maintenance
Removing and cleaning the grease filter Part Number: SYRSF353C60 / SYRSF353C90 / SYRSF353IS
- First remove the grease filter by sliding the securing nibs at the sides of the grille on the underside of the cooker hood.
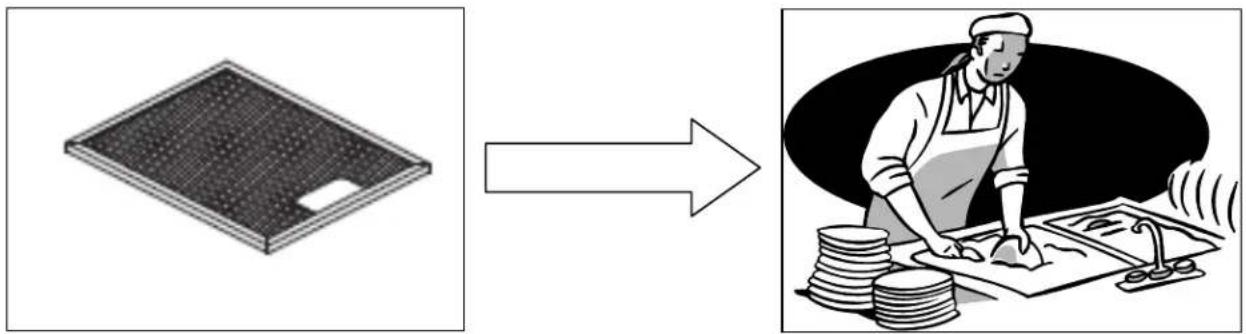
- Soak the grease filter in hot water and washing up liquid for about an hour.
- Rinse it off thoroughly with hot water.
- Repeat the process if required.
o IMPORTANT: Let the grease filter dry thoroughly before refitting it in the rangehood.
- Never attempt to use your rangehood without the grease filter in place.
Changing a light bulb Part number: SYKL34B / SYKL34

○ IMPORTANT – Always ensure the rangehood has been switched off before carrying out any work, including replacing light bulbs.
o Prior to removing the LED light, ensure that it has cooled down.
- Remove the grease filter by sliding the securing nibs at the sides of the grill on the underside of the rangehood.
- Disconnect the internal plug leading to the LED light
○ Replace in reverse order using only genuine spare part SYKL34B / SYKL34
o IMPORTANT: Defective bulbs should be replaced immediately.
- If the light still does not work, make sure that the internal plug is fitted properly before you call for technical assistance.
- Refit the grease filter.
Fitting the carbon filter Part number CF260 / SQ1
If the appliance is going to be used in recirculation mode then it is necessary to fit a carbon filter. This will help to absorb unpleasant odours caused by cooking.
IMPORTANT: Before attempting to fit or remove the carbon filters, you must ensure the rangehood is switched off first.
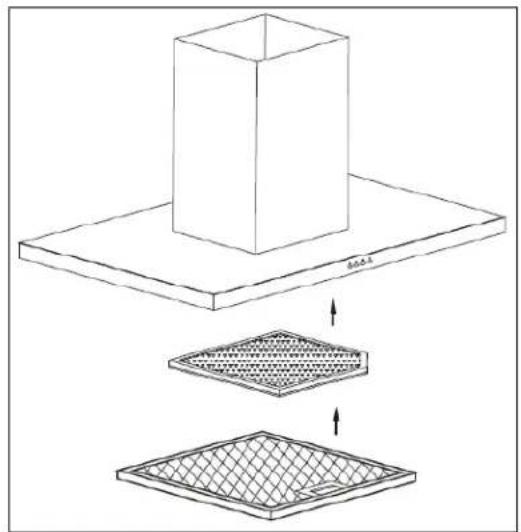
To remove, or install, the charcoal filter (CF260/SQ1) in the direction shown below.

natural_image
Technical line drawing of a ceiling-mounted device with internal components and mounting base (no text or symbols)CF260
natural_image
Diagram showing a 3D cube placed on a flat base, with two separate views of a meshed square underneath (no text or symbols)SQ1
1) Remove the grease filters (as described previously).
2) Insert the carbon filter in the rectangular hole, fitting it over the motor.
Installation
IMPORTANT: Before installation read all the instructions and make sure that the voltage (V) and the frequency (Hz) indicated on the rating plate are exactly the same as the voltage and frequency in your home. The rating plate can be found behind the grease filters.
The manufacturer declines all responsibility in the event of the installer failing to observe all the accident prevention regulations in
force, which are necessary for normal use and the regular operation of the electric system.
Electrical connection
Your rangehood is intended for fitting with power cord & plug for connection to 10A power outlet.
- The power cable must be connected to the terminals marked L (live) and N (neutral) in the rangehood and fixed with a cable clamp.
- The rangehood's power cable must be fitted upstream from the electrical connection using an omni-polar switch with a contact distance of at least 3mm.
WARNING – THIS APPLIANCE MUST BE EARTHED!
We recommend that the appliance is connected by a qualified electrician, who is registered with the EWRB and who will comply with ALL regulations. The wires in the mains lead are coloured in accordance with the following UK code:
$$ \text { Blue } = \text { Neutral }, \text { Brown } = \text { Live }, \text { Green / Yellow } = \text { Ground } $$
If you can only find two wires in the cable (blue and brown), neither must be connected to the Earth terminal!
- As the colours of the wires in the appliance's mains lead may not correspond with the coloured markings identifying the terminals in your spur box, please proceed as follows:

- The blue wire must be connected to the terminal marked "N" (neutral), or coloured black.
- The brown wire must be connected to the terminal marked "L" (live), or coloured red.
- The green/yellow wire must be connected to the terminal marked "E" or .
Before beginning installation
- Check that the product purchased is of a suitable size for the chosen installation area. In addition, check whether there is an electrical socket available that will be accessible once the rangehood is mounted. If the product is going to be used in extraction mode, then there should also be space to connect a ducting hose to the outside.
- Carry out all necessary masonry work prior to the fitting of the rangehood.
- Ensure that all electrical connections are carried out by a suitably qualified person.
- Before commencing installation of the rangehood the grease filters should be removed.
- Check inside the product and ensure that there is no transit packaging or any other materials, such as packets of screws, guarantees etc. These should be removed and kept for future use.
- If possible, disconnect and move freestanding or slot-in cookers from their position, to provide easier access to the rear wall and ceiling. If this is not possible then a thick, protective covering should be placed over the worktop, hob top or cooker. This will help to protect these surfaces from damage and debris.
- Select a flat surface for assembling the rangehood. Cover that surface with a protective covering and place all rangehood parts and fittings on it.
- Do not tile, grout or silicone this appliance to the wall or cabinetry. This appliance is designed to be surface mounted only.
Installing your rangehood (BRT60SS/BRT90SS)
IMPORTANT: You will have to decide before installing your rangehood whether to use it in extraction mode or recirculation mode. Please refer to page 17 to understand the differences between these two modes.
- We recommend that at least two people install this rangehood.
- If you are using the appliance in recirculation mode, then PLEASE NOTE that all of the vent in the upper chimney section must be exposed. You will have to take this into account when calculating the minimum height of the extractor when installed.
○ IMPORTANT: If the recirculation vents are obstructed then the efficiency of the extraction will be affected and could damage the motor.
IMPORTANT: YOUR RANGEHOOD SHOULD BE CONNECTED TO YOUR MAINS SUPPLY AFTER THE REST OF THE INSTALLATION PROCESS HAS BEEN COMPLETED.
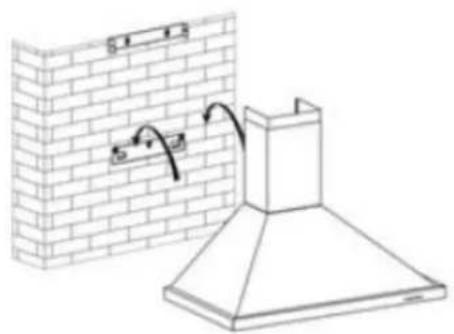
1) Determine the correct height for the hood and fix the hook. Ensure that the hook is level when fixed. Mark and fix the inner chimney bracket as described in the section "Fitting the chimney" on page 13.
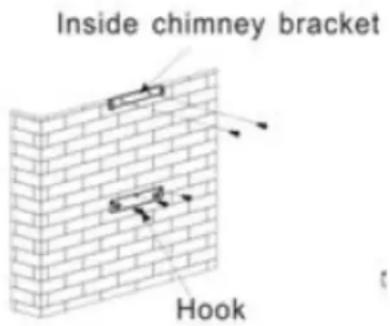
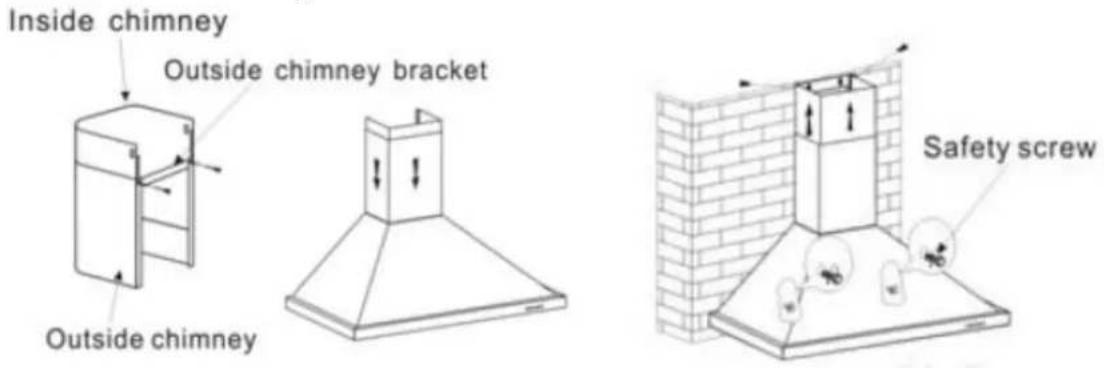
2) Fix the outer chimney bracket to the outer chimney ensuring that the inner chimney is free to slide to the required height and the exhaust ducting does not impede the movement. Then fit the exhaust ducting and the chimney assembly to the hood and hang on the hook.

natural_image
Technical line drawing of a brick chimney and wall assembly (no text or symbols)3) Feed the exhaust ducting to your desired position then adjust the height of the inside chimney to the inner chimney bracket and screw in place. Once the position is fixed secure the unit with two safety screws through the 6mm holes in the back casing.
Fitting the chimney
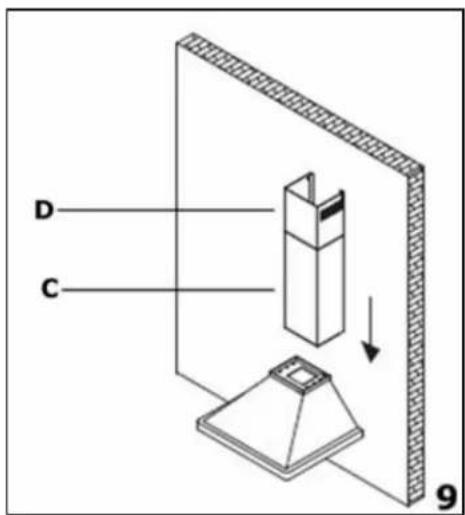
9) Take the two chimney sections (C) and (D).
Rest the bottom of chimney section (C) on the top of the hood. You should take care to position the tabs on the chimney section into the rear of the hood.
○ Mark the side measurement of both sides of chimney section (C) on the wall with a pencil.
natural_image
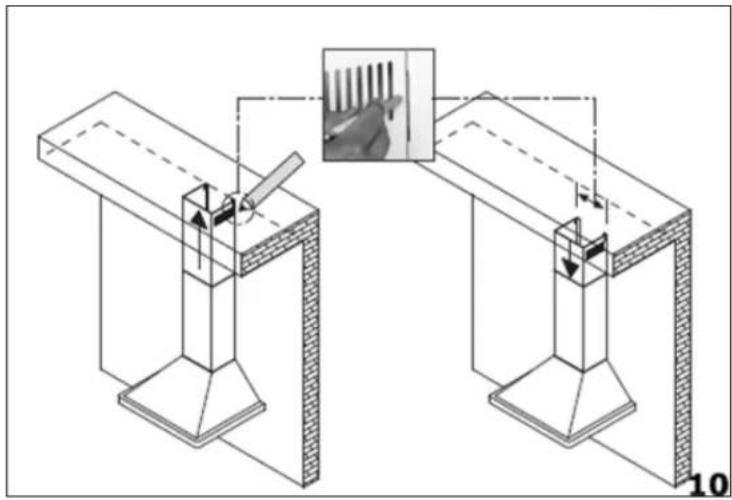
Technical diagram of a mechanical assembly with two identical structural supports and a close-up inset showing a magnified view of a component (no text or symbols present)10) Lift chimney section (D) upwards until it reaches the ceiling. You must ensure that it is perpendicular to the hood.
○ Mark the side measurements of both sides of chimney section (D) on the wall with a pencil and then remove chimney section (D).

11) Take the flat bracket (E) and place it between the two pencil marks that you made in step 9.
- Keeping the bracket in contact with the wall, use a pencil to
mark on the wall the anchoring holes that are cut out of the bracket.

12) Using a 6 mm drill bit, drill two holes on the pencil markings that you made in step 10. Insert rawl plugs into the holes and then use a screwdriver to secure the fixing bracket to the wall.
○ Refit chimney section (C) to the hood and fix it onto the hood using the two screws that are supplied.
- Secure the top of chimney section (C) to the flat bracket, using the screws provided.

natural_image
Technical diagram showing a structural component with an inset close-up of a grid pattern, labeled '13' (no text or symbols on the diagram itself)- Slide chimney section (D) inside of chimney section (C). Then secure the L shaped bracket to the wall, using the same method as you have just used to secure the lower bracket.
13) Lift chimney section (D) up to the ceiling and secure it to the L shaped bracket using the screws provided.
Connecting to external ducting (top)

- Connect the coupling to the top of the rangehood, using two of the smaller screws provided (if side ducting, this is either through the wall or the Soffit).
- Connect a 150 mm ducting hose to a discharge outlet that is suitable for cooking vapours. Please note that the ducting hose is not supplied with the appliance but one can be obtained from the Retail outlet where you purchased your appliance.
- The maximum distance between the coupling and your discharge outlet should be 3 metres, with one 90 degree bend. For each additional 90 degree bend, the maximum distance is reduced by a further metre.
Before fixing the rangehood into the kitchen unit, you should connect the other end of the ducting hose to the coupling in the top of the cooker hood.
Installing your rangehood (BRT90ISS)
- The ceiling must can bear at least 40kgs weight, and the thickness of the ceiling must be ≥ 30MM, see pic 2, drill 1*170mm round hole in the ceiling.
- According to the hanging board, drill 12 holes in the ceiling, see pic 2, 12pcs of ST6*40mm big flat screws will be used to fix the hanging board on the ceiling, and then 8pcs of M4*10 screws and M4 nut with gasket will be used to connect the angle iron into the hanging board, see pic 1, calculated the length of the angle iron, and 16pcs M4*10 big flat screws and M4 nut with gasket will be used to connect the angle iron and another angle iron (the overlap length of angle iron can not less 100MM)
- Let the one side of the extensible pipe go outside through the hole of 170MM, see pic 3.
- 4pcs ST4*8 big flat screws will be used to connect the internal chimney into the hanging board, then put one the external chimney, two hooks will be used to put up the external chimney in order to the next installation, see pic 4.
- 4pcs ST4*8 big flat screws will be used to install the outlet, see pic 5.
- Hold up the hood, 16pcs M4*10 big flat screws will be used to connect the hood body into angle iron, see pic 6.
- Put the extensible pipe on the outlet; after ensure all the things ok, put down the hook, take from the external chimney, all the installation is finished, see pic7& 8.
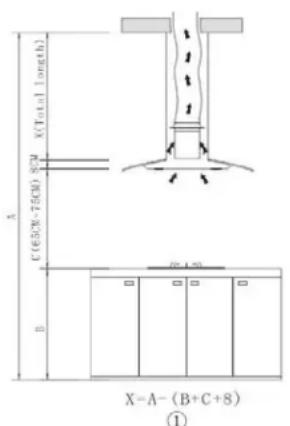
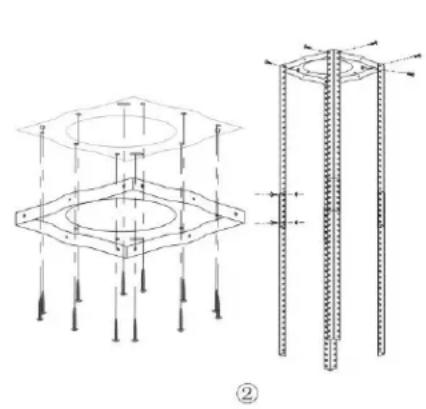
natural_image
Technical diagram showing structural components with arrows indicating forces or dimensions, no readable text or symbols present.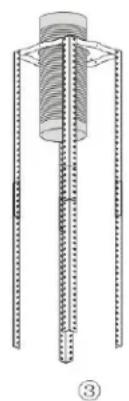
natural_image
Technical diagram of a mechanical assembly with threaded components and a central shaft (no text or symbols)4
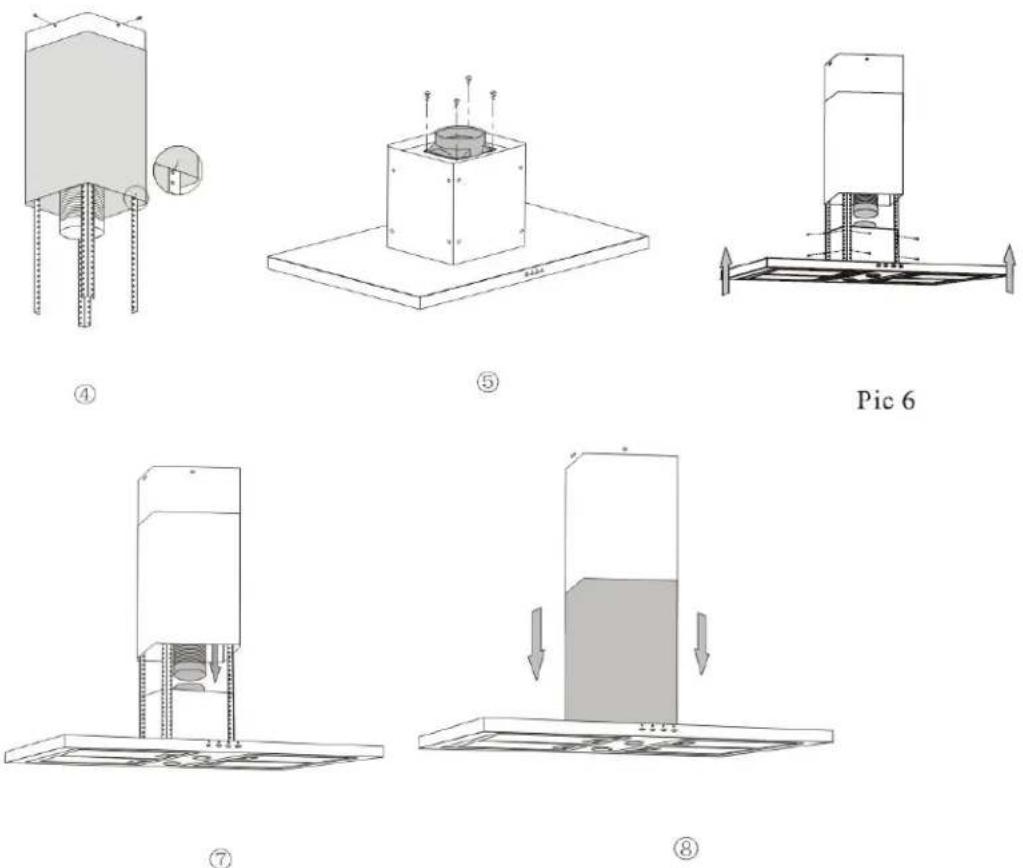
NOTICE OF INSTALLATION
- Before installation, please ensure the area is clean to avoid suction of the remaining bits of broken wood and dust.
- It cannot share the same air ventilation tube with other appliance such as gas tube, warmer tube, and hot wind tube.
- The bending of ventilation tube should be ≤ 120^ , parallel or above the start point and should be connected to the external wall.
- After installation, make sure that the extractor is level to avoid grease collection at one end.

natural_image
Two identical line drawings of a top hat on a curved base, with checkmark and cross symbols indicating alignment (no text or labels)Completing the installation
If you are setting the appliance to recirculation mode, then you should now fit the carbon filters. See the section "Fitting the carbon filter" on page 10
The electrical connection must correspond to the electrical requirement noted on the rating plate, which is placed inside the rangehood. The appliance should now be connected to the electrical supply. See page 10 for detailed information on the electrical connection.
Refit the grease filter and then switch on the mains supply to the appliance. Check that the appliance is operating correctly by selecting each speed and switching the light bulb on and off.
Extraction or recirculation mode?
IMPORTANT: You will have to decide prior to installing your rangehood whether to use it in extraction mode or recirculation mode.
What is the difference between extraction and recirculation modes?
In extraction mode, the stale air will be taken via the grease filter and out of the room via external ducting.
In recirculation mode stale air is taken via the grease filter, and passed through a charcoal filter for purification. The air then re-enters the kitchen via an opening in the rangehood.
For optimum performance, we recommend that the rangehood is used in extraction mode and connected to external ducting.
Unfortunately if you live in a flat, or if the rangehood is too far from an outside wall, this may not be possible. The only alternative is to recirculate the air.
Do I need a charcoal filter?
All rangehoods have a grease filter but if you are using your rangehood in recirculation mode, then a charcoal filter must be fitted in addition to the grease filter.
Troubleshooting
IMPORTANT: If your rangehood appears not to be operating properly, before contacting an authorised service agent, please refer to the checklist below.

My rangehood will not start.
- Check that the rangehood is connected to the power supply and whether you have selected any of the fan speeds.

My rangehood is not working effectively.
- Check that the fan speed is set to an appropriate setting.
- Check that the grease filters are not dirty and do not require cleaning.
- If the rangehood is set up for recirculation mode, check that the carbon filter does not need to be replaced.
- If the rangehood is set up for extraction mode, check that the ducting hose and discharge outlet are not blocked.

My rangehood is noisy and/or vibrating.
- Check whether the installation has been completed as per the instruction booklet.
- It is normal to get a certain amount of noise and vibration, due to the extraction capacity of the rangehood.

Where do I go to get parts for my rangehood.
- If you need bulbs, filters, or semi-rigid aluminium ducting for your rangehood, please contact the retailer from where you purchased it, or visit www.Baumatic.co.nz/service for more information.

My rangehood is not working properly.
Do not attempt to repair the appliance yourself. If the appliance is not operating correctly please contact an authorised service agent. Go to www.Baumatic.co.nz or phone 0800 M10 HLP / 0800 610 457 to locate your closest service agent.
DO NOT ATTEMPT TO REPAIR THE APPLIANCE YOURSELF.

Please note that if a Technician is asked to attend whilst the product is under guarantee and finds that the problem is not the result of an appliance fault, then you may be liable for the cost of the call-out charge.
The appliance must be accessible for the Technician to perform any necessary repair. If your appliance is installed in such a way that an engineer is concerned that damage will be caused to the appliance or your kitchen, then the Technician will not complete a repair.
This includes situations where appliances have been tiled in, sealed in with sealant, have wooden obstructions placed in front of the appliance such as plinths, or where any installation other than the one specified by the manufacturer has been completed.
Please refer to the conditions of guarantee that appear on the warranty card that you receive with the appliance.
IMPORTANT: The manufacturer operates a policy of continuous improvement and reserves the right to adjust and modify its products without prior notification.
Baumatic®
WARRANTY REGISTRATION CARD
Congratulations on your new appliance purchase!
To help care for your investment, be sure to register your appliance online. Registration will help you if you need to arrange service in the future, and serves as a record of your purchase – including critical information like model number and serial number – that you can refer to at any time. Simply visit the below website, or ask your retailer for help:
www.applico.co.nz/register
WARRANTY:
Unless otherwise stated in paragraph 7, these products are covered by a warranty for a period of 24 months from the date of purchase, subject to the following conditions*. The warranty covers rectification free of charge of any fault arising from defective materials or components, or faulty workmanship or assembly.
* The conditions above mentioned are:
- That the purchaser carefully follows all instructions packed with the product;
- That the purchaser and/or installer carefully follows the installation instructions provided and complies with electrical wiring regulations, gas and/or plumbing codes;
- That the purchaser carefully follows instructions provided in the owner's handbook relating to the proper use and care of the product and does not use the product for any purpose other than the domestic use for which it has been designed;
- Commercial use of the product for professional or industrial purposes will void this warranty.;
- That the product was purchased and installed in New Zealand;
- That this warranty does not extend to:
a) optional glass lids for hobs apart from claims which relate to mechanical or physical damage thereof at the date of purchase;
b) 'consumable' parts such as light bulbs or filters;
c) damage to ceramic glass caused by liquid or solid spill-overs, lack of maintenance, or impact;
d) damage to surface coatings caused by cleaning or maintenance using products not recommended by the owner's handbook;
e) defects caused by normal wear and tear, accident, negligence, alteration, misuse or incorrect installations;
After registering your appliance online, we recommend you fill out the below information for your reference and keep this warranty card in a safe place.
PRODUCT:
RETAILER:
DATE OF PURCHASE:
INVOICE NO:
MODEL NO:
f) a product dismantled, repaired or serviced by any serviceman other than an authorised service agent;
g) a product not in possession of the original purchaser;
h) damage caused by power outages or surges
i) damage caused by pests (eg. rats, cockroaches etc.)
- That if the product is a freestanding microwave oven or small appliance it must be returned to the dealer/retailer for servicing. These products, unless stated otherwise, have a 12 month warranty from original date of purchase with 24 months on the microwave magnetron; Waste disposers have a 12 month warranty.
- The provision of service under this warranty is limited by a 25km boundary from the retailer where the product was purchased except for microwaves. Such travelling outside of these limits will incur commercial cost to be paid by you, regulated by the number of kilometres travelled beyond the 25km limit (50km return trip). Microwaves are to be delivered to the nearest authorised service agent by the customer.
- All warranty repairs must be agreed to by Applico and undertaken by an Applico appointed authorised service agent. Please refer to your user manual for any further conditions that may apply to your specific model.
Please refer to your user manual for any further conditions that may apply to your specific model.
Nothing herein contained shall be construed in any way as excluding or limiting your rights under the Consumer Guarantees Acts 1993.
For Service please visit baumatic.co.nz/service or contact the dealer/retailer from whom you purchased the product from or call the 0800 number listed below. If you are unable to establish the date of purchase, or the fault is not covered by this warranty, or if the product is found to be in working order, you will be required to bear all service call charges.
Registration of this warranty constitutes acceptance of the terms and conditions of this warranty.
Should you require any assistance, please call Customer Services on 0800 763 448.
Distributed by Applico Ltd.
www.baumatic.co.nz
November 2015
SERIAL NO*:
REGISTRATION WEBSITE DETAILS FOR
www.applico.co.nz/register
WEBSITE USERNAME: ....
WEBSITE PASSWORD:
Baumatic
Imported by Applico Ltd.
Private Bag 92900
Onehunga, Auckland 1061,
New Zealand
Website
www.baumatic.co.nz
- User Manual for your Baumatic
- 600/900mm Stainless Steel Box Canopy Rangehood
- BRT60SS BRT90SS BRT90ISS
- Baumatic
- Contents
- Using your rangehood
- Cleaning your rangehood
- Maintenance
- Installation
- Environmental note
- Important safety information
- Specifications of your rangehood
- Product dimensions
- Your rangehood is fitted with:
- Before first use
- To use your rangehood
- Your rangehood's control panel
- Cleaning
- The Grease filter
- Removing and cleaning the grease filter Part Number: SYRSF353C60 / SYRSF353C90 / SYRSF353IS
- Changing a light bulb Part number: SYKL34B / SYKL34
- Fitting the carbon filter Part number CF260 / SQ1
- Electrical connection
- Your rangehood is intended for fitting with power cord & plug for connection to 10A power outlet.
- WARNING – THIS APPLIANCE MUST BE EARTHED!
- If you can only find two wires in the cable (blue and brown), neither must be connected to the Earth terminal!
- Before beginning installation
- Installing your rangehood (BRT60SS/BRT90SS)
- Fitting the chimney
- Connecting to external ducting (top)
- Installing your rangehood (BRT90ISS)
- NOTICE OF INSTALLATION
- Completing the installation
- Extraction or recirculation mode?
- Troubleshooting
- My rangehood will not start.
- My rangehood is not working effectively.
- My rangehood is noisy and/or vibrating.
- Where do I go to get parts for my rangehood.
- My rangehood is not working properly.
- DO NOT ATTEMPT TO REPAIR THE APPLIANCE YOURSELF.
- Baumatic®
- WARRANTY REGISTRATION CARD
- www.applico.co.nz/register
- WARRANTY:
- Website
Brand : BAUMATIC
Model : BRT90SS
Category : Range hood