Gallant XL Longarm - Sewing machine BABY LOCK - Free user manual and instructions
Find the device manual for free Gallant XL Longarm BABY LOCK in PDF.

| Product Type | Longarm Quilting Machine |
| Brand | Baby Lock |
| Model | Gallant XL |
| Dimensions (L x W x H) | Approx. 121.9 cm x 60.9 cm x 121.9 cm (48" x 24" x 48") |
| Weight | Approx. 43 kg (95 lbs) |
| Power Supply | 120 V, 60 Hz, 1.5 A |
| Stitch Length Range | 2.5 mm to 5.0 mm |
| Maximum Sewing Speed | Up to 2,000 stitches per minute |
| Needle System | 134 or 135x17 |
| Needle Size | 14/90 to 18/110 |
| Bobbin Type | L-style or M-style, depending on configuration |
| Throat Space | 20" (50.8 cm) to the right of the needle |
| Quilting Frame Compatible | Yes, designed for use with Baby Lock or compatible longarm frames |
| Stitch Regulation | Electronic stitch regulator (optional on some models) |
| Lighting | Bright LED work light |
| Maintenance | Regular cleaning of bobbin area and oiling as per manual |
| Safety Features | Automatic needle stop, safety power switch |
| Parts and Repairability | Authorized Baby Lock service centers; spare parts available through dealers |
| Additional Features | Adjustable presser foot pressure, automatic thread cutter |
Frequently Asked Questions - Gallant XL Longarm BABY LOCK
User questions about Gallant XL Longarm BABY LOCK
0 question about this device. Answer the ones you know or ask your own.
Ask a new question about this device
Download the instructions for your Sewing machine in PDF format for free! Find your manual Gallant XL Longarm - BABY LOCK and take your electronic device back in hand. On this page are published all the documents necessary for the use of your device. Gallant XL Longarm by BABY LOCK.
USER MANUAL Gallant XL Longarm BABY LOCK
Instruction and Reference Guide
Model BLGT18A

FOR THE LOVE OF SEWING
To register your machine warranty and receive Baby Lock product updates and offers, go to babylock.com. If you have questions with registration, visit your Authorized Baby Lock Retailer.
Baby Lock Consumer Helpline: 800-313-4110
www.babylock.com
Brought to you by Tacony Corporation®
How to Use This Manual
Special Information
NOTE: A NOTE indicates important information that helps you make better use of your Baby Lock product.
IMPORTANT: An IMPORTANT note provides information that is essential to properly using your Baby Lock product.
△ CAUTION: A CAUTION indicates a potential for causing harm to your quilting machine, the quilt, or to yourself.
QUILTING TIP: Baby Lock Educators share tips to help you get started quilting.
Finding Information
What are you looking for?
Find it here
Warranty Information....User manual
Safety Information....User manual
Regulatory Information ....User manual
What's Included with Your Machine....User manual
Machine Specifications....User manual
Frame Setup Information .... Longarm quilting frame installation manual (included with frame)
Machine Setup Information ....User manual
How to Thread Your Machine...... Quick reference card
Type of needle to use in machine...... Quick reference card
Basic Maintenance ....User manual
Customer Care/Baby Lock Product Support......Baby Lock Product Support - 800-313-4110
Available 8:30 AM to 5:00 PM Central Time, Monday to Friday
Contents
How to Use This Manual....1
Special Information .... 1
Finding Information.... 1
Congratulations on Your Purchase! 4
What's Included with Your Machine.... 4
Important Safety Information....5
Save these instructions....6
Recommended Use and Storage 7
About Your Machine....9
Get to Know Your Gallant XL.... 10
Left Side View (picture shown with optional rear handlebars) 10
Right Side View (picture shown without handlebars) 11
Rear View 12
Power Cord....14
Front Handlebars 14
Touchscreen Display 15
Spool Pin and Thread Mast 16
Machine Head USB Port (built-in) 16
Optional Accessories 17
Rear Handlebars Kit 17
Ruler Base.... 18
Rear Laser Light 19
Horizontal Spool Pin 20
Accessory Feet....20
Operating Instructions....21
Power Switch 21
Lighting 21
Machine Needle 21
Hopping Feet 23
Bobbin and Bobbin Tension....24
Quilting with the Gallant XL....26
Preparing to Quilt....26
Threading the Machine 28
Top Tension.... 30
Threading the Needle with the Needle Threader.... 30
Tension Quick Start Guide 31
Free-Motion Quilting....32
Gallant XL Screen Navigation 33
Home Screen 33
Main Menu.... 34
Lights 34
Stitching....35
Overspeed Alarm....35
Information.... 36
Diagnostics 36
Updates 39
Stitch Modes 40
Cruise Mode 41
Precision Mode....41
Manual Mode 42
Alerts 43
Machine Maintenance....45
Clean and Oil Your Gallant XL 45
Maintenance Schedule 46
Troubleshooting 47
Appendix 1....53
Congratulations on Your Purchase!
Remember, if you ever have questions, an authorized Baby Lock retailer can help you. If the retailer is not available, contact Baby Lock Product Support, Monday through Friday, 8:30 AM to 5:00 PM Central Time (1-800-313-4110).
IMPORTANT: The packaging materials are designed to prevent the machine from being damaged. Keep the carton and packing materials in case you need to bring this machine to the retailer, send it for repair, or otherwise transport it. If you don't pack the machine properly or if you don't use the correct packaging materials, the machine could be damaged. Baby Lock is not liable for damage that occurs during return shipping.
What's Included with Your Machine
- Bobbins (5) one installed in bobbin case • Needle threader
- Bobbin case • Replacement O-ring
- Needle (134) size 100/16 (pack of 10)
- Needle (134) size 110/18 (pack of 10)
- Spool pin and thread mast • Open-toe Foot
- Pen oiler • Lint brush
• Power cord (locking) • Gallant XL Bobbin Winder - Screwdriver
• Wrench, 8mm/10mm combined
• Gallant XL Quick Reference Card
• Closed-toe Foot (installed)
- Gallant XL Quilting Machine (including carriage, front handlebars, touchscreen)
Important Safety Information
This device complies with Part 15 of the FCC Rules. Operation is subject to the following two conditions: (1) This device may not cause harmful interference, and (2) this device must accept any interference received, including interference that may cause undesired operation. See the full Declaration of Conformity in the Appendix.
IMPORTANT: Do not operate your Gallant XL quilting machine until you have completely read the information contained in this manual. Please keep all packaging and order information for warranty purposes.
IMPORTANT SAFETY INSTRUCTIONS
Read all instructions before using this machine.
When using this machine, basic safety precautions should always be followed.
DANGER — To reduce the risk of electric shock:
- A quilting machine should never be left unattended when plugged in. Always unplug the machine from the electrical outlet immediately after using and before cleaning.
WARNING — To reduce the risk of burns, fire, electric shock, or injury to persons:
- It is recommended to have two people when lifting your Gallant XL. Always lift from the throat of the machine, not from the handlebars or the needle bar area.
- Always unplug the Gallant XL from the electrical outlet when performing any maintenance, changing the needle, removing thread locks, or when left unattended.
- Do not unplug by pulling on the cord. To unplug, grasp the plug, not the cord.
- Keep fingers away from all moving parts. Use caution around the needle.
- Change the needle often. Do not use bent or dull needles. "Every quilt deserves a new needle" is our motto.
- Switch the machine to the off (or symbol O), position to turn it off when making any adjustments in the needle area, such as threading the needle, changing the needle, changing the bobbin, or changing the hopping foot.
- Never drop or insert foreign objects into any opening.
- The Gallant XL should only be used indoors, away from moisture.
- The Gallant XL should not be stored or used in extreme temperatures.
- Use the Gallant XL only for its intended purpose as described in this manual.
-
Connect this appliance to a properly grounded outlet only.
-
To disconnect from the wall outlet, push the switch to the off position. Then remove the plug from outlet, pulling from the plug, not the cord. Never operate the Gallant XL if the cord is damaged or not working correctly. If a mechanical or electrical problem is encountered, return the Gallant XL to the nearest authorized Baby Lock retailer for examination, repair, electrical or mechanical adjustment.
- It is not recommended that the Gallant XL quilting machine be used with any machine quilting frame other than those recommended by Baby Lock.
- Use this quilting machine only for its intended purpose as described in this manual. Use only attachments recommended by Baby Lock as contained in this manual.
- Never operate the machine with any ventilation openings blocked. Keep openings of the machine free from the accumulation of lint, dust, and loose fabric.
- Do not operate where aerosol products are being used or where oxygen is being administered.
- Do not move the machine across the fabric at an excessive speed while stitching. It may deflect the needle enough to cause it to break.
- Use only needles designed for free-motion quilting and recommended by Baby Lock for this machine. Use the specific needle system recommended by Baby Lock.
- Children should not play with the machine. Close attention and supervision is necessary when this machine is used by or near children.
- This stitching machine may be used by children age 8 years and above and persons with reduced physical, sensory, or mental capabilities or lack of experience and knowledge if they have been given supervision and instruction concerning use of the machine in a safe way and understand the hazards involved.
- Cleaning and user maintenance should not be performed by children without supervision.
Save these instructions
This machine is intended for household use. These are the original instructions.
Disclaimer
Baby Lock and its retailers are in no way legally responsible or liable for damage to the Gallant XL when used improperly or not in accordance with the guidelines stated in this manual or when used on machine quilting frames not recommended by Baby Lock.
When using an electrical appliance, basic safety precautions should always be followed, including the following:
-
Carefully watch the needle when stitching. Do not touch the handwheel, take-up lever, needle, or other moving parts while the machine is running.
-
Turn the machine off and unplug the cord in the following cases:
-
when you have finished using the machine
- when you replace or remove the needle or any other part
- when you check or clean the machine
-
when you leave the machine unattended
-
Do not use extension cords. Connect the machine directly to the wall outlet or to a surge protector or UPS (Uninterrupted Power Source) that connects directly to the wall outlet.
To increase the life of your machine
- Do not store your Gallant XL in areas exposed to direct sunlight or high humidity. Never use or store the machine near a heater, an iron, a halogen lamp or other hot items.
- Use only neutral soaps or detergents to clean the machine. Never use benzene, solvents or scouring powders. They can damage the case and the machine. A damp microfiber cloth is a good choice.
- Do not drop or bump the machine.
- Always consult the manual to replace or fix the hopping foot, needle or any other part of the machine. If necessary, contact an authorized Baby Lock retailer or Baby Lock Product Support, 800-313-4110.
Recommended Use and Storage
-
It is recommended that our products be operated within in a temperature range of 60^ F to 90^ F.
-
Store products in a climate-controlled environment with the following provisions:
-
Store machine in the original packaging, which contains the internal supports designed specifically to maintain and protect the machine during transport or storage.
- Detach cables and accessories before packing.
-
To best protect your electronics, store them in the original packaging, especially any that arrived in antistatic containers.
-
Storage or use in an environment other than what is recommended may result in
-
Rust
- Premature wear
- Damaging condensation
• Overheating
- Poor performance
- Shortened battery life
- If the product is stored at a temperature above or below the recommended operating range, allow the machine to acclimate to the operating environment before use.
To repair or adjust the machine
If the machine is not functioning properly or needs adjustment, first check the troubleshooting chart in the appendix to inspect and adjust the machine yourself.
For more product information and updates, visit our website at www.babylock.com.
The contents of this manual and product specifications are subject to change without prior notice.
Check for updated manuals at www.babylock.com.
About Your Machine
General Specifications
The Gallant XL uses high-tech electronics and an innovative user interface to offer greater functionality and ease of operation to home quilters than ever before conceived in the quilting industry. The Gallant XL quilting machine is a high quality machine that incorporates robust design features and is easy to maintain.
Stitching Opening Dimensions (210 mm X 383 mm) 8.25 inches X 18.00 inches
Stitching Speed Manual Mode: from 25 to 2,100 stitches per minute
Regulated Mode: from 0 stitches per minute to full speed
Cruise Speed 50 to 800 stitches per minute.
Stitches Per Inch 4 stitches to 18 stitches per inch in regulated mode
Needle System 134
Needle Sizes (recommended) From 80/12 to 130/21
Hook System Rotary, Horizontal Axis, M-class bobbin
Bobbin Type Aluminum, Class M
Bobbin Case Type MF
Motor Type Brushless DC, servo controlled
Needle Positioning Up and down, walking stitch
Electrical Power Maximum 200 watts, 50-60Hz, 100-240 VAC
Average 0.9 ampere at 115 VAC, 60Hz
This machine conforms to UL and international safety standards for stitching machines and US and international laws for electromagnetic compliance.
Display 7-inch color touchscreen
Sew Foot Stroke/Lift 5 mm
Needle Bar Stroke 35.3 mm
Take-Up Stroke 73 mm
Lubrication, main components Kluber Lube, permanent
Lubrication of hook Velocite 10, Texaco 22
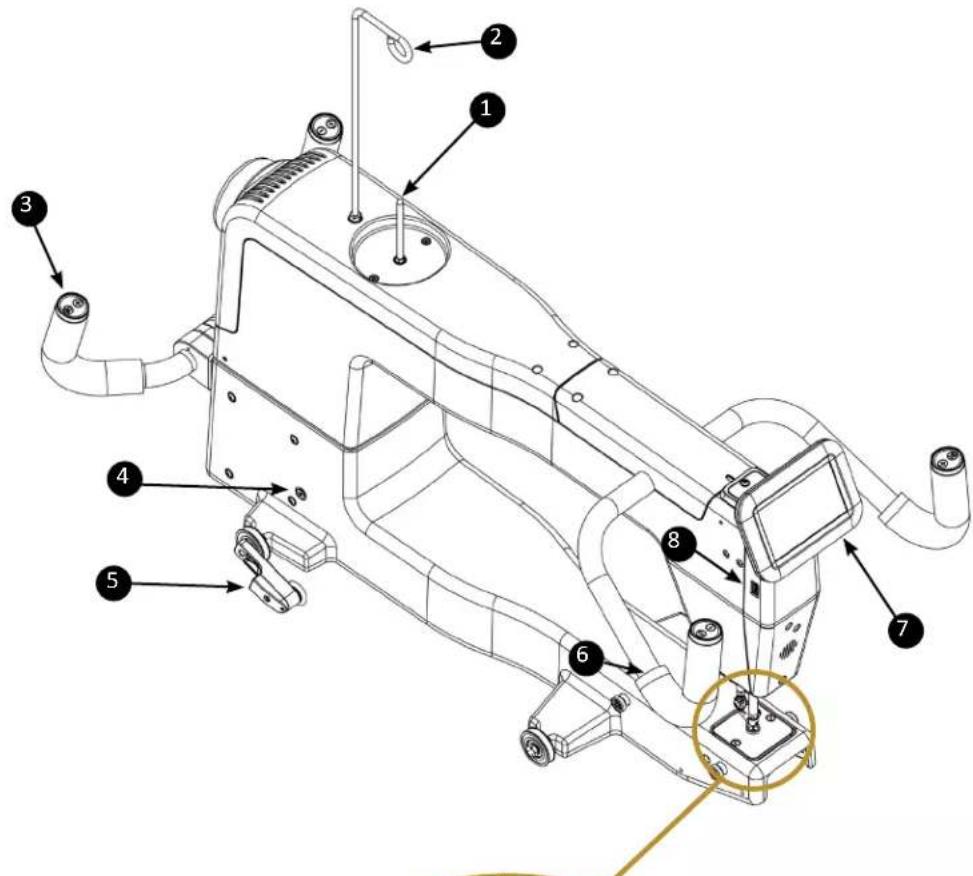
Get to Know Your Gallant XL
Left Side View (picture shown with optional rear handlebars)
- Spool pin
- Thread mast
- Rear handlebars (optional accessory)
- Machine encoder connector
- Machine encoder
- Front handlebars
- Front touchscreen display
- USB port
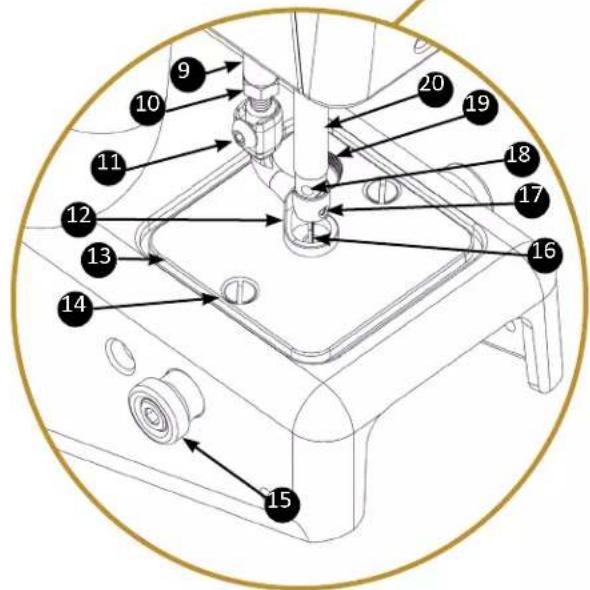
Close-up view of needle area
- Presser bar
- Presser bar jam nut
- Hopping foot mounting screw
- Closed Toe Hopping Foot
- Needle plate
- Needle plate screw
- Ruler base post (optional accessory)
- Needle
- Needle bar thread guide
- Needle stop sight hole
- Needle bar clamp screw
- Needle bar
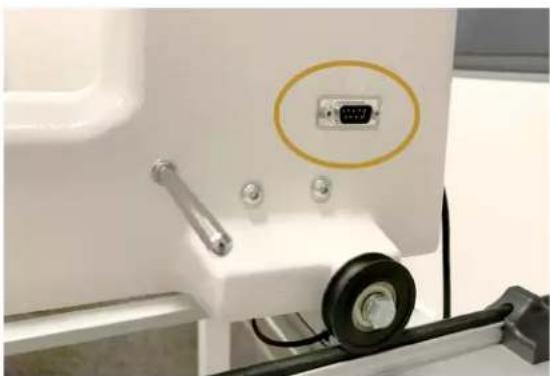
Right Side View (picture shown without handlebars)
IMPORTANT: Only rotate the handwheel toward you from this side of the machine. From the rear of the machine, it will rotate counterclockwise.
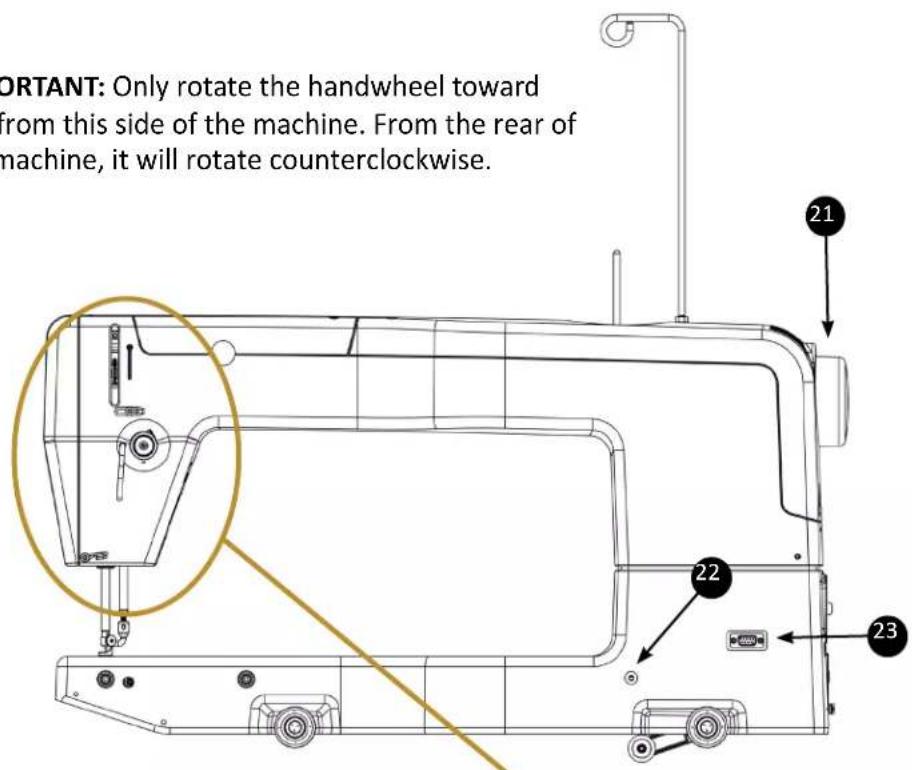
- Handwheel
- Threaded hole for the optional laser pin
- 9-pin connection plug for the optional laser
Close-up view of tension assembly area
- Three-hole thread guide
- Thread guide
- Take-up spring
- Top tension assembly
- Thread stirrup
- Take-up lever
- Lower thread guide
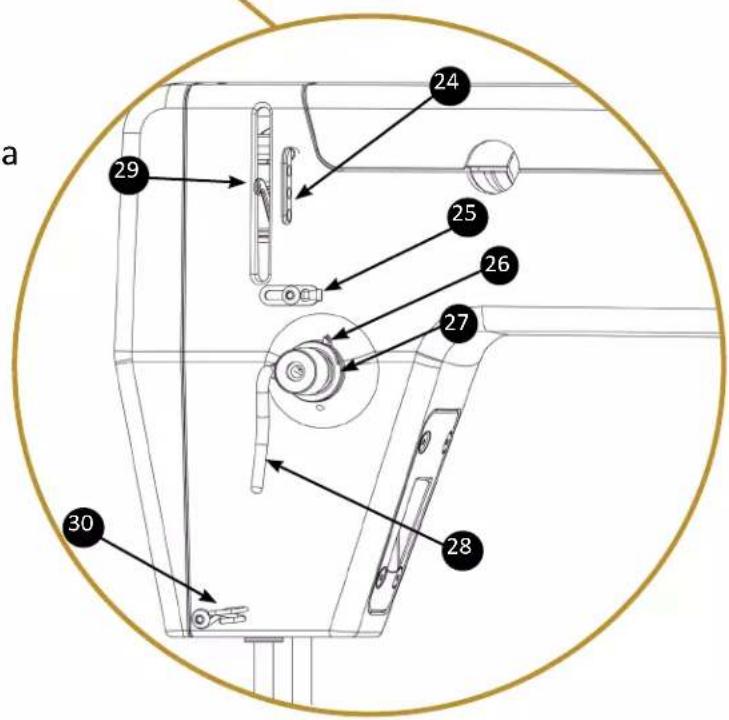
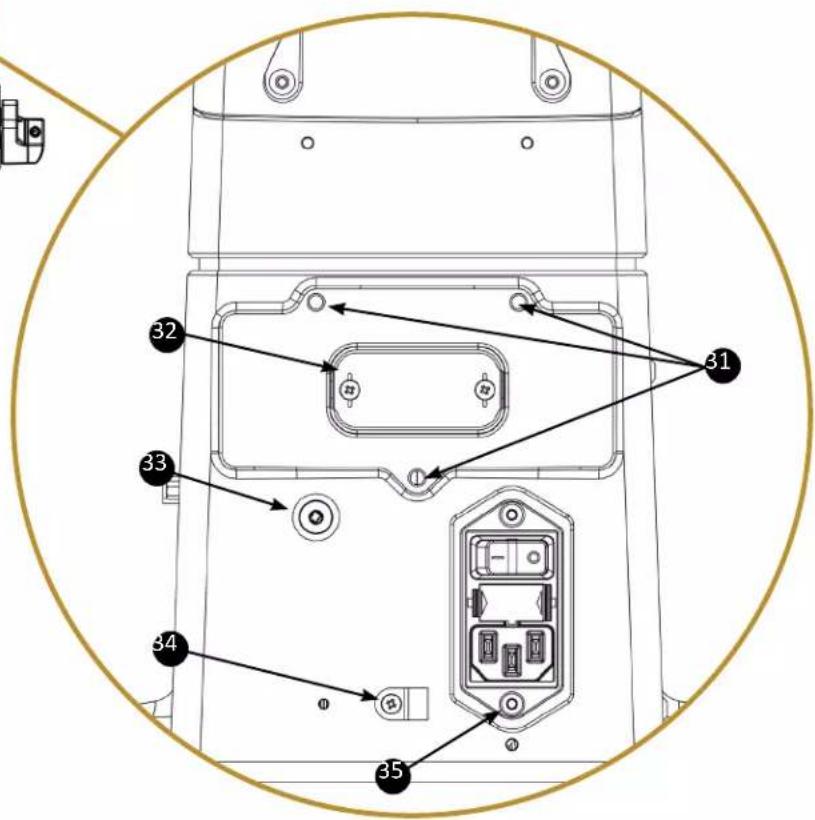
Rear View
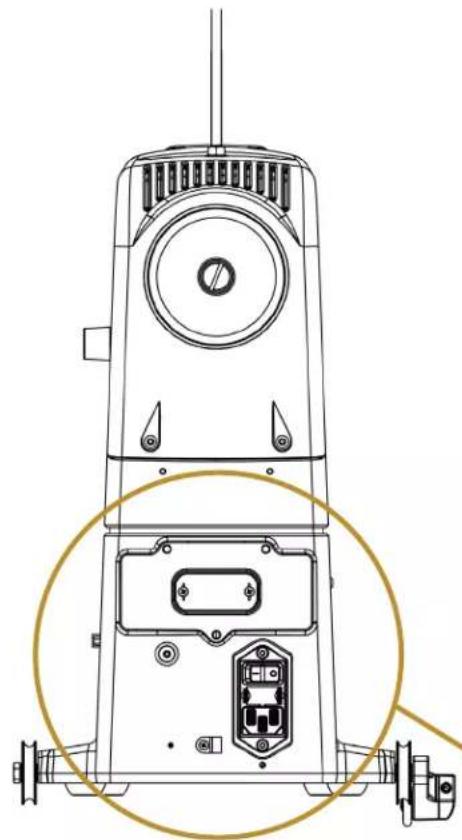
natural_image
Technical line drawing of a mechanical device with labeled components and a circular highlight (no text or symbols present)Back View
- Rear handlebar mounting holes (3)
- Rear handlebar connection cover
- Carriage encoder connection jack
- Carriage encoder cable clip
- Power input module with fuse holder
Installation and Setup
NOTE: Refer to the Manual included with the frame for detailed set-up instructions for the frame.
Carriage
To install the carriage and machine on the frame
-
Place the carriage on the tracks, ensuring that the stitch regulator faces the back of the frame.
-
Place the machine on the carriage.
△ CAUTION: It is suggested to have two people when lifting the Gallant XL. Always lift from the throat of the machine, not from the handlebars, needle bar area or needle bar.
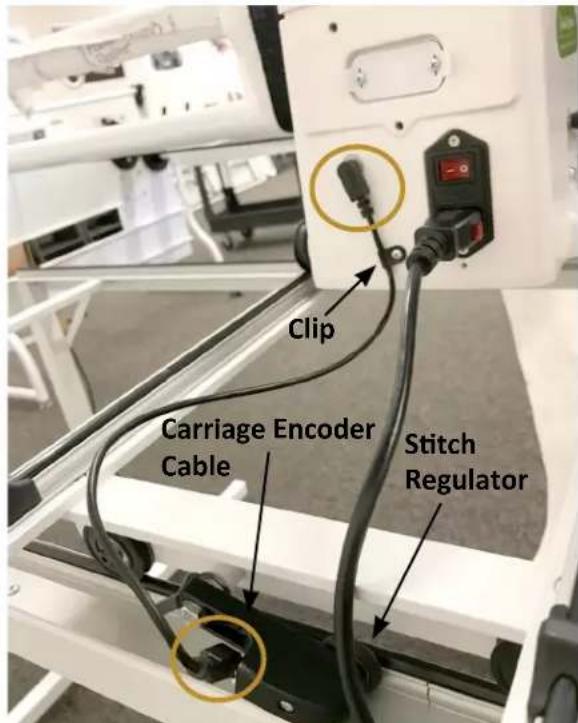
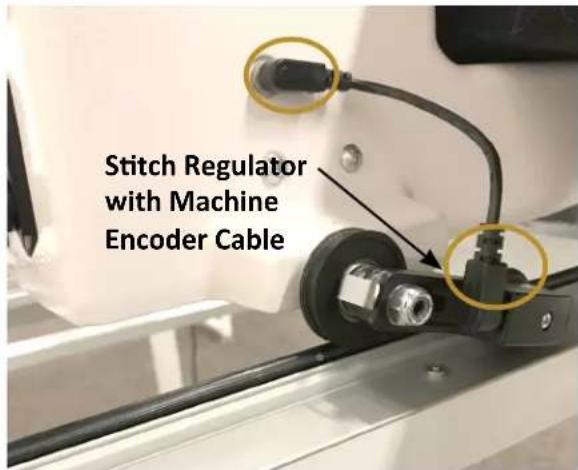
-
Plug the carriage encoder cable into the round jack on the back of the machine (to the left of the power cord). Plug the other end into the encoder.
-
Secure the carriage encoder cable through the clip at the back of the machine. Check that there is no strain on the cable at the plug into the machine.
-
Plug the machine encoder cable into the round jack on the right side of the machine (as seen from the rear of the machine). Plug the other end into the encoder.
IMPORTANT: If you ever need to remove the machine from the carriage, disconnect the carriage encoder cable from the carriage encoder. Failure to unplug the cable when removing the machine from the carriage could result in damage to the cable or carriage encoder.
△ CAUTION: Never plug or unplug the encoder cables or any other cables while the machine is on, as this could potentially cause electrical damage to the machine or encoders.
Steps 3 and 4
Step 5
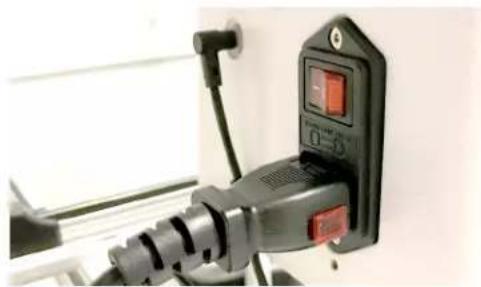
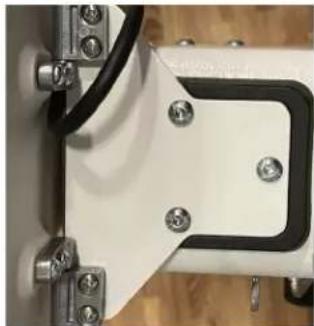
Power Cord
To install the power cord
- Insert the plug into the power connector on the rear of the machine. Plug the three-prong plug end into your power source. Do not turn on the machine until the handlebars are installed.
To disconnect the power cord
- First pull out on the red buttons on the sides of the plug and then pull the plug out of the machine.
NOTE: Make sure that the machine is off before plugging into a power source. The main power switch should be in the O (off) position.
natural_image
Close-up of a black electrical plug with a red indicator switch and power outlet, mounted on a white wall (no visible text or symbols)Front Handlebars
The Gallant XL comes with handlebars for the front of the machine. Optional rear handlebars are available for quilting with pantographs or pattern boards. The front handlebars are used for most other quilting activities.
△ CAUTION: To prevent any electrical damage to the handlebars, always turn off all power to the machine when connecting or disconnecting the handlebars.
To install the front handlebars
-
Remove the two screws in the front top cover with a 3mm hex tool. Remove cover by pulling up on the rear portion then sliding tabs out in the front.
-
Place four M4x10mm screws with washers down through the handlebar into the top of the machine and tighten them firmly with a 3mm hex tool.
-
Plug the two handlebar cable plugs into the two jacks in the back top (left plug to left jack and right to right). The right handlebar cable is labeled.
-
Push ferrites down into the space so that the cover will fit back into place.
-
Replace the front top cover by sliding tabs at the front into machine and angling the back of the cover down into place. Tighten the screws with a 3mm hex tool. Do not over tighten.

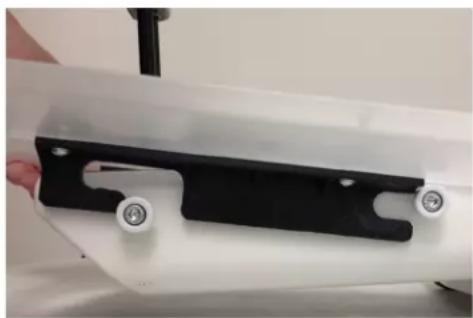
natural_image
Technical diagram showing three views of an electrical enclosure with internal components and wiring (no text or symbols present)Refer to Step 4
Touchscreen Display
The Gallant XL comes with one 7-inch touchscreen front display.
To install the front display
-
Locate the three screws for the touchscreen bracket. Line up the white touchscreen bracket and the black connector piece with the holes on top of the Gallant XL. Insert and tighten the screws with the included hex wrench.
-
For the front display, locate the four 4-40 screws and a small Phillips screwdriver (not provided). You'll also need the display with the hinges attached to the bottom row of connectors on the back of the display.
-
Insert the 4-40 screws into the openings on the display's metal hinge. Align the screws in the hinge with the holes on the display bracket. Use the small Phillips screwdriver to fully tighten the screws.
-
Plug the USB mini B cable (with 90° connection), coming out of the top front cover, into the bottom of the display. This cable provides power and signal connection from the machine to the display. The USB connection on the bottom right of the display is used for updating the display and the machine software.
IMPORTANT: Note the other connections on the bottom of the display for power and audio are not functional.
natural_image
Close-up of a mechanical component with bolts and a black rectangular bracket (no visible text or symbols)
natural_image
Close-up of a white electronic device with metal connectors and a black cable, mounted on a wooden surface (no visible text or symbols)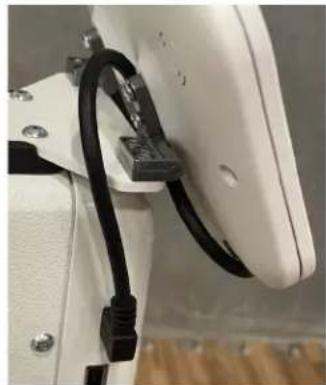
natural_image
Close-up of a white mechanical component with black cable and connector (no visible text or symbols)IMPORTANT: If you have Pro-Stitcher Lite, you will install the Pro-Stitcher Lite tablet computer to the top of the machine, and the touchscreen display will still be attached. See the instructions that come with Pro-Stitcher Lite for more information about installing the tablet.
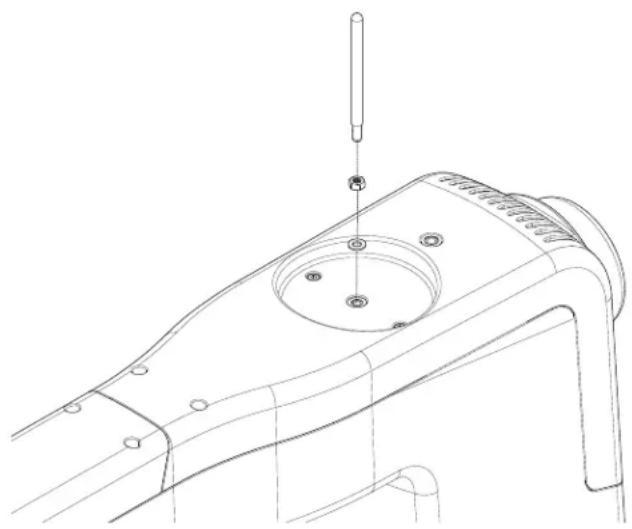
Spool Pin and Thread Mast
To install the spool pin on the machine
- You'll need the spool pin with nut and washer.
- Remove the nut and washer.
- Place the washer against the top of the machine cover.
- Screw the nut all the way up to the spool pin.
- Place the spool pin through the washer and into the top cover and tighten it all the way.
- Hold the spool pin firmly and tighten the nut with the 8mm wrench (provided). Do not over tighten.
natural_image
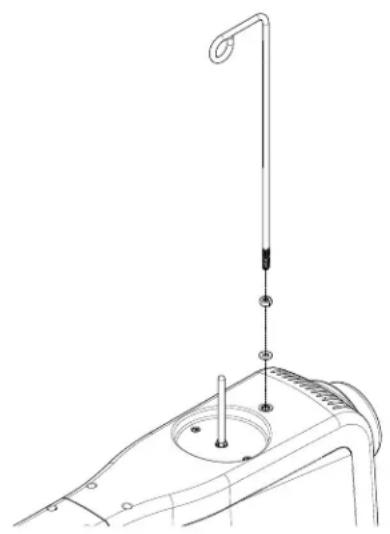
Technical line drawing of a mechanical component with a screw and circular feature (no text or symbols)To install the thread mast onto the machine
- You'll need the thread mast with washer and nut.
- Remove the nut and washer.
- Place the washer against the top of the machine cover.
- Screw the nut all the way up to the thread mast.
- Place the thread mast through the washer and into the top cover and tighten it down to the nut. Turn until the loop of the mast is directly over the spool pin.
- Hold the thread mast firmly and tighten the nut with a 10mm wrench (provided). Do not over tighten.
natural_image
Technical line drawing of a mechanical device with a vertical rod and circular base (no text or symbols)Machine Head USB Port (built-in)
The USB port is located on the side of the machine to the LEFT of the display at the Front. This port can be used to power a USB device or communicate with accessories. This port CANNOT be used to make machine or display updates.
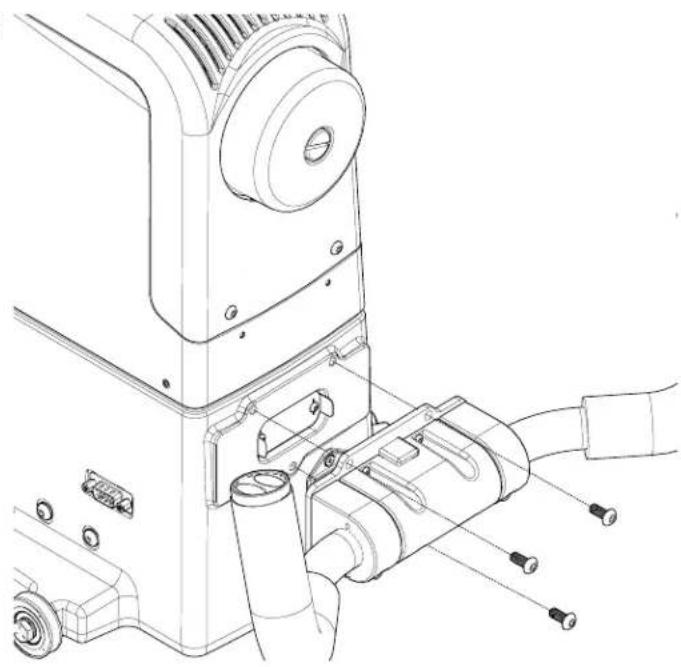
Optional Accessories
Rear Handlebars Kit
To install the rear handlebars
NOTE: Make sure that the machine is off before installing the rear handlebars. The main power switch must be in the O (off) position.
- Slightly loosen the two Philips screws on the rear handlebars connection cover with a #1 Phillips screwdriver (not provided). Do NOT remove the screws.
- Pull off the plastic cover. It protects the rear handlebars connection. Do NOT remove the screws.
- Re-tighten the two screws. They hold the connection board to the machine.
- You will need three M5 x 12 SKB ZN screws for the rear handlebars (included in the Rear Handlebars Kit package) and a 3mm hex wrench.
- Align the three holes in the handlebars with the holes on the back of the machine.
- Attach with the three screws. Tighten securely.
To install the laser pin
- You will need the laser pin, washer and nut.
- Screw the nut all the way onto the laser pin.
- Slide the washer onto the laser pin threads and screw the laser pin all the way into the side of the machine.
- While holding the laser pin, firmly tighten the nut with the 8mm wrench (provided).
natural_image
Technical line drawing of a mechanical device with attached components (no text or symbols)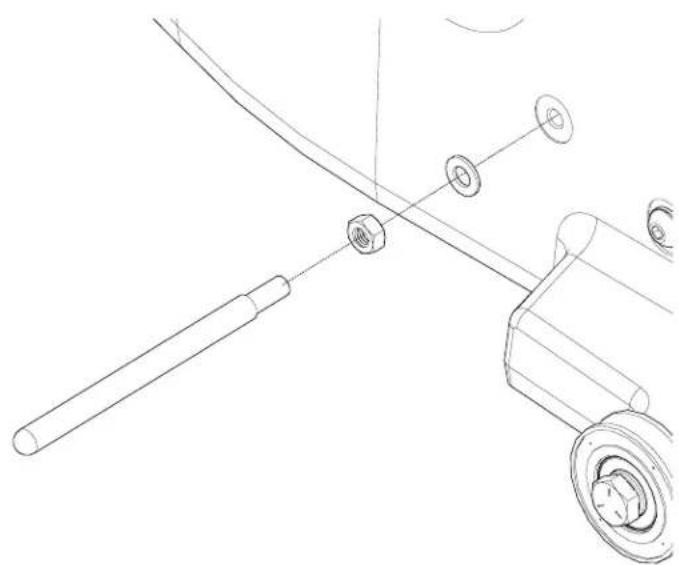
natural_image
Technical line drawing of a mechanical assembly with a rod, nut, and wheel (no text or symbols)Ruler Base
If you plan to use rulers and templates with your Gallant XL, you will need to attach the ruler base to give you a large, stable surface on which to rest the ruler or template. The ruler base, rulers, and templates are optional accessories. For more information, visit http://www.babylock.com.
To install the ruler base
The Ruler Base Kit comes with four posts to attach to the machine using the 4 screws.
- Attach the 4 screws to the machine using the four posts as indicate in the photo
-
Guide the wide part of the latches back until they are between the front and rear ruler base posts. Then lower the ruler base down between the posts.
-
Push the ruler base back until it is touching the machine or snaps into place.
natural_image
Close-up of a white mechanical component with black and white parts, no visible text or symbolsStep 2
NOTE: When the wide part of the latch is down between the two posts there will still be a gap between the ruler base opening and the front of the machine. Push back on the ruler base to secure it into place
To remove the ruler base
- Grasp the front corners of the ruler base. Pull the ruler base towards you, up and away from the machine.
To use rulers and templates with your quilting machine
△ CAUTION: Use only 1/4-inch thick rulers with your machine. Do not use rotary-cutting rulers; they are too thin and can easily slip under the hopping foot. Always use the ruler base to stabilize the ruler. The ruler foot will give an extra measure of security while using rulers.
Keep the ruler flat and quilt only where the ruler is held securely. Avoid losing control by walking your hand along the ruler or stopping and repositioning your hand and/or the ruler.
- Quilting with rulers requires gentle three-point pressure as follows:
- Position and press the ruler against any side of the hopping foot.
-
Press machine against ruler.
-
Press ruler against ruler base with only as much force as is necessary to keep the ruler from slipping. Too much pressure will prevent the machine from moving.
The quilting line will be approximately 1/4 inch away from the ruler edge. The markings on many rulers take this into consideration.
NOTE: Set the machine to stop in the needle-down position to keep the machine from moving while making adjustments with the ruler.
Rear Laser Light
The optional laser light (for use with pantographs) is installed on a mounting post. The post is threaded into a hole on the machine casting. The hole is found towards the back of the machine on the right side about 2 inches in front of the rear wheel.
The laser projects a straight laser beam visible as a dot on surfaces it hits. The laser dot is used as a guide enabling you to use printed pantograph designs and stitch the pattern onto a quilt by tracing the design with the laser dot.
The laser attaches to a mounting post which attaches to the machine. The laser stylus can move in any direction by rotating the clamp on the post and pivoting the laser up or down. To make an adjustment, simply loosen the black thumbscrews, position, and re-tighten.
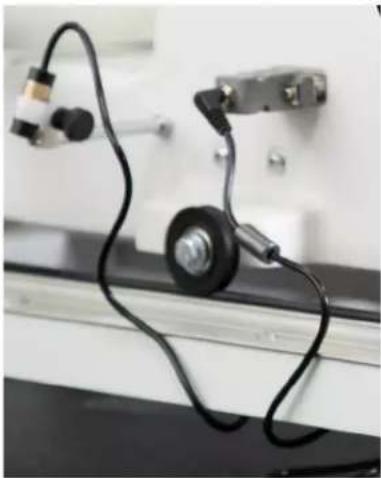
natural_image
Close-up of a mechanical device with black cables and a black wheel, no visible text or symbolsIMPORTANT: A label is attached to the laser's case and shows an arrow which indicates the direction of the laser light when energized. The label must remain in place on the laser. Removing the label voids the laser's warranty.
Laser Operation and Safety
When using the laser stylus, observe the following basic safety precautions.
• Never shine directly into the eyes.
- The laser stylus should never be left on and unattended.
- Do not use the laser stylus as a toy.
- Pay close attention when the laser stylus is being used by or near children or pets.
- Use the laser stylus only for its intended use as described in this manual.
△ CAUTION: Use of controls or adjustments or performance of procedures other than those specified herein may result in hazardous radiation exposure.
Unplug the laser from the back of the machine to turn it off. Be sure the laser is attached to the machine and pointed downward toward the table before connecting it to the port. Never point it in a direction that would project the beam into someone's eyes. If the laser should stop working, ensure the plug is firmly seated into the Gallant XL laser port.
natural_image
Close-up of a white electronic device with a labeled port (V1) and mechanical components, no visible text or symbols.Laser Focus and Image Size
Focus the laser by turning the threaded housing surrounding the lens clockwise or counterclockwise. The laser image can be adjusted to project a bigger or smaller dot, or focal size. The direction of rotation needed is determined by the distance of the laser from the pantograph surface. Experiment by rotating the threaded end to achieve desired focal size.
NOTE: If you can't see the threaded housing, the lens may be threaded too far into the laser body. Use a large slotted screwdriver to turn it counterclockwise until the housing is visible. Then rotate it with your fingertips to bring the light into focus. Be very careful to not scratch the lens when using the screwdriver.
Horizontal Spool Pin
The optional Horizontal Spool Pin allows threads that feed horizontally from the side of the spool. Examples would be straight-wound spools or mylar holographic threads.
The Horizontal Spool Pin kit comes with 3 parts; a threaded post, a pin and a clamp. The Gallant XL does not require the threaded post, so set that aside.
- Loosen thumbscrew on clamp and attach to the top of the Gallant XL spool pin through the opening closest to the thumbscrew.
- Place the pin through the other opening and position it so that it is horizontal, at a 90-degree angle to the Gallant XL spool pin and pointing out to the right of the machine.
- Tighten the thumbscrew.
- Place spool of thread on the horizontal spool pin and thread machine normally.
Accessory Feet
Visit www.babylock.com or an Authorized Baby Lock retailer for optional accessory feet. Baby Lock offers several optional accessory feet that can be used for everyday quilting as well as specialty techniques.
Operating Instructions
Power Switch
The main power switch is at the rear of the machine.
Turn on the main power switch first by toggling the switch from the O position (off) to the | position (on).
IMPORTANT: When you are finished quilting, if you will not be using the machine for more than a day, we recommend you turn off the main power switch and unplug the power cord from the power source.
IMPORTANT: Refer to the safety instructions.
Lighting
The Gallant XL includes bright LED lights above the needle, making it easy for you to see your quilting. If needed, adjust the intensity of the lights to suit your environment.
Machine Needle
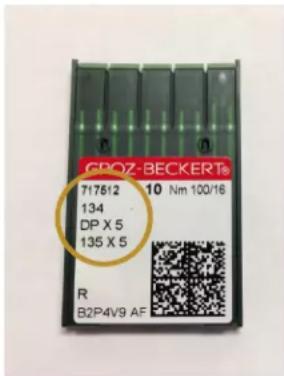
Use only the recommended needle system for your Gallant XL quilting machine. The machine is timed to use this specific needle type (System 134) which is designed to work with the high quilting speeds and multi-directional stitching the Gallant XL offers.
The Gallant XL uses the 134 needle system. Note that the needle has a round shank rather than a shank with a flat side, like home stitching machines use.
If you use the recommended needle, you will experience:
- Fewer skipped stitches
• Less needle breakage
• Less thread breakage, especially at high speeds
• Less thread splicing or shredding - Optimum fabric protection
IMPORTANT: Change the needle regularly. We recommend you use a new needle for each new quilt and any time the needle becomes bent, dull, or burred.
△ CAUTION: A damaged needle may result in poor stitch quality or may even damage the machine or your quilt.
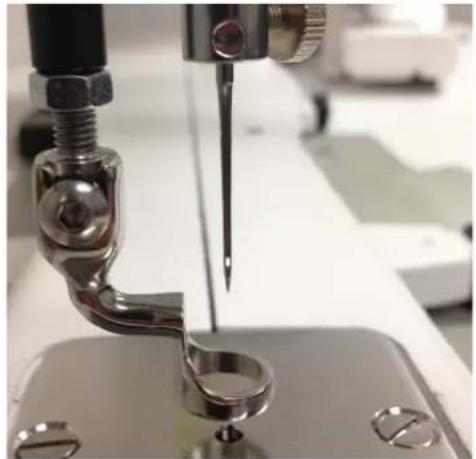
To change the needle
- Move the needle bar to the UP position by pressing the Needle Up/Down control on the handlebar.
- Turn the machine's power switch to the off position.
- Loosen the needle bar clamp screw with the 2.5mm hex wrench.
-
Remove the old needle by pulling it down. Discard the old needle in a safe way.
-
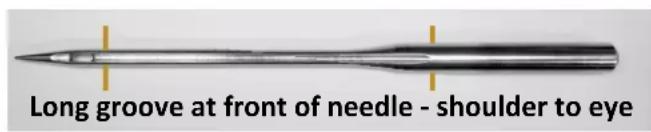
With the scarf of the needle (indentation at the back of the needle just above the needle eye) facing the rear of the machine and the long groove down the front of the needle facing the front of the machine, push the needle all the way up into the needle bar until it stops. Check the sight hole to verify that the top of the needle can go up no farther.
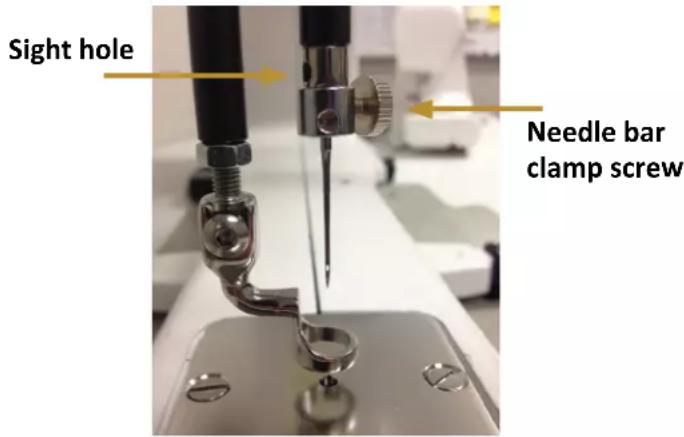

△ CAUTION: Check the needle to confirm it is fully inserted. The needle bar has a sight hole above the needle bar clamp screw. Make sure the needle is touching the top of the sight hole. If it is not all the way up, the machine timing will be off and it may be possible for the needle to collide with internal parts, causing damage not covered by warranty.
- Carefully tighten the needle bar clamp screw.
△ CAUTION: Although you can use your fingers to tighten the needle bar clamp screw, we recommend that after finger-tightening the screw, use the 2.5mm hex wrench to tighten it just a bit more. The Gallant XL runs at very high speeds and this ensures the needle will not loosen while quilting. However, do not over-tighten the needle clamp screw, as this may strip the threads of the screw. (Stripped threads are not covered under the warranty.) Once the screw no longer turns freely by hand, gently turn the hex tool until the screw is tightened snuggly.
| Needle Size Thread Size | |
| 12 and 14 monofilament, 100 | wt. silk, 60 wt. polyester, mylar |
| 16 monofilament, mylar, 100 | wt., 80 wt., 60 wt., 50 wt., 40 wt. silk, polyester and cotton thread |
| 18 40 wt. cotton and polyester | 30 wt. cotton and polyester |
| 19 and 21 Any thread 30 wt. and heavier such as 12 wt., 19 wt., 30 wt. | |

QUILTING TIP: A size 16/100 needle will accommodate most threads and fabrics. Heavier threads will require a larger needle such as 18/110 or 21/130. Lofty batting and heavier fabrics such as denim, canvas, or densely woven fabric may also require a larger needle.
Hopping Feet
Your machine comes with two hopping feet: a closed-toe foot (comes installed) and an open-toe foot. Use the closed-toe foot for everyday quilting and the open-toe foot when you need greater stitch visibility (for example, micro quilting).
To change the hopping foot
-
Turn off all power to the machine
-
Raise the needle and foot to their highest position. Remove the foot that is on the mount by using the 2.5mm hex wrench to loosen the mounting screw far enough that you can slide the foot off of the mount.
-
Slide the desired foot onto the mount. Note that the opening on the side of the foot is lined up with the screw. Push the foot up as far as it will go.
-
Fully tighten the screw with the 2.5mm hex wrench.
natural_image
Close-up of a sewing machine needle stitching a metal component (no visible text or symbols)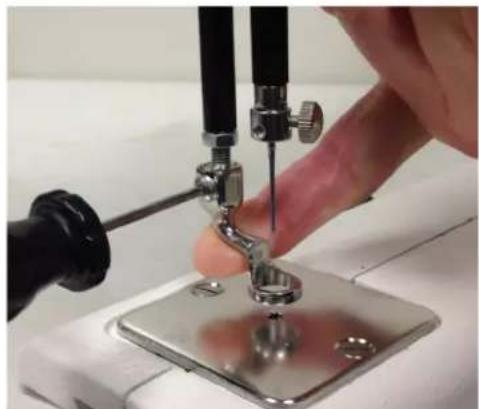
natural_image
Close-up of a sewing machine needle being adjusted with a hand, no visible text or symbolsIMPORTANT: The Gallant XL does not have a presser foot lever, or top tension release, like a home sewing machine. On a home sewing machine the top tension is released when the presser foot is raised, allowing the thread to come freely out of the machine. When a home machine is threaded the tension discs are released and open to allow the thread to easily fall between the tension discs. This isn't the case with the Gallant XL machine. The top tension is always engaged and the tension discs are never open. Therefore the thread must be pulled up, or flossed, between the tension discs or it will stay outside the discs and float without tension, causing serious stitch quality problems and/or thread nests.
Bobbin and Bobbin Tension
The Gallant XL quilting machine uses M-class bobbins that are much larger than home sewing machine L-class bobbins. The larger bobbins hold more thread and enable you to quilt for a longer time between bobbin changes.
To wind the bobbin
The Gallant XL comes with a separate bobbin winder. For full instructions about using the bobbin winder, see the instruction manual that is packaged with the bobbin winder.
To insert the bobbin into the bobbin case
△ CAUTION: To prevent personal injury, always turn off the power switch while inserting and/or removing the bobbin case or anytime your hands are near the needle area, such as when you change the needle or the hopping foot.
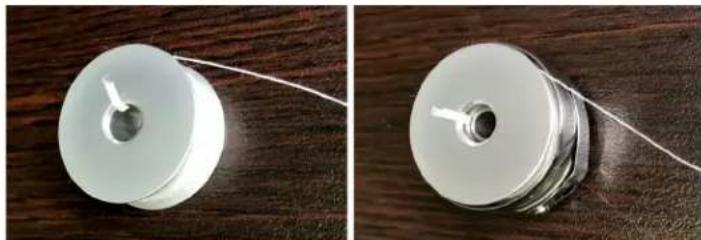
- Place the bobbin in the bobbin case so the thread is wound clockwise and coming off top right.
natural_image
Two views of a white cylindrical mechanical component with a wire, placed on a wooden surface (no text or symbols visible)- The thread will then backtrack through the slot.
natural_image
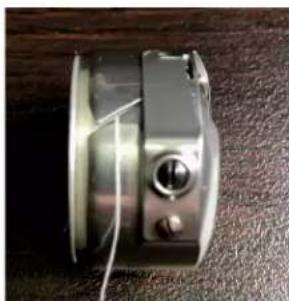
Close-up of a metallic mechanical component with a central knob and two screws, resting on a textured surface (no visible text or symbols)- Guide the thread under the bobbin case tension spring.
NOTE: Leave a thread tail of 5 to 6 inches of thread hanging loose.
natural_image
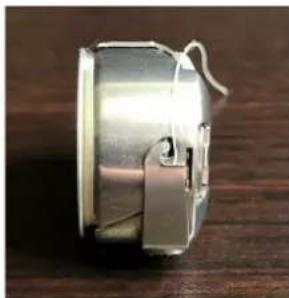
Close-up of a metallic cylindrical object with a looped end, resting on a wooden surface (no text or symbols visible)- The bobbin should rotate counterclockwise when the thread is pulled when properly threaded under the tension spring.
NOTE: The rule is for the thread to backtrack as it comes off the bobbin under the tension spring. It should rotate the opposite way it is wound. It should not rotate the same direction it is wound.
To test bobbin tension
The bobbin tension is the foundation for stitch tension. Always set the bobbin tension first.
NOTE: Check the bobbin tension each time a new bobbin is inserted.
- With the bobbin properly in the bobbin case, hold the bobbin case in the palm of your hand with the open end facing up.
- Wrap the thread once around the index finger of the opposite hand and attempt to lift the bobbin up by the thread. The bobbin case should stand up on its side, and barely lift out of your hand. If the bobbin will not stand up on its side, the bobbin tension is too loose. If it lifts completely out of your hand and hangs by the thread, the bobbin tension is too tight.
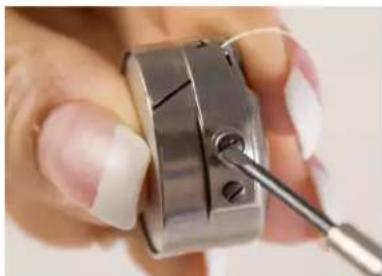
To adjust the bobbin tension
- Make the adjustment using the screw in the center of the tension spring (the larger of the 2 screws). Turn clockwise to tighten and counterclockwise to loosen the tension. Make tiny adjustments to the screw and test.
- Remove and repeat process again, if needed.
natural_image
Close-up of a hand holding a metallic mechanical component with a metal tool inserted (no visible text or symbols)To insert the bobbin case into the machine
- Move the needle to the up position. Turn off the power to the machine.
- Place the bobbin in the bobbin case.
- Leave 5 to 6 inches of thread hanging loose. See page 25 for more details.
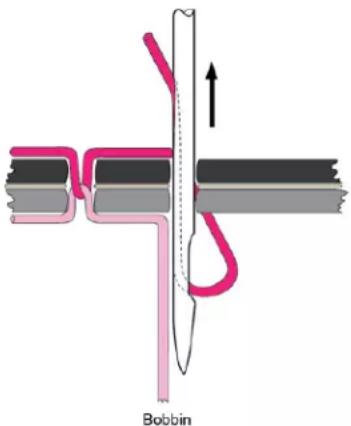
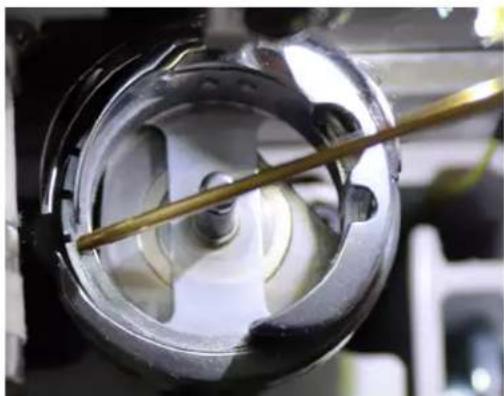
- To fit the bobbin case onto the hook spindle in the machine, orient the bobbin case as shown in the photo with alignment tab into the notch to the right. Push the bobbin case inward until it clicks into place.
NOTE: Do not insert the bobbin case into the machine by lifting the release lever on bobbin case. Use the lever only for removing the bobbin case.

natural_image
Close-up of a metallic mechanical component with internal cavities and mounting holes (no visible text or symbols)Quilting with the Gallant XL
Preparing to Quilt
IMPORTANT: Make sure your machine has been cleaned, oiled, has a new needle, and that the tracks on the frame are free from threads or other debris.
- If the machine isn't already plugged in, plug it in now.
- Select the thread and wind one or more bobbins.
- Set the bobbin tension and thread the machine.
- Turn on the main power switch at the back of the machine.
- After loading the quilt top, use a scrap of fabric along the edge of the quilt backing and batting to test the top tension. Make adjustments to the top tension as needed.
To load the quilt
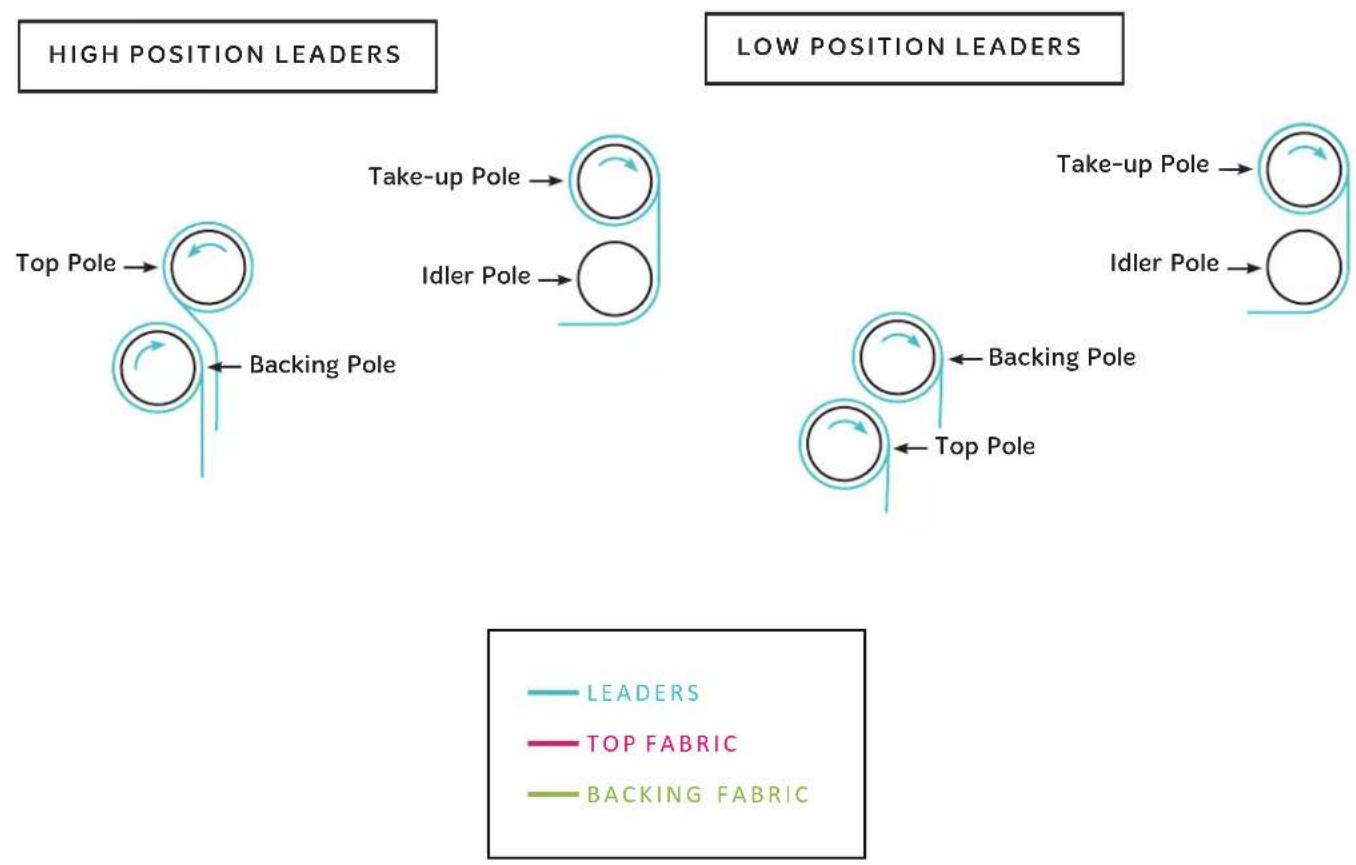
- Start with the backing fabric. Find the center of the bottom edge of the backing and match with the center of the backing pole leader. You marked the center of the leader when you installed it with the Velcro. The wrong side of the fabric should be facing up. It is helpful to drape the backing fabric over the take-up pole as you pin the bottom edge to the backing pole leader.
- Match the raw edge of the fabric with the edge of the leader and pin together. Use long, sturdy quilting pins and insert the pins parallel to the edge of the leader, about 1/4 inch away from the edge. Place pins about 1/2 inch apart. Start pinning at the center and work your way to one side, being careful not to stretch the fabric. Return to the center and work your way to the opposite side.
- Once the bottom edge is pinned in place, make sure the ratchet stop is engaged and roll the fabric around the pole, smoothing gently as you go. The top edge of the backing fabric gets pinned to the take-up pole leader in the same fashion, matching center of fabric to center of leader. Make sure the leader travels under the idler pole before getting pinned to the top edge of the backing fabric.
- Next, find the center of the bottom edge of the quilt top. The right side of the quilt top should be facing up. It is helpful to drape the quilt top over the take-up pole as you pin the bottom edge to the top pole leader. Pin the quilt top to the top pole leader in the same way you pinned the backing. Once the edge is pinned in place, make sure the ratchet stop is engaged and roll the quilt top around the pole, smoothing gently as you go. The top edge of the quilt top will get basted in place to the backing and batting.
- Consult the diagram on the following page to determine the correct pole and the direction of rolling for each of your pieces. If you engage the ratchet stop before rolling, you will always roll in the correct direction.

flowchart
graph TD
    subgraph_High_Position["HIGH POSITION"]
        A["Top Pole"] --> B["Take-up Pole"]
        B --> C["Fabric is level"]
        C --> D["Idler Pole"]
        D --> E["Backing Pole"]
        E --> F["Top Pole"]
        G["Top Pole"] --> H["Backing Pole"]
        H --> I["Text label: 101/110"]
        J["Text label: Backing Pole"] --> K["Text label: 101/110"]
    end
    subgraph_Low_POSITION["LOW POSITION"]
        L["Top Pole"] --> M["Backing Pole"]
        M --> N["Text label: 101/110"]
        O["Text label: Backing Pole"] --> P["Text label: 101/110"]
        Q["Text label: Top Pole"] --> R["Backing Pole"]
        S["Text label: Top Pole"] --> T["Text label: 101/110"]
        U["Text label: Backing Pole"] --> V["Text label: 101/110"]
    end
flowchart
graph TD
    A["LEADERS"] --> B["Top Pole"]
    B --> C["Backing Pole"]
    D["Take-up Pole"] --> E["Idler Pole"]
    F["Backing Pole"] --> G["Top Pole"]
    H["Leaders"] --> I["Top FABRIC"]
    H --> J["Backing FABRIC"]
    K["Leaders"] --> L["Take-up Pole"]
    K --> M["Idler Pole"]
    N["Leaders"] --> O["Backing Pole"]
    N --> P["Top Pole"]
Threading the Machine
Use the visual guide on the following page as well as the instructions below to thread your machine. Baby Lock recommends that you select and use only high-quality threads for your quilts.
To thread the machine
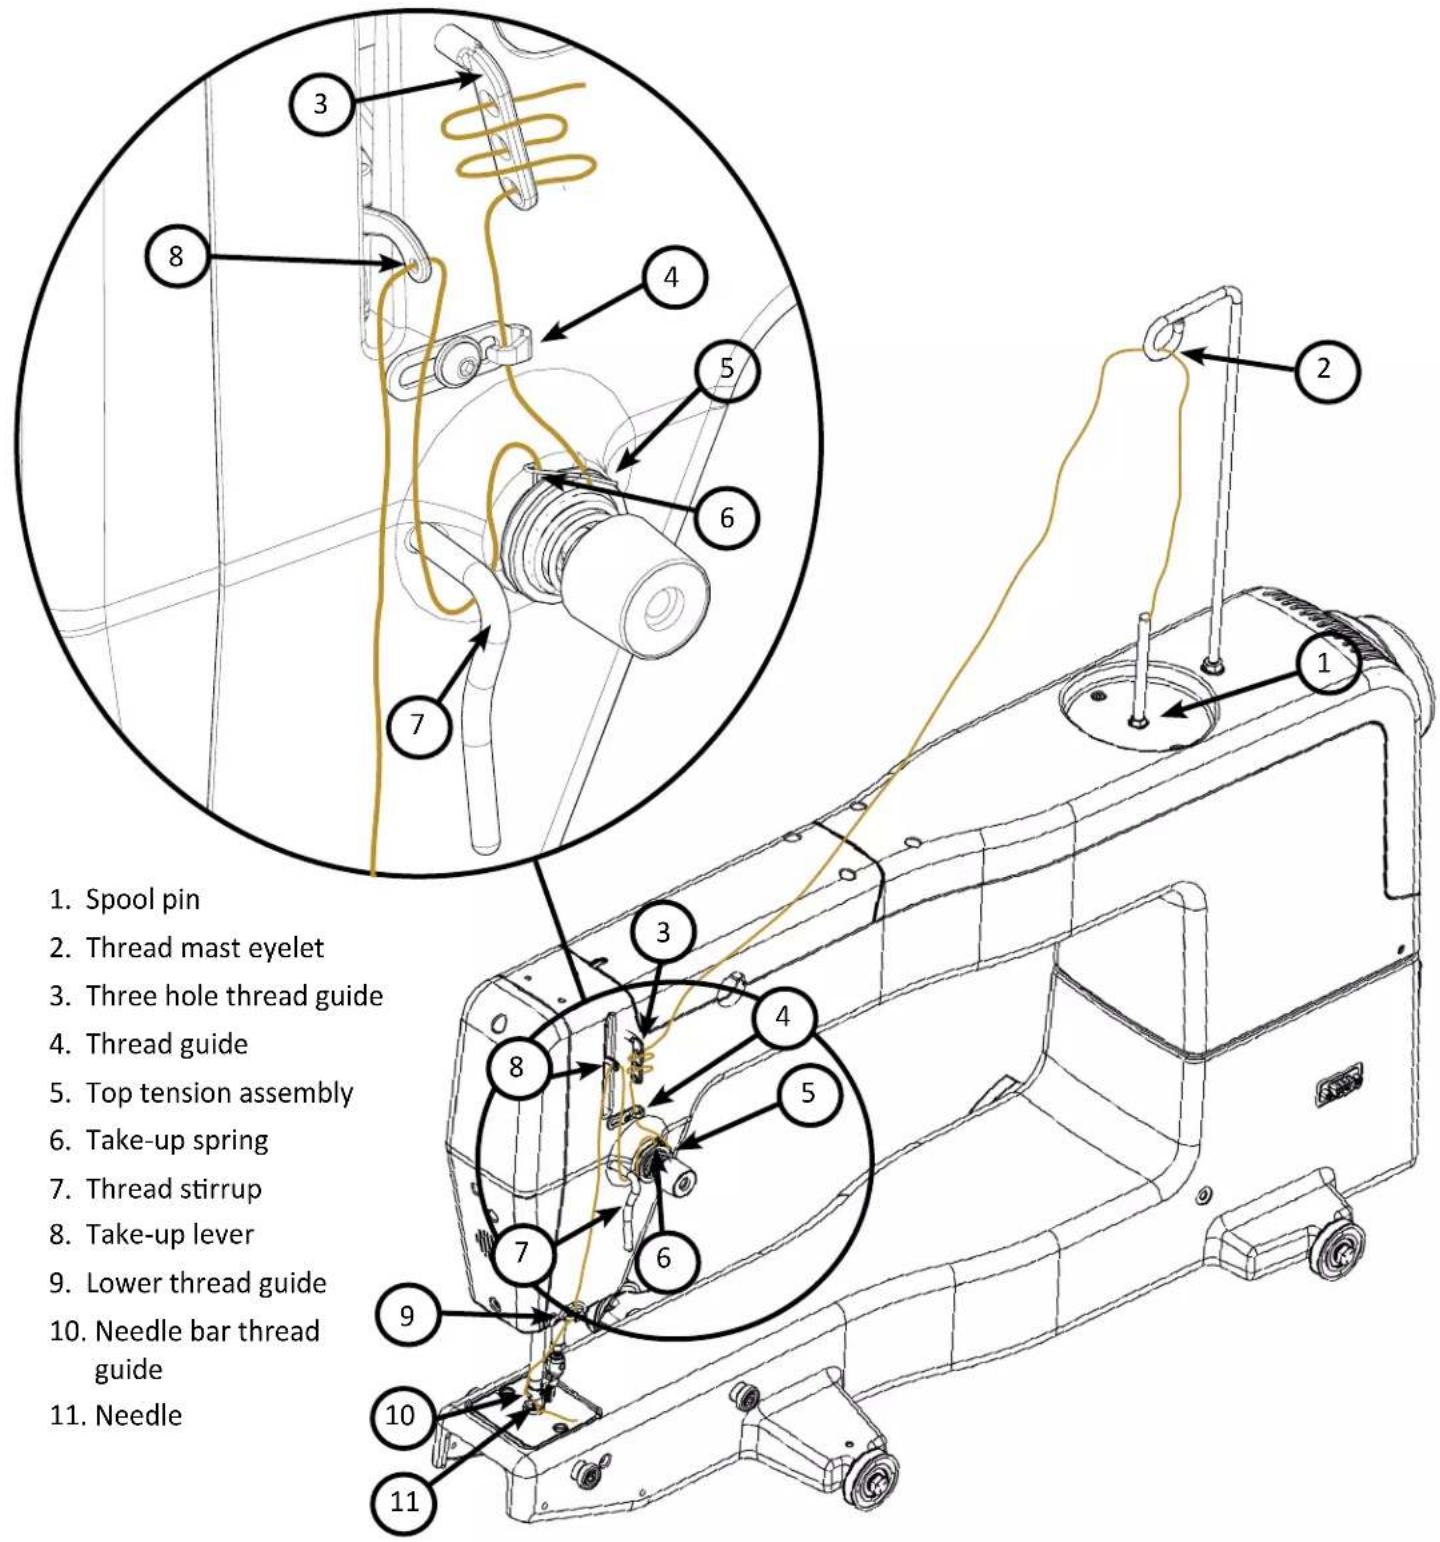
- Place thread cone onto spool pin (1) at the top of the machine; insert the thread through the thread-mast eyelet (2) from back to front, continuing to the three hole thread guide (3).
-
On the three hole thread guide, thread all three holes from back to front, wrapping as you go, being careful not to cross threads. Threading all 3 holes is recommended for most threads. However, some very delicate threads, like metallic or monofilament, may require less tension. If you are having problems with thread breaking, try threading only one or two holes of three-hole thread guide.
-
Continue through the thread guide just above the top tension assembly (4).
-
The thread continues down to the top tension assembly (5).
IMPORTANT: The thread must be flossed up between the two tension discs. If the thread is not firmly in place between the two tension discs, the thread will lay on top of the tension discs (no tension) and thread looping on the bottom of the quilt can occur.
- After the thread is in place between the tension discs, be sure that the thread catches on the take-up spring (6). Then guide the thread under the stirrup thread guide (7). Bring the thread up and through the hole of the take-up lever (8) from back to front, and then through the lower thread guide (9).
NOTE: Before threading the needle, test that the machine is threaded properly and the tension is correct by carefully pulling the top thread. It should pull smoothly with light to medium tension. If thread pulls freely with no tension, re-thread the machine, ensuring that the thread is flossed all the way between (pulled up into) the tension discs. Thread through the needle bar thread guide hole (10), this time from front to back. Almost there!
- Make sure the thread follows the groove down the front of the needle and insert the thread through the eye of the needle from front to back (11). While pulling thread through the eye of the needle, be careful that the thread does not twist around the needle.
Top Tension
One of the joys of quilting with the Gallant XL is its ability to utilize many different types of thread. Quilt with almost any high-quality thread as long as you first adjust the bobbin tension and then adjust the top tension to suit the thread chosen.
Puckering, gathers, and thread breakage occur when the top thread tension is too tight. Loops and thread nests occur when the top thread tension is too loose. Tension may need to be adjusted depending on the fabric, thread, or batting you are using for your project.
NOTE: Top tension should be adjusted after the bobbin case tension adjustment is made.
NOTE: Dark threads will be thicker (because of more dye) than light threads of the same weight and may require a tension adjustment. The type or brand of thread may also affect tension settings. Each time threads are changed, check the tension.
IMPORTANT: Before adjusting your top tension, remember to floss the top thread UP between the tension discs or it will float outside the discs providing little or no top tension. This could cause significant stitch quality or thread nesting problems.
☑ QUILTING TIP: Test the tension settings before quilting. The best way to make sure the top and bobbin tension settings are balanced is by quilting a test sample. Keep small pieces of light solid fabric on hand to place at the side of the quilt on the extra batting and backing. Then quilt some small loops and swirls and look at the stitches on top and underneath to ensure the tension looks balanced. Fine tune the tension as needed.
To adjust the top tension
- Test stitching with a scrap of fabric placed on the extra batting and backing at the side of the quilt. Examine the stitches both on the top and on the underside of the quilt.
- Adjust the tension by turning the tension dial clockwise to tighten and counterclockwise to loosen.
- Continue to test the stitching on the fabric scrap and adjust by turning the tension dial until you are happy with the stitches.
Threading the Needle with the Needle Threader
- Turn off the power to the machine.
- Hold the needle threader by the grip, with the triangle mark facing up.
- Guide the thread, inserting it into the Y groove from right to left horizontally.
- Place the V groove around the needle, above the eye.
- Push the grip gently. You should see the threader pin and thread loop at the back of the needle.
-
Turn machine power back on.
-
Slide the automatic threader down the needle, while pushing it gently against the needle, until the threader pin goes into the needle eye.
-
Remove the threader from the needle slowly, then pick up the loop with the hook on the threader, pulling the end of the thread out to the back.
To bring bobbin thread to the top of the quilt
- After the machine is threaded, move the machine over the quilt to your starting location.
- While firmly holding the tail of the needle thread, press the needle up/down key (button) twice, causing the needle to go down through the quilt sandwich and then back to the up position.
- Move the machine two to three inches while holding the needle thread in place. The bobbin thread will pull through to the top of the quilt.
- Grasp the bobbin thread and pull it to the desired length. Reposition the needle to the starting location. Tie off the threads by quilting a few very tiny stitches while holding both the top and bobbin thread. Press the Start/Stop key (button) to begin quilting.
To start or stop quilting
- Start or stop the machine at any time by pressing the Start/Stop key on the handlebars.
- To start quilting press the Start/Stop key. Do not hold the key down.
- To stop quilting press the same Start/Stop key.

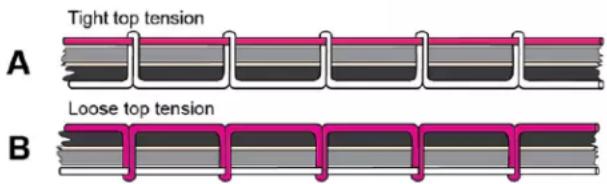
Tension Quick Start Guide
- Always adjust bobbin tension first. Bobbin adjustments are minute. Turn the screw in small increments like single minutes on the clock.
- Stitch to check top tension. To adjust the top tension, turn the knob in quarter turns or 15 minute increments.
- If thread looks like Diagram A Problem: The top thread is too tight. Solution: Turn the top tension dial counterclockwise to loosen the top tension.
- If thread looks like Diagram B Problem: The top thread is too loose. Solution: Turn the top tension dial clockwise to tighten the top tension.
Free-Motion Quilting
QUILTING TIP: When quilting, relax your hands and maintain a light touch on the handlebars. Gripping the handlebars too tightly means you are trying too hard and you won't quilt smoothly. The Gallant XL, in combination with the frame system will give you a smooth even glide while stitching.
Gallant XL Screen Navigation
Complete detailed information for navigation and operation can be found on the following pages.
Home Screen
The home screen is the main stitching screen that looks like this or something similar to this. The machine's touchscreen will need to be showing the Home Screen when you are stitching.
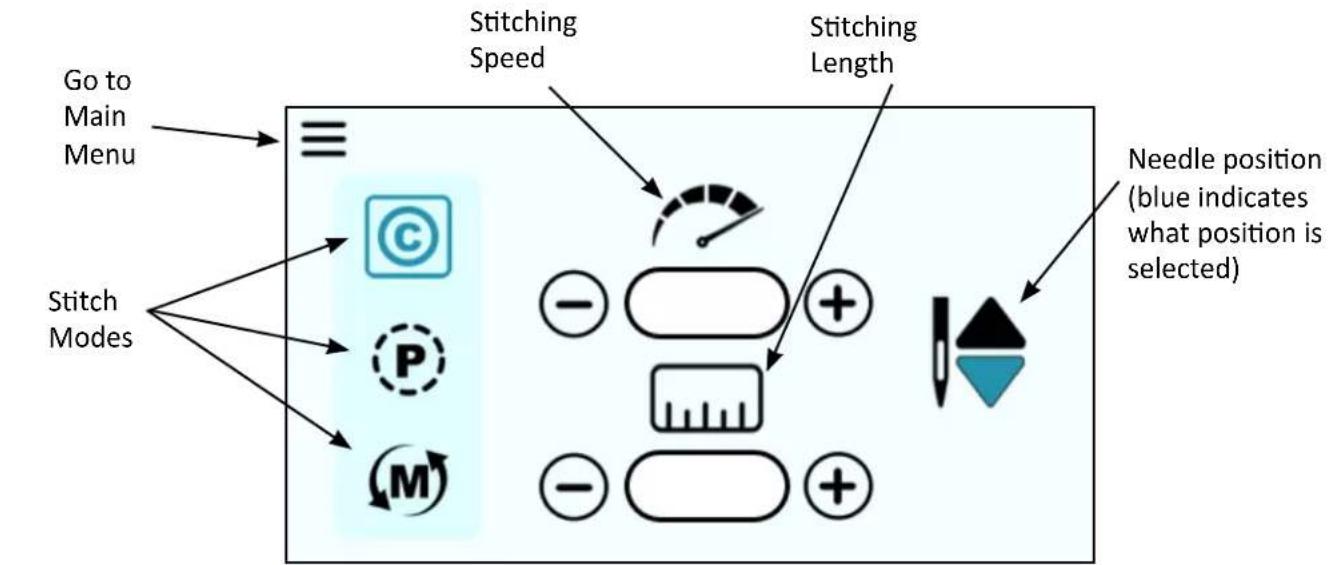

Box around icon indicates which item is selected

Menusymbol indicates screen is a submenu


Needle Stop Position indicates the final needle position when the machine stops stitching
There are two other variations of the home screen, which change depending on the Stitch Mode that is selected.
For more information about stitching with the different stitch modes, go to the Stitch Modes section on page 41.
Main Menu
This the main menu that you will use to go to the machine settings that are listed. When you click on one of the icons, you will be sent to that icon's submenu. Press the Home button to go back to the stitching screen.
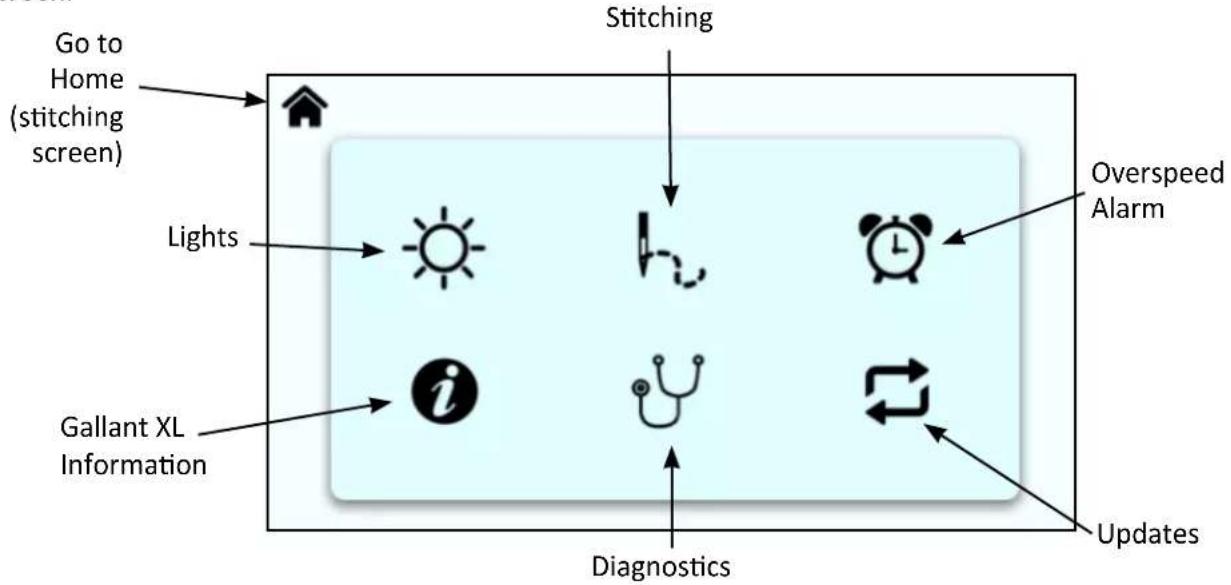
flowchart
graph TD
    A["Go to Home (stitching screen)"] --> B["Light"]
    C["Stitching"] --> D["Overspeed Alarm"]
    E["Gallant XL Information"] --> F["Diagnostics"]
    G["Updates"] --> H["Updates"]
    I["Light"] --> J["Diagnosis Icon"]
    K["Light"] --> L["Diagnosis Icon"]
    M["Light"] --> N["Diagnosis Icon"]
    O["Light"] --> P["Diagnosis Icon"]

Lights
When you click on the Lights icon on the main menu, you will be taken to this screen. This will allow you to adjust the brightness of the light under the nose of the machine.
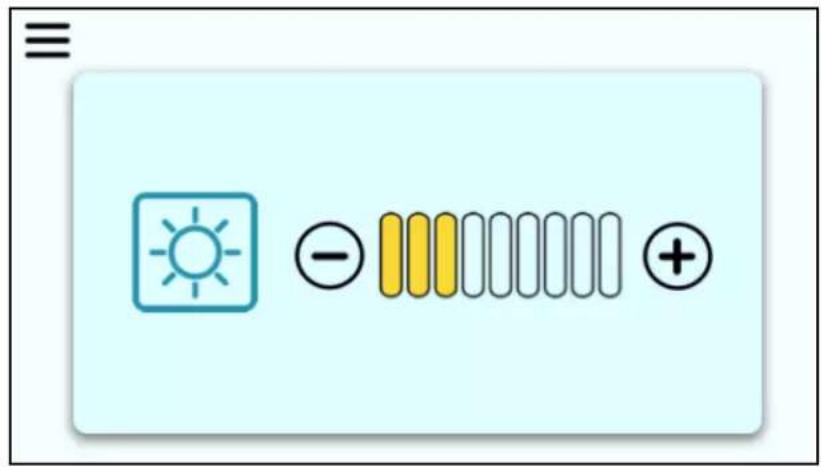
Press the Plus icon (+) to increase the brightness of the light. Press the Minus icon (−) to decrease the brightness of the light. The level of brightness is indicated by the yellow fill lines in the progress bar.
Press the Menu symbol to go back to the Main Menu (the screen shown at the top of this page).

Stitching
When you click on the Stitching icon on the main menu, you will be taken to this screen. This screen indicates the stitch count of a project and the lifetime stitch count of the machine.
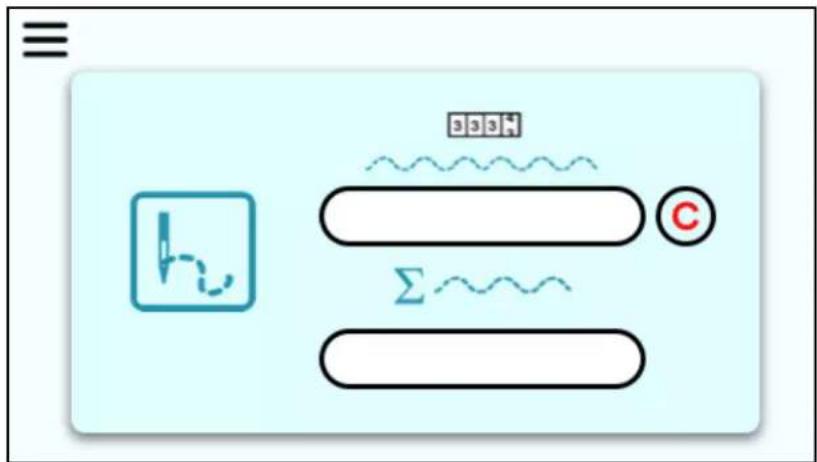
Press the C icon next to the project stitch count to reset the count back to zero. The lifetime stitches cannot be reset
Press the Menu symbol to go back to the Main Menu.

Overspeed Alarm
Your machine has an alarm that will alert you when you are moving the machine faster than the stitch regulation encoders can track. This may result in uneven quilting. This alarm will sound for you to slow down your movement.
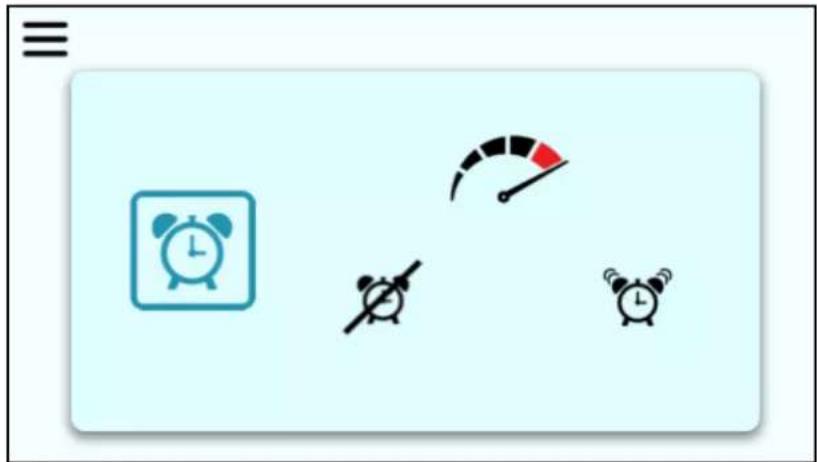
To turn the alarm ON, make sure you select the alarm clock icon on the right that does not have a line going through it. To turn the alarm off, select the icon on the left that has the line going through it.
When the alarm is OFF, the alarm will not sound, regardless of how fast you move the machine.
Press the Menu symbol to go back to the Main Menu.

Information
The Information screen displays the Machine and Display hardware versions. To check the current hardware and versions of the quilting machine and the display or touchscreen, go to this screen by touching the Information icon.
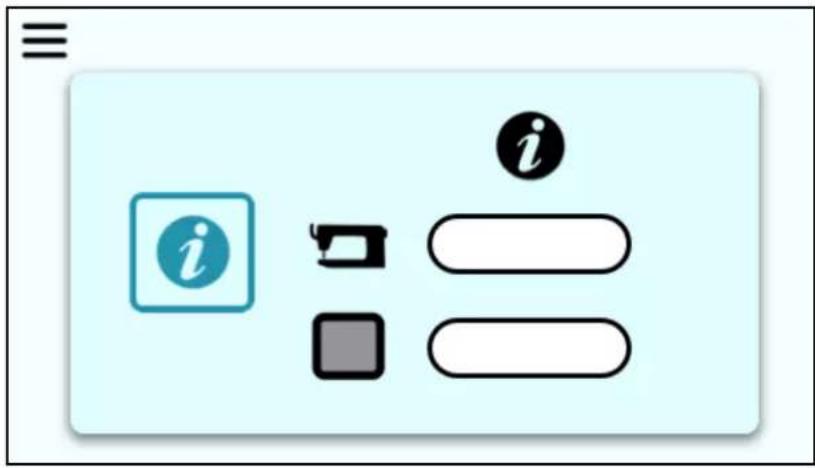
The hardware version is listed first followed by the firmware version.
The Machine information is on top. The Display information is below.
Press the Menu symbol to go back to the Main Menu.

Diagnostics
You may be asked to perform diagnostic tests by Baby Lock's Product Support team or an authorized Baby Lock retailer.
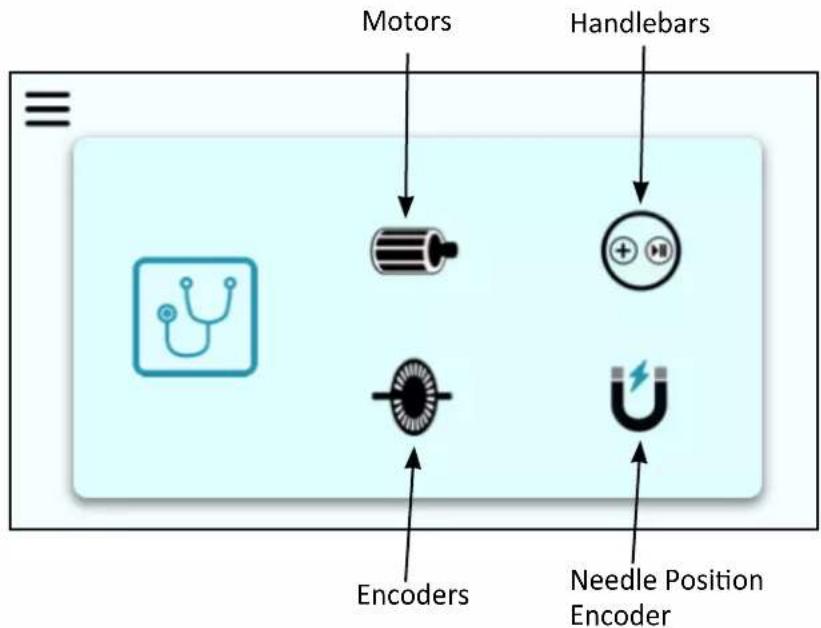
There are four different items you can run diagnostic testing on: motors, handlebars, encoders, and needle position encoder.
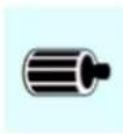
Motor
Select this icon to start the test for the motor functionality.
While rotating the handwheel the A, B, and C letters should toggle between selected and unselected, indicated by a change of color.
Fail: If A, B, or C does not toggle between selected and unselected as the handwheel is turned, the motor has failed.
Press the Menu symbol to go back to the Diagnostics menu.

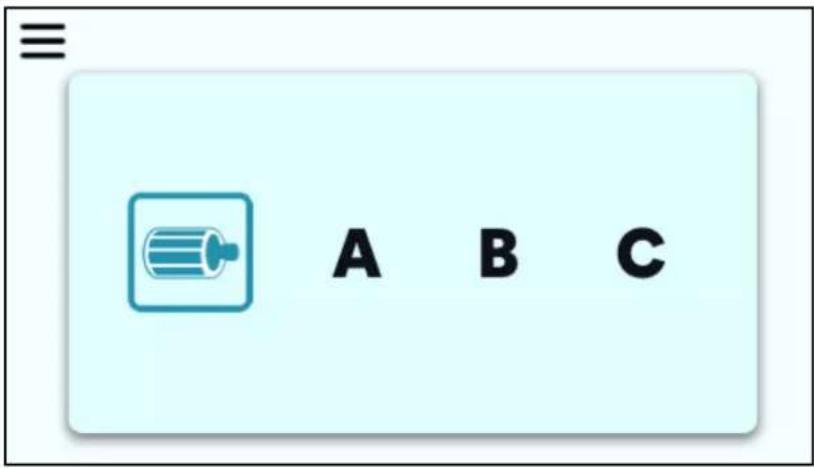
Handlebars
Select this icon to test the functionality of the handlebar key switches.
flowchart
graph TD
    A["Needle Up/Down"] --> B["←"]
    C["Minus"] --> D["−"]
    E["Play/Pause"] --> F["+"]
    G["Plus"] --> H["+"]
    I["+"] --> J["+"]
    K["+"] --> L["+"]
When the screen shown above is open, press any of the four keys on the front or optional back handlebars to verify the machine is reading the keys as they are pressed.
Press each key on the front or back handlebars several times. When a key is pressed, it will become selected or highlighted on the touchscreen to indicate that key is working.
Pass: Each time a key is pressed, the corresponding key icon on the diagnostic screen will toggle between selected or unselected.
Press the Menu symbol to go back to the Diagnostics menu.

Encoders
Select this icon to test the current X stitch-regulation encoder (left-to-right and right-to-left) and Y stitch-regulation encoder (front-to-back and back-to-front).
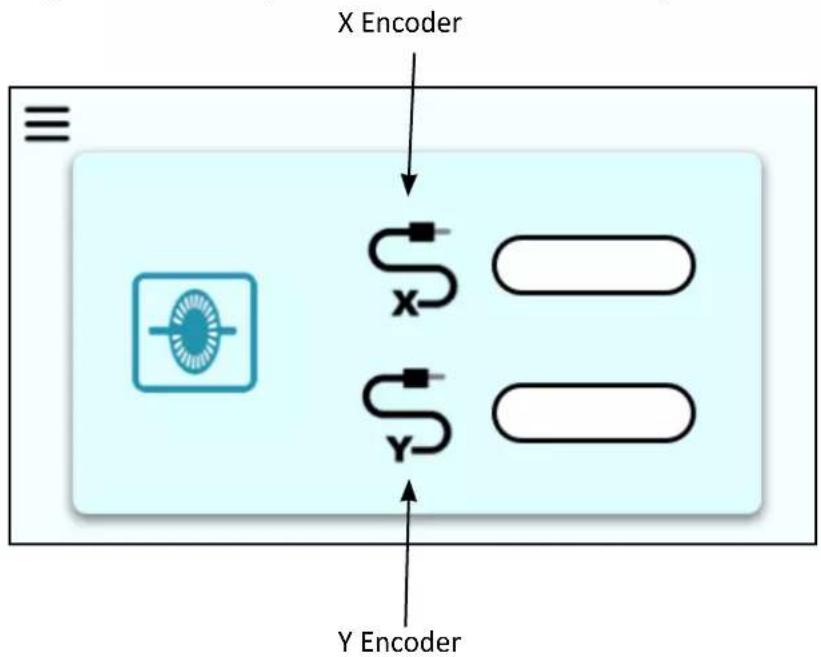
flowchart
graph TD
    A["X Encoder"] --> B["Sensor Block"]
    B --> C["Y Encoder"]
    style B fill:#f9f,stroke:#333
    style C fill:#bbf,stroke:#333
When the above screen is shown, move the machine around the frame.
Pass: Values for X and Y will increase and decrease as the machine and carriage are moved.
Press the Menu symbol to go back to the Diagnostics menu.

Needle Position Encoder
Select this icon to tests the needle position using the handwheel.
When the above screen is open, rotate the handwheel to test the needle position. The numbers should cycle from 0 to 359.
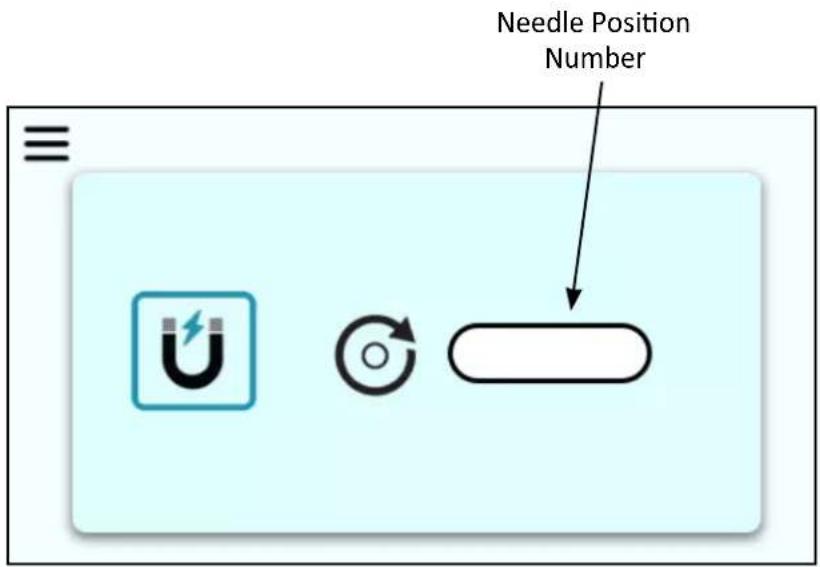
Pass: The numbers cycle from 0 to 359 while the handwheel is rotating.
Press the Menu symbol to go back to the Diagnostics menu.
When back at the Diagnostics menu, press the Menu symbol again to go back to the Main Menu.

Updates
From time to time, it may be necessary to perform updates to your machine's software. When the update screen is open, this is what you will see:

flowchart
graph TD
    A["Machine Update"] --> B["Device Icon"]
    B --> C["Display Update"]
    style A fill:#f9f,stroke:#333
    style B fill:#ccf,stroke:#333
    style C fill:#cfc,stroke:#333
This screen can be used to update the touchscreen display and the machine software using a USB drive (with the updated firmware versions) inserted into the touchscreen's USB port.
To complete an update, follow these steps:
- Download the update(s) and save to a USB drive.
For the latest software update for your machine or display, visit babylock.com and select the machine model.
- Insert the USB drive into the bottom of the Gallant XL touchscreen.
NOTE: This USB port is used for both the Machine and Display updates.
- Press either the Machine icon or the Display icon to begin the update.
You will hear beeps:
- 3 beeps at 2 second intervals: indicates there is no USB drive in the port or the USB drive is unreadable.
- 2 beeps at 2 second intervals: indicates the update file cannot be found or is corrupt.
- 1 beep at 2 second intervals: indicates the update is in progress.
When the update is complete the machine will beep and return to the Home screen.
NOTE: When you need to update both the Machine and Display software at the same time, ALWAYS COMPLETE THE DISPLAY UPDATE FIRST. Then proceed with the Machine update.
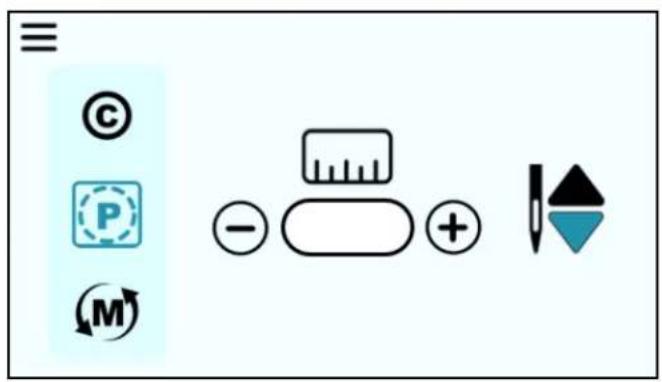
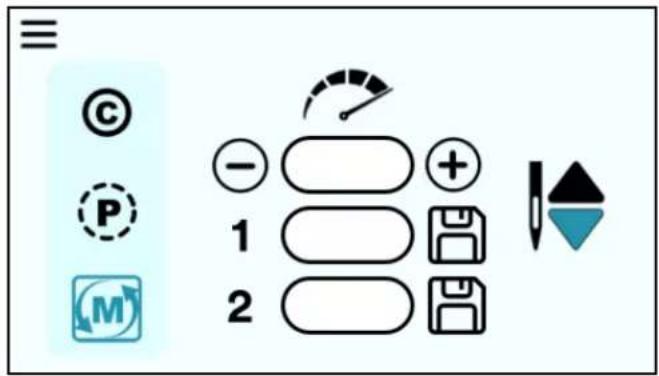
Stitch Modes
On the home screen, you can view the different Stitch Modes that you are able to access. Each Stitch Mode varies the look of the home screen and have slightly different functions.
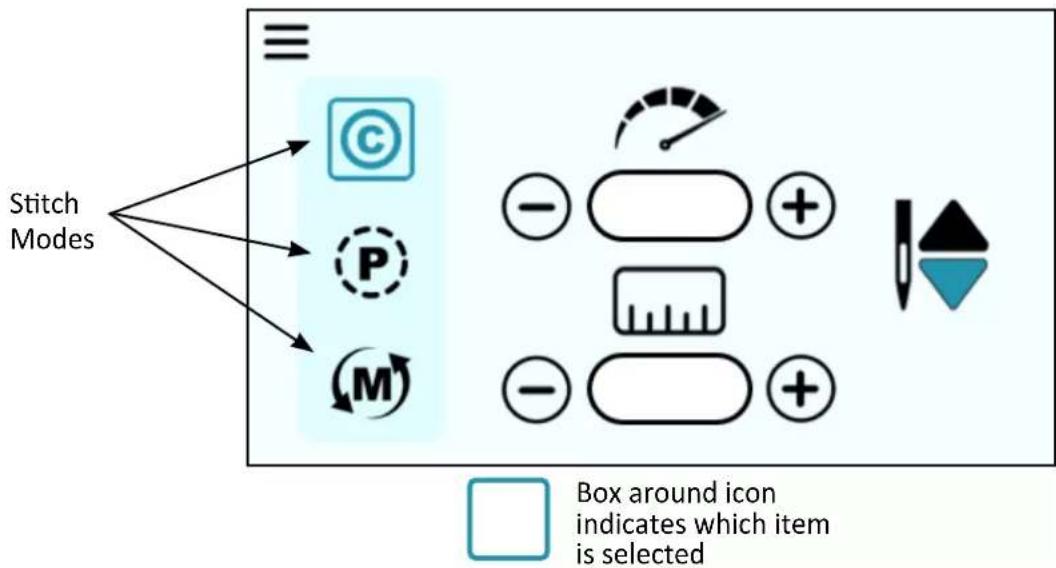
flowchart
graph TD
    A["Stitch Modes"] --> B["©"]
    A --> C["P"]
    A --> D["M"]
    B --> E["-"]
    C --> F["+"]
    D --> G["-"]
    E --> H["Box around icon indicates which item is selected"]
IMPORTANT: The Stitch Mode settings cannot be adjusted while the machine is stitching. Ensure the machine has been paused and make your desired changes. Then you may continue stitching.
Cruise Mode

When quilting in Cruise mode, the needle will start to move immediately when you press the Start/Stop key on the handlebars, according to the cruise speed (stitches-per-minute) setting.
Once you begin to move the machine, the needle will move according to the stitches-per-inch (SPI) setting. The needle continues to move at the Cruise speed (stitches-per-minute) anytime you pause the machine, until you press the Start/Stop key on the handlebars to fully stop quilting.
Select Cruise Mode by touching the Cruise icon on the Home screen.

The Cruise speed is the SPM the machine will stitch, regardless of how the machine is moved.

Precision Mode
Stitch regulation maintains a consistent stitch length (stitches-per-inch) regardless of how quickly or slowly you move the machine. When quilting in Precision mode, the needle only moves when you move the machine.
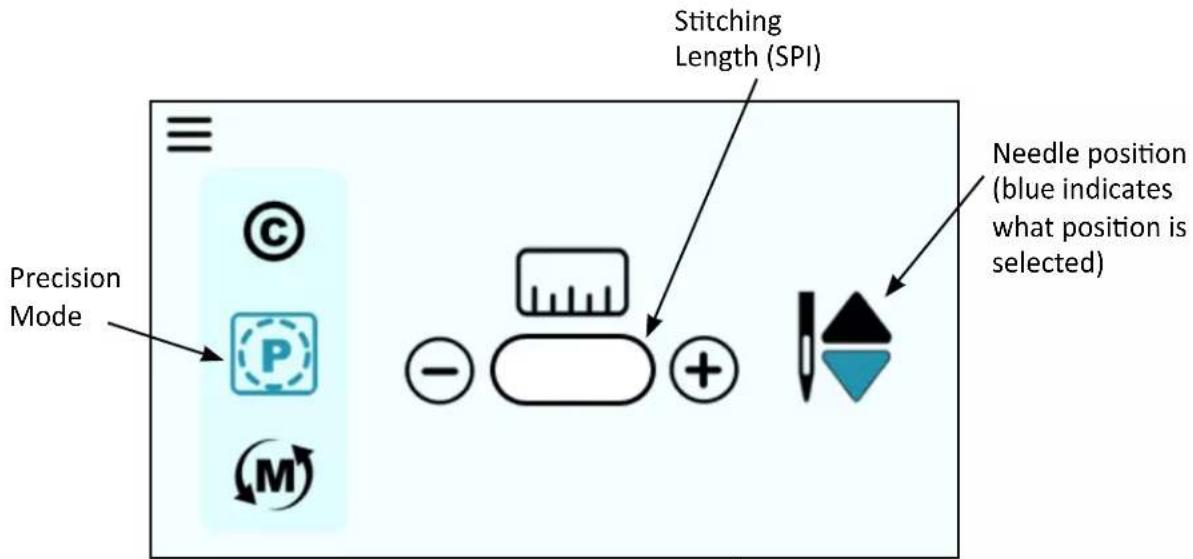
After pressing the Start/Stop key on the handlebars, move the machine to begin quilting according to the stitches-per-inch setting. When you pause moving the machine, the needle will pause again. Press the Start/Stop key on the handlebars to fully stop quilting.
Select the Precision icon and then specify the stitches per inch by pressing the Plus or Minus key on the screen.

Manual Mode
When using manual stitching mode, the length of the stitch is determined by how quickly or slowly you move the machine around the quilt, in combination with the number of stitches per minute (up to 1800) that you choose.
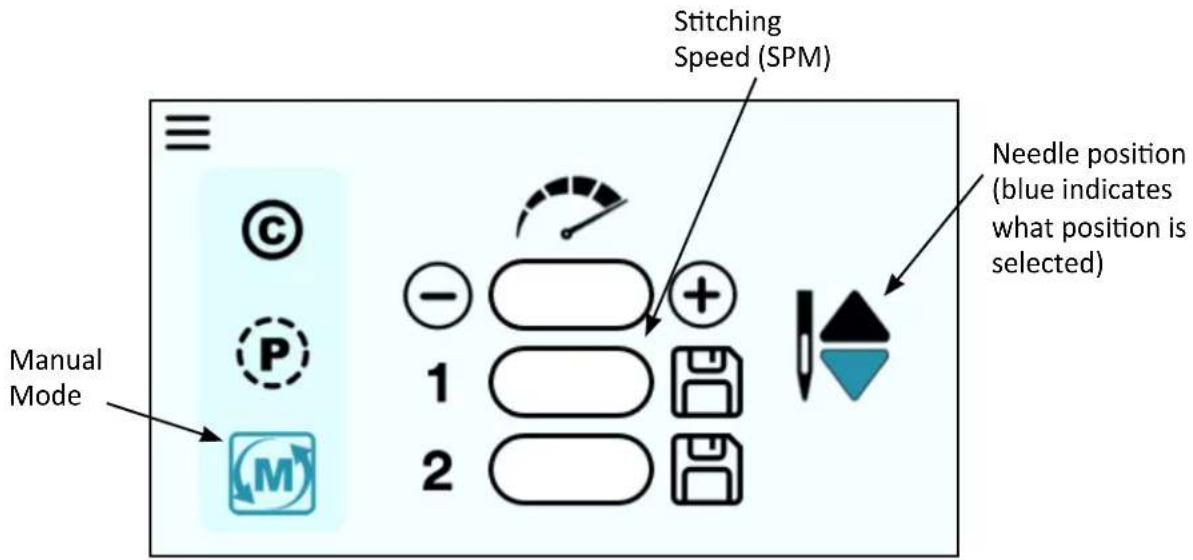
For a consistent stitch length, move the machine at a consistent speed. Experiment with different combinations of quilting speed and stitches-per-minute to find what the optimal conditions are for you.
Select the Manual icon and then specify the stitches per minute (speed) by pressing the Plus or Minus key on the screen.
Alerts
Alert screens display an icon that indicates an issue with the operation of the machine. The Alert might indicate a minor problem you can remedy on your own, like a loose cable. Other times you may need to seek help an authorized Baby Lock retailer or Baby Lock's Product Support team.
An icon will be displayed on the screen along with a code number that appears in the upper right corner of the screen. This number will help a Baby Lock retailer diagnose the issue. The number will not mean anything to you, but make note of this and relay it to your authorized Baby Lock retailer.
The icons that can be displayed are shown below.

Over/under voltage: This icon appears when the machine has detected a voltage that is out of range for an extended period of time.
Power cycle the machine by turning the machine off at the power switch, wait 10 seconds, and then turn back on. If the trouble repeats, please contact your authorized Baby Lock retailer for service.

Over-current: This icon may appear when the machine has hit an obstruction or is unable to sew through the fabric.
Check your quilt for any obstruction, such as a pin, and remove it. Check that the handwheel can rotate freely then clear the screen by pressing any key. If the trouble repeats, please contact your authorized Baby Lock retailer.

Obstruction: This icon indicates there may be thread or lint trapped in the bobbin race.
Check for thread or lint in the bobbin race. You may need to have someone turn the handwheel while you watch the bobbin race. Remove the obstruction and oil the hook. Check that the handwheel can rotate freely. Clear the screen by pressing any key.
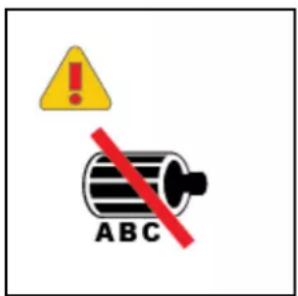
Motor Hall Sensor: This icon indicates the hall sensors did not change state correctly.
In the unlikely situation where the control system has detected an incorrect motor sensor sequence, please contact your authorized Baby Lock retailer for repairs.

natural_image
Illustration of a thermometer with a yellow sun and brown rays (no text or symbols)Over-temperature: The over-temperature icon appears if:
• the machine is being stressed by an obstruction
- the machine is stitching through extremely difficult fabric to sew, or
- the machine is operating in a hot environment.
Power off the machine and allow it to cool down. If the problem persists, contact your authorized Baby Lock retailer.

Magnetic Encoder: This icon indicates a problem with the main shaft position sensor.
Please contact your authorized Baby Lock retailer for service.
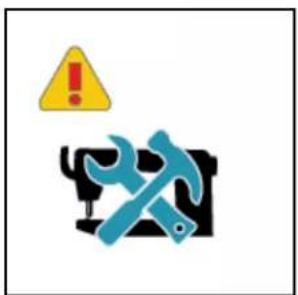
Service: This icon indicates that the machine should be serviced.
Please contact your authorized Baby Lock retailer for service
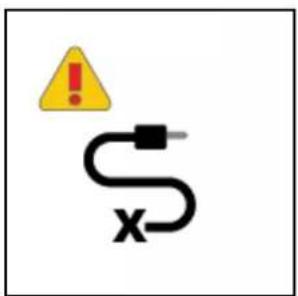
X Encoder: This icon shows the X encoder is not fully plugged in.
Turn off the machine then unplug and replug the connector at both the encoder end and the machine end to ensure it is completely plugged in. Also check the X encoder (at the back of the carriage) and the cable for damage.
Clear the screen by pressing any key.
Machine Maintenance
Clean and Oil Your Gallant XL
The only place where you need to regularly oil your machine is the bobbin hook assembly. Failure to keep the hook assembly lubricated can cause severe damage to the machine.
We recommend that you oil the hook assembly with each bobbin change and before use if you haven't used the machine for a few days. A change in the sound of the machine while quilting also indicates that it may need to be oiled.
NOTE: Internal lubrication will be done when the machine is taken to an authorized Baby Lock retailer for routine maintenance and cleaning, every 24 months or 10 million stitches (whichever comes first).
IMPORTANT: Only use light stitching machine oil on the hook when oiling your machine.
To clean the bobbin area and oil the bobbin hook
-
Turn off the machine. Remove the bobbin and bobbin case.
-
Clean the bobbin basket area using a lint brush (provided) or a quick blast of canned air.
-
Put a small drop of oil on the hook in the region where the bobbin basket assembly and the rotating hook meet. The oil will work its way back into the interlocking area of the hook and bobbin basket.
-
Replace the bobbin case with bobbin and turn on the machine.
natural_image
Close-up of a mechanical component with a central shaft and circular housing (no visible text or symbols)QUILTING TIP: After oiling, always sew a few seconds on a scrap piece of fabric off the side of the quilt as oil may cling to thread. Over-oiling can cause excess dripping from the bobbin assembly.
To clean the Gallant XL display
- Use a soft rag or microfiber cloth (dampened with diluted isopropyl alcohol if needed) and gently wipe the display to remove any dust or finger marks.
△ CAUTION: Never use any chemicals to clean your display as this may negatively affect the display's performance.
Maintenance Schedule
In addition to the ongoing cleaning and oiling maintenance that you do on a regular basis when you quilt, you should have your machine serviced by an authorized Baby Lock retailer every 24 months or 10 million stitches, whichever occurs first. They will take care of oiling and greasing internal parts and ensure the machine is in optimal working order.
Troubleshooting
You can correct many problems on your own. If you need additional help, contact your local, authorized Baby Lock retailer who supports you and your machine. You can also contact Baby Lock Product Support at 1-800-313-4110.
First, check the following:
- The AC power cord is properly connected (at both ends) and the power switch is turned on.
- Confirm that all cables are properly seated into their connections.
- Turn off the machine completely. Wait for at least ten seconds and then turn it back on.
If the above checks do not solve the problem, refer to the information below.
| Skipped Stitches Corrective Measure(s) | |
| The needle is damaged, dull, bent, or installed improperly | Replace the needle often, normally once or twice per day for continuous quilting or at least once per quilt. Use only the recommended needle system.Always change the needle if the needle has struck any hard object such as a pin. The tip of the needle can become damaged or burred, resulting in fabric damage, as well as skipped stitches, thread breakage, or shredding.Always change the needle if it has been hit, bumped or pulled off center while maneuvering the machine over the quilt. A slightly bent needle can be a major cause of skipped stitches. |
| Incorrect needle size• Use the proper size needle for the job. Start with matching the needle size with the thread; consult the chart on your Gallant XL Quick Reference Card. Some battings and fabrics used in quilting may require a larger size needle.You will need to experiment to determine which works best with your combination of fabric, thread, and batting. | |
| Fabric is too tight on the frame | Loosen the fabric tension on the frame. Fabric that is tensioned too tight causes the fabric to bounce while quilting. This can result in skipped stitches. |
| Thread tension too tight• Check bobbin case tension and then check top thread tension.For more information about adjusting tension, see Bobbin and Bobbin Tension in the Using Your Machine section of this manual. | |
| Improper threading • Ensure that the machine is threaded correctly. Refer to your Gallant XL Quick Reference Card if needed. | |
| The needle is not positioned properly | • Position the needle properly to the needle bar. Inspect the position of the needle to make sure the needle is at the 6 o'clock position. When you stand directly in front of the needle, facing the front (bobbin case side) of the machine, you will see the entire needle eye directly facing you. This is the 6 o'clock position.• Make sure (a) the needle is installed all the way into the needle bar, and (b) the long groove in the needle is toward the front, and (c) the scarf, the scooped out part of the back of the needle, is toward the back of the machine. |
| Needle Breaks Corrective Measure(s) | |
| The needle is bent or not installed properly | • Replace the needle. Make sure that the needle is pushed into the needle bar clamp until it can go no further. Visually check that it is up to the top of the sight hole above the needle bar clamp screw. If the needle isn't installed properly, it can cause damage in the bobbin area and throat plate. |
| The needle hits the throat plate | • Correctly position the needle, throat plate, or hopping foot. Replace with a new needle. |
| Stitches Are Puckered Corrective Measure(s) | |
| The tension is not balanced • Balance the tension of the top thread after ensuring the bobbin tension is adjusted correctly. For more information about adjusting tension, see Bobbin and Bobbin Tension in the Using Your Machine section of this manual. | |
| Needle too large for quilting thread | • Replace the needle with a size better suited for the thread. |
| Poor Stitch Quality Corrective Measure(s) | |
| The tension is not balanced • Balance the tension of the top thread after ensuring the bobbin tension is adjusted correctly. For more information about adjusting tension, see Bobbin and Bobbin Tension in the Using Your Machine section of this manual. | |
| Bobbin case is damaged, corroded, dirty, etc. | • Since thread slides over the surface of the bobbin case at a high speed, make sure the case is free of any lint or foreign matter that could impede thread passage through the machine. |
| Moving the machine too fast for needle speed selected (Manual mode) | • Synchronize machine movement and needle speed to get your desired stitch length. Elongated stitches are an indication of moving the machine too fast for the current speed. |
| Tension Is Poor Corrective Measure(s) | |
| Lint caught under the tension spring on the bobbin case | ·If using short staple threads, inexpensive threads, industrial threads, or coated threads, lint and other material will build up under the tension spring and begin to lift the spring. This reduces the spring's ability to compress against the thread. Insert the corner of a business card under the spring and clear out the lint. The bobbin tension will return fairly close to its preset tension. Test the tension before quilting. |
| Handwheel Won't Rotate Corrective Measure(s) | |
| Thread is entangled and caught in the hook | ·There may be a thread lock. Quickly rock the handwheel, at the back of the machine, back and forth several times. You may need another person to turn the handwheel while you look for the thread that is caught. Once thread lock is cleared re-oil the hook and make sure the handwheel turns freely. |
| There is a thread lock. ·Carefully rock the handwheel in direction of motion and then the other direction until the thread lock breaks free. Once the handwheel can be turned freely, remove the thread from the hook and basket. Now oil the hook and make sure the handwheel turns freely without the hook hitting the needle. It is possible for a thread lock to cause a timing problem. | |
| Thread Nests under Quilt Corrective Measure(s) | |
| Not enough tension on top thread | ·Check that the machine is threaded correctly. Make certain that the thread is flossed snugly in place between the two tension discs. If the machine is threaded correctly, tighten top tension by rotating the tension knob clockwise. (For more information about adjusting tension, see Bobbin and Bobbin Tension in the Using Your Machine section of this manual.) |
| Improper threading | ·Refer to threading diagram and threading instructions. |
| Thread Backlash Corrective Measure(s) | |
| Bobbin thread tangles within the bobbin case, tangles and winds onto the hook spindle, or occasionally forms loops on the bottom of the quilt | ·Make sure the bobbin is in the bobbin case correctly and the thread is coming out from under the tension spring. The bobbin should rotate clockwise when the thread is pulled. |
| Hard to Guide Machine Corrective | Measure(s) |
| Carriage wheels not centered on track | Center the carriage wheels on top of the continuous track. Refer to your frame instructions.Check that the machine carriage has not jumped the track. |
| Thread caught in wheels Remove | ve all thread or debris from the wheels.Check that the tracks are free of lint and threads. |
| Motor Fails to Run Corrective Measure(s) | |
| On/Off switch turned off Make sure that the power switch is in the on position. | |
| Machine not receiving power Check that the power connector is securely plugged into the back of the machine and the three-prong end is plugged into the power source. Unplug and re-plug. | |
| Uneven Quilt Design Corrective Measure(s) | |
| Take-up rollers may be bowed or bent | Make certain the fabric is not rolled too tight, causing the poles to bow. Check that poles are inserted completely together with the push buttons engaged so bowing won't occur. |
| Leaders are stretched or worn If fabric is beginning to stretch or fray, contact your authorized Baby Lock retailer to purchase replacement leaders. | |
| Thread Breaks Corrective Measure(s) | |
| Poor quality thread, may have severe twisting or thread rot | Look for severe twisting of threads when approximately 12 to 15 inches has been pulled off, with the ends pinched together.Cotton threads are particularly susceptible to dry rot or wet rot which makes thread brittle.Do not use poor quality thread, or thread that is rotted or brittle. |
| Top and bobbin tensions not balanced | Balance the tension of the needle thread after ensuring the bobbin tension is adjusted correctly. (For more information about adjusting tension, see Bobbin and Bobbin Tension in the Using Your Machine section of this manual.) |
| The machine has been threaded incorrectly or thread spools are not positioned correctly | Check that the machine is threaded correctly. Refer to diagram on Quick Reference Card.Check for accidental double wrapping of thread on thread guides.Check the thread mast, making sure the eyelet of the mast is directly over the cone.Check the position of the thread cone. Tipped cones can dramatically affect thread tension and can cause breakage. |
| Debris in tension discs | Inspect for particles and remove any fuzz or debris. |
| Bobbin rotation is not smooth | Change the bobbin. The slightest hesitation of the bobbin rotation can be the cause of dramatic tension change and thread breakage. |
| Needle is burred, bent or dull, or installed incorrectly | Change the needle at least once per quilt. Make sure the needle is installed to the top of the sight hole in the needle bar. |
| Needle not suitable for thread | Replace the needle to one better suited for the thread. Use the proper size needle. Refer to chart in Machine Needle section. |
| Hesitating too long at one point in quilting motif | Move more quickly so stitches don’t overlap or build up. When starting the machine, begin moving immediately. Stitching in one place too long will cause the thread to break. |
| Improper needle/hook relationship | Machine timing needs to be checked. Consult an authorized Baby Lock retailer. |
| Damage or burr at needle hole of throat plate or other thread handling part | ·If thread is shredding at the throat plate, check for burrs or jagged edges. Gently rub with emery cloth to remove the sharp edge. Consult an authorized Baby Lock retailer to polish any hard-to-reach or delicate areas. |
| Wrong type of needle ·Use only | the needles recommended by Baby Lock (needle system 134, sizes 12 through 21). |
| Other possible problems ·Needle | too close to hook, causing friction and possible collision of hook point and needle (causing broken thread).Needle plate damageHook damageBroken needles or damaged needle bar clamp |
NOTE: If the troubleshooting tips do not eliminate the problem, please consult an authorized Baby Lock retailer.
Appendix 1
Federal Communications Commissions (FCC) Declaration of Conformity (For USA Only)
Responsible Party: Tacony Corporation
| 1760 | Gilsinn | Lane |
| Fenton, | Missouri, | 63026 |
declares that the product,
Product Name: Gallant XL
complies with Part 15 of the FCC Rules. Operation is subject to the following two conditions: (1) this device may not cause harmful interference, and (2) this device must accept any interference received, including interference that may cause undesired operation.
This equipment has been tested and found to comply with the limits for Class B digital device, pursuant to Part 15 of the FCC Rules. These limits are designed to provide reasonable protection against harmful interference in a residential installation. This equipment generates, uses, and can radiate radio frequency energy and, if not installed and used in accordance with the instructions, may cause harmful interference to radio communications. However, there is no guarantee that interference will not occur in a particular installation.
If this equipment does cause harmful interference to radio or television reception, which can be determined by turning the equipment off and on, the user is encouraged to try to correct the interference by one or more of the following measures:
- Reorient or relocate the receiving antenna.
- Increase the separation between the equipment and receiver.
- Consult the retailer or an experienced radio/TV technician for help.
Changes or modifications not expressly approved by the manufacturer or local sales distributor could void the user's authority to operate the equipment.
Canadian Department of Communications Compliance Statement (For Canada Only)
This digital apparatus does not exceed the Class B limits for radio noise emission from digital apparatus as set out in the interference-causing equipment standard entitled “Digital Apparatus”, ICES-003 of the Department of Communications.
Radio Interference (Other than USA and Canada)
This machine complies with EN55022 (CISPR Publication 22) /Class B and AUS/NZ 55022/Class B.