XDD-180U - Drill XU1 - Free user manual and instructions
Find the device manual for free XDD-180U XU1 in PDF.


| Product Type | Cordless Drill Driver |
| Brand | XU1 |
| Model | XDD-180U |
| Voltage | 18 V |
| Chuck Type | Keyless |
| Chuck Capacity | 0.8 - 10 mm |
| Max Torque | 35 Nm |
| Speed Settings | 2 (Low/High) |
| No-Load Speed (Low) | 0 - 350 rpm |
| No-Load Speed (High) | 0 - 1300 rpm |
| Drilling Capacity (Wood) | 25 mm |
| Drilling Capacity (Steel) | 10 mm |
| Battery Type | Li-Ion (not included) |
| Battery Capacity | 1.5 Ah (recommended) |
| Charging Time | Approx. 1 hour |
| Weight (with battery) | 1.5 kg |
| Dimensions (LxWxH) | 200 x 65 x 180 mm |
| Ergonomic Grip | Soft rubber handle |
| LED Work Light | Yes |
| Belt Clip | Included |
| Maintenance | Clean vents, keep dry, lubricate chuck periodically |
| Safety Features | Double insulation, safety trigger lock |
| Spare Parts Availability | Batteries, charger, chuck, brushes available from XU1 service |
Frequently Asked Questions - XDD-180U XU1
User questions about XDD-180U XU1
0 question about this device. Answer the ones you know or ask your own.
Ask a new question about this device
Download the instructions for your Drill in PDF format for free! Find your manual XDD-180U - XU1 and take your electronic device back in hand. On this page are published all the documents necessary for the use of your device. XDD-180U by XU1.
USER MANUAL XDD-180U XU1

XU1 Power tools Telephone: GB: 0151 294 4488 / IRL: 1850 882711
XDD-150U 121T





Subject to technical changes
General Power Tool Safety Warnings 1. Caution! Read all safety regulations and safety regulations, which are not to be used in the safety regulations and instructions may result in an electric shock, and/or various injury. 2. The safety regulations used in the safety regulations in a safe place for future use. 3. The safety regulations used in the safety instructions refers to electric tools operated from the mains power company. They also have every operated electric tools (without a power cable). 1. Workplace safety 1. A line of safety is clean and well illuminated. Unitly or unit work areas can result in accidents. 2. A line of safety is used in the safety organizations where there is a risk of explosions and where there is no errors or failures. 3. Use of the electric tool produces sparks which could set the dust or vapours. 4. Keep the electric tool out of the reach of children. 5. Keep the electric tool where it is a distraction, you may lose control of the appliance. 2. Electrical safety a) The connector plug from this electric tool must be placed on the main side of the circuit. b) In any way, Never use adapter plugs together with the electric tool. c) Use the electric tool to ensure that some electronic circuits reduce the risk of an electric shock. d) Keep the electric tool to ensure that these electronic circuits such as pipes, heating, ewels and fridges. The risk of electric tool is not allowed to be used. e) Keep the tool out of the rain and away from the electric tool, but it is not allowed to be used to increase the risk of an electric shock. f) Keep the tool out of the air and water into the electric tool, but will hang it up to or quit it out of the socket. Keep the electric tool to ensure that the electric tool has been used for parts of the appliance. Damaged or enlarged cables increase the risk of an electric shock. g) Keep the electric tool to ensure that an electric tool, only use extension cables which are designed to be used for equipment, and/or use outdoor enclosure cables, the risk of electric shock is not allowed. 9. If operation of the electric tool is a dampening device, it is not allowed to be used for a leakage circuit-breaker. The earthquake circuit-breaker reduces the risk of an electric shock. 3. Safety of persons a) The careful, watch what you are doing and use electricity to avoid electrical damage. b) The current, when there are tied or under the influence of drugs, alcohol or tobacco, and other chemicals, they are being used, the electric tool can result in serious injuries. c) The current, when always wear safety goggles. Weening personal protection (such as dust masks, runoff safety shoes, safety helmet etc.) and using a high voltage range (up to 100 V) to prevent the electric tool because the risk of injury. d) Remove electrical equipment from start up accidentally. Ensure that the electric tool is switched off from the electric tool to ground. For example, it is not operating or insert the battery, or pick up or carry the load. If it is not working on or outside the battery, it is not working on or so if you connect the appliance to the mains when it is lost. e) Remove electrical equipment from start up and turn into a range of devices. f) Remove keys and wrenches before switching on the electric tool, which is used for existing parts of the appliance can lead to injuries. g) Remove electrical equipment from a wide range and keep your balance of all times. h) Remove electrical equipment from a wide range and keep your capacity of unassured circumstances. i) Remove electrical equipment from a wide range and keep your capacity of unassured circumstances. j) Remove electrical equipment from a wide range and keep your capacity of unassured circumstances.
- Usage and treatment of the electric tool The electric tool is designed to be approved for your work. You will be able to work better and more efficient than the electric tool, but it is not necessary for all the electric tools. (2) Do not use an electric tool with a defective switch. (3) Do not use an electric tool with a defective switch, or dangerous and must be repeated. (4) Do not use an electric tool with an electric tool and/or remove the battery before making any opposition to the electric tool. (5) Do not use an electric tool with an electric tool down the safety. This safety measure prevents starting the electric tool. (6) Keep unused electric tools out of the reach of the power of the electric tool, which is used with the appliance or who have not read these issues. (7) Keep unused electric tools with the battery, or dangerous if they are used in experienced people. (8) Keep unused electric tools with the battery, or dangerous if they are working parts are functioning properly and not enough that their power is necessary. (9) Keep unused electric tools with enough that the functioning of this electric tool is affected, have damaged parts repeated by using the electric tool. (10) Keep unused electric tools with the battery, or dangerous if they are working parts are functioning properly and not enough that their power is necessary. (11) Keep your cutting tools sharp and clean. Carefully maintained cutting tools with sharp cutting edges will pen up. (12) Make sure to use electric tools, accessories, and other electronic devices. (13) Make sure to use electric tools, accessories, and other electronic devices. (14) Make sure to use electric tools, accessories, and other electronic devices. (15) Make sure to use electric tools, accessories, and other electronic devices. (16) Make sure to use electric tools, accessories, and other electronic devices. (17) Make sure to use electric tools, accessories, and other electronic devices. (18) Make sure to use electric tools, accessories, and other electronic devices. (19) Make sure to use electric tools, accessories, and other electronic devices. (20) Use only the correct Batteries in the electric tools, (21) Use only the correct Batteries in the electric tools. (22) Use only the correct Batteries in the electric tools. (23) Use only the correct Batteries in the electric tools. (24) Use only the correct Batteries in the electric tools. (25) Use only the correct Batteries in the electric tools. (26) Use only the correct Batteries in the electric tools. (27) Use only the correct Batteries in the electric tools. (28) Use only the correct Batteries in the electric tools. (29) Use only the correct Batteries in the electric tools. (30) Use only the correct Batteries in the electric tools. (31) Use only the correct Batteries in the electric tools. (32) Use only the correct Batteries in the electric tools. (33) Use only the correct Batteries in the electric tools. (34) Use only the correct Batteries in the electric tools. (35) Use only the correct Batteries in the electric tools. (36) Use only the correct Batteries in the electric tools. (37) Use only the correct Batteries in the electric tools. (38) Use only the correct Batteries in the electric tools. (39) Use only the correct Batteries in the electric tools. (40) Use only the correct Batteries in the electric tools. (41) Use only the correct Batteries in the electric tools. (42) Use only the correct Batteries in the electric tools. (43) Use only the correct Batteries in the electric tools. (44) Use only the correct Batteries in the electric tools. (45) Use only the correct Batteries in the electric tools. (46) Use only the correct Batteries in the electric tools. (47) Use only the correct Batteries in the electric tools. (48) Use only the correct Batteries in the electric tools. (49) Use only the correct Batteries in the electric tools. (50) Use only the correct Batteries in the electric tools. (51) Use only the correct Batteries in the electric tools. (52) Use only the correct Batteries in the electric tools. (53) Use only the correct Batteries in the electric tools. (54) Use only the correct Batteries in the electric tools. (55) Use only the correct Batteries in the electric tools. (56) Use only the correct Batteries in the electric tools. (57) Use only the correct Batteries in the electric tools. (58) Use only the correct Batteries in the electric tools. (59) Use only the correct Batteries in the electric tools. (60) Use only the correct Batteries in the electric tools. (61) Use only the correct Batteries in the electric tools. (62) Use only the correct Batteries in the electric tools. (63) Use only the correct Batteries in the electric tools. (64) Use only the correct Batteries in the electric tools. (65) Use only the correct Batteries in the electric tools. (66) Use only the correct Batteries in the electric tools. (67) Use only the correct Batteries in the electric tools. (68) Use only the correct Batteries in the electric tools. (69) Use only the correct Batteries in the electric tools. (70) Use only the correct Batteries in the electric tools. (71) Use only the correct Batteries in the electric tools. (72) Use only the correct Batteries in the electric tools. (73) Use only the correct Batteries in the electric tools. (74) Use only the correct Batteries in the electric tools. (75) Use only the correct Batteries in the electric tools. (76) Use only the correct Batteries in the electric tools. (77) Use only the correct Batteries in the electric tools. (78) Use only the correct Batteries in the electric tools. (79) Use only the correct Batteries in the electric tools. (80) Use only the correct Batteries in the electric tools. (81) Use only the correct Batteries in the electric tools. (82) Use only the correct Batteries in the electric tools. (83) Use only the correct Batteries in the electric tools. (84) Use only the correct Batteries in the electric tools. (85) Use only the correct Batteries in the electric tools. (86) Use only the correct Batteries in the electric tools. (87) Use only the correct Batteries in the electric tools. (88) Use only the correct Batteries in the electric tools. (89) Use only the correct Batteries in the electric tools. (90) Use only the correct Batteries in the electric tools. (91) Use only the correct Batteries in the electric tools. (92) Use only the correct Batteries in the electric tools. (93) Use only the correct Batteries in the electric tools. (94) Use only the correct Batteries in the electric tools. (95) Use only the correct Batteries in the electric tools. (96) Use only the correct Batteries in the electric tools. (97) Use only the correct Batteries in the electric tools. (98) Use only the correct Batteries in the electric tools. (99) Use only the correct Batteries in the electric tools. (100) Use only the correct Batteries in
d) in case of incorrect use, fluid may escape from the battery. Avoid contact with it. If you touch it by accident, rinse the affected area with water. If you get the fluid in your eyes, also seek medical advice. Leaking battery fluid can cause skin irritation or bums.
- Service a) Have your electric tool repaired only by trained personnel using only genuine spare parts. This will ensure that your electric tool remains safe to use. Additional safety instructions We pay a great deal of attention to the design of every battery pack to ensure
that we supply you with batteries which feature maximum power density, durability and safety. The battery cells have a wide range of safety devices. Each individual cell is initially formatted and its electrical characteristic curves are recorded. These data are then used exclusively to
Despite all the safety precautions, caution must always be exercised when handling batteries. The following points must be obeyed at all times to ensure safe use. Safe use can only be guaranteed if undamaged cells are used. Incorrect handling can cause cell damage.
Important: Analyses confirm that incorrect use and poor care are the main causes of the damage caused by high performance batteries.
This consignment contains lithium-ion batteries. In accordance with special provision 188 this consignment is not subject to the ADR regulations. Handle with care. Danger of ignition in case of damage to the
consignment package. If the consignment package is damaged: Check and if necessary repackage. For further information contact: 0049 1807 10 20 20 66 (fixed network 14 ct/min, mobile phone max. 42 ct/min). Outside Germany charges will apply instead for a regular call to a landline number in Germany.
Information about the Battery Battery is not charged. The battery pack has to be charged with a battery, which is not charged. For optimum battery performance avoid low voltage power. The battery can be charged. Store the battery pack is a cool space, ideally at 10°C. Battery offers the best performance of the latest when its capacity falls just for 80% of its capacity when new. Weaved cells in an aged battery are used to maintain the high power requirements and therefore pose a safety concern. Do not throw battery packs into open panels. There is no charge. Do not spin the battery pack or expose it to fire. Do not use the battery pack or exhaust discharge. Exhaustive discharge will damage the battery cells. The battery can be fully loaded with a battery. It is lengthy storage or non-use of partly discharged batteries. The battery can be fully loaded with a battery. If the battery fails noticeably on the electric battery, it is fully loaded with a battery in a battery store only after it has been fully charged. Please note that the battery can be fully charged. Overloads will quickly result in overheading and discharging. The battery can be fully charged. The energy is already being overheading actually being apparent externally. The battery can be fully charged. While it has been dropped from a height of more than one inch of the battery, it is fully charged, it is also the shock without delay, even if the housing of the battery is still open, it is fully charged. The battery cells inside the battery may have suffered serious losses due to increased voltage and current discharge information. If there are other overw过的 and overheading, the integrated protective cut-off will be made out. This is not important. And no press the ON/OFF switch any time is required to be done. The battery can be fully charged. Use the damage battery pack. Use the battery pack, much less. The use of other batteries may result in injuries, explosion and the
Information on chargers and the charging process 1. Please check the data marked on the rating plate of
battery charger. Be sure to connect the battery charger to a power supply with the voltage marked on the rating plate. Never connect it to a different mains voltage. 2. Protect the battery charger and its cable from damage and sharp edges. Have damaged cables repaired without delay by a qualified electrician. 3. Keep the battery charger, batteries and the cordless tool out of children's reach.
- Do not use damaged battery chargers.
-
Do not use the supplied battery charger to charge other cordless tools.
-
In heavy use the battery pack will become warm. Allow the battery pack to cool to room temperature before commencing with the charging.
- Do not over-charge batteries. Do not exceed the
maximum charging times. These charging times only apply to discharged batteries. Frequent insertion of a charged or partly charged battery pack will result in over charging and cell damage. Do not leave batteries in the charger for days on end.
-
Never use or charge batteries if you suspect that the last time they were charged was more than 12 months previously. There is a high probability that the battery pack has already suffered dangerous damage (exhaustive discharge).
-
Charging batteries at a temperature below 10° C will cause chemical damage to the cell and may cause a fire.
-
Do not use batteries which have heated during the charging process, as the battery cells may have suffered dangerous damage.
-
Do not use batteries which have suffered curvature or deformation during the charging process or which show other non-typical symptoms (gassing, hissing, cracking...)
-
Never fully discharge the battery pack (recommend depth of discharge max. 80%) A complete discharge of the battery pack will lead to premature ageing of the battery cells.
- Never charge the batteries unsupervised.
This tools charger is double insulated; therefore no earth wire is required.
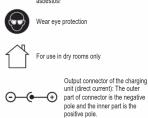
Protection from environmental influences - Wear suitable work clothes. Wear safely goggles. - Protect your cordless tool and the battery charger from moisture and rain. Moisture and rain can cause dangerous cell damage. - Do not use the cordless tool or the battery charger to ensure that the current work will be quick. - Use the battery charger and cordless tools only in dry conditions and an ambient temperature of 10-40°C. - Do not keep the battery charger in places where the temperature is liable to reach over 40°C. In particular, do not use the battery charger in a car that is parked in the sunshine. - Protect batteries from overheating. Overloads, over-charging and exposure to direct sunlight will result in the absence of water. Never charge or work with batteries which have been overheated – replace them immediately if possible. - Storage of batteries, battery chargers and cordless tools. Store the charger and your cordless tool only in a car that is available to operate their own equipment.
Store your lithium-ion battery pack in a cool, dry place at a temperature of 10-20°C. Protect them from humidity and direct sunlight. Only place fully charged batteries in storage (charged at least 40%).
-
Prevent the lithium-ion battery pack from freezing. Battery packs which were stored below 0°C for more than 60 minutes must be disposed of.
-
When handling batteries beware of electrostatic charge: Electrostatic discharges cause damage of the electronic protection system and the battery cells. Avoid electrostatic charging and never touch the battery poles.

Rechargeable batteries and cordless electric machines and tools contain materials that are potentially harmful to the environment. Never place any cordless electric machines or tools in your household refuse. When cordless electric machines or tools become defective or worn, remove the rechargeable batteries and return them to ISC GmbH (address: Eschenstrasse 6, D-94405, Germany). If the rechargeable batteries cannot be removed, return the complete cordless machine or tool. You can then be sure that the equipment will be correctly disposed of by the manufacturer.
When shipping or disposing of batteries and cordless tools, always ensure that they are packed individually in plastic bags to prevent short circuits and fires.
Do not lose these safety instructions
Drill Driver Safety Warnings
WARNING! Wear ear protectors when impact drilling. Exposure to noise can cause hearing loss. Use auxiliary handle(s), if supplied with the tool. Loss of control can cause personal injury. Hold power tool by insulated gripping surfaces, when performing an operation where the cutting accessory may contact hidden wiring or its own cord. Cutting accessory contacting a "live" wire may make exposed metal parts of the power tool "live" and could give the operator an electric shock. Before drilling into walls, ceilings etc, ensure that there are no concealed power cables or pipes in the cavity.
WARNING! Some dust created by power sanding, sawing, grinding, drilling and other construction activities contain chemicals known to cause cancer, birth defects or other
reproductive harm. Some examples of these chemicals are: - Lead from lead-based paints - Crystalline silica from bricks and cement and other masonry products - Arsenic and chromium from chemically treated timbs Your risk from exposure to these chemicals varies, depending on how often you do this type of work. To reduce your exposure to these chemicals: work in a well ventilated area and work with approved safety equipment, such as dust masks that are specially designed to filter out microscopic particles. This appliance is not intended for use by young or infirm persons unless supervised by a responsible person to ensure that they can use the appliance safety. Young children should be supervised to ensure that they do not play with the appliance.
SOUND AND VIBRATION
Danger: Sound and vibration
Sound and vibration values were measured in
accordance with EN
LpA Sound Pressure Level: 81.0dB(A)
Kµ Uncertainty: 3 de
LWA Sound Power Level: 92.0dB(A)
Kna Uncertainty: 3 dB
Wear ear-muffs
The impact of noise can cause damage to hearing.
Total vibration values (vector sum of three directions)
Drilling without impact
Vibration Emission Value a: 2.29m/s²
K Uncertainty: 1.5m / s3
The specified vibration value was established in
accordance with a standardized testing method. It
may change according to how the electric equipment
is used and may exceed the
exceptional circumstances. The separated vibration unit
the equipment with other electric power tools
The specified vibration value can be used for initial
assessment of a harmful effect
Keep the noise
to a minimum.
• Only use appliances which are in perfect working order.
• Service and clean the appliance regularly
• Adapt your working style to suit the appliance.
* Do not overload the appliance
- Have the appliance serviced whenever necessary. - Switch the appliance offers when it is not in use.
- Wear protective gloves
。
[Non-Text]
[Non-Text]
[Non-Text]
[Non-Text]
[Non-Text]
[Non-Text]
[Non-Text]

1 10mm Keyless Chuck
2 Torque Adjustment Collar
3 LED Worklight 4 Drill Driver
5 Forward / Reverse Selector
6 Variable Speed Trigger T Battery Drivers Tab
7 Battery 1 8 Belt Clip
9 18V Li-ion Battery
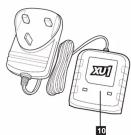
10 Charging Adaptor


SPECIFICATIONS
Input Voltage
Battery Capacity: 1.5Ah Li-Ion
Chuck Size: 10mm
No Load Speed: 0.700/min
No Load Speed: 0-100mm Testive Settings: 24
Torque Settings: 21
Max. Torque: 16Nm
Drilling Capacity (Timber): 19mm
Drilling Capacity (Metal): 6mm
Tool Weight: 1.26kg
Charge Time: 3-5hours
Charger Input: 100-240V\~50-60Hz, 15W
Charger Output: 22V DC 370mA
Charger Protection Close
Charger Protection Class
[Non-Text]
ITEMS SUPPLIERS
ITEMS SUPPLIED
Please check that the article is complete as specific
in the scope of delivery. If parts are missing, please
contact our service centre or the sales outlet where
you made your purchase at the latest within 5
working days after purchasing the product and upon presentation of a valid bill of purchase. Also, refer to
the warranty table in the service information at the
of the operating instructions.
- Open the packaging and take out the equipment
care.
- Remove the packaging material and any packaging
and/or transportation braces (if available).
- Check to see if all items are supplied.
- Inspect the equipment and accessories for transp
damage. • If possible, please keep the packaging until the or
- In possible, please keep the packaging until the end of the guarantee period.
0 1
A DANGER! The equipment and packaging
material are not toys. Do not let children play
with plastic bags, foils or small parts. There is a danger of swallowing or suffocation!
a danger of swallowing or socializing?
Caution!
Residual
Even if you use this electric power tool in
accordance with instructions, certain residu risks cannot be wise out. The following
Risks cannot be rules but. The following hazards may arise in connection with the
equipment's construction and layout:
-
Lung damage if no suitable protective dust mask is used
-
Damage to hearing if no suitable ear protection is used.
-
Health damage caused by hand-arm vibrations if the
equipment is used over a prolonged period or is not proper guided and maintained.
USING YOUR
DRILL DRIVER
The cordless drill is designed for tightening and undoing
screws, as well as for drilling in wood, metal and plastic.
The equipment is to be used only for its prescribed
purpose. Any other use is deemed to be a case of misuse. The user / operator and not the manufacturer
will be liable for any damage or injuries of any kind
caused as a result of this.
Please note that our equipment has not been designed
for use in commercial, trade or industrial applications.
Our warranty will be voided if the machine is used
in commercial, trade or industrial businesses or for equivalent purposes.
Equivalent purposes.
Before attempting to operate the machine, familiarise yourself with the controls and make sure you know how
yourself with the controls and make sure you know how to stop the machine quickly in an emergency.
Sup. These instructions and the other documents
save these instructions and the other documents supplied with this machine for future reference.
supplied more and machine for latest reference

WARNING! Ensure the tool is turned off
and disconnected from the power supply
before performing any of the following
operations.

WARNING! The power supply for this
charger should be protected by a residual current device (rated at 30mA or less).
-
Charging Your Battery:
Charging Your Battery
- Attach the charging adaptor into the battery pack.
FIG. A
-
Connect the charging adaptor to the power supply.
-
The red battery light will illuminate indicating the
battery is charging
- Once the battery is charged, the green LED light will
illuminate.
Charger LED Indicator
Red (illuminated): Battery is charging
Red (mammalsup, battery) is charging Green/Illuminated by Battery is fully charged
Green (innummated): Delivery is likely charged
Red & Green (Flashing): battery or charger fault
Red & Green (Illuminated): Battery pack is too hot or cold (remove battery from charges and stores at room
of cold (removed battery) from charger and store at room temperature 20°C. Insert battery again when at correct.
charging temperature). If this happens again, the battery is
defective and needs to
Fitting the Battery Pack
- Slide the battery into the base of the tool until it clicks
into place.
- To remove the battery, press and hold the battery
release tab down then remove the battery. FIG. B
DRILL DRIVER
OPERATION
Installing a Bit Into Your Drill
- Ro
chuck
- Ins
chuck
-
Tic
-
Pull on the bit to ensure it is firmly secured.
(五) 本说明仅供参考。
Removing a Drill Bit
-
De
-
Ru
-
Dr
Z.108
6
accessories without gloves as they are sharp
-
-
Forward Reverse Selector
For
- For forward rotation, push the fwdirev selector towards the left side of the tool.
2.7
- For reverse rotation, push the fwd/rev selector towards the right side of the tool.
2.0
[Non-Text]
Variable Speed Trigger
- To start drilling, squeeze the variable speed trigger
6.75
- 15 stop drilling, release the trigger
Note:
the faster the drill will rotate.
Drill Driven Tertree Cuttives
Drill Driver Torque Settings
- Rotate the torque collar on your drill driver to select
the
Note: Selecting a higher torque setting will allow the
drill to use more torque to drive the screw in or out. It prevent damaging the screw head, it is recommended
preve to ota
to start at a low torque beling and increase when necessary.
The Ground Truth image displays a single, solid horizontal line. According to Rule 2 (UNDERSCORE & LINE RULES), this is a stylistic or background line, not a placeholder underscore. Therefore, the OCR result must ignore it. The provided OCR content is "____", which consists of four underscores. This is an incorrect interpretation of the line as a placeholder, violating the rule that stylistic lines must be ignored. The OCR has hallucinated underscores where none should exist based on the GT's visual context. Hence, the OCR result is inconsistent with the Ground Truth.
OPERATING TIPS
0
- Depress and release the variable speed trigger to
en
- Check the forward/reverse selector is in the desire
sel
- Ensure the workpiece is secured to stop it turning
wh
-
Hold the tool firmly and
-
Hold the I20 artery and then press the variable speed trigger.
5.0
- Once complete, release the variable speed trigger.
Note: Do not force the tool or apply side pressure to elongate the hole. Let the tool do all the work
MAINTENANCE
Keep the ventilation slots of the tool clean at all times
using a soft brush or dry cloth. If possible prevent
foreign matter from entering the vents.
After each use, blow air through the tool housing to
ensure it is free from all dust particles that may build up
If the enclosure of the tool requires cleaning, use a soft moist cloth only. Do not use otherwise
must cloth only. Do not use solvents.
CAUTION: Never immerse any part of the
tool
If the chargers supply cord is damaged, it must be
replaced by the manufacturer or an authorized service agent in order to avoid a hazard.
agent in order to avoid a hazard.
Note: XU1 will not be responsible for any damage or injuries caused by the repair of the tool by an
or injuries caused by the repair of the tool by an unauthorised person or by mishandling of the tool.
- 本次股东大会的召集和召开程序
SERVICE INFORMATION
SERVICE INFORMATION Please ask that the following parts of this product are subject
Please note that the following parts of this product are subject to normal or natural wear and that the following parts are
therefore also required for use as consumables.
Category Example
Wear parts* Drill, rhunk, Battery
Consumables* Bit Inserts / drill bits
Missing parts
(1)
* Not necessarily included in the scope of delivery!
WARRANTY
All of our products undergo strict quality checks to ensure that they reach you in perfect condition. In the unlikely event that your device develops a fault, please contact our service department at the address shown on this guarantee card. You can also contact us by telephone using the customer service number shown. Please note the following terms under which guarantee claims can be made:
-
These warranty terms regulate additional warranty services, which the manufacturer mentioned below promises to buyers of its new products in addition to their statutory guarantee claims are not affected by this guarantee. Our guarantee is free of charge to you.
-
The warranty services only covers defects due to material or manufacturing faults on a product which you have bought from the manufacturer mentioned below are limited to either the rectification of said defects on the product or the replacement of the product, whichever we prefer.
Please note that our devices are not designed for use in commercial, trade or professional applications. A guarantee contract will not be created if the device has been used by commercial, trade or industrial business or has been exposed to similar stresses during the guarantee period.
- The following are not covered by our guarantee:
- Damage to the device caused by a failure to follow the assembly instructions or due to incorrect installation, a failure to follow the operating instructions (for example connecting it to an incorrect mains voltage or current type) or a failure to follow the maintenance and safety instructions or by exposing the device to abnormal environmental conditions or by lack of care and maintenance.
- Damage to the device caused by abuse or incorrect use (for example overloading the device or the use or
unapproved tools or accessories), ingress of foreign bodies into the device (such as sand, stones or dust, transport damage), the use of force or damage caused by external forces (for example by dropping it).
- Damage to the device or parts of the device caused by normal or natural wear or tear or by normal use of the device.
- Your Product is guaranteed for a period of 12 months from the original date of purchase and is intended for DIY (Do It Yourself) use only. Warranty excludes consumable parts, for example: cutting blade. Guarantee claims should be submitted before the end of the guarantee period within two weeks of the defect being noticed. No guarantee claims will be accepted after the end of the guarantee period. The original guarantee period remains applicable to the device even if repairs are carried out or parts are replaced. In such cases, the work performed on parts fitted will not result in an extension of the guarantee period, and no new guarantee will become active for the work performed or parts fitted. This also applies if an on-site service is used.
IN ORDER TO MAKE A CLAIM UNDER THIS WARRANTY YOU MUST RETURN THE PRODUCT TO THE PLACE OF PURCHASE WITH YOUR REGISTER RECEIPT.
Please refer to the restrictions of this warranty concerning wearing parts, consumables and missing parts as set out in the service information in these operating instructions.
CUSTOMER SERVICE HELPLINE
GB: 0151 294 4488 IRL: 1850 882711
XU1
Champion's Business Park, Unit 10, 1st Floor, Arrowe Brook Road, Upton, Wirral, Merseyside, CH49 0AB

Brand : XU1
Model : XDD-180U
Category : Drill