USER MANUAL 6030 XEROX
701P45100
Xerox Corporation
Global Knowledge & Language Services
800 Phillips Road Bldg. 845-17S
Webster, NY 14580
Copyright © 2006 Xerox Corporation. All rights reserved.
Printed in the United States of America.
Copyright protection claimed includes all forms and matters of copyrighted material and information now allowed by statutory or judicial law or hereinafter granted, including without limitation, material generated from the software programs that are displayed on the screen such as styles, templates, icons, screen displays, looks, etc.
AIX is a trademark of International Business Machines Corporation.
AutoCAD is a registered trademark of AutoDesk, Inc.
HDI is an acronym for Heidi® Device Interface. Heidi is a registered trademark of AutoDesk, Inc.
HP-GL is a trademark of Hewlett-Packard Company.
Macintosh and AppleTalk are registered trademarks of Apple Computer, Inc.
Microsoft® Windows, Windows 95/98, Windows Me, Windows NT®, Windows® XP, Windows® 2000, Windows® Server 2003 are trademarks of Microsoft Corporation.
Internet Explorer is a copyright protected program of Microsoft Corporation.
Netscape is a registered trademark of Netscape Communications Corporation.
Solaris and SunOS are registered trademarks of Sun Microsystems, Inc.
UNIX is a registered trademark of Open Group Company Limited
XEROX®, The Document Company®, the digital X®, Xerox
6030/6050 Wide Format Printer, and Versatec are the trademarks of or licensed to XEROX CORPORATION.
Preface
Thank you for using the Xerox 6030/6050 Wide Format Copier/Printer User Guide (hereinafter known as 6030/6050 Wide Format).
This User Guide describes the basic operations and the detailed functions of the Xerox 6030/6050 Wide Format Copier, Printer, and integrated Scanner. It also includes usage precautions, safety, replenishing toner, replacing paper, troubleshooting, and other general instructions.
The explanations provided in this User Guide assume that the user has a basic knowledge of operating the computer and network configuration in use. Refer to the manuals supplied with the computer, Windows related documentation, and the manuals supplied with the network system for details on computer and network operations.
Conventions
This User Guide uses the following symbols and conventions:
< >key Indicates the keys on the keyboard.
Example Press the key.
[ ] Indicates the menus and display items on the screens.
Example Select either the [On] or [Off] buttons to display [Job Name], [Owner], and [Reason] in that order.
" " Indicates areas of reference within this User Guide.
Also indicates messages.
Example Refer to "3.2 Print Services".
A message stating "Additional Port Information Required. The Device could not be identified" appears.
Important Indicates important information which you should read.
Note Indicates additional information on operations or features.
Refer to Indicates reference sources.
Example Indicates examples.
Safety Notes
Read these safety notes carefully before using this product to ensure you operate the equipment safely.
Your Xerox product and recommended supplies have been designed and tested to meet strict safety requirements. These include safety agency approval, and compliance with established environmental standards. Please read the following instructions carefully before operating the product and refer to them as needed to ensure the continued safe operation of your product.
The safety and environment testing and performance of this product have been verified using Xerox materials only.
WARNING: Any unauthorized alteration, which may include the addition of new functions or connection of external devices, may affect the product certification. Please contact your authorized local dealer for more information
WARNING MARKINGS
Warning Markings
All warning instructions marked on or supplied with the product should be followed.

Warning This WARNING alerts user to areas of the product where there is the possibility of personal injury.
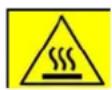
Warning This WARNING alerts users to areas of the product where there are heated surfaces, which should not be touched.
WARNING
This product is certified manufactured and tested in compliance with strict safety and radio frequency interference regulations. Any unauthorized alteration which, includes the addition of new functions or the connection of external devices, may affect this certification. Please contact your local XEROX Limited representative for a list of approved accessories.
WARNING
In order to allow this equipment to operate in proximity to Industrial, Scientific, and Medical (ISM) equipment, the external radiation from the ISM equipment may have to be limited or special mitigation measures taken.
WARNING
Shielded cables must be used with this equipment to maintain compliance with Council Directive 89/336/EEC.
The Electricity at Work Regulation (in England and Wales) UK ONLY
Electricity at Work Regulations
The Electricity at Work Regulation 1989 came into force in England and Wales on the 1 April 1990. This 1989 Regulation places a duty on all employers and self-employed persons to ensure the electrical system in their premises are constructed, maintained and operated in such a manner as to prevent, so far as reasonably practical, danger. This includes ensuring all electrical equipment connected to such electrical systems are safely constructed, maintained and operated. All Xerox equipment have been designed to exacting safety standards. They have all undergone a variety of stringent safety tests including earth bond, insulation resistance and electrical strength tests. Xerox manufacturing plants have been awarded ISO 9000 quality certification and are subject to regular audits by the British Standards Institution or equivalent national standards body. Xerox equipment which has been properly and regularly serviced and maintained should not have to undergo additional specific safety tests pursuant to the 1989 Regulation. Customers wishing to complete safety testing should contact Xerox for advice prior to any test implementation. Xerox equipment should, however, be properly and regularly serviced and maintained at all times.
QUESTION: What is the Electricity at Work Regulation?
ANSWER: The Electricity at Work Regulation 1989 came into force in England and Wales on the 1 April 1990. This 1989 Regulation places a duty on all employers and self-employed persons to ensure the electrical systems in their premises are constructed, maintained and operated in such a manner as to prevent, so far as reasonably practicable, danger. This includes ensuring all electrical products connected to such electrical systems are safely constructed, maintained and operated.
QUESTION: Does Xerox comply with the Electricity at Work Regulation?
ANSWER: The regulation places a duty on all employers and self-employed persons to ensure the electrical systems in their premises are, effectively safe. The regulation does not impose on, amongst others, manufacturers or suppliers of such electrical systems. However, rest assured that all Xerox equipment which Xerox and its authorized distributors supplies to customers, conform with all the relevant safety legislation and standards.
QUESTION: Is Xerox equipment safe?
ANSWER: All Xerox equipment supplied by Xerox and their authorized distributors conform to all relevant safety legislation and standards.
QUESTION: Is the Xerox equipment in my premises safe?
ANSWER: All Xerox equipment supplied by Xerox and its authorized distributors conform to all relevant safety legislation and standards. However, like all electrical equipment, they have to be regularly serviced and maintained by competent persons. Xerox Customer Service Engineers ensure Xerox equipment is serviced and maintained to exacting Xerox safety standards. If you would like your Xerox equipment to be serviced and maintained to such high standards, please contact your local Xerox Customer Service Organization. They will be pleased to assist you.
QUESTION: Does the Xerox equipment in my premises comply with the Electricity at Work Regulations?
ANSWER: All employers and self-employed persons must ensure that the electrical systems in their premises are safe. This will include ensuring Xerox equipment in such premises is safe. Xerox Product Safety function has prepared a guide which contains a list of tests which may be completed by your Xerox Customer Service Organization.
Note
THESE TESTS MUST BE CARRIED OUT ONLY BY PERSONS WHO POSSESS THE RELEVANT SKILL, KNOWLEDGE AND EXPERIENCE TO CARRY OUT SUCH TESTS.
Please contact the Xerox Customer Service Organization for further information.
Note
THE USE OF INAPPROPRIATE TEST PROCEDURES AND TEST EQUIPMENT MAY PROVIDE MISLEADING RESULTS AND MAY CAUSE DEATH, PERSONAL INJURY AND/OR DAMAGE TO PROPERTY.
QUESTION: I would like to carry out my own safety tests on the Xerox equipment in my premises.
ANSWER: You may, of course, request such tests as you deem necessary to satisfy yourself that your Xerox equipment is safe. Your Xerox Customer Support will be pleased to advise you on such testing.
QUESTION: I require records of all tests
ANSWER: After safety testing, your Xerox Customer Service Engineer will provide you with a certificate which details the results of all tests completed. In the event of any defect being noted, the Xerox equipment will be switched off and disconnected from the supply until the defect has been corrected. You will be advised of such action to enable such defects to be corrected.
Note
PLEASE NOTE: YOU MUST ENSURE THAT YOUR XEROX EQUIPMENT IS SAFE AT ALL TIMES
Electrical Supply
This product shall be operated from the type of electrical supply indicted on the product 's data plate label. If you are not sure that your electrical supply meets the requirements, please consult your local power company for advice.
WARNING

This product must be connected to a protective earth circuit.
This product is supplied with a plug that has a protective earth pin. This plug will fit only into an earthed electrical outlet. This is a safety feature. To avoid risk of electric shock, contact your electrician to replace the electrical outlet if you are unable to insert the plug into it. Never use an earthed adapter plug to connect the product to an electrical outlet that lacks an earth connection terminal.
Operator Accessible Areas
This equipment has been designed to restrict operator access to safe areas only. Operator access to hazardous areas is restricted with covers or guards, which would require a tool to remove. Never remove these covers or guards.
Maintenance
Any operator product maintenance procedures will be described in the user documentation supplied with the product. Do not to carry out any maintenance on this product, which is not described in the customer documentation.
Cleaning Your Product
Before cleaning this product, unplug the product from the electrical outlet. Always use materials specifically designated for this product; the use of other materials may result in poor performance and may create a hazardous situation. Do not use aerosol cleaners; they may be explosive and flammable under certain circumstances.
CAUTION
Ensure that the power connection for your machine satisfies these requirements
Emergency Power Off
If any of the following conditions occur, switch off the power to the machine immediately and disconnect the power cord from the electrical outlet. Call an authorized local service representative to correct the problem.
- The equipment emits unusual noise or odors.
- The power cord is damaged or frayed.
- A wall panel circuit breaker, fuse, or other safety device has been tripped.
- Liquid is spilled into the copier/printer.
- The equipment is exposed to water.
- Any part of the equipment is damaged.
Note
The only method to remove all power from the machine is to disconnect the power cord plug from the electrical outlet.
Disconnect Device
The power cable is the disconnect device for this equipment. It is attached to the back of the machine as a plug-in device. To remove all electrical power from the equipment, disconnect the power cable from the electrical outlet.
Xerox equipment and supplies have been designed and tested to meet strict safety requirements. These include safety agency examination, approval and compliance with established environmental standards. To ensure the continued safe operation of your Xerox/Fuji Xerox equipment, follow these safety guidelines at all times.
Do These:
- Always connect equipment to a correctly grounded power outlet. If in doubt, have the outlet checked by a qualified electrician.
- Always locate the machine on a solid support surface (not on plush carpet) that has adequate strength to support the weight of the machine.
- This equipment must be connected to a protective earth circuit.
This equipment is supplied with a plug that has a protective earth pin. This plug will fit only into an earthed electrical outlet. This is a safety feature. To avoid risk of electric shock, contact your electrician to replace the electrical outlet if you are unable to insert the plug into it. Never use a plug that lacks an earth connection terminal to connect the product to an electrical outlet.
- Always follow all warnings and instructions that are marked on or supplied with the equipment.
- Always exercise care when moving or relocating equipment. Please contact your local Xerox/Fuji Xerox Service Department, or your local support organization to arrange relocation of the product to a location outside of your building.
- Always locate the equipment in an area that has adequate ventilation, and the room for servicing. See the Install guide for minimum dimensions.
- Always use materials and supplies specifically designed for your Xerox/Fuji Xerox equipment. Use of unsuitable materials may result in poor performance.
• Always unplug this equipment from the electrical outlet before cleaning.
Do Not Do These:
- Never use a plug that lacks an earth connection terminal to connect the product to an electrical outlet.
- Never attempt any maintenance function that is not specifically described in this documentation.
-
This equipment should not be placed in a built-in installation unless proper ventilation is provided, please contact your Authorized local dealer for further information.
-
Never remove covers or guards that are fastened with screws. There are no operator serviceable areas within these covers.
- Never locate the equipment near a radiator or any other heat source.
- Never push objects of any kind into the ventilation openings.
- Never override or "cheat" any of the electrical or mechanical interlock devices.
- Never operate the equipment if you notice unusual noises or odors. Disconnect the power cord from the electrical outlet and contact your local Xerox/Fuji Xerox Service Representative or Service Provider immediately.
Maintenance Information
Do not attempt any maintenance procedure that is not specifically described in the documentation that is supplied with your copier/printer.
- Do not use aerosol cleaners. The use of cleaners that are not approved may cause poor performance of the equipment, and could create a dangerous condition.
- Use supplies and cleaning materials only as directed in this manual. Keep all of these materials out of the reach of children.
- Do not remove covers or guards that are fastened with screws. There are no parts behind these covers that you can maintain or service.
- Do not perform any maintenance procedures unless you have been trained to do them by an authorized local dealer or unless a procedure is specifically described in the user manuals.
This product will produce ozone during normal operation. The ozone produced is heavier than air and is dependent on copy volume. Providing the correct environmental parameters as specified in the Xerox installation procedure will ensure that the concentration levels meet safe limits.
If you need additional information about ozone, please request the Xerox publication Ozone by calling 1-800-828-6571 in the United States and Canada. In other markets please contact your authorized local dealer or Service Provider.
For Consumables
Store all consumables in accordance with the instructions given on the package or container.
- Keep all consumables away from the reach of children.
- Never throw toner, toner cartridges, or toner containers into an open flame.
Radio Frequency Emissions
United States, Canada, Europe, Australia/New Zealand
This equipment has been tested and found to comply with the limits for a class A digital device, pursuant to Part 15 of the FCC Rules. These limits are designed to provide reasonable protection against harmful interference when the equipment is operated in a commercial environment. This equipment generates, uses, and can radiate radio frequency energy and, if not installed and used in accordance with the instruction manual, may cause harmful interference to radio communications. Operation of this equipment in a residential area is likely to cause harmful interference in which case the user will required to correct the interference at his own expense.
Changes and modifications to this equipment not specifically approved by Xerox/Fuji Xerox may void the user's authority to operate this equipment.
Shielded interface cables must be used with this equipment to maintain compliance with FCC regulations in the United States and the Radio Communications Act 1992 in Australia/New Zealand as applicable.
Canadian EME
This Class "A" digital apparatus complies with Canadian ICES-003.
Product Safety Certification
This product is certified by the following Agencies using the Safety standards listed.
Agency Standard
TUV Rheinland of North America, Inc. UL60950:2000 (USA)
Can/CSA-c22.2 No. 60950-00 (Canada)
TUV Rheinland Japan Ltd. IEC60950:1999
CE Mark
The CE mark applied to this product symbolizes Xerox's declaration of conformity with the following applicable Directives of the European Union as of the dates indicated:
January 1, 1995: Council Directive 72/23/EEC amended by Council directive 93/68/EEC, approximation of the laws of the member states related to low voltage equipment.
January 1, 1996: Council directive 89/336/EEC, approximation of the laws of the member states related to electromagnetic compatibility.
March 9, 1999: Council Directive 99/5/EC, on radio equipment and telecommunications terminal equipment and the mutual recognition of their conformity.
A full declaration of conformity, defining the relevant directives and referenced standards, can be obtained from your Authorized local dealer.
WARNING: In order to allow this equipment to operate in proximity to Industrial Scientific and Medical (ISM) equipment, the external radiation from the ISM equipment may have to be limited or special mitigation measures taken.
WARNING: This is a Class A product. In a domestic environment the product may cause radio frequency interference, in which case the user may be required to take adequate measures.
WARNING: Shielded interface cables must be used with this product to maintain compliance with Council Directive 89/336/EEC.
Environmental Compliance
USA - Energy Star
As an ENERGY STAR partner, Xerox Corporation/Fuji Xerox has determined that (the basic configuration of) this product meets the ENERGY STAR guidelines for energy efficiency.
The ENERGY STAR and ENERGY STAR MARK are registered United States trademarks.
The ENERGY STAR Office Equipment Program is a team effort between U.S., European Union and Japanese governments, and the office equipment industry to promote energy-efficient copiers, printers, fax, multifunction machine, personal computers, and monitors. Reducing product energy consumption helps combat smog, acid rain and long-term changes to the climate by decreasing the emissions that result from generating electricity.
Xerox ENERGY STAR equipment is preset at the factory to enter a "low power" state and/or shut off completely after a specified period of use. These energy-saving features can reduce product energy consumption in half when compared to conventional equipment.
Canada - Environmental Choice
Terra Choice Environmental Services, Inc. of Canada has verified that this product conforms to all applicable Environmental Choice EcoLogo requirements for minimized impact to the environment.
As a participant in the Environmental Choice program, Xerox Corporation has determined that this product meets the Environmental Choice guidelines for energy efficiency.
Environment Canada established the Environmental Choice program in 1988 to help consumers identify environmentally responsible products and services. Copier, printer, digital press and fax products must meet energy efficiency and emissions criteria, and exhibit compatibility with recycled supplies. Currently, Environmental Choice has more than 1,600 approved products and 140 licensees. Xerox has been a leader in offering EcoLogo approved products.
Product Recycling and Disposal
USA
Xerox operates a world wide equipment take back and reuse/recycle program. Contact your Xerox Sales Representative (1-800-ASK-XEROX) to determine whether this Xerox product is part of the program. For more information about Xerox environmental programs, visit www.xerox.com/environment.
If you are managing the disposal of your Xerox product, please note that the product contains lead, mercury and other materials whose disposal may be regulated due to environmental considerations. The presence of lead and mercury is fully consistent with global regulations applicable at the time that the product was placed on the market. For recycling and disposal information, contact your local authorities. In the United States, you may also refer to the Electronic Industries Alliance web site: www.eiae.org.
Illegal Copies and Printouts
USA
Congress, by statute, has forbidden the reproduction of the following subjects under certain circumstances. Penalties of fine or imprisonment may be imposed on those guilty of making such reproductions.
- Obligations or Securities of the United States Government, such as:
Certificates of Indebtedness National Bank Currency
Coupons from Bonds Federal Reserve Bank Notes
Silver Certificates Gold Certificates
United States Bonds Treasury Notes
Federal Reserve Notes Fractional Notes
Certificates of Deposit Paper Money
Bonds and Obligations of certain agencies of the government, such as FHA, etc.
Bonds. (U.S. Savings Bonds may be photographed only for publicity purposes in connection with the campaign for the sale of such bonds.)
Internal Revenue Stamps. (If it is necessary to reproduce a legal document on which there is a canceled revenue stamp, this may be done provided the reproduction of the document is performed for lawful purposes.)
Postage Stamps, canceled or uncanceled. (For philatelic purposes, Postage Stamps may be photographed, provided the reproduction is in black and white and is less than 75% or more than 150% of the linear dimensions of the original.)
Postal money Orders.
Bills, Checks, or Draft of money drawn by or upon authorized officers of the United States.
- Stamps and other representatives of value, of whatever denomination, which have been or may be issued under any Act of Congress.
- Adjusted Compensation Certificates for Veterans of the World Wars.
- Obligations or Securities of any Foreign Government, Bank, or Corporation.
- Copyrighted materials, unless permission of the copyright owner has been obtained or the reproduction falls within the "fair use" or library reproduction rights provisions of the copyright law. Further information of these provisions may be obtained from the Copyright Office, Library of Congress, Washington, D.C. 20559. Ask for Circular R21.
- Certificates of Citizenship or Naturalization. (Foreign Naturalization Certificates may be photographed.)
- Passports. (Foreign Passports may be photographed.)
- Immigration Papers.
- Draft Registration Cards.
- Selective Service Induction Papers that bear any of the following Registrant's information:
Earnings or Income Dependency Status
Court Record Previous military service
Physical or mental condition
Exception: United States military discharge certificates may be photographed.
- Badges, Identification Cards, Passes, or Insignia carried by military personnel, or by members of the various Federal Departments, such as FBI, Treasury, etc. (unless photograph is ordered by the head or such department or bureau.)
Reproducing the following is also prohibited in certain states:
Automobile Licenses - Drivers' Licenses - Automobile Certificates of Title.
The above list is not all-inclusive, and no liability is assumed for its completeness or accuracy. In case of doubt, consult your attorney.
Canada
Parliament, by statute, has forbidden the reproduction of the following subjects under certain circumstances. Penalties of fine or imprisonment may be imposed on those guilty of making such reproductions.
- Current bank notes or current paper money.
- Obligations or securities of a government or bank.
- Exchequer bill paper or revenue paper.
- The public seal of Canada or of a province, or the seal of a public body or authority in Canada, or of a court of law.
- Proclamations, orders, regulations or appointments, or notices thereof (with intent to falsely cause same to purport to have been printed by the Queen's Printer for Canada, or the equivalent printer for a province).
- Marks, brands, seals, wrappers or designs used by or on behalf of the Government of Canada or of a province, the government of a state other than Canada or a department, board, Commission or agency established by the Government of Canada or of a province or of a government of a state other than Canada.
- Impressed or adhesive stamps used for the purpose of revenue by the Government of Canada or of a province or by the government of a state other than Canada.
- Documents, registers or records kept by public officials charged with the duty of making or issuing certified copies thereof, where the copy falsely purports to be a certified copy thereof.
- Copyrighted material or trademarks of any manner or kind without the consent of the copyright or trademark owner.
The above list is provided for your convenience and assistance, but it is not all-inclusive, and no liability is assumed for its completeness accuracy. In case of doubt, consult your solicitor.
Other Countries
Copying certain documents may be illegal in your country. Penalties of fine or imprisonment may be imposed on those found guilty of making such reproductions.
- Currency notes
- Bank notes and cheques
- Bank and government bonds and securities
- Passports and identification cards
- Copyright material or trademarks without the consent of the owner
- Postage stamps and other negotiable instruments
This list is not inclusive and no liability is assumed for either its completeness or accuracy. In case of doubt, contact your legal counsel.
These Xerox Digital Copiers/Printers are in compliance with various governmental agencies and national safety regulations. All system ports meet the requirements for Safety Extra Low Voltage (SELV) circuits for connection to customer-owned devices and networks. Additions of customer-owned or third-party accessories that are attached to these printers/copiers must meet or exceed the requirements previously listed. All modules that require external connection must be installed per Xerox installation procedures.
Table of Contents
Chapter 1 Product Overview
1.1 Product Configurations....2
1.2 Major Components....4
1.3 Power On/Off....7
1.4 Power Save Mode....9
1.5 Copier Control Panel....10
Setup Screens ....13
1.6 Printer Control Panel Overview....15
1.7 Print Services on Web Overview 16
Operating Modes....17
1.8 Logical Printers Overview....19
1.9 Using Originals....20
Usable Originals....20
Use the Document Carrier for These Originals....20
Loading Originals in the Scanner....21
Precautions When Handling Originals....22
Using the Paper Heater....22
1.10 Stopping Document Scanning....23
1.11 Loading Roll Media....24
1.12 Drawer Media Size Indicators 27
Inserting media size sheets....28
1.13 Loading Media for Manual Feeding....30
1.14 Cutting Roll Media 31
Cutting Roll Media Manually....32
1.15 Setting Up Media....37
Media Parameters....37
Setting up Media on the Copier Control Panel....39
1.16 Copy, Print, and Scan Functions....41
Chapter 2 Copy
2.1 Main Copy Features....44
2.2 Copying Procedure....46
Auto and Manual Copying Modes 46
Basic Copying Procedure....48
Making Manual Feed Copies ....49
Adjusting Density and Background Suppression....51
Selecting the Media Cut Mode....52
Selecting the Reduction/Enlargement Settings ....53
Selecting the Media Supply....54
2.3 Interruption Copying....55
2.4 Copying from Memory 56
2.5 Sample Copies .... 58
Chapter 3 Copy Features
3.1 Overview....2
3.2 Making Copies in the Auto Mode....3
3.3 Selecting the Document Image Type 7
3.4 Adjusting Image Sharpness....9
3.5 Reduction and Enlargement....10
Normal R/E....11
R/E by L&W 13
3.6 Selecting the Media Supply 16
3.7 Media Cut Modes....17
3.8 Image Density 22
3.9 Background Suppression 23
3.10 Image Location 26
3.11 Edge Erase 29
3.12 Scan Start Position 31
3.13 Mirror Image....33
3.14 Invert Image....34
3.15 Threshold Level 36
3.16 Sorting Using E-Sorter....38
3.17 Sorting Using Multi-Job 44
Chapter 4 Stored Jobs
4.1 Overview of the Stored Job Feature....50
4.2 Storing a Job 52
4.3 Recalling a Stored Job ....54
4.4 Deleting a Stored Job....55
4.5 Printing the Stored Job Settings....57
Chapter 5 Custom Presets/Meter Check
5.1 Custom Presets....60
5.2 Setting up the System Presets 64
Time & Date 65
Timer 66
Auto Clear/Backlight Off....68
How to Start Scanning....70
Scan Speed 71
Attention Tone....72
Other System Presets....73
5.3 Setting up the Copy Features....76
Switch Feature Buttons 77
Default Copy Features....79
Media Type for Auto Mode....81
R/E Preset....82
Variable Length Preset....83
Auto Image Rotation 84
Output Order Preset....85
Program Sort Preset....86
Setting Up the Other Copy Presets....90
5.4 Meter Check....92
5.5 Document Size Series....93
Chapter 6 Scanner Functions
6.1 Overview....96
Scanning Procedures 97
Chapter 7 Printer Overview
7.1 Overview of the 6030/6050 Wide Format Print Service....100
What is the 6030/6050 Wide Format Print Service? ....100
Print Service Operations....102
Main Printing Functions....104
7.2 Printer Control Panel Usage....110
Basic Printer Control Panel Operations....111
Overview of the Operation Menu....112
7.3 Print Services on Web....117
Operating Environment....117
Starting and Exiting Print Services on Web 118
Print Services on Web Organization....119
Chapter 8 Printer Setup
8.1 Communication Parameters....124
Communication Parameters Definitions ....124
8.2 Communication Parameter Setup (Printer Control Panel)....132
8.3 Communication Parameter Setup
(Print Services on Web)138
8.4 System Parameter Setup (Printer Control Panel)....141
8.5 System Parameter Setup (Print Services on Web)....144
8.6 User Management
(Print Services on Web)154
8.7 Printing a Configuration List....158
8.8 Software Option....162
8.9 Change Password....163
8.10 Change Default Language....164
Chapter 9 Logical Printer Setup and Operation
9.1 Creating a New Logical Printer....166
9.2 Defining the Print Settings....169
9.3 Logical Printer Print Settings....170
Media Series....173
User-Defined Size 180
Input Option 181
Input Size Margin....183
Plot Area....185
Priority....189
Title Block....190
Split Drawing 191
Message Option....193
Printed Copy....195
Output Option....196
Size Recognition....199
Color Option....201
Transform 202
Define Single Pen....204
Define Multi Pen 208
Pen Option....209
Emulation 210
PS Command....211
EOP Command....212
VCGL Pen Style (VCGL Define Pen) 213
VCGL Pen Width 215
VRF Define Pen (Define Single Pen)....216
VRF Define Multi Pen 218
TIFF Option....219
CALS Option....220
PS/PDF Option 221
9.4 Logical Printer Operations....222
Selecting the Media Type....223
Using Media Other Than the Default Series 224
Changing Output Roll Media for an Entire Job 225
Reduction and Enlargement Using Size Mapping 226
Printing Long Documents 227
9.5 Print Services on Web: Job and Log 228
Display the Print Queue 228
Cancel and Change the Priority of Jobs 231
Manage the Job and Error Logs 233
9.6 Print Services on Web: Status....245
Display Printer Status....245
Start and Stop Job Reception, Printing, and the Print Service ....248
9.7 Print Services on Web: Tools....249
Print a Test Pattern 249
Print a Diagnostic Report 250
9.8 Manual Feed Printing 251
10.1 Introduction....254
10.2 Printer Control Panel Menu 255
10.3 Test Printing....261
10.4 Managing the Job and Error Logs....262
Job Log....262
Error Log....264
10.5 Reprinting 266
10.6 Billing Meter Confirmation 267
10.7 Print Setup Menu 268
Setting Up Media....269
10.8 Automatic Cut Using the Printer Control Panel 274
Chapter 11 Ethernet Print Service (for UNIX)
11.1 Overview of the Ethernet Print Service 276
11.2 Registering the Xerox 6030/6050 Wide Format Printer System ....277
Host System Registration 277
Registering the Remote Printer 278
11.3 Printing Using the ftp Command....280
Printing 280
Other Subcommands 283
Message List....284
11.4 Printing Using the lp/lpr Command....289
Printing (lpr Command) 289
Printing (lp Command) (for SunOS 5.x)....291
Status Display (lpq Command) 292
Cancel (lprm Command)....294
Message List....297
Chapter 12 Maintenance
12.1 Loading Toner....300
12.2 Cleaning the Scanner 303
Chapter 13 Problem Solving
13.1 Check the Control Panel(s)....306
13.2 Poor Image Quality....307
13.3 Other Problems 308
13.4 Copier/Printer Troubleshooting 309
13.5 Printer Troubleshooting 312
13.6 Clearing Jams....313
Document Jams 314
Jams in the Feeder (Roll Media) 315
Jams in the (MSI) Multi Sheet Inserter/Manual Feed Unit 317
Jams in the Printer and Ejection Port 319
Chapter 14 Specifications
14.1 Main Specifications 322
14.2 Media Specifications....328
14.3 Machine Specifications....329
Command List 334
Chapter 1
Product Overview
1.1 Product Configurations
The following product configurations and options are available for the Xerox 6030/6050 Wide Format Printer and the Xerox 6030/6050 Wide Format Copier/Printer.
This unit is a printer only. Refer to the printer sections of this guide for information about its setup, features, and usage.
Xerox 6030/6050 Wide Format Printer
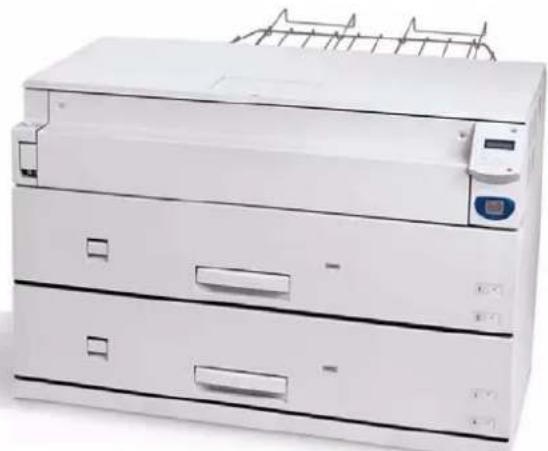
natural_image
Exterior view of a white paper printer with three stacked drawers and a rack (no visible text or labels)
This unit features copier functionality through an integrated scanner and copier control panel, plus the ability to receive and print jobs submitted to it from remote workstations.
Xerox 6030/6050 Wide Format Copier/Printer

natural_image
Exterior view of a white paper filter or scanner device with a rack-mounted top panel and control panel (no visible text or symbols)
This unit features copier and printer functionality, plus the Synergix® Scanner and the AccXES® Controller.
Xerox 6030/6050 Wide Format Printer with Scan System
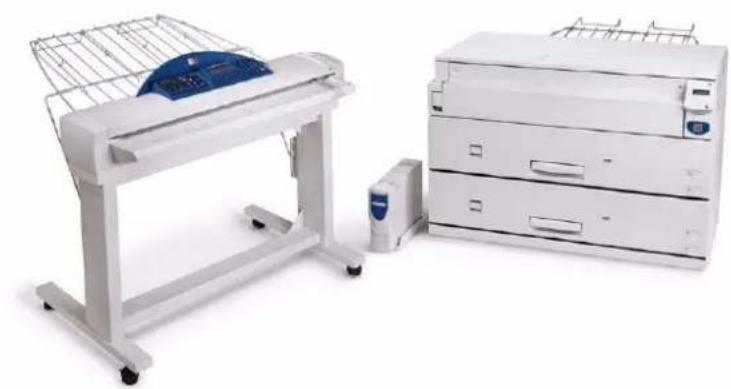
natural_image
Exterior view of a printer and paper printer unit (no visible text or symbols)
You may acquire additional hardware and software options for all units.
Contact your Xerox Sales Representative to obtain additional information on options.
1.2 Major Components

text_image
Technical diagram of a device with numbered parts for identification
Major Components: Front
| Name Function | |
| 1 | Document table | Documents to be scanned are inserted here. |
| 2 | Setup screen (touch screen) | Used to set up copy jobs, map originals to the installed media, display messages and procedures, and provide troubleshooting help, e.g., for jam clearance. |
| 3 | Control panel | Contains a numeric keypad, Start/Stop buttons, and selection buttons for copy setups. |
| 4 | Document insertion guide | Helps the user align the edge of a document when feeding it into the scanner. |
| 5 | Printer control panel | Used to change the media size and type, set up printing and communication parameters, etc. |
| 6 | MSI*/Manual Feed Unit (*Multi Sheet Inserter) (optional) | Used for printing or copying on cut sheet media. |
| 7 | Feeder LED | Illuminates red when the media tray is in use. |
| 8 | Media tray (6050 only) | A dual-roll media tray that feeds roll paper. |
| 9 | Media tray (Standard) | A dual-roll media tray that feeds roll paper. |
| 10 | Scanner power switch | Switches the power to the scanner on and off. |
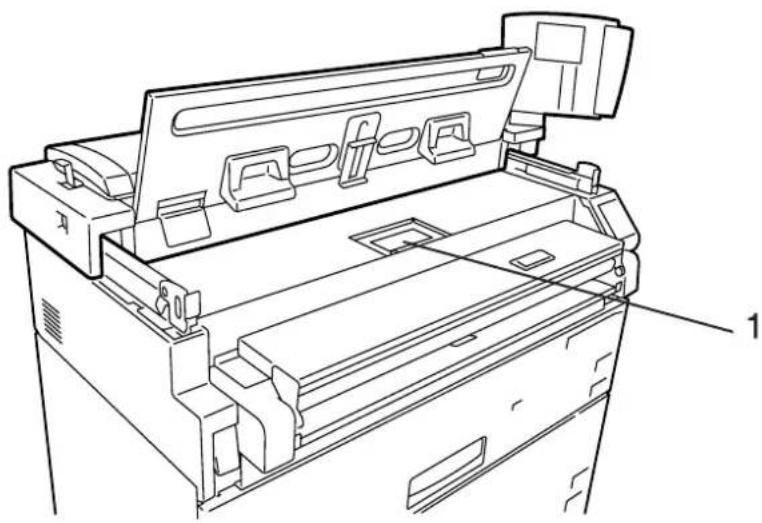
natural_image
Technical line drawing of an open printer with internal compartments and mounting bracket (no text or symbols)
| Name Function | |
| 1 | Toner supply port | The toner is refilled through this port. |
Major Components: Rear
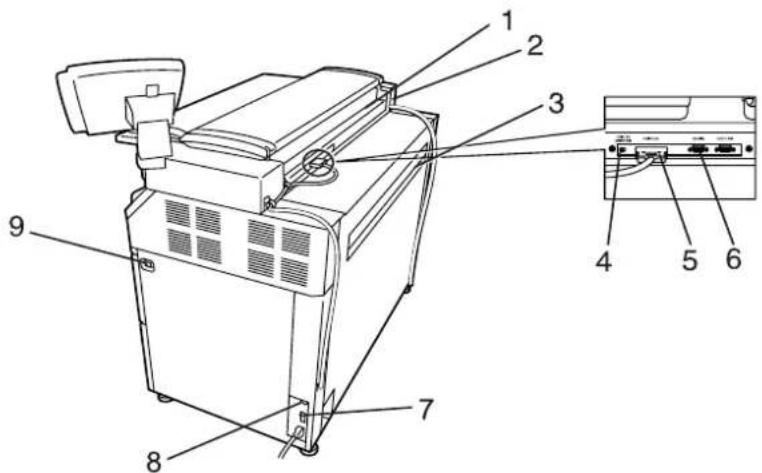
text_image
Technical diagram of a device with numbered components and an inset view showing internal ports and labeled parts.
| Name Function | |
| 1 | Document ejection port | Documents exit the scanner from this location. |
| 2 | Power outlet socket Not available |
| 3 | Print ejection port | Fused copies and prints exit the machine from this location. |
| 4 | Remote switch | A selector switch that enables the user to switch the power to both the scanner and the printer on and off from the Main Power Switch. |
| 5 | Interface connector | The connector to which the printer is connected. |
| 6 | Serial port connector | Used by the service representative for maintenance. |
| 7 | Circuit Breaker Switch | Provides circuit breaker protection for the Copier/Printer or Printer. |
| 8 | Paper Heater Switch | Switches the paper heaters on and off. |
| 9 | Main Power Switch | Switches the printer power on and off (if the Circuit Breaker Switch is already switched on). |
Important
Connections to the host computer and other necessary connections will be taken care of by your service representative.
1.3 Power On/Off
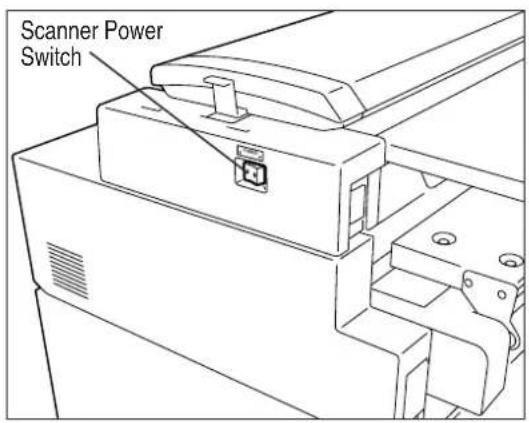
The scanner and the printer are each equipped with a power switch. The Circuit Breaker Switch must be in the ON position to switch the printer and scanner power on and off. No power is consumed when the Circuit Breaker Switch is in the OFF position, even though the power plug is connected to the power source.
Powering On
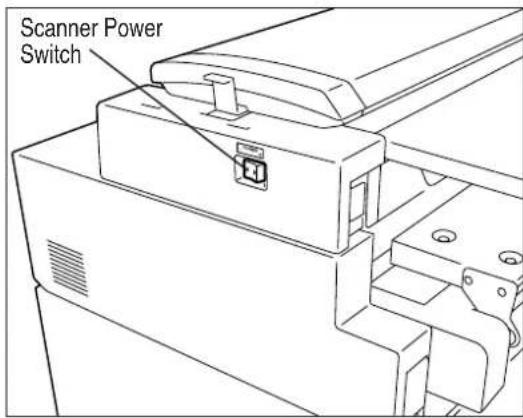
text_image
Scanner Power
Switch
text_image
Main Power
Switch
Circuit Breaker
1 Set the Remote Switch to [Connect].
Note
When the Remote Switch is set to [Connect], and the Scanner Power Switch is set to ON, the Main Power Switch controls power to both the Printer and the Scanner.
2 Switch ON the Scanner Power Switch.
3 Switch ON the Circuit Breaker Switch.
4Switch ON the Main Power Switch.
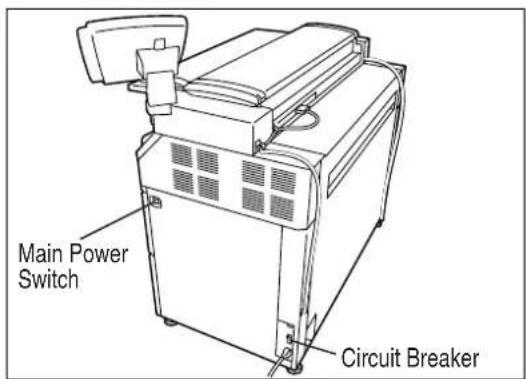
Powering Off
Switch off the power following the steps below.

Never switch off the power while the machine is printing. Failure to observe this precaution may result in paper jams in the high-temperature areas of the printer.
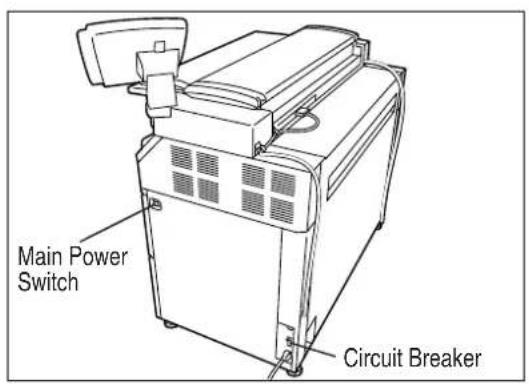
text_image
Main Power
Switch
Circuit Breaker
text_image
Scanner Power
Switch
1 Switch OFF the Main Power Switch.
Note
When the remote switch is set to [Connect], and the Scanner Power Switch is set to ON, the power to the Printer and Scanner can be switched on and off with the Main Power Switch.
2 Switch OFF the Scanner Power Switch.
Note
Switch off the Circuit Breaker Switch if the machine will not be used for a long period of time.
3 Switch the Circuit Breaker Switch to the OFF position.
The Power Save Mode automatically lowers the power consumption of the machine by reducing the fuser power. The machine will enter the power save mode when no prints or copies have been made for a preset period of time.
- Low power mode 1
This mode reduces the temperature of the fuser, thereby reducing power consumption. The parameters that can be set up are [ON], [OFF], and the time that must elapse before the mode activates (1 to 120 minutes; the default setting is [5 minutes].)
- Low power mode 2
This mode reduces the temperature of the fuser more than Low power mode 1.
The parameters that can be set up are [ON], [OFF], and the time that must elapse before the mode activates (5 to 120 minutes; the default setting is [15 minutes].)
- Sleep Mode
The sleep mode automatically switches off the power to the printer. The parameters that can be set up are [ON], [OFF], and the time that must elapse before the mode activates (15 to 120 minutes; the default setting is [90 minutes].)
Power is restored to normal levels when a print job is received by the printer, and when the key on the printer control panel is pressed.
The Power Save Mode settings can be accessed and changed using either the key on the copier control panel, or the setup menu on the printer control panel.
Refer to
Refer to the "Timer" discussion in section "5.2 Setting up the System Presets" for assistance in changing the power save mode settings from the copier control panel. Refer to "8.4 System Parameter Setup (Printer Control Panel)" for changing the power save mode settings from the printer control panel.
1.5
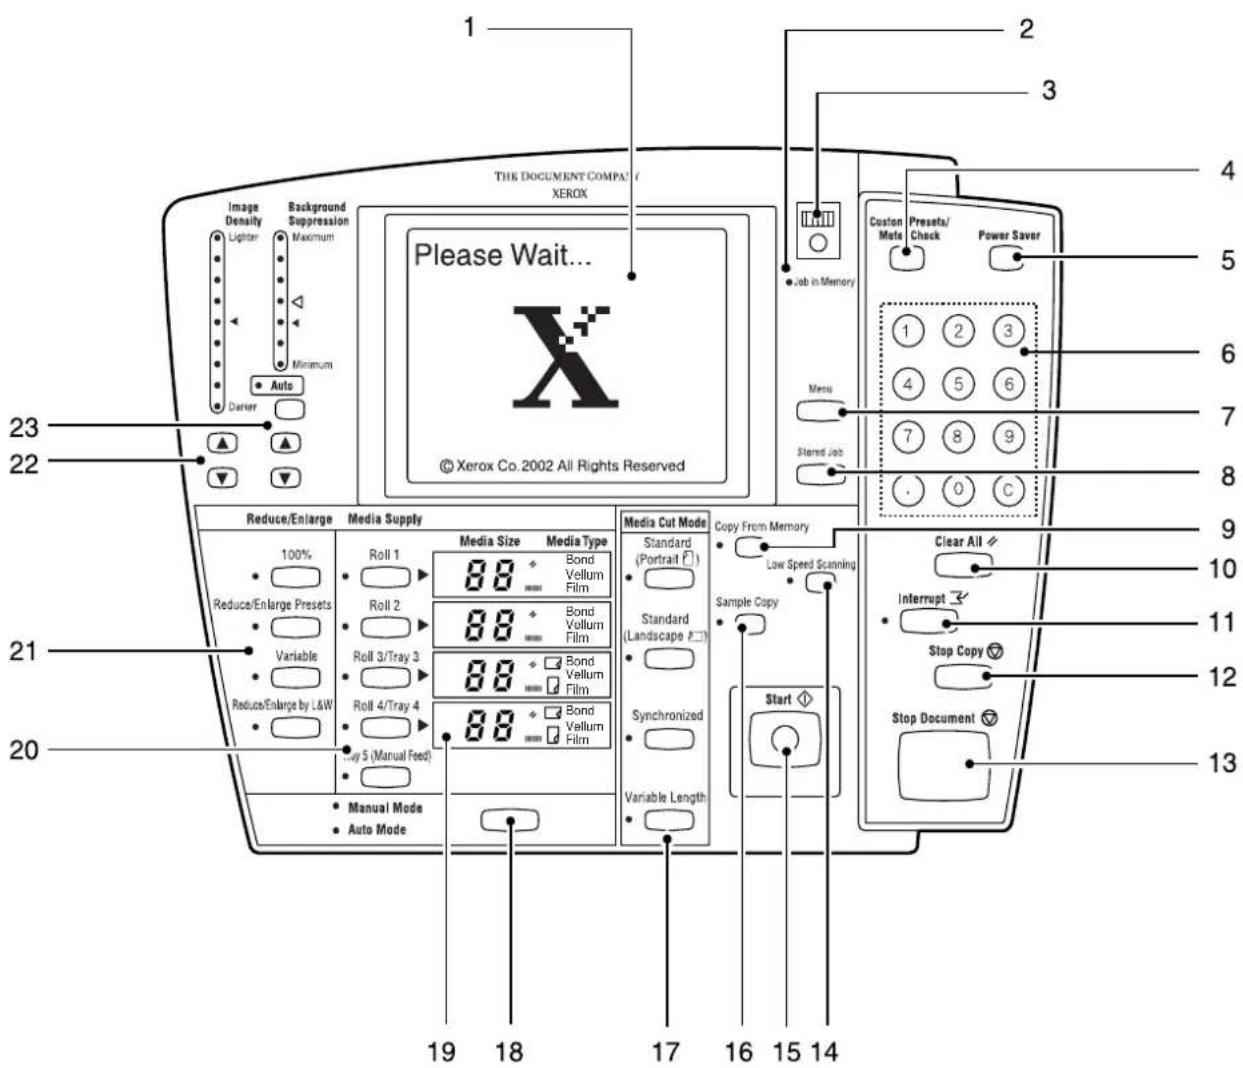
Copier Control Panel
The copier control panel consists of buttons, lamps, and a touch panel that displays menu and setup screens. Touch the required buttons on the screens to select features. The screen also will display messages relating to machine status, and step-by-step instructions for performing various procedures.
text_image
Image Density
Lighter
Background Suppression
Maximum
Minimum
Auto
Carrier
23
22
19
18
17
16
15
14
THE DOCUMENT COMPAT /
XEROX
Please Wait...
© Xerox Co. 2002 All Rights Reserved
1
2
3
4
5
6
7
8
9
0
C
Menu
Stored Job
Custom Mate Preseta/Check Power Saver
Reduce/Enlarge Media Supply Media Size Media Type
100% Roll 1 Bond Vellum Film
Reduce/Enlarge Presets Roll 2 Bond Vellum Film
Variable Roll 3/Tray 3 Bond Vellum Film
Reduce/Enlarge by L&W Roll 4/Tray 4 Bond Vellum Film
Play 5 (Manual Feed) Bond Vellum Film
Manual Mode Auto Mode
Copy From Memory
Standard (Portrait)
Standard (Landscape)
Sample Copy
Synchronized
Variable Length
Start
Clear All
Interrupt
Stop Copy
Stop Document
| No. | Name Function | |
| 1 | Menu Screen or (Setup Screen) | Used to set up copy jobs, map original sizes to the media, display messages and procedures, and provide troubleshooting help, e.g., for jam clearance. |
| 2 | [Job in Memory] lamp | Illuminates for a preset period while the previous copy job is retained in memory. Enables the user to reprint the previous copy job without rescanning the original(s). |
| 3 | Screen Contrast Dial | Adjusts the contrast of the touch screen. |
| 4 | key | Provides access to the machine's default settings. Also enables the user to view the billing meters, software versions, machine configuration, etc. |
| 5 | key | Switches the machine into and out of the low power mode. |
| 6 | Keypad (0 to 9, C) | Enables the user to enter the copy quantity and setting values. Pressing thekey clears all entered values. |
| 7 | key Currently not supported. | |
| 8 | key | Saves copy job settings in memory so they can be recalled and the stored jobs run again. |
| 9 | key | Reprints the most recent copy job. The lamp illuminates when copies are printed from memory. |
| 10 | key | Cancels the current job settings and returns them to the default values. |
| 11 | key | Enables the user to interrupt a copy job to perform a higher priority job. The lamp on the left side illuminates during interruption copying. |
| 12 | key | Ejects all copies currently in process and stops the machine. |
| 13 | key | Immediately stops document feed. |
| 14 | key | Used to prevent damage to fragile originals. Press this key to enter the low-speed scan mode. The lamp on the left side will illuminate during low-speed scanning. |
| 15 | key | Starts document scanning when the scanner is set to the manual start mode, when copying from memory, and when making sample copies. |
| 16 | key | Enables the user to try out different copy settings to determine which provide the best copy quality. The lamp on the left side illuminates during sample copying. |
| 17 | keys | Selects the method for cutting media. The lamp on the left side of the selected cut mode will illuminate. |
| 18 | Manual/Auto key | Switches between the automatic and the manual copying modes. |
| 19 | [Media Size/Media Type] screen | Displays the size and type of the roll media in the tray(s). |
| 20 | keys | Select the media supply to be used for a copy job. The lamp on the left side of the selected tray illuminates. |
| 21 | keys | Set up the percentage of reduction or enlargement at which the copies will be printed. The lamp on the left side of the selected percentage illuminates. |
| 22 | keys | Adjusts the density (lightness or darkness) of the copy. The<▲key decreases the density; the < >▼key increases the density. |
| 23 | keys | Remove unwanted background noise or gray tint from copies. The <▲key increases the strength of suppression; the < >▼key decreases it. |
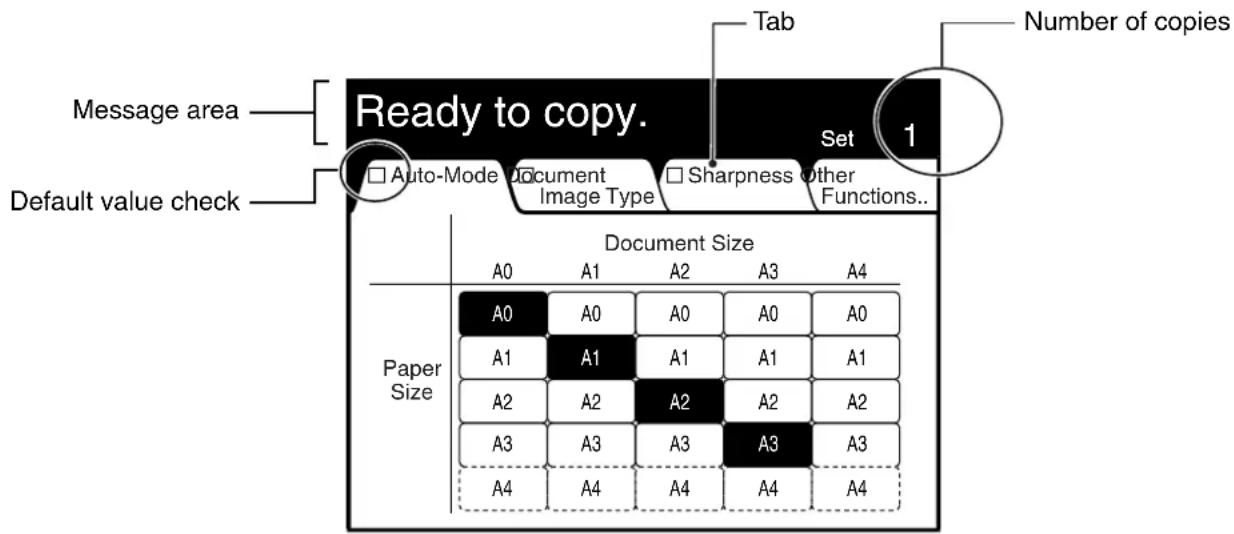
This section explains the features of the setup screens.
text_image
Message area
Default value check
Ready to copy.
Tab
Number of copies
□ Auto-Mode Document Image Type □ Sharpness other Functions...
Set 1
Document Size
A0 A1 A2 A3 A4
Paper Size
A0 A0 A0 A0 A0
A1 A1 A1 A1 A1
A2 A2 A2 A2 A2
A3 A3 A3 A3 A3
A4 A4 A4 A4 A4
Message area
Displays messages which show the status of the machine. Also provides information to help the user perform tasks.
Default value check
A check will display in this box if the selected features or functions differ from the default values.
Tabs
Press the tabs to switch between the setup screens. Press the [Other Functions] tab to display additional features and functions.
Number of copies (copy quantity)
The copy quantity is entered by pressing the <0> to <9> keys on the numeric keypad. Press the key to return the setting to <1>.
text_image
Auto-Mode Document
Image Type
Sharpness Other
Functions...
Normal R/E...
Media Cut
Mode...
Image Location...
Mirror Image
E-Sorter...
R/E by L&W...
Image Density...
Edge Erase...
Contrast Reversal
Multi-Job...
Media Supply...
Background Suppression...
Scan Start Position...
Threshold Level...
There is a following page
[Previous]
/[Next] buttons
[Cancel] button
[CancellImage Location Done]
Up/Down
(999 ~ 0 ~ 999)
0 mm
Left/Right
(500 ~ 0 ~ 500)
0 mm
+100
-100
+100 Centering -100
Scroll buttons
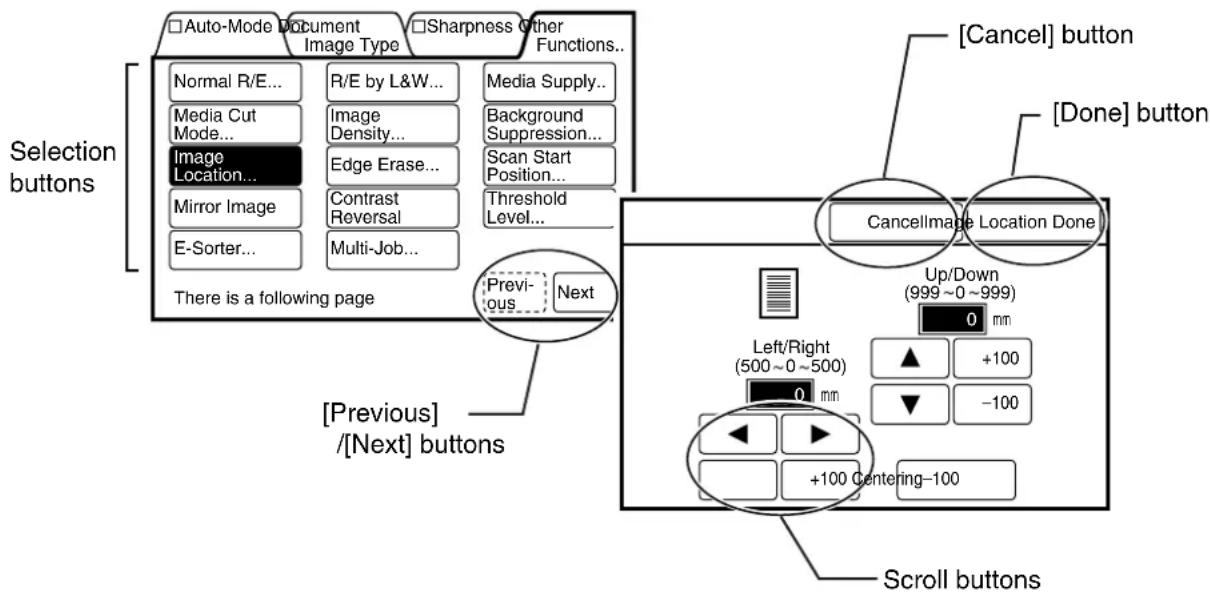
Press these buttons to select features or functions. The buttons will highlight (darken) when selected. When a button's name ends with an ellipsis [...], such as the [Image Location...] button, another setup screen will display when this button is selected.
The [Previous] and [Next] enable you to navigate between multiple setup screens.
Pressing the [Done] button informs the machine's controller of your selection(s) and closes the screen.
Cancels the selected setting or function and closes the screen.
The [▼[],▲], and [ ] buttons increase or decrease the values assigned to different settings. Pressing a button that displays a value, [100] for example, will increase or decrease the setting by that amount.
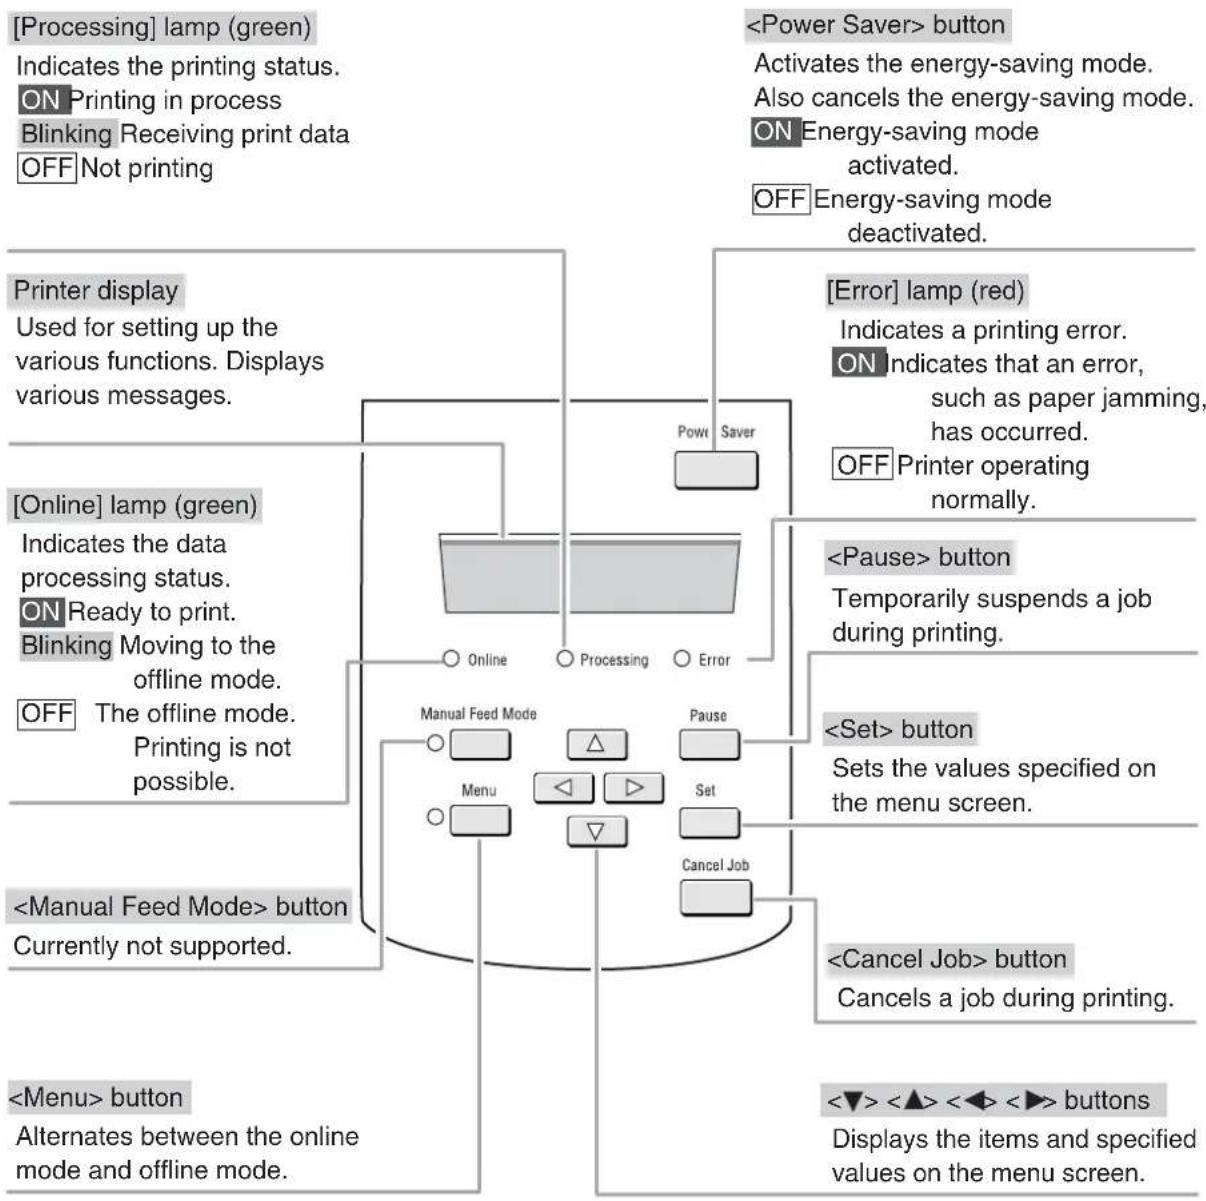
Both the Printer and the Copier/Printer versions of the 6030/6050 Wide Format are equipped with a printer control panel. This section provides an overview of this device.
Important
Refer to section "7.2 Printer Control Panel Usage" and "Chapter 10 Additional Operations from the Printer Menu" for detailed explanations of the use of the printer control panel.
Note
It is seldom necessary to use the printer control panel on the 6030/6050 Wide Format Copier/Printer because the same settings usually can be made using either the copier control panel or Print Services on Web, the built-in web interface.
flowchart
graph TD
    A["Printer display"] --> B["Used for setting up the various functions. Displays various messages."]
    C["On"] --> D["Data processing status. ON Ready to print. Blinking Moving to the offline mode. OFF The offline mode. Printing is not possible."]
    E["Manual Feed Mode"] --> F["Button Currently not supported."]
    G["Power Saver"] --> H["Processing"]
    I["Manual Feed Mode"] --> J["Menu"]
    K["Pause"] --> L["Set"]
    M["Cancel Job"] --> N["Next Step"]
    O["<Power Saver> button"] --> P["Activates the energy-saving mode. Also cancels the energy-saving mode. ON Energy-saving mode activated. OFF Energy-saving mode deactivated."]
    Q["Error"] --> R["lamp (red) Indicates a printing error. ON indicates that an error, such as paper jamming, has occurred. OFF Printer operating normally."]
    S["<Pause> button"] --> T["Temporarily suspends a job during printing."]
    U["<Set> button"] --> V["Sets the values specified on the menu screen."]
    W["<Cancel Job> button"] --> X["Next Step: Cancels a job during printing."]
    Y["<Menu> button"] --> Z["Alternates between the online mode and offline mode."]
    AA["<Power Saver> button"] --> AB["Activates the energy-saving mode. Also cancels the energy-saving mode. ON Energy-saving mode activated. OFF Energy-saving mode deactivated."]
1.7
Print Services on Web Overview
Print Services on Web is web server software which is pre-installed in the 6030/6050 Wide Format Printer and Copier/Printer. Print Services on Web provides a user-friendly way to perform printer setup, communication (port) setup, job and error log management, and other procedures via a web browser. Print Services on Web also enables the user to perform operations which can not be performed from the printer control panel, for example, displaying job lists and changing job priority.
Refer to Refer to the topic "Starting and Exiting Print Services on Web" in "7.3 Print Services on Web" to learn how to log on to Print Services on Web.
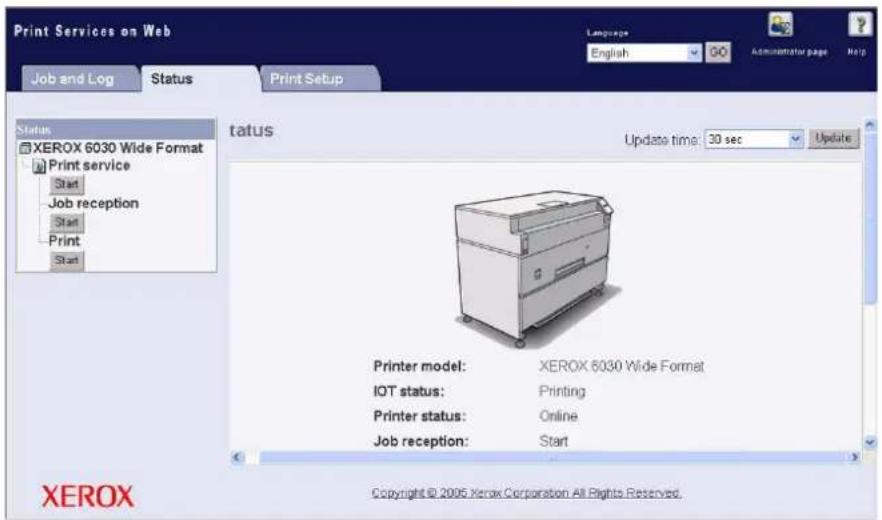
User Mode
The user mode interface (user page) is shown in the image below. This page displays immediately after a user logs on to Print Services on Web. The selections on the tabs enable the user to do the following.
[Job and Log] tab Check the status of a print job.
View and print a job log.
[Status tab] Check the status of the Printer or Copier/Printer.
Start a print job.
[Print Setup] tab View the logical printer settings.
text_image
Print Services on Web
Job and Log
Status
Print Setup
Language
English
GO
Administrator page
Help
Status
XEROX 6030 Wide Format
Print service
Start
Job reception
Start
Print
Start
status
Update time: 30 sec
Update
Printer model: XEROX 6030 Wide Format
IOT status: Printing
Printer status: Online
Job reception: Start
Copyright © 2005 Xerox Corporation All Rights Reserved.
XEROX
Refer to Refer to section "1.8 Logical Printers Overview" to learn more about logical printers.
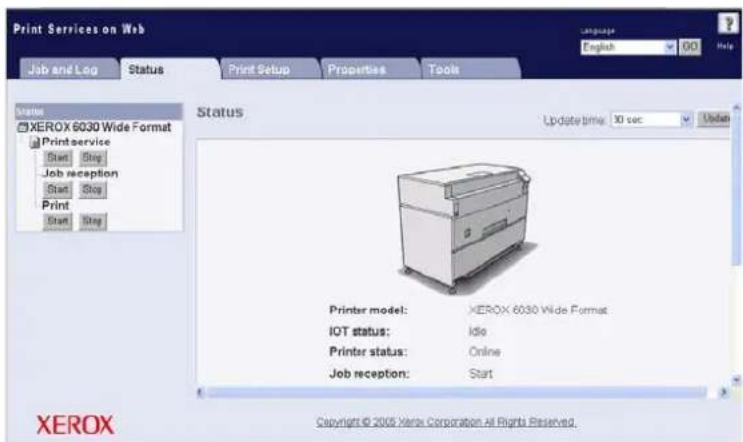
Administrator Mode
To enter the administrator mode, log on to Print Services on Web, select the [Administrator page] button, and then enter the administrator login and password when prompted to do so. The administrator page displays two additional tabs, [Properties] and [Tools], and expands the capabilities of the [Job and Log], [Status], and [Print Setup] tabs.
The selections on the Administrator page tabs enable the administrator to perform the tasks listed below.
[Job and Log] tab • Check the status of jobs in the print queue.
• View and print the job log and the error log.
- Cancel a print job.
- Change the priority of a print job.
[Status tab] • Check the status of the Printer or Copier/Printer.
- Stop and start print services (job reception and printing).
- Stop and start job reception from client computers.
- Stop and resume print jobs.
[Print Setup] tab • Set up new logical printers for each of the allowable data formats (HP-GL, TIFF, CALS, VERSATEC, PS/PDF).
- Edit the settings of existing logical printers.
[Properties] tab • View and change the machine configuration.
• View and change communications configurations.
- Manage ftp users.
[Tools] tab • Print a test pattern to verify machine (printer) operation.
• Print a Diagnostic Report.
text_image
Print Services on Web
Job and Log Status Print Setup Properties Tools
Language: English 00 Help
XEROX 6030 Wide Format
Printservice
Start Stop
Job reception
Start Stop
Print
Start Stop
Status
Update time: 10 sec
Printer model: XEROX 6030 Wide Format
IOT status: Idie
Printer status: Online
Job reception: Start
Copyright © 2005 Xerox Corporation All Rights Reserved.
A logical printer (virtual printer) is a group of saved print job settings for a particular data format, i.e., HP-GL, Versatec, TIFF, CALS, and PS/PDF. These saved settings, which are created using Print Services on Web, may include pen attributes, media type, print quantity, and the other parameters that define the print job that the logical printer will be required to perform. Logical printers are to printing as Stored Jobs are to copying, that is, both reduce setup time and increase efficiency by using previously saved job settings. A maximum of one hundred logical printers can be set up within one 6030/6050 Wide Format Printer or Copier/Printer for each supported data format.
Refer to "Chapter 9 Logical Printer Setup and Operation" to learn how to set up logical printers.
How Logical Printers are Named

text_image
PLT00H
Number
Format
Logical printer names are assigned based on the following. This naming structure can not be changed.
1st to 3rd digits [PLT] or [plt] character strings
4th to 5th digits (number) Two-digit number from 00 to 99
6th digit (data format) Any of the following.
H: HP-GL format
V: Versatec format
T: TIFF format
C: CALS format
A: PS/PDF format (optional)
This section describes the types of originals that can be scanned and how to scan them.
Usable Originals
Maximum width: 36 inches (914.4 mm)
Minimum width: 7.16 inches (182 mm)
Maximum length: 49.2 feet (15,000 mm/15 m)
Minimum length: 8.26 inches (210 mm/A4 width)
Thickness: 2.5 mm or less for flat, opaque and translucent paper.
Use the Document Carrier for These Originals
Use the document carrier (optional) when making copies of the following.
• Originals that are badly wrinkled
• Originals that are badly curled
- Originals that are perforated, creased, or have tears
• Originals to which tape has been adhered
• Originals that are stapled together
• Originals with holes that exceed 25 mm in size
- Originals to which glue or adhesive tape has been applied
This section explains how to load originals in the scanner.
- Scanning will begin automatically if the [How to Start Scanning] parameter is set to [Auto start] in the Custom Presets.
Refer to
Refer to section "5.2 Setting up the System Presets" in "Chapter 5 Custom Presets/Meter Check" for more information about setting up the [How to Start Scanning] function.
- The scanning speed will differ based on the reduction and enlargement settings.
- Blank copies may print if the key is pressed during scanning.
- Long documents (originals up to 15 m in length) can be scanned. Scanning may stop if the document length exceeds 15 m.
- A document jam may occur if pressure is applied to the top of the document or if it is pulled during scanning.
- When scanning originals that contain holes, insert the original so that the area with the holes feeds in last. Jams may occur if the area with the holes feeds in first.
Procedure
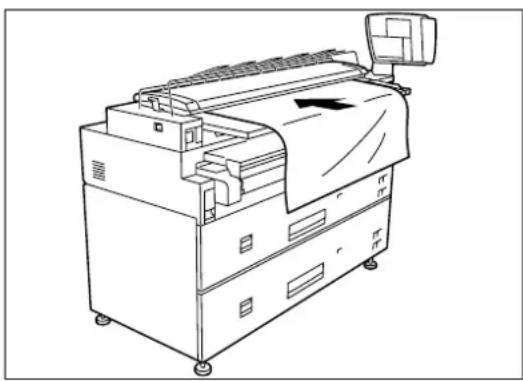
natural_image
Line drawing of a mechanical device with control panel and fan (no text or symbols)
1 Place the side of the original that is to be scanned face down. Align the edge of the original with the document insertion guide.
Note
To prevent edge damage when scanning a delicate original, move the document insertion guide all the way to the right, and align the right edge of the original with the marking on the document table, not the document insertion guide.
2 Gently push the front (lead) edge of the document into the scanner. Immediately after you hear the document feed motor start, the document will feed a short distance into the scanner and stop.
Important
Continue to support the document until the lead edge is held by the feed rollers. The document may jam if it is released too soon.
Attempting to correct document misalignment during a scan may cause a jam.
3 The scanned original will eject to the document output tray. Remove the original.
Observe the following precautions when handling originals.
- The scanning area will become contaminated if documents have glue, adhesive tape, or correction fluid on them. Avoid scanning documents that have stick-type glue or spray glue applied to them.
- Black lines or streaks may appear on copies if the scanning area is contaminated.
- When scanning rolled documents, ensure that the diameter of the roll is 40 mm or larger. Flatten rolls that have a diameter of 40 mm or less.
- Feeding the following types of originals may cause document jams and tearing, and image quality defects (white blotches) on copies.
• Originals that are badly wrinkled.
• Originals that are badly curled.
- Originals that are perforated, creased, or torn.
• Originals to which tape has been adhered.
• Originals that are stapled together.
- Originals that contain holes that exceed 25 mm.
- Originals to which glue or adhesive tape has been applied.
Using the Paper Heater
Media may wrinkle when used in a high humidity environment. Switching the paper heater on can prevent paper from becoming wrinkled. Use the switch shown in the illustration to switch the paper heater on and off.
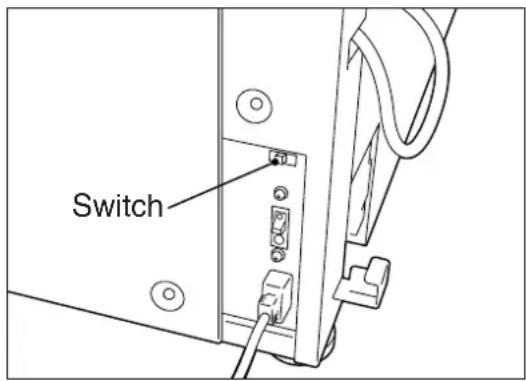
text_image
Switch
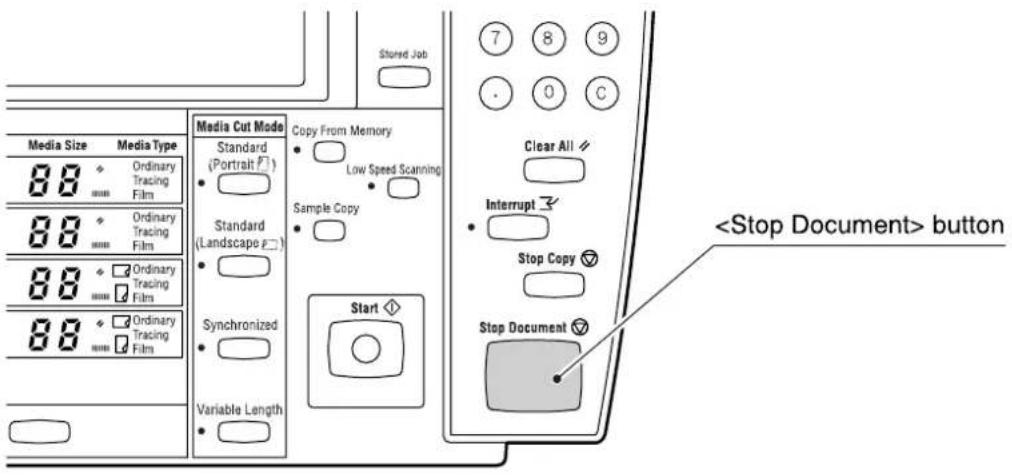
1.10 Stopping Document Scanning
Press the key on the control panel to stop a scan. The scanner will stop immediately.
text_image
Stored Job
Media Size Media Type
88 Ordinary Tracing Film
88 Ordinary Tracing Film
88 Ordinary Tracing Films
88 Ordinary Tracing Films
Media Cut Mode
Standard (Portrait)
Standard (Landscape)
Synchronized
Variable Length
Copy From Memory
Low Speed Scanning
Sample Copy
Start
Clear All
Interrupt
Stop Copy
Stop Document
button
Note
Blank copies may be output after the key is pressed.
The message 'Replace xxx media." will display when there is no media loaded or when the roll in use runs out.
The media size displayed on the control panel will turn off when there is no media in the machine.
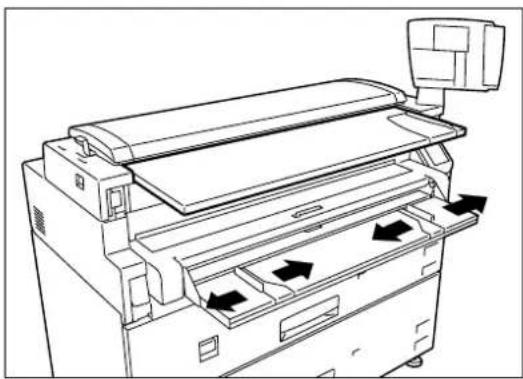
Two rolls of media can be loaded in each of the media trays.
Important
Refer to the instructions provided in "1.15 Setting Up Media" and set up the media parameters after the roll media has been loaded.
Note
Media can be reloaded in the lower media tray while printing is occurring from the upper media tray. Be sure that the Feeder LED on the lower media tray is off (not illuminated) before opening the lower media tray.
Procedure
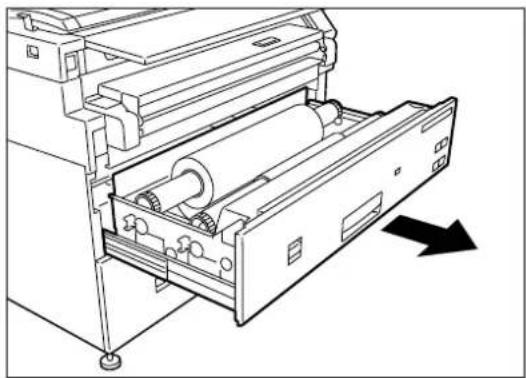
natural_image
Technical line drawing of a mechanical device with rollers and a handle, showing no text or symbols
natural_image
Technical line drawing of a mechanical assembly with hands operating a component (no text or symbols visible)
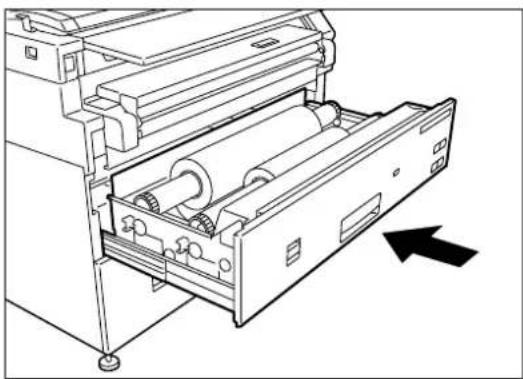
1 Open the media tray.
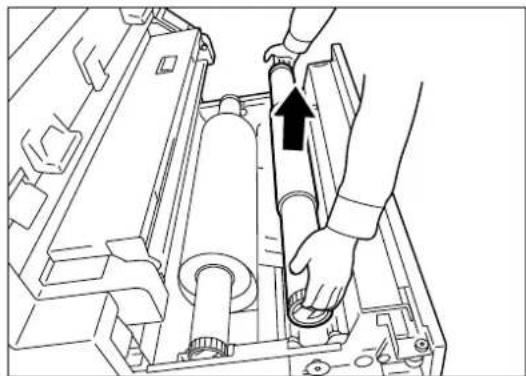
2 Remove the shaft containing the roll paper that is to be replaced.
natural_image
Diagram of a cylindrical device with internal components and directional arrows, showing internal structure (no text or symbols)
natural_image
Technical line drawing of a mechanical assembly with cylindrical components and mounting brackets (no text or symbols)
natural_image
Technical line drawing of a mechanical component with a black arrow indicating direction (no text or symbols)

natural_image
Line drawing of a mechanical assembly with hands operating a component (no text or symbols)
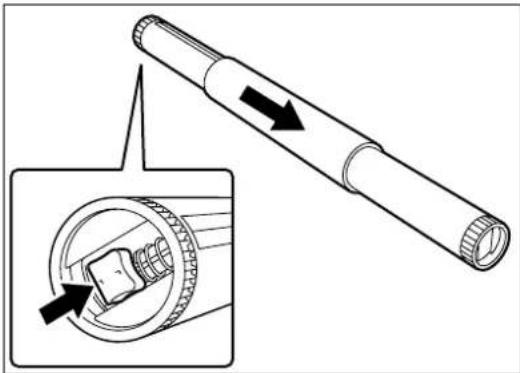
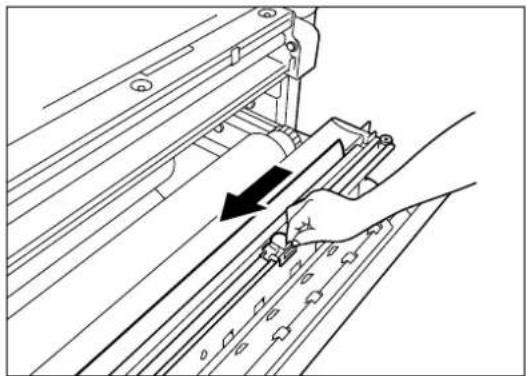
3 While pulling on the lever located in the end of the roll paper shaft, remove the paper core in the direction of the arrow.
Note
Pulling the lever releases the lock and allows the roll to be removed from the shaft.
Note
There is an area at the front of the tray on which the roll paper can be placed.
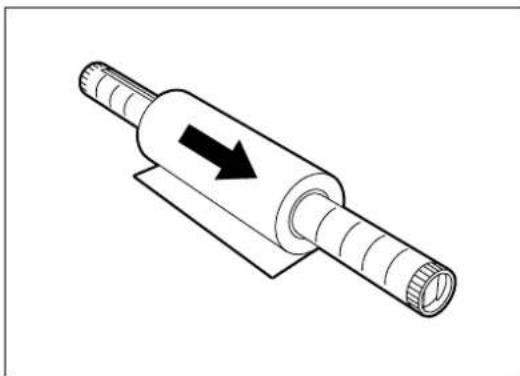
4 While pulling the lever located in the end of the roll paper shaft, align the roll paper with the paper size marks on the shaft and set the roll in place.
5 Align the roll paper following the directions displayed inside the media tray and load the roll on the shaft guide.
Note
Cut the lead edge of the media before setting it in place if it is damaged. Refer to "1.14 Cutting Roll Media" for details on how to do this.

natural_image
Technical line drawing of a mechanical assembly with internal components and a black arrow indicating direction (no text or symbols)
natural_image
Technical line drawing of a printer with rollers and a drawer, showing no text or symbols
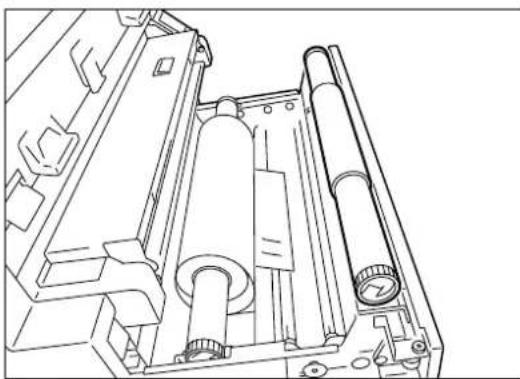
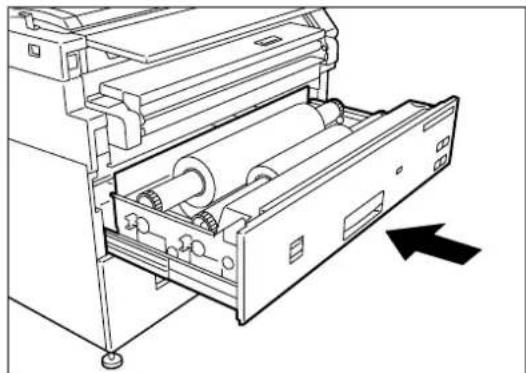
6 Rotate the roll media until the lead edge is gripped in the roller.
Note
Rotate the knob until the leading edge of the paper can be seen in the window.
7 Gently but firmly close the media tray. The LED on the front of the tray will illuminate, and the roll paper will feed automatically to its starting position.
8 Set up the media parameters on the copier control panel.
Refer to
"1.15 Setting Up Media"
Note The media parameters also may be set up on the printer control panel.
Refer to
"Chapter 10 Additional Operations from the Printer Menu"
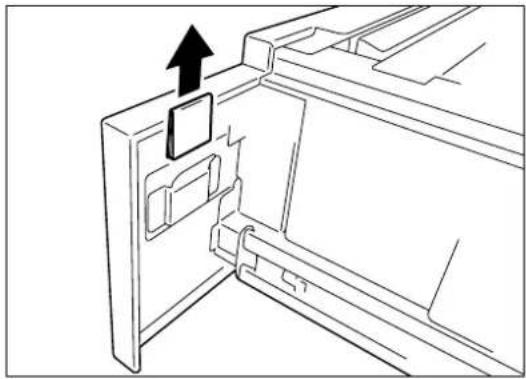
The media size indicators help the user identify the media that is loaded in each of the drawers. These indicators are visible on the right hand side of the drawers. Usage instructions begin on the next page.
The following types are available.
- Standard size A
- Inch size A
Standard size A
| V3A1V. dS1B5SB1Sp.A1A3A1B2 Sp.A2 Sp.A0 A2 A0 | | | |
Inch size A
| 12”18”24”34”11”17” | “9”30”36” | | | |

natural_image
Technical line drawing of a mechanical device with internal rollers and a directional arrow indicating motion (no text or symbols)
1 Open the tray.
natural_image
Line drawing of a door handle with an arrow indicating upward movement (no text or symbols)
2 Remove the media size sheet.
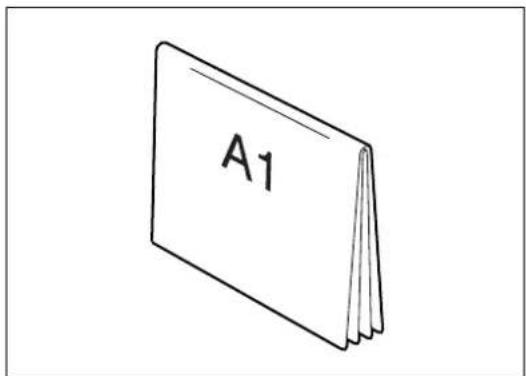
text_image
A₁
3 Fold the sheet so that the size loaded is displayed.
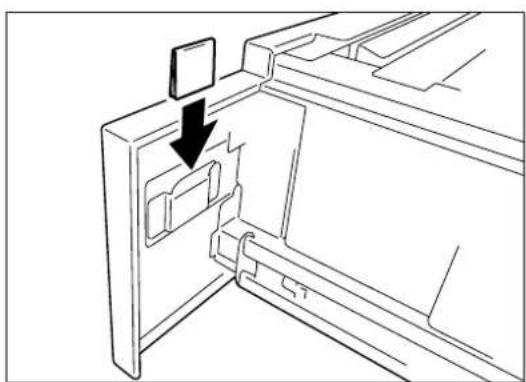
natural_image
Line drawing of a door handle with a black arrow pointing to a folder (no text or symbols)
4 Insert the media size sheet.
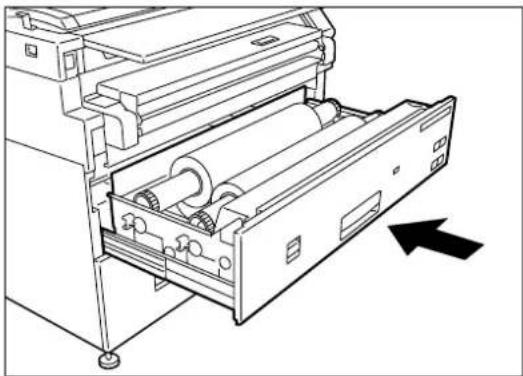
natural_image
Technical line drawing of a mechanical device with internal rollers and a directional arrow (no text or symbols)
5 Gently but firmly close the media tray.
natural_image
Line drawing of a printer with scroll and paper feed, showing internal structure and directional arrows (no text or symbols)
1 Adjust the (MSI) Multi Sheet Inserter/ Manual Feed Unit's side guides to fit the size of the media that is to be printed.
2 Place the side of the media to be printed face up, and align it with the (MSI) Multi Sheet Inserter/Manual Feed Unit's side guides.
Important
- The optional (MSI) Multi Sheet Inserter/Manual Feed Unit is required when making manually fed copies.
- Standard paper having a width of 297 to 914mm and a length of 210 to 2,000mm can be used with the (MSI) Multi Sheet Inserter/Manual Feed Unit.
3 Push the front edge of the media as far into the machine as it will go. You will hear the sound of a motor as the machine lifts the media to the feed position.
Important
Two or more sheets of A3 (horizontal feed) and A4 (horizontal/vertical feed) size paper can be placed in the MSI. Paper sizes other than A3 (horizontal feed) and A4 (horizontal/vertical feed) sizes must be inserted one sheet at a time.
Only Bond paper can be used in the (MSI) Multi Sheet Inserter/Manual Feed Unit.
4 Make the required media settings on the copier control panel.
The lead edge of the media should be cut when the media is loaded, on recovery from a media jam, and when the lead edge of the roll is damaged. There are two methods for cutting the lead edge of the roll media:
- Automatic cut: This involves making selections on either the copier control panel touch screen or the printer control panel.
Refer to the section "Setting up Media on the Copier Control Panel" in this chapter and to "10.8 Automatic Cut Using the Printer Control Panel" in "Chapter 10 Additional Operations from the Printer Menu" for details about automatic cutting.
- Manual cut: Open the media tray and slide the cutter manually.
Refer to Refer to section "Cutting Roll Media Manually" in this chapter.
Cutting the Front Roll

natural_image
Technical line drawing of a mechanical device with rollers and a handle, showing no text or symbols
1 Open the media tray.
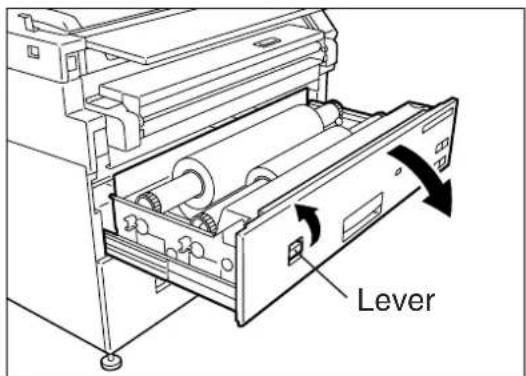
text_image
Lever
2 Pull the lever to open the tray cover.
natural_image
Technical line drawing of a mechanical assembly with internal components and a black arrow indicating direction (no text or symbols)
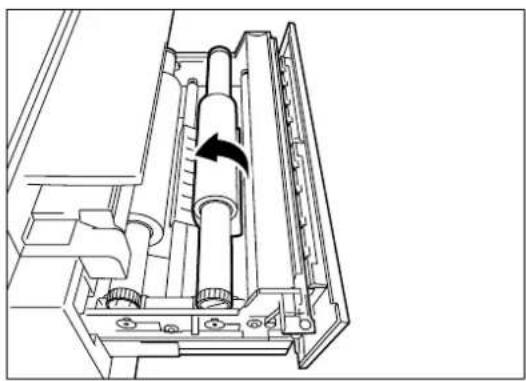
3 Rotate the roll media until the lead edge is gripped by the roller.
natural_image
Technical line drawing of a mechanical assembly with gears and shafts (no text or symbols)
natural_image
Technical line drawing of a mechanical assembly with an arrow indicating direction (no text or symbols present)
natural_image
Technical line drawing of a mechanical component with directional arrows indicating movement or force (no text or symbols)
text_image
Window
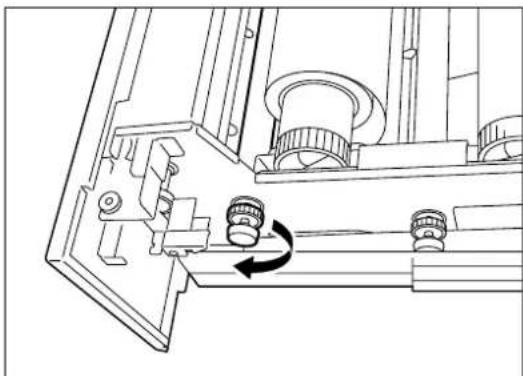
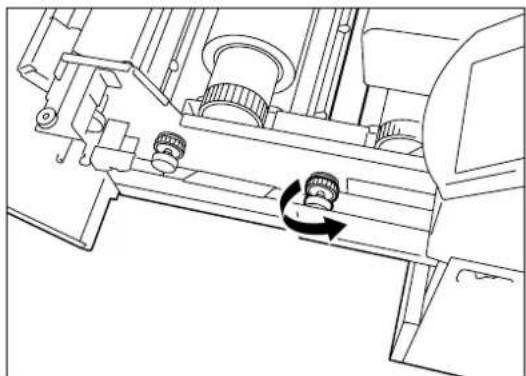
4 Rotate the knob until the media's lead edge protrudes from the tray outlet.
5 Grasp the cutter by the handle and slide it to the opposite side of the tray to cut the paper.
CAUTION: Use the cutter handle to prevent personal injury which may result from sliding your fingers along the sharp, metal cutting bar.
6 Remove the cut off media.
7 Close the tray cover.
8 Return the media to its original location by rotating the knob until the lead edge can be seen in the window.

natural_image
Technical line drawing of a mechanical device with rollers and a handle, showing no text or symbols
9 Close the media tray.
Cutting the Rear Roll
natural_image
Technical line drawing of a mechanical device with rollers and a drawer, showing no text or symbols
natural_image
Technical line drawing of a mechanical assembly with no visible text or symbols
natural_image
Technical line drawing of a mechanical device with internal components and directional arrows (no text or symbols)
natural_image
Technical line drawing of a mechanical component with internal structure and directional arrows (no text or symbols)
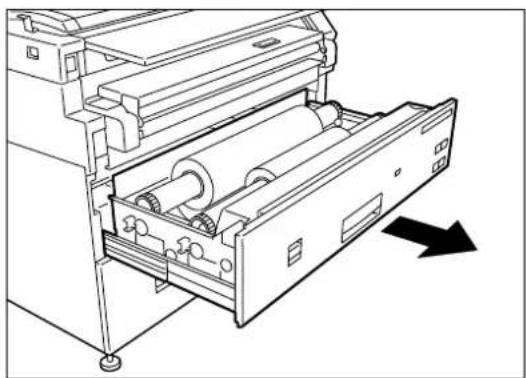
1 Open the media tray.
2 Rotate the roll paper until the lead edge is gripped by the roller.
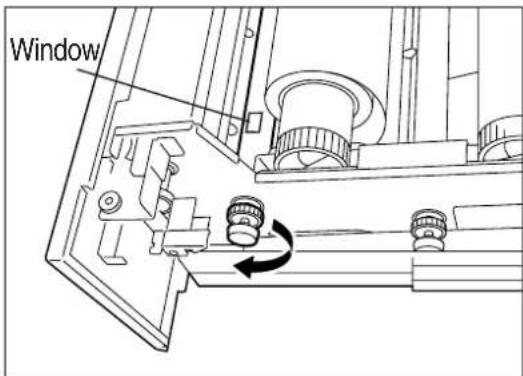
3 Rotate the knob until the media's lead edge protrudes from the tray outlet.
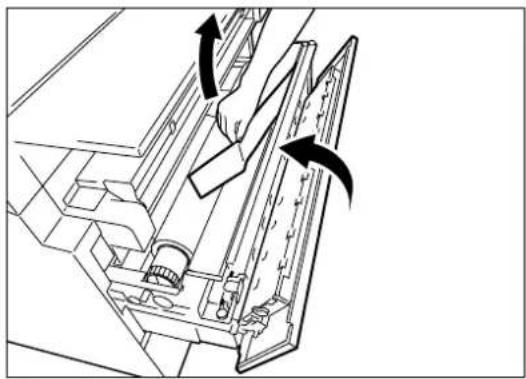
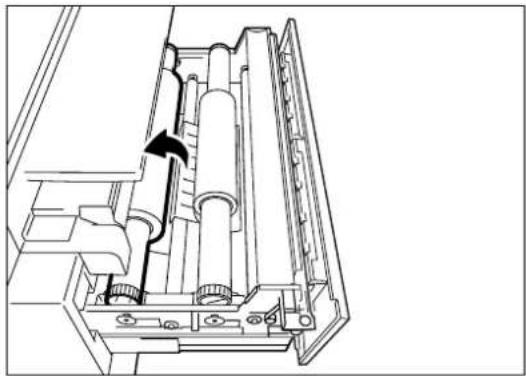
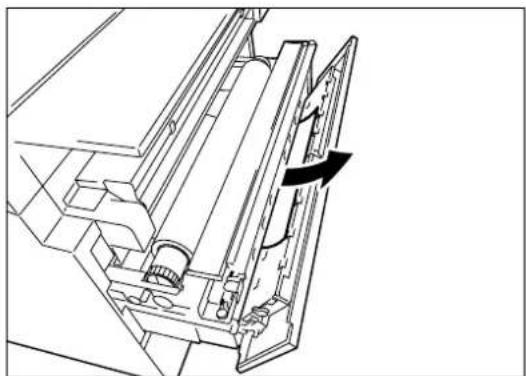
4 Pull the lever to open the tray cover.
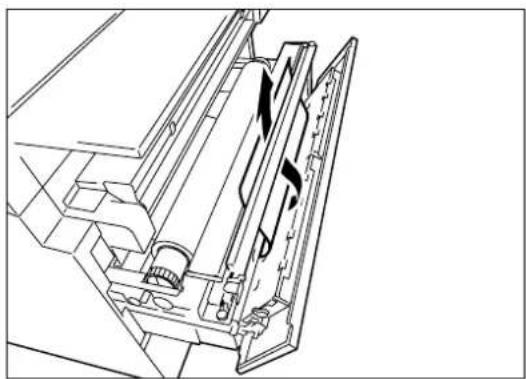
5 Rotate the knob until the paper passes through the tray outlet.

natural_image
Technical line drawing of a mechanical assembly with an arrow indicating direction (no text or symbols present)
natural_image
Technical line drawing of a mechanical component with directional arrows indicating movement or force (no text or symbols)
natural_image
Mechanical assembly diagram showing a rotating component with two curved arrows indicating rotational motion (no text or labels)
natural_image
Technical line drawing of a mechanical device with rollers and a drawer, showing no text or symbols
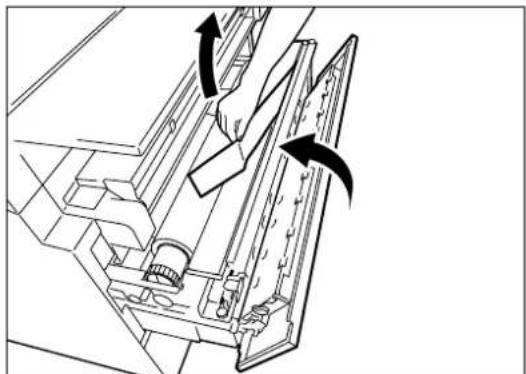
6 Grasping the cutter by the handle, slide the cutter to the opposite side of the tray to cut the paper.
CAUTION: Use the cutter handle to prevent personal injury which may result from sliding your fingers along the sharp, metal cutting bar.
7 Remove the media that was cut off.
8 Close the tray cover.
9 Return the media to its original location by rotating the knob until the lead edge can be seen in the window.
10 Close the media tray.
The media parameters (size series, type, weight) must be set up when new media is loaded or when the size, type, and/or weight of the media is changed. This information enables the machine's controller to optimize imaging, printing, and fusing based on the media which is selected for a copy or print job.
The media settings may be made at either the copier control panel or the printer control panel. This section describes how to make these settings at the copier control panel.

Refer to the section "Setting Up Media" in "Chapter 10 Additional Operations from the Printer Menu" for details on making media setups on the printer control panel.
The following Size Series/Media Type/Weight parameters must be set up.
| Settings Eligible Values |
| Size Series | The size series is selected from [ISO A], [SP. A-1], [SP. A-2], [ISO B], [ARCH], [ANSI], and [ARCH-30]. |
| Media Type | The media type is selected from [Bond], [Vellum], or [Film]. |
| Weight The weight is selected from [Light], [Ordinary], or [Heavy]. |
The media Size Series and sizes that can be set up are as follows.
| Size Series Eligible Media |
| ISO A series | A4 (210 × 297 mm)A3 (297 × 420 mm) A3 roll media (297 mm wide)A2 (420 × 594 mm) A2 roll media (420 mm wide)A1 (594 × 841 mm) A1 roll media (594 mm wide)A0 (841 × 1,189 mm) A0 roll media (841 mm wide) |
| ISO B series B4 | (250 x 353 mm) B4 roll media (250 mm wide)B3 (353 x 500 mm) B3 roll media (353 mm wide)B2 (500 x 707 mm) B2 roll media (500 mm wide)B1 (707 x 1000 mm) B1 roll media (707 mm wide) |
| SP. A-1 series | SP. A-0 (880 × 1,230 mm) SP. A-1 (625 × 880 mm) SP. A-2 (440 × 625 mm) SP. A-3 (312 × 440 mm) SP. A-0 roll media (880 mm wide) SP. A-1 roll media (625 mm wide) SP. A-2 roll media (440 mm wide) SP. A-3 roll media (312 mm wide) |
| SP. A-2 series | SP. A-1 (620 × 871 mm) SP. A-1 roll media (620 mm wide) |
| SP. A-2 (435 × 620 mm) SP. A-2 roll media (435 mm wide) |
| SP. A-3 series | SP. A-3 (310 × 435 mm) SP. A-3 roll media (310 mm wide) |
| ARCH 36", 24", | 18", 12", 9" |
| ANSI 34", 22", 17", 11", 8.5" |
| ARCH-30 30", 24", 18", 12", 9" |
The media [Weight] can be specified as follows:
| Media set to [Light] Bond | (16-18lb./ 60-69g/m2) | |
| Vellum (18-20lb./ 70-79g/m2) | |
| Film (50-69μ) | |
| Media set to Ordinary [Ord.] | Bond (18-20lb./ 70-85g/m2) | Premium (20lb./75gsm) Performance (20lb./75gsm) |
| Vellum (20-24lb./ 80-95g/m2)) | Premium Tracing (24lb./ 90gsm) |
| Film (70-80μ) Premium Film (75micron) |
| Media set to [Heavy] Bond | (20-29lb./ 86-110g/m2) | Presentation (29lb./110gsm) |
| Vellum (24-29lb./ 96-112g/m2) | Premium Tracing (29lb./112gsm) |
| Film (81-100μ) Premium Film (100micron) |
This section explains how to set up the media on the copier control panel.
Procedure
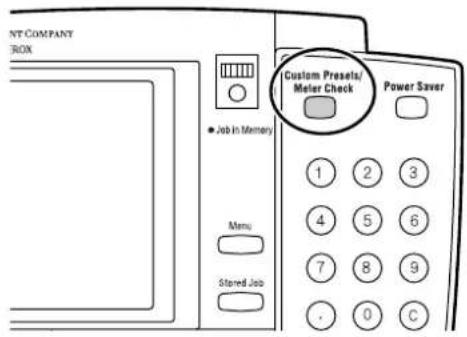
1 Press the key.
text_image
NT COMPANY
BOX
• Job In Memory
Menu
Stored Job
Custom Preset/
Meter Check
Power Saver
1 2 3
4 5 6
7 8 9
. 0 C
2 The [Custom Presets/Meter Check] screen will display. Select [Media Setting/Trimming].
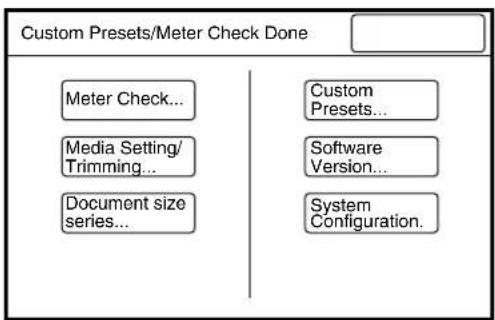
flowchart
graph TD
    A["Custom Presets/Meter Check Done"] --> B["Meter Check..."]
    A --> C["Media Setting/Trimming..."]
    A --> D["Document size series..."]
    A --> E["Custom Presets..."]
    A --> F["Software Version..."]
    A --> G["System Configuration."]
3 The [Media Setting/Trimming] screen will display. Select the roll that is to be set up, or the Manual Feed tray.
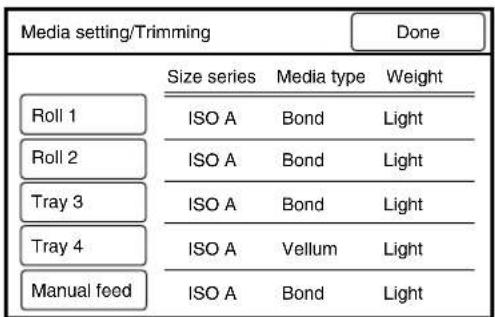
text_image
Media setting/Trimming
Done
Roll 1
Size series Media type Weight
ISO A Bond Light
Roll 2
ISO A Bond Light
Tray 3
ISO A Bond Light
Tray 4
ISO A Vellum Light
Manual feed
ISO A Bond Light
4 Select the appropriate [Size Series], [Media Type], and [Weight]. To trim the lead edge of roll media, set the Trimming Time using the [▲and [ ] buttons, and then press the key on the control panel. Press the [Done] button.

flowchart
graph TD
    A["Size Series Media Type Weight"] --> B["ISO A"]
    A --> C["Bond"]
    A --> D["Light"]
    A --> E["Trimming Time(s) (1/2/3)"]
    B --> F["SP. A-1"]
    B --> G["ANSI"]
    C --> H["Vellum"]
    C --> I["Film"]
    D --> J["Ordinary"]
    D --> K["Heavy"]
    E --> L["1"]
    E --> M["▲"]
    E --> N["▼"]
5 Press the [Done] button on the [Media Setting/Trimming] screen. The media settings are complete. The screen returns to the [Custom Presets – System Presets] screen.
The 6030/6050 Wide Format Copier/Printer can be used as a copier, a printer, and a scanner. This section provides an overview of the copy, the printer, and the scanner modes.
Copy Mode
Images which are scanned with the scanner are printed from the 6030/6050 Wide Format Copier/Printer as copies. This screen enables the user to set up the copy functions.
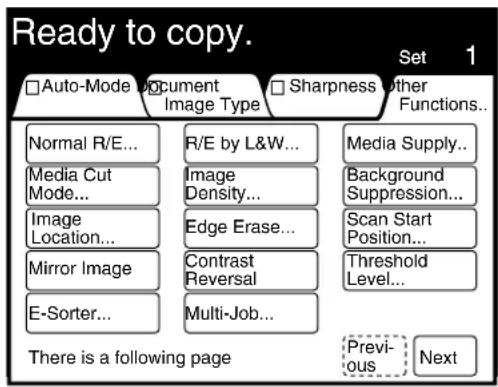
text_image
Ready to copy.
Set 1
□Auto-Mode Document □Sharpness other Functions...
Normal R/E... R/E by L&W... Media Supply...
Media Cut Mode... Image Density... Background Suppression...
Image Location... Edge Erase... Scan Start Position...
Mirror Image Contrast Reversal Threshold Level...
E-Sorter... Multi-Job...
There is a following page Previous Next
Printer Mode
The printer mode activates when print data is received from an external host PC. The machine reverts to the copier mode when printing is completed.
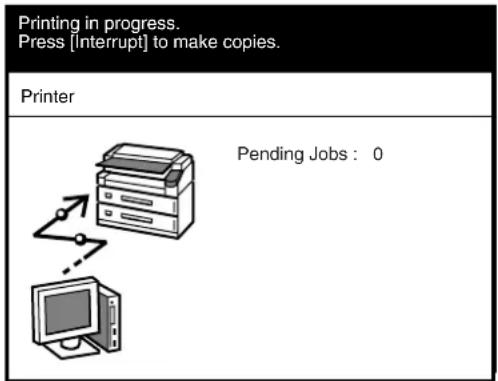
text_image
Printing in progress.
Press [Interrupt] to make copies.
Printer
Pending Jobs : 0

Press the [Interrupt] key to switch to the copier mode when printing is in progress. Refer to "2.3 Interruption Copying" for more details.
Scanner Mode
The scanner mode activates when a signal is received from the host PC. Images scanned with the scanner are transmitted to the host PC when in the scanner mode.
An instruction is required from the host PC to cancel the scanner mode.
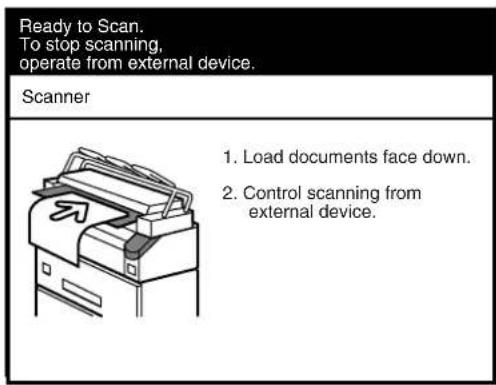
text_image
Ready to Scan.
To stop scanning,
operate from external device.
Scanner
1. Load documents face down.
2. Control scanning from
external device.
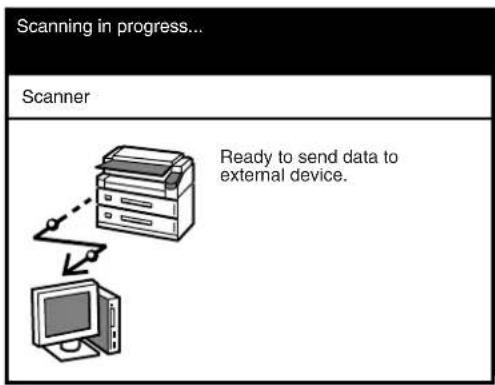
text_image
Scanning in progress...
Scanner
Ready to send data to
external device.
Refer to
Refer to "Chapter 6 Scanner Functions" for more details on the scanner functions.
Chapter 2
Copy
The 6030/6050 Wide Format Copier/Printer provides the following copy features.


■Document Image Type
Ensures that the image data from the scanned original is faithfully reproduced in the copy.

■Sharpness
Increases or decreases the sharpness of lines.
flowchart
graph TD
    A["Initial Plan"] --> B["Step 1: Initial Plan with Step 2"]
    B --> C["Step 2: Step 3: Step 4: Step 5"]
    C --> D["Step 3: Final Output"]
    D --> E["Feedback Loop"]
Cuts roll media to standard, non-standard, or user-defined sizes.
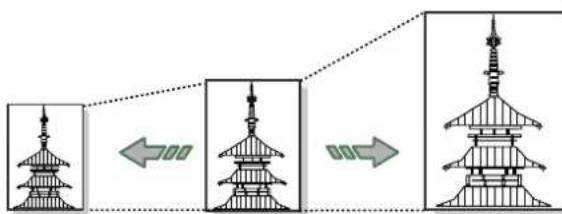
flowchart
graph LR
    A["Traditional Pyramid"] --> B["Modern Pyramid"]
    B --> C["Modern Tower"]
    style A fill:#f9f,stroke:#333
    style B fill:#bbf,stroke:#333
    style C fill:#dfd,stroke:#333
■Reduce/Enlarge
Reduces or enlarges copies.
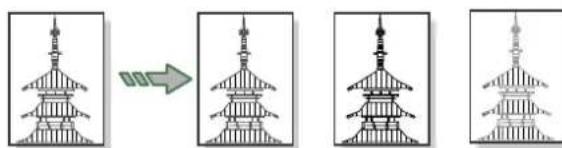
natural_image
Four identical architectural diagrams showing a pagoda with vertical stripes, arranged in a row (no text or symbols)
■Copy Density
Adjusts the density (darkness or lightness) of copies.
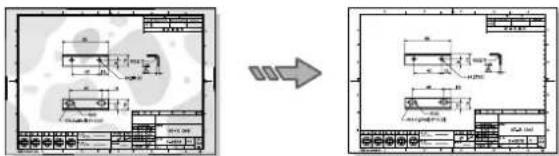
text_image
Technical drawing showing a mechanical part before and after modification, with dimension annotations and layout diagrams.
■Background Suppression
Eliminates unwanted background which may be present on originals.
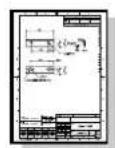
→
■Image Location
Moves the printed image up, down, left, and right.
→
■Edge Erase
Erases unwanted detail from the edges of the document.
→
■Scan Start Position
Specifies the location on the document where scanning will begin.
→
■Mirror Image
Creates a mirror image of the original document.
→

■Contrast Reversal
Reverses the black and white contrast areas of the image.
This section describes the basic procedures for making copies. It also describes automatic enlargement and reduction based on media selection.
Auto and Manual Copying Modes
Copies can be made in either of two modes - Auto or Manual. The Copier/Printer can be switched between these modes by pressing the key.
When copying is performed in the [Auto Mode], the 6030/6050 Wide Format Copier/Printer will automatically print either an enlarged or a reduced copy based on the selected media size. In order for the [Auto Mode] to work correctly, a table that establishes the relationships between document sizes and media sizes first must be created. The media type also is set up beforehand, using the custom presets function. When copies are made, the resulting reduction or enlargement and media type selection are based on both the document size and the entries in the size- and media-mapping tables.
Copying in the [Manual Mode] requires the user to select the copy settings (reduction/enlargement, media type, etc.) before making a copy. If the key or the key is pressed while the machine is in the auto mode, the mode will be canceled and the manual mode activated.
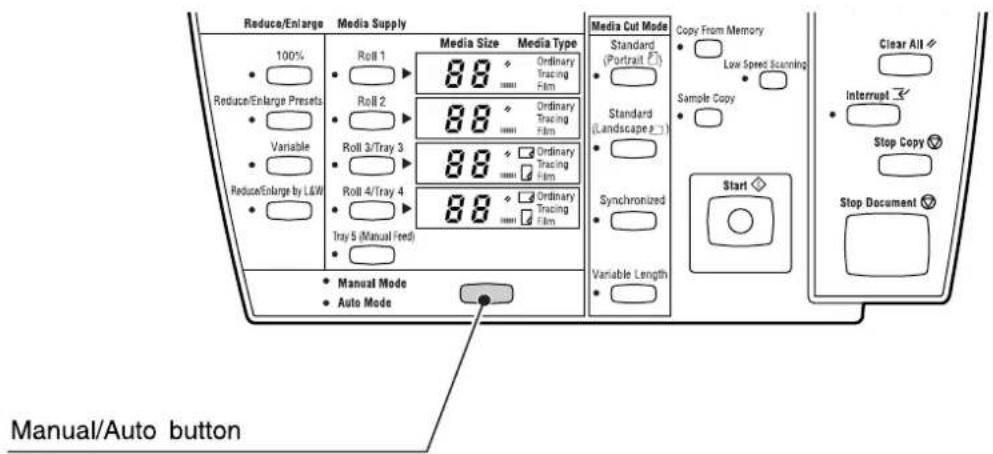
text_image
Reduce/Enlarge Media Supply
100%
Roll 1
Roll 2
Roll 3/Tray 3
Roll 4/Tray 4
Tray 5 (Manual Feed)
Media Size Media Type
88 Ordinary Tracing Film
88 Ordinary Tracing Film
88 Ordinary Tracing Film
88 Ordinary Tracing Film
Media Cut Mode
Standard (Portrait P)
Standard (Landscape P)
Synchronized
Variable Length
Copy From Memory
Low Speed Scanning
Sample Copy
Start
Clear All
Interrupt
Stop Copy
Stop Document
Manual/Auto button

The document size is automatically recognized based on the size series information which is set up using the custom presets. Refer to section "5.5 Document Size Series" for more details.
Activate the auto mode to display the media mapping table on the touch screen. The media size that will be selected for each scanned document size is set up in this table. In the example below, an A2 document is enlarged to the A1 size (141.4%) and copied on bond A1 paper (the settings are the shaded values). A [No Paper] error will occur if A1 paper is not loaded in the tray.
Copy setup screen
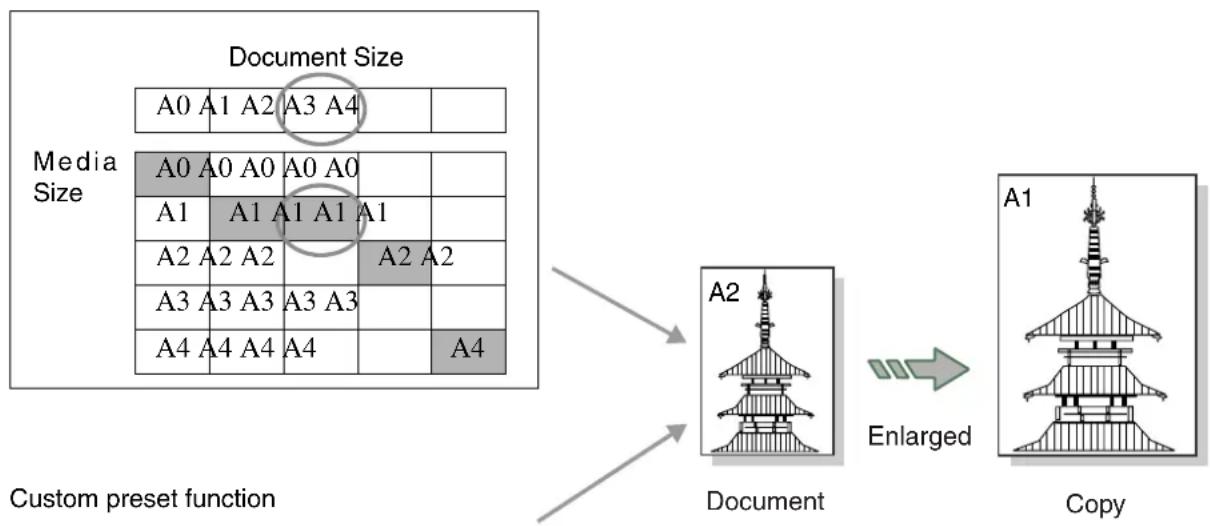
flowchart
graph TD
    A["Custom preset function"] --> B["Document"]
    B --> C["Enlarged"]
    C --> D["Copy"]
    style A fill:#f9f,stroke:#333
    style B fill:#ccf,stroke:#333
    style C fill:#cfc,stroke:#333
    style D fill:#fcc,stroke:#333
Media
A0 A1 A2 A3 A4
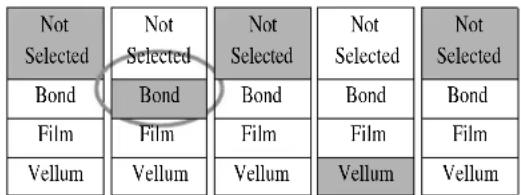
text_image
Not
Selected
Not
Selected
Not
Selected
Not
Selected
Bond
Bond
Bond
Bond
Bond
Film
Film
Film
Film
Vellum
Vellum
Vellum
Vellum
Vellum
Refer to
- Refer to section "3.2 Making Copies in the Auto Mode" for more details on the auto mode.
- Refer to the "Media Type for Auto Mode" section in "5.3 Setting up the Copy Features" for more details on the custom presets.
This section explains the basic steps that are involved in making copies.
Refer to
Refer to "Sorting Using E-Sorter" and "Sorting Using Multi-Job" to learn how to produce collated and sorted copies of multiple originals.
Procedure
Note The media mapping table must be set up before copying can be performed in the Auto mode.
Note To copy to 30 inch media you must use the Manual mode and select the roll number that contains the 30 inch media. Automatic roll switching is not available.
1 When copying in the manual mode, select the required reduction or enlargement and the media type on the copier control panel.
Refer to "Selecting the Reduction/Enlargement Settings" and "Selecting the Media Supply" in this chapter for more details on these functions.
2 Select the required copy features, for example, the background suppression, image density, media cut mode, etc.
3 Enter the copy quantity on the keypad. The quantity can be set from 1 to 99.
4 Insert the document in the scanner face down. Be sure that the edge of the document is aligned with the document insertion guide. The document will begin scanning automatically if automatic scanning is enabled. If automatic scanning is not enabled, press the key.
Note Refer to the "How to Start Scanning" section in "5.2 Setting up the System Presets" for more details on the custom presets.
Refer to "1.9 Using Originals" in this chapter for more details on loading documents.
The scanned data will enter the print queue. The copy will print when its number is reached.
Manual feeding of cut sheet media is performed using the optional Multi Sheet Inserter (MSI). Up to 100 sheets of A3 portrait or A4 portrait/landscape media (standard paper only) can be loaded in the Multi Sheet Inserter. Larger size paper must be loaded one sheet at a time.
Important
- Standard paper having a width of 297 to 914mm and a length of 210 to 2,000mm can be used in the MSI.
Note
The auto mode cannot be used when making manual feed copies.
Procedure
1 Open the manual feed table, set the media in place, and adjust the side guides to the edges of the media.
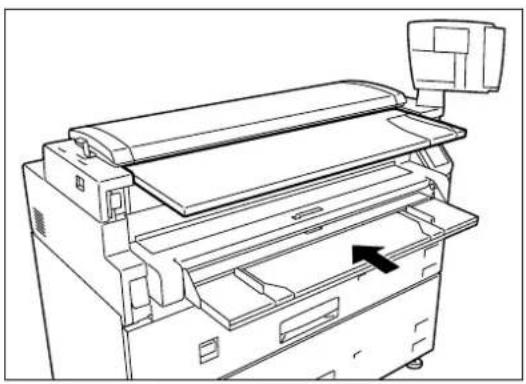
natural_image
Line drawing of a printer with a paper roll and scroll, showing internal components and a black arrow indicating a motion or force (no text or symbols present)
Refer to
Refer to section "1.13 Loading Media for Manual Feeding" in "Chapter 1 Product Overview" for more information on loading media in the MSI.
2 Press the key on the control panel.
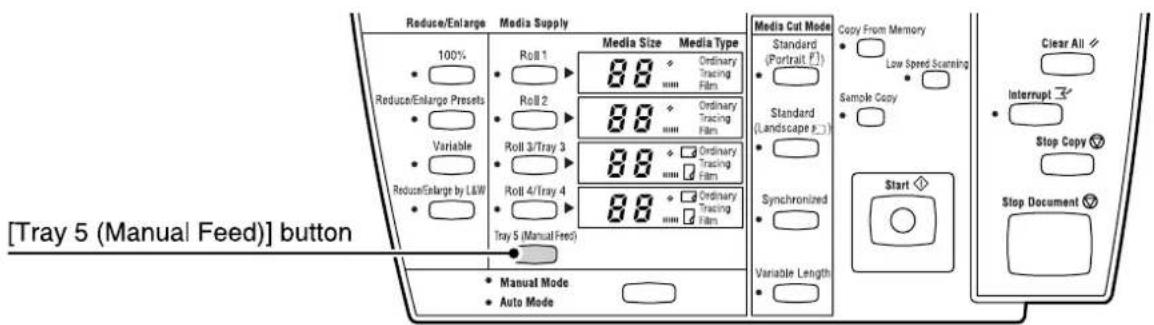
text_image
[Tray 5 (Manual Feed)] button
Reduce/Enlarge Media Supply
100%
Reduce/Enlarge Presets
Variable
Reduce/Enlarge by L&W
Media Size Media Type
Roll 1 Ordinary Tracing Film
Roll 2 Ordinary Tracing Film
Roll 3/Tray 3 Ordinary Tracing Film
Roll 4/Tray 4 Ordinary Tracing Film
Tray 5 (Manual Feed)
Media Cut Mode Copy From Memory
Standard (Portrait F)
Standard (Landscape P)
Sample Copy
Synchronized
Variable Length
Clear All
Interrupt
Stop Copy
Stop Document
Manual Mode
Auto Mode
3 Make the required copy settings, for example, reduction/enlargement, background suppression, and image density.
Refer to "Selecting the Reduction/Enlargement Settings" and "Adjusting Density and Background Suppression" in this chapter for more details on these functions.
4 Enter the copy quantity on the keypad.
Note The number of copies can only be specified when A3 or A4 size paper is being used.
5 Insert the document in the scanner face down, with the edge aligned with the document insertion guide.
The document will begin to scan automatically if scanning is set to [Auto].
Note If "start document scanning" is set to manual, press the key at this time. Refer to "How to Start Scanning" in "5.2 Setting up the System Presets" for more details on the custom presets.
Refer to "1.9 Using Originals" in this manual for more details on loading documents.
Otherwise, press the key.
The scanned data will enter the print queue. The copy will print when its output number is reached.
6 Return the manual feed table to its original position.
Adjusting Density and Background Suppression
Image density may be set at any one of nine levels using the buttons on the control panel. The < key decreases the density; the < key increases the density.
Background suppression may be used to eliminate the background which may be present on originals such as blueprints, documents printed on colored paper, or documents that have discolored or darkened with age. The ◀▲ key increases the amount of background suppression, and the ◀▼ key decreases it.
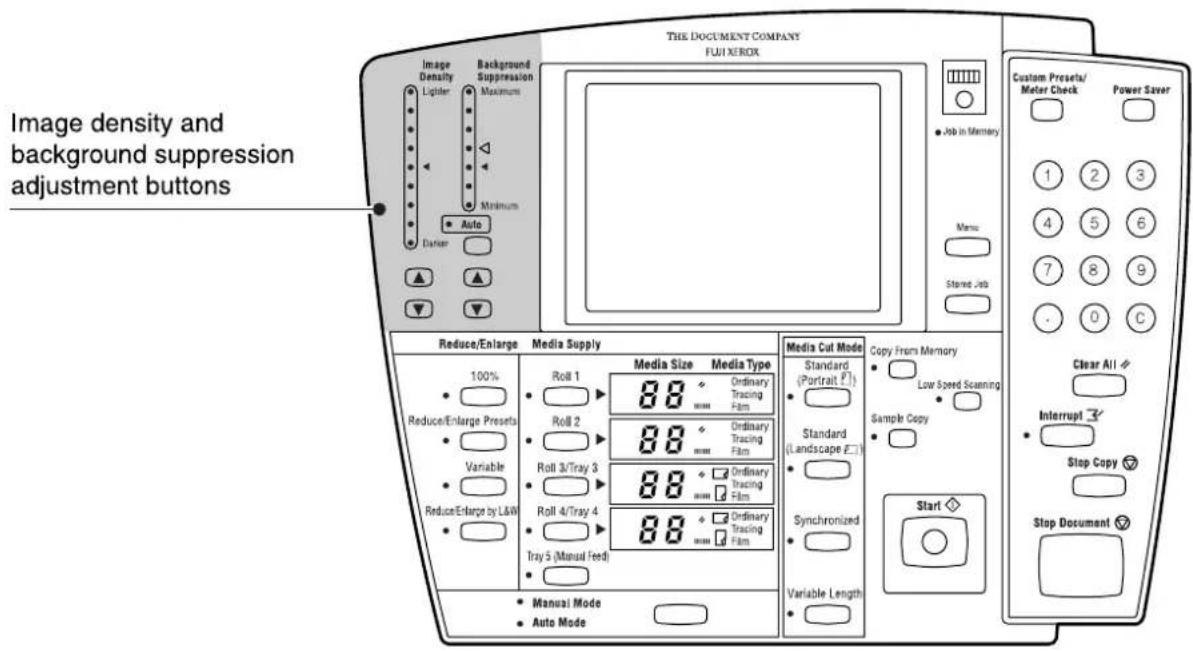
text_image
Image density and
background suppression
adjustment buttons
THE DOCUMENT COMPANY
FUJ XEROX
Image Density
Lighter
Maximum
Minimum
Auto
Diameter
-
-
-
-
-
-
-
-
-
-
-
-
-
-
-
-
-
-
-
-
-
-
-
-
-
-
-
-
-
-
-
-
-
-
-
-
-
-
-
-
-
-
-
-
-
-
-
-
-
-
-
-
-
-
-
-
-
-
-
-
-
-
-
-
-
-
-
-
-
-
-
-
-
-
-
-
-
-
-
-
-
-
-
-
-
-
-
-
-
-
-
-
-
-
-
-
-
-
-
-
-
+
+
+
+
+
+
+
+
+
+
+
+
+
+
+
+
+
+
+
+
+
+
+
+
+
+
+
+
+
+
+
+
+
+
+
+
+
+
+
+
+
+
+
+
+
+
+
+
+
+
+
+
+
+
+
+
+
+
+
+
+
+
+
+
+
+
+
+
+
+
+
+
+
+
+
+
+
+
+
+
+
+
+
+
+
+
+
+
+
+
+
+
+
+
+
+
+
+
+
+
100%
Reduce/Enlarge Presets
Variable
Reduce/Enlarge by L&W
Media Supply
Roll 1
Roll 2
Roll 3/Tray 3
Roll 4/Tray 4
Tray 5 (Manual Feed)
Media Size
88
Ordinary Tracing Film
88
Ordinary Tracing Film
88
Ordinary Tracing Film
88
Ordinary Tracing Film
Media Type
88
88
88
88
88
88
88
88
88
88
88
88
88
88
88
88
88
88
88
88
88
88
88
88
88
88
88
88
88
88
88
88
88
88
Refer to "3.8 Image Density" and "3.9 Background Suppression" for more details on these functions.
Note
This function can also be performed on the copier touch screen.
The media cut mode setting determines where the cut will occur on standard and non-standard size copies which are printed on roll media. The following methods are available.
- Standard Portrait Cuts the copy to the standard size that matches the dimensions of a standard size document that is scanned in a portrait (vertical) orientation.
- Standard Landscape Cuts the copy to the standard size that matches the dimensions of a standard size document that is scanned in a landscape (horizontal) orientation.
- Synchronized Used primarily with non-standard size documents, the Synchronized cut mode cuts the media to the same dimensions as the document. When reduction or enlargement is selected, the copy will retain the same length to width ratio as the original. Top and bottom margins that range from 0 to 999mm also can be added to the copy.
- Variable Length Cuts the roll media to a specified length, that is, from 210 to 15,000 mm.
The advanced media cut mode settings are set up on the touch screen when the key and the key are pressed.
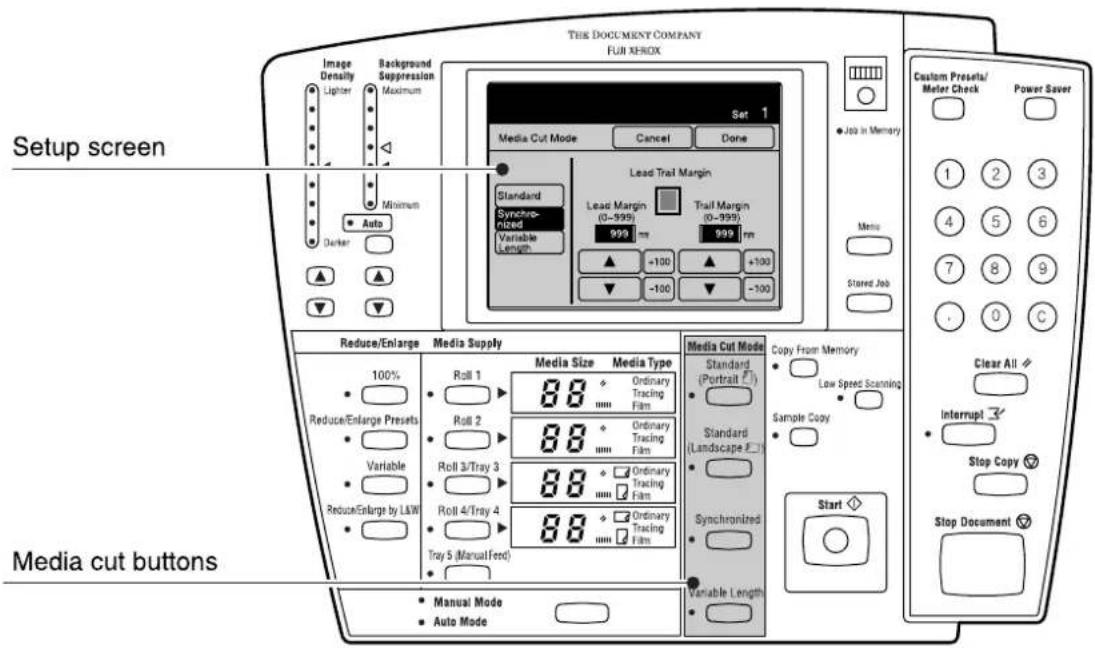
text_image
THE DOCUMENT COMPANY
FUJI XEROX
Image
Density
Lighter
Background
Suppression
Maximum
Set 1
Media Cut Mode
Cancel
Done
Lead Trail Margin
Standard
Synchronized
Variable
Length
Lead Margin
(0-999)
999 mm
Trail Margin
(0-999)
999 mm
+100
-100
+100
-100
Job in Memory
Menu
Stored Job
Custom Presets/
Meter Check
Power Saver
Setup screen
Auto
Darker
Reduce/Enlarge Media Supply Media Cut Mode Copy From Memory
100%
Roll 1
88 +
Ordinary
Tracing
Film Standard (Portrait F)
Standard
(Landscape F)
Low Speed Scanning
Sample Copy
Clear All
Interrupt
Stop Copy
Media cut buttons
Reduce/Enlarge Presets
Roll 2
88 +
Ordinary
Tracing
Film Standard (Landscape F)
Roll 3/Tray 3
88 +
Ordinary
Tracing
Film Synchronized
Tray 4/Tray 4
88 +
Ordinary
Tracing
Film Variable Length Start Stop Document
Reduce/Enlarge by L&W
Tray 5 (Manual Feed)
Manual Mode
Auto Mode
Refer to "1.14 Cutting Roll Media" for further more details on this function.
Selecting the Reduction/Enlargement Settings
The Reduction/Enlargement (R/E) settings determine the percentage of the document size that the copy will be printed. The R/E settings must be selected when copying in the manual mode. The following selections are available.
• 100% Copies the document full size.
- Reduce/Enlarge Enables any one of the six R/E presets to be selected. Presets
- Variable Copies the document at a specified percentage in a range from 25% to 400% .
- Reduce/Enlarge Changes the length and width that are to be used for the copy. by L&W
The reduction and enlargement settings must be made on the setup screens when the key, the key, or the key is pressed.
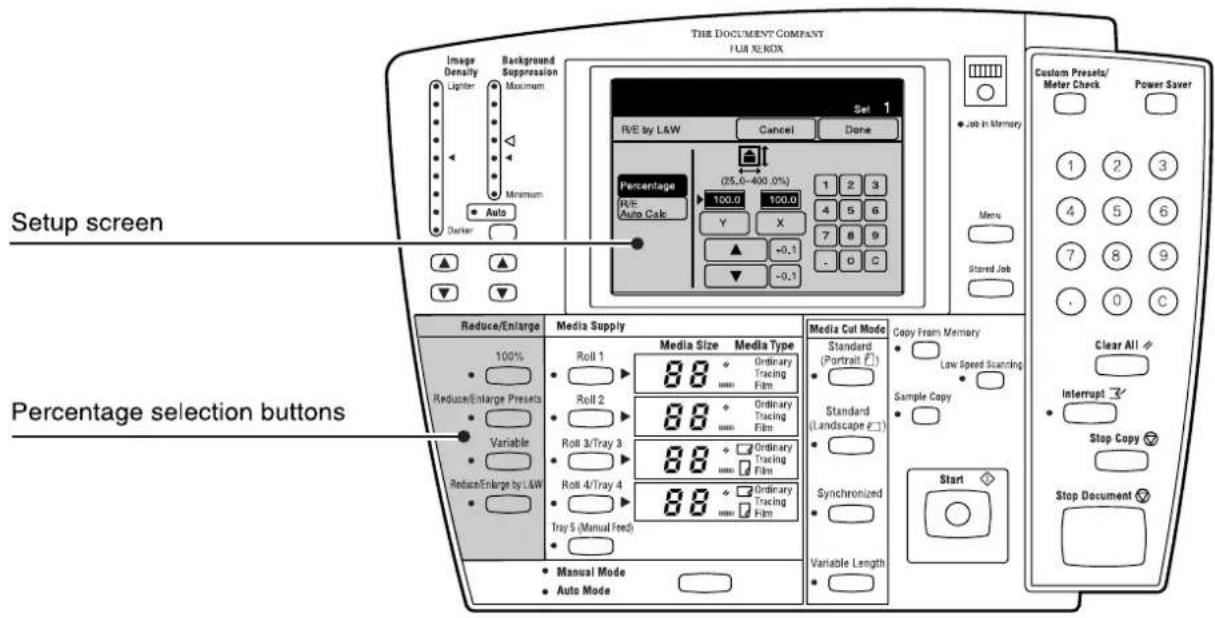
text_image
THE DOCUMENT COMPANY
FUI REMOX
Image
Density
Ligiter
Background
Suppression
Maximum
Minimum
Auto
Carrier
Set 1
R/E by L&W
Cancel
Done
Percentage
(25.0-400.0%)
R/E-
Auto Calc
100.0
100.0
Y
X
7
8
9
▲
+0,1
-0,1
● Job in Memory
Menu
Stored Job
Custom Presets/
Meter Check
Power Saver
1
2
3
4
5
6
7
8
9
0
C
Setup screen
Reduce/Enlarge Media Supply Media Cut Mode Copy From Memory
100%
Roll 1 Media Size Media Type Standard Low Speed Scanning
Roll 2 Ordinary Tracing Film Sample Copy
Roll 3/Tray 3 Ordinary Tracing Film (Landscape 2)
Roll 4/Tray 4 Ordinary Tracing Film
Tray 5 (Manual Feed) Synchronized
Manual Mode Ordinary Tracing Film Variable Length
● Reduce/Enlarge Presets Variable
○ Reduce/Enlarge by L&W
○ Reduce/Enlarge Pressets Variable
○ Reduce/Enlarge by L&W
○ Reduce/Enlarge by L&W
○ Reduce/Enlarge by L&W
○ Reduce/Enlarge by L&W
○ Reduce/Enlarge by L&W
○ Reduce/Enlarge by L&W
○ Reduce/Enlarge by L&W
○ Reduce/Enlarge by L&W
○ Reduce/Enlarge by L&W
○ Reduce/Enlarge by L&W
○ Reduce/Enlarge by L&W
○ Reduce/Enlarge by L&W
○ Reduce/Enlarge by L&W
○ Reduce /Enlarge by L&W
○ Reduce /Enlarge by L&W
○ Reduce /Enlarge by L&W
○ Reduce /Enlarge by L&W
○ Reduce /Enlarge by L&W
○ Reduce /Enlarge by L&W
○ Reduce /Enlarge by L&W
○ Reduce /Enlarge by L&W
○ Reduce /Enlarge by L&W
○ Reduce /Enlarge by L&W
○ Reduce /Enlarge by L&W
○ Reduce /Enlarge by L&W
○ Reduce /Enlarge by L&Ay
○ Reduce /Enlarge by L&W
○ Reduce /Enlarge by L&W
○ Reduce /Enlarge by L&W
○ Reduce /Enlarge by L&W
○ Reduce /Enlarge by L&W
○ Reduce /Enlarge by L&W
○ Reduce /Enlarge by L&W
○ Reduce /Enlarge by L&W
○ Reduce /Enlarge by L&W
○ Reduce /Enlarge by L&W
○ Reduce /Enlarge by L&W
○ Reduce /Enlarge by L&W
○ Reduce : Enable to be used in the setup screen.
○ Reduce : Enable to be used in the percentage selection buttons.
○ Reduce : Enable to be used in the percentage selection buttons.
○ Reduce : Enable to be used in the percentage selection buttons.
○ Reduce : Enable to be used in the percentage selection buttons.
○ Reduce : Enable to be used in the percentage selection buttons.
○ Reduce : Enable to be used in the percentage selection buttons.
○ Reduce : Enable to be used in the percentage selection buttons.
○ Reduce : Enable to be used in the percentage selection buttons.
○ Reduce : Enable to be used as manual mode.
○ Reduce : Enable to be used as auto mode.
○ Reduce : Enable to be used as manual mode.
○ Reduce : Enable to be used as auto mode.
○ Reduce : Enable to be used as manual mode.
○ Reduce : Enable to be used as auto mode.
○ Reduce : Enable to be used as manual mode.
○ Reduce : Enable to be used as auto mode.
○ Reduce : Enable to be used as manual mode.
○ Reduce : Enable to be used as auto mode.
○ Reduce : Enable to be used as manual mode.
Refer to "3.5 Reduction and Enlargement" for more details on this function.
Select the media source when copying in the manual mode.
Note
Only single copies can be made for media types other than A3 and A4 when using the manual feed function. Also, the folder function cannot be used.
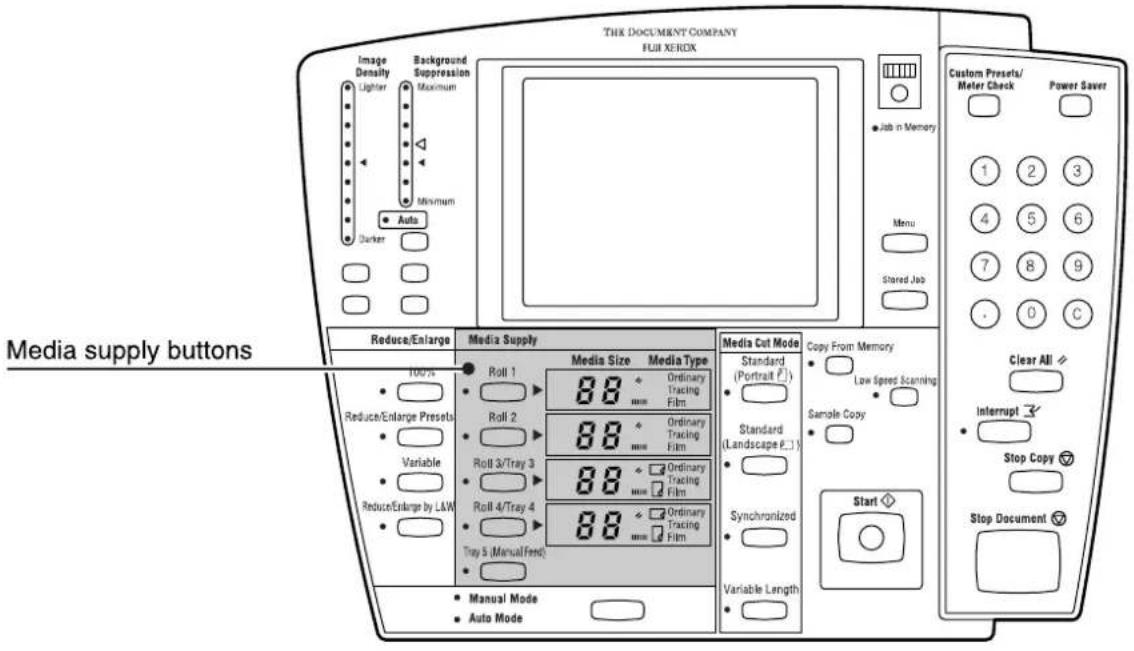
text_image
THE DOCUMENT COMPANY
FUJ XEROX
Image
Density
Lighter
Maximum
Minimum
Auto
Darker
Media Supply buttons
Media Supples
Reduce/Enlarge
100%
Reduce/Enlarge Presets
Variable
Reduce/Enlarge by LLM
Media Supply
Roll 1
88
Ordinary
Tracing
Film
Roll 2
88
Ordinary
Tracing
Film
Roll 3/Tray 3
88
Ordinary
Tracing
Film
Roll 4/Tray 4
88
Ordinary
Tracing
Film
Tray 5 (Manual/Fend)
88
Copy From Memory
Standard
(Portraft P.1)
Standard
(Landscape P.1)
Sample Copy
Synchronized
Variable Length
Custom Presets/
Meter Check
Power Savet
1 2 3
4 5 6
7 8 9
. 0 C
Clear All
Interrupt 3
Stop Copy 7
Stop Document 7
Refer to
Refer to "3.6 Selecting the Media Supply" in this manual for further more details on this function.
It is possible to interrupt large copying jobs when a high priority copy must be made. The settings for the interrupted job are retained until the interruption job is finished.
Note
- The following are not possible during interruption copying.
- Interruptions by other copying jobs.
- key operations.
- Sorted output and multi-jobs.
Procedure
1 Press the key on the control panel.
The [Interrupt] lamp will illuminate and the job that is in process will be suspended.
Note
An "interruption reservation status" goes into effect if the interruption job cannot be processed immediately.
2 Make the required copy settings (R/E, background suppression, image density, etc.) for the new copy job.
3 Enter the copy quantity (1 to 99) on the keypad.
4 Insert the document in the scanner face down, with the edge aligned with the document insertion guide. The document will scan.
5 When the interruption job is finished, press the key again. The interruption mode will be cancelled and processing of the suspended job will resume.
Note
If you forget to cancel the interruption mode, it will be canceled automatically after a preset period elapses during which no copies are made.
The [Copy from Memory] function enables the user to reprint the most recently copied document. If the most recent job involved collation, a complete set of sorted copies will reprint.
[Copy from Memory] can not be used under the following conditions.
- The key is pressed.
- The latest image no longer remains in the memory because too much time has elapsed and the machine has reverted to the default copy settings.
• The power is switched off.
- The power saver mode is active.
- A new document is inserted.
- The machine is in the scanner mode.
- Interruption copying is being performed.
- The key is pressed.
- The scanned image exceeds the installed memory capacity.
Note
- The media cut method cannot be changed when copying from memory.
- The copy from memory function and the sample copy function cannot be used at the same time.
- Copying from memory is not possible when sorted program copying or multi-job copying has been performed.
- If the Clear All key is pressed while copying from memory, the copy from memory settings will be retained. The settings will not revert to the copy defaults which are set up using the custom presets.
Procedure
1 Press the key on the control panel.
The [Copy from Memory] screen will display.

text_image
Ready to make copy from memory.
Set 1
Copy from Memory
The last output copy can be re-printed.
To change the number of sets, enter the value using the numeric keypad.
To change the setup, press [Change Setup].
Press [Start] to copy from memory.
To stop, press [Copy from Memory] again.
Change Setup
2 Press [Change Setup] if you need to change the copy settings.
Note
On the 6030/6050 Wide Format Copier/Printer, the key will not be displayed unless the optional Scan & Function Extension Set is installed.
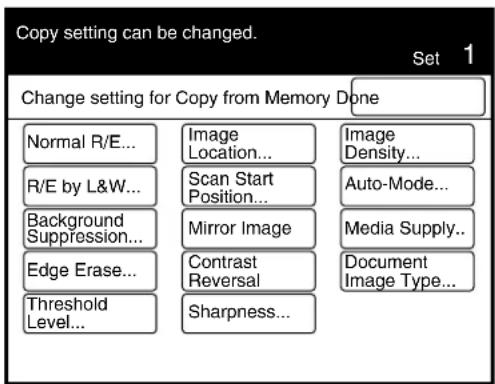
flowchart
graph TD
    A["Change setting for Copy from Memory Done"] --> B["Normal R/E..."]
    A --> C["Image Location..."]
    A --> D["Image Density..."]
    B --> E["R/E by L&W..."]
    C --> F["Scan Start Position..."]
    D --> G["Auto-Mode..."]
    E --> H["Background Suppression..."]
    F --> I["Mirror Image"]
    G --> J["Media Supply..."]
    H --> K["Edge Erase..."]
    I --> L["Contrast Reversal"]
    J --> M["Document Image Type..."]
    K --> N["Threshold Level..."]
    L --> O["Sharpness..."]
3 Enter the copy quantity (1 to 99) on the keypad.
4 Press the key.
The machine will start and the most recent copy will print.
5 Press the key again when the job is finished to cancel the [Copy from Memory] mode.
Note
If you forget to cancel the [Copy from Memory] mode, it will be automatically cancel after a preset period of time elapses during which no copies are made.
The Sample Copy feature enables users to evaluate the effects on copy quality of selecting different copy settings.
The area to be copied can be set as well. It is possible to change the enlarge/reduce settings, the image density, the image type and all other settings for this area of the document by selecting [Part Output] when the [Output Range Setting] button has been selected.
It is also possible to view only the nine different levels of density of the selected area of the image by selecting [Part Output (Density)] when the [Output Range Setting] button has been selected.
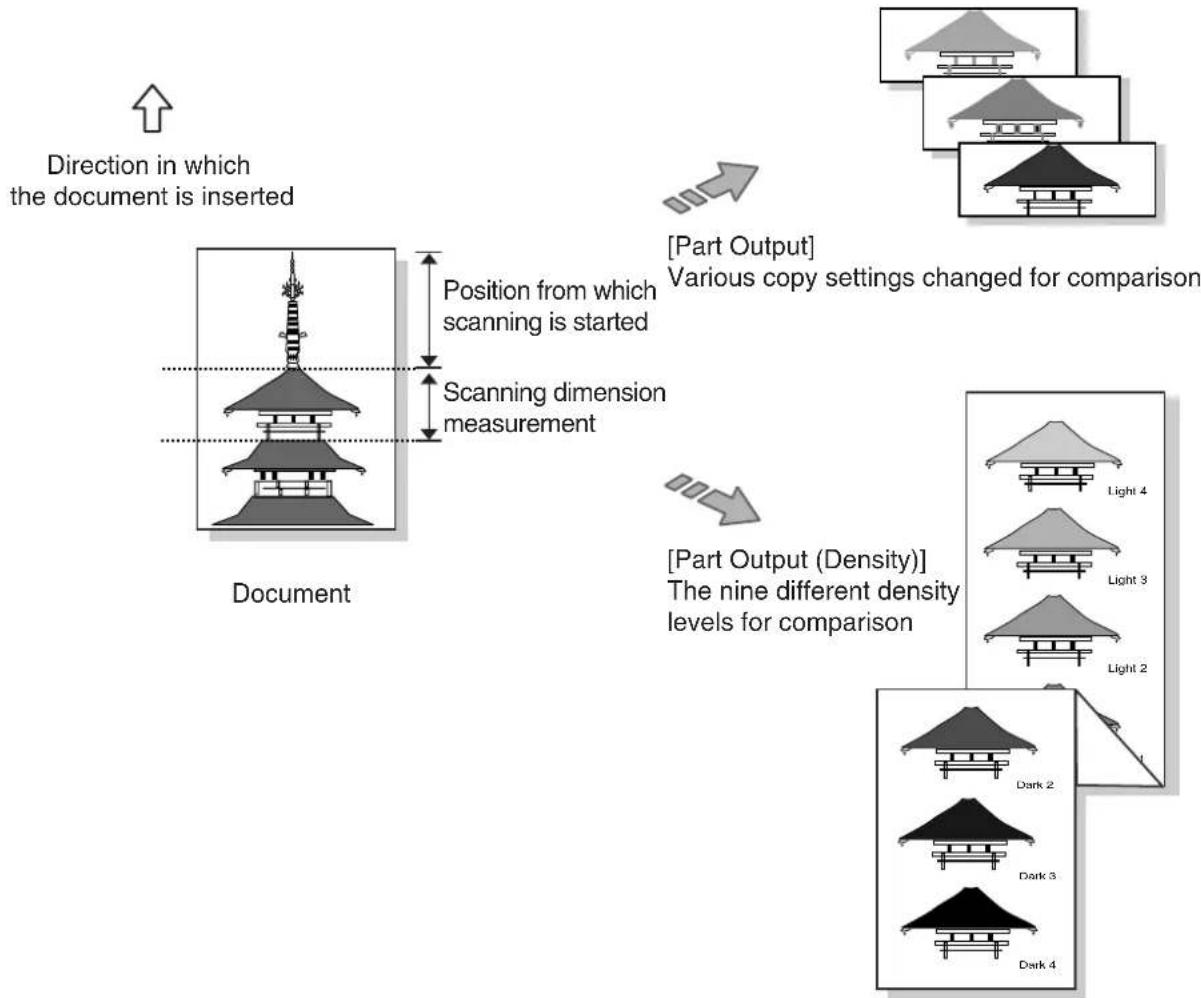
flowchart
graph TD
    A["Document"] --> B["Direction in which the document is inserted"]
    B --> C["Position from which scanning is started"]
    C --> D["Scanning dimension measurement"]
    D --> E["[Part Output"] Various copy settings changed for comparison]
    E --> F["[Part Output (Density)"] The nine different density levels for comparison]
Procedure
1 Press the key on the control panel.
The [Sample Copy] screen will display.

text_image
Ready to Sample Copy.
Sample Copy
To change setup, press [Change Setup].
To change the print image range,
press [Output Range Setting] button.
To cancel sample copy,
press [Sample Copy] button again.
Change
Setup...
Output Range
Setting...
2 Press the [Output Range Setting] button to define the output range, that is, the section of the copy that will be printed using the new copy settings. Press the [Change Setup] button to set up the copy features.
When the [Output Range Setting] button is pressed.
The [Sample Copy Output Range Setting] screen will display.

text_image
Ready to Sample Copy.
Sample Copy
Output Range Setting
Cancel
Done
Part Output
Part Output
(Density)
Start Position
(0 ~ 1200)
0 mm
Measurement
(50 ~ 200)
50 mm
▲ +100
▼ -100
Select either [Part Output] or [Part Output (Density)]. Then, set up the start position and the measurement value with the use of the [▲ and [ ]▼ buttons.
Note Press the [+100] or [-100] buttons to change the value in increments of 100 mm.

The [Sample Copy Change Setup] screen will display.
![XEROX 6030 - When the [Change Setup] button is pressed - 1](/content/2026/05/1061283/images/a33729c41a7b137d7b5bc79dbebc63bf3b361ae5848dede0e49a832b770f67e4.jpg)
text_image
Copy setting can be changed.
Sample Copy Change Setup Done
Normal R/E...
R/E by L&W... Auto-
Media Cut Mode...
Media Supply...
Document Image Type...
-Mode...
Background Suppression...
Threshold Level...
Mirror Image
Contrast Reversal
Sharpness...
Image Density...
Set up each of the required functions.
Refer to "3.1 Overview" in this manual for more details on these functions.
3 Insert the document in the scanner face down, and with the edge aligned with the document insertion guide. The document will scan.
4 Press the key. A sample copy which includes the selected settings will print.
5 Repeat steps 1 through 4 to print additional sample copies.
Note The sample copy mode is canceled every time a sample copy is printed. To print additional sample copies, press the key again and make the necessary setting adjustments.
6 Once the desired copy quality is achieved, press the key to print the document again. The changed settings will be applied to the entire image.
Refer to "2.4 Copying from Memory" in this manual for more details on how to copy from the memory.
Chapter 3
Copy Features
3.1 Overview
The 6030/6050 Wide Format Copier/Printer has the following copy features.
| Function Description |
| Auto-Mode copying | Sets up the automatic copying mode. |
| Document Image Type | Enables the user to select the image type that best matches the original, for example, [Line], [Photo], [Line (Diazo)]. Helps ensure optimal copy quality. |
| Sharpness Adjusts the sharpness of image outlines. |
| Normal R/E Enlarges and reduces images. |
| R/E by L&W Enables the user simultaneously to apply different length and width reduction and/or enlargement settings to an image. |
| Media Supply Selects the roll to use for copying (or the manual feeder). |
| Media Cut Mode Enables the user to select the cutting method for roll media. |
| Image density Adjusts the copy density. |
| Background Suppression | Suppresses background and noise which may be present on originals which consist largely of lines and text. |
| Image Location Moves the location of the image on the copy when folding and other functions are to be applied. |
| Edge Erase Erases unwanted detail which may be present on the outside edges of originals. |
| Scan Start Position Changes the location on an original where the scanner begins to collect and transmit image information. |
| Mirror Image Inverts the image of the original as if reflected in a mirror. |
| Contrast Reversal Reverses the black and white contrast levels of an original, much like a photographic negative. |
| Threshold Level Assigns black or white values to gray scale shades on the document. |
| E-Sorter | Sorts the image data from multiple scanned originals for collation purposes. |
| Multi-Job | Sorts copies for multiple stored jobs. |

Refer to "Default Copy Features" in "5.3 Setting up the Copy Features" for more details on the factory default settings.
The auto-mode allows you to automatically reduce or enlarge an original based on the entries in the media mapping table. The media mapping table is a matrix that specifies which media size will be selected when a standard size original is copied. For example, a media mapping table may specify that ARCH D originals will be copied on ARCH B media. In this case, the ARCH D original will be reduced and printed automatically on ARCH B media, without the user having to enter a reduction percentage. The media mapping table is created using the custom presets.
Note
- The [Media Supply], [Normal R/E], and [R/E by L&W] settings are invalid when the auto mode is selected.
- The [Media Cut Mode] and [Variable Length] settings cannot be used in combination when in the auto mode.
Refer to
- Refer to "Media Type for Auto Mode" in "5.3 Setting up the Copy Features" for details on the custom presets.
- Refer to "1.14 Cutting Roll Media" for details on the media cut mode.
The following restrictions apply to making copies in the auto mode. These restrictions are based on the media cut mode that is specified for various media sizes.
| Media Series | Media Cut Restrictions |
| ANSI series | Portrait No restrictions. |
| Landscape | Document size: E cannot be selected.Media size: E cannot be set up. |
| Synchronized Media size: A cannot be set up. |
| ARCH series | Portrait No restrictions. |
| Landscape | Document size: E cannot be selected.Media size: E cannot be set up. |
| Synchronized Media size: A cannot be set up. |
| ISOA series | Portrait No restrictions. |
| Landscape | Document size: A0 cannot be selected.Media size: A0 cannot be set up. |
| Synchronized Media size: A4 cannot be set up. |
| Special A series | Portrait | SP. A-3 cannot be set up as the media size when Auto Image Rotate is set to [Off].No restrictions for the media size when Auto Image Rotate is set to [On]. |
| Landscape | SP. A-0 cannot be set up as the document size.SP. A-0 cannot be set up as the media size. |
| Synchronized | SP. A-3 and SP A-4 cannot be set up as the media size. |
Procedure
1 Select the [Auto-Mode] tab from the copier's menu screen.
Note
The same operation can be performed by pressing the key on the control panel.
The [Auto-Mode] screen will display.
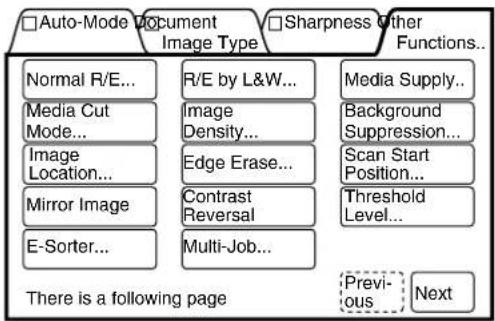
flowchart
graph TD
    A["□ Auto-Mode Document Image Type"] --> B["Normal R/E..."]
    A --> C["Media Cut Mode..."]
    A --> D["Image Location..."]
    A --> E["Mirror Image"]
    A --> F["E-Sorter..."]
    G["□ Sharpness Other Functions..."] --> H["R/E by L&W..."]
    G --> I["Image Density..."]
    G --> J["Edge Erase..."]
    G --> K["Contrast Reversal"]
    G --> L["Multi-Job..."]
    M["Media Supply..."] --> N["Background Suppression..."]
    M --> O["Scan Start Position..."]
    M --> P["Threshold Level..."]
    Q["There is a following page"] --> R["Previous"]
    Q --> S["Next"]
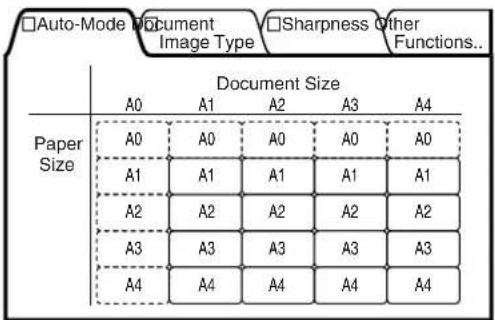
text_image
□Auto-Mode Document Image Type □Sharpness Other Functions...
Document Size
A0 A1 A2 A3 A4
Paper Size
A0 A0 A0 A0 A0
A1 A1 A1 A1 A1
A2 A2 A2 A2 A2
A3 A3 A3 A3 A3
A4 A4 A4 A4 A4
2 Set up the media sizes that are to correspond with the document sizes.
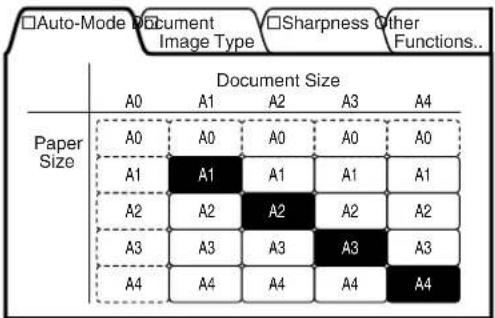
other
□Auto-Mode Document Image Type □Sharpness Other Functions..
| Paper Size | Document Size | A0 | A1 | A2 | A3 | A4 |
| :--- | :--- | :--- | :--- | :--- | :--- | :--- |
| Paper Size | A0 | A0 | A0 | A0 | A0 | A0 |
| Paper Size | A1 | A1 | A1 | A1 | A1 | A1 |
| Paper Size | A2 | A2 | A2 | A2 | A2 | A2 |
| Paper Size | A3 | A3 | A3 | A3 | A3 | A3 |
| Paper Size | A4 | A4 | A4 | A4 | A4 | A4 |
The media sizes that correspond with the document widths are set when [Synchronized] has been selected on the [Media Cut Mode] screen.
The [Auto-Mode] lamp will illuminate after the settings are made.
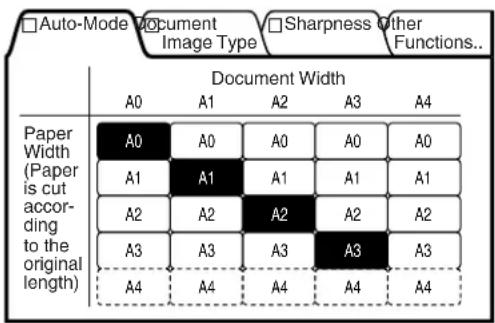
other
□Auto-Mode Document Image Type □Sharpness Other Functions..
| Paper Width (Paper is cut according to the original length) | Document WidthA0A1A2A3A4A0A0A0A0A0A1A1A1A1A1A2A2A2A2A2A3A3A3A3A3A4A4A4A4A4
Note
Either press the Manual Mode/
Auto Mode button or select
[Percentages] or [Media] to
cancel the auto mode.
The following are examples of the displays when the Special A series has been specified:
Portrait
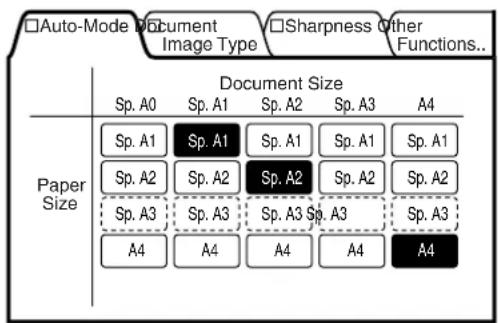
text_image
□Auto-Mode Document Image Type □Sharpness Other Functions..
Document Size
Sp. A0 Sp. A1 Sp. A2 Sp. A3 A4
Paper Size
Sp. A1 Sp. A1 Sp. A1 Sp. A1 Sp. A1
Sp. A2 Sp. A2 Sp. A2 Sp. A2 Sp. A2
Sp. A3 Sp. A3 Sp. A3 Sp. A3 Sp. A3
A4 A4 A4 A4 A4
Landscape
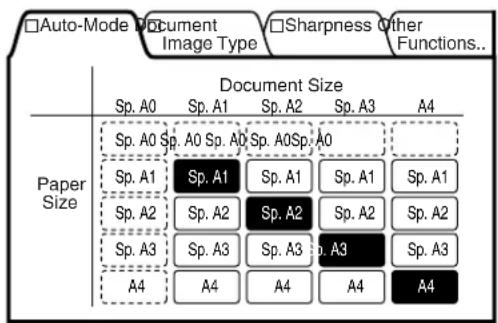
text_image
□Auto-Mode Document
Image Type □Sharpness Other
Functions..
Document Size
Sp. A0 Sp. A1 Sp. A2 Sp. A3 A4
Paper Size
Sp. A0 Sp. A0 Sp. A0 Sp. A0
Sp. A1 Sp. A1 Sp. A1 Sp. A1 Sp. A1
Sp. A2 Sp. A2 Sp. A2 Sp. A2 Sp. A2
Sp. A3 Sp. A3 Sp. A3 Sp. A3 Sp. A3
A4 A4 A4 A4 A4
Synchronized
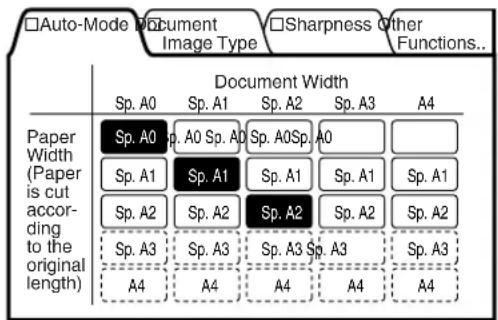
text_image
□Auto-Mode Document Image Type □Sharpness Other Functions...
Document Width
Sp. A0 Sp. A1 Sp. A2 Sp. A3 A4
Paper Width (Paper is cut according to the original length)
Sp. A0 Sp. A0 Sp. A0 Sp. A0 Sp. A0
Sp. A1 Sp. A1 Sp. A1 Sp. A1 Sp. A1
Sp. A2 Sp. A2 Sp. A2 Sp. A2 Sp. A2
Sp. A3 Sp. A3 Sp. A3 Sp. A3 Sp. A3
A4 A4 A4 A4 A4
The correct Document Image Type must be selected to ensure that copies match the appearance of the original. The available document image types are listed below.
| Line | Most suitable for documents that consist of characters and lines. Produces sharp images. |
| Line/Picture | Most suitable for documents that consist of a mixture of characters, lines, and pictures. Produces sharp characters and lines, and high levels of gradation within the pictures. |
| Picture | Most suitable for printed matter such as posters and pamphlets. Produces smooth gradation levels; suppresses moiré patterns. |
| Photo | Most suitable for photographs. Produces smooth gradation levels. |
| Line (Dark) | Most suitable for line documents with relatively dark backgrounds. Background suppression can be used to produce sharp images. |
| Line (Transparent) | Most suitable for transparent documents. Suppresses blurring around the edges of characters. |
| Line (DIAZO) | Most suitable for blueprints. |
| Line (Cut & Paste) | Most suitable for originals with drastic density changes, for example, cut and paste documents. |

- [Picture] and [Photo] cannot be selected when [Background Suppression] is set to [Auto].
- Adjust the background suppression manually if horizontal lines appear on the lead edge of the pasted document when [Line (Cut & Paste)] selected.
Procedure
1 Select the [Document Image Type] tab from the copier's menu screen.
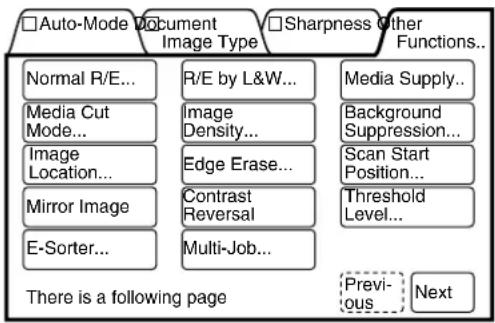
flowchart
graph TD
    A["□Auto-Mode Document Image Type"] --> B["Normal R/E..."]
    A --> C["Media Cut Mode..."]
    A --> D["Image Location..."]
    A --> E["Mirror Image"]
    A --> F["E-Sorter..."]
    G["□Sharpness Other Functions..."] --> H["Media Supply..."]
    G --> I["Background Suppression..."]
    G --> J["Scan Start Position..."]
    G --> K["Threshold Level..."]
    G --> L["Previous..."]
    G --> M["Next"]
The document image type screen will display.
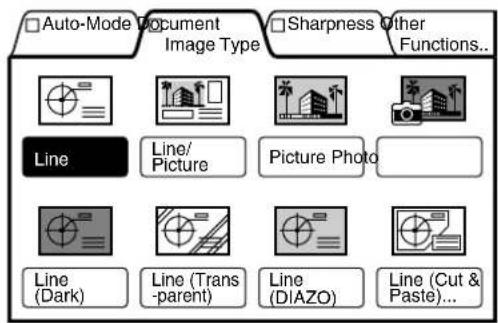
text_image
Auto-Mode Document Image Type Sharpness Other Functions...
Line Line/Picture Picture Photo
Line (Dark) Line (Trans-parent) Line (DIAZO) Line (Cut & Paste)...
2 Select the image type that best matches the document that is to be copied.
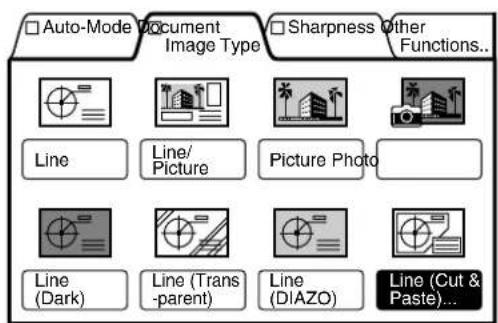
text_image
Auto-Mode Document Image Type Sharpness Other Functions...
Line Line/Picture Picture Photo
Line (Dark) Line (Trans-parent) Line (DIAZO) Line (Cut & Paste)...
3 Set up the [Cut & Paste Width] if [Line (Cut & Paste)] is selected.
Note
The value selected represents a square "sight window" that will determine if the pasted object(s) will have the background reproduced.
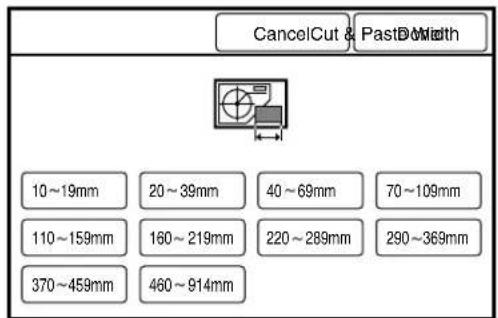
text_image
CancelCut & PastD Width
10~19mm 20~39mm 40~69mm 70~109mm
110~159mm 160~219mm 220~289mm 290~369mm
370~459mm 460~914mm
Note
- Select the proper Cut & Paste Width to remove or keep the background, as shown in the following illustrations. If Cut & Paste Width is smaller than the pasted object the background will be removed from that object but, if the width is larger than the object the background will not be removed.
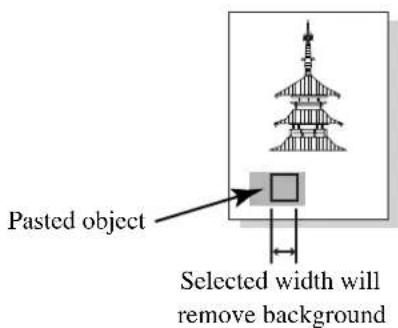
text_image
Pasted object
Selected width will
remove background
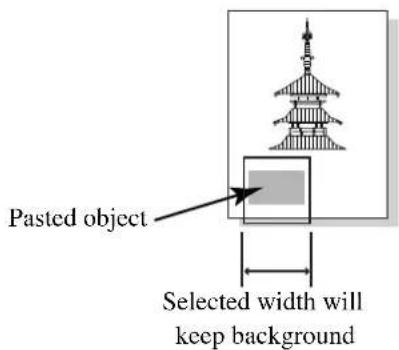
text_image
Pasted object
Selected width will
keep background
4 Press the [Done] button after the settings are made.
This function sharpens or blurs image outlines.
| Maximum | Strengthens outlines. |
| Normal | Does not adjust the strength of the outlines. |
| Minimum | Subdues outlines. |

Procedure
1 Select the [Sharpness] tab from the copier's menu screen.

flowchart
graph TD
    A["□ Auto-Mode Document Image Type"] --> B["Normal R/E..."]
    A --> C["Media Cut Mode..."]
    A --> D["Image Location..."]
    A --> E["Mirror Image"]
    A --> F["E-Sorter..."]
    G["□ Sharpness Other Functions..."] --> H["R/E by L&W..."]
    G --> I["Image Density..."]
    G --> J["Edge Erase..."]
    G --> K["Contrast Reversal"]
    G --> L["Multi-Job..."]
    M["□ Previous"] --> N["Next"]
    O["Medium Supply..."]
    P["Background Suppression..."]
    Q["Scan Start Position..."]
    R["Threshold Level..."]
The Sharpness screen will display.
2 Select the desired sharpness level from the five available options.
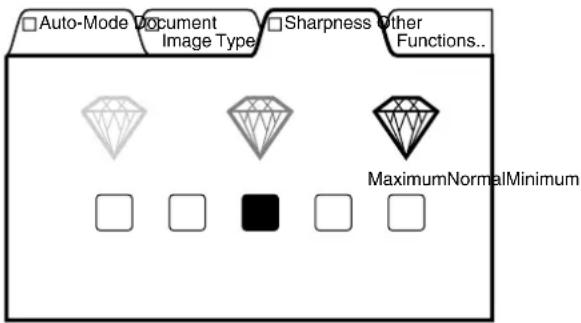
text_image
Auto-Mode Document
Image Type...
Sharpness Other
Functions..
MaximumNormalMinimum
3.5
Reduction and Enlargement
The 6030/6050 Wide Format Copier/Printer features a wide range of reduction and enlargement (R/E) options. The two main R/E categories are Normal Reduction and Enlargement (Normal R/E) and Reduction and Enlargement by Length and Width (R/E by L&W).
Copies made using the Normal R/E selections maintain the same aspect ratio as the original, that is, the ratio of the length to the width of the copy is the same as the ratio of the original. The R/E by L&W feature enables the user to set up different R/E values affecting the length and/or the width of the copy, thereby changing the aspect ratio of the copy. Examples of both Normal R/E and R/E by L&W appear in the following descriptions.
The following Normal R/E selections are available
| 100% | Produces a copy that is the same size as the original. |
| R/E Presets | Enables the user to select one of the six R/E presets. |
| Variable | Enables the user to specify an R/E percentage in a range from 25% to 400%, in increments of 0.1%. |
Note
- The manual mode will automatically activate if [Normal R/E] is selected when the machine is in the auto mode. If the auto mode is selected after the [Normal R/E] values have been set up, all settings will be invalidated
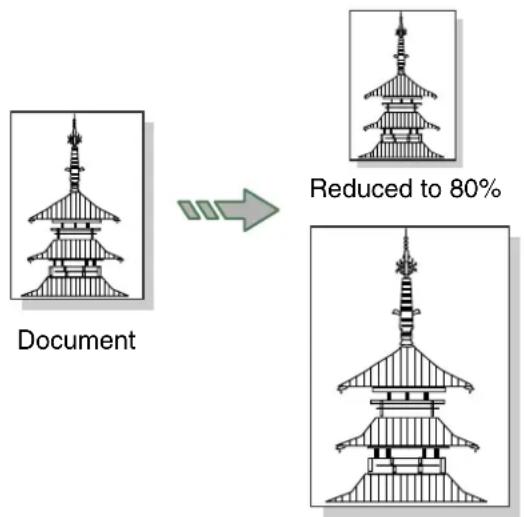
text_image
Document
Reduced to 80%
Enlarged to 150%
Procedure
1 Select [Normal R/E] from the menu screen's [Other Functions] tab.

flowchart
graph TD
    A["□ Auto-Mode Document Image Type"] --> B["Normal R/E..."]
    A --> C["R/E by L&W..."]
    A --> D["Image Density..."]
    A --> E["Image Location..."]
    A --> F["Edge Erase..."]
    A --> G["Mirror Image"]
    A --> H["Contrast Reversal"]
    A --> I["E-Sorter..."]
    A --> J["Multi-Job..."]
    K["□ Sharpness Other Functions..."] --> L["Media Supply..."]
    K --> M["Background Suppression..."]
    K --> N["Scan Start Position..."]
    K --> O["Threshold Level..."]
    P["There is a following page"] --> Q["Previous"]
    P --> R["Next"]
The [Normal R/E] screen will display.
2 Select the enlargement/reduction method from [100.0%], [R/E Presets], or [Variable].
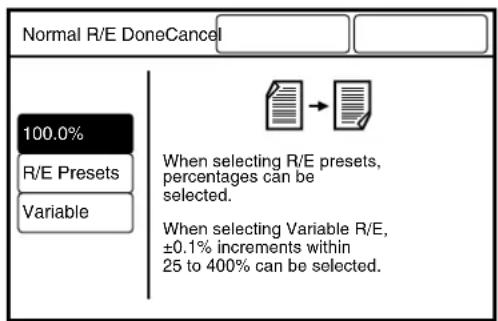
text_image
Normal R/E DoneCancel
100.0%
R/E Presets
Variable
When selecting R/E presets,
percentages can be
selected.
When selecting Variable R/E,
±0.1% increments within
25 to 400% can be selected.
When [R/E Presets] is selected
Select the required percentage from the menu buttons.
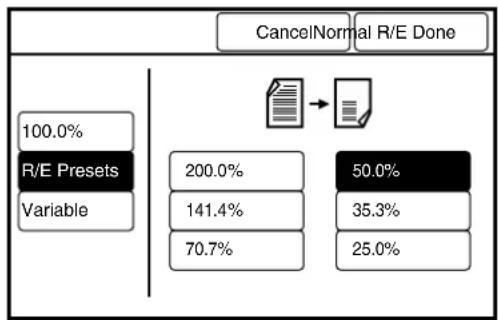
flowchart
graph TD
    A["100.0% R/E Presets Variable"] --> B["200.0%"]
    B --> C["141.4%"]
    C --> D["70.7%"]
    E["50.0%"] --> F["35.3%"]
    F --> G["25.0%"]
    H["CancelNormal R/E Done"] --> I["-->"]
When [Variable] is selected
Set the required percentage (25% to 400%) using the [▲and [ ]▼ buttons, or with the on-screen keypad.
Note Press the [+0.1] and [-0.1] buttons to increase or decrease the values in increments of 0.1%.
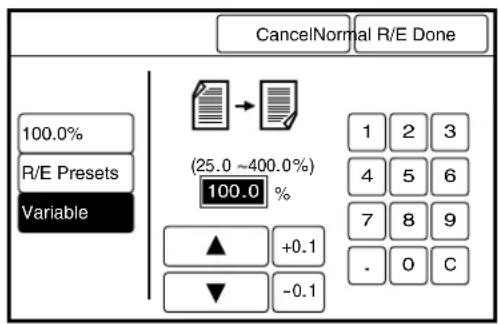
text_image
CancelNormal R/E Done
100.0%
R/E Presets
Variable
(25.0 ~400.0%)
100.0 %
▲ +0.1
▼ -0.1
1 2 3
4 5 6
7 8 9
. 0 C
3 Press the [Done] button.
The [Normal R/E] parameters will be set up, and the copier's menu screen will reappear.
The following R/E by L&W selections are available.
| Percentage | Enables the user to set up the length and width percentages in a range from 25% to 400%, in increments of 0.1%. |
| R/E Auto Calc | Specifies the length and width of the document and the length and width of the copy. The reduction or enlargement values are calculated and set up automatically in a range from 25% to 400%. |

The manual mode will activate if [R/E by L&W] is selected when copying in the auto mode. If the auto mode is selected after the [R/E by L&W] values have been set up, all settings will be invalidated.
Percentage
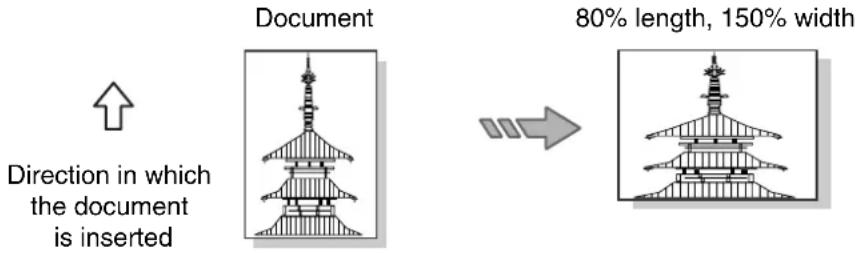
text_image
Document
Direction in which
the document
is inserted
80% length, 150% width
R/E Auto Calc
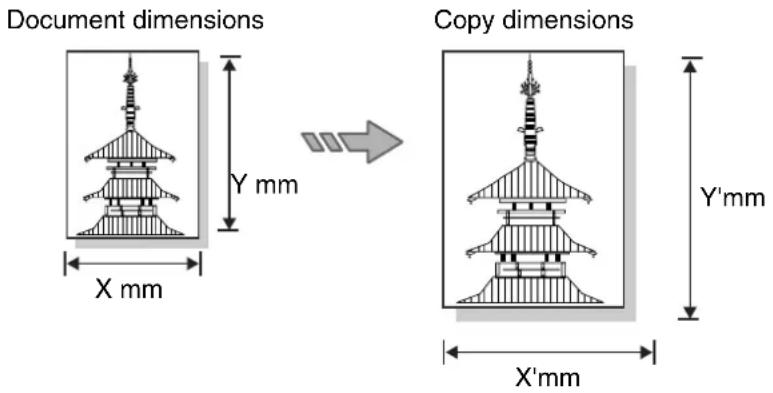
text_image
Document dimensions
X mm
Y mm
Copy dimensions
X'mm
Y'mm
Procedure
1 Select [R/E by L&W] from the menu screen's [Other Functions] tab.
The [R/E by L&W] screen will display.
2 Select the R/E by L&W method from either [Percentage] or [R/E Auto Calc].
When [Percentage] is selected
-
Press the [Y] or the [X] button to move the [▶] indicator to the field (Y or X) that is to be set up.
-
Select the required percentage (25% to 400%) using the [▲] and [▼] buttons or the on-screen keypad.
Note
Press the [+0.1] and [-0.1] buttons to increase or decrease the values in increments of 0.1%.
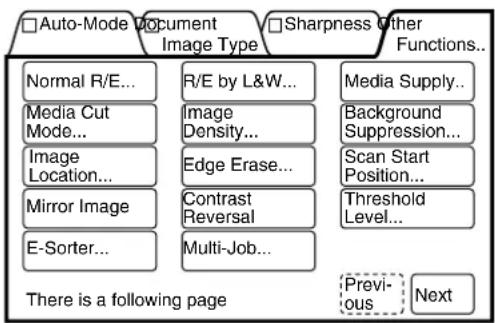
flowchart
graph TD
    A["□Auto-Mode Document Image Type"] --> B["Normal R/E..."]
    A --> C["Media Cut Mode..."]
    A --> D["Image Location..."]
    A --> E["Mirror Image"]
    A --> F["E-Sorter..."]
    G["□Sharpness Other Functions..."] --> H["R/E by L&W..."]
    G --> I["Image Density..."]
    G --> J["Edge Erase..."]
    G --> K["Contrast Reversal"]
    G --> L["Multi-Job..."]
    M["□Media Supply..."] --> N["Background Suppression..."]
    M --> O["Scan Start Position..."]
    P["Threshold Level..."] --> Q["Previous"]
    P --> R["Next"]
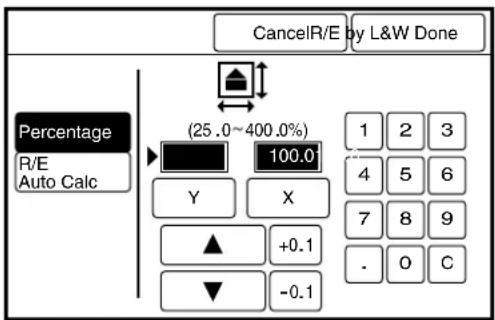
text_image
CancelR/E by L&W Done
Percentage
R/E
Auto Calc
(25.0~400.0%)
100.0
Y X
▲ +0.1
▼ -0.1
1 2 3
4 5 6
7 8 9
. 0 C
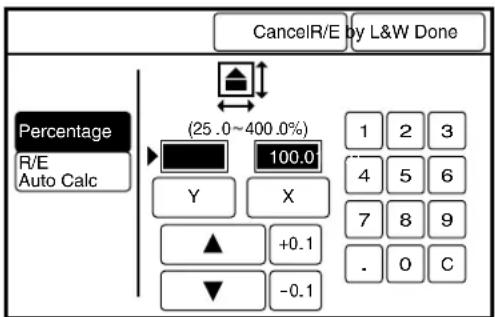
text_image
CancelR/E by L&W Done
Percentage
R/E
Auto Calc
(25.0~400.0%)
100.0
Y X
▲ +0.1
▼ -0.1
1 2 3
4 5 6
7 8 9
. 0 C
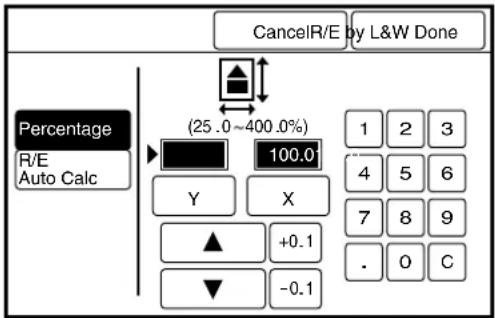
text_image
CancelR/E by L&W Done
Percentage
R/E
Auto Calc
(25.0~400.0%)
100.0
Y X
▲ +0.1
▼ -0.1
1 2 3
4 5 6
7 8 9
. 0 C

When [R/E Auto Calc] is
selected
- Move the [ ] indicator with the [Scroll] button to select the field that is to be set up.
- Enter the [Document Length] and the [Required Copy Length] values using the keypad.
The percentages will be automatically calculated and displayed at the top. The calculated results must be within a range of 25% to 400%.
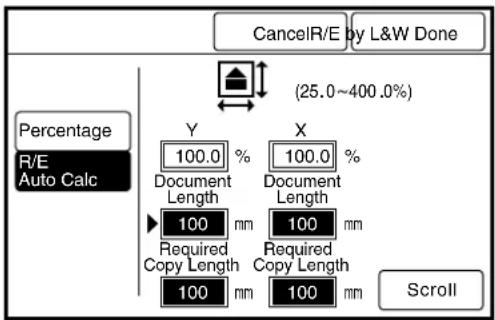
text_image
CancelR/E by L&W Done
(25.0~400.0%)
Percentage
R/E
Auto Calc
Y
100.0 %
Document
Length
100 mm
Required
Copy Length
100 mm
X
100.0 %
Document
Length
100 mm
Required
Copy Length
100 mm
Scroll
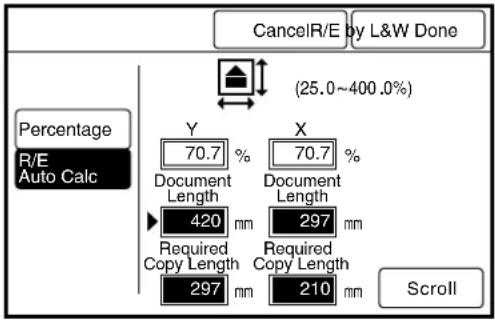
text_image
CancelR/E by L&W Done
(25.0~400.0%)
Percentage
R/E
Auto Calc
Y 70.7 %
Document Length 420 mm
Required Copy Length 297 mm
X 70.7 %
Document Length 297 mm
Required Copy Length 210 mm
Scroll
The [R/E by L&W] parameters will be set up, and the copier's menu screen will reappear.
This function selects the media supply when copying in the manual mode.
Important
The optional (MSI) Multi Sheet Inserter/Manual Feed Unit is required when making manually fed copies.
Note
- The manual mode will activate if [Media Supply] is selected when in the auto mode. If the auto mode is specified after the [Media Supply] values have been set, all settings will be invalidated.
- Only single copies can be made using the manual feeder when the media size exceeds B/A3 and A/A4.
Procedure
1 Select [Media Supply] from the menu screen's [Other Functions] tab.
The [Media Supply] screen will display.

flowchart
graph TD
    A["□ Auto-Mode Document Image Type"] --> B["Normal R/E..."]
    A --> C["Media Cut Mode..."]
    A --> D["Image Location..."]
    A --> E["Mirror Image"]
    A --> F["E-Sorter..."]
    G["□ Sharpness Other Functions..."] --> H["Media Supply..."]
    G --> I["Background Suppression..."]
    G --> J["Scan Start Position..."]
    G --> K["Threshold Level..."]
    G --> L["Previous"]
    G --> M["Next"]
    N["There is a following page"] --> A
    N --> G
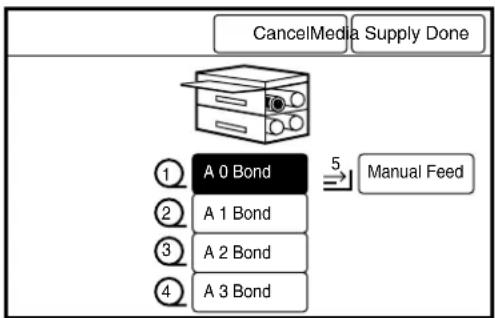
text_image
CancelMedia Supply Done
① A 0 Bond
② A 1 Bond
③ A 2 Bond
④ A 3 Bond
5 Manual Feed
2 Select the roll that is to serve as the media supply, or select [Manual Feed] is copying cut sheet media.
3 Press the [Done] button.
The [Media Supply] parameters will be set up, and the screen will return to the copier's menu screen.
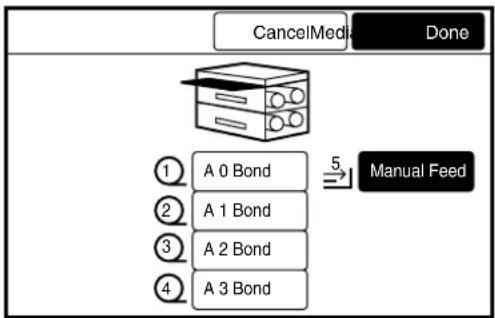
flowchart
graph TD
    A["Printer"] --> B["A 0 Bond"]
    A --> C["A 1 Bond"]
    A --> D["A 2 Bond"]
    A --> E["A 3 Bond"]
    F["Manual Feed"] --> G["5"]
    G --> H["CancelMedia Done"]
This function selects the cutting method for roll media.
| Standard | Cuts the roll media to a standard size. The direction the document is to be scanned can be selected from either [Portrait] or [Landscape]. |
| Synchronized | Cuts the roll media to the same size as the original, or to the user-specified reduction/enlargement value. The lead and trail margins also can be set up, in a range from 0 to 999 mm.210 mm is set as the cut length if the [Document Length× Copy Percentage] calculation is less than 210 mm. |
| Variable Length | Cuts the roll media to a user-specified length of between 210 mm and 15,000 mm (See [Important] below). The image on the copy will be cut off if the cut length specified by the user is too small. A blank trail margin will print if the user-specified cut length is too large. |
Note
- The [Variable Length] default values for each media size can be set up using the custom presets functions. Refer to the "Variable Length Preset" section in "5.3 Setting up the Copy Features" for further details.
- A [Variable Length] value cannot be specified when in the auto mode.
Synchronized
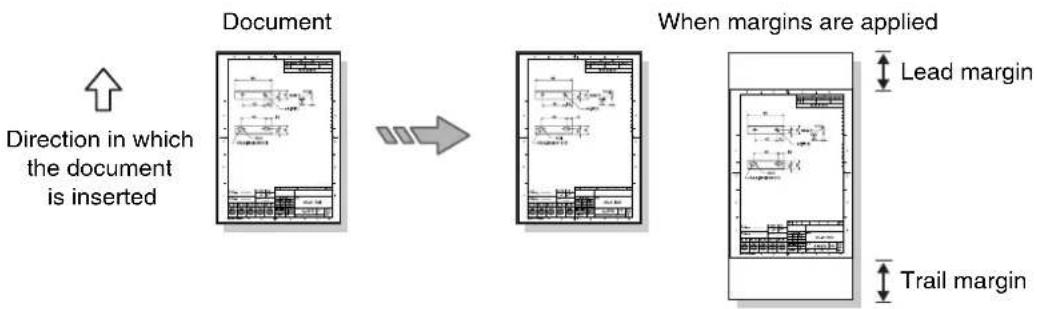
flowchart
graph LR
    A["Document"] --> B["When margins are applied"]
    B --> C["Lead margin"]
    B --> D["Trail margin"]
    style A fill:#f9f,stroke:#333
    style B fill:#ccf,stroke:#333
    style C fill:#cfc,stroke:#333
    style D fill:#fcc,stroke:#333
Variable length
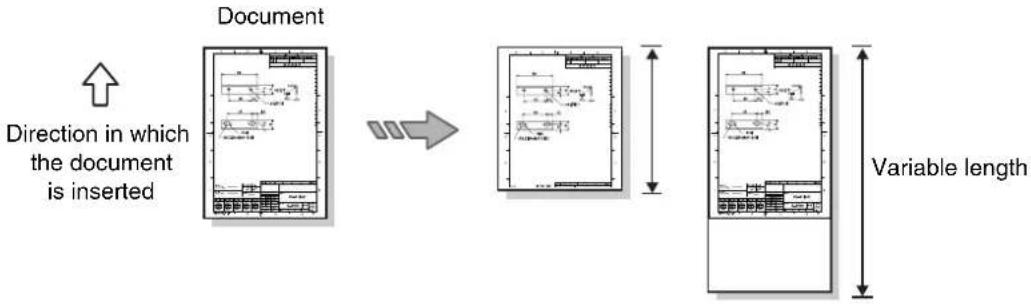
flowchart
graph LR
    A["Document"] -->|Inserted Direction| B[" Edinburgh Layout"]
    B -->|Variable Length| C[" Edinburgh Layout"]
When [Standard] is specified as the media cut method, the location of the cut is based on the width of the roll media and the direction in which the document is scanned (see the table below).
| Media Series | Roll Media | Media Direction Specification | Cut Length Media Size/Direction |
| ISO A | A0(841mm) | Portrait 1189 mm A0/Portrait | |
| Landscape 594 mm A1/Landscape | |
| A1(594mm) | Portrait 841 mm A1/Portrait | |
| Landscape 420 mm A2/Landscape | |
| A2(420mm) | Portrait 594 mm A2/Portrait | |
| Landscape 297 mm A3/Landscape | |
| A3(297mm) | Portrait 420 mm A3/Portrait | |
| Landscape 210 mm A4/Landscape | |
| ISO B (500mm) | B1(707mm) | Portrait 1000 mm B1/Portrait | |
| Landscape 500 mm B2/Landscape | |
| B2(353mm) | Portrait 707 mm B2/Portrait | |
| 353 mm B3/Landscape | |
| B3(353mm) | Portrait 500 mm B3/Portrait | |
| Landscape 250 mm B4/Landscape | |
| B4(250mm) | Portrait 353 mm B4/Portrait | |
| Landscape 176 mm N/A | |
| SP. A-1 | SP. A0(880 mm) | Portrait 1,230 mm SP. A0 (880 mm)/Portrait | |
| Landscape 625 mm SP. A1 (625 mm)/Landscape | |
| SP. A1(625 mm) | Portrait 880 mm SP. A1 (625 mm)/Portrait | |
| Landscape 440 mm SP. A2 (440 mm)/Landscape | |
| SP. A2(440 mm) | Portrait 625 mm SP. A2 (440 mm)/Portrait | |
| Landscape 312 mm SP. A3 (312 mm)/Landscape | |
| SP. A-2 | SP. A1(620 mm) | Portrait 871 mm SP. A1 (620 mm)/Portrait | |
| Landscape 435 mm SP. A2 (435 mm)/Landscape | |
| SP. A2(435 mm) | Portrait 620 mm SP. A2 (435 mm)/Portrait | |
| Landscape 310 mm SP. A3 (310 mm)/Landscape | |
| ARCH | 36" | Portrait 48" | E/Portrait |
| Landscape 36" | D/Landscape |
| 24" | Portrait 36" | D/Portrait |
| Landscape 18" | C/Landscape |
| 18" | Portrait 24" | C/Portrait |
| Landscape 12" | B/Landscape |
| 12" | Portrait 18" | B/Portrait |
| Landscape 9" | A/Landscape |
| ANSI | 34" | Portrait 44" E/Portrait | |
| Landscape 34" D/Landscape | |
| 22" | Portrait 34" D/Portrait | |
| Landscape 17" C/Landscape | |
| 17" | Portrait 22" C/Portrait | |
| Landscape 11" B/Landscape | |
| 11" | Portrait 17" B/Portrait | |
| Landscape 8.5" A/Landscape | |
| ARCH-30 Landscape 18" D/ | E30 (30") | Portrait 42" E/Portrait | |
| Landscape N/A N/A | |
| D (24") | Portrait 36" D/Portrait | |
| Landscape | |
| C (18") | Portrait 24" C/Portrait | |
| Landscape 12" C/Landscape | |
| B (12") | Portrait 18" B/Portrait | |
| Landscape 9" B/Landscape | |
Procedure
1 Select [Media Cut Mode] from the menu screen's [Other Functions] tab.

flowchart
graph TD
    A["□ Auto-Mode Document Image Type"] --> B["Normal R/E..."]
    A --> C["R/E by L&W..."]
    A --> D["Image Density..."]
    A --> E["Edge Erase..."]
    A --> F["Contrast Reversal"]
    A --> G["E-Sorter..."]
    A --> H["Multi-Job..."]
    I["□ Sharpness Other Functions..."] --> J["Media Supply..."]
    I --> K["Background Suppression..."]
    I --> L["Scan Start Position..."]
    I --> M["Threshold Level..."]
    N["There is a following page"] --> O["Previous Next"]
The [Media Cut Mode] screen will display.
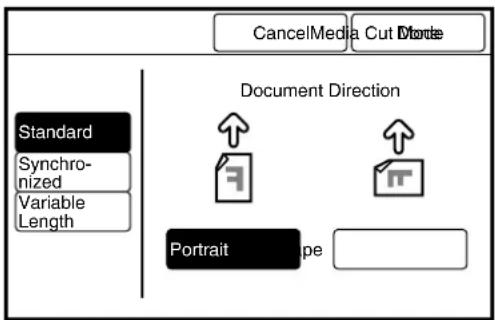
text_image
CancelMedia Cut Disorder
Standard
Synchronized
Variable Length
Document Direction
↑
Document Direction
↑
Portrait
Pe
2 Select the media cut mode from [Standard], [Synchronized], or [Variable Length].
When [Standard] is selected
Select the direction in which the document will scanned from either [Portrait] or [Landscape].
Refer to Refer to the table on the previous page for details on the various media sizes selections.
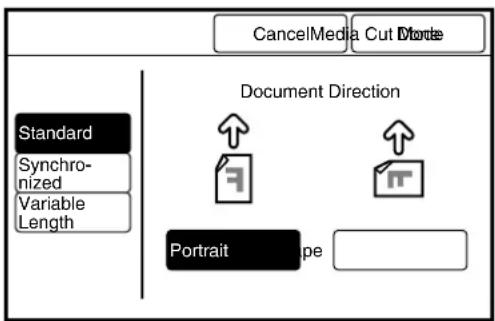
text_image
CancelMedia Cut Window
Standard
Synchronized
Variable Length
Document Direction
↑
Document Direction
↑
Portraite
ape
When [Synchronized] is selected
Set up the lead and trail margin values (0 to 999 mm) using the [▲and [ ]▼buttons.
Note Press the [+100] or [-100] buttons to change the value in increments of 100.
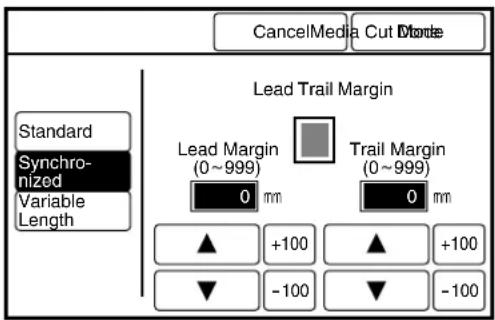
text_image
CancelMedia Cut Monte
Standard
Synchronized
Variable Length
Lead Trail Margin
Lead Margin (0~999)
0 mm
Trail Margin (0~999)
0 mm
▲ +100
▲ +100
▼ -100
▼ -100

When [Variable Length] is selected
Set up the variable length value (210 to 15,000 mm) using either the [▲and [ ]▼buttons or the [0] to [9] buttons on the on-screen keypad.
Note
Press the [+100] or [-100] buttons to change the value in increments of 100.
![XEROX 6030 - When [Variable Length] is selected - 1](/content/2026/05/1061283/images/826160aee2fc2478eae111ba1037236f1dace5234d5a026dab56a3413daef15a.jpg)
text_image
CancelMedia Cut Mode Done
Standard
Synchronized
Variable Length
(210 ~ 15000)
210 mm
▲ +100
▼ -100
1 2 3
4 5 6
7 8 9
0 C
The [Media Cut Mode] parameters will be set up, and the screen will return to the copier's menu screen.
Adjusts the density (lightness/darkness) of the copy. The density can be selected from nine levels, minimum to maximum.
![XEROX 6030 - Press the [Done] button. - 1](/content/2026/05/1061283/images/8ff73bd3e216774c37c1882f3e54c3533dd700bc0e259cfa6a82b147130bc5a6.jpg)
Procedure
1 Select [Image Density] on the menu screen's [Other Functions] tab.

flowchart
graph TD
    A["□Auto-Mode Document Image Type"] --> B["Normal R/E..."]
    A --> C["Media Cut Mode..."]
    A --> D["Image Location..."]
    A --> E["Mirror Image"]
    A --> F["E-Sorter..."]
    G["□Sharpness Other Functions..."] --> H["R/E by L&W..."]
    G --> I["Image Density..."]
    G --> J["Edge Erase..."]
    G --> K["Contrast Reversal"]
    G --> L["Multi-Job..."]
    M["Media Supply..."] --> N["Background Suppression..."]
    M --> O["Scan Start Position..."]
    M --> P["Threshold Level..."]
    Q["There is a following page"] --> R["Previous"]
    Q --> S["Next"]
The [Image Density] screen will display.

The Image Density also can be set up using the image density keys on the copier control panel.
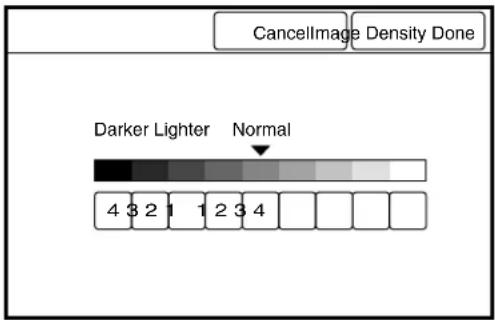
text_image
CancellImage Density Done
Darker Lighter Normal
4 3 2 1 1 2 3 4
2 Select the image density from the nine available levels.
Move the [▼mark to the required density setting.
3 Press the [Done] button. The copier's menu screen will reappear.
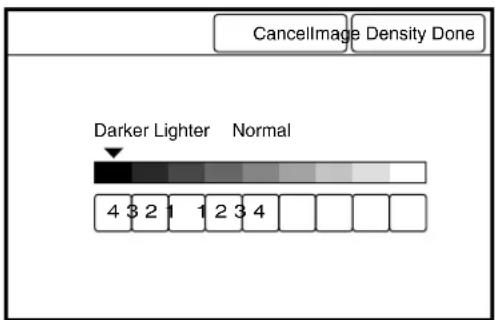
text_image
CancellImage Density Done
Darker Lighter Normal
4 3 2 1 1 2 3 4
Background suppression subdues or removes unwanted detail (noise, background) from copies. The larger the value specified, the more the background is suppressed; the smaller the value specified, the less the background is suppressed.
| Auto Adjustment | Enables the suppression level to be selected from seven settings between [Minimum] and [Maximum]. |
| Manual Adjustment | Enables the suppression level to be selected from thirty-nine settings between [Minimum] and [Maximum]. This method allows for fine adjustments to be made when the difference between the document's image area and the background is small. |
Note
The background level is sometimes difficult to detect automatically. For more information, refer to the next section, "Using [Background Suppression]."
Example of an image, such as a blueprint, in which the entire background has been erased uniformly.
text_image
M6V0.7
1.5
A B C B0.2
1.6
C2040
12
R8(2)
12.2(2)
23.6
-0.5
41.6以下
16.1
3.4
1.2
1.4(2)
3.8(2)
12.2(2)
自632.2×4×2×12*19.6(2)
中 A B C 0.5
XE-A (A4)
K1234
A4
Example of an image in which the dark areas in the background of a document have been erased.

text_image
95
40 13
R2以下
9.20
c4.28(2)
46 10
10 16
R(4)
孔5.528(夹骨12(2))
X6-B (A4)
X6-678
A4
B
C
D
E
F
G
H
I
J
K
L
M
N
O
P
Q
R
S
T
U
V
W
X
Y
Z
A
B
C
D
E
F
G
H
I
J
K
L
M
N
O
P
Q
R
S
T
U
V
W
X
Y
Z


text_image
M4X0.7
A B C 60.7
1.2
2.4,3
1.2(2)
3.6(2)
1.2(2)
1.2(2)
1.2(2)
C2540
28(2)
12-2(2)
23.6
(6.2)×高さ(2.0,5/2)
A B C 0.5
R1 6/2 下
16.1
A B C 0.5
X1234
X6-A (A4)
text_image
66
40 13
R225
φ4.28(2)
46 10
R(4)
中5.528×英寸12(2)
X7-B (A4)
X-5676
A4
Using [Background Suppression]
Background Suppression technology detects the background level of originals that consist of text and lines. When a dark background is selected as the [Document Image Type], image loss may occur when copying a normal-to-light density document.
■ Background may not be suppressed in the following cases. Use manual adjustment instead.
- The document background is extremely dark.
- The document is torn or contains holes.
■ Use manual adjustment when the following are observed.
- The lead edge of the copy becomes blurred.
- Image loss occurs.
- The background is not completely suppressed.
■ [Auto] adjustment of [Background Suppression] cannot be used when [Picture] or [Photo] is selected as the [Document Image Type].
■ Use manual adjustment for the following.
- Complex color documents or photos and posters.
- Documents with light colored horizontal line(s) or light color strings of text. Line/text length: Half of the document width.
Line/text width: 1mm or more (excluding cases where the line/text density is dark)
- The document has a low-density frame.
The low-density edge may be detected as the background. As a consequence, the edges and ambient images are erased, or the background is not suppressed.
- High line density documents such as maps. These documents may have more lines than background. The high density area may be detected as the background to be suppressed.
Note
Although this function also can be performed using the Background Suppression keys on the copier control panel, the menu screen provides significantly more adjustment steps.
Procedure
1 Select [Background Suppression] on the menu screen's [Other Functions] tab.
The [Background Suppression] screen will display.
To select automatic adjustment
- Select the background suppression level from the seven available settings.
To select manual adjustment
-
Press the [Auto] button.
The Manual Adjustment screen will display.
-
Select the background suppression level from the thirty-nine available settings.
Press one of the seven [▲] marks to set the initial suppression level, and then use the [◀] and [ ]▶ buttons to make the fine adjustments.
2 Press the [Done] button.
The [Background Suppression]
parameter will be set up, and the
screen will return to the copier's
menu screen.

flowchart
graph TD
    A["□ Auto-Mode Document Image Type"] --> B["Normal R/E..."]
    A --> C["Media Cut Mode..."]
    A --> D["Image Location..."]
    A --> E["Mirror Image"]
    A --> F["E-Sorter..."]
    G["□ Sharpness Other Functions..."] --> H["R/E by L&W..."]
    G --> I["Image Density..."]
    G --> J["Edge Erase..."]
    G --> K["Contrast Reversal"]
    G --> L["Multi-Job..."]
    M["□ Previous Next"] --> N["Previous"]
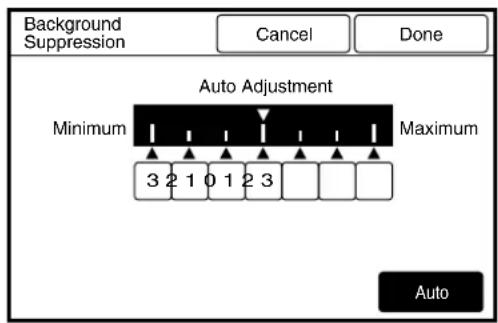
text_image
Background
Suppression
Cancel
Done
Auto Adjustment
Minimum
Maximum
3 2 1 0 1 2 3
Auto
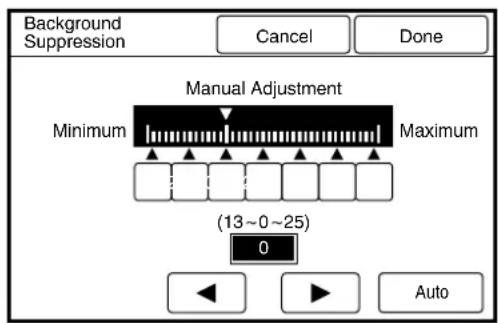
text_image
Background
Suppression
Cancel
Done
Manual Adjustment
Minimum
Maximum
(13~0~25)
0
Auto
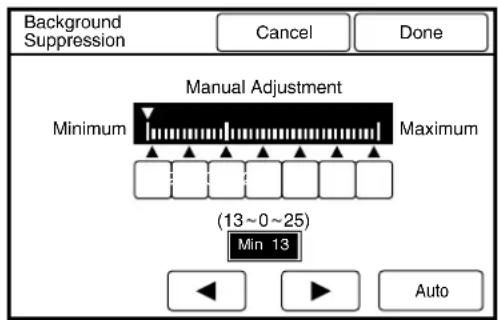
text_image
Background
Suppression
Cancel
Done
Manual Adjustment
Minimum
Maximum
(13~0~25)
Min 13
Auto
3.10 Image Location
The image location feature moves the location of the image on the copy.
| Up/Down | Moves the image up/down in a range from 0 to ± 999 mm. |
| Left/Right | Moves the image left/right in a range from 0 to ± 500 mm. |
| Centering | Centers the image on the media when the image size and the media size are not the same. |
Note
- The amount of image movement on the copy is based on the media size. It is not affected by R/E settings.
- Image areas that overlap the edge of the media after being moved will be cut off when [Synchronized] is selected as the [Image Cut Mode].
Direction in which the document is inserted
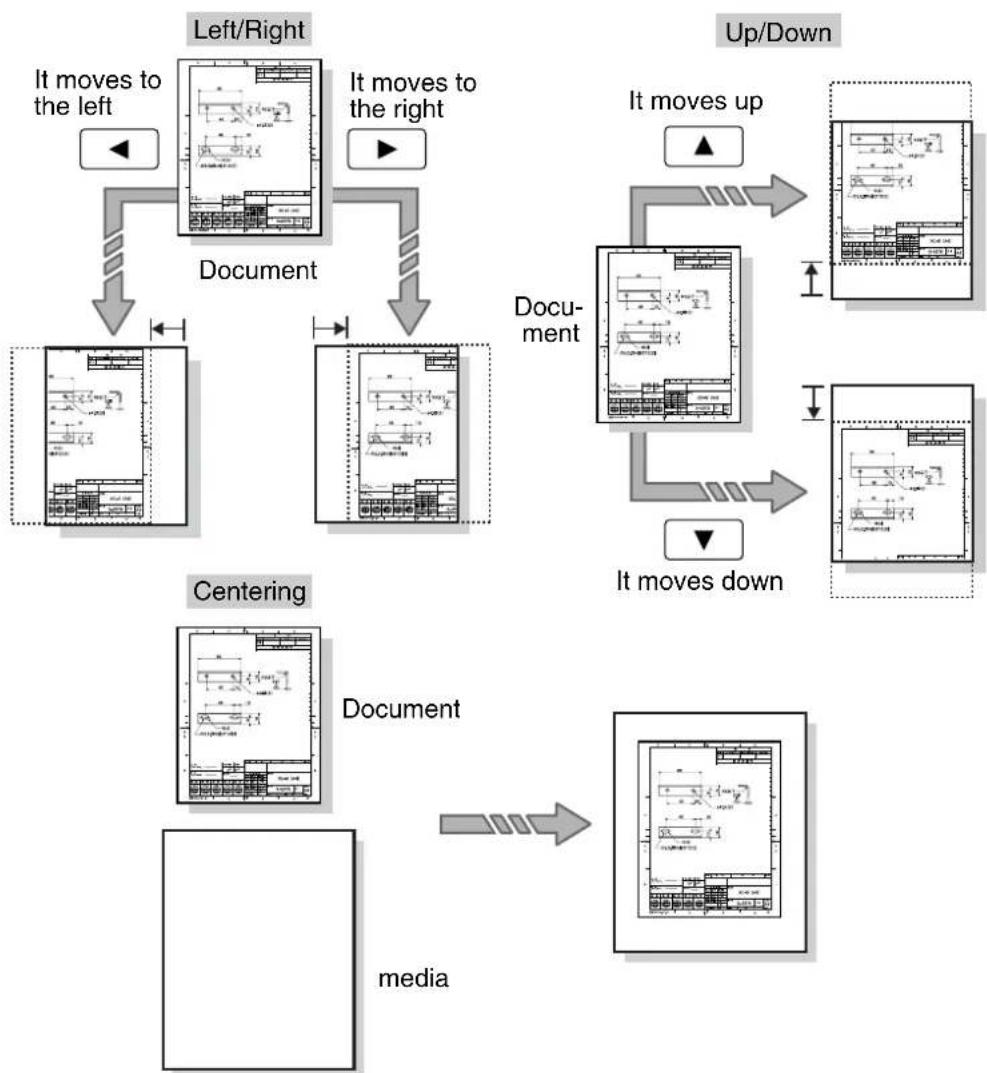
flowchart
graph TD
    A["Left/Right"] -->|It moves to the left| B["Document"]
    C["Document"] -->|It moves to the right| B
    B --> D["Centering"]
    D -->|It moves down| E["Up/Down"]
    E -->|It moves up| F["Document"]
    F --> G["Media"]
    G --> H["Document"]
Procedure
1 Select [Image Location] from the menu screen's [Other Functions] tab.
The [Image Location] screen will display.

flowchart
graph TD
    A["□Auto-Mode Document Image Type"] --> B["Normal R/E..."]
    A --> C["Media Cut Mode..."]
    A --> D["Image Location..."]
    A --> E["Mirror Image"]
    A --> F["E-Sorter..."]
    G["□Sharpness Other Functions..."] --> H["R/E by L&W..."]
    G --> I["Image Density..."]
    G --> J["Edge Erase..."]
    G --> K["Contrast Reversal"]
    G --> L["Multi-Job..."]
    M["There is a following page"] --> N["Previous Next"]
    O["Media Supply..."] --> P["Background Suppression..."]
    Q["Scan Start Position..."] --> R["Threshold Level..."]
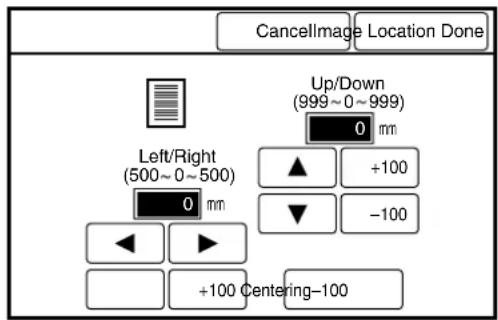
text_image
CancellImage Location Done
Up/Down
(999~0~999)
0 mm
Left/Right
(500~0~500)
0 mm
▲ +100
▼ -100
+100 Centering-100
2 Set up the amount of image movement.
To move the image up or down
Select the amount to move the image up or down (in a range from 0 to +/- 999 mm) using the [▲] and [▼buttons.
Note
Press the [+100] and [-100] buttons to increase or decrease the
values in increments of 100 mm.
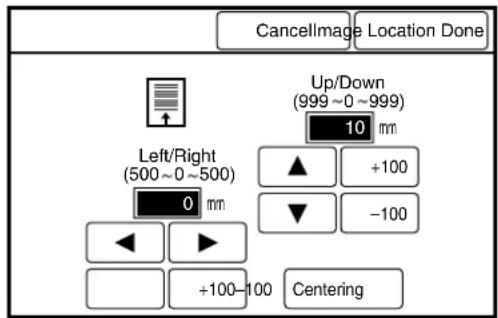
text_image
CancellImage Location Done
Up/Down
(999 ~ 0 ~ 999)
10 mm
Left/Right
(500 ~ 0 ~ 500)
0 mm
+100
-100
+100 - 100
Centering
To move the image left or right
Select the amount to move the image left or right (in a range from 0 to +/-500 mm) using the [ ] and [ ] buttons.
Note
Press the [+100] and [-100] buttons to increase or decrease the values in increments of 100 mm.

text_image
CancellImage Location Done
Up/Down
(999~0~999)
0 mm
Left/Right
(500~0~500)
20 mm
+100
-100
+100-100
Centering

To center the image
Press the [Centering] button.
The [Image Location] parameters are set up, and the screen will return to the copier's menu screen.
![XEROX 6030 - Press the [Done] button. - 1](/content/2026/05/1061283/images/2cd4f429faaf255e001b1469f7dfc882aa863a6fbf5a3a603a62e3945e54c925.jpg)
text_image
CancellImage Location Done
Up/Down
(999~0~999)
mm
Left/Right
(500~0~500)
- mm
+100
-100
+100~100
Centering
3.11 Edge Erase
Edge erase removes image detail from the outer edges of the document (top, bottom, left, and right edges). Edge erase can be set up to erase from 0 to 50 mm of the edges, in increments of 1 mm.
Edge erase can only be used when copying on standard size media.
If edge erase is selected for a document that is longer than the standard size, the trail edge may copy blank.
| Lead Edge Erase | Erases image detail from the lead edge (the edge fed into the scanner/top) of the document. |
| Trail Edge Erase | Erases image detail from the trail edge (bottom) of the document. |
| Left Erase | Erases image detail from the left edge of the document. |
| Right Erase | Erases image detail from the right edge of the document. |
Note
- The edge erase settings are applied to the media. They are not affected by R/E settings.
Standard document
text_image
Technical drawing with dimension annotations and labeled components in Chinese

text_image
Technical drawing with dimension annotations and a table of measurements in Chinese

Direction in which the document is inserted
Document that is longer that standard
text_image
Technical drawing with dimensioned mechanical part views and annotations in Chinese

text_image
Technical drawing with dimensioned mechanical parts and tolerances
Procedure
1 Select [Edge Erase] from the menu screen's [Other Functions] tab.

flowchart
graph TD
    A["□ Auto-Mode Document Image Type"] --> B["Normal R/E..."]
    A --> C["R/E by L&W..."]
    A --> D["Image Density..."]
    A --> E["Edge Erase..."]
    A --> F["Contrast Reversal"]
    A --> G["E-Sorter..."]
    A --> H["Multi-Job..."]
    I["□ Sharpness Other Functions..."] --> J["Media Supply..."]
    I --> K["Background Suppression..."]
    I --> L["Scan Start Position..."]
    I --> M["Threshold Level..."]
    N["There is a following page"] --> O["Previous..."]
    N --> P["Next"]
The [Edge Erase] screen will display.

text_image
CancelEdge ErasDone
Lead Edge Erase
(0 ~50)
Trail Edge Erase
(0 ~ 50)
Left Erase
(0 ~ 50)
Right Erase
(0 ~ 50)
0 mm
0 mm
0 mm
0 mm
▲
▲
▲
▲
▼
▼
▼
▼
2 Select the amount of edge erase (from 0 to 50 mm) using the [▲] and [▼buttons.
Note
The lead edge, trail edge, left edge, and right edge can be set up independently.
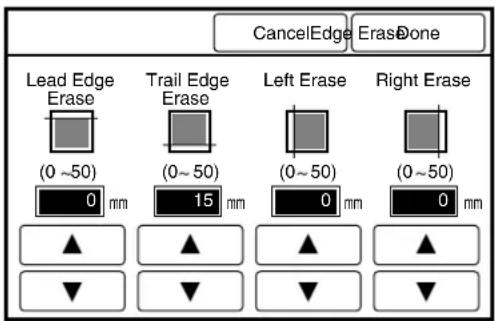
text_image
CancelEdge ErasDone
Lead Edge Erase
(0 ~50)
0 mm
Trail Edge Erase
(0 ~ 50)
15 mm
Left Erase
(0 ~ 50)
0 mm
Right Erase
(0 ~ 50)
0 mm
▲
▲
▲
▲
▼
▼
▼
▼
3 Press the [Done] button.
The [Edge Erase] parameters are set up, and the screen will return to the copier's menu screen.
3.12 Scan Start Position
Document scanning (image acquisition) normally starts at the top, left-hand corner of the document. The scan start position feature enables the user to change the location where the scanner begins acquiring the image data. This feature is useful because it eliminates unnecessary image detail from copies. When [Synchronized] is selected as the [Media Cut Mode], the cut will occur at a point which is equal to the scan start position plus the length of the document.
| Up/Down | Specifies the scan start position in a range from 0 to ± 999 mm (in 1 mm increments), with the top edge of the document set as a standard [0]. |
| Left/Right | Specifies the scan start position in a range of 0 to ± 999 mm (in increments of 1 mm) with the top left edge of the document set as a standard [0]. |
Note
- The scan starting position is applied to the media. It is not affected by R/E settings.
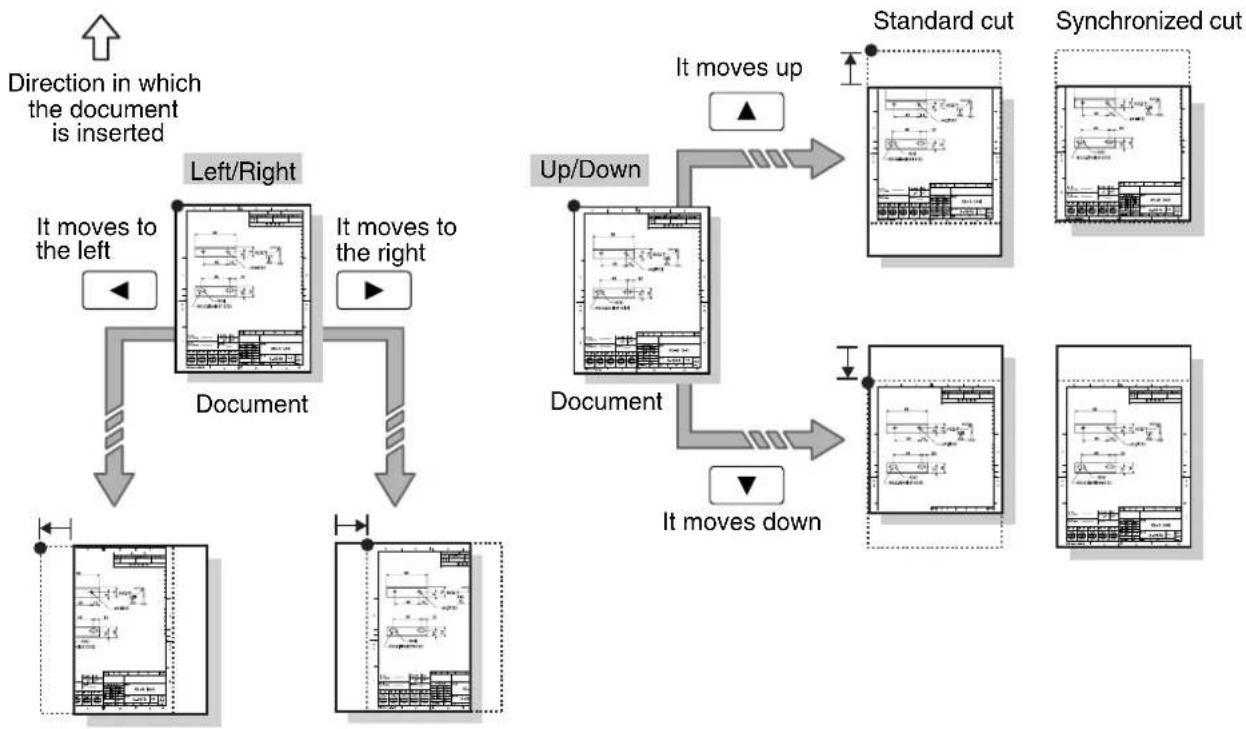
flowchart
graph TD
    A["Direction in which the document is inserted"] --> B["Left/Right"]
    B --> C["Document"]
    C --> D["Up/Down"]
    D --> E["Standard cut"]
    D --> F["Synchronized cut"]
    D --> G["It moves up"]
    D --> H["It moves down"]
    B --> I["It moves to the left"]
    C --> J["It moves to the right"]
    D --> K["It moves down"]
Procedure
1 Select [Scan Start Position] from the menu screen's [Other Functions] tab.

flowchart
graph TD
    A["□ Auto-Mode Document Image Type"] --> B["Normal R/E..."]
    A --> C["Media Cut Mode..."]
    A --> D["Image Location..."]
    A --> E["Mirror Image"]
    A --> F["E-Sorter..."]
    G["□ Sharpness Other Functions..."] --> H["R/E by L&W..."]
    G --> I["Image Density..."]
    G --> J["Edge Erase..."]
    G --> K["Contrast Reversal"]
    G --> L["Multi-Job..."]
    M["Media Supply..."] --> N["Background Suppression..."]
    M --> O["Scan Start Position..."]
    M --> P["Threshold Level..."]
    Q["There is a following page"] --> R["Previous"]
    Q --> S["Next"]
The [Scan Start Position] screen will display.
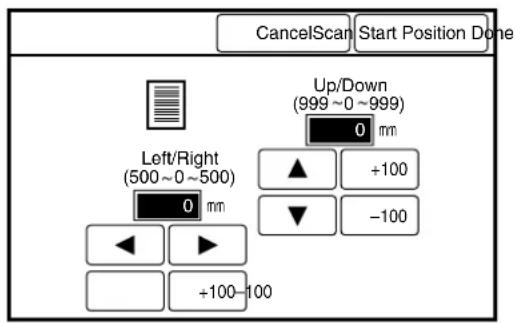
text_image
CancelScan Start Position Done
Up/Down
(999 ~ 0 ~ 999)
0 mm
Left/Right
(500 ~ 0 ~ 500)
0 mm
+100
-100
+100 - 100
2 Set up the up/down scan start position (in a range from 0 to +/- 999 mm) using the [▲and [ ]▼ buttons.
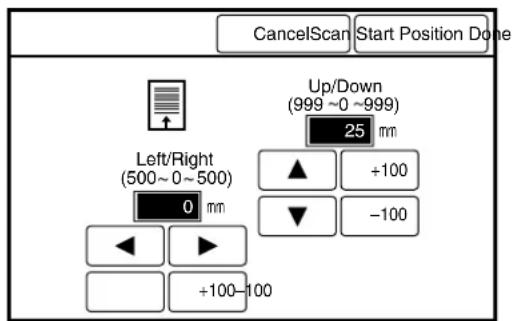
text_image
CancelScan Start Position Done
Up/Down
(999 ~0 ~999)
25 mm
Left/Right
(500 ~ 0 ~ 500)
0 mm
+100
-100
+100 - 100

Press the [+100] and [-100] buttons to increase or decrease the
values in increments of 100 mm.
3 Set up the left/right scan start position (in a range from 0 to +/- 500 mm) using the [◀] and [ ]▶ buttons.
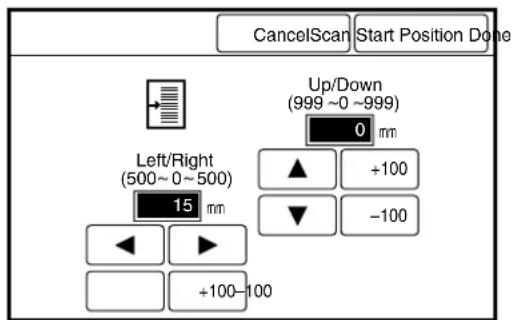
text_image
CancelScan Start Position Done
Up/Down
(999 ~0 ~999)
0 mm
Left/Right
(500 ~ 0 ~ 500)
15 mm
▲ +100
▼ -100
◀ ▶
+100-100

Press the [+100] and [-100] buttons to increase or decrease the values in increments of 100 mm.
4 Press the [Done] button.
The [Scan Start Position]
parameters are set, and the screen will return to the copier's menu screen.
The mirror image feature inverts the scanned image. The right side of the copy will have a blank margin if the scanned image is smaller than the media used.
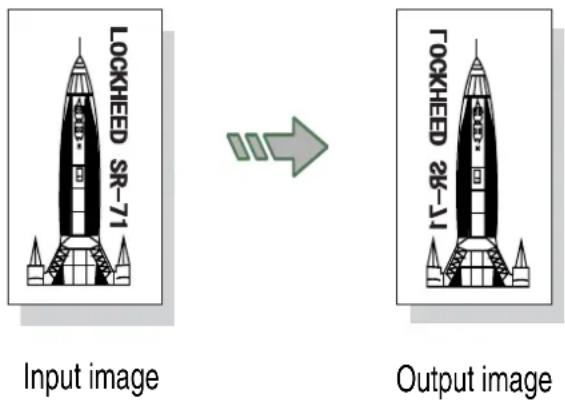
Procedure
1 Display the menu screen's [Other Functions] tab.
2 Press the [Mirror Image] button. The button will highlight and the mirror image feature will be enabled for the copy job.
Note
Press the [Mirror Image] button again to cancel the setting.
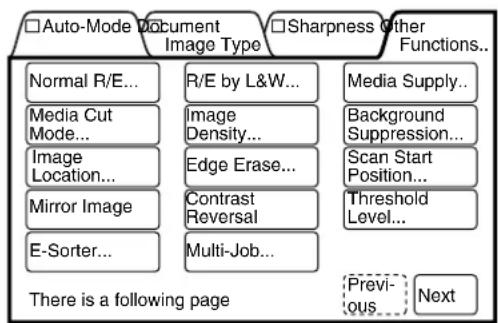
flowchart
graph TD
    A["□ Auto-Mode Document Image Type"] --> B["Normal R/E..."]
    A --> C["Media Cut Mode..."]
    A --> D["Image Location..."]
    A --> E["Mirror Image"]
    A --> F["E-Sorter..."]
    G["□ Sharpness Other Functions..."] --> H["R/E by L&W..."]
    G --> I["Image Density..."]
    G --> J["Edge Erase..."]
    G --> K["Contrast Reversal"]
    G --> L["Multi-Job..."]
    M["□ Previous"] --> N["Next"]
    O["□ Background Suppression..."] --> P["Scan Start Position..."]
    Q["Threshold Level..."] --> R["Previous"]
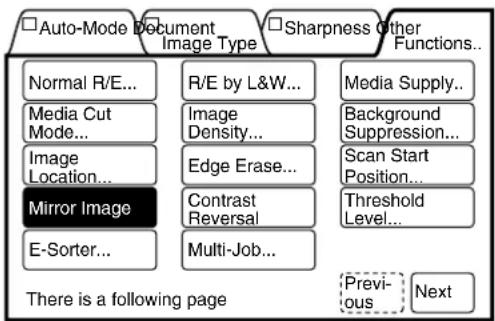
flowchart
graph TD
    A["□Auto-Mode Document Image Type"] --> B["Normal R/E..."]
    A --> C["Media Cut Mode..."]
    A --> D["Image Location..."]
    A --> E["Mirror Image"]
    A --> F["E-Sorter..."]
    G["□Sharpness Other Functions..."] --> H["R/E by L&W..."]
    G --> I["Image Density..."]
    G --> J["Edge Erase..."]
    G --> K["Contrast Reversal"]
    G --> L["Multi-Job..."]
    M["Media Supply..."]
    N["Background Suppression..."]
    O["Scan Start Position..."]
    P["Threshold Level..."]
    Q["Previous"] --> R["Next"]
3.14 Invert Image
The invert image (contrast reversal) feature reverses the black and white contrast of an image. Only the scanned image area will be reversed. If the selected media is larger than the scanned image, the areas outside of the image will copy in white. The margins will copy in white regardless of the contrast reversal settings.
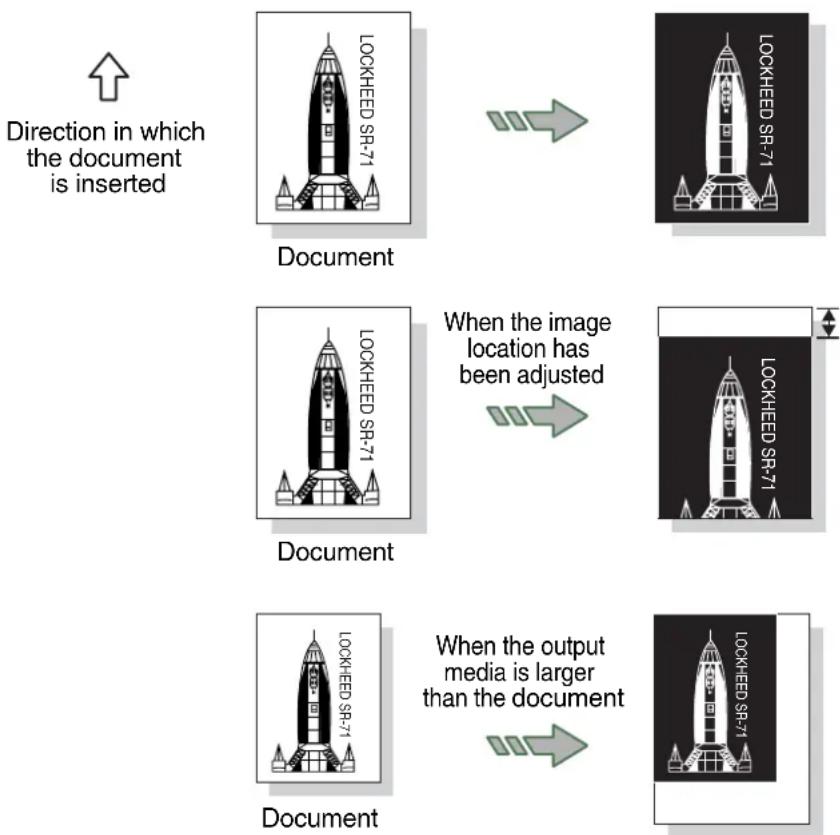
flowchart
graph TD
    A["Direction in which the document is inserted"] --> B["Document"]
    B --> C["When the image location has been adjusted"]
    C --> D["Document"]
    D --> E["When the output media is larger than the document"]
Procedure
1 Display the menu screen's [Other Functions] tab.

flowchart
graph TD
    A["□ Auto-Mode Document Image Type"] --> B["Normal R/E..."]
    A --> C["R/E by L&W..."]
    A --> D["Image Density..."]
    A --> E["Edge Erase..."]
    A --> F["Contrast Reversal"]
    A --> G["E-Sorter..."]
    H["□ Sharpness Other Functions..."] --> I["Media Supply..."]
    H --> J["Background Suppression..."]
    H --> K["Scan Start Position..."]
    H --> L["Threshold Level..."]
    M["There is a following page"] --> N["Previous..."]
    M --> O["Next"]
2 Press the [Contrast Reversal] button.
The button will highlight and contrast reversal will be applied to the scanned image data.
Note
Press the [Contrast Reversal] button once more to cancel the setting.
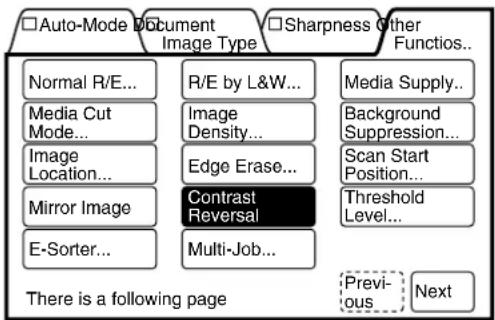
flowchart
graph TD
    A["□Auto-Mode Document Image Type"] --> B["Normal R/E..."]
    A --> C["R/E by L&W..."]
    A --> D["Image Density..."]
    A --> E["Image Location..."]
    A --> F["Edge Erase..."]
    A --> G["Contrast Reversal"]
    A --> H["E-Sorter..."]
    A --> I["Multi-Job..."]
    A --> J["Media Supply..."]
    A --> K["Background Suppression..."]
    A --> L["Scan Start Position..."]
    A --> M["Threshold Level..."]
    A --> N["Previous Next"]
    style A fill:#f9f,stroke:#333
    style B fill:#ccf,stroke:#333
    style C fill:#ccf,stroke:#333
    style D fill:#ccf,stroke:#333
    style E fill:#ccf,stroke:#333
    style F fill:#ccf,stroke:#333
    style G fill:#ccf,stroke:#333
    style H fill:#ccf,stroke:#333
    style I fill:#ccf,stroke:#333
    style J fill:#ccf,stroke:#333
    style K fill:#ccf,stroke:#333
    style L fill:#ccf,stroke:#333
    style M fill:#ccf,stroke:#333
    style N fill:#ccf,stroke:#333
Threshold level assigns black or white values to a document's gray scale colors.
| On | Assigns black or white to gray scale colors. The threshold for judging black and white can be specified. |
| Off | Leaves the gray scale colors as they are. |
White range large Document Black range large
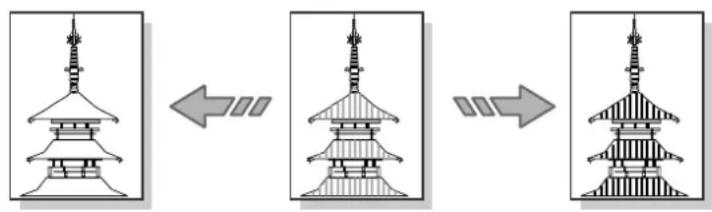
text_image
Diagram showing three sequential stages of a traditional pagoda with Chinese characters indicating the process.
Procedure
1 Select [Threshold Level] from the menu screen's [Other Functions] tab.
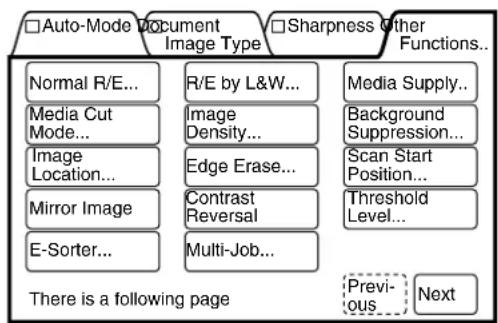
flowchart
graph TD
    A["□ Auto-Mode Document Image Type"] --> B["Normal R/E..."]
    A --> C["Media Cut Mode..."]
    A --> D["Image Location..."]
    A --> E["Mirror Image"]
    A --> F["E-Sorter..."]
    G["□ Sharpness Other Functions..."] --> H["R/E by L&W..."]
    G --> I["Image Density..."]
    G --> J["Edge Erase..."]
    G --> K["Contrast Reversal"]
    G --> L["Multi-Job..."]
    M["There is a following page"] --> N["Previous"]
    M --> O["Next"]
The [Threshold Level] screen will display.
2 Select either [On] or [Off].
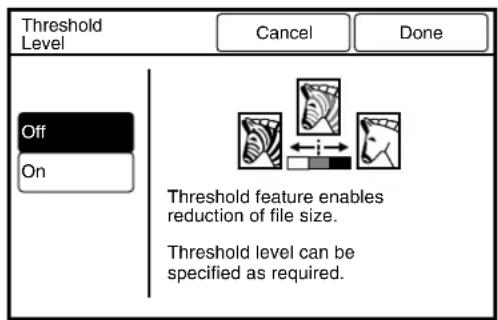
text_image
Threshold Level
Cancel Done
Off
On
Threshold feature enables reduction of file size.
Threshold level can be specified as required.

When the threshold level is set to [On]
Set the threshold value (0 to 127) for recognizing white or black with the use of the [◀] and [ ] buttons.
![XEROX 6030 - When the threshold level is set to [On] - 1](/content/2026/05/1061283/images/6741fda83c080317a3b06898630f3758fbabf385f63e113837d65f292b9be5fb.jpg)
Press the [◀0] and [10] ▶
buttons to increase or decrease the values in increments of 10 mm.
![XEROX 6030 - When the threshold level is set to [On] - 2](/content/2026/05/1061283/images/d4b1d1393c958628c9f00b8a65e27d41c8388148eac3325fe4ab459ef0bbfaaa.jpg)
text_image
Threshold
Level
Cancel Done
Off
On
White Range Black Range
(127~0~127)
1
10 10
The [Threshold Level] parameters will be set up, and the screen will return to the copier's menu screen.
The E-Sort feature enables the user to sort and print multiple sets of copies. The copies may be sorted into sets [Collated] or sorted into a predetermined distribution pattern [Program]. The copy features for each document also can be set up so that the same document will have the same settings in every set. Banner sheets also can be inserted when [E-Sort] is selected. The group number and time will be printed on the banner sheet.
| Off | Does not sort. |
| Collated(Sorts into sets) | Prints and sorts copies into collated sets. |
| Program(Sort preset) | Prints and sorts copies based on a programmed distribution pattern which is defined using the Program Sort feature in the custom presets. |
Note
- Copies can be set up to print in either ascending order or descending order. Refer to "Output Order Preset" in "5.3 Setting up the Copy Features".
• Collated (sorts into sets)
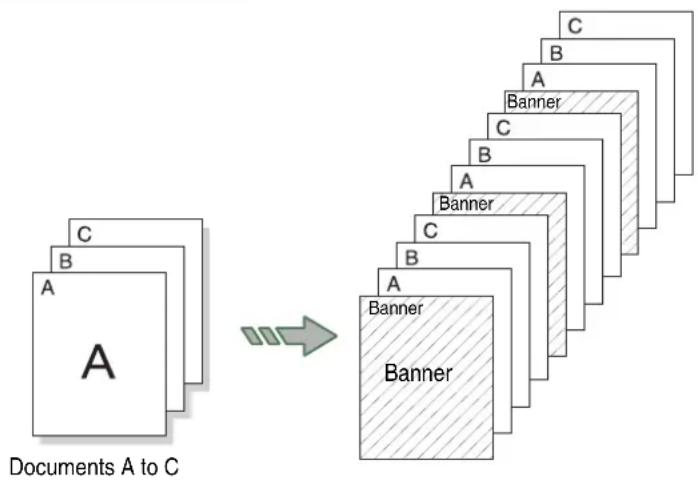
Multiple sets of a program can be printed by entering the quantity during Program E-Sort setup.
Procedure
1 Select [E-Sorter] from the menu screen's [Other Functions] tab.

flowchart
graph TD
    A["□Auto-Mode Document Image Type"] --> B["Normal R/E..."]
    A --> C["Media Cut Mode..."]
    A --> D["Image Location..."]
    A --> E["Mirror Image"]
    A --> F["E-Sorter..."]
    G["□Sharpness Other Functions..."] --> H["R/E by L&W..."]
    G --> I["Image Density..."]
    G --> J["Edge Erase..."]
    G --> K["Contrast Reversal"]
    G --> L["Multi-Job..."]
    M["There is a following page"] --> N["Previous"]
    M --> O["Next"]
The [E-Sorter] screen will display.
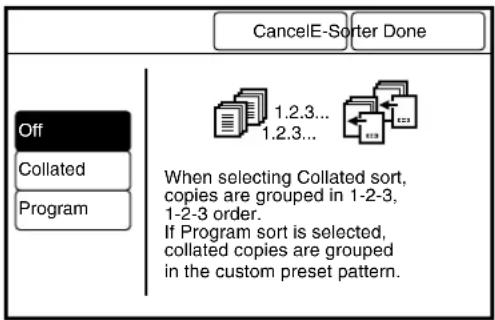
text_image
CancelE-Sorter Done
Off
Collated
Program
1.2.3...
1.2.3...
When selecting Collated sort,
copies are grouped in 1-2-3,
1-2-3 order.
If Program sort is selected,
collated copies are grouped
in the custom preset pattern.
Procedure (Off - Uncollated)
1 Select [Off].
2 Press the [Done] button.
3 Insert the documents to make copies (copies of your documents will be output in a set order 1-1-1, 2-2-2, 3-3-3).
Procedure (Collated)
1 Select [Collated] as the sorting method.
2 Select whether or not to insert a banner sheet ([No] or [Yes]).
3 Select the number of sets on the numeric keypad.
4 Press the [Done] button.
The [E-Sorter] parameters are set up. The screen will return to the copier's menu.
5 Insert the first document from the document set in the scanner. The [E-Sorter Collated] screen will display.
6 Check the copy. If the copy features are OK, continue at step 10.
7 Press [Delete] if you need to delete the last document scanned.
8 Press [Change Setup] if you need to change any of the copy features of a scanned document.
The [Change Setup] screen will display.
9 Select the desired feature buttons. Select the new settings. Select [Done] to return to the [Change Setup] screen. Select [Done] on the [Change Setup] screen.
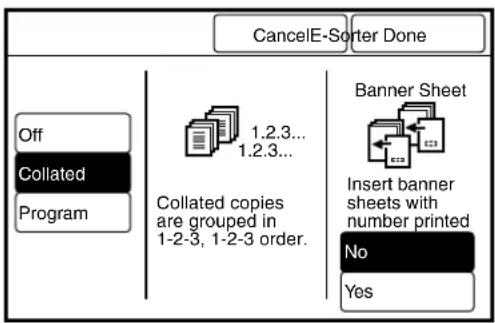
text_image
CancelE-Sorter Done
Off
Collated
Program
1.2.3...
1.2.3...
Collated copies
are grouped in
1-2-3, 1-2-3 order.
Banner Sheet
Insert banner
sheets with
number printed
No
Yes
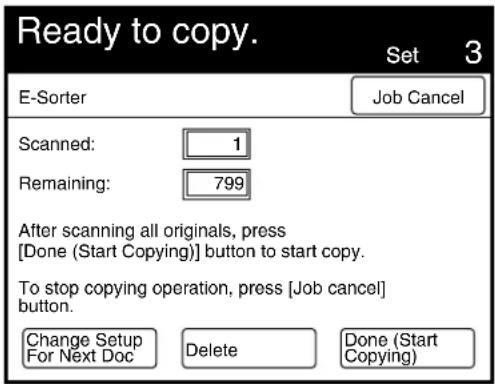
text_image
Ready to copy.
Set 3
E-Sorter
Job Cancel
Scanned: 1
Remaining: 799
After scanning all originals, press
[Done (Start Copying)] button to start copy.
To stop copying operation, press [Job cancel]
button.
Change Setup
For Next Doc Delete Done (Start
Copying)

text_image
Ready to copy.
Set 1
Change Setup For Next Doc
Done
Media Cut
Mode...
Threshold
Level...
Image
Location
Scan Start
Position...
Contrast
Reversal
Background
Suppression...
Image
Density...
Mirror Image
Document
Image Type...
Edge Erase...
Sharpness...
10 Insert the next document to be copied. If needed, select additional features. Repeat step 6 for each document.
11 When all the documents are scanned, select [Done].
12 Press the key or the key to stop the operation.
Procedure (Program E-Sort)
1 Select [Program] as the sorting method.
Enter the program (Program Sort Preset) number using the keypad.
Note
The programs are created using the custom presents functions. Refer to the section on "Program Sort Preset" in "5.3 Setting up the Copy Features" for further details.
2 Select whether or not to insert a banner sheet ([No] or [Yes]).
3 Enter the number of sets to print using the numeric keypad.
4 Press the [Done] button.
The [E-Sorter] parameters will be set up. The screen will return to the copier's menu.
5 Insert the first document from the set into the scanner.
The [E-Sorter Collated] screen will display.
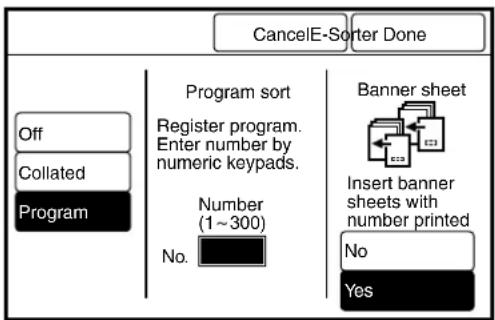
text_image
CancelE-Sorter Done
Off
Collated
Program
Program sort
Register program.
Enter number by
numeric keypads.
Number
(1~300)
No.
Banner sheet
Insert banner
sheets with
number printed
No
Yes
6 Check the copy. If the copy features are OK, continue at step 10.
7 Press [Delete] if you need to delete the last document scanned.
8 Press [Change Setup] if you need to change any of the copy features of the scanned document The [Change Setup] screen will display.
9 Select the desired feature buttons. Select the new settings. Select [Done] to return to the [Change Setup] screen. Select [Done] on the [Change Setup] screen.
10 Insert the next document to be scanned. If needed, select additional features. Repeat step 6 for each document.
11 When the documents are all scanned, select [Done (Start Copying)].
12 Press the key or the key to stop the operation.

text_image
Ready to copy.
Count /40
Program Sort
Job Cancel
Scanned: 1
Remaining: 799
Program No. (1-300)
1
After scanning all originals, press
[Done (Start Copying)] button to start copy.
To stop copying operation, press [Job cancel]
button.
Change Setup
For Next Doc
Delete
Done (Start
Copying)
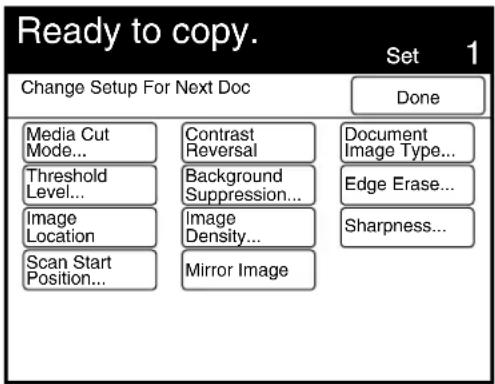
text_image
Ready to copy.
Set 1
Change Setup For Next Doc
Done
Media Cut
Mode...
Threshold
Level...
Image
Location
Scan Start
Position...
Contrast
Reversal
Background
Suppression...
Image
Density...
Mirror Image
Document
Image Type...
Edge Erase...
Sharpness...
3.17
Sorting Using Multi-Job
The Multi-Job feature enables the user to make and sort copies for multiple stored jobs. The copying mode (Auto/Manual), reduction/enlargement, media supply, finishing (if installed), and the copy quantity can be set up. A maximum of twenty multi-jobs can be stored. Banner sheets also can be inserted between multi-jobs. The group number and time will be printed on the banner sheets.
Job 1 Job 2 Job 3
Two sets of copies.
Same percentage as auto

Two sets of copies.
Same percentage as auto
Stamp No.3

Three sets of copies.
Auto mode A3
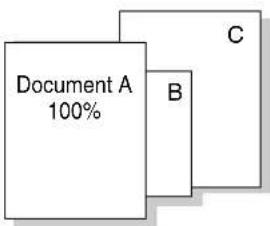
text_image
Document A
100%
B
C
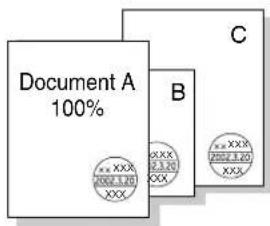
text_image
Document A 100%
B
C
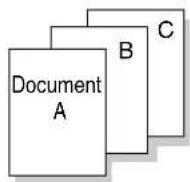
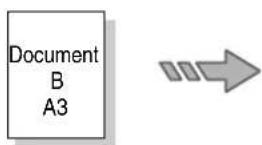

text_image
Document A
100%
B
C
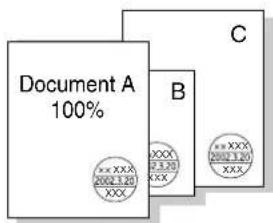
Copies can be set up to print in either ascending order or descending order. Refer to the section "Output Order Preset" in "5.3 Setting up the Copy Features".
Procedure
1 Set up the multi-job copy settings using the [Stored Job] feature.
Refer to Refer to "Chapter 4 Stored Jobs".
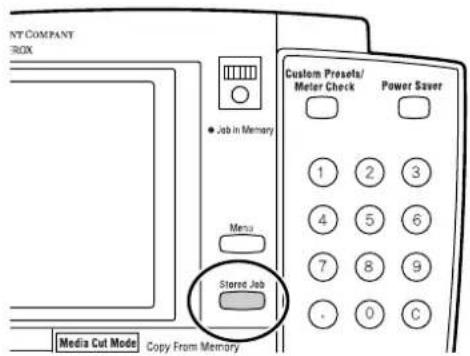
text_image
NY COMPANY
BOX
● Job in Memory
Menu
Stored Job
Media Cut Mode Copy From Memory
Custom Presets/
Meter Check Power Saver
1 2 3
4 5 6
7 8 9
. 0 C

text_image
Stored Job Done
Job
1~20
Job
21~40
Job
41~60
Multi
Job
Image
Quality
Recall
Store
1 2 3
4 5
Delete
6 7 8
9 10
Setup
Print
11 12
13 14 1$
16 17
18 19 20
2 Select [Multi-Job] from the menu screen's [Other Functions] tab.

flowchart
graph TD
    A["□Auto-Mode Document Image Type"] --> B["Normal R/E..."]
    A --> C["Media Cut Mode..."]
    A --> D["Image Location..."]
    A --> E["Mirror Image"]
    A --> F["E-Sorter..."]
    G["□Sharpness Other Functions..."] --> H["R/E by L&W..."]
    G --> I["Image Density..."]
    G --> J["Edge Erase..."]
    G --> K["Contrast Reversal"]
    G --> L["Multi-Job..."]
    M["Media Supply..."] --> N["Background Suppression..."]
    M --> O["Scan Start Position..."]
    P["Threshold Level..."] --> Q["Previous..."]
    P --> R["Next"]
The [Multi-Job] screen will display. Previously stored multi-jobs are outlined with a solid line. Unused numbers are outlined with dotted lines.
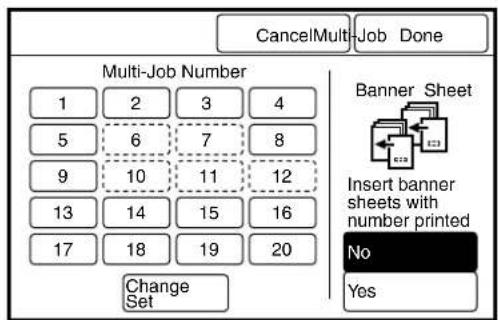
text_image
CancelMulti-Job Done
Multi-Job Number
1 2 3 4
5 6 7 8
9 10 11 12
13 14 15 16
17 18 19 20
Change
Set
Banner Sheet
Insert banner
sheets with
number printed
No
Yes
3 Select the multi-job number(s).
Select whether or not to insert a banner sheet.
Note
It is possible to select more than one multi-job number. If no job numbers are selected, the multi-job procedure will be voided.
4 Press the [Change Set] button if the copy quantity needs to be changed.
Note
This function can be used to change the copy quantity that is stored in the stored job. However, note that a change made here will not update in the stored job.
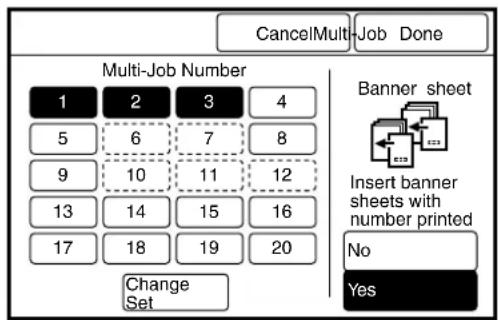
text_image
CancelMulti-Job Done
Multi-Job Number
1 2 3 4
5 6 7 8
9 10 11 12
13 14 15 16
17 18 19 20
Change
Set
Banner sheet
Insert banner
sheets with
number printed
No
Yes
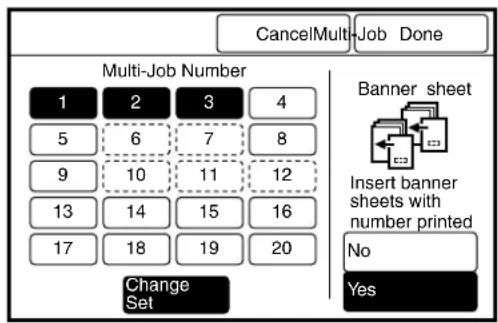
text_image
CancelMulti-Job Done
Multi-Job Number
1 2 3 4
5 6 7 8
9 10 11 12
13 14 15 16
17 18 19 20
Change Set
Banner sheet
Insert banner sheets with number printed
No
Yes
5 Select the required number of copies for each multi-job number.
Note
Press the [Next] button to set up multi-job numbers 11 to 20.
6 Press the [Done] button.
The screen will return to the [Multi-Job] screen.
7 Press the [Done] button.
The [Multi-Job] parameters will be set up, and the screen will return to the copier's menu.
8 Insert the first document from the set in the scanner.
The [Program Sort] screen will display.
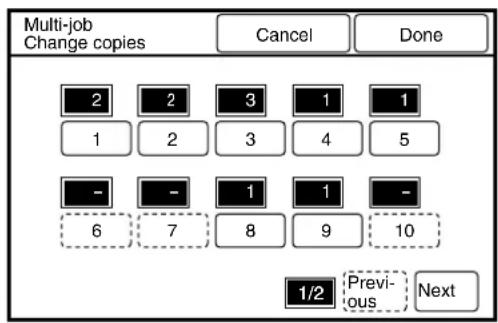
text_image
Multi-job
Change copies
Cancel
Done
2 2 3 1 1
1 2 3 4 5
- - 1 1 -
6 7 8 9 10
1/2 Previous Next

text_image
CancelMulti-Job Done
Multi-Job Number
1 2 3 4
5 6 7 8
9 10 11 12
13 14 15 16
17 18 19 20
Change
Set
Banner sheet
Insert banner
sheets with
number printed
No
Yes
9 Check the copy. If the copy features are OK, continue at step 13.
10 Press [Delete] if you need to delete the last document scanned.
11 Press [Change Setup] if you need to change any of the copy features of the scanned document The [Change Setup] screen will display.
12 Select the desired feature buttons. Select the new settings. Select [Done] to return to the [Change Setup] screen. Select [Done] on the [Change Setup] screen.
13 Insert the next document to be scanned. If needed, select additional features. Repeat step 9 for each document.
14 When the documents are all scanned, select [Done (start Copying)].
15 Press the key or the key to stop the operation.
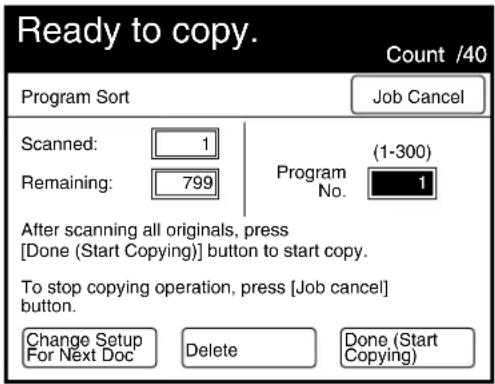
text_image
Ready to copy.
Count /40
Program Sort
Job Cancel
Scanned: 1
Remaining: 799
Program No. (1-300)
1
After scanning all originals, press
[Done (Start Copying)] button to start copy.
To stop copying operation, press [Job cancel]
button.
Change Setup
For Next Doc
Delete
Done (Start
Copying)
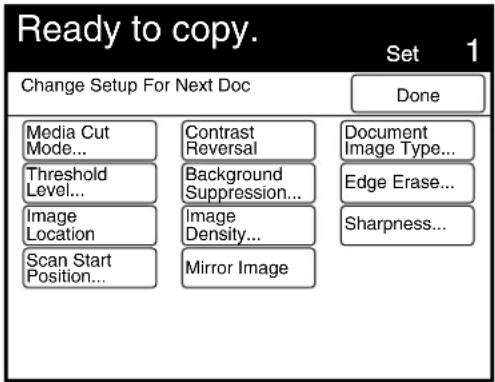
text_image
Ready to copy.
Set 1
Change Setup For Next Doc
Done
Media Cut
Mode...
Threshold
Level...
Image
Location
Scan Start
Position...
Contrast
Reversal
Background
Suppression...
Image
Density...
Mirror Image
Document
Image Type...
Edge Erase...
Sharpness...
Chapter 4
Stored Jobs
The stored job feature enables a user to store copy settings that are frequently used, and then recall them at a later time. Storing complex or frequently used settings as stored jobs simplifies job setups when they need to be run again.
Three types of stored job are available.
| Job | The [Job] selection enables the user to set up a stored job using all of the copy settings.A maximum of 60 such job setups can be stored. |
| Multi-Job | [Multi Job] is the designated job type for storing multi-jobs.The settings that can be stored here include the copying mode (auto/manual), R/E settings, media supply, copy quantity, and finishing, e.g., folding.A maximum of 20 multi-jobs can be stored. |
| Image Quality | [Image Quality] is the stored job type for saving image quality settings.The settings that can be stored here include the document's image type, background suppression, sharpness, image density, and threshold levels.A maximum of 20 such jobs can be stored. |
Refer to "3.17 Sorting Using Multi-Job" for more details on multi-jobs.
Preparation
The following preparation is recommended before creating stored jobs.
- Create a table or similar document in which to record stored job information.
Record the stored job numbers and types, the names of the stored jobs, the names of the document(s) that comprise the stored job(s), etc.
- Copy and use the Stored Job Check Sheet provided on the next page.
Determine which jobs have not been stored and then check off their set up requirements on the check sheet. This sheet is useful when you need to store complex jobs.
- Store the check sheet and other stored job records and originals in a safe location.
Stored Job Check Sheet
Stored job Number ( )
Copy Sets < > (1 to 99)
Media Supply; R/E □ Auto-Mode □ Manual-Mode
Auto-Mode A0->A A1->A A2->A A3->A A4->A
| Media Cut Mode □ | Standard Portrait | □ Standard Landscape | □ Synchronized | □ Variable Length |
| Variable Length | A0: mm | A1: mm | A2: mm | A3: mm | A4: mm |
| Reduce/Enlarge □ | Fixed/Variable | % | | | | |
| □ R/E by L&W | Ver: % Hor: % | | | | |
| Media Supply □ | Roll 1 □ | Roll 2 □ | Roll 3 □ | Roll 4 |
| □ Tray3 □ | Tray4 □ | Manual Feed | | |
Image Type
| Document Image Type | ☐ Line ☐ | Line/Picture ☐ | Picture | ☐ Photo |
| ☐ Dark | ☐ Transparent | ☐ Diazo ☐ | Cut & Past |
| Image Density | | | (Light 4 <- Normal -> Dark 4) |
| Sharpness | | | (Minimum 2 <- Normal -> Maximum 2) |
| Background Suppression | ☐ Auto | ☐ Manual | (Auto: Minimum 3 <- Normal -> Maximum 3) |
| | | (Manual: Minimum 13 <- Normal -> Maximum 25) |
| Threshold Level | ☐ Off | ☐ On | (White 127 <- Normal -> Black 127) |
| Edit |
| Lead Trail Margin | ☐ Off | ☐ On | Lead: mm Trail: mm |
| Image Location ☐ | Off | ☐ On | ☐ Centering UP /Down: mm Left/Right: mm |
| Scan Start position | ☐ Off | ☐ On | UP Down: mm Left Right: mm |
| Edge Erase | Lead: mm | Trail: mm | Left: mm Right: mm |
| Mirror Image | ☐ Off | ☐ On | | |
| Contrast Reversal | ☐ Off | ☐ On | | |
| E-Sorter |
| E-Sorter | ☐ Off | ☐ Collated | ☐ Programed < > (1 -> 300) |
| Banner Sheet ☐ | No | ☐ Yes | | |
| Output Destination | ☐ Top tray | ☐ Output bin | | |
| Multi-Job |
| Multi-Job | ☐ Off | ☐ On | | |
| Banner Sheet ☐ | No | ☐ Yes | | |
| Multi-Job Number | ☐ 1 ☐ 2 ☐ | 3 ☐ 4 ☐ | 5 ☐ 6 ☐ 7 ☐ 8 ☐ 9 ☐ 10 |
| ☐ 11 ☐ 12 | ☐ 13 ☐ 14 | ☐ 15 ☐ 16 ☐ 17 ☐ 18 ☐ 19 ☐ 20 |
| Output Destination | ☐ Top tray | ☐ Output bin | | |
| Others |
| Low Speed Scanning | ☐ Off | ☐ On | | |
| Paper Exit | ☐ Off | ☐ On | | |
This procedure saves custom copy settings as a stored job.

To change how a stored job will be processed, first delete the existing stored job, and then set it up again.
Procedure
1 Using the selections on the menu screen, set up all of the copy features that must be stored.

Using the check sheet on the previous page to determine which functions need to be stored.
2 Press the [Stored Job] button on the control panel.
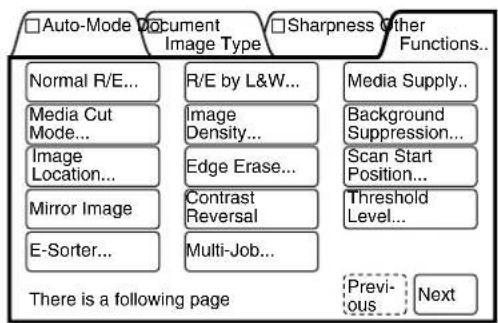
flowchart
graph TD
    A["□ Auto-Mode Document Image Type"] --> B["Normal R/E..."]
    A --> C["Media Cut Mode..."]
    A --> D["Image Location..."]
    A --> E["Mirror Image"]
    A --> F["E-Sorter..."]
    G["□ Sharpness Other Functions..."] --> H["R/E by L&W..."]
    G --> I["Image Density..."]
    G --> J["Edge Erase..."]
    G --> K["Contrast Reversal"]
    G --> L["Multi-Job..."]
    M["There is a following page"] --> N["Previous Next"]
    O["Media Supply..."] --> P["Background Suppression..."]
    Q["Scan Start Position..."] --> R["Threshold Level..."]

text_image
NY COMPANY
ERDX
• Job in Memory
Menu
Stored Job
Media Cut Mode Copy From Memory
Custom Presets/
Meter Check
Power Saver
1 2 3
4 5 6
7 8 9
. 0 C
The stored job screen will display.
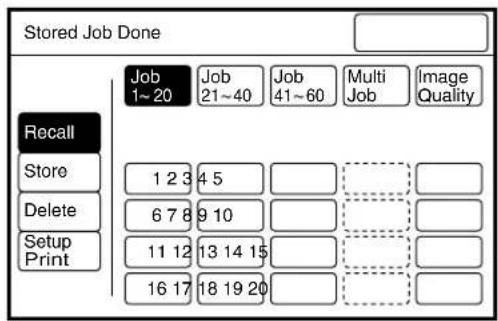
text_image
Stored Job Done
Recall
Store
Delete
Setup Print
Job
1~20
Job
21~40
Job
41~60
Multi
Job
Image
Quality
1 2 3
4 5
6 7 8
9 10
11 12
13 14 15
16 17
18 19 20
![XEROX 6030 - Press the [Store] button. - 1](/content/2026/05/1061283/images/5c1abdac82c48e3a6aac50275f05dd137917679df1442d8a28d3e0b179547bfe.jpg)
text_image
Stored Job Done
Recall
Store
Delete
Setup
Print
Job
1~20
Job
21~40
Job
41~60
Multi
Job
Image
Quality
1 2 3 4 5
6 7 8 9 10
11 12 13 14 15
16 17 18 19 20
4 Select the job type, that is, [Job], [Multi Job], or [Image Quality], and a job number that is not is use.
Note
The buttons outlined in dotted lines already contain stored jobs and cannot be selected.
![XEROX 6030 - Select the job type, that is, [Job], [Multi Job], or [Image Quality], and a job number that is not is use. - 1](/content/2026/05/1061283/images/f67b738400ff491f83c883b3ad57c402daa1e97df831d457d5c4e6145e51cbaf.jpg)
text_image
Stored Job Done
Job
1~20
Job
21~40
Job
41~60
Multi
Job
Image
Quality
Recall
Store
21 22 23 24 25
26 27 28 29 30
31 32 33 34 35
36 37 38 39 40
The settings will be saved as the stored job. The copy menu screen will reappear.
This procedure recalls a stored job.
Procedure
1 Press the key on the control panel.
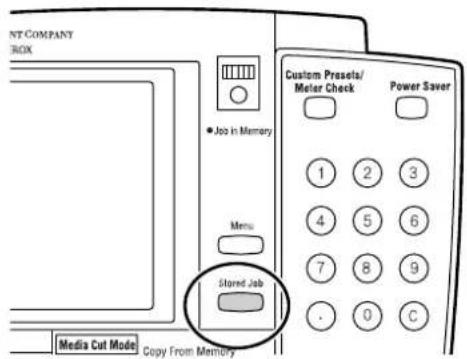
text_image
NT COMPANY
BOX
Job in Memory
Menu
Stored Job
Media Cut Mode Copy From Memory
Custom Presets/
Meter Check
Power Saver
1 2 3
4 5 6
7 8 9
. 0 C
The stored job screen will display.
2 Press the [Recall] button.
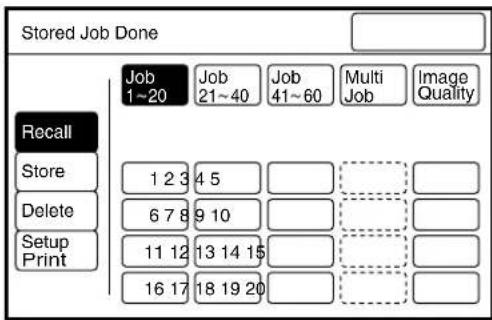
text_image
Stored Job Done
Recall
Store
Delete
Setup
Print
Job
1~20
Job
21~40
Job
41~60
Multi
Job
Image
Quality
1 2 3 4 5
6 7 8 9 10
11 12 13 14 15
16 17 18 19 20
3 Select the job type and job number that are to be recalled.
Note
The buttons outlined in dotted lines do not have stored jobs and cannot be selected.
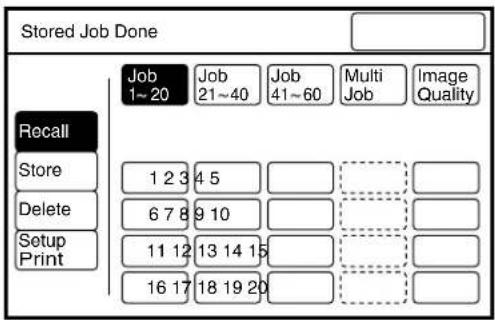
text_image
Stored Job Done
Recall
Store
Delete
Setup
Print
Job
1~20
Job
21~40
Job
41~60
Multi
Job
Image
Quality
1 2 3 4 5
6 7 8 9 10
11 12 13 14 15
16 17 18 19 20
4 Insert the document(s) and begin copying.
The copies will be made according to the stored job settings.
This procedure deletes a stored job.
Procedure
1 Press the key on the control panel.

text_image
NT COMPANY
BOX
● Job in Memory
Menu
Stored Job
Media Cut Mode Copy From Memory
Custom Preseta/
Meter Check Power Saver
1 2 3
4 5 6
7 8 9
. 0 C
The stored job screen will display.

text_image
Stored Job Done
Recall
Store
Delete
Setup
Print
Job
1~20
Job
21~40
Job
41~60
Multi
Job
Image
Quality
1 2 3 4 5
6 7 8 9 10
11 12 13 14 15
16 17 18 19 20
2 Press the [Delete] button.
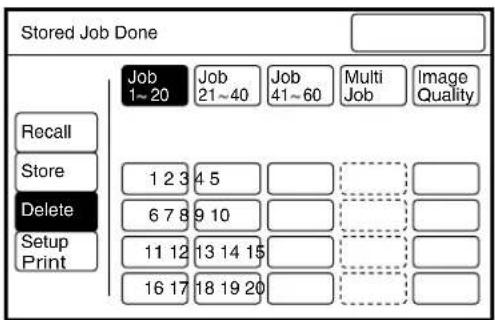
text_image
Stored Job Done
Recall
Store
Delete
Setup
Print
Job
1~20
Job
21~40
Job
41~60
Multi
Job
Image
Quality
1 2 3 4 5
6 7 8 9 10
11 12 13 14 15
16 17 18 19 20
3 Select the job type and the job number that are to be deleted.
Note
The buttons that are outlined with dotted lines do not contain stored jobs and cannot be selected.
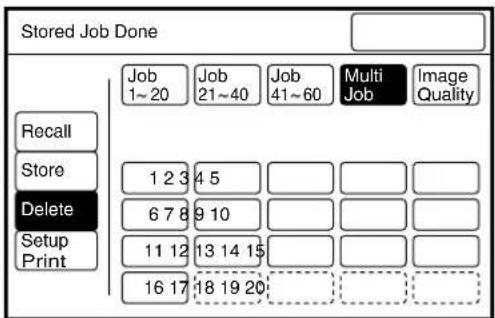
text_image
Stored Job Done
Recall
Store
Delete
Setup
Print
Job
1~20
Job
21~40
Job
41~60
Multi
Job
Image
Quality
1 2 3 4 5
6 7 8 9 10
11 12 13 14 15
16 17 18 19 20
4 Press the [Delete] button when the confirmation screen displays. The stored job will be deleted.
5 Press the [Done] button.
The copy menu screen will reappear.
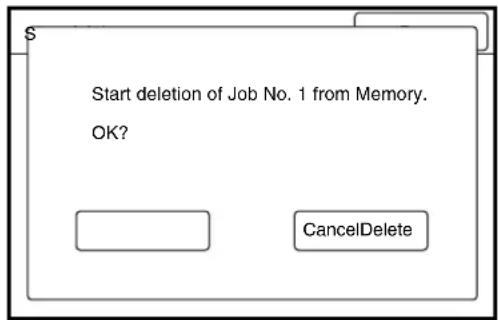
text_image
Start deletion of Job No. 1 from Memory.
OK?
CancelDelete
This procedure prints a list of the stored job(s) settings.
Procedure
1 Press the key on the control panel.

text_image
NT COMPANY
BOX
■ Job in Memory
Menu
Stored Job
Media Cut Mode Copy From Memory
Custom Presets/
Meter Check
Power Saver
1 2 3
4 5 6
7 8 9
. 0 C
The stored job screen will display.
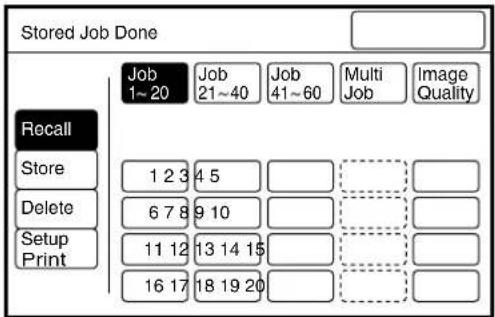
text_image
Stored Job Done
Recall
Store
Delete
Setup
Print
Job
1~20
Job
21~40
Job
41~60
Multi
Job
Image
Quality
1 2 3 4 5
6 7 8 9 10
11 12 13 14 15
16 17 18 19 20
2 Press the [Setup Print] button.
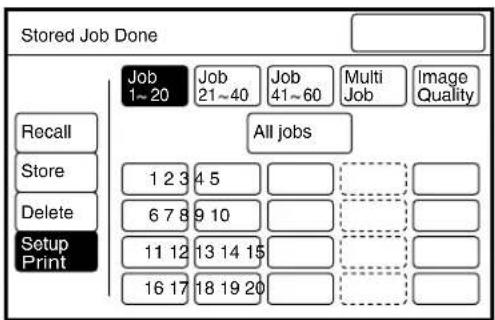
text_image
Stored Job Done
Recall
Store
Delete
Setup
Print
Job
1~20
Job
21~40
Job
41~60
Multi
Job
Image
Quality
All jobs
1 2 3 4 5
6 7 8 9 10
11 12 13 14 15
16 17 18 19 20
3 Select the job type and the job number that are to be printed. Press the [All Jobs] button if all stored job settings are to be printed.
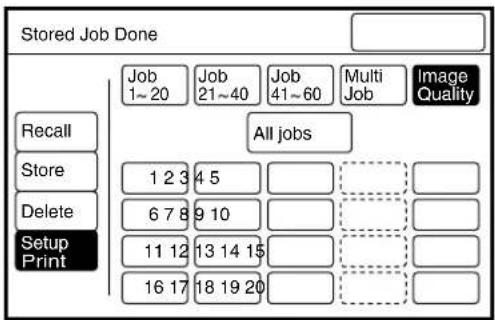
text_image
Stored Job Done
Recall
Store
Delete
Setup
Print
Job
1~20
Job
21~40
Job
41~60
Multi
Job
Image
Quality
All jobs
1 2 3 4 5
6 7 8 9 10
11 12 13 14 15
16 17 18 19 20
Note
The buttons that are outlined with dotted lines do not contain stored jobs and cannot be selected.
4 Press the key on the control panel.
The stored job settings will print.
5 Press the [Done] button.
The copy menu screen will reappear.
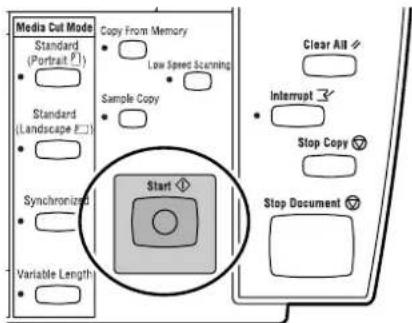
text_image
Media Cut Mode
Standard
(Portraite P1)
Standard
(Landscape E2)
Sample Copy
Copy From Memory
Low Speed Scanning
Clear All
Interrupt
Stop Copy
Stop Document
Synchronized
Variable Length
Start
Chapter 5
Custom Presets/Meter Check
Most system administration functions are performed through the Custom Presets feature. Changing the custom presets overrides the factory (default) settings that were in effect when the machine was installed. Users typically change the custom presets to customize the machine for their unique operating needs.
There are two subsets of features within the custom presets - the System Presets and the Copy Features. The System Presets affect general machine behavior. The Copy Features determine how the machine performs copying tasks, such as image processing and image editing.
In addition to providing access to the Custom Presets, pressing the key enables the user to do the following.
• View the billing meter readings.
- View the machine software version and system configuration information.
- Define the default sizes, types, and weights of media that will be used in the machine.
- Set up the document size series for automatic size detection purposes.
Procedure
1 Press the key.
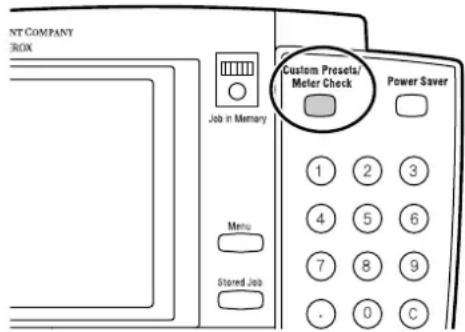
text_image
NT COMPANY
BOX
Job in Memory
Menu
Stored Job
Custom Presets/
Meter Check
Power Saver
1 2 3
4 5 6
7 8 9
. 0 C
The [Custom Presets/Meter Check] screen will display.
2 Select the button for the parameter that needs to be set up, or the item that needs to be checked.

flowchart
graph TD
    A["Custom Presets/Meter Check Done"] --> B["Meter Check..."]
    A --> C["Media Setting/Trimming..."]
    A --> D["Document size series..."]
    A --> E["Custom Presets..."]
    A --> F["Software Version..."]
    A --> G["System Configuration."]

When [Meter Check...] is selected
Displays the billing meters.
Refer to
Refer to "5.4 Meter Check" for more details.
![XEROX 6030 - When [Meter Check...] is selected - 1](/content/2026/05/1061283/images/c2c870eb03e4a811ea6ecd434c869a9df58d9ec5296836356cb5ad6b03e6e52a.jpg)
Allows the user to set up the size, type, and weight of roll and cut sheet media.
Refer to
Refer to "1.15 Setting Up Media" for further details.
![XEROX 6030 - When [Media Setting/Trimming...] is selected - 1](/content/2026/05/1061283/images/33e6530c468e319ef94430eabe846e441fc934bc3c1d7f78b85456fc0361d5f6.jpg)
When [Custom Presets] is selected
Allows the user to change the custom presets. There are two types of custom presets - System Presets and Copy Features.
![XEROX 6030 - When [Custom Presets] is selected - 1](/content/2026/05/1061283/images/5012e893b3653499c735fcdad8f2550cd936244d288805f7976e4ca5d74e7d75.jpg)
text_image
DoneMeter Check
Current Count
Meter 1 0
Meter 2 0
Meter 3 0
Machine Number : 1234567890
![XEROX 6030 - When [Custom Presets] is selected - 2](/content/2026/05/1061283/images/bc2b31f8571a640bf1f07b0b23e274bd41cec070cb8635c7844085045abca751.jpg)
text_image
Media setting/Trimming
Done
Roll 1
Size series Media type Weight
ISO A Bond Light
Roll 2
ISO A Bond Light
Tray 3
ISO A Bond Light
Tray 4
ISO A Vellum Light
Manual feed
ISO A Bond Light
![XEROX 6030 - When [Custom Presets] is selected - 3](/content/2026/05/1061283/images/edf704cf88e45b5c560462df269bd12cb5b53b4da9aa75b91e69d915ce551755.jpg)
text_image
Custom Presets Done
System Presets...
Copy Features...
[System Presets] sets up the operating parameters for the machine, such as the system clock and the power saver mode settings.
Refer to
Refer to "5.2 Setting up the System Presets" for further details.
[Copy Features] sets up the copying parameters, such as the copier's default values for copying and the media types to use in the auto mode.
Refer to
Refer to "5.3 Setting up the Copy Features" for further details.

flowchart
graph TD
    A["Custom Presets – System Presets Done"] --> B["Time & Date... Timer..."]
    B --> C["How to start scanning..."]
    C --> D["Other System Presets..."]
    D --> E["Scan Speed..."]
    E --> F["Auto Clear/Backlight Off."]
    E --> G["Attention Tone..."]
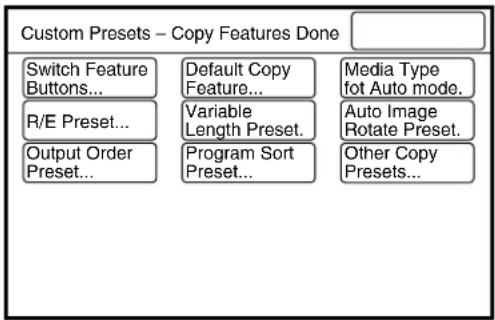
flowchart
graph TD
    A["Switch Feature Buttons..."] --> B["Default Copy Feature..."]
    C["R/E Preset..."] --> D["Variable Length Preset."]
    E["Output Order Preset..."] --> F["Program Sort Preset..."]
    G["Media Type fot Auto mode."] --> H["Auto Image Rotate Preset."]
    I["Other Copy Presets..."] --> J["Output Order Preset..."]

When [Software Version] is selected
Displays the versions of the software which are installed on the machine.
![XEROX 6030 - When [Software Version] is selected - 1](/content/2026/05/1061283/images/a8863c328924e703cb48fd584417653cdea007f92d035c569d4479ecbeec403c.jpg)
text_image
Software Version
Done
Items Setting
1.XXXXXXXXXXXX XXXXXXXXXXXXXXX
2.XXXXXXXXXXXX XXXXXXXXXXXXXXX
3.XXXXXXXXXXXX XXXXXXXXXXXXXXX
4.XXXXXXXXXXXX XXXXXXXXXXXXXXX
5.XXXXXXXXXXXX XXXXXXXXXXXXXXX
6.XXXXXXXXXXXX XXXXXXXXXXXXXXX
7.XXXXXXXXXXXX XXXXXXXXXXXXXXX
8.XXXXXXXXXXXX XXXXXXXXXXXXXXX
9.XXXXXXXXXXXX XXXXXXXXXXXXXXX
10.XXXXXXXXXXXX XXXXXXXXXXXXXXX
▲ ▼ n/n Previous Next
![XEROX 6030 - When [Software Version] is selected - 2](/content/2026/05/1061283/images/920e088ce2fbfe54bc1c99dbc8d1c5633cb7d0b9cb82e8dc2345bbb2581abaec.jpg)
When [System Configuration] is selected
Displays the configuration of the machine, e.g., the installed memory and the installed options.
![XEROX 6030 - When [System Configuration] is selected - 1](/content/2026/05/1061283/images/fbec1444d038a1ebf2df7ce872e0df64decef8663c7bc39777cd4901fc22b6fb.jpg)
text_image
System Configuration
Done
Items Setting
1.XXXXXXXXXXXX XXXXXXXXXXXXXXX
2.XXXXXXXXXXXX XXXXXXXXXXXXXXX
3.XXXXXXXXXXXX XXXXXXXXXXXXXXX
4.XXXXXXXXXXXX XXXXXXXXXXXXXXX
5.XXXXXXXXXXXX XXXXXXXXXXXXXXX
6.XXXXXXXXXXXX XXXXXXXXXXXXXXX
7.XXXXXXXXXXXX XXXXXXXXXXXXXXX
8.XXXXXXXXXXXX XXXXXXXXXXXXXXX
9.XXXXXXXXXXXX XXXXXXXXXXXXXXX
10.XXXXXXXXXXXX XXXXXXXXXXXXXXX
▲ ▼ n/n Previous Next
![XEROX 6030 - When [System Configuration] is selected - 2](/content/2026/05/1061283/images/3bc10eadec4d55395801d77256f0ec48d346863d34fa1d7bcbeac58b2dfc75e3.jpg)
When [Document size series] is selected
Displays the size series selections for document size detection.
Refer to
Refer to "5.5 Document Size Series" for further details.
![XEROX 6030 - When [Document size series] is selected - 1](/content/2026/05/1061283/images/177ad74a59e551214dc0531f937331e222b559d662a27cc45416dbd7bd9b06ab.jpg)
text_image
Original detect
Size series setting
Cancel Done
A size series
B size series
SP. A-1
SP. A-2
ANSI
ARCH
The items listed in the table below can be accessed from the copier control panel by pressing the key, selecting [Custom Presets], and then selecting [System Presets].
| System Presets |
| Time & Date Sets up the system | clock and calendar. |
| Timer Sets up the amount of time | that must elapse beforethe machine enters each of the three power saver modes. |
| Auto Clear/Backlight Off Auto Clear | ar automatically resets the copy settings ofthe most recent copy job to the current machine default settings. Backlight Off enables or disables the copier control panel backlight. If either of these settings is enabled, the user can specify the amount of time that must elapse from the end of the previous job until they take effect. |
| How to Start Scanning This selection | tion determines how to initiate document scanning, that is, [Auto Start] (scanning starts when the lead edge of the document is detected by the scanner), or [Manual Start] (when the user presses thekey). |
| Scan Speed Enables or disables | the slow scanning speed function. Slow speed scanning helps protect delicate originals from damage. |
| Attention Tone Turns On and Off | the tones that sound when the keys on the control panel are pressed, and when the warm up period ends. |
| Other System Presets Sets up all | other system presets. |
This selection sets up the system date and time.
Procedure
1 Select [Time & Date...] on the [Custom Presets – System Presets] screen.

flowchart
graph TD
    A["Custom Presets – System Presets Done"] --> B["Time & Date... Timer..."]
    A --> C["How to start scanning..."]
    A --> D["Other System Presets..."]
    A --> E["Scan Speed..."]
    A --> F["Auto Clear/Backlight Off."]
    A --> G["Attention Tone..."]
2 The [ ] mark indicates the active data entry field. Enter the required value on the keypad, and then press the [Scroll] button.
The [ ] mark will move to the next field.
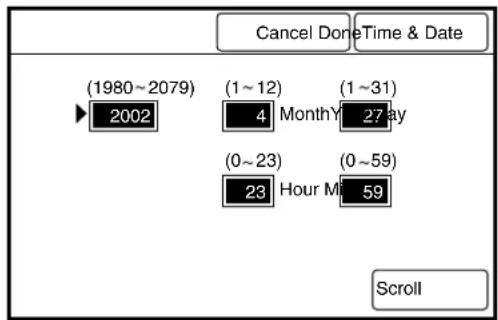
text_image
Cancel DoneTime & Date
(1980~2079) (1~12) (1~31)
2002 4 Month Y 27 May
(0~23) (0~59)
23 Hour M 59
Scroll
3 Enter the next value on the keypad, and then press the [Scroll] button.
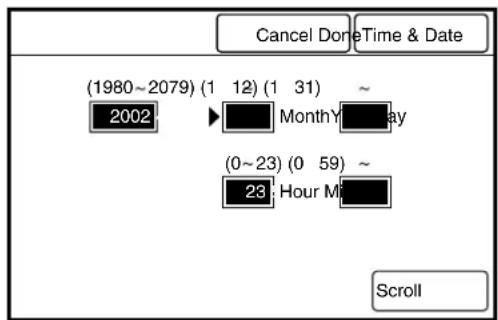
text_image
Cancel Done Time & Date
(1980~2079) (1 12) (1 31) ~
2002 Month Day
(0~23) (0 59) ~
23 Hour M
Scroll
4 Press the [Done] button when all values are set up.
The specified values will be saved and the screen will return to the [Custom Presets – System Presets] screen.
These settings determine when the machine will enter each of the power save modes. The power save feature reduces the machine's power consumption between copy and print jobs.
| Power saveLow Power Mode 1 | Reduces the temperature of the fuser. The amount of time that must elapse since the previous job was completed can be set from 1 to 120 minutes. The default setting is 5 minutes. |
| Power saveLow Power Mode 2 | Reduces the temperature of the fuser further. The amount of time that must elapse since the previous job was completed can be from 5 to 120 minutes. The default setting is 15 minutes. |
| Power saveSleep Mode | Automatically switches off the printer power. The amount of time that must elapse since the previous job was completed can be from 15 to 120 minutes. The default setting is 90 minutes. |
The Low Power and Sleep Modes will be canceled when any of the following occur:
- The key on the copier control panel is pressed.
• A print job is received.
- The key on the printer control panel is pressed.
Procedure
1 Select [Timer...] on the [Custom Presets – System Presets] screen.

flowchart
graph TD
    A["Custom Presets – System Presets Done"] --> B["Time & Date... Timer..."]
    A --> C["How to start scanning..."]
    A --> D["Other System Presets..."]
    A --> E["Scan Speed..."]
    A --> F["Auto Clear/Backlight Off."]
    A --> G["Attention Tone..."]
2 Select the required mode with the [▲ and [ ]▼ buttons, and then press the [Open] button.
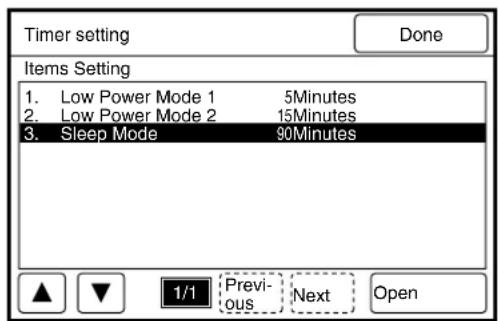
text_image
Timer setting
Done
Items Setting
1. Low Power Mode 1 5Minutes
2. Low Power Mode 2 15Minutes
3. Sleep Mode 90Minutes
▲ ▼ 1/1 Previous Next Open
3 Select the time with the [ ] and [▼buttons, and then press the [Done] button.
The selection will display on the timer setting screen.
4 Press the [Done] button again.
The selected values will be saved and the [Custom Presets – System Presets] screen will reappear.
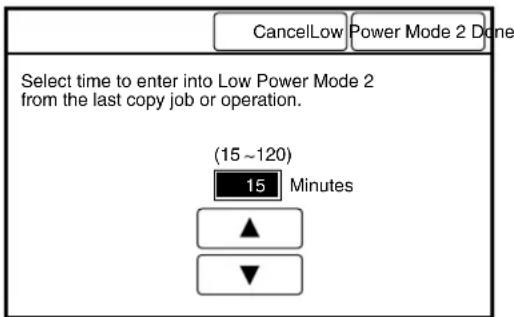
text_image
CancelLow Power Mode 2 Done
Select time to enter into Low Power Mode 2
from the last copy job or operation.
(15 ~ 120)
Minutes
▲
▼
Specifies whether or not to automatically reset the system to the copy defaults, and switch off the touch panel's backlight. The default value when shipped from the factory is [No].
| Auto Clear This function has the same effect as pressing the |
| key at the end of a copy job. The system will clear all current copy settings and revert to the default settings after a preset period elapses with no selections being made on the control panel. |
| Backlight Off Determines whether the backlight will be switched off |
| after a preset period elapses with no selections made on the control panel. |
| Select time from the end of copy/last job | Sets the time-out interval that must elapse before the machine reverts to the default copy settings or switches off the backlight. The setting may range from 30 to 180 seconds, in increments of 30 seconds. |
These modes can be cancelled by performing the following.
- Pressing any button on the control panel.
- Touching the touch panel display (setup screen)
Procedure
1 Select [ Auto Clear/Backlight Off] on the [Custom Presets – System Presets] screen.

flowchart
graph TD
    A["Custom Presets – System Presets Done"] --> B["Time & Date... Timer..."]
    A --> C["How to start scanning..."]
    A --> D["Other System Presets..."]
    A --> E["Scan Speed..."]
    A --> F["Auto Clear/Backlight Off."]
    A --> G["Attention Tone..."]
2 Select [Yes] or [No] to specify whether or not to automatically reset the system and switch off the backlight.
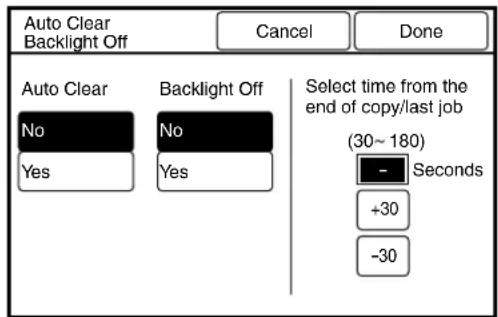
text_image
Auto Clear
Backlight Off
Cancel
Done
Auto Clear
No
Backlight Off
No
Select time from the
end of copy/last job
(30~180)
-
Seconds
+30
-30
3 If [Yes] is selected, set the time-out interval using the [+30] and [-30] buttons.
The selected values will be saved and the screen will return to the [Custom Presets - System Presets] screen.
Determines whether scanning will start automatically or by pressing the key. The default value when shipped from the factory is [Auto Start].
Auto Start Automatically starts scanning when the lead edge of the document is detected by the scanner.
Manual Start Starts scanning when the key is pressed.
Procedure
1 Select [How to Start Scanning] on the [Custom Presets – System Presets] screen.

flowchart
graph TD
    A["Custom Presets – System Presets Done"] --> B["Time & Date... Timer..."]
    B --> C["How to start scanning..."]
    C --> D["Other System Presets..."]
    D --> E["Scan Speed..."]
    E --> F["Auto Clear/Backlight Off."]
    E --> G["Attention Tone..."]
2 Select either [Auto Start] or [Manual Start] as the method to start scanning.

text_image
CancelHow to start scanning
Auto Start
Manual Start
Auto Start :
Start scanning automatically
when document is set.
Manual Start :
Start scanning after 'Start'
button is pressed.
3 Press the [Done] button.
The specified values will be saved and the screen will return to the [Custom Presets – System Presets] screen.
This setting determines whether or not the low document scanning speed will be enabled when the key on the control panel is pressed. The scanning speed is reduced by fifty percent if this parameter is set to [On]. The default value when shipped from the factory is [Off].
Procedure
1 Select [Scan Speed...] on the [Custom Presets – System Presets] screen.

flowchart
graph TD
    A["Custom Presets – System Presets Done"] --> B["Time & Date... Timer..."]
    A --> C["How to start scanning..."]
    A --> D["Other System Presets..."]
    A --> E["Scan Speed..."]
    A --> F["Auto Clear/Backlight Off..."]
    A --> G["Attention Tone..."]
2 Select [On] to enable low speed scanning. Select [Off] to disable low speed scanning.
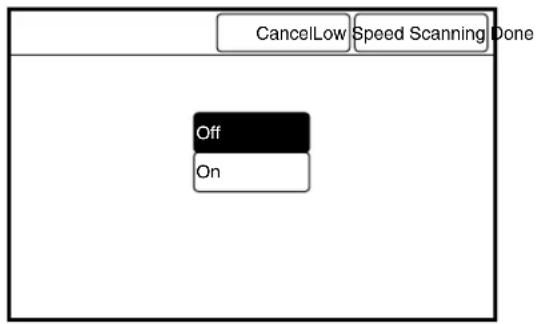
text_image
CancelLow Speed Scanning Done
Off
On
3 Press the [Done] button.
The specified values will be saved and the screen will return to the [Custom Presets – System Presets] screen.
This feature sets up the attention tones. The default value when shipped from the factory is [On] for all tones.
Normal This setting determines whether or not to sound a tone when the buttons on the control panel are accepted by the system.
Alarm This setting determines whether or not to sound a tone when the buttons on the control panel are not accepted by the system.
Ready to Copy This setting determines whether or not to sound a tone when the warm up period ends.
Procedure
1 Select [Attention Tone...] on the [Custom Presets – System Presets] screen.
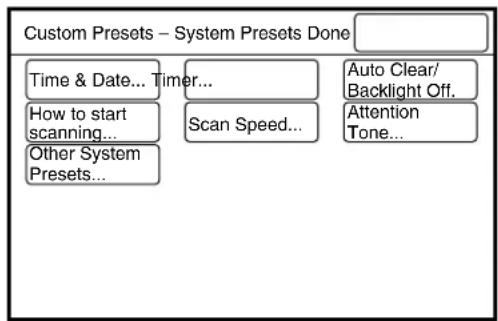
flowchart
graph TD
    A["Custom Presets – System Presets Done"] --> B["Time & Date... Timer..."]
    A --> C["How to start scanning..."]
    A --> D["Other System Presets..."]
    A --> E["Scan Speed..."]
    A --> F["Auto Clear/Backlight Off."]
    A --> G["Attention Tone..."]
2 Select the required item with the use of the [▲and [ ]▼buttons, and then press the [Open] button.
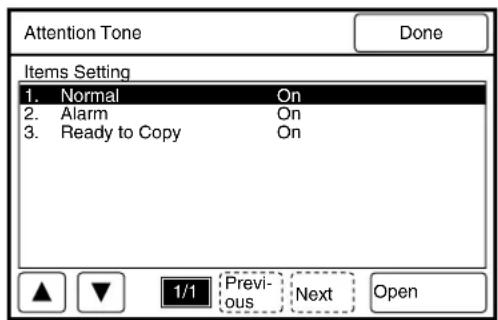
text_image
Attention Tone
Done
Items Setting
1. Normal On
2. Alarm On
3. Ready to Copy On
▲ ▼ 1/1 Previous Next Open
3 Select [On] to enable the selected feature; select [Off] to disable the feature. Press the [Done] button. The selection will display on the [Attention Tone] setup screen.
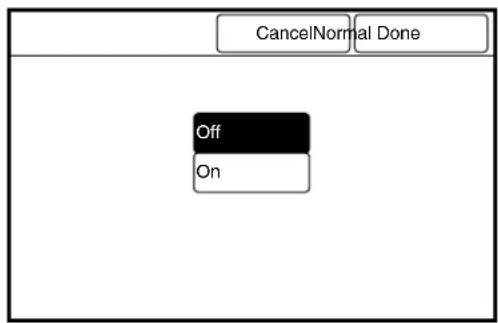
text_image
CancelNormal Done
Off
On
4 Press the [Done] button.
The selected values will be saved and the screen will return to the [Custom Presets – System Presets] screen.
To access the Other System Presets, select the [Other System Presets] button on the [Custom Presets - System Presets] screen. These selections can be used to set up all of the remaining system presets (see the table below).
| Code Number | Other System Preset (description) Change Default | | |
| 0 Determines whether or not to switch from the tray to the roll automatically. (N/A for 6030/6050) | No: 0Yes: 1 | No: 0 |
| 1 Determines whether or not to switch from the roll to the tray automatically. | No: 0Yes: 1 | No: 0 |
| 2 Sets up the priority sequence for roll 1. 0 to 4 1 | | |
| 3 Sets up the priority sequence for roll 2. 0 to 4 2 | | |
| 4 Sets up the priority sequence for roll 3. 0 to 4 3 | | |
| 5 Sets up the priority sequence for roll 4. 0 to 4 4 | | |
| 6 Reserved - - | | |
| 7 Reserved - - | | |
| 8 Sets up the priority sequence for manual feeding. | 0 to 6 0 | |
| 9 Sets up the minimum length of the guaranteed cut when synchronized cutting is selected. | 0 to 15 m(Subsequent documents will not be scanned until the previous copy has printed when this parameter is set to [0] or to a value that exceeds the capacity of the memory.) | 7 m |
| 10 Determines whether copies will print while scanning is being performed when synchronized cutting has been selected. | No: 0 (copies will print while the document is being scanned.)Yes: 1 (copies will print after scanning is completed.) | Yes: 1 |
| 11 Sets up the roll or tray to be used when printing stamp lists and the contents of the job memory. | Roll 1: 0 Roll 2: 1Roll 3: 2 Roll 4: 3 | Roll 1: 0 |
| 12 Sets up the media cut mode to be used when printing stamp lists and the contents of the job memory. | Standard Portrait: 0Standard Landscape: 1Variable Length: 2Synchronized: 3 | Standard Portrait: 0 |
| 13 Enables or disables the sleep mode. Not Disable: 0 | Disable: 1 | Not Disable: 0 |
| 14 Sets up the amount of time that the image data from the previous job will be stored in memory, thereby enabling the [Copy From Memory] feature.Once the time set here elapses, the stored image data will be erased. | Time (seconds) 60 seconds | |
| 15 Sets up the time period during which an interruption job must begin after thekey is pressed.Once the time set here elapses, the interruption mode is cancelled. | Time (seconds) 60 seconds | |
| 16 Determines if the document scanning width will be fixed at 36". | No: 0 (Scan at the standard sizes detected by the document size sensor.)Yes: 1 (Scan at a fixed size of 36".) | No: 0 |
| 17 Determines if the auto mode function will link with document size series setting. | Link with document size series: 1Do not link with document size series: 0 | Not linked: 0 |
| 18 Sets up the density of the gray stamp. Light: 0, Normal: 1, Dark: 2,Darker: 3, Darkest: 4 | Normal: 1 |
Procedure
1 Select [Other System Presets] on the [Custom Presets – System Presets] screen.
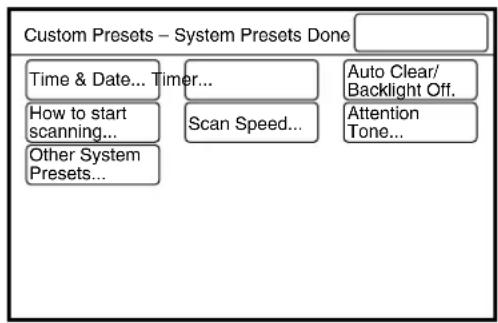
flowchart
graph TD
    A["Custom Presets – System Presets Done"] --> B["Time & Date... Timer..."]
    A --> C["How to start scanning..."]
    A --> D["Other System Presets..."]
    A --> E["Scan Speed..."]
    A --> F["Auto Clear/Backlight Off."]
    A --> G["Attention Tone..."]
2 Enter the Code Number from the Other System Presets table using the numeric keypad, and then press the [Scroll] button.
The [▶] mark will move to the next field.
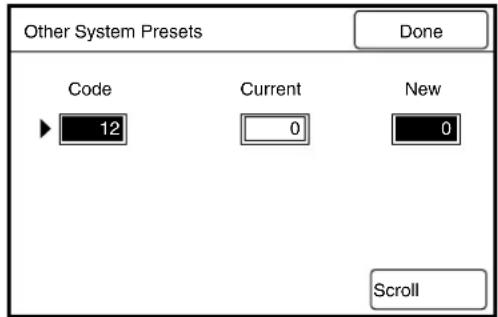
text_image
Other System Presets
Done
Code Current New
12 0 0
Scroll
3 Referring to the Change column in the table above, enter the desired value in the [New] field using the numeric keypad, and then press the [Scroll] button.
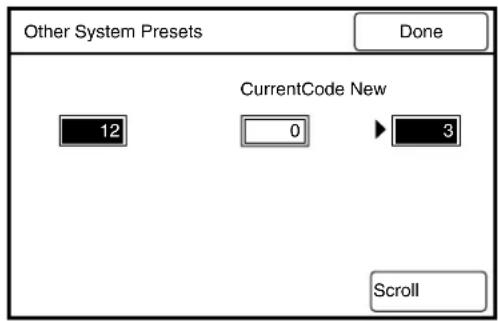
text_image
Other System Presets
Done
CurrentCode New
12 0 3
Scroll
4 Press the [Done] button.
The specified values will be saved and the screen will return to the [Custom Presets – System Presets] screen.
The copy features (copying parameters) are defined in the table below. To set up the copy features, press the key, select [Custom Presets], and then select [Copy Features].
| Copy Features |
| Switch Feature Buttons Lays | out the menus and features on the touch panel. |
| Default Copy Features Sets up | up the copying settings that the system returns to when thekey is pressed. |
| Media Type for Auto Mode S | Specifies the default media type when copying in the auto mode. |
| R/E Preset Defines the preset | reduction and enlargement settings. |
| Variable Length Preset Sets up | up the default values for the variable lengths specified for each media size. |
| Auto Image Rotation When m | media that matches the portrait dimension of an original is not available, this function will rotate the image 90 degrees (from portrait to landscape) and print it on media that matches the image's landscape dimension. This feature requires that the width of at least one media roll is the same as either the length or the width of the original.ImportantThis setting is valid only when [Portrait] is selected in Auto Mode.Auto Image Rotation becomes invalid when any of the following are set up for a job.FolderLead/Trail Margin, Image Location, Scan Start Position, Edge EraseMulti Job |
| Output Order Preset Determin | whether copies will be printed in ascending order (first to last) or descending order (last to first) when sorting is selected. |
| Program Sort Preset Sets up | the sorting programs. |
| Setting Up the Other Copy Presets | Sets up other copy presets. |
This feature enables the user to customize the layout of the copy setup screens by placing the items that are used the most often on the top screen.
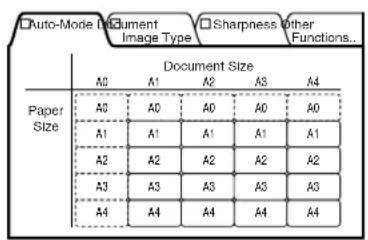
text_image
Auto-Mode Document
Image Type
Sharpness other
Functions...
Document Size
A0 A1 A2 A3 A4
Paper
Size
A0 A0 A0 A0 A0
A1 A1 A1 A1 A1
A2 A2 A2 A2 A2
A3 A3 A3 A3 A3
A4 A4 A4 A4 A4
Tab1
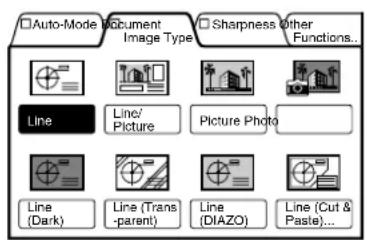
text_image
Auto-Mode Document Image Type Sharpness other Functions...
Line Line Picture Picture Photo
Line (Dark) Line (Trans -parent) Line (DIAZO) Line (Cut & Paste)...
Tab2
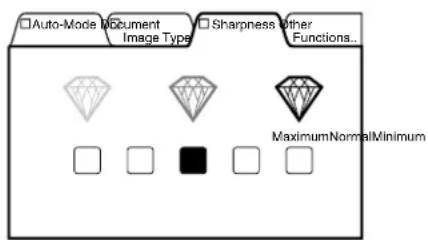
text_image
Auto-Mode Document
Image Type
Sharpness other
Functions...
MaximumNormalMinimum
Tab3
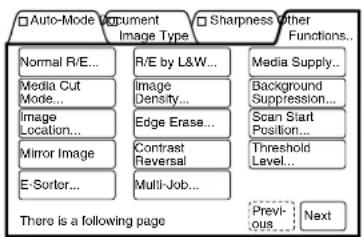
flowchart
graph TD
    A["□ Auto-Mode Document Image Type"] --> B["Normal R/E..."]
    A --> C["Media Cut Mode..."]
    A --> D["Image Location..."]
    A --> E["Mirror Image"]
    A --> F["E-Sorter..."]
    G["□ Sharpness other Functions..."] --> H["Media Supply..."]
    G --> I["Background Suppression..."]
    G --> J["Scan Start Position..."]
    G --> K["Threshold Level..."]
    G --> L["Previous Next"]
    M["There is a following page"] --> N["Previous Next"]
Tab4 P1 Tab4 P2
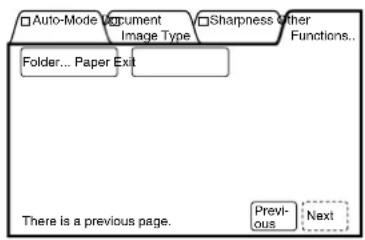
text_image
Auto-Mode Document Image Type Sharpness other Functions...
Folder... Paper Ext
There is a previous page.
Previous Next
Procedure
1 Select [Switch Feature Buttons] on the [Custom Presets – Copy Features] screen.
The [Switch copy function button] screen will display.
2 Select the item (tab or menu) that is to be placed on a tab in the copier's menu screen, and then press the [Open] button.

Press the [Next] button if the required menu is not displayed on the screen.
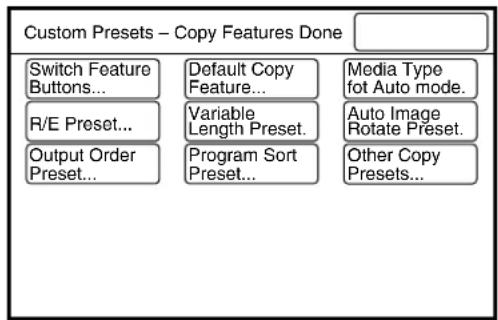
text_image
Custom Presets – Copy Features Done
Switch Feature Buttons...
R/E Preset...
Output Order Preset...
Default Copy Feature...
Variable Length Preset...
Program Sort Preset...
Media Type fot Auto mode.
Auto Image Rotate Preset.
Other Copy Presets...
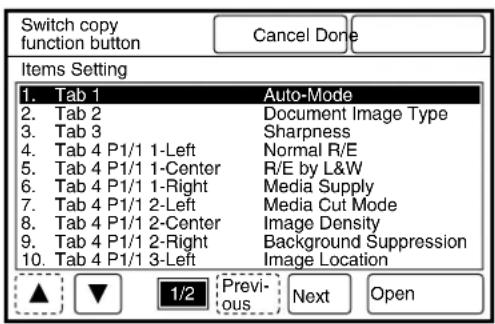
text_image
Switch copy
function button
Cancel Done
Items Setting
1. Tab 1 Auto-Mode
2. Tab 2 Document Image Type
3. Tab 3 Sharpness
4. Tab 4 P1/1 1-Left Normal R/E
5. Tab 4 P1/1 1-Center R/E by L&W
6. Tab 4 P1/1 1-Right Media Supply
7. Tab 4 P1/1 2-Left Media Cut Mode
8. Tab 4 P1/1 2-Center Image Density
9. Tab 4 P1/1 2-Right Background Suppression
10. Tab 4 P1/1 3-Left Image Location
▲ ▼ 1/2 Previous Next Open
3 Select the tab or the menu that is to be replaced by the tab or menu selected in step 2.
The menu will be placed in this location.
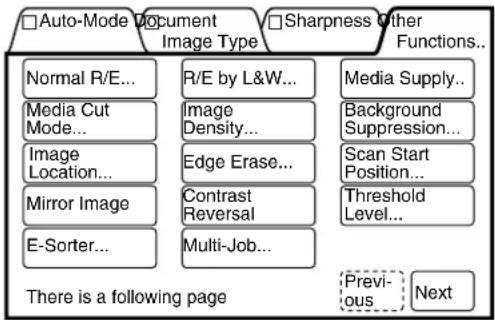
flowchart
graph TD
    A["□Auto-Mode Document Image Type"] --> B["Normal R/E..."]
    A --> C["Media Cut Mode..."]
    A --> D["Image Location..."]
    A --> E["Mirror Image"]
    A --> F["E-Sorter..."]
    G["□Sharpness Other Functions..."] --> H["R/E by L&W..."]
    G --> I["Image Density..."]
    G --> J["Edge Erase..."]
    G --> K["Contrast Reversal"]
    G --> L["Multi-Job..."]
    M["Media Supply..."] --> N["Background Suppression..."]
    M --> O["Scan Start Position..."]
    M --> P["Threshold Level..."]
    Q["There is a following page"] --> R["Previous"]
    Q --> S["Next"]
4 Press the [Done] button when all values have been set.
The specified values will be saved and the screen will return to the [Custom Presets – Copy Features] screen.
The Default Copy Features are defined in the table below. The system returns to these settings when the machine power is switched on, when the key is pressed, and when the automatic reset function ([Auto Clear]) activates. Defining the most frequently used settings as the defaults reduces the need to reset the parameters every time a copy is made.
| No. | Copy Function Available Values | Default when shipped form the factory |
| 1 | Default Mode Auto Mode, Manual Mode Auto Mode | |
| 2 | Auto Mode Used to map document sizes to media sizes. - | |
| 3 | Reduce/Enlarge Presets | 25 to 400% 200.0%, 141.1%, | 70.7%, 50.0%, 35.3%, 25.0% |
| 4 | Media Supply Default | Roll 1, Roll 2, Roll 3, Roll 4, Manual Feed Roll 1 | |
| 5 | Media Cut Mode Default | Standard Portrait, Standard Landscape, Synchronized, Variable Length | Standard Portrait |
| 6 | Lead/Trail Margin Lead margin: 0 to 999 mm/0 to 39.0 inches Trail margin: 0 to 999 mm/0 to 39.0 inches | Lead margin 0 mm/in. Trail margin 0 mm/in. |
| 7 | Image Density Darker, Normal, Lighter (9 steps) Normal | |
| 8 | Background Suppression | Auto Adjustment (7 steps), Manual Adjustment (39 steps) | Automatic (standard) |
| 9 | Document Image Type | Line, Line/Picture, Picture, Photo, Line (Dark), Line (Transparent), Line (DIAZO), Line (Cut & Paste) | Line |
| 10 | Sharpness Minimum to Normal to Maximum (5 steps) Normal | |
| 11 | Image Location Up/Down ± 999 mm/39.0 inches Left/Right ± 500 mm/19.0 inches | Up/Down 0 mm/in. Left/Right 0 mm/in. |
| 12 | Edge Erase Lead Edge Erase: 0 to 50 mm/0 to 2.0 inches Trail Edge Erase: 0 to 50 mm/0 to 2.0 inches Left Erase: 0 to 50 mm/0 to 2.0 inches Right Erase: 0 to 50 mm/0 to 2.0 inches | Lead Edge 0 mm/in. Trail Edge 0 mm/in. Left 0 mm/in. Right 0 mm/in. |
| 13 | Scan Start Position Top/Bottom ± 999 mm/39.0 inches Left/Right ± 500 mm/19.0 inches | Up/Down 0 mm/in. Left/Right 0 mm/in. |
| 14 | Threshold Level On, Off | Off |
| 15 | Banner Sheet On, Off | Off |
| 16 | Sample Copy Start Position: 0 to 1.2 m/0 to 47.0 inches Measurement: 50 to 200 mm/2.0 to 7.5 inches | Start Position 0 mm/in. Measurement 50 mm/2.0 inches |
Procedure
1 Select [Default Copy Feature...] on the [Custom Presets – Copy Features] screen.

flowchart
graph TD
    A["Switch Feature Buttons..."] --> B["Default Copy Feature..."]
    C["R/E Preset..."] --> D["Variable Length Preset."]
    E["Output Order Preset..."] --> F["Program Sort Preset..."]
    G["Media Type fot Auto mode."] --> H["Auto Image Rotate Preset."]
    I["Other Copy Presets..."] --> J["Output Order Preset..."]
2 Select the item to be set up using the [▲ and [ ]▼ buttons, and then press the [Open] button.
Note
Press the [Next] button if the required menu is not displayed on the screen.
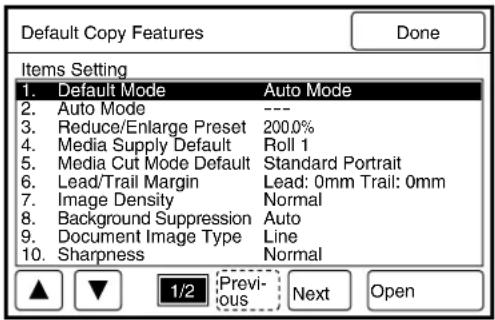
text_image
Default Copy Features
Done
Items Setting
1. Default Mode Auto Mode
2. Auto Mode ---
3. Reduce/Enlarge Preset 200.0%
4. Media Supply Default Roll 1
5. Media Cut Mode Default Standard Portrait
6. Lead/Trail Margin Lead: 0mm Trail: 0mm
7. Image Density Normal
8. Background Suppression Auto
9. Document Image Type Line
10. Sharpness Normal
▲ ▼ 1/2 Previous Next Open
3 Change the default setting as required, and then press the [Done] button.
The entered value will be displayed on the default copy features screen.
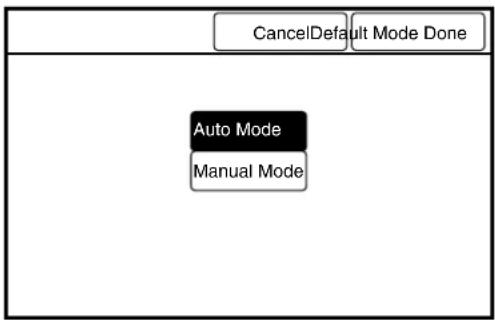
text_image
CancelDefault Mode Done
Auto Mode
Manual Mode
4 Press the [Done] button when all values have been set up.
The specified values will be saved and the screen will return to the [Custom Presets – Copy Features] screen.
Sets up the media type for each media size for auto mode copying. The selections include [Not Selected], [Bond], [Film], and [Vellum].
A [No Paper] error will be triggered if the media specified here is not loaded in the machine.
Refer to "3.2 Making Copies in the Auto Mode" for details on the auto mode.
Procedure
1 Select [Media Type for Auto mode] on the [Custom Presets – Copy Features] screen.
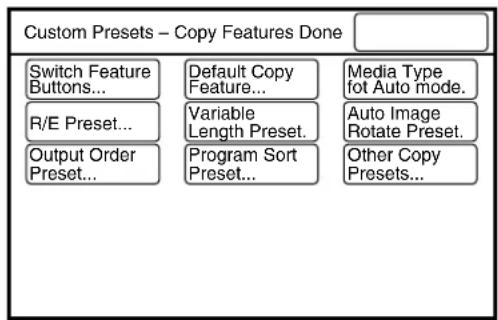
text_image
Custom Presets – Copy Features Done
Switch Feature Buttons...
R/E Preset...
Output Order Preset...
Default Copy Feature...
Variable Length Preset.
Program Sort Preset...
Media Type fot Auto mode.
Auto Image Rotate Preset.
Other Copy Presets...
2 Select the media type for each media size.
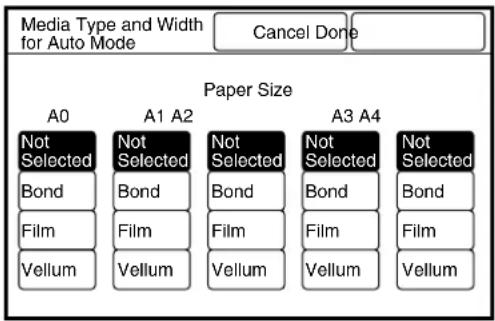
text_image
Media Type and Width
for Auto Mode
Cancel Done
Paper Size
A0 A1 A2 A3 A4
Not Selected Not Selected Not Selected Not Selected Not Selected
Bond Bond Bond Bond Bond
Film Film Film Film Film
Vellum Vellum Vellum Vellum Vellum
3 Press the [Done] button.
The specified values will be saved and the screen will return to the [Custom Presets – Copy Features] screen.
Sets up the reduction and enlargement presets that are displayed on the setup screen when [R/E Presets] is selected.
Procedure
1 Select [R/E Preset...] on the [Custom Presets – Copy Features] screen.
The [Reduce/Enlarge Presets] screen displays.
2 Select the item to be set up using the [▲and [ ] Buttons, and then press the [Open] button.
3 Set up the required percentages (25 to 400%) using the [▲] and [▼] buttons, and then press the [Done] button.
The entered value will be displayed on the [Reduce/Enlarge Presets] screen.
Note
Press the [+0.1] and [-0.1] buttons to increase or decrease
the value in increments of 0.1.
4 Press the [Done] button when all values have been set.
The specified values will be saved and the screen will return to the [Custom Presets – Copy Features] screen.
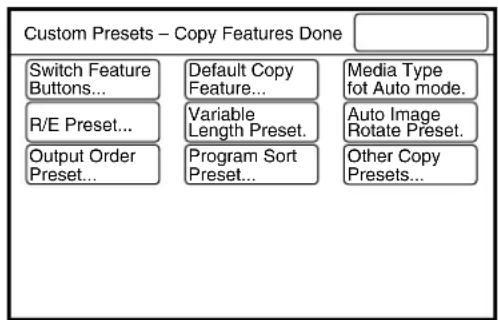
text_image
Custom Presets – Copy Features Done
Switch Feature Buttons...
R/E Preset...
Output Order Preset...
Default Copy Feature...
Variable Length Preset...
Program Sort Preset...
Media Type fot Auto mode.
Auto Image Rotate Preset.
Other Copy Presets...
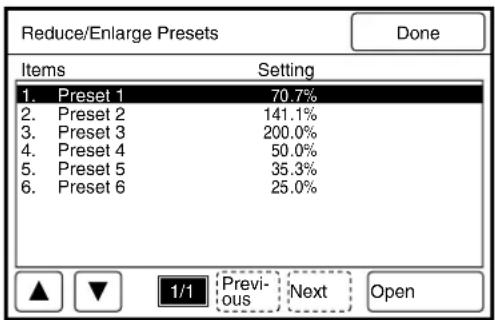
text_image
Reduce/Enlarge Presets
Done
Items Setting
1. Preset 1 70.7%
2. Preset 2 141.1%
3. Preset 3 200.0%
4. Preset 4 50.0%
5. Preset 5 35.3%
6. Preset 6 25.0%
▲ ▼ 1/1 Previous Next Open
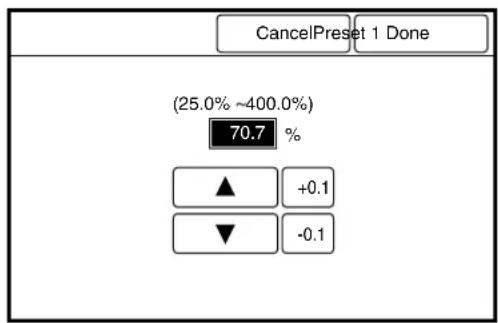
text_image
CancelPreset 1 Done
(25.0% ~400.0%)
70.7 %
▲ +0.1
▼ -0.1
Sets up the default values for the [Variable Length] displayed on the setup screen when the media cut mode is specified. The paper sizes can be set up within a range of 210 to 15,000 mm for each media size.

The maximum length that can be printed will differ based on the width of the selected media and whether or not the optional Print Length Extension Memory (512 MB) is installed.
Procedure
1 Select [Variable Length Preset] on the [Custom Presets – Copy Features] screen.
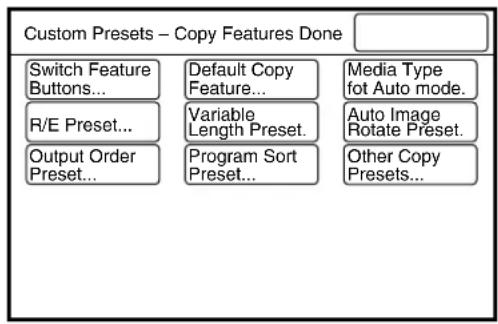
flowchart
graph TD
    A["Custom Presets – Copy Features Done"] --> B["Switch Feature Buttons..."]
    A --> C["Default Copy Feature..."]
    A --> D["Media Type fot Auto mode."]
    A --> E["R/E Preset..."]
    A --> F["Variable Length Preset."]
    A --> G["Auto Image Rotate Preset."]
    A --> H["Output Order Preset..."]
    A --> I["Program Sort Preset..."]
    A --> J["Other Copy Presets..."]
2 Select the item to be set up with the use of the [▲and [ ]▼ buttons, and then press the [Open] button.
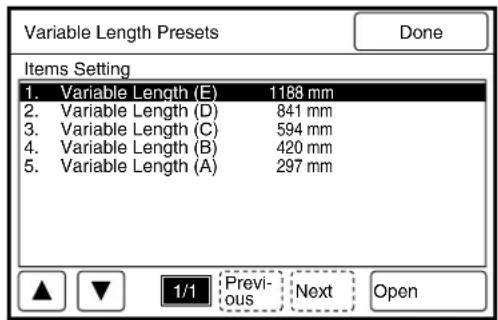
text_image
Variable Length Presets
Done
Items Setting
1. Variable Length (E) 1188 mm
2. Variable Length (D) 841 mm
3. Variable Length (C) 594 mm
4. Variable Length (B) 420 mm
5. Variable Length (A) 297 mm
▲ ▼ 1/1 Previous Next Open
3 Set the required length with the use of the [▲and [ ]▼buttons, and then press the [Done] button. The entered value will be reflected back on the Variable Length Preset screen.

text_image
CancelVariable Length (E) Done
(210 ~ 15000)
1188 mm
▲ +100
▼ -100

Press the [+100] and [-100] buttons to increase or decrease the value in increments of 100.
4 Press the [Done] button.
The specified values will be saved and the screen will return to the [Custom Presets – Copy Features] screen.
Rotates an image 90 degrees to print on landscape media when the corresponding size portrait media is unavailable.
Important
This setting is valid only when [Portrait] is selected in [Auto Mode].
Auto Image Rotation becomes invalid when any of the following are set up.
- Folder
- Lead/Trail Margin, Image Location, Scan Start Position, Edge Erase
- Multi Job
Procedure
1 Select [Auto Image Rotate Preset] from the [Custom Presets-Copy Features] Screen.
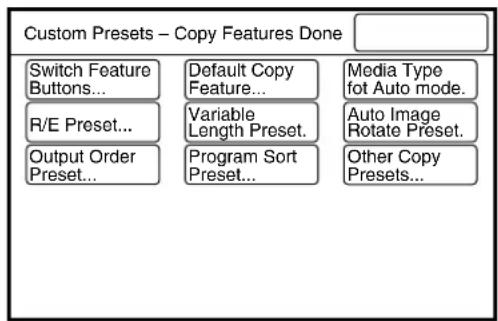
text_image
Custom Presets – Copy Features Done
Switch Feature Buttons...
R/E Preset...
Output Order Preset...
Default Copy Feature...
Variable Length Preset.
Program Sort Preset...
Media Type fot Auto mode.
Auto Image Rotate Preset.
Other Copy Presets...
2 Select [On] or [Off] for the [Auto Image Rotate].
3 Press the [Done] button.
The setting is saved, and the screen will return to the [Custom Presets-Copy Features] screen.

text_image
CancelAuto Image Rotate Done
Off
On
Rotate image 90 degrees to print on
Landscape media when corresponding
size portrait media is empty, when
[Standard Size Portrait] selected
in Auto Mode.
Determines the order in which copies will be printed when sorting or multi-job copying is selected.
The copies will be output in first-to-last order when [Ascending Order] is specified. The copies will be output in last-to-first order when [Descending Order] is specified.
Refer to
Refer to "3.16 Sorting Using E-Sorter" for details on the sorting function, and "3.17 Sorting Using Multi-Job" for details on the multi-job function.
Procedure
1 Select [Output Order Preset] on the [Custom Presets – Copy Features] screen.
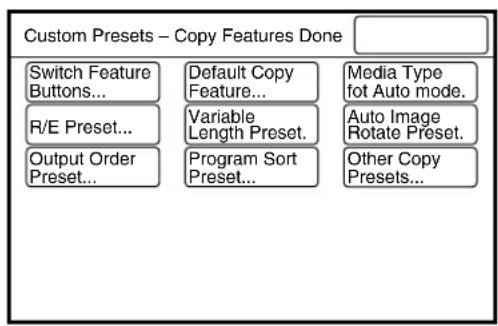
text_image
Custom Presets – Copy Features Done
Switch Feature Buttons...
R/E Preset...
Output Order Preset...
Default Copy Feature...
Variable Length Preset.
Program Sort Preset...
Media Type fot Auto mode.
Auto Image Rotate Preset.
Other Copy Presets...
2 Select the output order from either [Ascending Order] or [Descending Order].
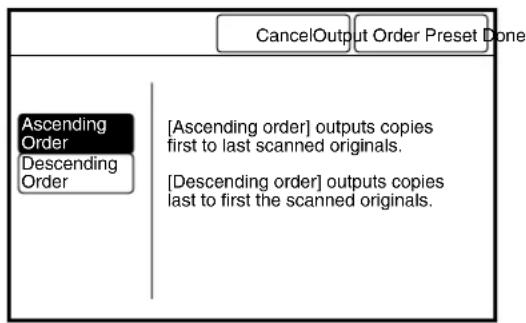
text_image
CancelOutput Order Preset Done
Ascending
Order
Descending
Order
[Ascending order] outputs copies
first to last scanned originals.
[Descending order] outputs copies
last to first the scanned originals.
3 Press the [Done] button.
The specified values will be saved and the screen will return to the [Custom Presets – Copy Features] screen.
This feature defines the number of copies that will be printed for each distribution destination when Program E-Sort is selected. A maximum of 40 groups containing 300 programs can be saved.
Refer to
Refer to "3.16 Sorting Using E-Sorter" for further details on the program sort presets.
Procedure
1 Select [Program Sort Preset] on the [Custom Presets – Copy Features] screen.

text_image
Custom Presets – Copy Features Done
Switch Feature Buttons...
R/E Preset...
Output Order Preset...
Default Copy Feature...
Variable Length Preset.
Program Sort Preset...
Media Type fot Auto mode.
Auto Image Rotate Preset.
Other Copy Presets...
2 Select the program number to be saved.
Note
The buttons outlined in dotted lines are not saved and cannot be selected.
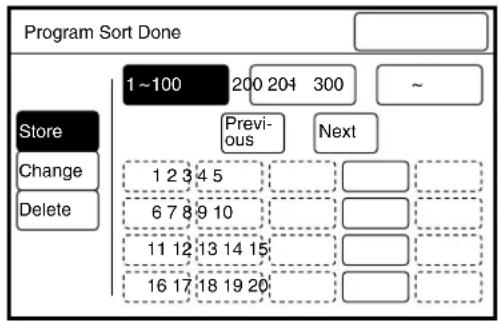
text_image
Program Sort Done
1~100 200 204 300 ~
Store
Change
Delete
Previous Next
1 2 3 4 5
6 7 8 9 10
11 12 13 14 15
16 17 18 19 20
3 Press the [Next] button if the number is over 20.
Press the [101 - 200] button if the number is over 100, and the [201 - 300] button if it is over 200.
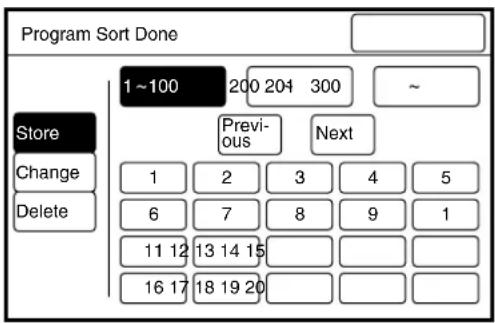
text_image
Program Sort Done
1~100 200 204 300 ~
Store
Change
Delete
Previous Next
1 2 3 4 5
6 7 8 9 1
11 12 13 14 15
16 17 18 19 20
4 Select the distribution group destination number, and enter the number of copies to be made on the keypad.
Note
Press the [Next] button if the number is over 11.
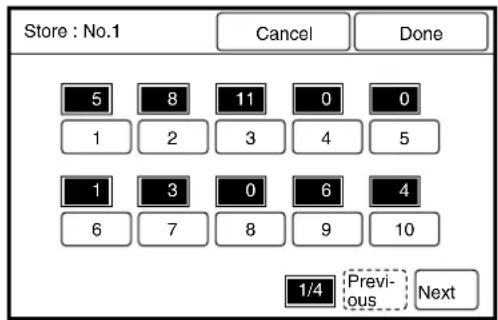
text_image
Store : No.1
Cancel Done
5 8 11 0 0
1 2 3 4 5
1 3 0 6 4
6 7 8 9 10
1/4 Previous Next
5 Press the [Done] button.
The screen will return to the [Program Sort Preset] screen.
6 Press the [Done] button when all values have been set.
The specified parameters will be saved and the screen will return to the [Custom Presets – Copy Features] screen.
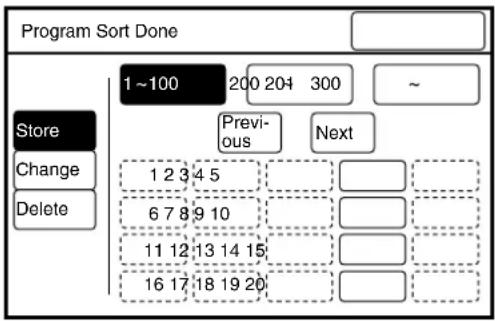
flowchart
graph TD
    A["Program Sort Done"] --> B["Store"]
    B --> C["Change"]
    B --> D["Delete"]
    C --> E["1 ~100"]
    D --> F["200 204 300"]
    E --> G["Previous"]
    F --> H["Next"]
    G --> I["1 2 3 4 5"]
    H --> J["6 7 8 9 10"]
    I --> K["11 12 13 14 15"]
    J --> L["16 17 18 19 20"]
    K --> M[" "]
    L --> N[" "]
    M --> O[" "]
Changing Program Sort Presets
1 Select [Program Sort Preset] on the [Custom Presets – Copy Features] screen.
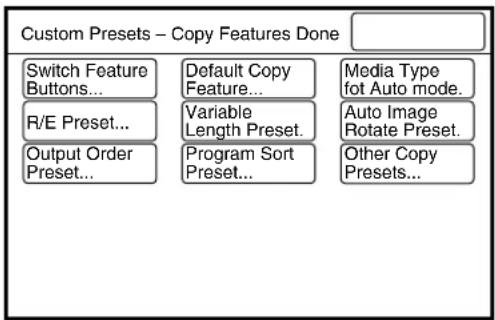
text_image
Custom Presets – Copy Features Done
Switch Feature Buttons...
R/E Preset...
Output Order Preset...
Default Copy Feature...
Variable Length Preset.
Program Sort Preset...
Media Type fot Auto mode.
Auto Image Rotate Preset.
Other Copy Presets...
2 Press the [Change] button and select the program number to be changed.
Note
- The buttons outlined in dotted lines are not saved and cannot be selected.
- Press the [Next] button if the number is to be over 20, the [101 - 200] button if it is over 100, and the [201 - 300] button if it is over 200.

text_image
Program Sort Done
1~100 101 200 204 300
Store
Change
Delete
Previous Next
1 2 3 4 5
6 7 8 9 10
11 12 13 14 15
16 17 18 19 20
3 Select the distribution group destination number, and enter the number of copies to be made with the use of the keypad.
Note
Press the [Next] button if the number is over 11.
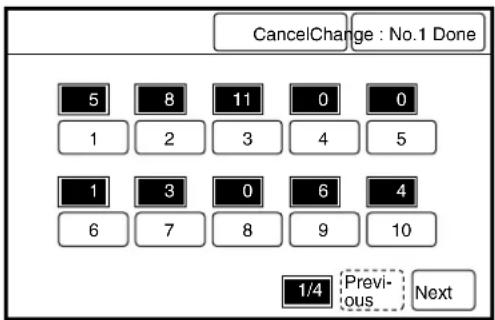
text_image
CancelChange : No.1 Done
5 8 11 0 0
1 2 3 4 5
1 3 0 6 4
6 7 8 9 10
1/4 Previous Next
4 Press the [Done] button.
The screen will return to the [Program Sort Preset] screen.
5 Press the [Done] button when all values have been set.
The specified parameters will be saved accordingly, and the screen will return to the [Custom Presets – Copy Features] screen.
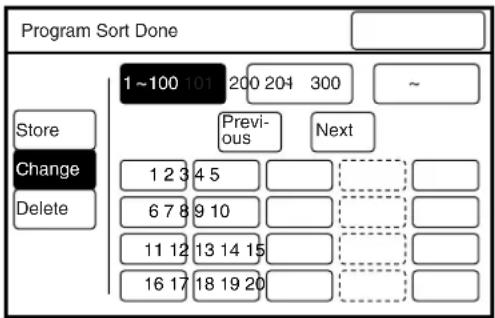
text_image
Program Sort Done
1~100 101 200 204 300
Store
Change
Delete
Previous Next
1 2 3 4 5
6 7 8 9 10
11 12 13 14 15
16 17 18 19 20
Deleting Program Sort Presets
1 Select [Program Sort Preset] on the [Custom Presets – Copy Features] screen.

flowchart
graph TD
    A["Custom Presets – Copy Features Done"] --> B["Switch Feature Buttons..."]
    A --> C["R/E Preset..."]
    A --> D["Output Order Preset..."]
    A --> E["Default Copy Feature..."]
    A --> F["Variable Length Preset."]
    A --> G["Program Sort Preset..."]
    A --> H["Media Type fot Auto mode."]
    A --> I["Auto Image Rotate Preset."]
    A --> J["Other Copy Presets..."]
2 Press the [Delete] button and select the program sort number to be deleted.
Note
- The buttons outlined in dotted lines are not saved and cannot be selected.
- Press the [Next] button if the number is to be over 20, the [101 - 200] button if it is over 100, and the [201 - 300] button if it is over 200.
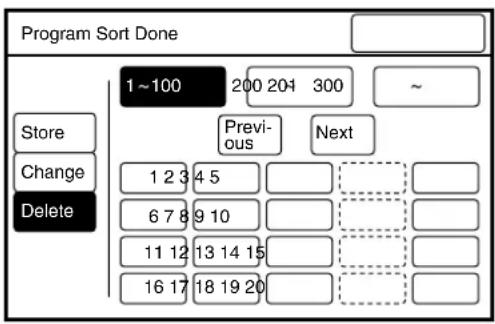
flowchart
graph TD
    A["Program Sort Done"] --> B["1~100"]
    B --> C["200 204 300"]
    C --> D["~"]
    E["Store"] --> F["Previous"]
    G["Change"] --> H["1 2 3 4 5"]
    I["Delete"] --> J["6 7 8 9 10"]
    K["11 12 13 14 15"] --> L["16 17 18 19 20"]
    M["Next"] --> N[" "]
    O[" "] --> P[" "]
    Q[" "] --> R[" "]
    S[" "] --> T[" "]
    U[" "] --> V[" "]
    W[" "] --> X[" "]
3 Select [Yes (Delete)] on the confirmation message.
The selected sort program will be deleted, and screen will return to the [Program Sort Preset] screen.
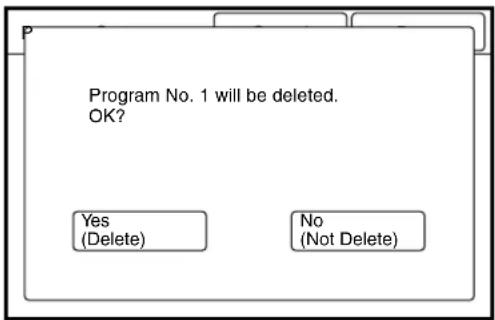
text_image
Program No. 1 will be deleted.
OK?
Yes
(Delete)
No
(Not Delete)
4 Press the [Done] button when all values have been set.
The specified parameters will be saved accordingly, and the screen will return to the [Custom Presets – Copy Features] screen.
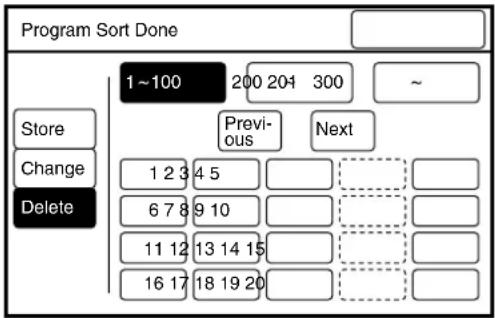
flowchart
graph TD
    A["Program Sort Done"] --> B["1~100"]
    B --> C["200 204 300"]
    C --> D["~"]
    E["Store"] --> F["Previous"]
    F --> G["Next"]
    H["Change"] --> I["1 2 3 4 5"]
    J["Delete"] --> K["6 7 8 9 10"]
    L["11 12 13 14 15"] --> M[" "]
    N["16 17 18 19 20"] --> O[" "]
The other copy presets are used to set up additional, detailed copy presets. Enter the [Code] number and the [New] parameters from the table below to set up the other system presets.
| Code | Function New parameter | Default | |
| 0 Sets the roll or tray from which to feed the banner sheet. | Roll 1: 0 Roll 2: 1Roll 3: 2 Roll 4: 3 | Roll 1:0 |
| 1 Sets up the length of the banner sheet. 210 to 15,000 mm 210 mm | |
| 2 Sets up the media type for the banner sheet. Ordinary: 0Tracing: 1Film: 2 | Ordinary: 0 |
| 3 Determines whether or not to use the smoothing function when printing. | Yes: 1No: 0 | No: 0 |
| 4 Determines whether or not to use the smoothing function when copying. | Yes: 1No: 0 | No: 0 |
| 5 Sets up the default value for the cursor ([] ▶ mark) on the control panel's [Independent Portrait/Landscape Percentage] setup screen. | Not set: 0Portrait: 1Landscape: 2 | Portrait: 1 |
| 6 Determines whether or not to perform a synchronized cut when printing a sample copy. | OFF: 0ON (Synchronized Cut): 1 | ON(Synchronized Cut): 1 |
Note
Smoothing is a function that prints copies at a higher resolution (1200 dpi). The smoothing function corrects jaggedness on angled lines and smooths images. This can be set up separately for both copying and printing.
Halftones may print darker than usual when the smoothing function is used.
Procedure
1 Select [Other Copy Presets] on the [Custom Presets – Copy Features] screen.

flowchart
graph TD
    A["Switch Feature Buttons..."] --> B["Default Copy Feature..."]
    C["R/E Preset..."] --> D["Variable Length Preset."]
    E["Output Order Preset..."] --> F["Program Sort Preset..."]
    G["Media Type fot Auto mode."] --> H["Auto Image Rotate Preset."]
    I["Other Copy Presets..."] --> J["Output Order Preset..."]
2 Enter the code number with the use of the keypad, and then press the [Scroll] button.
The mark will move to the next field.
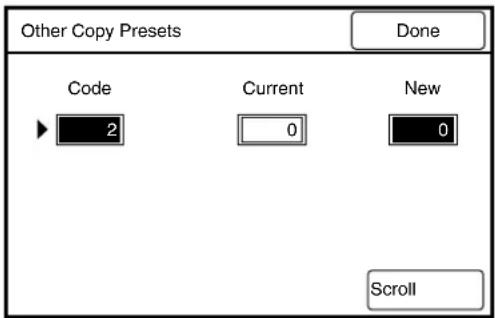
text_image
Other Copy Presets
Done
Code Current New
2 0 0
Scroll
3 Enter the new value with the use of the keypad, and then press the [Scroll] button.
4 Press the [Done] button.
The specified values will be saved and the screen will return to the [Custom Presets – Copy Features] screen.
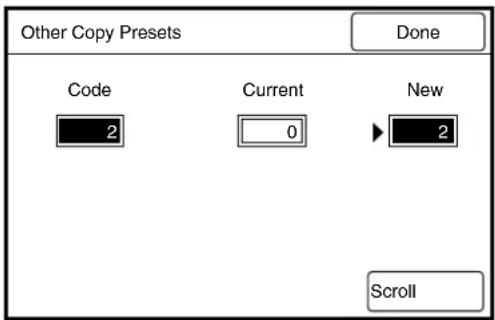
text_image
Other Copy Presets
Done
Code Current New
2 0 2
Scroll
This function displays the current total media usage of the machine. The meter counts below are displayed.
- Meter 1: Displays the total area of media printed in square feet or square meters.
- Meter 2: Displays the total length of paper printed in feet or in meters.
- Meter 3: Displays the total number of stamps printed.
Procedure
1 Press the key on the control panel.
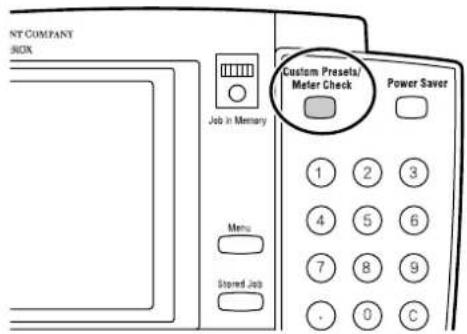
text_image
NY COMPANY
BOX
Job in Memory
Menu
Stored Job
Custom Presets/
Meter Check
Power Saver
1 2 3
4 5 6
7 8 9
. 0 C
2 Press the [Meter Check] button.
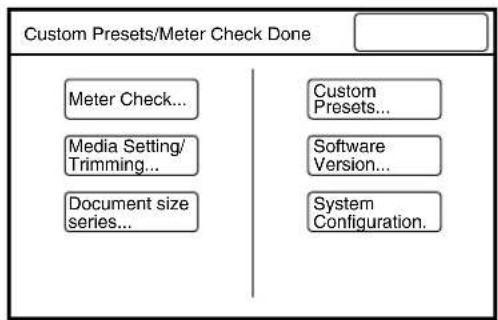
flowchart
graph TD
    A["Custom Presets/Meter Check Done"] --> B["Meter Check..."]
    A --> C["Media Setting/Trimming..."]
    A --> D["Document size series..."]
    A --> E["Custom Presets..."]
    A --> F["Software Version..."]
    A --> G["System Configuration."]
The meter check screen will be displayed.
3 Press the [Done] button to return to the [Custom Presets/Meter Check] screen.
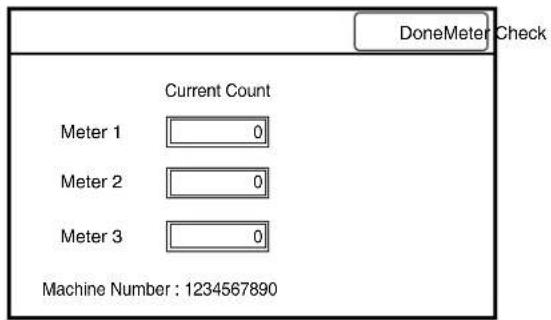
text_image
DoneMeter Check
Current Count
Meter 1 0
Meter 2 0
Meter 3 0
Machine Number : 1234567890
This feature selects the size series for document size detection. The choices are [A size series], [B size series], [SP. A-1] (Special A-1), [SP. A-2] (Special A-2), [ANSI], and [ARCH]. The default value when shipped from the factory is [A size series].
Note ARCH-30 documents are included within the [ARCH] series.
Procedure
1 Select [Document Size Series] on the [Custom Presets/Meter Check] screen.
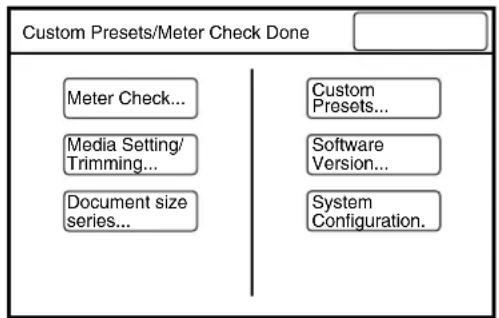
flowchart
graph TD
    A["Custom Presets/Meter Check Done"] --> B["Meter Check..."]
    A --> C["Media Setting/Trimming..."]
    A --> D["Document size series..."]
    A --> E["Custom Presets..."]
    A --> F["Software Version..."]
    A --> G["System Configuration."]
2 Select the required size series.
3 Press the [Done] button.
The selection will be saved and the screen will return to the [Custom Presets/Meter Check] screen.
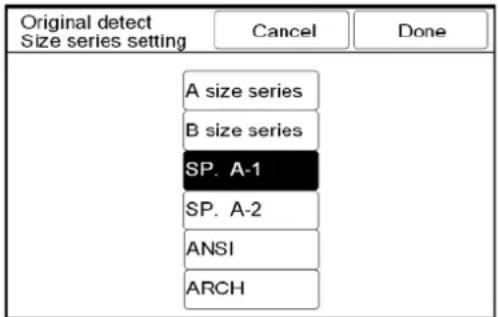
text_image
Original detect
Size series setting
Cancel
Done
A size series
B size series
SP. A-1
SP. A-2
ANSI
ARCH
Chapter 6
Scanner Functions
The 6030/6050 Wide Format Copier/Printer offers three different functions: printer, copier, and integrated scanner. The following operating modes are available when the machine is used as a scanner.
Note
The sizes of the scan files will vary due to differences in image density and complexity.
Scanner Mode
This mode allows the scanner to be used independently from the printer. The scanner scans images and transmits the image data to the host PC. The scanning parameters reside in the software which is installed on the host PC.
Scan and Copy Mode
This mode allows copies to be made while scanning to a host PC is being performed. These operations are the same as those for the copier.
This section explains the basic scanning procedures.
Scanner Mode Procedure
1 Activate the scanner mode from the host PC.
[Ready to Scan] will display on the copier control panel touch screen.
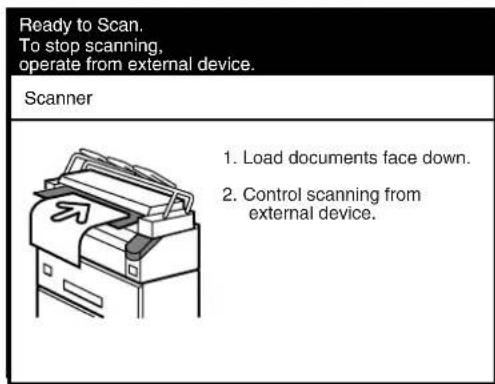
text_image
Ready to Scan.
To stop scanning,
operate from external device.
Scanner
1. Load documents face down.
2. Control scanning from
external device.
2 Insert the document in the scanner face down, with the edge aligned with the document insertion guide.
Note If scanning is set to manual start, press the key at this time.
The machine will scan the document, and the scan data will be transmitted to the host PC.

text_image
Scanning in progress...
Scanner
Ready to send data to
external device.
3 Terminate the scanner mode at the host PC. The copier/printer will return to the copier mode.
1 Activate the scan and copy mode from the host PC. The copier menu will be displayed on the copier control panel's touch screen.
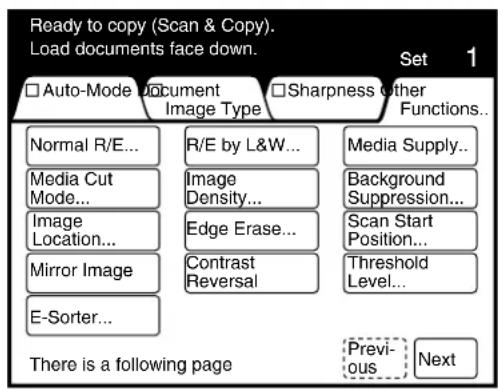
text_image
Ready to copy (Scan & Copy).
Load documents face down.
□ Auto-Mode Document □ Sharpness other
Image Type Functions...
Normal R/E... R/E by L&W... Media Supply...
Media Cut Mode... Image Density... Background Suppression...
Image Location... Edge Erase... Scan Start Position...
Mirror Image Contrast Threshold
E-Sorter... Reversal Level...
There is a following page Previous Next
2 Set up the copy features on the copier control panel.
Note [Multi-Job] cannot be selected while in the scan and copy mode.
3 Insert the document in the scanner face down, with the edge aligned with the document insertion guide.
The machine will scan the document and transmit the scan data to the host PC. The printer will print the copies simultaneously.
4 Terminate the scan and copy mode at the host PC. The copier/printer will return to the copy mode.
Chapter 7
Printer Overview
7.1
This section provides an overview of the 6030/6050 Wide Format print service.
The 6030/6050 Wide Format print service is software that processes print jobs that it receives from a client. The 6030/6050 Wide Format print service enables all types of image data to be printed in the supported formats, including standard and non-standard size documents, enlarged and reduced images, and split (fragmented) images. It also allows the user to view the status of print jobs, cancel print jobs, and change print job priority.
Processing is possible for the following data formats.
• HP-GL formats (HP-GL, HP-GL/2, HP-RTL)
• VERSATEC formats (VRF, VCGL)
• TIFF formats (conforming to TIFF Revision 6.0)
• CALS formats (CALS Type 1)
- PS/PDF formats (PostScript 3.0, PDF Version 1.3)(Optional)
Communication Interfaces
The following communication interfaces are supported.
- Ethernet (100Base-TX and 10Base-T)
- RS232C
- Centronics (optional)
• VPI (optional)
Printing Methods
Documents may be submitted from a client to the 6030/6050 Wide Format Printer using any of the following.
- Ethernet (Direct) Printing
This capability is for UNIX systems. Printing takes place over TCP/IP networks using the ftp and lpr commands.
Refer to Refer to "Chapter 11 Ethernet Print Service (for UNIX)" for details on available functions.
- Wide Format Windows Driver
The Microsoft ^® Windows ^® print drivers (32 bit only) enable users to print documents from various Windows applications.
Important Serial output is not supported by the Wide Format Windows Driver.
Refer to Refer to the Xerox 6030/6050/6204 Wide Format Windows Driver User Guide for details on available functions.
• BT-PlotAssistant (Ver. 3.4.0 or later)(Optional)
BT-PlotAssistant is printer support software that runs on Windows operating systems. Using BT-PlotAssistant's simple user interface, the user can submit documents to the 6030/6050 Wide Format printer.
Refer to Refer to the Xerox 6030/6050/6204 Wide Format BT Plot Assistant User Guide for details on available functions.
- PostScript/PDF Driver (PS/PDF)(Optional)
The PostScript/PDF driver provides enhanced printing performance and enables users to print PDF documents. The customer who purchases the PS/PDF driver is provided with a Feature Key which is required for driver installation.
Refer to Refer to the Xerox 6030/6050/6204 Wide Format PostScript Driver User Guide for details on available functions.
The printer control panel and Print Services on Web are the two main features that enable users to set up and perform print service operations.
Printer Control Panel
The printer control panel can be used to perform a variety of tasks, among them:
• media setup for roll media and the MSI (Multi Sheet Inserter/Manual Feed Tray)
- communication (port) setup
- system parameter setup
- printing of test patterns to verify printer operation
- job log and error log management
• reprinting of the most recent print job
• displaying billing meter information
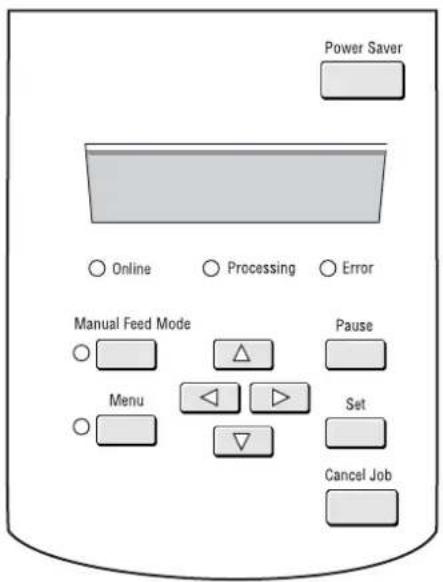
text_image
Power Saver
Online
Processing
Error
Manual Feed Mode
Pause
Menu
Set
Cancel Job
Refer to "7.2 Printer Control Panel Usage" for more details on the printer control panel and its usage.
Print Services on Web
Print Services on Web is web server software which is pre-installed in the 6030/6050 Wide Format. Print Services on Web provides a user-friendly way to perform printer setup, communication (port) setup, log management, and other procedures via a web browser.
Print Services on Web also enables the user to perform operations which can not be performed from the printer control panel, for example, displaying job lists, changing job priority, and starting and stopping the server.
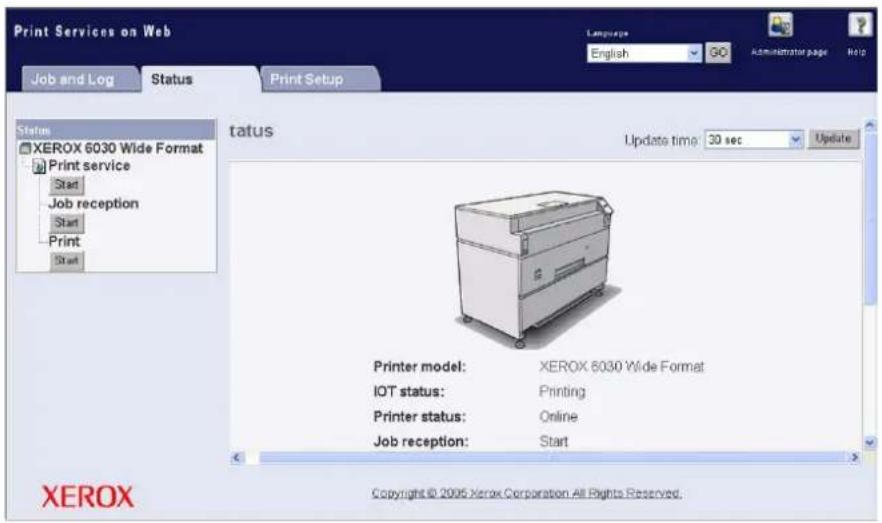
text_image
Print Services on Web
Job and Log
Status
Print Setup
Language
English
GO
Administrator page
Help
Status
XEROX 6030 Wide Format
Print service
Start
Job reception
Start
Print
Start
status
Update time: 30 sec
Update
Printer model: XEROX 6030 Wide Format
IOT status: Printing
Printer status: Online
Job reception: Start
Copyright © 2005 Xerox Corporation All Rights Reserved.
XEROX
Refer to "7.3 Print Services on Web" for further details on Print Services on Web and its operation.
This section describes the main printing functions which are available with the 6030/6050 Wide Format Printer and Copier/Printer.
Logical Printers
A logical (virtual) printer is a group of saved print job settings for a particular data format, i.e., HP-GL, Versatec, TIFF, CALS, and PS/PDF. These saved settings, which are created using Print Services on Web, may include pen attributes, media type, print quantity, and the other parameters that define the print job that the logical printer will be required to perform. Logical printers are to printing as Stored Jobs are to copying, that is, both reduce setup time and increase efficiency by using previously saved settings. A maximum of one hundred logical printers can be set up within one 6030/6050 Wide Format Printer or Copier/Printer for each supported data format.
Logical printer names are assigned based on the following. It is not possible to change these names.
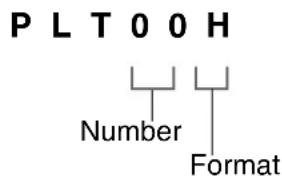
text_image
PLT00H
Number
Format
1st to 3rd digits [PLT] or [plt] character strings
4th to 5th digits (number) Two-digit number from 00 to 99
6th digit (format) Any of the following.
H: HP-GL format
V: Versatec format
T: TIFF format
C: CALS format
A: PS/PDF format (optional)
The sixth digit can be omitted when Ethernet multi-data format functions are in use. When this digit is omitted, the relevant software to be started will be selected according to the extension log of the transmitted data file.
If a logical printer is selected that has a different sixth digit than the format of the print file, the file may be forwarded to a logical printer that has the same extension as the transmitted file.
Refer to
- Refer to "8.5 System Parameter Setup (Print Services on Web)" for details on setting up the logical printer extensions.
- Refer to "9.1 Creating a New Logical Printer" for help in setting up logical printers.
The following two methods are available for judging the size of the input document:
- Automatic Calculates the coordinates of the input document and automatically selects the closest size.
- Size SpecificationEnables the user to manually select the media size of the input image. The media size can be selected from standard sizes and user-defined sizes.
The Automatic setting is used under normal circumstances. Specify the size manually if restrictions are to be placed on the input coordinates. When the size is specified, all areas that exceed that size will be cut off.
Refer to
Refer to the "Input Option" section of "9.3 Logical Printer Print Settings" for details on available functions.
The following two methods for judging the size of the output media are available:
- Automatic When Automatic is selected, the print size is enlarged or reduced automatically based on a size mapping table (explained later). Also, the size of the media that is selected is determined based on a media mapping table, or by automatic mapping (explained later).
- Size SpecificationWhen Size Specification is selected, the output media size is specified manually. If the specified media size is different from the input document size, the document will be enlarged or reduced to match the size of the paper.
"Automatic" is used under normal circumstances. Specify the media size manually if all output is to be printed on a single media size.
Refer to
Refer to "9.3 Logical Printer Print Settings" for details on available functions.
Size Mapping
Size mapping is the process of setting up a table that establishes relationships between input document sizes and output image sizes. When size mapping is finished (must be done prior to printing), documents can be enlarged or reduced automatically based on the table entries.
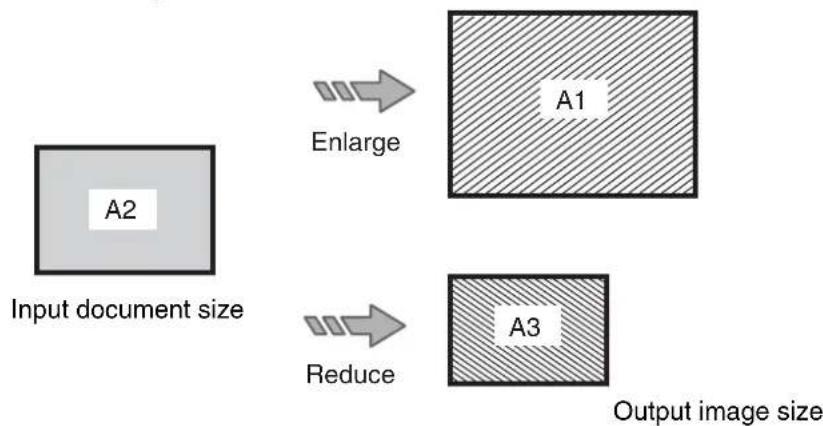
flowchart
graph TD
    A["Input document size"] --> B["Enlarge"]
    A --> C["Reduce"]
    B --> D["A1"]
    C --> E["A3"]
    D --> F["Output image size"]
    E --> F
Refer to "Size/Media Mapping" in "9.3 Logical Printer Print Settings" for more details.
Media mapping is the process of setting up a table that establishes relationships between output image sizes and media sizes. This process, like size mapping, must be performed prior to printing. Once the media mapping table is finished, the media size is determined by the entries in the media mapping table.
When Automatic Mapping is selected, the output media size that matches the output image size will be selected.
Note Check media mapping to be sure the media size selected matches the media loaded in the printer. Refer to "9.3 Logical Printer Print Settings" for more details.

flowchart
graph TD
    A["A3 A3"] --> B["Paper"]
    B --> C["Output on A3 roll media"]
    D["Rotated 90 degrees"] --> E["A3"]
    E --> F["Output on A2 roll media"]
    G["Output document size"] -.-> A
    H["Output document size"] -.-> E
Plot Area, Auto-Layout, and Offset
It is possible to print a specified area of an input document. The specified area can be printed in the center of the media or moved to another position (auto-layout, offset).
Refer to
Refer to the "Plot Area" section of "9.3 Logical Printer Print Settings" for details on available functions.
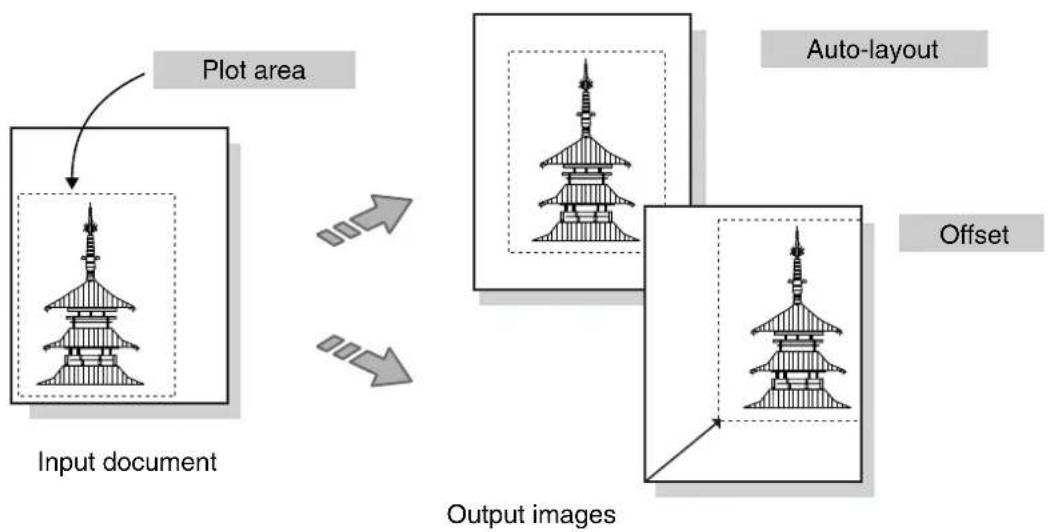
flowchart
graph LR
    A["Input document"] --> B["Plot area"]
    B --> C["Auto-layout"]
    C --> D["Offset"]
    D --> E["Output images"]
Mirror Image, 90-Degree Rotation
These functions perform mirroring (Mirror Image) or 90-degree rotation processing on the output image.
Refer to
Refer to the "Transform" section of "9.3 Logical Printer Print Settings" for details on available functions.
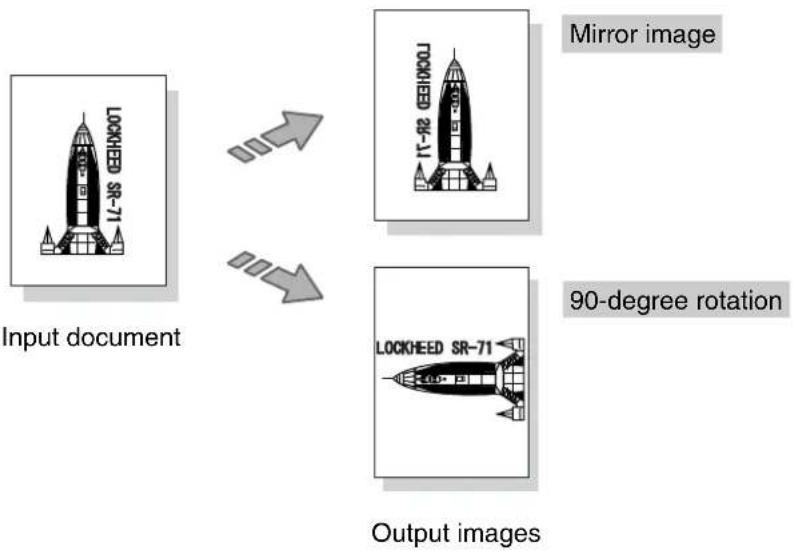
flowchart
graph TD
    A["Input document"] --> B["Mirror image"]
    A --> C["90-degree rotation"]
    B --> D["Output images"]
    C --> D
Split Drawing (Image Fragmentation)
Long images (those that exceed 1,189 mm in length) may be split into several parts and printed. Positioning marks can be added to the split prints for positioning purposes.
Refer to "Split Drawing" in "9.3 Logical Printer Print Settings" for more details.
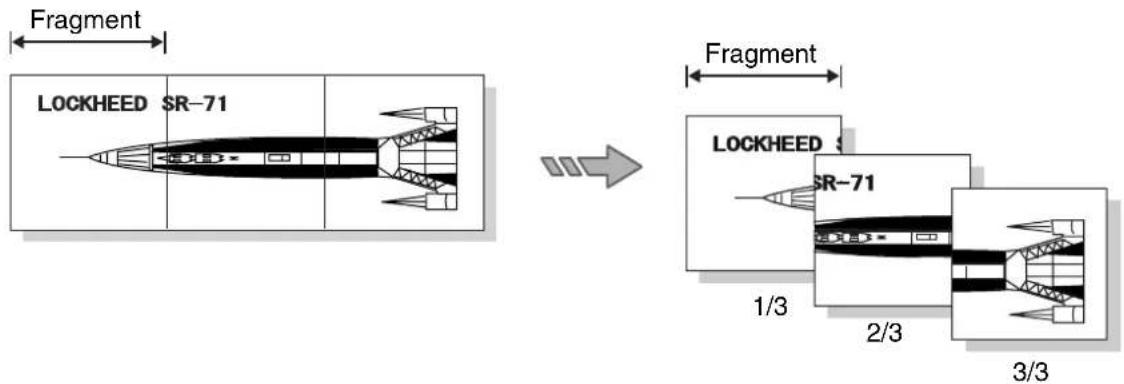
text_image
Fragment
LOCKHEED SR-71
Fragment
LOCKHEED SR-71
1/3
2/3
3/3
Printing the Output Time
The date and time a document is printed can be added to the edge of the document.
Refer to "Message Option" section of "9.3 Logical Printer Print Settings" for details on available functions.
Log Management
It is possible to print out a log of completed print jobs, an error log, and other information.
Refer to "10.4 Managing the Job and Error Logs" for details on printer control panel operations.
Reprinting
The most recently printed document can be reprinted. The print quantity also can be specified.
Note Reprinting is not possible with the Xerox 6030 WF or Xerox 6050 WF if a copy job is performed after the print operation.
Refer to "10.5 Reprinting" for details on available functions.
Canceling Jobs
Jobs transmitted to the 6030/6050 Wide Format can be deleted by pressing the key on the printer control panel. It is also possible to cancel jobs from Print Services on Web.
Refer to "7.2 Printer Control Panel Usage" for details on the key, and "9.5 Print Services on Web: Job and Log" for details on Print Service on Web operations.
Meter Display
The billing meters can be checked from both Print Services on Web and the printer control panel.
Refer to "9.6 Print Services on Web: Status" for details on web operations, and "10.6 Billing Meter Confirmation" for details on printer control panel operations.
Job Recovery
This machine is equipped with a recovery function for media jams and when media runs out.
- Media Jams
Documents that failed to print because of a media jam will print when the jam is cleared.
- No Media
Printing of a print job that is stored in memory will restart when the media is loaded in the printer.
The printer also can be set up to print (or not print) jobs that remained in the print queue when the printer was switched off.
Refer to "8.4 System Parameter Setup (Printer Control Panel)" and to the topic "Setting Up [Job Recovery]" in "8.5 System Parameter Setup (Print Services on Web)" for details on job processing after the power is switched on.
This section describes the names and functions of the printer control panel components.
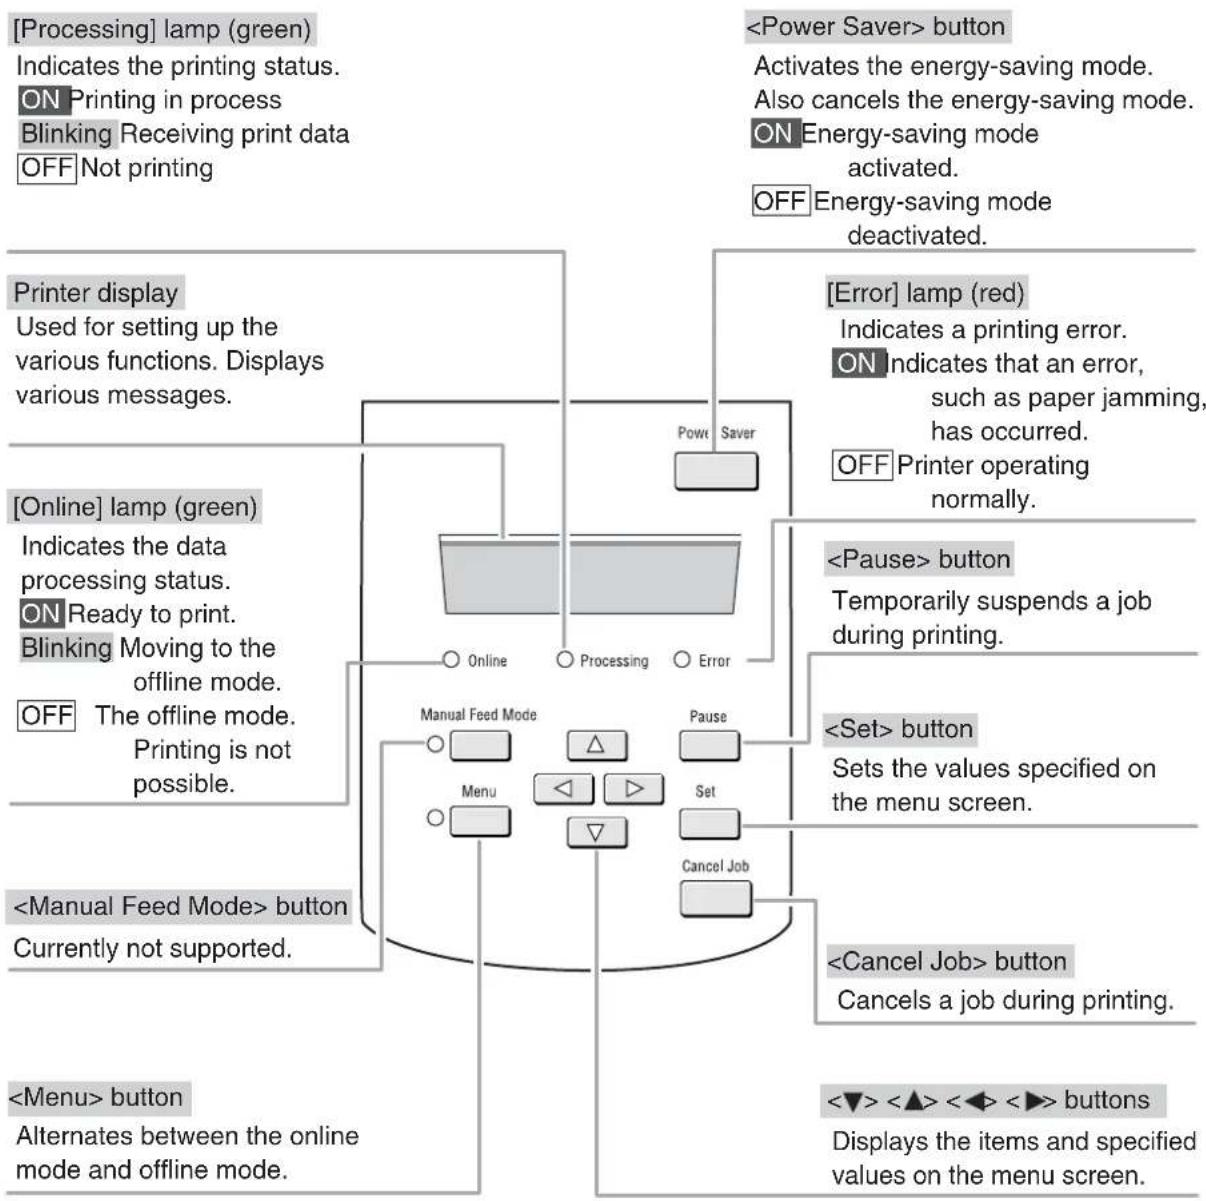
flowchart
graph TD
    A["Printer display"] --> B["Used for setting up the various functions. Displays various messages."]
    C["On Printing in process"] --> D["ON Ready to print. Blinking Moving to the offline mode. OFF The offline mode. Printing is not possible."]
    E["Power Saver"] --> F["Processing"]
    G["Manual Feed Mode"] --> H["Menu"]
    I["Pause"] --> J["Set"]
    K["Cancel Job"] --> L["Back"]
    M["<Power Saver> button"] --> N["Activates the energy-saving mode. Also cancels the energy-saving mode. ON Energy-saving mode activated. OFF Energy-saving mode deactivated."]
    O["Error"] --> P["lamp (red) Indicates a printing error. ON indicates that an error, such as paper jamming, has occurred. OFF Printer operating normally."]
    Q["<Pause> button"] --> R["Temporarily suspends a job during printing."]
    S["<Set> button"] --> T["Sets the values specified on the menu screen."]
    U["<Cancel Job> button"] --> V["Cancels a job during printing."]
    W["<Menu> button"] --> X["Alternates between the online mode and offline mode."]
    Y["<Power Saver> button"] --> Z["Activates the energy-saving mode. Also cancels the energy-saving mode. ON Energy-saving mode activated. OFF Energy-saving mode deactivated."]
    AA["Manual Feed Mode"] --> AB["Menu"]
    AC["Pause"] --> AD["Set"]
    AE["Cancel Job"] --> AF["Back"]
Note Press the <◀ and < > Keys simultaneously to reset the printer when an error code is displayed.
The printer must be in the offline mode before settings can be changed.
Pressing the
