
KRH3612IS - Range hood Kucht - Free user manual and instructions
Find the device manual for free KRH3612IS Kucht in PDF.

| Product Type | Island Range Hood |
| Model | KRH3612IS |
| Brand | Kucht |
| Width | 36 inches (914 mm) |
| Installation Height | 25-30 inches (65-75 cm) above cooktop |
| Rated Voltage | 110 V |
| Rated Frequency | 60 Hz |
| Motor Input Power | 198 W |
| Lamp Power | ≤ 2 x 20 W |
| Air Volume | 9.5-15 m³/min (336-530 CFM) |
| Air Pressure | ≥ 160 Pa |
| Noise Level | < 70 dB(A) |
| Exhaust Duct Diameter | 150 mm (6 inches) |
| Filter Type | Aluminum mesh (washable) |
| Material | Stainless steel |
| Control Type | Electronic push-button |
| Lighting Type | Incandescent (2 bulbs, 20W each) |
| Venting Type | Ducted (top exhaust) |
| Included Accessories | Exhaust pipe, decorative cover, one-way valve, aluminum filters, mounting bracket |
| Maintenance Frequency | Filters: weekly; interior: monthly |
| Safety Certifications | Complies with applicable standards |
Frequently Asked Questions - KRH3612IS Kucht
User questions about KRH3612IS Kucht
0 question about this device. Answer the ones you know or ask your own.
Ask a new question about this device
Download the instructions for your Range hood in PDF format for free! Find your manual KRH3612IS - Kucht and take your electronic device back in hand. On this page are published all the documents necessary for the use of your device. KRH3612IS by Kucht.
USER MANUAL KRH3612IS Kucht
WWW.KUCHT.COM
BE A PRO IN YOUR KITCHEN
natural_image
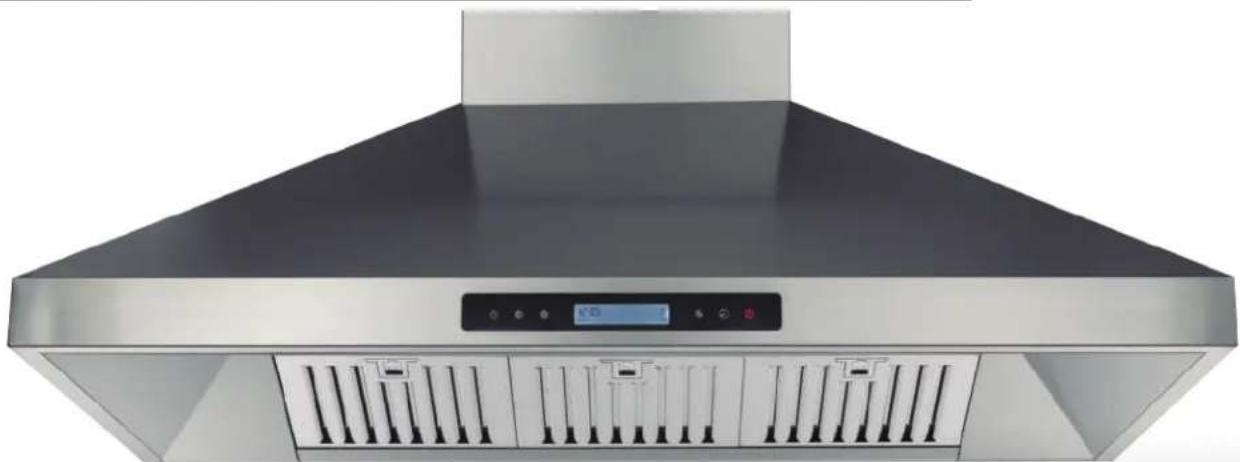
Exterior view of a stainless steel kitchen range hood with ventilation grilles and control panel (no visible text or symbols)ISLAND HOOD
INSTALLATION GUIDE AND USER MANUAL
APPLICABLE MODEL: KRH3612IS, KRH4812IS, KRH3613IS
USE, CARE, AND INSTALLTION GUIDE
Please read all manual carefully before installing and operating this appliance.
CONTENTS
- Product introduction
- Installation
- Technical parameters
- Maintenance
- Cautions
Model KRH3612IS - 36" Island Hood
Model KRH4812IS - 48" Island Hood
Model KRH3613IS - 36" Island Hood
1. Product introduction
Thank you very much for choosing our range hood. KUCHT has developed a series of range hoods based on assimilating the advantages of high volume of air, lower noise and elegant appearance.
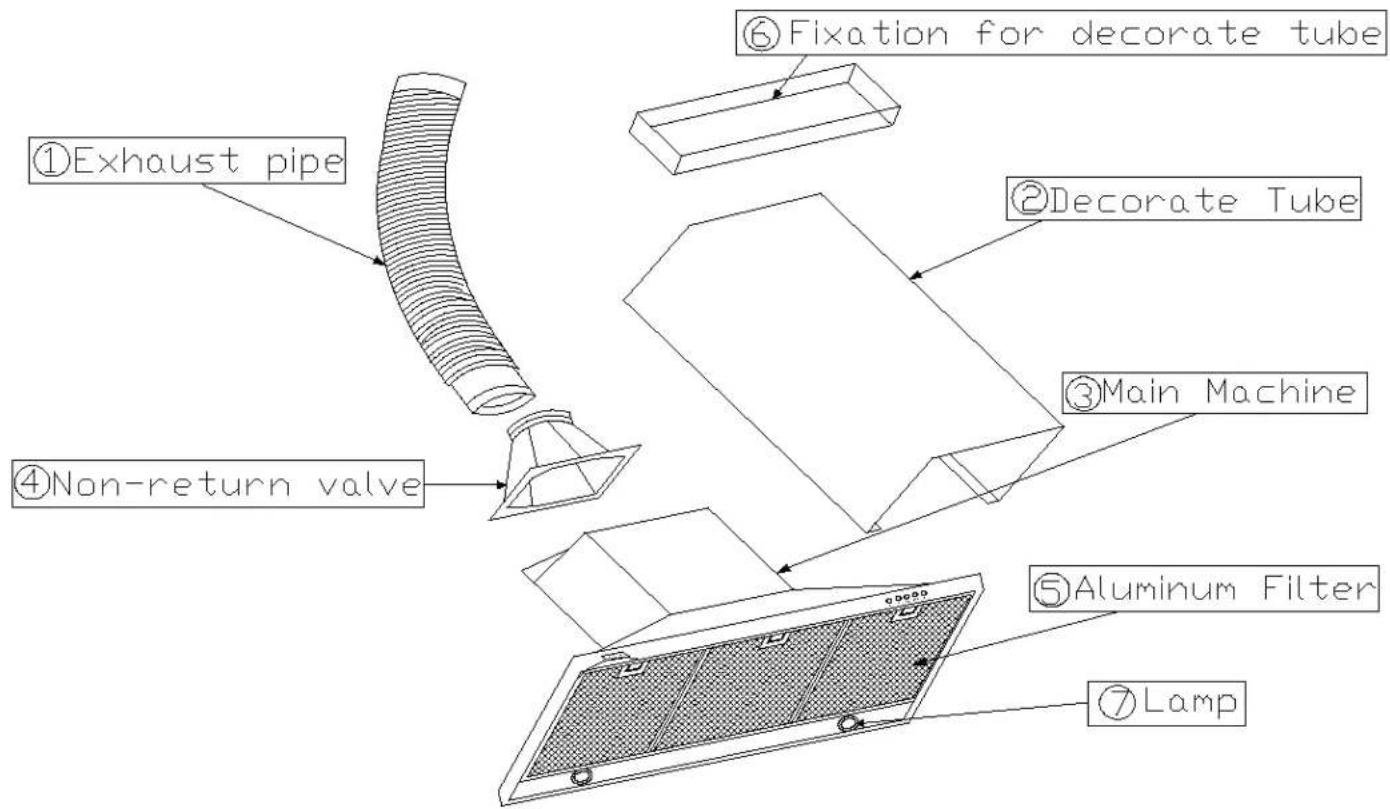
Product Configuration
| 1 | Exhaust pipe | 4 | One-way valve | 7 | Lamps |
| 2 | Decorative cover | 5 | Aluminum filters | ||
| 3 | Machine body | 6 | Bracket for decorative tube |
2. Installation and Operation
1) Position the range hood on the center of cooking stove wall. For best results, the mounting height of the range hood should be 25"-30" (65-75cm) above the top of the range. Mark the position of the holes, which need to be drilled to mount the range hood.
2) According to marks, drill two holes appropriate for heavy duty wall anchors and screws (not included. Mount the range hood on the wall with the two screws and anchors and tighten.
3) Install the one-way valve on top of the range hood and assemble the exhaust pipe and decorative cover.
4) Affix the decorative cover with two M4 tapping screws on the hood body.
5) Make sure all switches are off and then insert the electrical plug into an outlet.
3. Technical parameters
| ITEM unit parameter | ||
| Rated Voltage V | 110 | |
| Rated frequency Hz 60 | ||
| Motor input power W 198 | ||
| Lamp power W ≤2X20 | ||
| Air volume m3/min 9.5~15 | ||
| Air pressure | Pa | >160 |
| Noise level | dB(A) | <70 |
| Air output diameter | mm | 150 |

4. Maintenance
1) Make sure to pull out the plug and cut off the power before maintenance to ensure your safety.
2) Clean the inside and outside of the range hood with warm water containing neutral detergent, then dry them with a piece of dry cloth. Do not scrub them with rough materials such as cleansing ball to avoid damages to the surface. Put on gloves to avoid injuring your hands when cleaning the inside. The cleaning can be done once half a month to a month.
3) Do not crush the wind wheel when cleaning the inside of the wind track of the wind wheel to avoid the deformation of the wind wheel. Otherwise the movement will be increased, which will result in more noise and influence the effect of absorbing the oil-smoke.
4) Frequent cleaning of the filter shall be done. First press the spring on the edge of the filter to dismantle the filter, dip it into strong detergent and brush its surface with soft brush; then hold the filter with both hands and move it up and down in the detergent, clean it with clean water, after which dry it by airing and install it as what it is as before. The cleaning can be done once a week. Do not clean it with combustible detergent such as banana oil and gasoline.
5. Cautions
1) Do not attempt to install this appliance yourself without appropriate electrical and technical background.
2) When maintaining this range hood or changing a light bulb, please be sure that all power switches are in the off position.
3) Do not let the detergent flow into the electric appliance box and the switches when cleaning the inside of the range hood to avoid leaking electricity.
4) Do not flambé under the range hood.
5) There is a fire risk if cleaning is not carried out according to the instructions.
6) Cut off all the circuits with power before approaching the connection ends.
7) This appliance is not intended for use by young children and infirm persons unless they have been adequately supervised by a responsible person to ensure that they can use the appliance safely.
8) Young children should be supervised to ensure that they do not play with the
9) There should be adequate ventilation of the room when the range hood is used at the same time as appliance burning gas or other fuels.
10) The air must not be discharged into a flue that is used for exhausting fumes from appliances burning gas and other fuels.
12) The minimum distance between the supporting surface for the cooking vessels on the hob and the lowest part of the range hood, when the range hood is located above a gas appliance. This distance should be at least 25". If the instructions for installation for the gas hob specify a greater distance this must be considered.
13) Regulations concerning the discharge of air must be fulfilled.
14) Warning : If the supply cord is damaged, it must be replaced by the manufacturer, its service agent or a similarly qualified person to avoid a hazard.
INSTALLATION
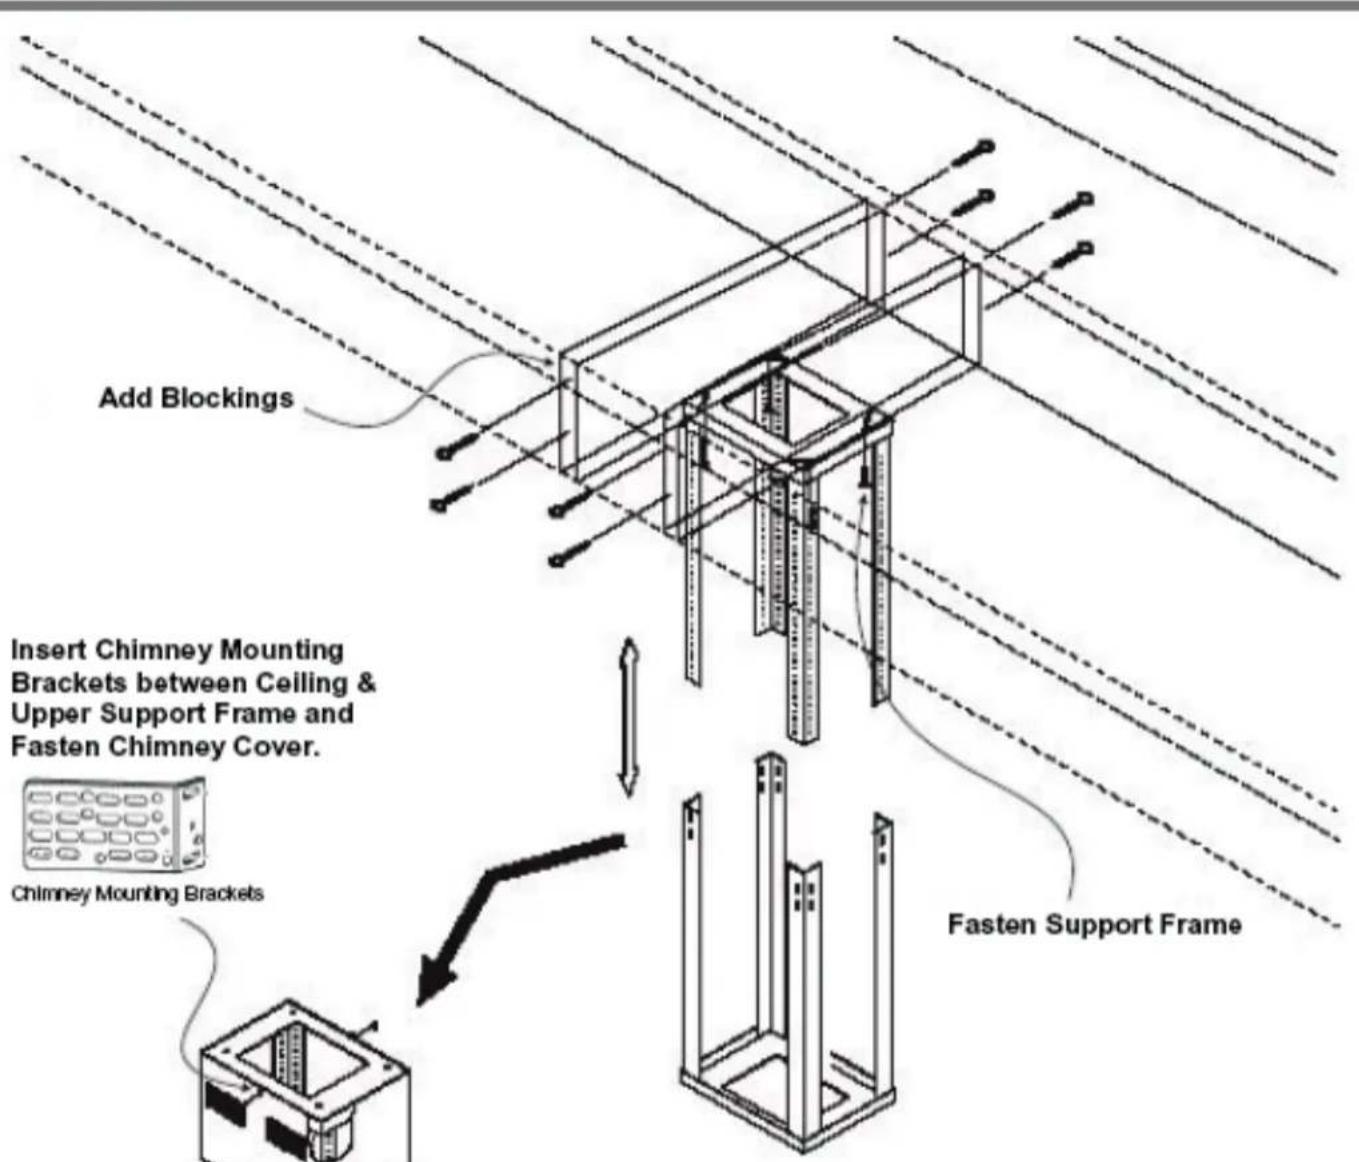
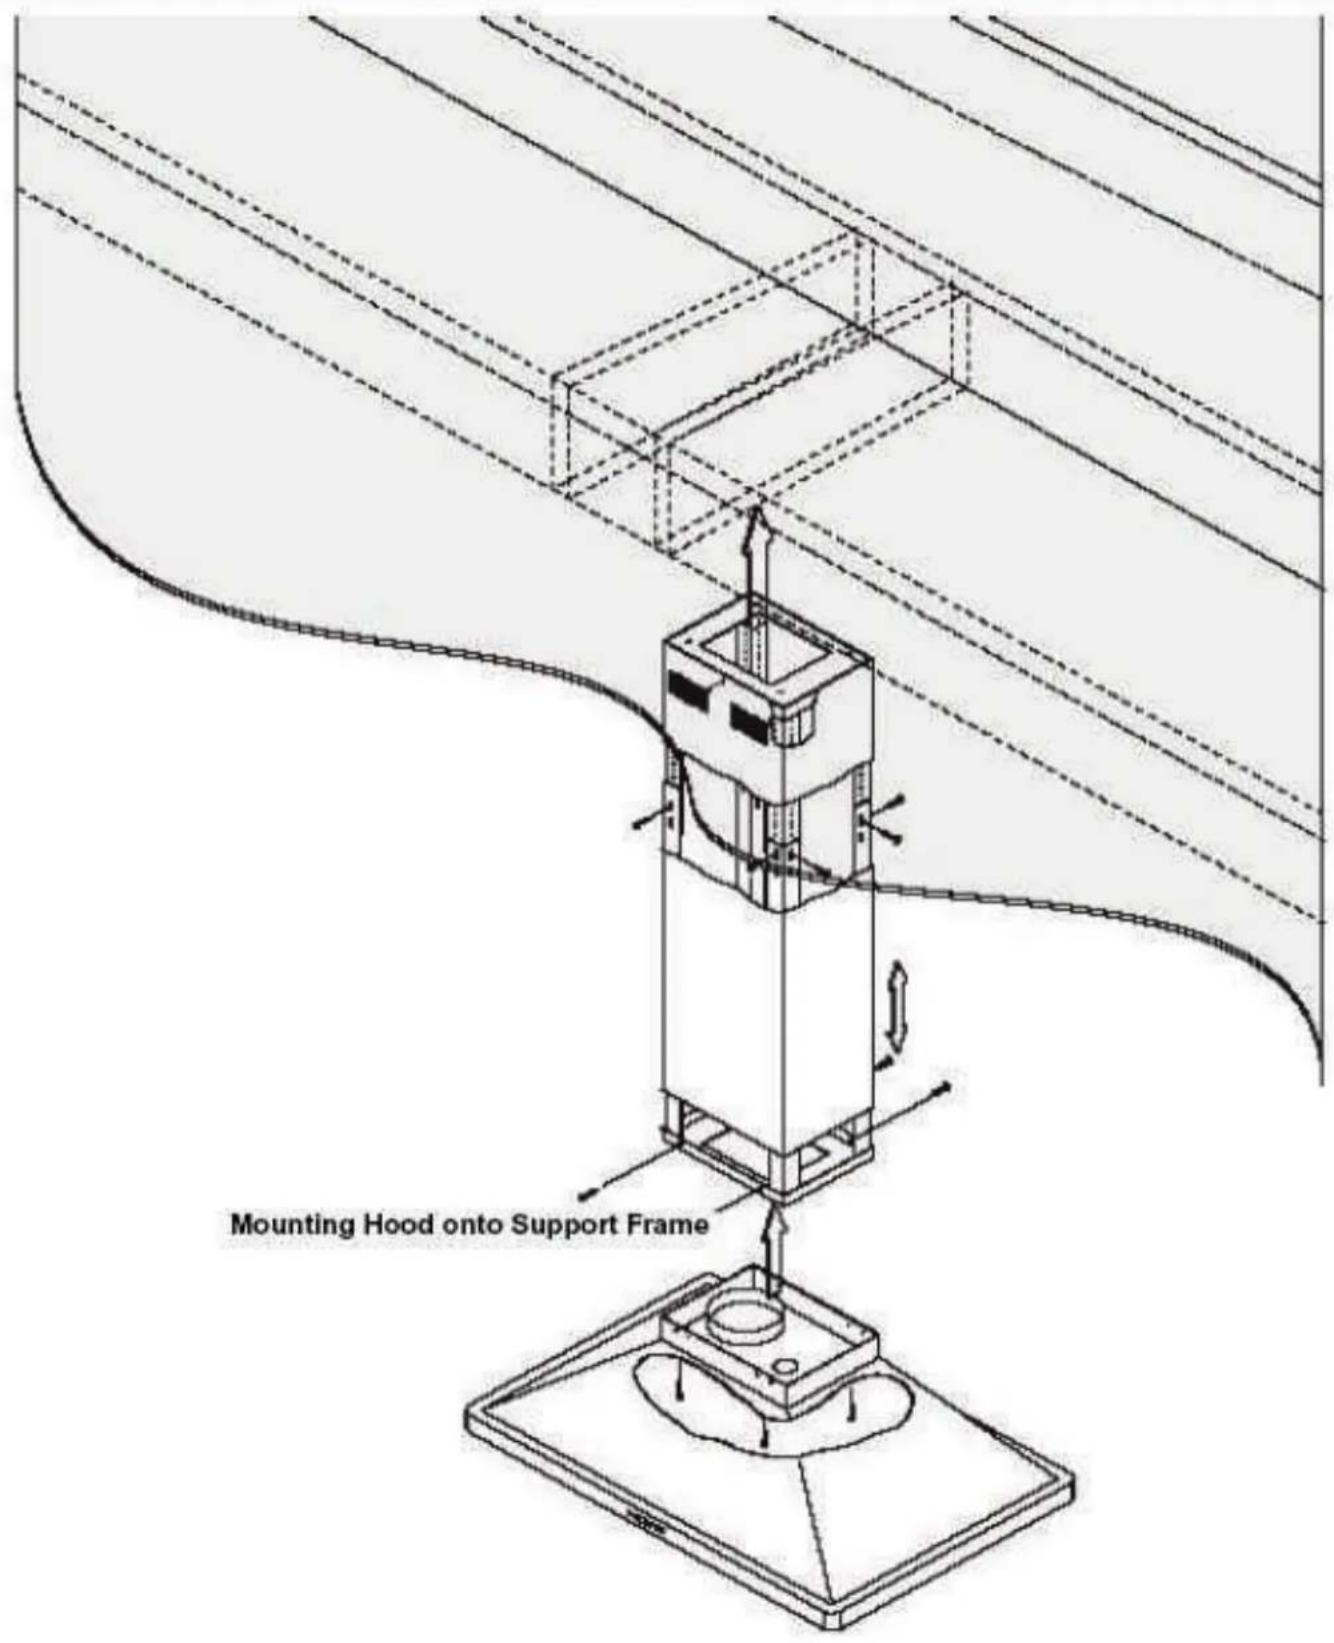
Mounting the Range Hood
Adjust Height & Fasten Support Frame
- Add and secure blockings (minimum 2x4 studs) onto ceiling joist.
- Fasten mounting telescopic support frame directly onto ceiling joist or stud blockings.
- Adjust height requirement and fasten support frame.
- Slip upper and lower telescopic duct covers onto support. Fasten upper duct cover piece.
- Install duct work & electrical.
- Install hood onto support frame & lower duct cover onto hood (next page).
INSTALLATION


WE TRANSFORM A SIMPLE KITCHEN INTO A PRO ONE. THIS IS WHY WE CARE ABOUT MAKING VERY HIGH PERFORMANCE RANGES AND HOODS, TO MAKE YOU FEEL LIKE A PRO AND STYLISH COOKER.
DESIGN: LONDON DC - WWW.LONDON-DC.COM
Brand : Kucht
Model : KRH3612IS
Category : Range hood