
RD-840 - Cassette player ROTEL - Free user manual and instructions
Find the device manual for free RD-840 ROTEL in PDF.


| Product Type | Stereo Cassette Tape Deck |
| Brand | Rotel |
| Model | RD-840 |
| Dimensions (W x H x D) | 430 x 115 x 270 mm (16-15/16 x 4-17/32 x 10-5/8 in) |
| Weight (net) | 4.17 kg (9.17 lbs) |
| Power Supply | 120V/60Hz, 220V/50Hz, 240V/50Hz (variable voltage, preset) |
| Power Consumption | 22 Watts |
| Tape Speed | 4.8 cm/sec |
| Heads | Rec/Play: High B Permalloy Laminated; Erase: Ferrite Core |
| Track System | 4-track, 2-channel stereo |
| Motor | Electronic DC Governor |
| Wow and Flutter | 0.10% (DIN), 0.97% (GWRMS) |
| Distortion (REC/PB 400 Hz) | 1.0% (Metal tape) |
| Frequency Response (at -20 dB) | Normal/LH/Special: 30-15,000 Hz ±3 dB; Metal: 30-16,000 Hz ±3 dB |
| Signal-to-Noise Ratio (WTD) | Dolby NR IN: 64 dB (B-type), 72 dB (C-type); Dolby NR OUT: 55 dB |
| Input Sensitivity/Impedance | MIC: 0.3 mV/10 kΩ; LINE: 58 mV/33 kΩ |
| Output Level/Impedance (LINE) | 580 mV/1 kΩ |
| Fast Wind Time (C-60) | 90 seconds |
| Tape Selector Settings | Normal/LH: Bias 100%, EQ 120 μs; Special: Bias 150%, EQ 70 μs; Metal: Bias 220%, EQ 70 μs |
| Noise Reduction | Dolby B and C type |
| Peak Level Indicators | 10-segment LED, -20 dB to +6 dB |
| Tape Counter | 3-digit with reset button |
| Microphone Inputs | Two 1/4" jacks (stereo) |
| Headphone Jack | 1/4" stereo jack |
| Included Accessories | Power cord, integrated RCA connection cables (permanently attached) |
Frequently Asked Questions - RD-840 ROTEL
User questions about RD-840 ROTEL
0 question about this device. Answer the ones you know or ask your own.
Ask a new question about this device
Download the instructions for your Cassette player in PDF format for free! Find your manual RD-840 - ROTEL and take your electronic device back in hand. On this page are published all the documents necessary for the use of your device. RD-840 by ROTEL.
USER MANUAL RD-840 ROTEL
Quality Uncompromised
ROTEL®
RD-84O
STEREO CASSETTE TAPE DECK
ENGLISH 1
DEUTSCH....4
FRANÇAIS 7
NEDERLANDS 10
ESPAÑOL....13
ITALIANO 16
SVENSKA....19
SUOMI 22
DANSK.25
NORSK.28
WARNING
TO PREVENT FIRE OR SHOCK HAZARD,
DO NOT EXPOSE THIS APPLIANCE TO
RAIN OR MOISTURE
Write your SERIAL NUMBER here.
The number is located near the name plate on the rear panel.
INTRODUCTION
We at Rotel want to thank you for purchasing our audio product.
Rotel audio products are designed to use the latest electronic technology, and they incorporate our long experience as a specialist manufacturer of audio equipment. We are confident that you will find satisfaction in the high quality sound and top performance, and that you will find pleasure in the functional beauty achieved through human-engineering concept. Before starting operation, please read this instruction manual thoroughly and acquaint yourself with the proper mode of using the unit and all its connections.
We hope you will enjoy top-notch performance for many years to come.

INSTALLATION
Be sure to place the unit in a level and flat place where it is free from humidity, vibration, high temperature and not exposed to direct sunlight. Be careful not to place the unit in a highly enclosed place such as near a wall or on a bookshelf. A poor ventilation will cause undesirable effects to the unit.
POWER SUPPLY CONNECTION
For power the unit requires the normal house electrical current (AC). You may simply plug the unit into a wall outlet, or into your amplifier's (or receiver's) convenience AC outlet.
CAUTION: Do not apply power without first making sure the proper connections are completed. If you live in U.K. and your unit comes with 2-core cord without a plug, be sure to read the exclusive caution for U.K.
EXCLUSIVE NOTE FOR U.K.
your unit comes with a 2-core cable without a plug, make certain live and neutral leads are connected to the proper terminals. Check that the terminals are screwed down firmly and no loose strands of wire are present.
IMPORTANT: The wires in this mains lead are coloured in accordance with the following code:
BLUE: NEUTRAL
BROWN: LIVE
As the colours of the wires in the mains lead of this apparatus may not correspond with the coloured markings identifying the terminals in your plug proceed as follows. The wire which is coloured BLUE must be connected to the terminal which is marked with the letter N or coloured BLUE or BLACK. The wire which is coloured BROWN must be connected to the terminal which is marked with the letter L or coloured BROWN or RED.
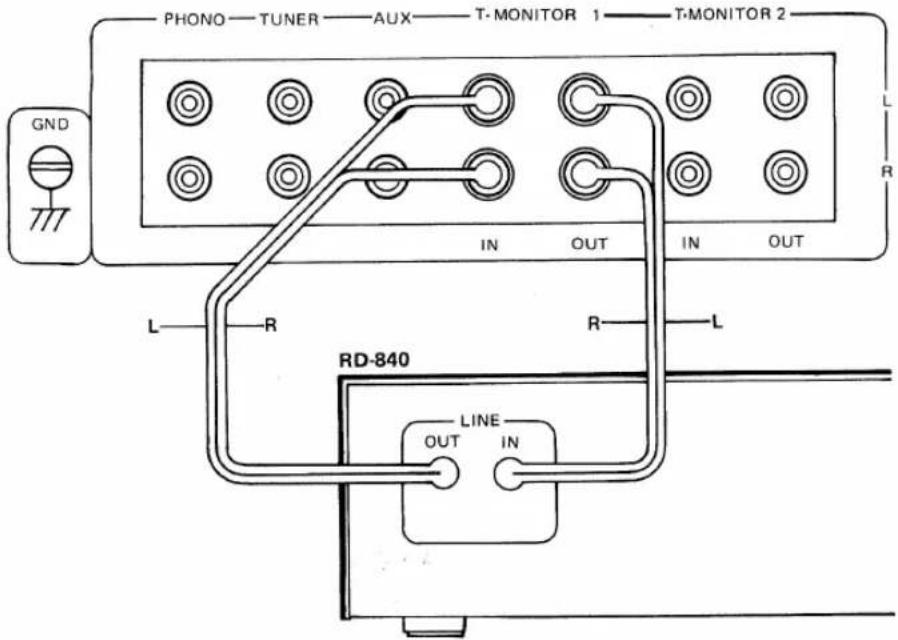
CONNECTION TO INTEGRATED AMPLIFIER OR RECEIVER
Two pairs of RCA cords for LINE IN/OUT extend out from the rear panel of the cassette deck. The cord from the LINE IN terminals of the deck should be plugged into the TAPE MONITOR OUT terminal of the amplifier or receiver, and the cord from LINE OUT terminal to the TAPE MONITOR IN terminal. RCA cords with white plugs are for left channel (L) connection, and cords with red plugs are for right channel (R).
AUTOMATIC SHUTOFF SYSTEM
When either end of tape is reached in play, record, fast-forward, or rewind mode, the motor and transport mechanism will automatically shut off, disengaging the present mode. Note, however, that it is still necessary to turn off the entire unit by pressing the power switch to off.
AMPLIFIER OR RECEIVER
CASSETTE TAPES
- To prevent possible trouble with the transport mechanism, use of large size cassette tapes, such as C-120, is not recommended.
- Handle cassette tapes with care. Keep them away from heat, circulating dust, or a magnetic field (e.g. on the TV set).
- Each cassette tape has safety tabs on its back edge to prevent accidental re-recording. The tabs are provided for both sides of cassette tape. You cannot record on the side whose tab has been removed. The tab can be removed with a screwdriver, etc. If you wish to record on the side with no tab, place a piece of adhesive tape, etc. over the opening where the tab has been, then you can record.

natural_image
Line drawing of a hand holding a cassette tape device with a cable inserted (no text or symbols)- A loosened tape may cause trouble in playback or recording. Check the tape before loading it into the deck. If it is slack, insert a pencil or the like into either of cassette's hubs, and rotate it carefully until the slack is taken up.

natural_image
Illustration of a hand using a power tool to press or install a device with a screwdriver (no text or symbols present)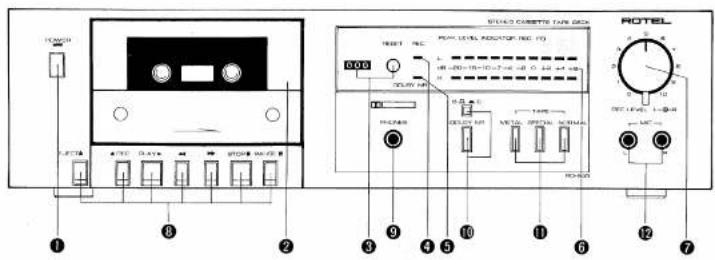
SWITCHES AND CONTROLS
(1) Power Button
This button turns on the unit. The LED indicator above it will glow when the power is on. Press the button a second time to turn off the power.
(2) Cassette Compartment Door
To open the door, press EJECT button. When the unit is not in use, be sure to close the door to prevent dust from entering. The door can be detached by loosening the 2 screws on the lower portion.
(3) Tape Counter and Reset Button
The three-digit tape counter indicates the amount of tape travel. Push the reset button to set the counter to "000". This counter is convenient in finding the beginning of a specific section of the tape or checking the amount of the remaining tape on the cassette.
(4) REC Indicator
Gloss when the unit is in recording mode.
(5) Dolby NR Indicator
Glows when the Dolby NR button is depressed, indicating the unit is in Dolby NR recording or playback mode.
(6) Peak Level Indicators
Give instantaneous display of recording or playback level for both left and right channels respectively. Each bank of 10 LEDs directly shows levels from -20dB to +6dB.
(7) Recording Level Control
Used to control the recording level of incoming signals, such as from the unit's tuner section, turntable, or microphones. This is a dual concentric knob which permits either separate or combined adjustment of both channels.
(8) Cassette Controls
EJECT Button (▲)
Press this button to open the door of cassette compartment when inserting or removing a cassette tape. To close the door, gently push it back. Do not attempt to press the eject button while the tape is running.
REC Button (●)
To record, press this and PLAY button. The unit is now in the recording mode, and the tape
should be winding.
PLAY Button (▶)
Press this button to start the cassette for
physics of recorded tape.
Rewind Button (◀)
For rapid tape rewind, press this button.
Fast-Forward Button (▶)
Press this button to advance the tape rapidly forward.
Stop Button (■)
Press this button to stop the tape in any mode record, playback, rewind, or fast-forward. This button will disengage any transport mode currently engaged.
PAUSE Button (Ⅲ)
This button is used to stop the tape temporarily during recording or playback. Pressing the button a second time will restart the tape in the interrupted mode.
(9) Headphone Jack
For headphone listening from the deck, the headset is plugged into this jack. Before beginning, make sure the volume control of your amplifier is set to minimum.
(10) Dolby NR Button and
Dolby B-C Type NR Selector
Depress the Dolby NR button when you wish to record or play back through the built-in Dolby noise reduction circuit.
Immediately above this button is a switch for selecting Dolby B-type or C-type noise reduction. Select B-type by setting switch in released position, and C-type by setting switch in depressed position.
(11) Tape Selector
Used to select the appropriate recording bias and playback equalization, according to type of cassette tape used. Use the METAL button for metal particle tape, the SPECIAL button for chromium dioxide tape, and the NORMAL button for normal tape. See TAPE SELECTOR SETTING GUIDE for details of different brands of cassette tapes and their proper setting positions.
(12) Microphone Jacks
When making live recording with stereo microphones, insert the microphone plugs into them
jacks. Make sure the right-hand microphone is connected to the right channel jack, and left-hand microphone to the left channel j. Be sure to unplug the microphones when recording from other sources.
OPERATION
- Be certain that power connection and connection with amplifier are properly made.
- When recording, be sure the safety tabs on the cassette tape are not removed.
- Be sure to unplug the microphones from the deck when recording from other sources.
- When recording with microphones, the microphone plugs must be inserted properly into the left and right microphone jacks.
- When recording from line sources, choose the desired program (tuner, turntable, etc.) on your amplifier.
Recording
-
When you wish to record through Dolby B- or C-type NR circuit, depress the Dolby NR button, and then set the B-C type selector button to the desired position.
-
Set the Tape Selector according to type of tape used.
-
Turn on the deck Power switch.
-
Press PAUSE button, then simultaneously press REC and PLAY buttons.
-
Adjust the recording level for left and right channels with Recording Level control so that the level indicator readings do not exceed 0dB position frequently, and when they do, only very briefly.
□□□□□□□■■■
-23 -10 -10 -1 -4 -2 8 +1 +4 +8
A □□□□□□■■■
-
After adjusting recording level, press the PAUSE button again to put the unit into recording mode and to start the tape.
-
Carefully watch the meter indication during recording as well. PAUSE button may be used to temporarily halt recording.
-
Press STOP button when recording is
finished. When the end of the tape is reached, the recording mode will automatically disengage and tape stops.
Playback
- Set the Dolby NR button in depressed position when you play back a tape recorded with Dolby NR.
Release the button when you play back a tape not recorded with Dolby NR.
When you play back a tape recorded with Dolby NR, also set the Dolby B-C type selector button according to whether Dolby NR, B or C, is used.
-
Set the tape selector to match the type of tape used.
-
Turn on the power switch on your amplifier, keeping its volume control set to minimum. When using headphones connected to the deck, the amplifier is not necessary.
-
Turn on the Power switch on the deck.
-
Press PLAY button and playback will begin. Raise the volume to the desired level.
-
To momentarily halt playback, press the PAUSE button. When you wish to end playback, press the STOP button. When the tape comes to an end, it stops automatically and playback mode is disengaged.

HEAD CLEANING
The most frequent cause of failure to record in one or both channels, or of weak, distorted sound, is dirty tape heads and capstan. So, be sure to clean the heads, capstan, pinch roller and tape guides as often as possible using a "O" tip dipped in ordinary rubbing alcohol or commercial liquid tape head cleaner. Thoroughly wipe the surface of the heads, capstan, roller and tape guide.


DEMAGNETIZING
The tape heads, capstan and tape guides gradually become magnetized with use, which will eventually affect the sound quality of your tapes. Demagnetizing should follow cleaning, but need not take place as often as cleaning, once after every 20 to 30 hours of use should suffice.
A demagnetizer may be purchased at a moderate cost from any dealer carrying tape recording accessories. Follow the instruction supplied with the demagnetizer.
Caution: Be sure to turn off the unit before you attempt demagnetizing.
VOLTAGE SELECTION
Not available for U.K., Canada and Scandinavia The unit is a variable voltage equipment that can run on 120V, 220V or 240V power supply. Your unit should already be preset at the proper voltage for use in your area. However, if you move to an area where the power supply voltage is different, consult your dealer.
SPECIFICATIONS
| Heads: Rec/Play... | High B permalloy laminated type |
| Erase... | Ferrite core |
| Track... | 4-track/2-channel |
| Tape Speed... | 4.8cm/sec. |
| Motor... | Electronic DC Governor |
| Wave and Flutter... | 0.10% (DIN) |
| 0.97% (GWRMS) | |
| Distortion (REC/PB, 400 Hz)... | 1.0% (METAL) |
| Frequency Response I~20 dB! | Normal, LH 30 to 15,000 Hz;3 dB |
| SPECIAL 30 to 15,000 Hz;3 dB | |
| Metal 30 to 16,000 Hz;3 dB |
Signal-to-Noise Ratio (WTD)
| 0 dB=580 mV, Chromium) . Dolby NR in: 64 dB (B type) |
| 12.00 TO type |
| Delivery AIR out: 55 dB |
Input Sensitivity/Impedance. ... MIC 0.3 mV/10 kohms
| Output Level/Impedance: | ||
| LINE | 580 mV/1 kohm | |
| Fast Wind Time (C-60) | 90 seconds | |
| Tape Selector | BIAS | EQUALIZER |
| Normal, LH | 100% | 120 μs |
| Special | 150% | 70 μs |
| Metal | 220% | 70 μs |
MISCELLANEOUS Power Requirement 120V/80 Hz, 220V/50 Hz, 240V/50 Hz
| Power Requirement | 120V/106 Hz, 220V/150 Hz, 240V/30 Hz or 120, 220, 240V/50-60 Hz (depending on destinations) |
| Power Consumption | 22 watts |
| Dimensions (Overall) | 430 (W) x 115 (H) x 270 (D) mm |
| 16-15/16" x 4-17/32" x 10-5/8" | |
| Weight (net) | 4.17 kg/9.17 lbs. |
- Specifications and design subject to possible modification without
notice
- Dolby and the double-D symbol are trade marks of Dolby Laboratories Licensing Corporation. Noise reduction system manufactured under license from Dolby Laboratories Licensing Corporation.
DEUTSCH STEREO-CASSETTENDECK RD-840
EINFÜHRUNG
Signal-Reuschabstand (WTD.
The following table is provided in the image.
Effacement .... Noysu ferrite
tenno de plates .... 4 plate/2 canaux erm de bande . . . . . . . . . . . . . . . . . . . . . . . . . . . . . . . . . . . . . . . . . . . . . . . . . . . . . . . . . . . . 4 Rem/sec
tations (Fore / Lact 400 Hz) 1.0% (META
| Signal-ruisverhouding (WTD,0 dB=580 mV, Chroom) . . . . Dolby NR IN |
| Dolby NR OUT | 72 dB (C-type)55 dB | |
| Ingangtgevoeligheid/impedantie | .MIC | 0,3 mV/10 k ohm |
| LINE | 58 mV/33 k ohm | |
| Uitgonganiveau/impedantie | .LINE | 580 mV/1 k ohm |
| Snelspoeltijd (C 60) | 90 seconden | |
| Bandkeuzeschakelaar | BIAS | EQUALIZER |
| Normaal, LH | 100% | 120 μS |
| Special | 150% | 70 μS |
| Motaal | 220% | 70 μS |
ALGEMEEN
Netspanning .220V/50 Hz Stroomverbruik .22 watt Almetingen (totaal) .430 (BI) x 115 (H) x 270 (D)mm Gewicht (netto) .4,17 kg
• Exerciceptive delivery system
Regulatory Laboratory Laboratories Licensing Corporation.
(7) REC LEVEL sãõdin
Süre (REC/PB, 400 Hz)
Tavallinen, LH. .30-15.000 Hz ≥3 dB
Special .30-15.000 Hz ±3 dB
Metalli .30-18.000 Hz ±3 dB Sionali/kohinasuhde (WTD.
0 dB = 580 mV, kromi) . . . .Dolly NR in 64 dB (B-typpi)
72 dB
Udaanosniwau/impedens
LINE 580 mV/1 k ohm
Hurtigospinostid (C-60) 9D sek.
Bändselektor BIAS EQUALIZER
Normal, LH 100% 120 μs
Special 150% 70 μs
Metal 220% 70 μs
DIVERSE
Strømforsyning . . . . . . . . . . . . . . . . . . . . 220V/50 Hz
Kraftforbrug. . . . . . . . . . . . . . . 22 watt
Udvendige mål. . . . . . . . . . . . . . . . . . . . 430 (B) x 115 (H) x 270 (D) mm
Licensing Corporation.
TILKOPLING TIL STROM
natural_image
Illustration of two mechanical devices with a tool, one showing a dial and the other a test tube (no text or symbols present)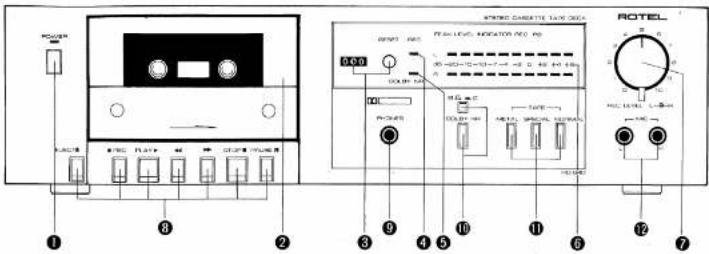
BRYTERE OG KONTROLLER
(1) Nettbryter (POWER)
- ROTEL®
- RD-84O
- INTRODUCTION
- INSTALLATION
- POWER SUPPLY CONNECTION
- EXCLUSIVE NOTE FOR U.K.
- CONNECTION TO INTEGRATED AMPLIFIER OR RECEIVER
- AUTOMATIC SHUTOFF SYSTEM
- CASSETTE TAPES
- SWITCHES AND CONTROLS
- Power Button
- Cassette Compartment Door
- Tape Counter and Reset Button
- REC Indicator
- Dolby NR Indicator
- Peak Level Indicators
- Recording Level Control
- Cassette Controls
- EJECT Button (▲)
- REC Button (●)
- should be winding.
- PLAY Button (▶)
- physics of recorded tape.
- Rewind Button (◀)
- Fast-Forward Button (▶)
- Stop Button (■)
- PAUSE Button (Ⅲ)
- Headphone Jack
- Dolby NR Button and
- Dolby B-C Type NR Selector
- Tape Selector
- Microphone Jacks
- OPERATION
- Recording
- Playback
- HEAD CLEANING
- DEMAGNETIZING
- VOLTAGE SELECTION
- DEUTSCH STEREO-CASSETTENDECK RD-840
- EINFÜHRUNG
- ALGEMEEN
- REC LEVEL sãõdin
- TILKOPLING TIL STROM
- BRYTERE OG KONTROLLER
Brand : ROTEL
Model : RD-840
Category : Cassette player