
RD-18F - Cassette player ROTEL - Free user manual and instructions
Find the device manual for free RD-18F ROTEL in PDF.


| Product Type | Cassette Player |
| Brand | Rotel |
| Model | RD-18F |
| Type | Stereo cassette deck |
| Dimensions (W x H x D) | 430 x 120 x 280 mm |
| Weight | 4.5 kg |
| Power Supply | 230 V AC, 50 Hz |
| Power Consumption | 15 W |
| Tape Speed | 4.76 cm/s |
| Frequency Response | 40 Hz – 14 kHz |
| Signal-to-Noise Ratio | 60 dB |
| Wow and Flutter | 0.15% |
| Inputs | RCA line in (2), microphone (optional) |
| Outputs | RCA line out (2), headphone 6.3 mm |
| Functions | Play, Record, Rewind, Fast Forward, Pause, Stop, Eject |
| Auto Stop | Yes |
| Tape Counter | 3-digit mechanical |
| Recording Level Control | Manual with VU meter |
| Maintenance | Clean tape heads and pinch roller monthly with isopropyl alcohol |
| Cleaning | Use a cotton swab moistened with alcohol; avoid touching other components |
| Spare Parts | Drive belts, magnetic playback/record heads |
| Safety Precautions | Do not expose to moisture; unplug during electrical storms |
Frequently Asked Questions - RD-18F ROTEL
User questions about RD-18F ROTEL
0 question about this device. Answer the ones you know or ask your own.
Ask a new question about this device
Download the instructions for your Cassette player in PDF format for free! Find your manual RD-18F - ROTEL and take your electronic device back in hand. On this page are published all the documents necessary for the use of your device. RD-18F by ROTEL.
USER MANUAL RD-18F ROTEL
Quality. Uncompromised
ROTEL®

natural_image
Pure electrical circuit lines without any symbolsSTEREO
CASSETTE
DECK
RD-18F
WARNING: TO PREVENT FIRE OR SHOCK HAZARD, DO NOT EXPOSE THIS APPLIANCE TO RAIN OR MOISTURE.
Write your SERIAL NUMBER here.
The number is located near the name plate on
the unit's rear panel.

日本語
じめに
We at Hotel would like to take this opportunity to thank you for purchasing our RD-1BF audio components.
The quality sound and high performance of this component are the result of Rotel's advanced electronics technology coupled with our own love of fine music. We are confident that this superb component will meet with your full satisfaction.
We ask you to fully read this instruction manual before using your unit, in order to assure proper operation, and so that you may enjoy its full performance for many years to come.
DEUTSCH
EINFÜHRUNG
For power the unit requires the normal house electrical current IACI. You may simply plug the unit to a well outlet, or to your amplifier's for receiver's) switched or unswitched AC outlet. If it is plugged to a switched outlet, by leaving the power switch of the unit on, you will be able to maintain switching control for the cassette deck with your amplifier or receiver. If it is connected to an unswitched outlet, like connecting to a wall outlet you must use the cassette's own power switch for switching control.
CAUTION - Do not apply power without first making sure the proper connections are completed. If you live in U.K. and your unit comes with 2-core cord without a plug, he sure to read the exclusive caution for U.K.
NETZANSCHLUSS
As your unit comes with a 2-core cable without a plug, make certain live and neutral leads are connected to the proper terminals. Check that the terminals are screwed down firmly and no loose strands of wire are present.
IMPORTANT: The wires in this mains lead are coloured in accordance with the following code:
BLUE: NEUTRAL BROWN: LIVE
As the colours of the wires in the mains load of this apparatus may not correspond with the coloured markings identifying the terminals in your plug proceed as follows. The wire which is coloured BLUE must be connected to the terminal which is marked with the letter N or coloured BLUE or BLACK. The wire which is coloured BROWN must be connected to the terminal which is marked with the letter L or coloured BROWN or RED.
WEDERLANDS
INTRODUCTIE
Be sure to place the unit in a level and flat place where it is free from humidity, vibration, high temperature and not exposed to direct sunlight.
Be careful not to place the unit in a highly enclosed place such as near a wall or on a bookshelf. A poor ventilation will cause undesirable effects to the unit.
INSTALLATION
Connect the unit's rear panel terminals to the TAPE MONITOR terminals of your amplifier, using either the RCA cords or a single DIN type record/playback cord. The unit's LINE IN terminals should be connected to the TAPE MONITOR OUT terminals of the amplifier, and the LINE OUT terminals to the TAPE MONITOR IN terminals of the amplifier. Do certain to properly match right and left terminals between arrangements. Do not attempt to connect the RCA type cords when the DIN type record/playback cord is used.
ANSCHLUB AN EINEN RECEIVER ODER VER-
m = 311
[Non-Text]
ヘッドフォ
のプロント
ク、ヘッドフ
きさい。
(でく亚太)。
t左右性立の書
减持してください
(1) 2017年1月1日
[Non-Text]
[Non-Text]
[Non-Text]
[Non-Text]
[Non-Text]
[Non-Text]
[Non-Text]
C
長
-
スイッチ
CONCEO
ます。再び押も
すべての電源は
[Non-Text]
(二) 本次股东大会的决议的有效期
ントロールボタン
Power Station Push to activ
Past to activate and pass again to deactivate. The VU meters will light up when the power is ON.
(1)
(2)\~(7)
Cassette Transport Control Buttons
(2)
Record Button
Allows you to activate the record
mechanism and must be depressed simultaneously with the PLAY
button in order to start the tape in motion when recording.
(五)
(3)
Rewind Button (▼▼)
Depress this button to rapidly return the tape in the direction of
the arrows. To protect the tape,
the function will automatically diagnose when the tape is fully
wound onto the supply reel.
(4)
(4) Fast Forward Button (▶▶)
Depress this button to rapidly ad-
vance the tape in the direction of
the this
disengage when the tape is fully
1950
(5)
Play Button (▶)
Depress this button when you wish to play a previously recorded tape
When recording a tape, depress the
button together and simultaneously with the SICORD button. The
with
call
rap
up
(6)
Stop/eject Button (■)
Purechont in two steps. One high push will disengage. [STOP] any
STEUERFUNKTIONEN
(1)
(1)
The image is too blurry to recognize any text content.
•
广力云智慧零售收银系统
(1) 本说明仅供参考。
ie, et
pou- ment
[Non-Text]
[Non-Text]
trans:
(五)本说明仅供参考。
[Non-Text]
[Non-Text]
10
t doit tvec
d'en-
gistro
[Non-Text]
[Non-Text]
The image is too blurry to recognize any text content.
d
er le
sagera
r la
[Non-Text]
[Non-Text]
)
sancer
direct
[Unreadable]
ruban
(No text)
[Non-Text]
[Non-Text]
# YOUR
scéde
vous
at e
d'EN
auto
表决结果:
[Non-Text]
-
(五)
[Non-Text]
[Non-Text]
[Non-Text]
[Non-Text]
[Non-Text]
[Non-Text]
[Non-Text]
[Non-Text]
[Non-Text]
[Non-Text]
[Non-Text]
[Non-Text]
[Non-Text]
[Non-Text]
[Non-Text]
[Non-Text]
[Non-Text]
[Non-Text]
[Non-Text]
[Non-Text]
[Non-Text]
[Non-Text]
[Non-Text]
[Non-Text]
[Non-Text]
[Non-Text]
[Non-Text]
[Non-Text]
[Non-Text]
[Non-Text]
[Non-Text]
[Non-Text]
[Non-Text]
[Non-Text]
[Non-Text]
[Non-Text]
[Non-Text]
[Non-Text]
[Non-Text]
[Non-Text]
[Non-Text]
[Non-Text]
[Non-Text]
[Non-Text]
[Non-Text]
[Non-Text]
[Non-Text]
[Non-Text]
[Non-Text]
[Non-Text]
[Non-Text]
[Non-Text]
日本語
mode of tape motion, except the PAUSE button. Another push will open (EJECT) the cassette trap door for insertion or removal of a tape. When all other buttons (with the exception of the PAUSE button) are at their unused positions, decreasing this button will only eject the tape.
(7
Pause Button |
Used in conjunction with the PLAY of RECORD button. When depressed, this button will interrupt the motion of the tape while playing or recording without affecting the position of the PLAY or RECORD button. Push again to release. Note the PAUSE button will not be released by the STOP button.
(8)
Phones Jack
You may connect a pair of headphones to this jack for private listening.
(9
Dolby NR Switch
To record or play back through the built-in Dolby noise reduction circuit be sure to set the DOLBY NR switch to ON beforehand. The DOLBY lamp will glow to indicate that the Dolby circuit is in operation. Any tape recorded through the Dolby circuit should also be played back through the Dolby circuit for optimum results.
Dolbyzed FM broadcasts must be recorded from a tuner capable of receiving such broadcasts, without using the tape deck's built-in Dolby circuit. Keep the DOLBY NR switch at OFF while recording such broadcasts. Use the built-in Dolby circuit only when playing back the recorded tape.
DEUTSCH


(10)
Bandkiezers (BIAS/EQUALIZERI)
Stelt u in staat te kiezen voor
narmal, chroom dioxyde, ferri-
chroom at metaal-band, voor het
aanpassen van de specifieke band-
geakteratieken voor opname/weer-
gave.
(Zie tabel).
Interruptores selectores de cinta (BIAS/EQUALIZER)
Le permiten seleccioner la cinta normal, de dióxido de cramo, de ferrocromo o metálica para adaptar la característica de la cinta específica para grabación/reproducción.
(Vease el diograma.)
Interruttori selettori di nastro (BIAS/EQUALIZER)
Vi permettono di scegliere il nastro normale, di bissido di cromo, di ferrioromo o metallico per accapolare la caratteristica del nastro specifico per registrazione/riproduzione.
(Vedere il diagramma.)
Bandväljare (BIAS/EQUALIZERI)
Med dessa omkopplare kan Ni inställa apparaten på egenskaperna av den bandtyp som används: normaltyp. kromdioxidtyp eller ferrokromtyp, för bästa av- och inspanning (se tabellen).
(10)
(10)
(10)
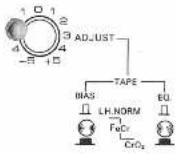
A bias scale from -5 to +5 allows you to adjust the bias range according to the kind of tape used. Should you feel sound quality in the high range to be inadequate, move the control towards the (-1) position. If you notice noise or distortion, move it towards the (11) position. (Refer to chart to adjust to proper bias for the tape you are using.)
(12)
Rec Level Control Allows you to control the recording level of incoming signals, such as from turntable, tuner and microphones.
The separate left and right channel controls are provided for reliable adjustment.
(13)
Microphone Jacks Use only low impedance type microphones (around 800 ohms). The microphones should be plugged only for a live recording, so if you are recording other sources be sure to remove the microphones from the jacks.
(14)
Cassette Trap Door Depress the EJECT button to open the door, and push lightly with your fingers to close the door.
(15)
Tape Counter The three-digit tape counter is provided as a means of relocating any given point on a tape once it has been recorded. When a recording is being made, simply log the reading on the counter at the beginning of each selection. You will then be able to wind the tape to the same point at any future date.
(16)
Reset Button The RESET button allows you to reset the counter to zero so that you will always be able to use the same frame of reference.
(11)
In the playback mode of operation the VU meters provide visual indication of the signal being fed. In the record mode the VU meters are used to monitor the level of the signal being recorded on the tape. They should be used along with the REC LEVEL controls to maintain the proper recording level.
(18)
Peak Level Indicator
In the record mode, the frequent light-up of the indicator means you should lower the input level for better performance at less distortion. Adjust the INPUT LEVEL controls so that the indicator will not light-up frequently.
The PEAK LEVEL indicator is a warning guide to higher limits for your recording level.
(19)
Function Indicators
These indicators visually show the activation of 2 important switches - DOLBY NR and RECORD. Each indicator will light up when the corresponding switch is activated.
(17)
To protect the RD-182's motor and drive mechanism against unnecessary wear, an automatic shut-off device has been built into the machine. When the supply hub stops for any reason the motor and drive mechanism will automatically shutoff after a short period of time (usually about 5 seconds). The machine is also automatically shut-off at the end of tape (PLAY, REC/PLAY, FAST FORWARD AND REWIND model, disengaging all locked buttons.
NOTE — Since this device will not affect the electronic circuits of the machine it will still be necessary to turn off the entire unit by pushing the power switch.
AUTOMATISCHE AB-
High-performance tapes ranging from normal to ferrochrome types are suitable for this component. (Metal tapes must not be used.) In addition, tape, tension and capstan tolerance for this unit have been carefully adjusted to the specific tape thickness of C30, C80 and C90 cassettes. For this reason, the use of C120 cassettes is not recommended. As cleanliness and precision are necessary for accurate sound reproduction, cassettes should always be handled with care, and kept away from dust and magnetic influences which might cause sound distortion.
Cassette tapes are provided with a safety feature which prevents against accidental erasure of previously recorded material. This feature consists of two small tabs lapsed on both sides at the rear of the cassette housing. After a recording has been made, these tabs are removed, leaving two small, square openings which prevent further recording on that type. (You will notice that these tabs are absent on any pre-recorded tapes you may leave.) If you wish to guard against erasure on a recording you have made on a blank cassette, it is necessary to remove one or both of these tabs as follows.
-
If both sides have been recorded, insert a thin bladed screwdriver in the opening around each tab and gently pry the tie off. Be sure the tie falls free from the cassette.
-
If one side only has been recorded, place the cassette or a table just as it has been removed from the recorder, with the side recorded facing up and the exposed tape area facing you. You should then
CASSETTENBÄNDER
BEFORE RECORDING OR PLAYBACK/CASSETTE INSERTION 1. Be certain that the power connection, and connections between the various components are properly made. 2. Make sure that the sustain prevention taps at the rear of the top phone to you are present, or that you have placed a piece of tape over the openings if the taps are missing. 3. If you are recording with microphones, be sure they are properly recorded in the top phone to you are sent. NOTE: LINE sources cannot be recorded when microphones are inserted in the MIC jacks. For this reason, be certain the microphones have been removed when you wish to be used for your use. 4. To insert a cassette, press the EJECT button to open the cassette door, and gently insert the cassette in the holder, with the exposed side of the tape facing slowly down the side of the door, while record facing you. Press the cassette door shut with your fingers.
ENGLISH
remove the tab in the left-hand corner to prevent erasure of that side of the tape. If you later wish to record over a previously recorded tape, simply place a piece of adhesive tape over the tab opening. This will show you to make a new recording. Removal of the tape after recording will again insure against accidental erasure. The cassette tape, when wound loosely on either hub, is likely to jam around the capsular and pinch roller during recording or playback. Therefore, if the tape is loose, insert a pencil into the more lightly wound hub, and turn it with the other part of the tape is taken up. Always be sure to check that the tape is wound lightly before inserting a cassette in your deck.
DEUTSCH
- When recording with microphones, be sure that the microphone plugs are properly inserted into the left and right MIC jacks. - When recording from LINE sources, choose the appropriate program (tuner, turntable, etc.) on your amplifier.
-
When you wish to record using the Dolby NR circuit, set the DOLBY SWITCH to the ON position.
-
Set the TAPE SELECTOR switches to match the type of tape used. Set the BIAS ADJUST control to the appropriate setting.
-
Turn the POWER SWITCH to DN.
-
Depress the PAUSE button.
-
Simultaneously depress the REC and PLAY buttons.
-
Adjust the recording level. Using the two VU meters, adjust the left and right REC LEVEL controls so that the forthmost position reached by the VU indicators does not exceed DdB. (See Diagram)
-
After adjusting recording levels, you may begin recording by again depressing the PAUSE button to start the tape.
-
Be certain to occasionally check the VU meters during recording, if the PEAK INDICATOR lamp goes on frequently, the power input should be increased slightly. The PAUSE button may be depressed if you wish to momentarily halt recording.
-
When you have complement a recording, press the STOP button. When the tape becomes fully wound onto the take-up spot, it will stop automatically.

生方法
- When using Dolbyized tapes, so the DOLBY switch to ON.
-
Set the TAPE SELECTOR switches to match the type of tape used.
-
Turn the power switch on your amplifier to ON, with the volume control set to the minimum position. (When using headphones connected to the tape deck, there is no need to use the amplifier for playback)
-
Turn the POWER switch to ON.
-
Press the PLAY button to begin playback.
-
Adjust the volume to your
AUFNAHME
desired volume level. 7. To momentarily halt playback, press the PAUSE button. When you wish to end playback, press the STOP button. When then tape becomes fully wound onto the tape-up spool, it will stop automatically.
DEUTSCH
REWINDING/FAST FOWARDING Press the RAW button when you wish to rewind a tape for replay or re-recording. When you wish to jump sheet, or pass over a selection, depress the F.WD button. To stop either of these modes, depress the STOP button. The TAPE COUNTER is convenient when you wish to hint to a specific point. By setting the RESET button to the 'G' position at a certain point on the tape, you will be able to return to that position whenever you wish.
CEANING The most frequent cause of failure to record in one or both channels, or of weak, distorted sound, is dirty tape heads and capstan. So, be sure to clean the heads, capstan, pinch roller and tape guides as often as possible using a "Q" tip dipped in ordinary rubbing alcohol or commercial liquid tape head cleaner. Thoroughly wipe the surface of the heads, capstan, roller and tape guide.
DEMAGNETIZING The tape heads, capston and tape guides gradually become magnetized with use, which will eventually affect the sound quality of your tapes. Demagnetizing should follow cleaning, but need not take place as often as cleaning, once after every 20 to 30 hours of use should suffice. A demagnetizer may be purchased at a moderate cost from any dealer carrying tape recording accessories. Follow the instruction supplied with the demagnetizer. CAUTION: Push the power switch off before you attempt demagnetizing.
The PD-18F has been fully lubricated at the factory. No other lubrication should be necessary for some time. If lubrication should become necessary at some future date, be sure to have this done by a qualified technician only.
SCHMIERUNG
In any high fidelity installation, hum may be caused by interconnecting associated equipment. If the addition of the RD-18F to your system is accompanied by previously nonexistent hum reverse the AC line plug in its socket. "If this does not help, you may have defective interconnecting cables or the cables may be located too rear a strong AC field, such as a television, power transformer, AC motor, or power lines." Do not attempt changes to plug connections in the U.K., in any attempt to reduce hum in your system.
BRUMM
Not available for U.K., Canada and Scandinavia
The RD-18F is a variable voltage equipment that can run on 120V, 220V or 240V power supply. Your unit should already be preset at the proper voltage for use in your area. However, if you move to an area where the power supply voltage is different, the voltage setting can be manually changed. BE SURE THAT YOUR UNIT IS NOT CONNECTED TO THE POWER SOURCE BEFORE ATTEMPTING TO MAKE THIS CHANGE. To check the voltage setting, remove the name plate on the rear panel and locate the VOLTAGE SELECTOR. Use a screwdriver to turn the voltage selector to the required voltage.
SPANNUNGSWAHL
| Heads. | Super Hard Permalloy REC/PBHead Ferrite Core Erase Head | |
| Track. | 4-Track/2-Channel | |
| Tape Speed | 4.8 cm/sec (1-7/8 ips.) | |
| Motor. | Electronic Governor DC Motor | |
| Wow & Flutter | 0.25% (DIN)0.08% (WRMS) | |
| Fast Wind Time | Approximately 90 Seconds (C-60) | |
| Frequency Response(MPX off) | Normal, LH Tape 30 - 13,000Hz±3dBChromium Tape 30 - 15,000Hz±3dBFerri Chrom 30 - 15,000Hz±3dB | |
| Signal-to-Noise Ratio(Chromium) | Dolby NR in: Better than 62dBDolby NR out: Better than 53dB | |
| Input Sensitivity/Impedance. | MIC 0.3mV/10 kohmsLINE 25mV/47 kohmsDIN 1.6mV/10 kohms | |
| Output Level(0VU, 1kHz=160pwb/mm) | LINE 410mVDIN 410mV | |
| Tape Selectors. | BIAS 100/110/150%EQUALIZER 120/70/70μS | |
| BIAS Adjust Level | NORM FeCr±10% CrO2±15% | |
| Power Requirements | 100V, 50/60Hz120V, 60Hz120V/220V/240V, 50/60Hz (switable) | |
| Power Consumption | 15 watts | |
| Dimensions (Overall) | 430(W) x *44.5(H) x 263(D)mn16-15/16(W) x 5-22/32(H) x 10/3 | |
| Weight (net) | 5.5kg/12.1 lbs. | |
| Specifications and design subject to possible modification without not Dolby and Dolbyized are trademarks of Dolby Laboratories. Noise reduction under license from Dolby Laboratories. | ||
- STEREO
- CASSETTE
- DECK
- RD-18F
- 日本語
- じめに
- DEUTSCH
- EINFÜHRUNG
- NETZANSCHLUSS
- WEDERLANDS
- INTRODUCTIE
- INSTALLATION
- ANSCHLUB AN EINEN RECEIVER ODER VER-
- STEUERFUNKTIONEN
- (7
- Pause Button |
- (8)
- Phones Jack
- (9
- Dolby NR Switch
- (12)
- (13)
- (14)
- (15)
- (16)
- (11)
- (18)
- (19)
- (17)
- AUTOMATISCHE AB-
- CASSETTENBÄNDER
- ENGLISH
- 生方法
- AUFNAHME
- SCHMIERUNG
- BRUMM
- SPANNUNGSWAHL
Brand : ROTEL
Model : RD-18F
Category : Cassette player