
NetShelter SX AR3200 - Patch panel APC - Free user manual and instructions
Find the device manual for free NetShelter SX AR3200 APC in PDF.


| Product Type | Server Rack Enclosure |
| Brand | APC |
| Model | NetShelter SX AR3200 |
| Rack Height | 42U |
| Width | 800 mm (31.5 in) |
| Depth | 1070 mm (42.1 in) |
| Weight (empty) | 130 kg (287 lbs) |
| Color | Black |
| Material | Steel, with translucent tempered glass door |
| Max Load Capacity | 1364 kg (3000 lbs) static; 1023 kg (2250 lbs) dynamic |
| Mounting Rails | Adjustable depth, tool-less square hole, 10-32 threaded holes |
| Door Type | Single, reversible, lockable glass door |
| Side Panels | Removable, lockable |
| Top and Bottom Cable Access | Openings with brush strips |
| Ventilation | Perforated front and rear doors, top fan mounting holes |
| Grounding | Front and rear grounding bars with bonding points |
| Compliance | EIA-310-E, UL 2416, RoHS |
| Maintenance | Wipe with dry cloth; avoid solvents; check hinges and locks periodically |
| Accessories | Cable management panels, fan modules, shelves, power distribution units |
| Intended Use | Mounting servers, networking equipment, and patch panels |
Frequently Asked Questions - NetShelter SX AR3200 APC
User questions about NetShelter SX AR3200 APC
0 question about this device. Answer the ones you know or ask your own.
Ask a new question about this device
Download the instructions for your Patch panel in PDF format for free! Find your manual NetShelter SX AR3200 - APC and take your electronic device back in hand. On this page are published all the documents necessary for the use of your device. NetShelter SX AR3200 by APC.
USER MANUAL NetShelter SX AR3200 APC
Installation and Customization Manual
NetShelter™ SX Colocation Enclosure
AR3200
990-3920A-001
Publication Date: December 2015

natural_image
Line drawing of a two-tiered refrigerator with doors and front panels (no text or symbols)Schneider Electric Legal Disclaimer
The information presented in this manual is not warranted by Schneider Electric to be authoritative, error free, or complete. This publication is not meant to be a substitute for a detailed operational and site specific development plan. Therefore, Schneider Electric assumes no liability for damages, violations of codes, improper installation, system failures, or any other problems that could arise based on the use of this Publication.
The information contained in this Publication is provided as is and has been prepared solely for the purpose of evaluating data center design and construction. This Publication has been compiled in good faith by Schneider Electric. However, no representation is made or warranty given, either express or implied, as to the completeness or accuracy of the information this Publication contains.
IN NO EVENT SHALL SCHNEIDER ELECTRIC, OR ANY PARENT, AFFILIATE OR SUBSIDIARY COMPANY OF SCHNEIDER ELECTRIC OR THEIR RESPECTIVE OFFICERS, DIRECTORS, OR EMPLOYEES BE LIABLE FOR ANY DIRECT, INDIRECT, CONSEQUENTIAL, PUNITIVE, SPECIAL, OR INCIDENTAL DAMAGES (INCLUDING, WITHOUT LIMITATION, DAMAGES FOR LOSS OF BUSINESS, CONTRACT, REVENUE, DATA, INFORMATION, OR BUSINESS INTERRUPTION) RESULTING FROM, ARISING OUT, OR IN CONNECTION WITH THE USE OF, OR INABILITY TO USE THIS PUBLICATION OR THE CONTENT, EVEN IF SCHNEIDER ELECTRIC HAS BEEN EXPRESSLY ADVISED OF THE POSSIBILITY OF SUCH DAMAGES. SCHNEIDER ELECTRIC RESERVES THE RIGHT TO MAKE CHANGES OR UPDATES WITH RESPECT TO OR IN THE CONTENT OF THE PUBLICATION OR THE FORMAT THEREOF AT ANY TIME WITHOUT NOTICE.
Copyright, intellectual, and all other proprietary rights in the content (including but not limited to software, audio, video, text, and photographs) rests with Schneider Electric or its licensors. All rights in the content not expressly granted herein are reserved. No rights of any kind are licensed or assigned or shall otherwise pass to persons accessing this information.
This Publication shall not be for resale in whole or in part.
Table of Contents
Introduction ....1
Unpack the Enclosure....2
Disclaimer 2
Inspection 2
Please Recycle....2
Important Safety Information 2
Safety Instructions ....3
Labels 3
Component Identification....4
Enclosure 4
Hardware 5
Required Tools (not provided) 5
Security....6
Door and Side-Panel Keys 6
Operating the Combination Lock 7
Parts Identification 7
Unlock using the Dials: 7
Lock using the Dials: 7
Changing the Combination: 7
Preparation 8
Move the Enclosure 8
Level the Enclosure 9
Joining Enclosures .... 10
Secure the Enclosure....11
Stabilization Options ...... 11
Grounding the Enclosure 12
Bonding Locations on the Enclosure 12
Enclosure Installation....13
Side Panels 13
Roof Installation 13
Doors 14
Equipment Installation....23
Vertical Mounting Rails....23
Adjust the Vertical Mounting Rails .....24
Install Rack-Mount Equipment in the Enclosure....25
Identify one U-space on the vertical mounting rail 25
Cage Nuts 25
Complete the Installation....26
Plug Installation....26
Cable Routing and Cable Management 26
Security Covers....26
Knock-out Panels 27
Specifications 28
Limited Factory Warranty 29
Terms of Warranty 29
Non-transferable Warranty 29
Exclusions....29
Warranty Claims ....30
Introduction
The NetShelter ^™ SX Colocation Enclosure is a high-quality split-level multi-tenant enclosure for storage of industry-standard (EIA-310) 19 in. rack-mount hardware, which includes servers, voice, data, networking, security, and power protection equipment.
For a complete list of accessories and more information, see www.schneider-electric.com.
This manual covers the following:
- NetShelter SX Colocation 2 x 20U (600 mm Wide x 1070 mm Deep) Enclosure (AR3200).
Disclaimer
Schneider Electric is not responsible for damage sustained during reshipment of this product.
Inspection
Inspect the packaging and contents for shipping damage. Make sure that all parts are accounted for. Report any damage immediately to the shipping agent. Report missing contents, damage, or other problems immediately to your reseller.
Please Recycle

The shipping materials are recyclable. Save them for later use, or dispose of them appropriately.
Important Safety Information
Read the instructions carefully to become familiar with the device before trying to install, operate, service or maintain it. The following messages may appear throughout this manual or on the equipment to warn of potential hazards or to call attention to information that clarifies or simplifies a procedure.

The addition of this symbol to a Danger or Warning safety label indicates that an electrical hazard exists which will result in personal injury if the instructions are not followed.

This is the safety alert symbol. It is used to alert you to potential personal injury hazards. Obey all safety messages that follow this symbol to avoid possible injury or death.
DANGER
DANGER indicates an imminently hazardous situation which, if not avoided, will result in death or serious injury.
WARNING
WARNING indicates a potentially hazardous situation which, if not avoided, can result in death or serious injury.
CAUTION
CAUTION indicates a potentially hazardous situation which, if not avoided, can result in minor or moderate injury.
CAUTION
CAUTION, used without the safety alert symbol, indicates a potentially hazardous situation which, if not avoided, can result in equipment damage.
NOTICE
NOTICE addresses practices not related to physical injury including certain environmental hazards, potential damage or loss of data.
Safety Instructions
This manual contains important instructions that must be followed during the installation and customization of the enclosure.
WARNING
TIP / HEAVY EQUIPMENT HAZARD
- This enclosure is easily tipped. Use extreme caution when unpacking or moving.
- At least two people are required to unpack and move the enclosure.
- Before moving the enclosure on its casters, load 158kg (350 lb) of equipment into the bottom of the enclosure for extra stability.
- Make sure the leveling feet are up and push the enclosure only from the front or rear when moving the enclosure on its casters. Never push the enclosure from the sides.
Failure to follow these instructions can result in death, serious injury, or equipment damage.
Labels
Look for additional safety information affixed to the enclosure. See “Labels” on page 8 for more information.
Component Identification
Enclosure
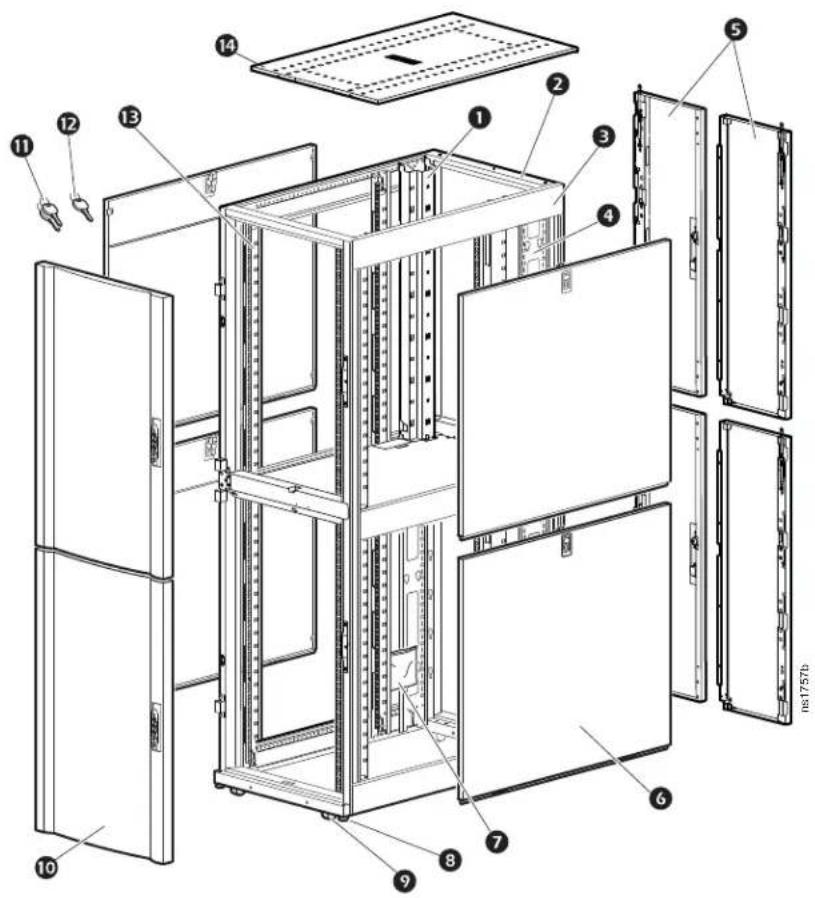
① Accessory channel security cover
② Frame
3 Side brace
4 Adjustable vertical 0U Accessory Channel
⑤ Removable rear split doors (AR7103)
6 Removable side panels with locks (AR7301)
⑦ Hardware bag (see page 5)
⑧ Adjustable leveling feet
9 Casters
10 Removable and reversible front door with combination lock (AR7003)
⑪ Keys for front and rear doors
⑫ Key for side panel
13 Adjustable vertical mounting rails
14 Roof
Hardware and tools (provided)

M6 Black Plastic Cup Washer (60)

7 mm Hole Plug (4)

M6 14/16
Cage Nut (60)

M5 x 12
Screw (4)

M6 x 16 Phillips/Slot Screw (60)

Torx® T30/#2 Phillips Wrench (1) Cage Nut Installation Tool (1)

Tools required (not provided)

Torque wrench Phillips screwdriver

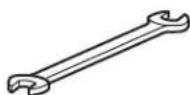
10 mm / 13 mm open-ended wrench

Level
Security for the Colocation Enclosure includes keyed entry for doors and side panels as well as a combination lock for the front and rear doors.
Door and Side-Panel Keys
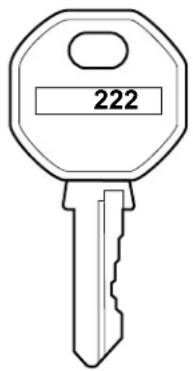
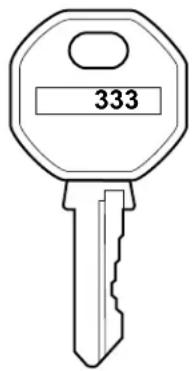
The Colocation Enclosure is shipped with a different key for side panels and doors. Door keys are marked with "222" and side panel keys are marked with "333".
Front and Rear Door Key
Side Panel Key
You can obtain replacement keys or unique locks with keys and a master key override by contacting EMKA Inc.: http://www.emka.com.
Operating the Combination Lock
NOTES:
– Dials cannot be turned when the doors have been unlocked by using the combination. The combination will be visible until the door is re-locked and the combination is cleared.
- When door is locked with the "222" key, make sure the wing knob cannot rotate to the unlocked position. If the knob rotates, the dials have been set to the combination. Turn the dials to clear the combination.
- When the door has been unlocked with the "222" key, the only way to re-lock the door is with the key. Until the door is locked with the key, the combination dials cannot be used.
Parts Identification
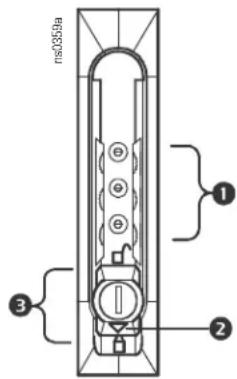
1 Combination dials
② Indicator arrow
③ Wing knob
Locked
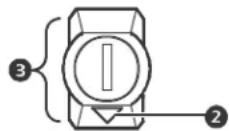
Unlocked
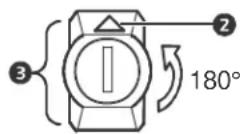
Unlock using the Dials:
- Dial the combination ① (factory default = "000").
- Turn the wing knob ③ until the arrow ② points up (unlocked position).
- Open door.
Lock using the Dials:
- Turn the wing knob ③ until the arrow ② points down (locked position).
- Turn the dials ① to clear the combination.
Changing the Combination:
NOTE: To change the combination, you must know the existing one.
- Dial the combination ① (factory default = "000").
- Turn the wing knob ③ until the arrow ② points up (unlocked position). Turn it counterclockwise an additional 15°, and enter your new combination.
- Turn the wing knob clockwise 15^ back to the unlocked position. The new combination is set.
Move the Enclosure
WARNING
TIP HAZARD
- This enclosure is easily tipped. Use extreme caution when unpacking or moving.
- Use at least two people to unpack and move the enclosure.
- Before moving the enclosure on its casters, load 158 kg (350 lb) of equipment into the bottom of the enclosure for extra stability.
- Make sure the leveling feet are up and push the enclosure only from the front or rear when moving the enclosure on its casters. Never push the enclosure from the sides.
Failure to follow these instructions can result in death, serious injury, or equipment damage.

Labels. The following labels can be found on the enclosure, and serve to communicate the following information:
Label ①: Generic Tip Hazard
Label ②: Extend Slide-Mounted Hardware One Piece at a Time
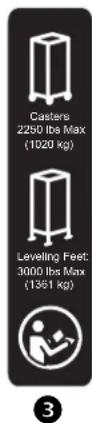
Casters. The enclosure can be moved on its casters with up to 1021 kg (2,250 lb) of equipment installed. Once in place, lower the leveling feet. With the leveling feet lowered, the static enclosure can be loaded to 1364 kg (3,000 lb).
NOTE: Some labels on the enclosure indicate caster related information. See label ③ to right.
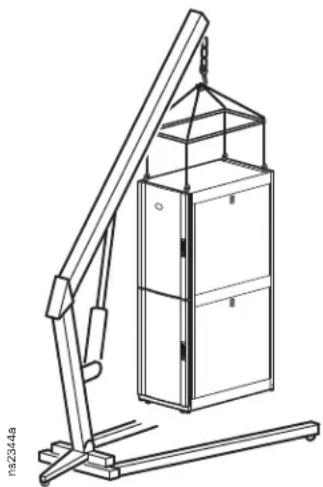
Eye bolts. The enclosure can be lifted using eye bolts with up to 567 kg (1,250 lb) of equipment installed. Use M10 eye bolts with a shoulder rated for 181 kg (400 lb).
NOTE: Use appropriate lifting hardware to assure straight-line pull on lifting eye bolts.
natural_image
Technical line drawing of a lifting device with a cabinet and lever (no text or symbols)Level the Enclosure
NOTES:
- The leveling feet at the corners of the equipment provide a stable base if the floor is uneven, but they cannot compensate for a badly sloped surface. - With the leveling feet lowered, the static enclosure can be loaded to 1364 kg (3,000 lb).
- Ensure the enclosure is in its intended location. Remove the front and rear doors. See "Front Door Removal" on page 16 for instruction.
NOTES:
- Door removal is not required if using the 13 mm open-ended-wrench.
- Before removing the front door, unplug the ground wires and any other wire connections that may interfere with the removal of the doors.
- Insert a Phillips head screwdriver into the screw above the leveling foot. Turn the screw clockwise to extend the leveling foot until it makes firm contact with the floor.
This method works best with an empty, or near empty enclosure. If loaded with equipment, a 13 mm open ended wrench can also be used to lower the leveling feet.

natural_image
Technical line drawing of a server rack cabinet with an inset showing a screwdriver inserted into a bracket (no text or symbols present)-
Adjust each foot and, using a level, adjust the feet until the enclosure is level and plumb.
-
If removed, install the front and rear doors, unless the enclosures are to be joined.
Joining Enclosures
Join enclosures with the provided brackets to provide alignment and some added stability. Enclosures may be joined with or without the side panels installed.
WARNING
TIP HAZARD
Joining enclosures provides limited stability. Make sure the leveling feet are down before joining.
Failure to follow these instructions can result in death, serious injury, or equipment damage.
- Remove the front and rear doors, if necessary. See "Front Door Removal" on page 16 for more information.
- Choose between 24 in. centers or 600 mm centers (see detail view).
NOTE: If enclosures are joined on 24 in. centers, Schneider Electric offers baying trim (AR7600), to cover the gap between the enclosures. The trim can be installed after the units are joined together.

- Align the enclosures and join them, using two brackets in the front and two brackets in the rear.
- Enclosures are joined using a M5 x 12 countersunk flat head screw (provided in the hardware bag). Using the Phillips head end of the provided Torx® T30/#2 Phillips tool, or a similar tool, insert the screw into the designated hole and tighten.
- Install the doors. See "Front Door Installation" on page 14 and "2" on page 16 for more information.

natural_image
Technical line drawing of a server rack cabinet with mounting holes and internal components, showing close-up detail (no text or symbols)Secure the Enclosure
| WARNING |
| TIP HAZARDSecure the enclosure to the floor before installing equipment.Failure to follow these instructions can result in death, serious injury, or equipment damage. |
To secure the enclosure to the floor, use fastener locations on the outside or inside of the enclosure, and choose from the accessories shown below.
| Accessory SKU | Description | |
| Pallet / Bolt-Down Brackets | Provided | Attaches to the enclosure, internally or externally, to secure the enclosure to the floor. This provides additional stability without blocking cable access. With the appropriate mounting hardware, meets IBC/CBC seismic requirements. 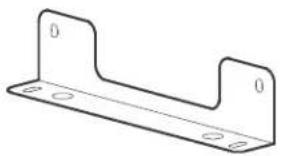 |
| NetShelter SX Stabilizer Plate | Option (AR7700) | Attaches externally to the enclosure and floor to provide additional stability.  |
| Bolt-down Kit | Option (AR7701) | Attaches to enclosure and floor internally or externally to provide additional stability without blocking cable access. 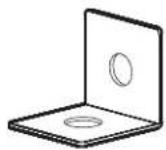 |

natural_image
Technical line drawing of a mechanical assembly with a magnified inset showing a detail view (no text or symbols)
natural_image
Technical line drawing of a mechanical assembly with mounting brackets and structural supports (no text or symbols)Grounding the Enclosure
Each enclosure should be bonded directly to a common ground using one of the designated grounding locations (two M6 threaded inserts) at the top or bottom of the enclosure.
- Use a Common Bonding Network Jumper kit (for example, Listed [KDER] Panduit® RGCBNJ660PY or equivalent).
- Use paint-piercing washers between the ground terminal and the enclosure frame, or remove the paint on the frame under the ground terminals, per NEC NFPA 70 Article 250.12.
- Torque the screws to 6.9 N·m (60 lb-in).
Bonding Locations on the Enclosure

DANGER
HAZARD OF ELECTRIC SHOCK
Connection of the enclosure to building Common Bonding Network (CBN) is required.
Failure to follow these instructions will result in death or serious injury.
Enclosure Installation
Side Panels
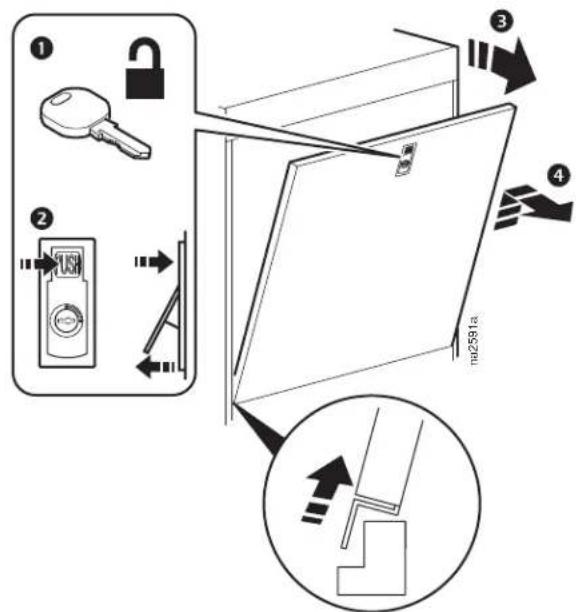
Roof Installation

Doors
DANGER
HAZARD OF ELECTRIC SHOCK
When Installing the doors, remember to reconnect all ground and other connection wires.
Failure to follow these instructions will result in death or serious injury.
Front Door Installation.
NOTE: The front doors can be installed on either the left or right side of the frame. When facing the enclosure, this procedure installs doors on the left side, causing the door to open from the right.
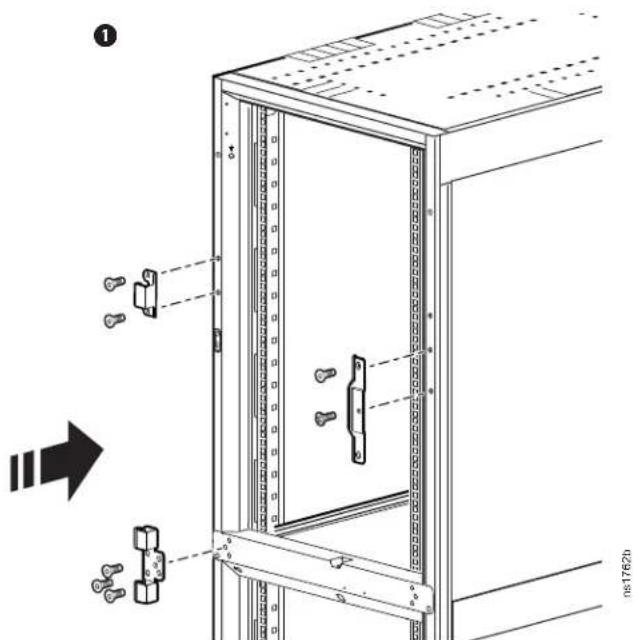
NOTE: Install the lower door using the same procedure.


Front Door Removal.
1

2

natural_image
Technical line drawing of a door frame assembly with mounting bracket and internal components (no text or symbols)Reversing the Front Door.
The front door can be hinged on either side of the enclosure.
NOTE: This procedure installs doors on the right side (when facing the enclosure), causing the door to open from the left.
- Remove the handle from both doors.
- Remove the doors. See "Front Door Removal" on page 16 for more information.
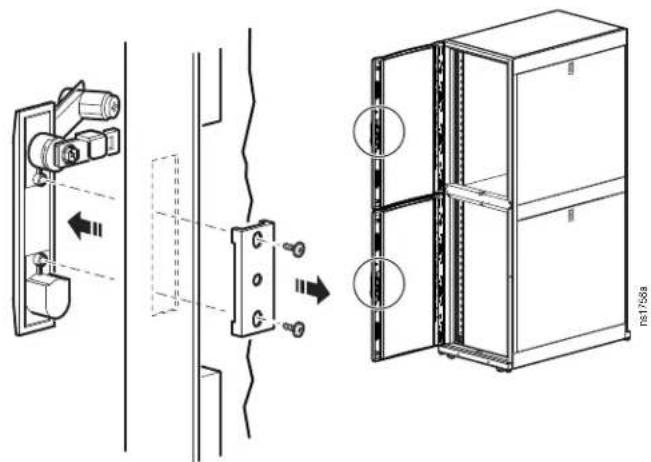
- Remove and retain the parts shown.
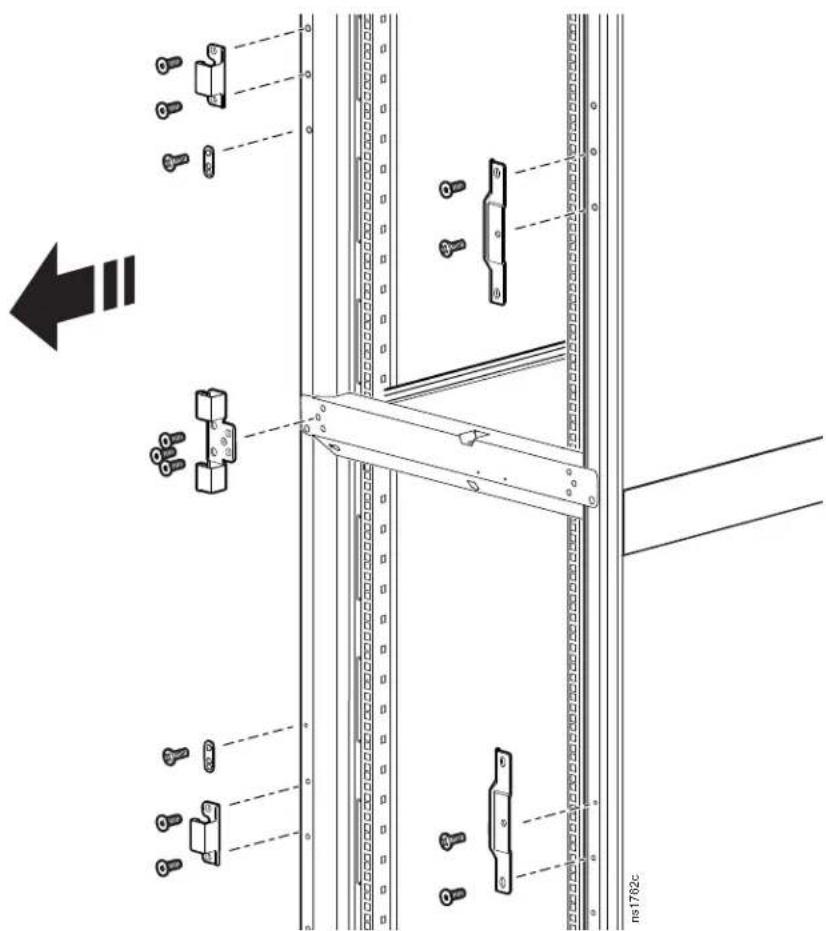
- Install parts as shown.

- Reinstall doors.

flowchart
graph TD
    A["Top Diagram"] --> B["Upper Bracket"]
    B --> C["Lower Bracket"]
    C --> D["Arrow to Top"]
    D --> E["Arrow to Bottom"]
    E --> F["Arrow to Bottom"]
    F --> G["Arrow to Bottom"]
    G --> H["Arrow to Bottom"]
    H --> I["Arrow to Bottom"]
    I --> J["Arrow to Bottom"]
    J --> K["Arrow to Bottom"]
    K --> L["Arrow to Bottom"]
    L --> M["Arrow to Bottom"]
    M --> N["Arrow to Bottom"]
    N --> O["Arrow to Bottom"]
    O --> P["Arrow to Bottom"]
    P --> Q["Arrow to Bottom"]
    Q --> R["Arrow to Bottom"]
    R --> S["Arrow to Bottom"]
    S --> T["Arrow to Bottom"]
    T --> U["Arrow to Bottom"]
    U --> V["Arrow to Bottom"]
    V --> W["Arrow to Bottom"]
    W --> X["Arrow to Bottom"]
    X --> Y["Arrow to Bottom"]
- For each door handle, remove and reinstall latch and washer oriented as shown. The washer is rotated 90° from its original orientation.


- Reinstall handles on both doors.
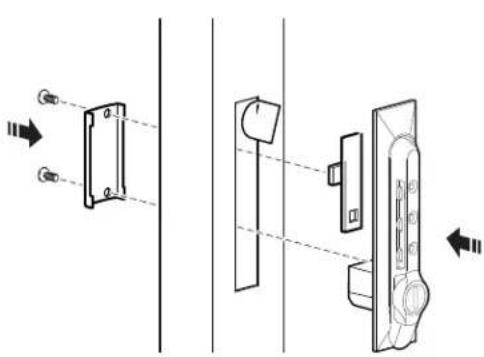
natural_image
Technical diagram showing two views of a door handle assembly with mounting brackets and adjustment arrows (no text or symbols)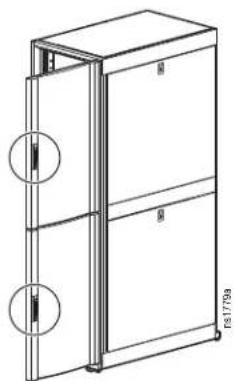
natural_image
Technical line drawing of a two-tiered cabinet or enclosure with mounting holes and internal compartments (no text or symbols)- Remove ground wires from door and frame and reinstall as shown. Torque ground wire mounting screw to 8.7 to 9.4 N·m (77 to 83 lb-in).
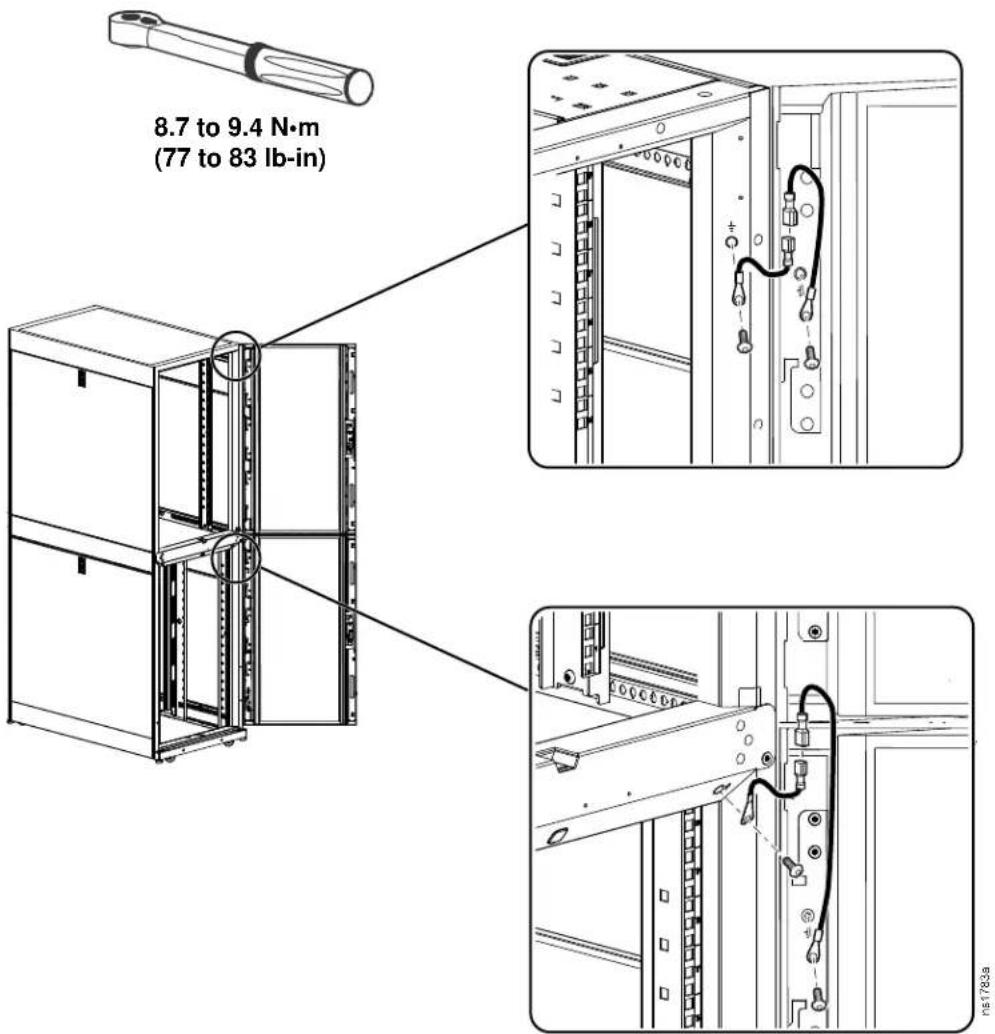
Rear Door Installation.
NOTE: The following procedure provides installation instructions for the upper rear door. The lower doors install using the same procedure.
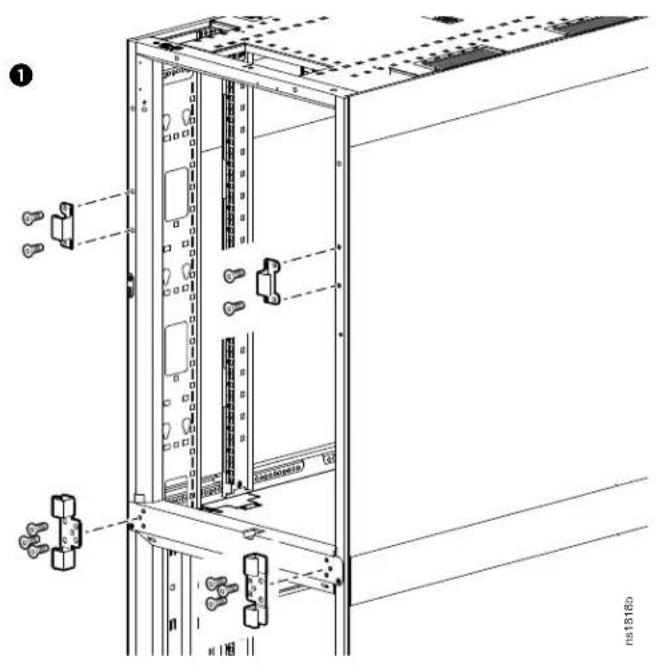


Equipment Installation
Vertical Mounting Rails

Equipment is secured to the vertical mounting rails in the Colocation Enclosure.
Installing some equipment in a NetShelter SX Colocation Enclosure can require changing the position of the vertical mounting rails.
Vertical mounting flanges come factory-installed at 737 mm (29 in.). This position is intended for use with rack-mounted equipment.
The vertical mounting rails can be adjusted to be as close together as 191 mm (7.5 in.) or as far apart as 935 mm (36.8 in.), when the vertical 0U accessory channels have been removed.
WARNING
HAZARD OF FALLING EQUIPMENT
Remove all equipment installed on the vertical mounting flanges before performing any adjustments.
Failure to follow these instructions can result in death, serious injury, or equipment damage.
Adjust the Vertical Mounting Rails
1

Vertically align the vertical mounting rail by making sure the middle symbol at the top of the vertical mounting rail matches the symbol at the bottom.
NOTES:
- Vertical mounting rails adjust in 12.7 mm (½ in.) increments.
- Make sure the vertical mounting rails on both sides of the enclosures are adjusted to the same depth. Symbols on each side should match.
2

3

Install Rack-Mount Equipment in the Enclosure
WARNING
TIP HAZARD
- This enclosure is easily tipped. Follow the precautions below during and after equipment installation.
- Secure the enclosure to the floor before installing equipment.
• Install the heaviest equipment first toward the bottom of the enclosure to prevent the enclosure from becoming top-heavy. - Do not extend equipment on sliding rails until you have installed 158 kg (350 lb) of equipment into the bottom of the enclosure for stability or until you have installed the stabilizer plate or bolt-down brackets. Do not extend more than one piece of equipment on sliding rails at a time.
Failure to follow these instructions can result in death, serious injury, or equipment damage.
Identify one U-space on the vertical mounting rail
Review the equipment manufacturer's installation instructions.
When installing equipment, locate the top and bottom of a U-space on the mounting rails. Every third hole on the mounting rails is numbered to indicate the middle of a U-space. A U-space consists of a numbered hole and the hole directly above and below, as shown.
Cage Nuts
Installation: Schneider Electric offers a cage nut hardware kit (AR8100) for use with square holes.
1 U

WARNING
HAZARD OF FALLING EQUIPMENT
Do NOT install cage nuts vertically with the ears engaging the top and bottom of the square hole. Failure to follow these instructions can result in injury or equipment damage.

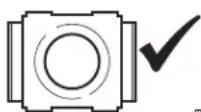
NOTE: Install cage nuts horizontally, with the ears engaging the sides of the square hole.
From inside of the enclosure, insert the cage nut into the square hole. Hook one ear of the cage nut assembly through the far side of the hole.
NOTE: Install the cage nuts on the interior of the vertical mounting rail.
Place the cage nut tool on the other side of the cage nut and pull to snap into position.
Removal: Remove any attached screw.
Grasp the cage nut and squeeze the sides to release it from the square hole.

Complete the Installation
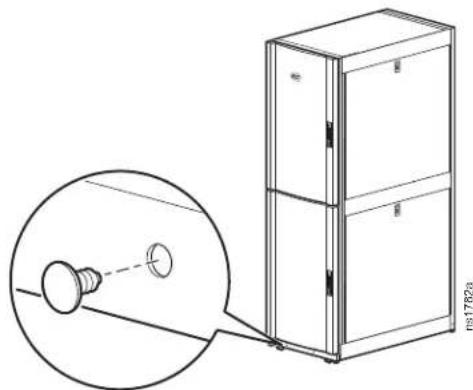
Plug Installation
Install plugs included in the hardware bag as needed.
natural_image
Technical line drawing of a refrigerator with an inset close-up showing a cylindrical component inserted into a housing (no text or symbols)Cable Routing and Cable Management
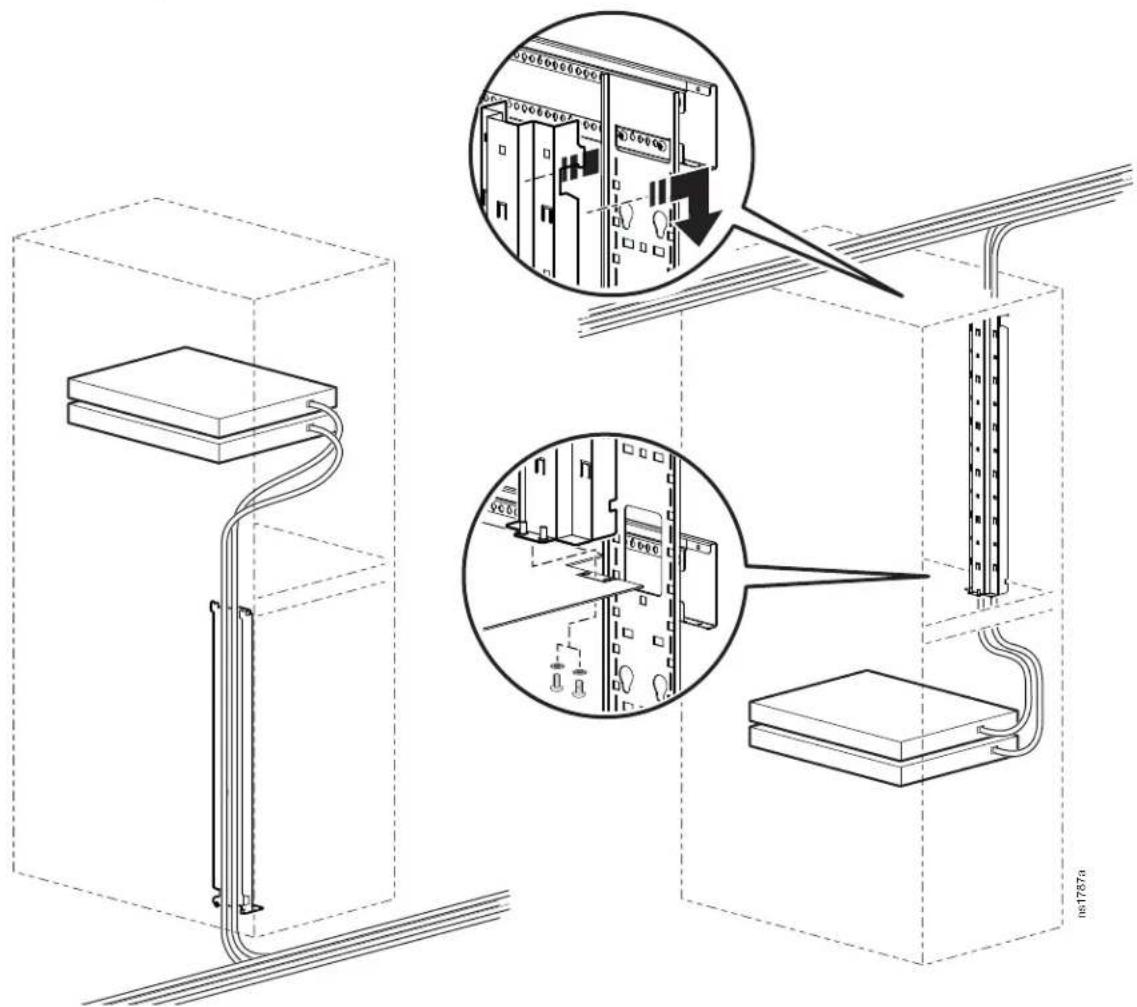
Security Covers
Remove security covers in order to route cables. If using cables with large connectors, this is of increased importance
Knock-out Panels
The two knock-out panels on the divider can be removed to provide for additional cable routing.
When changing the position of the vertical 0U accessory channels, removing the two knock-out panels on the divider may be of assistance.

natural_image
Technical line drawing of an internal server rack cabinet with a magnified inset showing internal components (no text or symbols)Height 1991 mm (78.3 in.)
Width 600 mm (23.6 in.)
Depth 1070 mm (42.1 in.)
Net weight 140.7 kg (309.5 lb)
Total open area (front door) 579 651 mm ^2 (898.5 in. ^2 )
Total open area (rear door) 653 582 mm ^2 (1,013.1 in. ^2 )
Open area per U (front door) 14 129 mm ^2 (21.9 in. ^2 )
Open area per U (rear door) 15 658 mm ^2 (24.7 in. ^2 )
Perforation pattern percentage 69%
Percent of perforated area (front) 66%
Percent of perforated area (rear) 74%
Clearance (for wiring) between 61.0 mm (2.4 in.)
front door and vertical rail
Weight rating: static load ^† 1361 kg (3,000 lb)
Weight rating: rolling 1021 kg (2,250 lb)
^ Lower the leveling feet if the static weight is over 1020.58 kg (2,250 lb).
NOTE: Additional packaging is required if the rack is being shipped with equipment installed. See the NetShelter SX product family page at www.schneider-electric.com for details on enclosures with shock packaging.
Limited Factory Warranty
The limited warranty provided by in this Statement of Limited Factory Warranty applies only to Products you purchase for your commercial or industrial use in the ordinary course of your business.
Terms of Warranty
Schneider Electric warrants its products to be free from defects in materials and workmanship for a period of five years (two years in Japan) from the date of purchase. Its obligation under this warranty is limited to repairing or replacing, at its sole discretion, any such defective products. This warranty does not apply to equipment that has been damaged by accident, negligence, or misapplication or has been altered or modified in any way. Repair or replacement of a defective product or part thereof does not extend the original warranty period. Any parts furnished under this warranty may be new or factory-remanufactured.
Non-transferable Warranty
This warranty applies only to the original purchaser who must have properly registered the product. Product may be registered at http://www.schneider-electric.com.
Exclusions
Schneider Electric shall not be liable under the warranty if its testing and examination disclose that the alleged defect in the product does not exist or was caused by end user's or any third person's misuse, negligence, improper installation or testing. Further shall not be liable under the warranty for unauthorized attempts to repair or modify wrong or inadequate electrical voltage or connection, inappropriate on-site operation conditions, corrosive atmosphere, repair, installation, start-up by non-Schneider Electric designated personnel, a change in location or operating use, exposure to the elements, Acts of God, fire, theft, or installation contrary to recommendations or specifications or in any event if the serial number has been altered, defaced, or removed, or any other cause beyond the range of the intended use.
THERE ARE NO WARRANTIES, EXPRESS OR IMPLIED, BY OPERATION OF LAW OR OTHERWISE, OF PRODUCTS SOLD, SERVICED OR FURNISHED UNDER THIS AGREEMENT OR IN CONNECTION HEREWITH. DISCLAIMS ALL IMPLIED WARRANTIES OF MERCHANTABILITY, SATISFACTION AND FITNESS FOR A PARTICULAR PURPOSE. SCHNEIDER ELECTRIC EXPRESS WARRANTIES WILL NOT BE ENLARGED, DIMINISHED, OR AFFECTED BY AND NO OBLIGATION OR LIABILITY WILL ARISE OUT OF, RENDERING OF TECHNICAL OR OTHER ADVICE OR SERVICE IN CONNECTION WITH THE PRODUCTS. THE FOREGOING WARRANTIES AND REMEDIES ARE EXCLUSIVE AND IN LIEU OF ALL OTHER WARRANTIES AND REMEDIES. THE WARRANTIES SET FORTH ABOVE CONSTITUTE SCHNEIDER ELECTRIC'S SOLE LIABILITY AND PURCHASER'S EXCLUSIVE REMEDY FOR ANY BREACH OF SUCH WARRANTIES. SCHNEIDER ELECTRIC WARRANTIES RUN ONLY TO PURCHASER AND ARE NOT EXTENDED TO ANY THIRD PARTIES.
IN NO EVENT SHALL SCHNEIDER ELECTRIC, ITS OFFICERS, DIRECTORS, AFFILIATES OR EMPLOYEES BE LIABLE FOR ANY FORM OF INDIRECT, SPECIAL, CONSEQUENTIAL OR PUNITIVE DAMAGES, ARISING OUT OF THE USE, SERVICE OR INSTALLATION, OF THE PRODUCTS, WHETHER SUCH DAMAGES ARISE IN CONTRACT OR TORT, IRRESPECTIVE OF FAULT, NEGLIGENCE OR STRICT LIABILITY OR WHETHER SCHNEIDER ELECTRIC HAS BEEN ADVISED IN ADVANCE OF THE POSSIBLY OF SUCH DAMAGES. SPECIFICALLY, SCHNEIDER ELECTRIC IS NOT LIABLE FOR ANY COSTS, SUCH AS LOST PROFITS OR REVENUE, LOSS OF EQUIPMENT, LOSS OF USE OF EQUIPMENT, LOSS OF SOFTWARE, LOSS OF DATA, COSTS OF SUBSTITUANTS, CLAIMS BY THIRD PARTIES, OR OTHERWISE.
NO SALESMAN, EMPLOYEE OR AGENT OF SCHNEIDER ELECTRIC IS AUTHORIZED TO ADD TO OR VARY THE TERMS OF THIS WARRANTY. WARRANTY TERMS MAY BE MODIFIED, IF AT ALL, ONLY IN WRITING SIGNED BY AN SCHNEIDER ELECTRIC OFFICER AND LEGAL DEPARTMENT.
Warranty Claims
Customers with warranty claims issues may access the Schneider Electric worldwide customer support network by visiting http://www.schneider-electric.com/support. Select your country from the country selection pull-down menu. Open the Support tab at the top of the web page to obtain contact information for customer support in your region.
Worldwide Customer Support
Customer support for this product is available at www.schneider-electric.com.

- Installation and Customization Manual
- NetShelter™ SX Colocation Enclosure
- Schneider Electric Legal Disclaimer
- Table of Contents
- Introduction ....1
- Unpack the Enclosure....2
- Important Safety Information 2
- Component Identification....4
- Security....6
- Preparation 8
- Enclosure Installation....13
- Equipment Installation....23
- Introduction
- Disclaimer
- Inspection
- Please Recycle
- Important Safety Information
- DANGER
- WARNING
- CAUTION
- NOTICE
- Safety Instructions
- TIP / HEAVY EQUIPMENT HAZARD
- Labels
- Component Identification
- Enclosure
- Hardware and tools (provided)
- Tools required (not provided)
- Door and Side-Panel Keys
- Operating the Combination Lock
- NOTES:
- Parts Identification
- Unlock using the Dials:
- Lock using the Dials:
- Changing the Combination:
- Move the Enclosure
- TIP HAZARD
- Level the Enclosure
- Joining Enclosures
- Secure the Enclosure
- Grounding the Enclosure
- Bonding Locations on the Enclosure
- HAZARD OF ELECTRIC SHOCK
- Enclosure Installation
- Doors
- Front Door Installation.
- Reversing the Front Door.
- Rear Door Installation.
- Equipment Installation
- Vertical Mounting Rails
- HAZARD OF FALLING EQUIPMENT
- Adjust the Vertical Mounting Rails
- Install Rack-Mount Equipment in the Enclosure
- Identify one U-space on the vertical mounting rail
- Cage Nuts
- Complete the Installation
- Plug Installation
- Cable Routing and Cable Management
- Security Covers
- Knock-out Panels
- Limited Factory Warranty
- Terms of Warranty
- Non-transferable Warranty
- Exclusions
- Warranty Claims
- Worldwide Customer Support
Brand : APC
Model : NetShelter SX AR3200
Category : Patch panel