BI1215 - Ice cream maker U-Line - Free user manual and instructions
Find the device manual for free BI1215 U-Line in PDF.


| Product Type | Ice Maker / Ice Cream Maker (Crescent Ice) |
| Model | BI1215 |
| Brand | U-Line |
| Installation | Freestanding or built-in (undercounter) - Not for use behind closed cabinet door |
| Dimensions (Product) | Width: 15" (381 mm), Height: 34 1/2" (876 mm), Depth: 24" (610 mm) (approx, refer to manual for exact) |
| Cutout Dimensions | Width: 15" (381 mm), Height: 34 1/2" (876 mm), Depth: 24" (610 mm) (allow for rear clearance for electrical) |
| Weight | Approximately 100 lbs (45 kg) (estimated) |
| Electrical Requirements | 115 VAC, 60 Hz, 15 A, grounded 3-prong receptacle |
| Water Supply | 1/4" compression fitting, 20-120 psi, potable water only |
| Ice Production | Automatic, adjustable cube size and harvest rate |
| Ice Storage Capacity | Removable ice bucket (approx. 3-4 lbs) |
| Defrost | Manual defrost required (approx. every 6 weeks or when frost > 1/4") |
| Operating Ambient Temperature | 50°F to 100°F (10°C to 38°C) |
| Control Type | Rocker switch (on/off), temperature control knob |
| Condenser Cleaning | Every 6 months (soft brush or vacuum) |
| Interior Cleaning | Mild detergent and warm water, avoid abrasive cleaners |
| Exterior Cleaning | Stainless steel cleaner/polish (monthly); black/white vinyl: mild detergent |
| Safety Features | Anti-tip bracket, door stop pin (90°), child entrapment warnings |
| Warranty | 1 year full, 2nd year on registration, 5 years sealed system (parts only) |
| Replacement Parts Available | Yes (genuine U-Line parts; part numbers listed in manual) |
| Country of Origin | USA (Milwaukee, Wisconsin) |
| Manual Page Count | 48 pages |
Frequently Asked Questions - BI1215 U-Line
User questions about BI1215 U-Line
0 question about this device. Answer the ones you know or ask your own.
Ask a new question about this device
Download the instructions for your Ice cream maker in PDF format for free! Find your manual BI1215 - U-Line and take your electronic device back in hand. On this page are published all the documents necessary for the use of your device. BI1215 by U-Line.
USER MANUAL BI1215 U-Line
USER GUIDE & SERVICE MANUAL
SAFETY • INSTALLATION & INTEGRATION • OPERATING INSTRUCTIONS • MAINTENANCE • SERVICE
SAFETY • INSTALLATION & INTEGRATION • OPERATING INSTRUCTIONS • MAINTENANCE • SERVICE
Tip: Click on any section below to jump directly there
Contents
Intro
Warranty
Safety
Safety and Warning
Disposal and Recycling
Installation
Environmental Requirements
Electrical
Cutout Dimensions
Product Dimensions
Side by Side Installation
Water Hookup
Anti-Tip Bracket
General Installation
Grille / Plinth Installation
Door Swing
Door Stop
Service Extended
Wire Diagram
Product Liability
Warranty Claims
Parts
Ordering Replacement Parts
System Diagnosis Guide
Compressor Specifications
Troubleshooting Extended
Defrost
Replace Ice Maker
Operating Instructions
First Use
Ice
Airflow and Product Loading
Maintenance
Cleaning
Cleaning Condenser
Extended Non-Use
Service
Troubleshooting
WELCOME TO U-LINE
Congratulations on your U-Line purchase. Your product comes from a company with over five decades of premium modular ice making, refrigeration, and wine preservation experience. U-Line continues to be the American leader, delivering versatility and flexibility for multiple applications including residential, light commercial, outdoor and marine use. U-Line's complete product collection includes Wine Captain® Models, Beverage Centers, Clear Ice Machines, Crescent Ice Makers, Glass & Solid Door Refrigerators, Drawer Models, Freezers, Combo® Models, and more.
U-Line has captivated those with an appreciation for the finer things with exceptional functionality, style, inspired innovations and attention to even the smallest details. We are known and respected for our unwavering dedication to product design, quality and selection. U-Line is headquartered in Milwaukee, Wisconsin and has shipped product to five continents for over two decades and is proud to have the opportunity to ship to you.
PRODUCT INFORMATION
Looking for additional information on your product? User Guides, Spec Sheets, CAD Drawings, Compliance Documentation, and Product Warranty information are all available for reference and download at u-line.com.
PROPERTY DAMAGE / INJURY CONCERNS
In the unlikely event property damage or personal injury is suspected related to a U-Line product, please take the following steps:
- U-Line Customer Care must be contacted immediately at +1.800.779.2547.
- Service or repairs performed on the unit without prior written approval from U-Line is not permitted. If the unit has been altered or repaired in the field without prior written approval from U-Line, claims will not be eligible.
GENERAL INQUIRIES
U-Line Corporation
8900 N. 55th Street
Milwaukee, Wisconsin 53223 USA
Monday - Friday 8:00 am to 4:30 pm CST
T: +1.414.354.0300
F: +1.414.354.7905
Email: sales@u-line.com
u-line.com
SERVICE & PARTS ASSISTANCE
Monday - Friday 8:00 am to 4:30 pm CST
T: +1.800.779.2547
F: +1.414.354.5696
Service Email: onlineservice@u-line.com
Parts Email: onlineparts@u-line.com
CONNECT WITH US



Designed, engineered and assembled in WI, USA
SAFETY • INSTALLATION & INTEGRATION • OPERATING INSTRUCTIONS • MAINTENANCE • SERVICE
Safety and Warning
NOTICE
Please read all instructions before installing, operating, or servicing the appliance.
Use this appliance for its intended purpose only and follow these general precautions with those listed throughout this guide:
SAFETY ALERT DEFINITIONS
Throughout this guide are safety items labeled with a Danger, Warning or Caution based on the risk type:

DANGER
Danger means that failure to follow this safety statement will result in severe personal injury or death.

WARNING
Warning means that failure to follow this safety statement could result in serious personal injury or death.

CAUTION
Caution means that failure to follow this safety statement may result in minor or moderate personal injury, property or equipment damage.
SAFETY • INSTALLATION & INTEGRATION • OPERATING INSTRUCTIONS • MAINTENANCE • SERVICE
Disposal and Recycling

DANGER
RISK OF CHILD ENTRAPMENT. Before you throw away your old refrigerator or freezer, take off the doors and leave shelves in place so children may not easily climb inside.
If the unit is being removed from service for disposal, check and obey all federal, state and local regulations regarding the disposal and recycling of refrigeration appliances, and follow these steps completely:
- Remove all consumable contents from the unit.
- Unplug the electrical cord from its socket.
- Remove the door(s)/drawer(s).
SAFETY • INSTALLATION & INTEGRATION • OPERATING INSTRUCTIONS • MAINTENANCE • SERVICE
Environmental Requirements
This model is intended for indoor/interior applications only and is not to be used in installations that are open/exposed to natural elements.
This unit is designed to operate between 50°F (10°C) and 100°F (38°C). Higher ambient temperatures may reduce the unit's ability to reach low temperatures and/or reduce ice production on applicable models.
For best performance, keep the unit out of direct sunlight and away from heat generating equipment.
In climates where high humidity and dew points are present, condensation may appear on outside surfaces. This is considered normal. The condensation will evaporate when the humidity drops.
CAUTION
Damages caused by ambient temperatures of 40^ F ( 4^ C) or below are not covered by the warranty.
SAFETY • INSTALLATION & INTEGRATION • OPERATING INSTRUCTIONS • MAINTENANCE • SERVICE
Electrical
SHOCK HAZARD — Electrical Grounding
Required. Never attempt to repair or perform maintenance on the unit until the electricity has been disconnected.
Never remove the round grounding prong from the plug and never use a two-prong grounding adapter.
Altering, cutting or removing power cord, removing power plug, or direct wiring can cause serious injury, fire, loss of property and/or life, and will void the warranty.
Never use an extension cord to connect power to the unit.
Always keep your working area dry.
NOTICE
Electrical installation must observe all state and local codes. This unit requires connection to a grounded (three-prong), polarized receptacle that has been placed by a qualified electrician.
The unit requires a grounded and polarized 115 VAC, 60 Hz, 15A power supply (normal household current). An individual, properly grounded branch circuit or circuit breaker is recommended. A GFCI (ground fault circuit interrupter) is usually not required for fixed location appliances and is not recommended for your unit because it could be prone to nuisance tripping. However, be sure to consult your local codes.
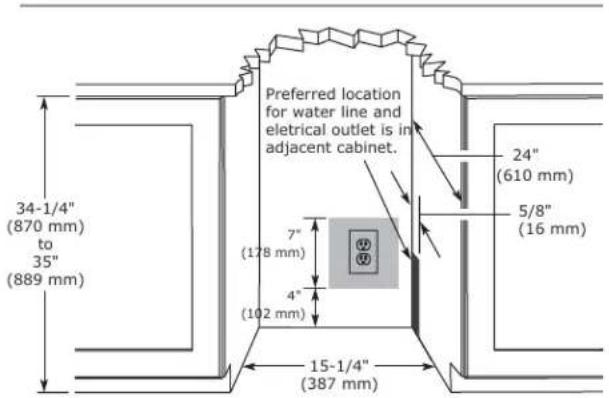
See CUTOUT DIMENSIONS for recommended receptacle location.
SAFETY • INSTALLATION & INTEGRATION • OPERATING INSTRUCTIONS • MAINTENANCE • SERVICE
Cutout Dimensions
PREPARE SITE
Your U-Line product has been designed for either freestanding or built-in installation. When built-in, your unit does not require additional air space for top, sides, or rear. However, the front grille must NOT be obstructed, and clearance is required for an electrical connection in the rear.
CAUTION
Unit can NOT be installed behind a closed cabinet door.
If you would like to align the face of the unit with other adjacent cabinet doors, you may need to alter the wall just behind the drain connection on the unit to accommodate the drain.
CUTOUT DIMENSIONS
SAFETY • INSTALLATION & INTEGRATION • OPERATING INSTRUCTIONS • MAINTENANCE • SERVICE
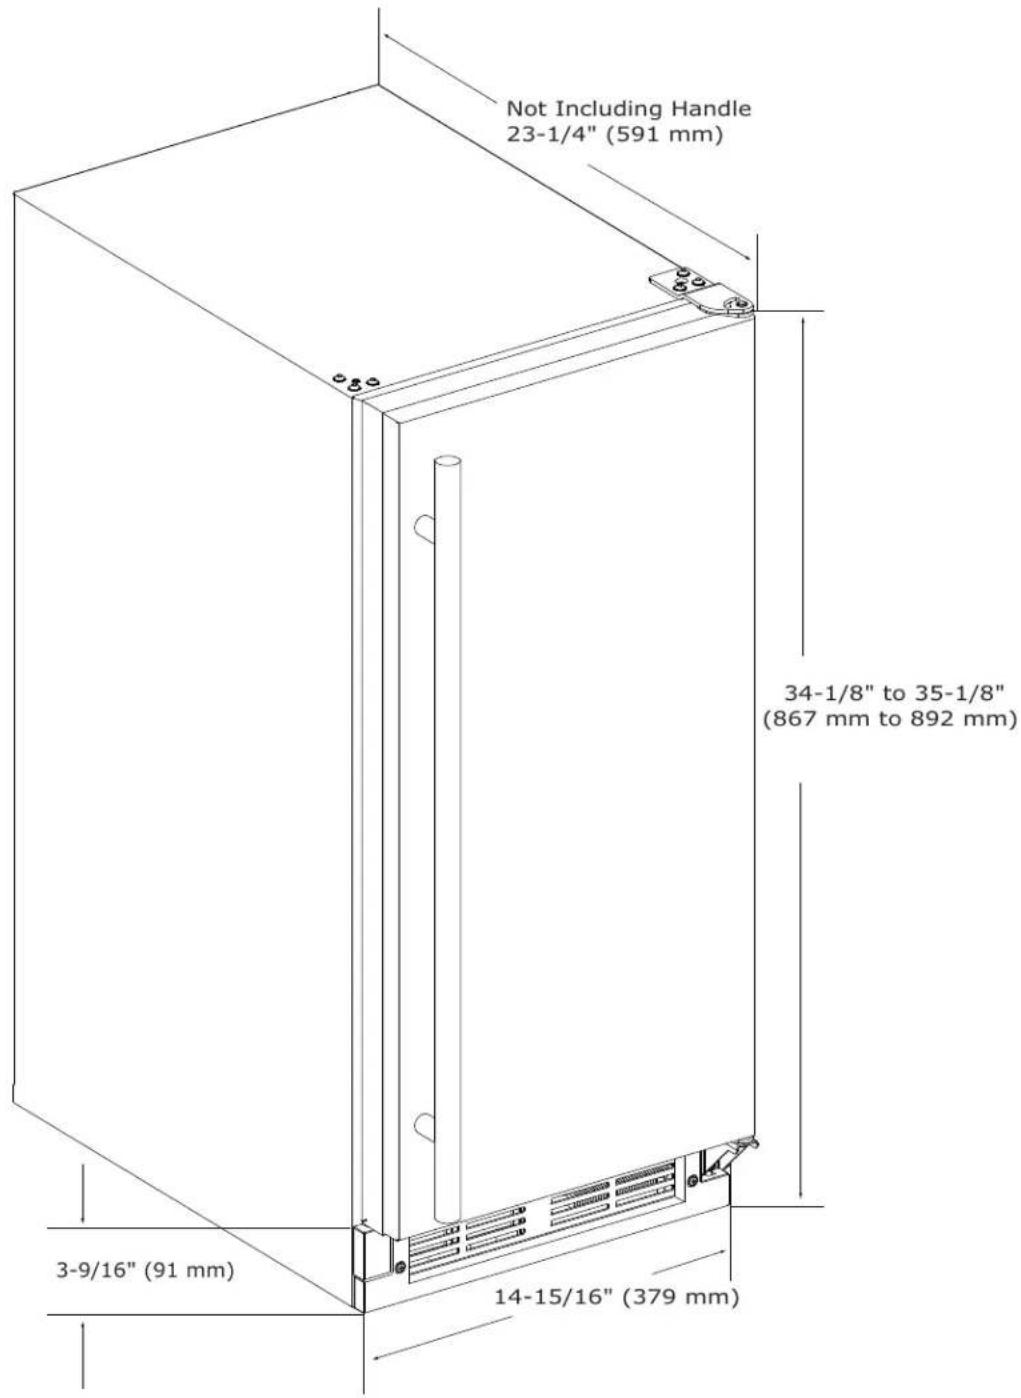
Product Dimensions
SAFETY • INSTALLATION & INTEGRATION • OPERATING INSTRUCTIONS • MAINTENANCE • SERVICE
Side-by-Side Installation
Two units may be installed side-by-side.
Cutout width for a side-by-side installation is the cutout dimension of a single unit times two.
No trim kit is required. However, 1/4" (6 mm) of space needs to be maintained between the units to ensure unobstructed door swing.
Units must operate from separate, properly grounded electrical receptacles placed according to each unit's electrical specifications requirements.
Side-by-Side Installation with Bracket
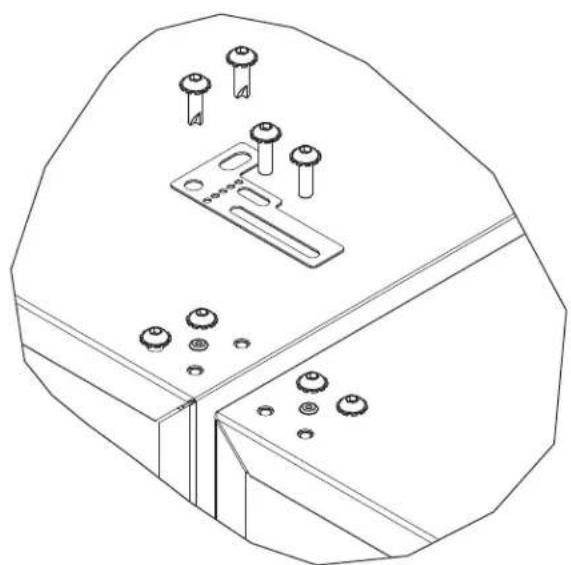
- Slide both units out so screws on top of units are easily accessible.
- Remove screws as shown below.
natural_image
Technical line drawing of a mechanical component with multiple holes and a central bracket (no text or symbols)- Place bracket over holes and attach to unit with two screws removed in step 2 using a T-25 Torx driver. Tighten screws fully.
- Gently push units into position. Be careful not to entangle the electrical cord or water line, if applicable.
- Re-check the leveling, from front to back and side to side. Make any necessary adjustments. The unit's top surface should be approximately 1/8" (3 mm) below the countertop.
SAFETY • INSTALLATION & INTEGRATION • OPERATING INSTRUCTIONS • MAINTENANCE • SERVICE
Water Hookup
PREPARE PLUMBING
The water valve uses a standard 1/4" (6.35 mm) compression fitting. U-Line recommends using accessory water hook up kit - part # WATERHOOKUP. The kit includes a 10' (3 m) braided flexible water supply line and a brass hose fitting. When using a 1/4" (6.35 mm) O.D. soft copper supply line use the brass nut and sleeve included with the unit.

CAUTION
Plumbing installation must observe all state and local codes. All water and drain connections MUST BE made by a licensed/qualified plumbing contractor. Failure to follow recommendations and instructions may result in damage and/or harm.
Water Supply Connection
When connecting the water supply, please note the following:
- Before installing the unit and connecting to the cold water supply, review the local plumbing codes.
- The water pressure should be between 20 and 120 psi (138 and 827 kPa).
- The water line MUST have a shut-off valve in the supply line.
- The water line should be looped into 2 coils. This will allow the unit to be removed for cleaning and servicing. Make certain that the tubing is not pinched or damaged during installation.

WARNING
Connect to potable water supply only.

CAUTION
Do not use any plastic water supply line. The line is under pressure at all times. Plastic may crack or rupture with age and cause damage to your home.
Do not use tape or joint compound when attaching a braided flexible water supply line that includes a rubber gasket. The gasket provides an adequate seal – other materials could cause blockage of the valve.
Failure to follow recommendations and instructions may result in damage and/or harm, flooding or void the product warranty.
Use new hose set. Do not reuse old hose set.

CAUTION
Turn off water supply and disconnect electrical supply to unit prior to installation.
Use caution when handling back panel. The edges could be sharp.
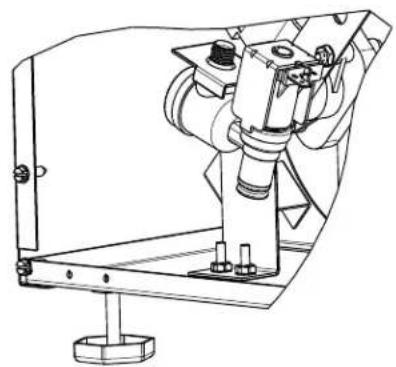
- Turn off water supply and disconnect electrical supply to product prior to attempting installation.
- Remove the back panel.
SAFETY • INSTALLATION & INTEGRATION • OPERATING INSTRUCTIONS • MAINTENANCE • SERVICE
- Locate water valve inlet.
natural_image
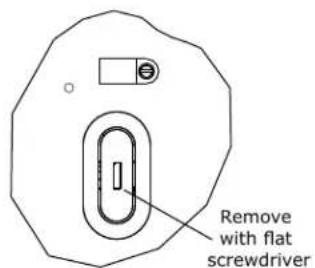
Technical line drawing of a mechanical device with mounting base and internal components (no text or symbols)- Break away filler feature in bushing with flat screwdriver.
-
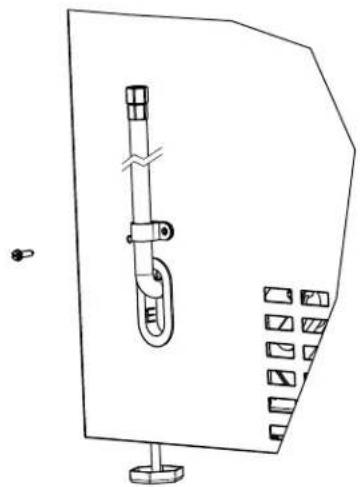
Thread water line through back panel hole (with bushing).
-
Locate water valve inlet and connect to valve.
-
Turn on water supply and check for leaks.
-
Reinstall back panel.
-
Install retaining clip.
natural_image
Technical line drawing of a mechanical clamp device with mounting base (no text or symbols)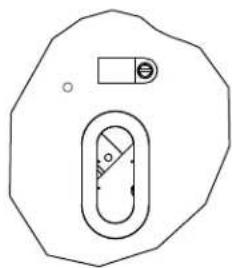
natural_image
Simple line drawing of an octagonal shape with a central oval and a small rectangular element (no text or symbols)SAFETY • INSTALLATION & INTEGRATION • OPERATING INSTRUCTIONS • MAINTENANCE • SERVICE
Anti-Tip Bracket
-
Slide unit out so screws on top of unit are easily accessible.
-
Remove the two screws from the opposite side of the hinge assembly using a T-25 Torx driver (see below).
NOTE: 1224 models shown with four screw. 1215 models only have three screws, but same screws are used in both applications.
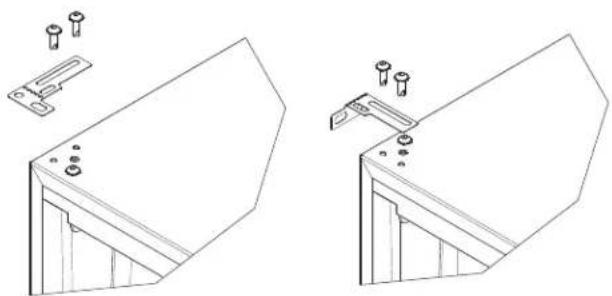
natural_image
Technical line drawing of two mechanical bracket components with mounting holes and mounting screws (no text or symbols)-
Place bracket (part #14154) over holes and attach to unit with two screws removed in step 2 using a T-25 Torx driver. Tighten screws fully.
-
Gently push unit into position. Be careful not to entangle the electrical cord or water line, if applicable.
-
Check to be sure the unit is level from front to back and side to side. Make any necessary adjustments. The unit's top surface should be approximately 1/8" (3 mm) below the countertop.
-
Secure bracket into adjoining surface.
SAFETY • INSTALLATION & INTEGRATION • OPERATING INSTRUCTIONS • MAINTENANCE • SERVICE
General Installation
LEVELING INFORMATION
- Use a level to confirm the unit is level. Level should be placed along top edge and side edge as shown.
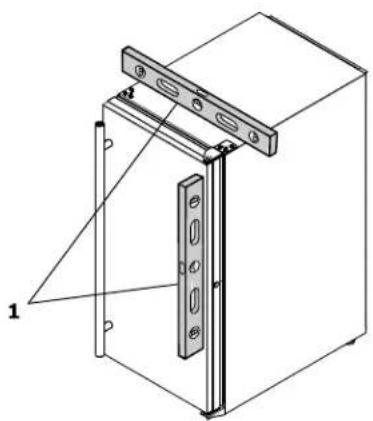
natural_image
Technical line drawing of a mechanical assembly with labeled components (no text or symbols present)- If the unit is not level, adjust the legs on the corners of the unit as necessary.
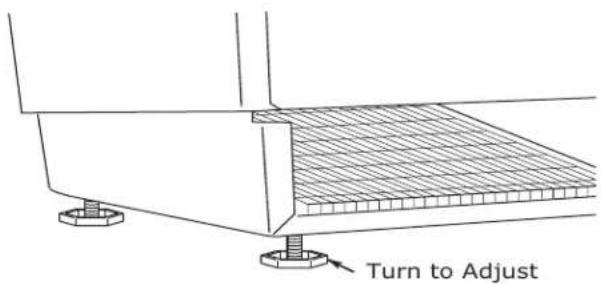
- Confirm the unit is level after each adjustment and repeat the previous steps until the unit is level.
INSTALLATION TIP
If the room floor is higher than the floor in the cutout opening, adjust the rear legs to achieve a total unit rear height of 1/8" (3 mm) less than the opening's rear height. Shorten the unit height in the front by adjusting the front legs. This allows the unit to be gently tipped into the opening. Readjust the front legs to level the unit after it is correctly positioned in the opening.
INSTALLATION
-
Plug in the power/electrical cord.
-
Gently push the unit into position. Be careful not to kink the water supply line or entangle the cord.
-
Re-check the leveling, from front to back and side to side. Make any necessary adjustments. The unit's top surface should be approximately 1/8" (3 mm) below the countertop.
-
Install the anti-tip bracket.
-
Remove interior packing material and wipe out the inside of the unit with a clean, water-dampened cloth.
SAFETY • INSTALLATION & INTEGRATION • OPERATING INSTRUCTIONS • MAINTENANCE • SERVICE
Grille - Plinth Installation
REMOVING AND INSTALLING GRILLE

WARNING
Disconnect electric power to the unit before removing the grille.
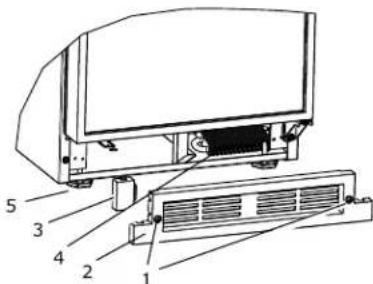
When using the unit, the grille (plinth strip/base fascia) must be installed.

WARNING
DO NOT touch the condenser fins (4). The condenser fins are SHARP and can be easily damaged.
Removing the grille
- Disconnect power to the unit.
- Loosen the two screws (1).
- Remove grille (2) and grille cap (3) from unit.
Installing the grille
-
Make sure grille cap (3) is behind grille in slots (2) provided in grille before attaching grille to unit.
-
Align cabinet and grille holes and secure, but do not over tighten grille screws (1).
-
Reconnect power to the unit.
SAFETY • INSTALLATION & INTEGRATION • OPERATING INSTRUCTIONS • MAINTENANCE • SERVICE
Door Swing
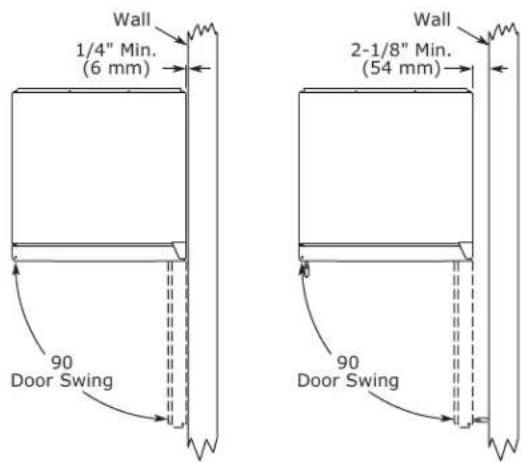
Units have a zero clearance for the door to open 90°, when installed adjacent to cabinets.
Stainless Steel and black and white models require 2-1/8" (54 mm) door clearance to accommodate the handle if installed next to a wall.
Integrated models require 1/4" (6 mm) clearance if installed next to a wall. Allow for additional space for any knobs or pulls installed on the integrated panel/frame.
SAFETY • INSTALLATION & INTEGRATION • OPERATING INSTRUCTIONS • MAINTENANCE • SERVICE
Door Stop
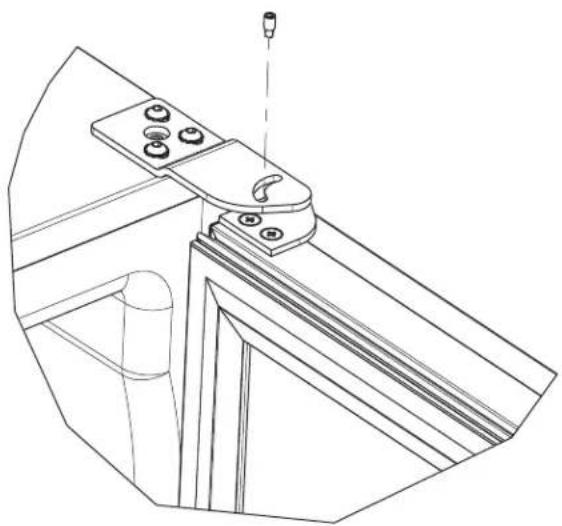
Your U-Line unit was shipped to you with the optional 90° pin(s). (Models that are 15" wide include 1 pin. Models that are 24" wide include 2 pins.) The unit's door will open freely without a fixed opening angle limitation. If you would like the door stop at 90° follow these instructions.
NOTICE
The pin is designed to stop the door at 90^ under normal operating conditions. It is not designed for excessive force. Do not use the door to move the unit in/out of the cutout during installation.
If your unit is already undercounter, it might need to be moved out/forward to access the hinge.
- Locate the threaded pin.
- With the door between 0° (closed) and 90° and using a 3/32" hex driver, install the threaded pin through the hinge.
natural_image
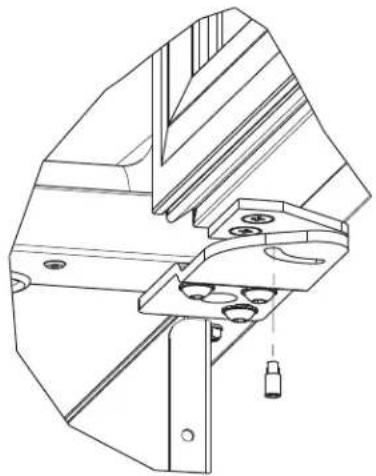
Technical line drawing of a mechanical bracket assembly (no text or symbols)- On 24" models, a second pin is included for the bottom hinge. Repeat steps above for second hinge.
NOTE: Threaded pin will be inserted from the bottom.
natural_image
Technical line drawing of a mechanical assembly with no visible text or symbols- Carefully slide your unit back in place.
NOTICE
The pin can be removed to return the door swing back to its original state by unscrewing the threaded pin.
SAFETY • INSTALLATION & INTEGRATION • OPERATING INSTRUCTIONS • MAINTENANCE • SERVICE
First Use
All U-Line controls are preset at the factory. Initial startup requires no adjustments.
NOTICE
U-Line recommends discarding the ice produced during the first two to three hours of operation to avoid possible dirt or scale that may dislodge from the water line.
To turn the unit on or off:
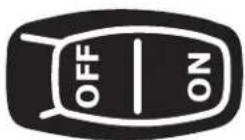
Press the rocker switch located inside the door on the front panel, or behind the grille.
SAFETY • INSTALLATION & INTEGRATION • OPERATING INSTRUCTIONS • MAINTENANCE • SERVICE
Ice
ICE MAKER OPERATION
When the ice bucket is full, the ice making mechanism will shut off. However, the refrigeration system will continue to cool and maintain the ice supply.
NOTICE
Do not place cans or bottles in the ice compartment because they will freeze.
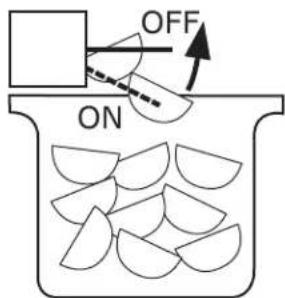
To turn off ice production: Raise the bin arm into an upright and locked position. The unit will preserve temperature for ice storage.
NOTICE
If not intending to use the ice maker, turn the water supply valve off. It is also important to raise the bin arm of the ice maker (see above). Failure to raise the bin arm may result in damage to the water valve.
Certain sounds are normal during the unit's operation. You may hear the compressor or fan motor, the water valve, or ice dropping into the ice bucket.

CAUTION
NEVER use an ice pick, knife or other sharp instrument to separate cubes. Shake the ice bucket instead.
During periods of limited use or high ambient temperatures, it is common for cubes to fuse together. Gently shake the bucket to break apart cubes. If not using the ice maker regularly, empty the ice bucket periodically to ensure fresh cubes.
It is normal for cubes to appear cloudy. The cause is air trapped in the water because of fast freezing. It is not caused by the health, taste or chemical make up of the water. It is the same air that is in every glass of water you drink.
Remove the ice bucket for emptying and cleaning. To remove the ice bucket, raise the bin arm and remove the bucket from the ice compartment. Use the ice bucket for ice storage only.
SAFETY • INSTALLATION & INTEGRATION • OPERATING INSTRUCTIONS • MAINTENANCE • SERVICE
ICE MAKER ADJUSTMENT
Ice Cube Thickness Adjustment
Interval - As Required
On ice maker equipped models, adjust the cube size by changing water amount injected into the ice maker assembly as follows:
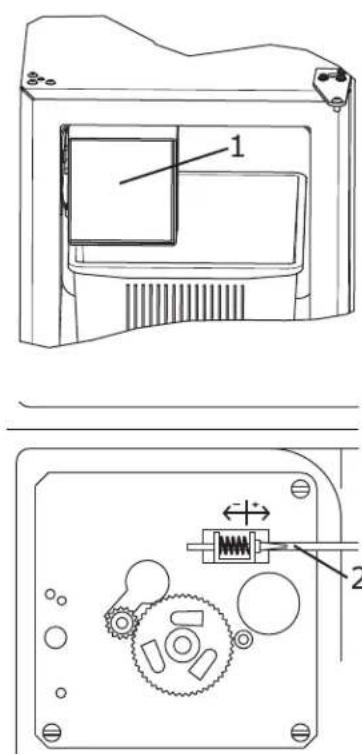
- Remove the ice maker assembly cover (1).
- Find the adjusting screw on the ice maker assembly control box (2). The adjusting screw is just below the minus (-) and plus (+) signs on the control box.

CAUTION
Too large of an adjustment to the screw can cause the water to overflow the ice maker and can cause property damage.
- Turn the adjusting screw toward the minus (-) sign (clockwise) for smaller cubes or toward the plus (+) sign (counterclockwise) for larger cubes.
- Install the ice maker assembly cover.
ADJUSTING ICE HARVEST
- Remove the front grille (see GRILLE-PLINTH INSTALLATION).
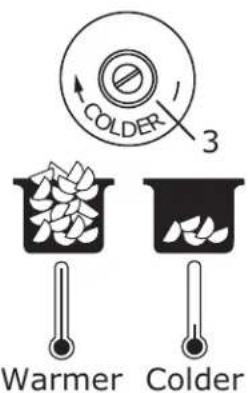
- Using a flat tip screwdriver, turn the adjusting screw (3) a small increment clockwise for a COLDER setting (slower ice production) or counterclockwise for a WARMER setting (faster ice production).
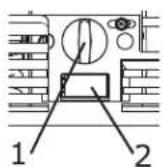
- Reinstall the front grille (two screws).
SAFETY • INSTALLATION & INTEGRATION • OPERATING INSTRUCTIONS • MAINTENANCE • SERVICE
Airflow and Product Loading
NOTICE
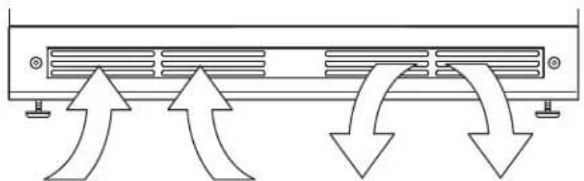
The unit requires proper airflow to perform at its highest efficiency. Do not block the front grille at any time, or the unit will not perform as expected. Do not install the unit behind a door.
natural_image
Pure diagram of a server rack with directional arrows indicating flow or movement (no text or symbols)SAFETY • INSTALLATION & INTEGRATION • OPERATING INSTRUCTIONS • MAINTENANCE • SERVICE
Cleaning
EXTERIOR CLEANING
Vinyl Clad (Black or White) Models
Clean surfaces with a mild detergent and warm water solution. Do not use solvent-based or abrasive cleaners. Use a soft sponge and rinse with clean water. Wipe with a soft, clean towel to prevent water spotting.
Clean any glass surfaces with a non-chlorine glass cleaner.
Stainless Models
Stainless door panels, handles and frames can discolor when exposed to chlorine gas, pool chemicals, saltwater or cleaners with bleach.
Keep your stainless unit looking new by cleaning with a good quality all-in-one stainless steel cleaner and polish monthly. For best results use Claire® Stainless Steel Polish and Cleaner. Comparable products are acceptable. Frequent cleaning will remove surface contamination that could lead to rust. Some installations may require cleaning weekly.
Do not clean with steel wool pads.
Do not use stainless steel cleaners or polishes on any glass surfaces.
Clean any glass surfaces with a non-chlorine glass cleaner.
Do not use cleaners not specifically intended for stainless steel on stainless surfaces (this includes glass, tile and counter cleaners).
If any surface discoloring or rusting appears, clean it quickly with Bon-Ami® or Barkeepers Friend Cleanser® and a nonabrasive cloth. Always clean with the grain. Always finish with Claire® Stainless Steel Polish and Cleaner or comparable product to prevent further problems.
Using abrasive pads such as ScotchBrite™ will cause the graining in the stainless to become blurred.
Rust not cleaned up promptly can penetrate the surface of the stainless steel and complete removal of the rust may not be possible.
Integrated Models
To clean integrated panels, use household cleaner per the cabinet manufacturer's recommendations.
INTERIOR CLEANING
Disconnect power to the unit.
Clean the interior and all removed components using a mild nonabrasive detergent and warm water solution applied with a soft sponge or non-abrasive cloth.
Rinse the interior using a soft sponge and clean water.
Do not use any solvent-based or abrasive
cleaners. These types of cleaners may transfer taste to the interior products and damage or discolor the interior.
SAFETY • INSTALLATION & INTEGRATION • OPERATING INSTRUCTIONS • MAINTENANCE • SERVICE
DEFROSTING
Manual Defrost Models
This unit is a manual defrost model and will require occasional defrosting. When there is build-up of 1/4" (6 mm) or more of frost, manually defrost the unit.

CAUTION
DO NOT use an ice pick or other sharp instrument to help speed up defrosting. These instruments can puncture the inner lining or damage the cooling unit. DO NOT use any type of heater to defrost. Using a heater to speed up defrosting can cause personal injury and damage to the inner lining.
To defrost:
- Disconnect power to the unit.
- Remove ice bucket and discard ice.
- Place towel or other absorbent material on bottom of ice bin.
- Fill the ice bucket half full with warm, not hot water. This will help the unit defrost faster.
- Place the ice bucket back into the unit on top of the towel or other absorbent material.
- Prop the door in an open position (2 in. [50 mm] minimum).
- After about 1 hour remove the ice bin and discard water.
- Allow the frost to melt naturally.
- After the frost melts completely clean the interior and all removed components. (See INTERIOR CLEANING).
NOTICE
DO NOT clean ice bucket using a dishwasher. The bucket is not dishwasher safe and will be damaged.
- When the interior is dry, reconnect power and turn unit on.
NOTE: To safeguard against contaminates in ice, discard first three batches of ice after defrosting.
SAFETY • INSTALLATION & INTEGRATION • OPERATING INSTRUCTIONS • MAINTENANCE • SERVICE
Cleaning Condenser
INTERVAL - EVERY SIX MONTHS
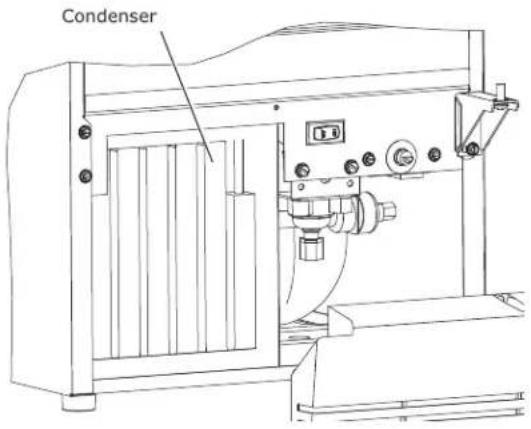
To maintain operational efficiency, keep the front grille free of dust and lint, and clean the condenser when necessary. Depending on environmental conditions, more or less frequent cleaning may be necessary.

WARNING
Disconnect electric power to the unit before cleaning the condenser.

WARNING
DO NOT touch the condenser fins. The condenser fins are SHARP and can be easily damaged.
NOTICE
DO NOT use any type of cleaner on the condenser unit.
- Remove the grille. (See GRILLE-PLINTH INSTALLATION).
- Clean the condenser coil using a using a soft brush with a "combing" action or vacuum cleaner. Do not touch the condenser coil.
- Install the grille.
SAFETY • INSTALLATION & INTEGRATION • OPERATING INSTRUCTIONS • MAINTENANCE • SERVICE
Extended Non-Use
VACATION/HOLIDAY, PROLONGED SHUTDOWN
The following steps are recommended for periods of extended non-use:
- Remove all consumable content from the unit.
- Disconnect the power cord from its outlet/socket and leave it disconnected until the unit is returned to service.
- Turn off the water supply.
- If ice is on the evaporator, allow ice to thaw naturally.
- Clean and dry the interior of the cabinet. Ensure all water has been removed from the unit.
- Disconnect the water and drain line (if applicable) making sure all water is removed from the lines.
- The door must remain open to prevent formation of mold and mildew. Open door a minimum of 2" (50 mm) to provide the necessary ventilation.
WINTERIZATION
If the unit will be exposed to temperatures of 40^ F ( 5^ C) or less, the steps above must be followed. In addition, P60 drain pumps in clear ice machines must be drained according to the following procedure:
- Remove the drain pump from the ice machine.
- Drain the water in the pump's reservoir by turning the pump upside down and allowing the water to drain through the pump's inlet and vent tube fittings.
- After water is drained, reinstall the drain pump and reattach all connections.
For questions regarding winterization, please call U-Line at +1.800.779.2547.
Damage caused by freezing temperatures is not covered by the warranty.
Do not put anti-freeze in your unit.
SAFETY • INSTALLATION & INTEGRATION • OPERATING INSTRUCTIONS • MAINTENANCE • SERVICE
Troubleshooting
BEFORE CALLING FOR SERVICE
If you think your U-Line product is malfunctioning, read the CONTROL OPERATION section to clearly understand the function of the control.
If the problem persists, read the NORMAL OPERATING SOUNDS and TROUBLESHOOTING GUIDE sections below to help you quickly identify common problems and possible causes and remedies. Most often, this will resolve the problem without the need to call for service.
IF SERVICE IS REQUIRED
If you do not understand a troubleshooting remedy, or your product needs service, contact U-Line Corporation directly at +1.414.354.0300
When you call, you will need your product Model and Serial Numbers. This information appears on the Model and Serial number plate located on the upper right or rear wall of the interior of your product.
All models incorporate rigid foam insulated cabinets to provide high thermal efficiency and maximum sound reduction for its internal working components. Despite this technology, your model may make sounds that are unfamiliar.
Normal operating sounds may be more noticeable because of the unit's environment. Hard surfaces such as cabinets, wood, vinyl or tiled floors and paneled walls have a tendency to reflect normal appliance operating noises.
Listed below are common refrigeration components with a brief description of the normal operating sounds they make. NOTE: Your product may not contain all the components listed.
- Compressor: The compressor makes a hum or pulsing sound that may be heard when it operates.
- Evaporator: Refrigerant flowing through an evaporator may sound like boiling liquid.
- Condenser Fan: Air moving through a condenser may be heard.
- Automatic Defrost Drain Pan: Water may be heard dripping or running into the drain pan when the unit is in the defrost cycle.
TROUBLESHOOTING GUIDE

DANGER
ELECTROCUTION HAZARD. Never attempt to repair or perform maintenance on the unit before disconnecting the main electrical power.
Troubleshooting - What to check when problems occur:
| Problem | Possible Cause and Remedy |
| Light Remains on When Door Is Closed. | Turn off light switch if equipped.Check reed switch. |
| Unit Develops Frost on Internal Surfaces. | Frost on the rear wall is normal and will melt during each off cycle.If there is excessive build-up of 1/4" or more, manually defrost the unit.Ensure the door is closing and sealing properly.High ambient temperature and excessive humidity can also produce frost. |
| Unit Develops Condensation on External Surfaces. | The unit is exposed to excessive humidity.Moisture will dissipate as humidity levels decrease. |
| Product Is Freezing. | Because product in contact with the rear wall may freeze, ensure no product is touching the rear wall.Adjust the temperature to a warmer set point. |
SAFETY • INSTALLATION & INTEGRATION • OPERATING INSTRUCTIONS • MAINTENANCE • SERVICE
| Problem | Possible Cause and Remedy |
| Product is Not Cold Enough. | Air temperature does not indicate product temperature. See CHECKING PRODUCT TEMPERATURE below.Adjust the temperature to a cooler set point.Ensure unit is not located in excessive ambient temperatures or in direct sunlight.Ensure the door is closing and sealing properly.Ensure the interior light has not remained on too long.Ensure nothing is blocking the front grille, found at the bottom of the unit.Ensure the condenser coil is clean and free of any dirt or lint build-up. |
CHECKING PRODUCT TEMPERATURE
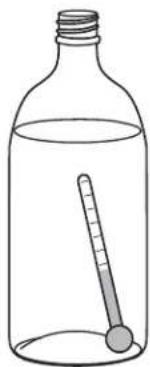
natural_image
Simple line drawing of a glass bottle containing a thermometer, with no text or symbols present.To check the actual product temperature in the unit:
- Partially fill a plastic (nonbreakable) bottle with water.
- Insert an accurate thermometer.
- Tighten the bottle cap securely.
- Place the bottle in the desired area for 24 hours.
- Avoid opening the unit during the testing period.
- After 24 hours, check the temperature of the water. If required, adjust the temperature control in a small increment (see CONTROL OPERATION).
Causes which affect the internal temperatures of the cabinet include:
• Temperature setting.
- Ambient temperature where installed.
• Installation in direct sunlight or near a heat source.
- The number of door/drawer openings and the time the door/drawer is open.
- The time the internal light is illuminated. (This mainly affects product on the top rack or shelf.)
• Obstruction of front grille or condenser.
SAFETY • INSTALLATION & INTEGRATION • OPERATING INSTRUCTIONS • MAINTENANCE • SERVICE
U-Line Corporation (U-Line) Limited Warranty
One Year Limited Warranty
For one year from the date of original purchase, this U-Line product warranty covers all parts and labor to repair or replace any part of the product that proves to be defective in materials or workmanship. For products installed and used for normal residential use, material cosmetic defects are included in this warranty, with coverage limited to 60 days from the date of original purchase. All service provided by U-Line under the above warranty must be performed by U-Line factory authorized service, unless otherwise specified by U-Line. Service provided during normal business hours.
Available Second Year Limited Warranty
Beyond the standard one year warranty outlined above, U-Line offers an extension of the one year warranty coverage for an additional second year from the date of purchase, free of charge. To take advantage of this second year warranty, you must register your product with U-Line within two months from the date of purchase at u-line.com providing proof of purchase.
Five Year Sealed System Limited Warranty
For five years from the date of original purchase, U-Line will repair or replace the following parts, labor not included, that prove to be defective in materials or workmanship: compressor, condenser, evaporator, drier, and all connecting tubing. All service provided by U-Line under the above warranty must be performed by U-Line factory authorized service, unless otherwise specified by U-Line. Service provided during normal business hours.
Terms
These warranties apply only to products installed in any one of the fifty states of the United States, the District of Columbia, or the ten provinces of Canada. The warranties do not cover any parts or labor to correct any defect caused by negligence, accident or improper use, maintenance, installation, service, repair, acts of God, fire, flood or other natural disasters. The product must be installed, operated, and maintained in accordance with the U-Line User Guide.
The remedies described above for each warranty are the only ones that U-Line will provide, either under these warranties or under any warranty arising by operation of law. U-Line will not be responsible for any consequential or incidental damages arising from the breach of these warranties or any other warranty, whether express, implied, or statutory. Some states do not allow the exclusion or limitation of incidental or consequential damages, so the above limitation or exclusion may not apply to you. These warranties give you specific legal rights, and you may also have other rights which vary from state to state.
Any warranty that may be implied in connection with your purchase or use of the product, including any warranty of merchantability or any warranty fit for a particular purpose is limited to the duration of these warranties, and only extends to five years in duration for the parts described in the section related to the five year limited warranty above. Some states do not allow limitations on how long an implied warranty lasts, so the above limitations may not apply to you.
- The warranties only apply to the original purchaser and are non-transferable.
• The second year and five year warranties cover products installed and used for normal residential or designated marine use only. - The warranties apply to units operated outside only if designed for outdoor use by model and serial number.
- Replacement water filters, light bulbs, and other consumable parts are not covered by these warranties.
- The start of U-Line's obligation is limited to four years after the shipment date from U-Line.
- In-home instruction on how to use your product is not covered by these warranties.
- Food, beverage, and medicine loss are not covered by these warranties.
- If the product is located in an area where U-Line factory authorized service is not available, you may be responsible for a trip charge or you may be required to bring the product to a U-Line factory authorized service location at your own cost and expense.
- Units purchased after use as floor displays, and/or certified reconditioned units, are covered by the limited one year warranty only and no coverage is provided for cosmetic defects.
• Signal issues related to Wi-Fi connectivity are not covered by these warranties.
For parts and service assistance, or to find U-Line factory authorized service near you, contact U-Line: 8900 N. 55th Street, Milwaukee, WI 53223 • u-line.com • onlineservice@u-line.com • +1.800.779.2547
Copyright © 2014/2017 U-Line Corporation. All Rights Reserved. | Publication Number 30379 | 10/2017 Rev. L
SAFETY • INSTALLATION & INTEGRATION • OPERATING INSTRUCTIONS • MAINTENANCE • SERVICE
Wire Diagram
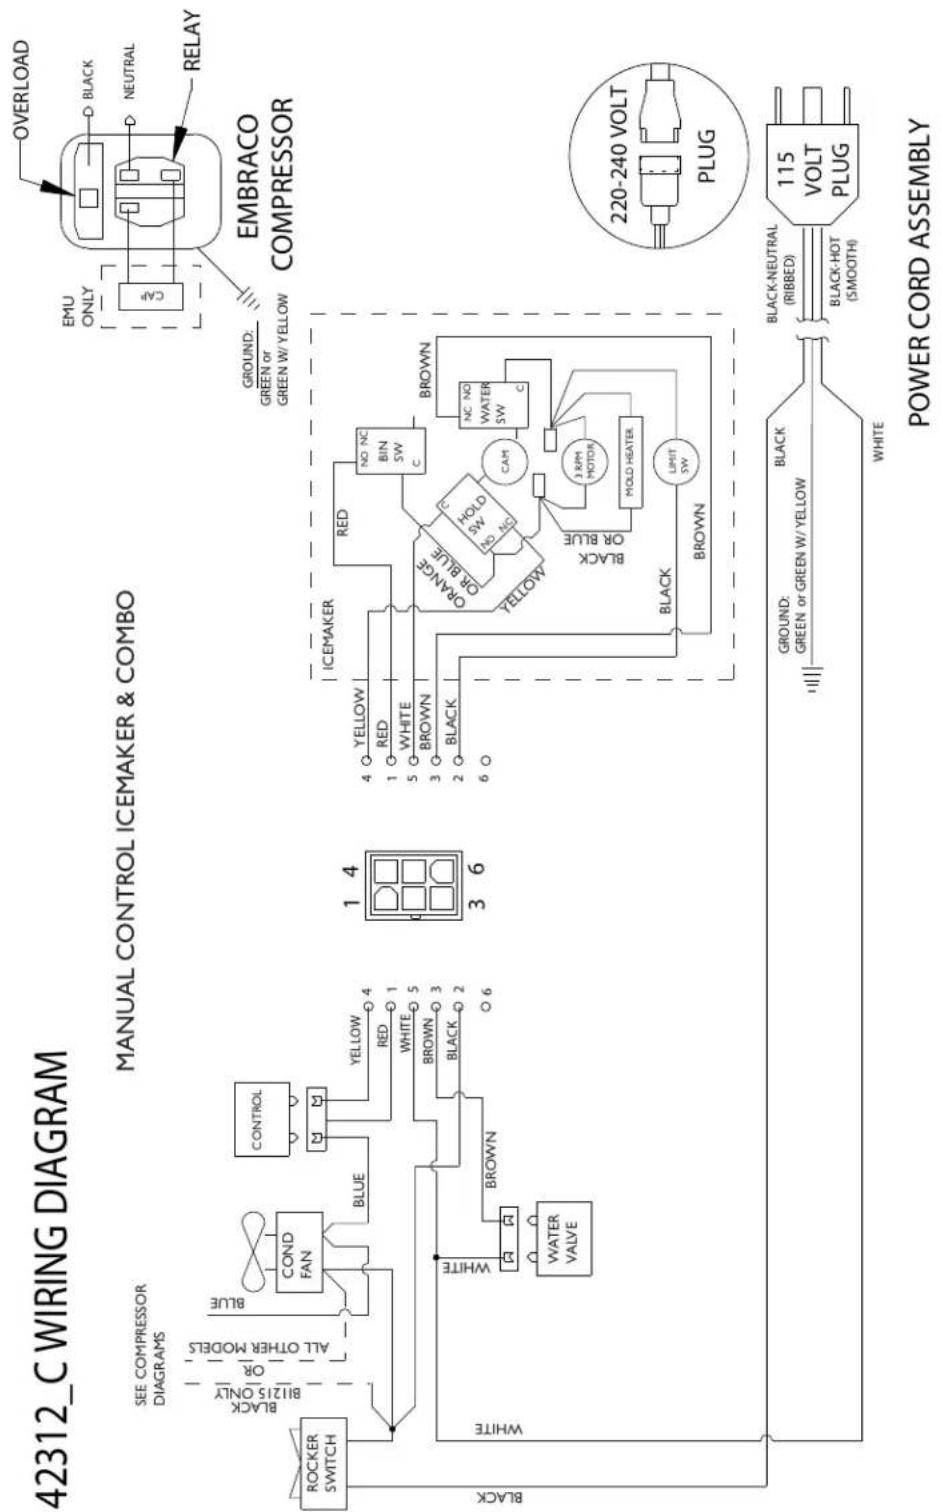
flowchart
graph TD
    subgraph 'MANUAL CONTROL ICEMAKER & COMBO'
        direction TB
        A["ROCKER SWITCH"] -->|SEE COMPRESSOR DIAGRAMS| B["COND FAN"]
        B -->|ALL OTHER MODELS| C["CONTROL"]
        C -->|BLUE| D["RED"]
        D --> E["WHITE"]
        E --> F["BROWN"]
        F --> G["BLACK"]
        G --> H["WATER VALVE"]
        I["AMBRACO COMPRESSOR"] --> J["ECAMER"]
        J --> K["ORANGE OR BLUE"]
        K --> L["SW HOLD"]
        L --> M["MINI"]
        M --> N["CAP"]
        N --> O["MC"]
        O --> P["MOLD HEATER"]
        P --> Q["BROWN"]
        Q --> R["LIMIT SW"]
        S["220-240 VOLT PLUG"] --> T["115 VOLT PLUG"]
    end

    subgraph 'POWER CORD ASSEMBLY'
        U["Ground: GREEN or GREEN W/ YELLOW"] --> V["BLACK"]
        W["BLACK-NEUTRAL (RIBBED)"] --> X["BLACK-HOT (SMOOTH)"]
        Y["OVERLOAD"] --> Z["EMU ONLY"]
        AA["RELLAY"] --> AB["CAP"]
        AC["GROUND: GREEN or GREEN W/ YELLOW"] --> AD["EMBRACO COMPRESSOR"]
    end
SAFETY • INSTALLATION & INTEGRATION • OPERATING INSTRUCTIONS • MAINTENANCE • SERVICE
Product Liability
Field service technicians are authorized to make an initial assessment in the event of reported damages. If there are any questions about the process involved, the technician should call U-Line for further explanation.
While inspecting for defects or installation issues, photos should be taken to document any damages or issues found.
During the assessment, if the service technician is able to find the source of the damage and it can be resolved by replacement of a part, the servicer is authorized to replace the part in question. The part that caused the damage must be returned to U-Line in its entirety. The part must be clearly labeled with the serial number of the unit it was removed from, the date, and the servicer who removed the part.
If the service technician determines the damage is the result of installation issues (water connection/drain, etc.), the consumer would be notified and the issues shall be resolved at the direction of the consumer.
If damage is evident and the service technician is unable to find the source, U-Line must be contacted at 1-800-799-2547 for further direction
8900 N. 55th Street • Milwaukee, WI 53223 T: +1.414.354.0300 • F: +1.414.354.354.5696 Website: www.u-line.com
Right product. Right place. Right temperature Since 1962.
SAFETY • INSTALLATION & INTEGRATION • OPERATING INSTRUCTIONS • MAINTENANCE • SERVICE
Warranty Claims
The following information defines the parameters for filing a warranty claim:
- Valid serial number needed
- Valid model number needed
- Narda (or equivalent) form or submitted online at www.u-line.com
- 60 day submittal deadline from date of completed service
- Only one repair or unit per warranty claim
- Refrigerant should be labeled and included on the labor submittal
- Door and water level adjustments are covered 30 days from install date.
Serial Number Requirements:
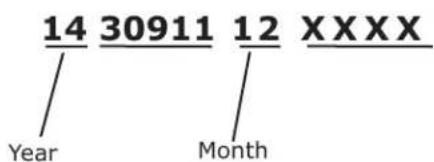
A typical serial number is shown above. The first two digits of the first segment, 14, represents the production year. The number between the dashes, 12, represents the production month. In most cases, warranty status can be verified by the production date information within the serial number.
• Alternatively, a Proof of Purchase (or equivalent) may submitted with the warranty claim to document
warranty status. We also accept the following information to verify warranty status:
• New Construction Occupancy Documents
- Closing Paperwork
• Final Billing - Remodel
Noting all of the following on the warranty claim will be considered proof of purchase, hard copy will not be required:
• Name of the selling Dealer
• Date of purchase/installation
• Order or Invoice number (if available)
• Description of document reviewed (i.e. store receipt, closing paperwork, etc)
Parts and labor claims are paid separately. Indicate part numbers and description for parts used in the warranty repair. Include the purchase invoice and name of the parts supplier used to procure the parts.
SAFETY • INSTALLATION & INTEGRATION • OPERATING INSTRUCTIONS • MAINTENANCE • SERVICE
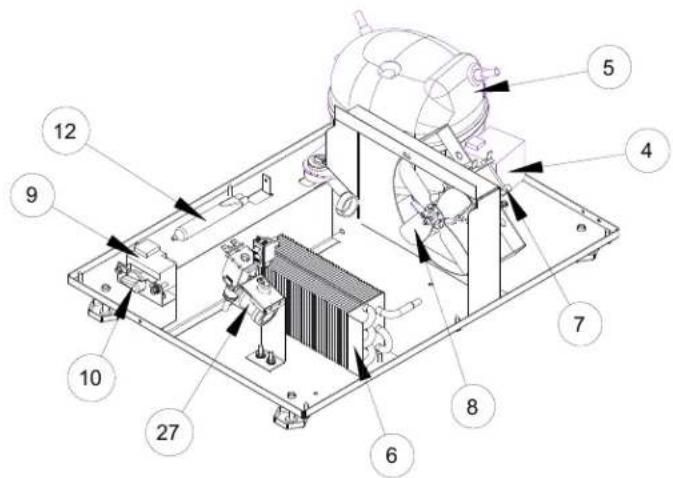
Parts
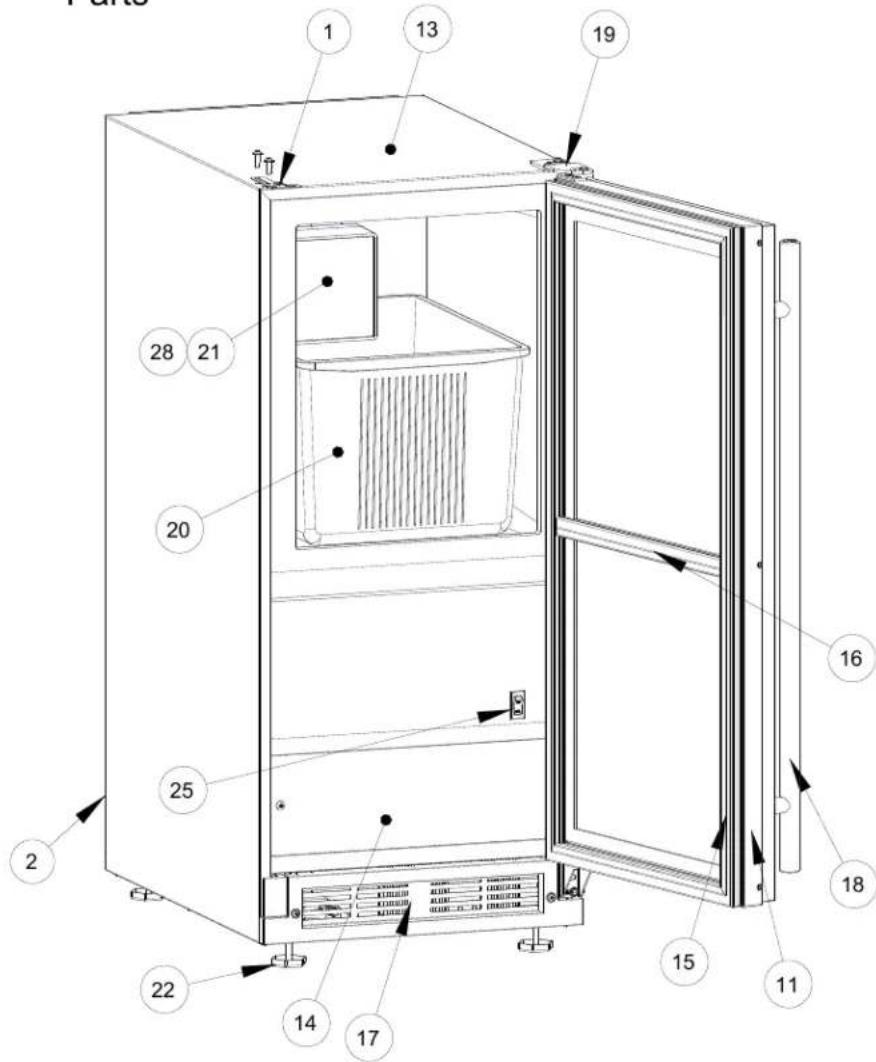
| U-BI1215S-00B | ||
| Item | Description | U-Line P/N |
| 1 | Anti tip brackets w/screws | 80-54221-00 |
| 2 | Back panel | 80-54392-00 |
| 3 | Compression nut/sleeve | 80-54355-00 |
| 4 | Compressor electricals only | 80-54377-00 |
| 5 | Compressor w/electricals | 80-54376-00 |
| 6 | Condenser assembly | 80-54293-00 |
| 7 | Condenser fan | 80-54378-00 |
| 8 | Condenser fan blade | 80-54379-00 |
| 9 | Control assembly | 80-54381-00 |
| 10 | Control knob | 80-54382-00 |
| 11 | Door assembly w/hinges | 80-54396-00 |
| 12 | Drier | 80-54055-00 |
| 13 | Evap/cabinet assembly | 80-54393-00 |
| 14 | Front panel w/screws | 80-54371-00 |
| 15 | Gasket, door | 80-54235-00 |
| 16 | Gasket, Horizontal | 80-54391-00 |
| 17 | Grille w/ screws | 80-54230-00 |
| 18 | Handle w/logo | 80-54214-00 |
| 19 | Hinges (2) w/screws | 80-54233-00 |
| 20 | Ice bucket | 80-54386-00 |
| 21 | Ice maker assembly | 80-54372-00 |
| 22 | Leg Levelers (4) | 80-54201-00 |
| 23 | Packaging | 80-54238-00 |
| 24 | Power cord | 80-54380-00 |
| 25 | Rocker switch | 80-54105-00 |
| 26 | Water line assembly | 80-54383-00 |
| 27 | Water valve assembly | 80-54356-00 |
| 28 | Faceplate 115V | 80-54523-00 |
SAFETY • INSTALLATION & INTEGRATION • OPERATING INSTRUCTIONS • MAINTENANCE • SERVICE
Ordering Replacement Parts
If you have a purchasing account, please utilize our service website to order parts.
Orders may also be placed by Fax or phone. See our contact information below:
www.U-LineService.com (with service login)
FAX Number: +1.414.354.5696
Phone Number: +1.800.779.2547
NOTICE
Use only genuine U-Line replacement parts. The use of non-U-Line parts can reduce speed of ice production, cause water to overflow from ice maker mold, damage the unit, and void the warranty.
Warranty parts will be shipped at no charge after U-Line confirms warranty status. Please provide the model, serial number, part number and part description. Some parts will require color or voltage information.
If U-Line requires the return of original parts, we will inform you when the parts order is taken. This requirement will be noted on your packing list. A prepaid shipping label will be included with the replacement part. Please enclose a copy of the parts packing list and any labor claims with your return. Please be sure the model and serial numbers are legible on the paperwork. Tag the part with the reported defect.
When ordering a non-warranty part, you will need an open account and tax exemption on file at U-Line. Another option would be to visit www.u-line.com to locate an authorized parts distributor in your area.
SAFETY • INSTALLATION & INTEGRATION • OPERATING INSTRUCTIONS • MAINTENANCE • SERVICE
System Diagnosis Guide
| System Condition | Suction Pressure | Suction Line | Compressor Discharge | Condenser | Capillary Tube | Evaporator | Wattage |
| Normal | Normal | Slightly below room temperature | Very hot | Very hot | Warm | Cold | Normal |
| Overcharge | Higher than normal | Very cold may frost heavily | Slightly warm to hot | Hot to warm | Cool | Cold | Higher than normal |
| Undercharge | Lower than normal | Warm - near room temperature | Hot | Warm | Warm | Extremely cold near inlet - Outlet below room temperature | Lower than normal |
| Partial Restriction | Somewhat lower than normal vacuum | Warm - near room temperature | Very hot | Top passes warm - Lower passes cool (near room temperature) due to liquid | Room temperature (cool) or colder | Extremely cold near inlet - Outlet below room temperature backing up | Lower than normal |
| Complete Restriction | In deep vacuum | Room temperature (cool) | Room temperature (cool) | Room temperature (cool) | Room temperature (cool) | No refrigeration | Lower than normal |
| No Gas | 0 PSIG to 25" | Room temperature (cool) | Cool to hot | Room temperature (cool) | Room temperature (cool) | No refrigeration | Lower than normal |
SAFETY • INSTALLATION & INTEGRATION • OPERATING INSTRUCTIONS • MAINTENANCE • SERVICE
Compressor Specifications

DANGER
Electrocution can cause death or serious injury. Burns from hot or cold surfaces can cause serious injury. Take precautions when servicing this unit.
Disconnect the power source.
Do not stand in standing water when working around electrical appliances.
Make sure the surfaces you touch are not hot or frozen.
Do not touch a bare circuit board unless you are wearing an anti-static wrist strap that is grounded to an electrical ground or grounded water pipe.
Handle circuit boards carefully and avoid touching components.
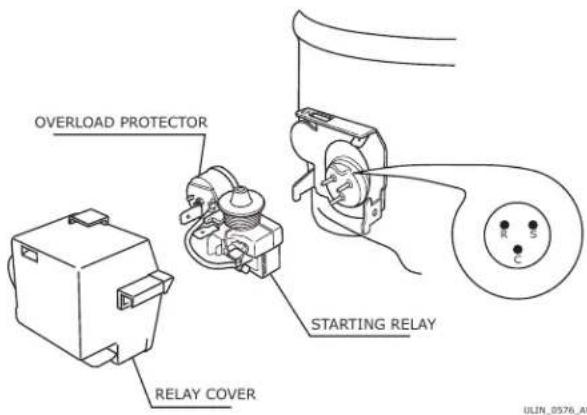
To measure the start winding resistance, measure across the C and S pins.
To measure the run winding resistance, measure across the C and R pins.
Also check S to R and you should get the sum of the run and start windings.
To ensure the windings are not shorted, check the S and R to ground.
| EM150HER | |
| Refrigerant | R134a |
| Voltage | 115 VAC |
| Frequency | 60 Hz |
| Run Cap | n/a |
| Start Winding | 12.1 Ohm at 77°F |
| Run Winding | 3.9 Ohm at 77°F |
| LRA | 18.0 A |
| FLA | 2.0 A |
| Starting Device | 213514105 |
| Overload | 4TM757KFBYY-53 |
* All resistance readings are ±10%
SAFETY • INSTALLATION & INTEGRATION • OPERATING INSTRUCTIONS • MAINTENANCE • SERVICE
Troubleshooting - Extended
SPECIFIC ERRORS & ISSUES

CAUTION
Never attempt to repair or perform maintenance on the unit until the main electrical power has been disconnected from the unit.
TROUBLESHOOTING GUIDE
| Concern | Potential Causes | Suggested Remedy |
| Will not eject ice (water frozen). | Control setting too cold. | Adjust control warmer (counterclockwise). |
| Control inoperable (1-2 contacts open) | Replace control. | |
| Bin switch inoperable. | Replace bin switch. | |
| Limit switch defective (open). | Replace limit switch. | |
| Ice maker assembly motor stalled. | Replace motor. | |
| Broken wire in ice maker circuit. | Repair or replace wiring. | |
| Water soaked cabinet insulation. | Replace foamed cabinet assembly. | |
| Dirty condenser. | Clean condenser. | |
| Will not fill with water. | Water supply valve closed. | Open water supply valve. |
| Water switch inoperable (open). | Replace water switch. | |
| Solenoid valve inoperable. | Replace solenoid valve. | |
| Fill tube outlet frozen. | Defrost fill tube. | |
| Broken wire in water fill circuit. | Repair or replace wiring. | |
| Will not stop making ice. | Bin switch inoperable (closed). | Replace bin switch. |
| Bin arm binding. | Lubricate bin arm pivot points or loosen bin arm lever screw. | |
| Water will not stop filling. | Water switch inoperable (closed). | Replace water switch. |
| Solenoid valve inoperable. | Replace solenoid valve. | |
| Stalled ice maker motor. | Replace motor. | |
| Temperature control inoperable. Ice maker is in continuous harvest cycle (contacts 1-2 closed). | Replace temperature control. | |
| Ejector blades will not stop turning. | Control inoperable (1-2 contacts will not open). | Replace control. |
| Hold switch inoperable. | Replace hold switch. | |
| Broken wiring. | Repair or replace wiring. | |
| Short in mold heater. | Replace heater. | |
| Low ice production. | Control set too cold. | Adjust control warmer (counterclockwise). |
| Fan motor stalled. | Replace fan motor. | |
| Ice cubes too large. | Lower water fill adjustment. | |
| Dirty condenser. | Clean condenser. | |
| Bypass valve stuck open (Frost Free units only). | Replace bypass valve (Frost Free units only). | |
| Not freezing (compressor and fan motors operating). | Little or no frost pattern on evaporator. | Check for sealed system leak or restriction. |
| Bypass valve stuck open (Frost Free units only). | Replace bypass valve (Frost Free units only). | |
| Not freezing (compressor not operating - fans operating). | Relay inoperable. | Replace relay. |
| Overload inoperable (open). | Replace overload. | |
| Compressor inoperable. | Replace compressor. |
SAFETY • INSTALLATION & INTEGRATION • OPERATING INSTRUCTIONS • MAINTENANCE • SERVICE
| Concern | Potential Causes | Suggested Remedy |
| Not freezing (compressor and fans not operating). | Power cord not plugged in. | Plug in power cord. |
| On/Off switch in off position. | Turn switch to on position. | |
| On/Off switch inoperable (open). | Replace On/Off switch. | |
| Hold switch inoperable (open). | Replace hold switch. | |
| Control inoperable (2-3 contacts open). | Replace control. | |
| Broken wire in freeze circuit. | Repair or replace wiring. | |
| Ejector blades not in freeze position (12:00) | Manually advance ejector blades to the 12:00 position (test ice maker and limit switch). | |
| Compressor overheating. | Condenser air flow restricted. | Remove restriction (clean condenser and grille). |
| Condenser fan blade obstructed. | Remove blade restriction. | |
| Condenser fan motor stalled. | Replace fan motor. | |
| Compressor inoperable. | Replace compressor. | |
| Compressor will not stop operating. | Control set too cold. | Adjust control warmer (counterclockwise). |
| Control inoperable (2-3 contacts will not open). | Replace control. | |
| Control sensing bulb not sensing mold temperature. | Fully insert bulb into ice maker tube. Rout bulb away from compressor discharge tube. | |
| Evaporator fan stalled (Frost Free units only). | Remove obstruction or replace motor. | |
| Water leak (under unit). | Water supply line leaking at solenoid valve inlet. | Tighten fitting or replace fitting gasket and/or fitting. |
| Water line leaking at solenoid valve outlet. | Replace water line and fitting. | |
| Water line leaking at fill tube. | Tighten clamp or replace fill tube assembly. | |
| Defrost drain line not in drain pan. | Position drain line in drain pan. | |
| Crack in water line. | Replace water line. | |
| Water leak (inside unit). | Ice maker assembly fill cup obstructed. | Remove obstruction. |
| Fill ice cup and fill tube out of alignment. | Align fill tube and fill cup. | |
| Water level too high. | Adjust water level. | |
| Defrost drain plugged (Frost Free units only). | Ice in drain trough (Frost Free units only) (see below). | |
| Excessive frost buildup. | Door gasket not sealing properly. | Adjust door hinges or replace door gasket. |
| Door out of alignment. | Adjust door hinges. | |
| Water soaked cabinet insulation. | Replace foamed cabinet assembly. | |
| Light stays on when door is closed. | Repair or adjust light bracket. | |
| Noisy. | Copper refrigeration tube touching cabinet. | Carefully adjust tubing. |
| Fan blade touching shroud. | Adjust fan mounting or shroud. | |
| Fan blade obstruction (wiring, foam insulation, packaging material). | Remove obstruction. | |
| Ice buildup in drain trough or drainage problem. | Obstructed drain cup or tube. | Clear obstruction. |
| Drain trough heater failed (Frost Free units only). | Replace drain trough heater (Frost Free units only). | |
| Kinked drain tube. | Align drain trough and drain cup. | |
| Drain trough spout and drain cup not aligned. | Reroute drain tube. | |
| Unit will not defrost (Frost Free units only). | Bypass coil inoperable. | Replace bypass valve. |
| Defrost timer inoperable. | Replace defrost timer. | |
| Bypass valve inoperable. | Replace bypass valve. | |
| Fresh food temperature too cold. | Temperature control set too cold. | Adjust control to warmer setting (counterclockwise). |
| Bin/Freezer door not closing. | Adjust or replace door. | |
| Ice bucket not fully inserted. | Check for ice behind bucket and push ice bucket in place. |
SAFETY • INSTALLATION & INTEGRATION • OPERATING INSTRUCTIONS • MAINTENANCE • SERVICE
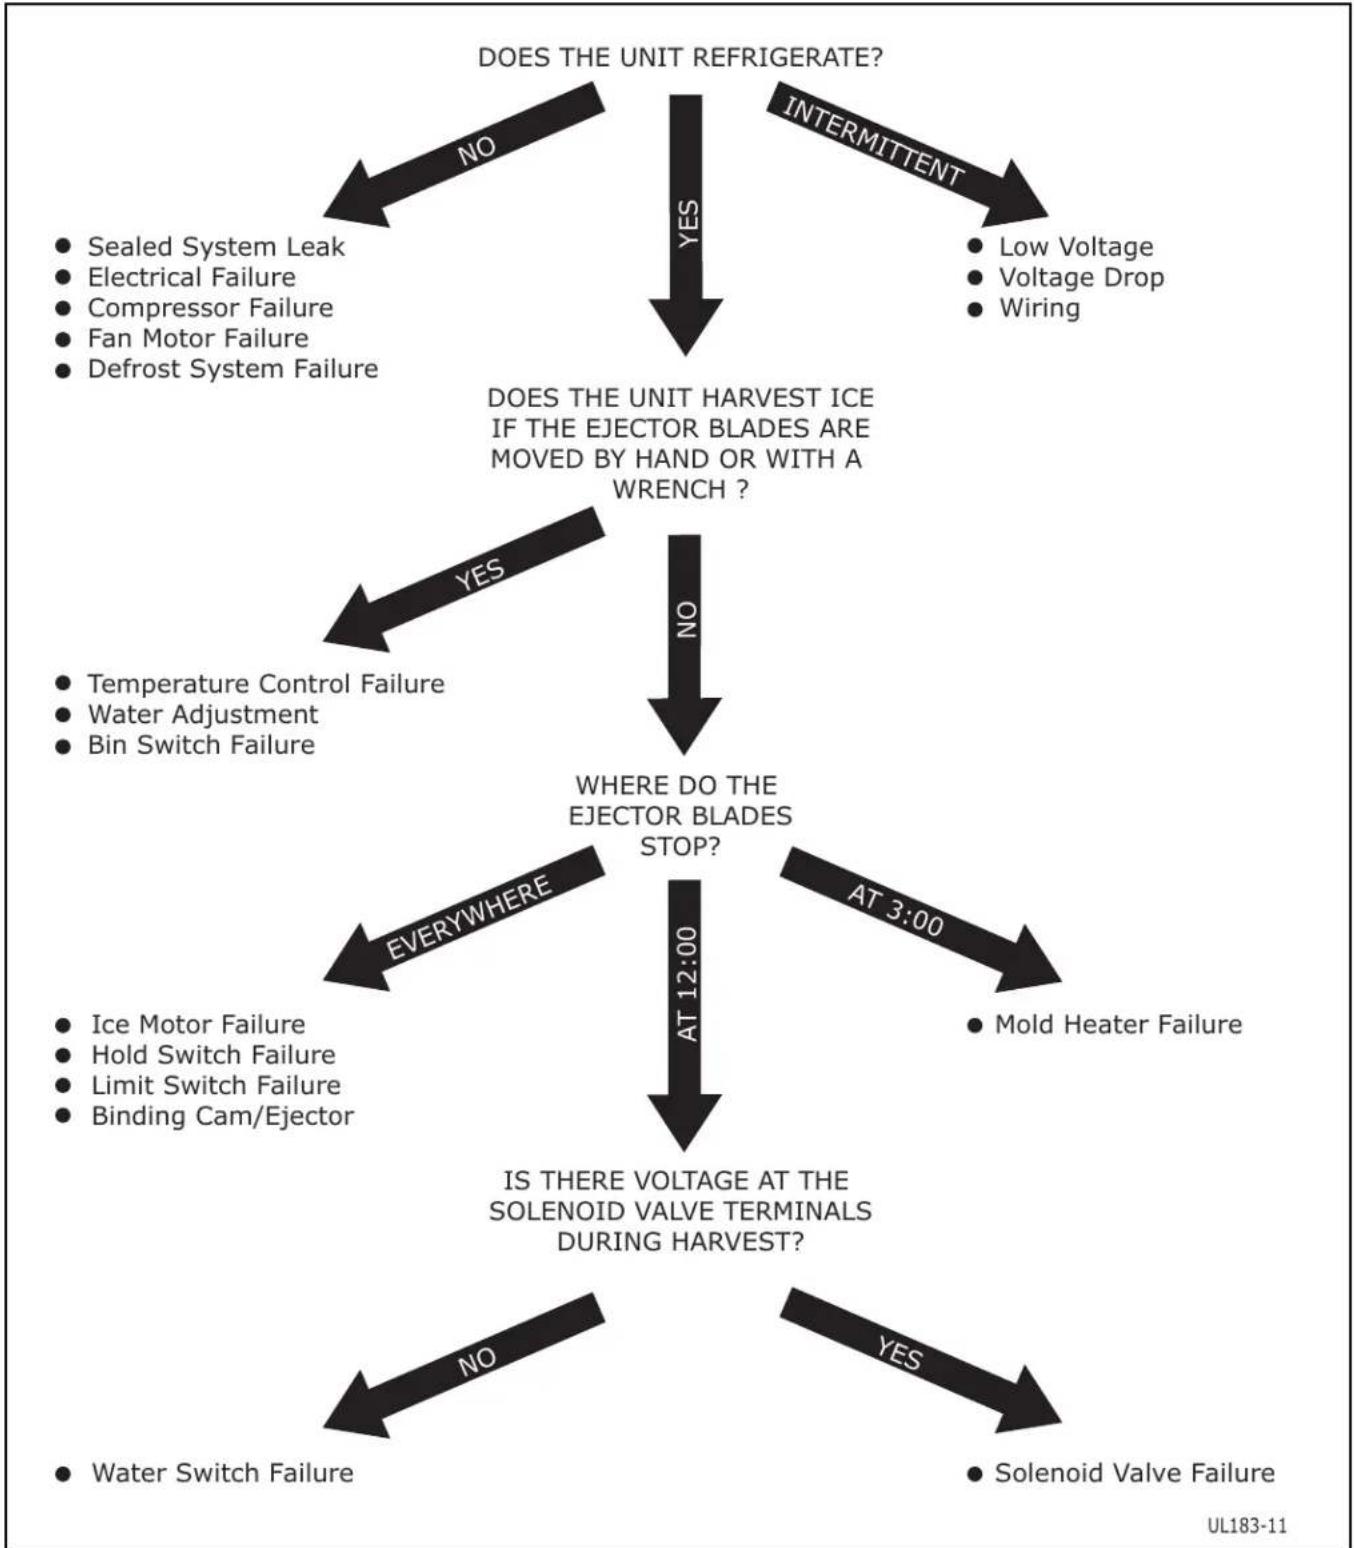
ICE MAKER DIAGNOSIS FLOW CHART
flowchart
graph TD
    A["DOES THE UNIT REFRIGERATE?"] -->|NO| B["INTERMITTENT"]
    A -->|YES| C["DOES THE UNIT HARVEST ICE IF THE EJECTOR BLADES ARE MOVED BY HAND OR WITH A WRENCH?"]
    C -->|NO| D["WHERE DO THE EJECTOR BLADES STOP?"]
    C -->|YES| E["Is THERE VOLTAGE AT THE SOLENOID VALVE TERMINALS DURING HARVEST?"]
    D -->|EVERYWHERE| F["SOLENOID VALVE FAILURE"]
    D -->|AT 3:00| G["Mold Heater Failure"]
    D -->|NO| H["Water Switch Failure"]
    D -->|YES| I["Solenoid Valve Failure"]
    B --> J["Sealed System Leak"]
    B --> K["Electrical Failure"]
    B --> L["Compressor Failure"]
    B --> M["Fan Motor Failure"]
    B --> N["Defrost System Failure"]
    C --> O["Low Voltage"]
    C --> P["Voltage Drop"]
    C --> Q["Wiring"]
    D --> R["Ice Motor Failure"]
    D --> S["Hold Switch Failure"]
    D --> T["Limit Switch Failure"]
    D --> U["Binding Cam/Ejector"]
SAFETY • INSTALLATION & INTEGRATION • OPERATING INSTRUCTIONS • MAINTENANCE • SERVICE
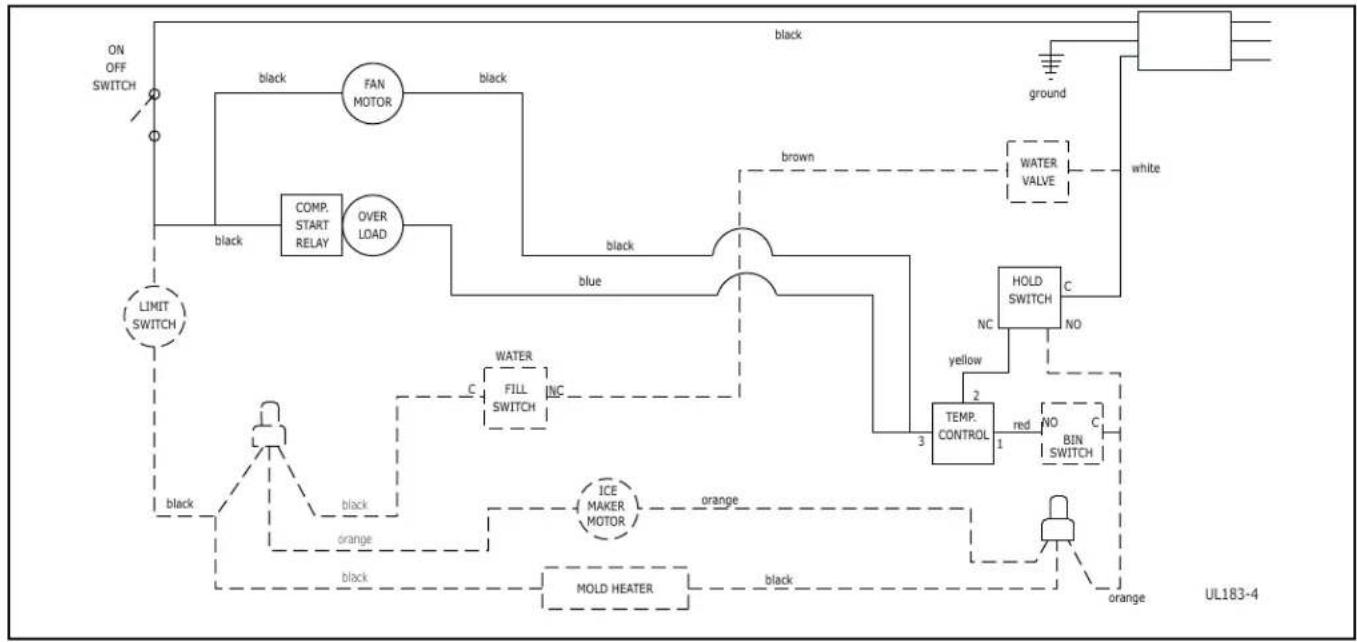
• Temperature control terminals 2 and 3 are closed.
• Power to the condenser.
• Power to the condenser fan.
flowchart
graph TD
    A["ON OFF SWITCH"] --> B["COMP. START RELAY"]
    B --> C["FAN MOTOR"]
    C --> D["OVER LOAD"]
    D --> E["LIMIT SWITCH"]
    E --> F["BLACK"]
    F --> G["BLACK"]
    G --> H["mold heater"]
    H --> I["ICE MAKER MOTOR"]
    I --> J["mold heater"]
    J --> K["MOLD HEATER"]
    K --> L["RED SWITCH"]
    L --> M["HOLD SWITCH"]
    M --> N["WHITE"]
    N --> O["ground"]
    O --> P["UL183-4"]
    P --> Q["RED SWITCH"]
    Q --> R["WHITE"]
    R --> S["WATER VALVE"]
    S --> T["GREEN RED LINE"]
    T --> U["GREEN NO LINE"]
    U --> V["GREEN RED LINE"]
    V --> W["GREEN NO LINE"]
    W --> X["GREEN RED LINE"]
    X --> Y["GREEN NO LINE"]
    Y --> Z["GREEN RED LINE"]
    Z --> AA["GREEN NO LINE"]
    AA --> AB["GREEN RED LINE"]
    AB --> AC["GREEN NO LINE"]
    AC --> AD["GREEN RED LINE"]
    AD --> AE["GREEN NO LINE"]
    AE --> AF["GREEN RED LINE"]
    AF --> AG["GREEN NO LINE"]
    AG --> AH["GREEN RED LINE"]
    AH --> AI["GREEN NO LINE"]
    AI --> AJ["GREEN RED LINE"]
    AJ --> AK["GREEN NO LINE"]
    AK --> AL["GREEN RED LINE"]
    AL --> AM["GREEN NO LINE"]
    AM --> AN["GREEN RED LINE"]
    AN --> AO["GREEN NO LINE"]
    AO --> AP["GREEN RED LINE"]
    AP --> AQ["GREEN NO LINE"]
    AQ --> AR["GREEN RED LINE"]
    AR --> AS["GREEN NO LINE"]
    AS --> AT["GREEN RED LINE"]
    AT --> AU["GREEN NO LINE"]
    AU --> AV["GREEN RED LINE"]
    AV --> AW["GREEN NO LINE"]
    AW --> AX["GREEN RED LINE"]
    AX --> AY["GREEN NO LINE"]
    AY --> AZ["GREEN RED LINE"]
    AZ --> BA["GREEN NO LINE"]
    BA --> BB["GREEN RED LINE"]
    BB --> BC["GREEN NO LINE"]
    BC --> BD["GREEN RED LINE"]
    BD --> BE["GREEN NO LINE"]
    BE --> BF["GREEN RED LINE"]
    BF --> BG["GREEN NO LINE"]
    BG --> BH["GREEN RED LINE"]
    BH --> BI["GREEN NO LINE"]
    BI --> BJ["GREEN RED LINE"]
    BJ --> BK["GREEN NO LINE"]
    BK --> BL["GREEN RED LINE"]
    BL --> BM["GREEN NO LINE"]
    BM --> BN["GREEN RED LINE"]
    BN --> BO["GREEN NO LINE"]
    BO --> BP["GREEN RED LINE"]
    BP --> BQ["GREEN NO LINE"]
    BQ --> BR["GREEN RED LINE"]
    BR --> BS["GREEN NO LINE"]
    BS --> BT["GREEN RED LINE"]
    BT --> BU["GREEN NO LINE"]
    BU --> BV["GREEN RED LINE"]
    BV --> BW["GREEN NO LINE"]
    BW --> BX["GREEN RED LINE"]
    BX --> BY["GREEN NO LINE"]
    BY --> BZ["GREEN RED LINE"]
    BZ --> CA["GREEN NO LINE"]
    CA --> CB["GREEN RED LINE"]
    CB --> CC["GREEN NO LINE"]
    CC --> CD["GREEN RED LINE"]
    CD --> CE["GREEN NO LINE"]
    CE --> CF["GREEN RED LINE"]
    CF --> CG["GREEN NO LINE"]
    CG --> CH["GREEN RED LINE"]
    CH --> CI["GREEN NO LINE"]
    CI --> CJ["GREEN RED LINE"]
    CJ --> CK["GREEN NO LINE"]
Figure 1. Freeze Cycle
SAFETY • INSTALLATION & INTEGRATION • OPERATING INSTRUCTIONS • MAINTENANCE • SERVICE
Harvest-1 Cycle
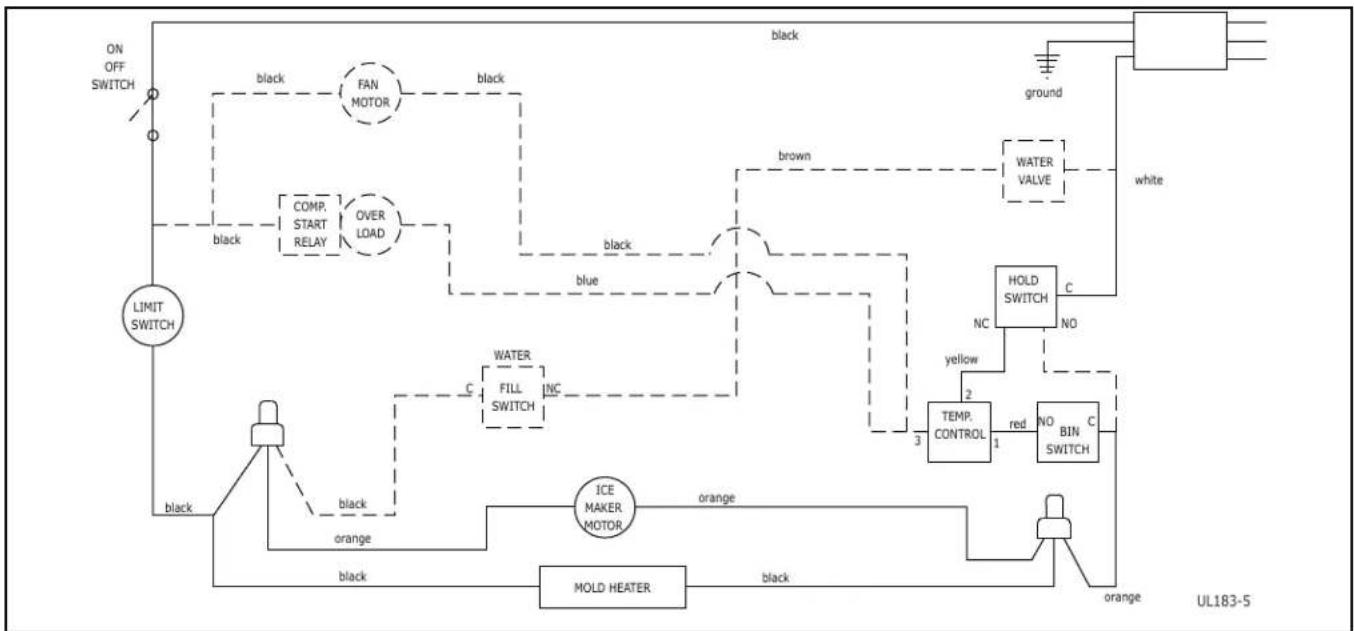
- Temperature control terminals 2 and 3 are open - 2 and 1 close.
• No power to the compressor or condenser fan. - If bin arm is down, power goes through bin arm switch to the ice maker motor. If bin arm is up, the ice maker will not harvest.
flowchart
graph TD
    A["ON OFF SWITCH"] --> B["LIMIT SWITCH"]
    B --> C["COMP. START RELAY"]
    C --> D["FAN MOTOR"]
    D --> E["OVER LOAD"]
    E --> F["BLUE"]
    F --> G["WATER VALVE"]
    G --> H["ground"]
    H --> I["white"]
    I --> J["HOLD SWITCH"]
    J --> K["NO"]
    K --> L["TEMP. CONTROL"]
    L --> M["RED"]
    M --> N["NO BIN SWITCH"]
    N --> O["C"]
    O --> P["WHITE"]
    P --> Q["GREEN RED"]
    Q --> R["RED NO"]
    R --> S["MOLD HEATER"]
    S --> T["ORANGE"]
    T --> U["ICE MAKER MOTOR"]
    U --> V["ORANGE"]
    V --> W["WHITE"]
    W --> X["GREEN RED"]
    X --> Y["RED NO"]
    Y --> Z["MOLD HEATER"]
    Z --> AA["ORANGE"]
    AA --> AB["WHITE"]
    AB --> AC["GREEN RED"]
    AC --> AD["RED NO"]
    AD --> AE["MOLD HEATER"]
    AE --> AF["ORANGE"]
    AF --> AG["WHITE"]
    AG --> AH["GREEN RED"]
Figure 2. Harvest-1 Cycle (Hold Switch in Normal Position)
SAFETY • INSTALLATION & INTEGRATION • OPERATING INSTRUCTIONS • MAINTENANCE • SERVICE
HARVEST-2 CYCLE
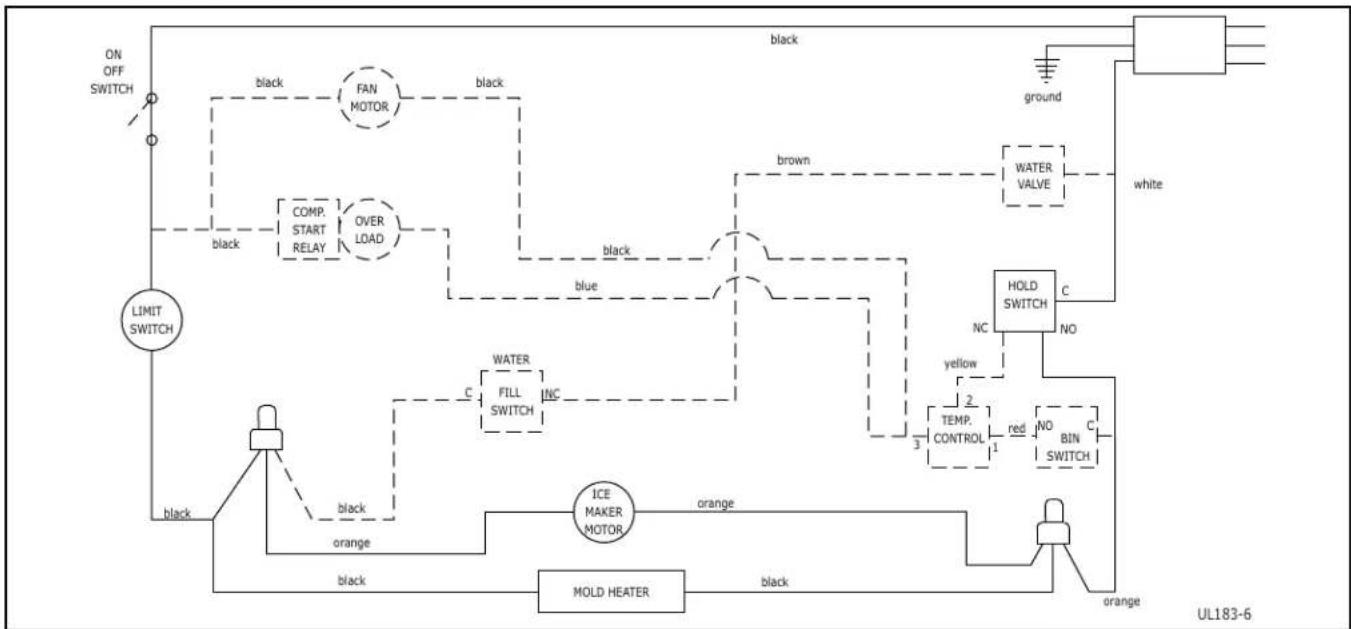
- Ice maker ejector blades reach approximately 2:00 position and cam depresses the hold switch. Power goes through the hold switch to the ice maker motor and mold heater.
- Ejector blades stall on ice and ice maker motor pulsates until mold heater warms and ice releases.
flowchart
graph TD
    A["ON OFF SWITCH"] --> B["LIMIT SWITCH"]
    B --> C["BLACK"]
    C --> D["FAN MOTOR"]
    D --> E["COMP. START RELAY"]
    E --> F["OVER LOAD"]
    F --> G["BLACK"]
    G --> H["BLUE"]
    H --> I["WATER VALVE"]
    I --> J["HOLD SWITCH"]
    J --> K["NO"]
    K --> L["TEM. CONTROL"]
    L --> M["RED"]
    M --> N["NO BIN SWITCH"]
    N --> O["GREEN RED/NO SWITCH"]
    O --> P["MOLD MEATER"]
    P --> Q["BLACK"]
    Q --> R["ICE MAKER MOTOR"]
    R --> S["orange"]
    S --> T["BLACK"]
    T --> U["WHITE"]
    U --> V["ground"]
    V --> W["white"]
    W --> X["Ground"]
Figure 3. Harvest-2 Cycle (Hold Switch in Switched Position)
SAFETY • INSTALLATION & INTEGRATION • OPERATING INSTRUCTIONS • MAINTENANCE • SERVICE
WATER FILL CYCLE
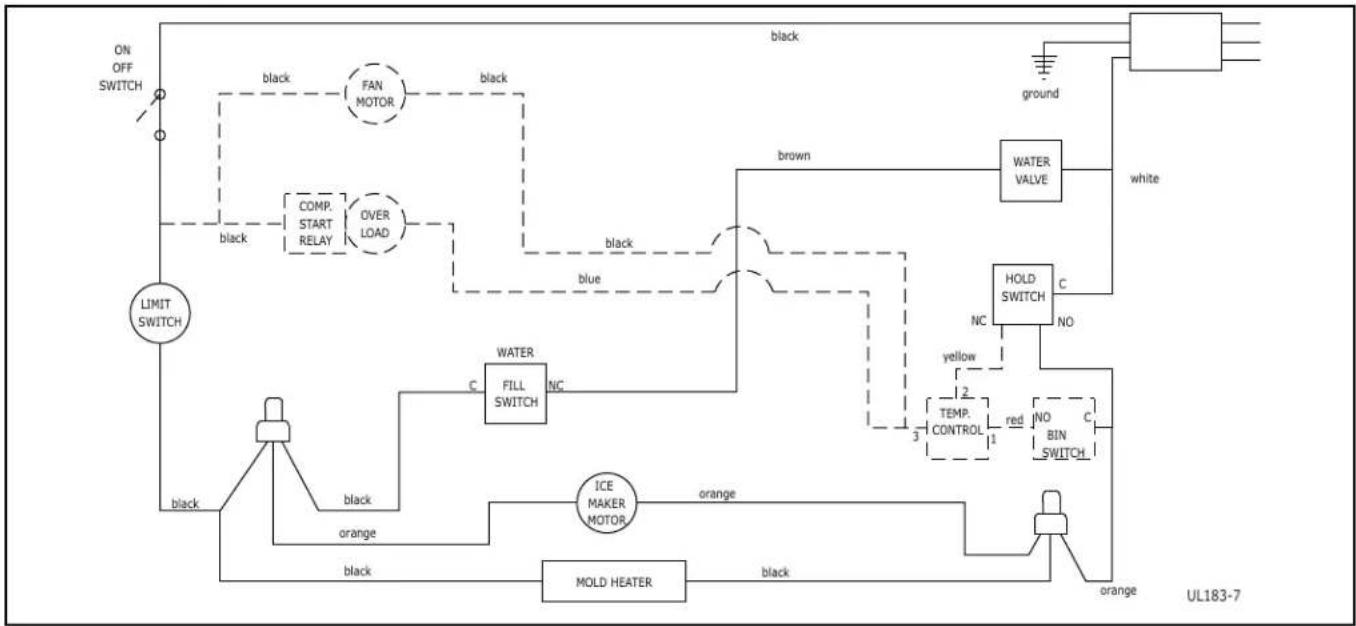
- Ice maker ejector blades reach approximately 10:00 position and cam depresses the water fill switch.
• Power to the water valve. Ice maker mold fills.
flowchart
graph TD
    A["ON OFF SWITCH"] --> B["LIMIT SWITCH"]
    B --> C["BLACK"]
    C --> D["FAN MOTOR"]
    D --> E["COMP. START RELAY"]
    E --> F["OVER LOAD"]
    F --> G["BLUE"]
    G --> H["WATER VALVE"]
    H --> I["WHITE"]
    I --> J["WATER"]
    J --> K["HOLD SWITCH"]
    K --> L["NO"]
    L --> M["RED"]
    M --> N["TEMP. CONTROL"]
    N --> O["ICE MAKER MOTOR"]
    O --> P["MOLD HEATER"]
    P --> Q["BLACK"]
    Q --> R["ORANGE"]
    R --> S["ORANGE"]
    S --> T["ORANGE"]
    T --> U["ORANGE"]
    U --> V["ORANGE"]
    V --> W["ORANGE"]
    W --> X["ORANGE"]
    X --> Y["ORANGE"]
    Y --> Z["ORANGE"]
    Z --> AA["ORANGE"]
    AA --> AB["ORANGE"]
    AB --> AC["ORANGE"]
    AC --> AD["ORANGE"]
    AD --> AE["ORANGE"]
    AE --> AF["ORANGE"]
    AF --> AG["ORANGE"]
    AG --> AH["ORANGE"]
    AH --> AI["ORANGE"]
    AI --> AJ["ORANGE"]
    AJ --> AK["ORANGE"]
    AK --> AL["ORANGE"]
    AL --> AM["ORANGE"]
    AM --> AN["ORANGE"]
    AN --> AO["ORANGE"]
    AO --> AP["ORANGE"]
    AP --> AQ["ORANGE"]
    AQ --> AR["ORANGE"]
    AR --> AS["ORANGE"]
    AS --> AT["ORANGE"]
    AT --> AU["ORANGE"]
    AU --> AV["ORANGE"]
    AV --> AW["ORANGE"]
    AW --> AX["ORANGE"]
    AX --> AY["ORANGE"]
    AY --> AZ["ORANGE"]
    AZ --> BA["ORANGE"]
    BA --> BB["ORANGE"]
    BB --> BC["ORANGE"]
    BC --> BD["ORANGE"]
    BD --> BE["ORANGE"]
    BE --> BF["ORANGE"]
    BF --> BG["ORANGE"]
    BG --> BH["ORANGE"]
    BH --> BI["ORANGE"]
    BI --> BJ["ORANGE"]
    BJ --> BK["ORANGE"]
    BK --> BL["ORANGE"]
    BL --> BM["ORANGE"]
    BM --> BN["ORANGE"]
    BN --> BO["ORANGE"]
    BO --> BP["ORANGE"]
    BP --> BQ["ORANGE"]
    BQ --> BR["ORANGE"]
    BR --> BS["ORANGE"]
    BS --> BT["ORANGE"]
    BT --> BU["ORANGE"]
    BU --> BV["ORANGE"]
    BV --> BW["ORANGE"]
    BW --> BX["ORANGE"]
    BX --> BY["ORANGE"]
    BY --> BZ["ORANGE"]
    BZ --> CA["ORANGE"]
    CA --> CB["ORANGE"]
    CB --> CC["ORANGE"]
    CC --> CD["ORANGE"]
    CD --> CE["ORANGE"]
    CE --> CF["ORANGE"]
    CF --> CG["ORANGE"]
    CG --> CH["ORANGE"]
    CH --> CI["ORANGE"]
    CI --> CJ["ORANGE"]
    CJ --> CK["ORANGE"]
Figure 4. Water Fill Cycle
EJECT CYCLE
- Ejector blades push ice into bucket and stop at 12:00 position.
• Temperature control terminals 2 and 3 have closed during harvest cycle. - Next freeze cycle begins with power to the compressor and condenser fan.
SAFETY • INSTALLATION & INTEGRATION • OPERATING INSTRUCTIONS • MAINTENANCE • SERVICE
TEMPERATURE CONTROL SPECIFICATIONS
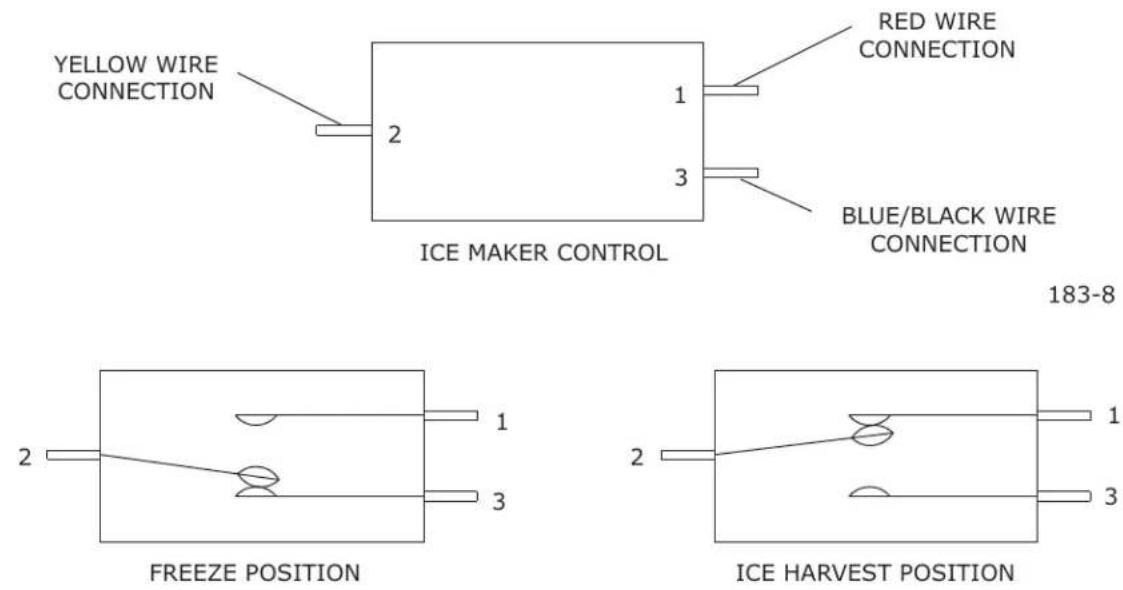
Double Throw Ice Maker Thermostat Numbers 4548, AR-19-12, 2636, 2690, 2691, 2717, 2783, 2782-S, 2763-S, 2780, 80-26005-02
These temperature controls are double throw, single pole controls. The sensing tube is inserted into the ice maker mold and senses mold temperature. After ice is sensed in the mold, the 2-3 contacts open (stopping the compressor) and the 2-1 contacts are closed (starting the ice maker motor). The 2-3 contacts close (2-1 contacts open) before the end of the ice harvest cycle. The hold switch prevents power going back to the compressor. This prepares the control for the next cycle.
| CYCLE | OPEN CIRCUIT | CLOSED CIRCUIT |
| FREEZE | 2 - 1 | 2 - 3 |
| HARVEST | 2 - 3 | 2 - 1 |
183-9
Figure 5. Temperature Controls - Manual Defrost Ice Makers
SAFETY • INSTALLATION & INTEGRATION • OPERATING INSTRUCTIONS • MAINTENANCE • SERVICE
LIMIT SWITCH SPECIFICATIONS
• Normally closed Bi-metal switch
- Open temperature: 104^ F
- Close temperature: 83^ F
The function of this switch is to open in the event of an overheating condition. This bi-metal thermostat is normally closed and does not initiate the ice harvest cycle. The ice harvest cycle is initiated by a double throw, single pole temperature located remotely from the ice maker assembly.
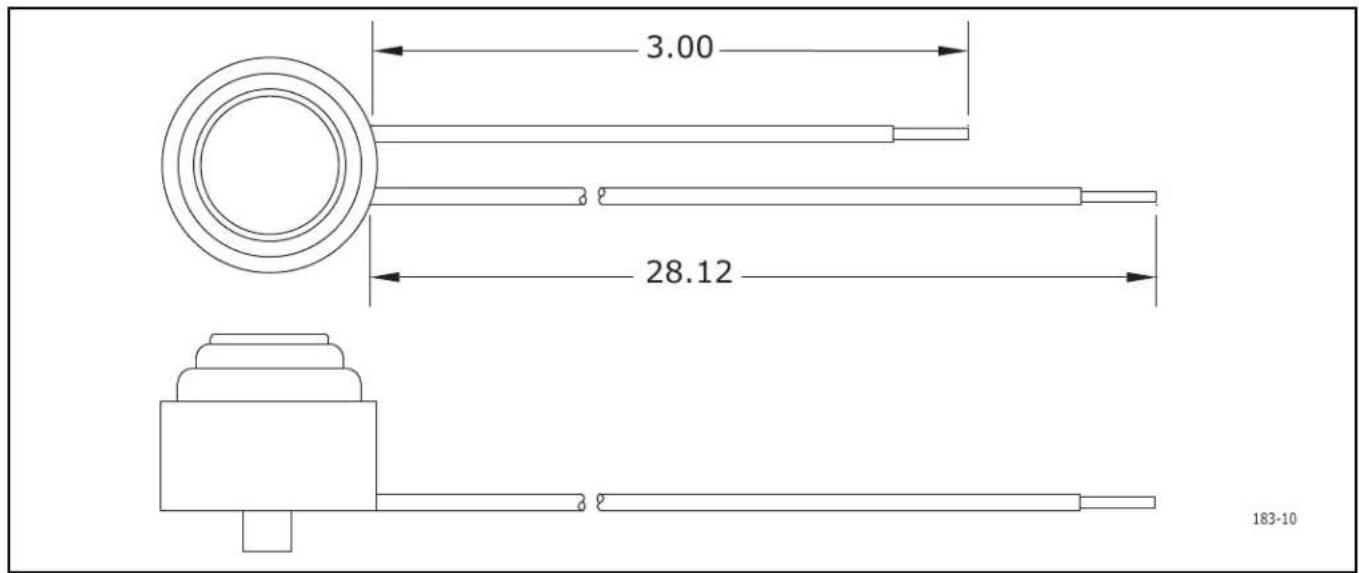
Figure 6. Limit Switch
SAFETY • INSTALLATION & INTEGRATION • OPERATING INSTRUCTIONS • MAINTENANCE • SERVICE
REPLACING ICE MAKER ASSEMBLY (CO29F ONLY)
- Unplug the unit from the main power source.
- Disconnect ice maker wire harness at plug (1).
- Remove control capillary tube from sensing tube on ice maker assembly (2).
- Remove water inlet tube.
- Remove front cover (3).
- Advance the ejector blade to the 3 o'clock position by turning the 5/16" hex head on the small brass gear counterclockwise (4).
-
Remove three screws from wall of freezer housing (5).
-
Remove ice maker assembly.
- Place new ice maker assembly into position and secure with three screws (5).
- Reconnect wire harness at plug.
- Insert control capillary tube into ice maker sensing tube.
- Insert water inlet tube.
- Apply Permagum ^® to all exit holes.
- Install back panel.
15.Plug in unit and test.
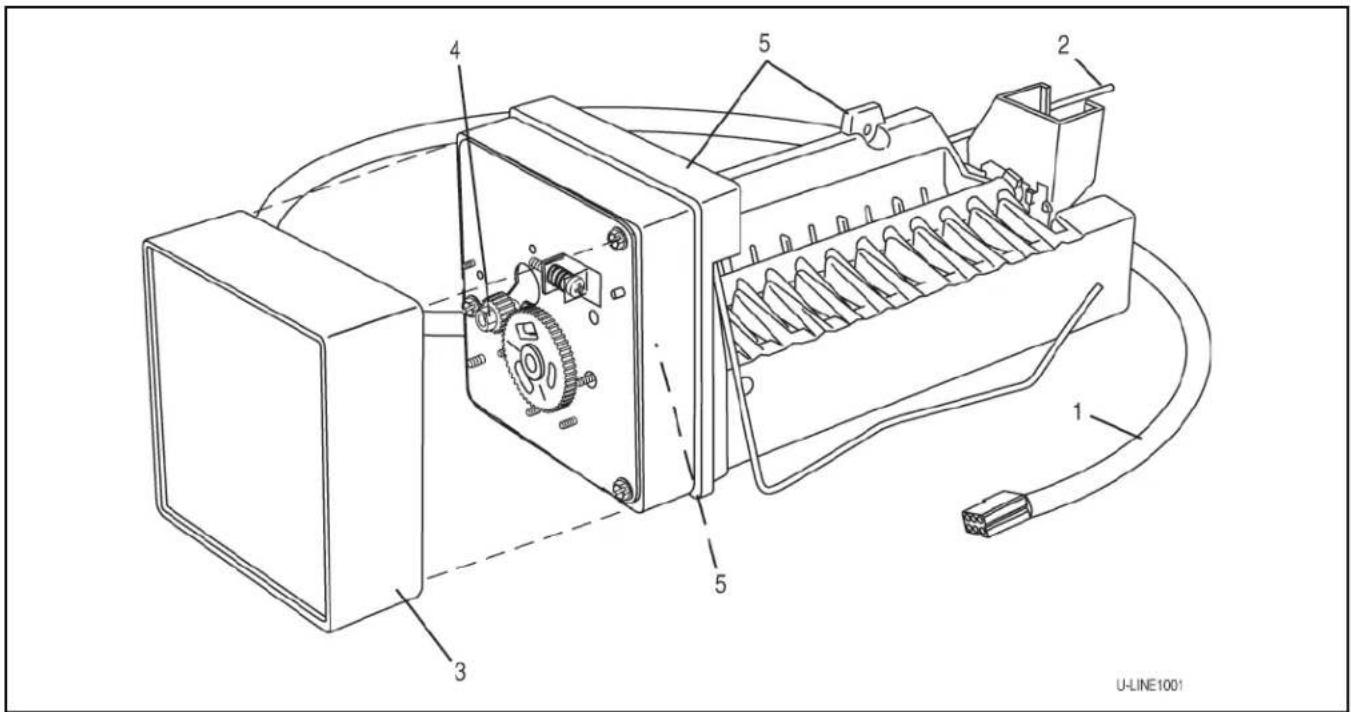
Figure 7. Ice Maker Assembly
SAFETY • INSTALLATION & INTEGRATION • OPERATING INSTRUCTIONS • MAINTENANCE • SERVICE
REPLACING ICE MAKER ASSEMBLY (ALL MODELS EXCEPT CO29F)
- Remove back panel.
- Disconnect all wires at bell connectors (5 wires-Models BI95, BI98 or SP18; or Plug-Models).
- Remove capillary tube from sensing tube on ice maker assembly (2).
-
Remove water inlet tube.
-
Remove front cover (3)
-
Advance ejector blades to the 3:00 position by turning the 5/16" hex head on the small brass gear counterclockwise (4).
-
Remove two screws from the side wall of evaporator (5).
-
Remove screws from the bottom of the evaporator plate.
-
Remove ice maker assembly from evaporator shelf.
-
Clean alumilastic from evaporator shelf.
-
Apply 1/4" layer of fresh alumilastic to heater side of new ice maker.
-
Replace parts in reverse order of removal.
-
Reconnect all wires.
-
Insert capillary tube into ice maker sensing tube.
-
Insert water inlet tube.
-
Apply permagum to all exit holes. Mount back panel.
-
Mount the back panel.
-
Plug in unit and test.
220 Volt Conversion List
All models listed in this manual are equipped to run on 110/115 volt. This document is a conversion list for the applicable 220 volt parts for the following models:
- SP18
• BI95
• BI98 - SS1095
| 110V P/N | 220V P/N | Description |
| 5263-S | 5195 | Fan Motor |
| 80-39015-00 | 628109 | I.M. motor (ice makers) |
| 402 | 619 | Ice maker assembly -Models SP18, BI95, BI98and model SS1095 |
| 402-29/1175 | 620 | Ice maker assembly -Models SP18, BI95, BI98and model SS1095 |
| 2552A | 2555A | Water valve |
| 5402-S | 5404-S | Compressor (ice makers) |
| 150 | 650 | Faceplate assembly |
| 5414 | 5418 | Relay |
| 5413 | 5417 | Overload |
SAFETY • INSTALLATION & INTEGRATION • OPERATING INSTRUCTIONS • MAINTENANCE • SERVICE
Defrost
These units are manual defrost.
To defrost unit remove ice bucket. Turn unit off. Use toweling inside to absorb water as it melts down. This will help prevent water from getting onto customer's floor.
The defrost duration is dependent upon usage or climate. Typically, defrosting is needed approximately every 6 weeks.
SAFETY • INSTALLATION & INTEGRATION • OPERATING INSTRUCTIONS • MAINTENANCE • SERVICE
Replace Ice Maker
The new ice maker assembly you have received will have a plug-in connection.
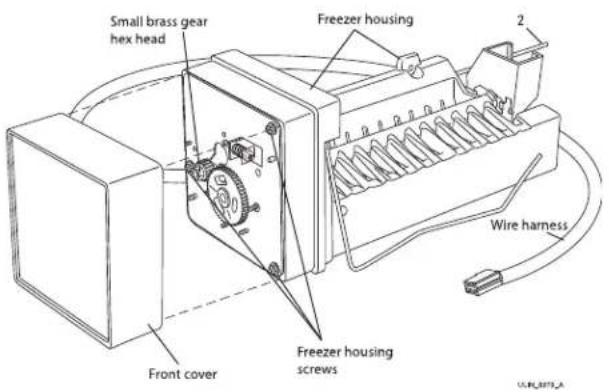
REMOVE ICE MAKER
- Unplug the unit.

WARNING
SHOCK HAZARD — Never attempt to repair or perform maintenance on the unit until the electricity has been disconnected.
- Disconnect ice maker wire harness at plug.
- Disconnect thermistor plug.
- Remove water inlet tube.
- Remove three screws from wall of freezer housing.
- Remove ice maker assembly.
INSTALL ICE MAKER
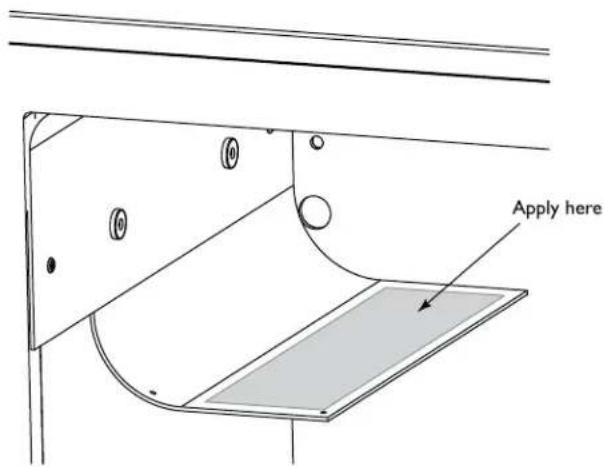
- If ice maker sits on evaporator (as shown) be sure to apply the included Alumilastic paste.
- Reconnect plug.
- Reconnect thermistor plug.
- Re-install screws.
- Insert water inlet tube.
- Apply Permagum ^® to all exit holes on back of unit.
- Install back panel.
- Plug in unit and test.
- USER GUIDE & SERVICE MANUAL
- Contents
- Safety
- Installation
- Service Extended
- Operating Instructions
- Maintenance
- Service
- WELCOME TO U-LINE
- PRODUCT INFORMATION
- PROPERTY DAMAGE / INJURY CONCERNS
- GENERAL INQUIRIES
- SERVICE & PARTS ASSISTANCE
- CONNECT WITH US
- Safety and Warning
- NOTICE
- SAFETY ALERT DEFINITIONS
- DANGER
- WARNING
- CAUTION
- Disposal and Recycling
- Environmental Requirements
- Electrical
- Cutout Dimensions
- PREPARE SITE
- Side-by-Side Installation
- Side-by-Side Installation with Bracket
- Water Hookup
- PREPARE PLUMBING
- Water Supply Connection
- Anti-Tip Bracket
- General Installation
- LEVELING INFORMATION
- INSTALLATION TIP
- Removing the grille
- Installing the grille
- Door Swing
- Door Stop
- First Use
- Ice
- ICE MAKER OPERATION
- NEVER use an ice pick, knife or other sharp instrument to separate cubes. Shake the ice bucket instead.
- ICE MAKER ADJUSTMENT
- Ice Cube Thickness Adjustment
- Interval - As Required
- ADJUSTING ICE HARVEST
- Airflow and Product Loading
- Cleaning
- EXTERIOR CLEANING
- Vinyl Clad (Black or White) Models
- Stainless Models
- Do not clean with steel wool pads.
- Do not use stainless steel cleaners or polishes on any glass surfaces.
- Using abrasive pads such as ScotchBrite™ will cause the graining in the stainless to become blurred.
- Rust not cleaned up promptly can penetrate the surface of the stainless steel and complete removal of the rust may not be possible.
- Integrated Models
- INTERIOR CLEANING
- Do not use any solvent-based or abrasive
- DEFROSTING
- Manual Defrost Models
- To defrost:
- Cleaning Condenser
- INTERVAL - EVERY SIX MONTHS
- Extended Non-Use
- VACATION/HOLIDAY, PROLONGED SHUTDOWN
- WINTERIZATION
- Troubleshooting
- BEFORE CALLING FOR SERVICE
- IF SERVICE IS REQUIRED
- TROUBLESHOOTING GUIDE
- ELECTROCUTION HAZARD. Never attempt to repair or perform maintenance on the unit before disconnecting the main electrical power.
- To check the actual product temperature in the unit:
- Causes which affect the internal temperatures of the cabinet include:
- U-Line Corporation (U-Line) Limited Warranty
- One Year Limited Warranty
- Available Second Year Limited Warranty
- Five Year Sealed System Limited Warranty
- Terms
- Product Liability
- Warranty Claims
- Ordering Replacement Parts
- System Diagnosis Guide
- Compressor Specifications
- Troubleshooting - Extended
- SPECIFIC ERRORS & ISSUES
- Harvest-1 Cycle
- HARVEST-2 CYCLE
- WATER FILL CYCLE
- EJECT CYCLE
- TEMPERATURE CONTROL SPECIFICATIONS
- LIMIT SWITCH SPECIFICATIONS
- REPLACING ICE MAKER ASSEMBLY (CO29F ONLY)
- REPLACING ICE MAKER ASSEMBLY (ALL MODELS EXCEPT CO29F)
- Volt Conversion List
- Defrost
- Replace Ice Maker
- REMOVE ICE MAKER
- INSTALL ICE MAKER
Brand : U-Line
Model : BI1215
Category : Ice cream maker