UMCR014-SS02A - Ice cream maker U-Line - Free user manual and instructions
Find the device manual for free UMCR014-SS02A U-Line in PDF.


| Product Type | Ice Maker |
| Brand | U-Line |
| Model | UMCR014-SS02A |
| Power Supply | 220-240 VAC, 50 Hz, 8 A |
| Refrigerant | R600a (Isobutane) |
| Defrost Type | Manual defrost |
| Ice Cube Thickness Adjustment | Adjustable via screw on ice maker |
| Ice Production Shut-Off | Automatic when bin full (bin arm) |
| Condenser Cleaning Interval | Every 6 months |
| Door Reversible | Yes (field reversible) |
| Door Latch | Included for travel/propping |
| Grille | Removable for cleaning |
| Water Supply | 1/4" compression fitting, 20-120 psi |
| Ice Bucket | Removable, not dishwasher safe |
| Warranty | 1 year parts & labor; 5 years sealed system |
| Dimensions (approximate) | 14.5" W x 24" D x 34.5" H |
| Installation Type | Built-in or freestanding |
| Outdoor Use | Indoor only |
Frequently Asked Questions - UMCR014-SS02A U-Line
User questions about UMCR014-SS02A U-Line
0 question about this device. Answer the ones you know or ask your own.
Ask a new question about this device
Download the instructions for your Ice cream maker in PDF format for free! Find your manual UMCR014-SS02A - U-Line and take your electronic device back in hand. On this page are published all the documents necessary for the use of your device. UMCR014-SS02A by U-Line.
USER MANUAL UMCR014-SS02A U-Line
USER GUIDE & SERVICE MANUAL

Model: UMCR014-SS02A
Click on any section below to jump directly there
Table of Contents
| Intro | Warranty Claims |
| Parts | |
| Safety | Ordering Replacement Parts |
| Safety and Warning | R600a Specifications |
| Disposal And Recycling | System Diagnosis Guide |
| Compressor Specifications | |
| Installation | Troubleshooting Extended |
| Environmental Requirements | Defrost |
| Electrical | Replace Ice Maker |
| Cutout & Product Dimensions | Warranty |
| Water Hookup | |
| General Installation | |
| Grille Installation | |
| Door Swing | |
| Door Adjust |
Maintenance
Door Latch
Cleaning
Cleaning Condenser
Extended Non-Use
Operating Instructions
First Use
Ice
Airflow and Product Loading
Service
Troubleshooting
Wire Diagram
Product Liability
WELCOME TO U-LINE
Congratulations on your U-Line purchase! Your product comes from a company with decades of premium modular ice making, refrigeration, and wine preservation experience. U-Line creates products focused on functionality, style, and inspired innovations — paying close attention to even the smallest details. Applications include residential, outdoor, ADA height compliant, marine, and commercial. Product categories include Beverage Centers, Wine Refrigerators, Ice Machines, Refrigerators, Freezers, and Dispensers. Our advanced refrigeration systems, large and flexible capacities, and clean integrated look are what makes our products Built-In to Stand Out®. Since 2014, U-Line has been part of the Middleby family of brands. Products are designed, engineered, and assembled in Milwaukee, Wisconsin, USA, and select products are available worldwide.
U-Line — RIGHT PRODUCT. RIGHT PLACE. RIGHT TEMPERATURE.®
PRODUCT INFORMATION
Looking for additional information on your product? User Guides, Spec Sheets, CAD Drawings, and Product Warranty information are available digitally on u-line.com.
PROPERTY DAMAGE / INJURY CONCERNS
In the unlikely event property damage or personal injury is suspected related to a U-Line product, please take the following steps:
- U-Line Customer Care must be contacted immediately at +1.414.354.0300.
- Service or repairs performed on the unit without prior written approval from U-Line is not permitted. If the unit has been altered or repaired in the field without prior written approval from U-Line, claims will not be eligible.
GENERAL INQUIRIES
U-Line Corporation
8900 N. 55th Street
Milwaukee, Wisconsin 53223 USA
Monday - Friday 8:00 am to 4:30 pm CST
T: +1.414.354.0300
Email: sales@u-line.com
u-line.com
SERVICE & PARTS ASSISTANCE
Monday - Friday 8:00 am to 4:30 pm CST
T: +1.414.354.0300
Service Email: onlineservice@u-line.com
Parts Email: onlineparts@u-line.com
CONNECT WITH US

Designed, engineered and assembled in WI, USA
Safety and Warning
NOTICE
Please read all instructions before installing, operating, or servicing the appliance.
Use this appliance for its intended purpose only and follow these general precautions with those listed throughout this guide:
SAFETY ALERT DEFINITIONS
Throughout this guide are safety items labeled with a Danger, Warning, or Caution based on the risk type:

DANGER
Danger means that failure to follow this safety statement will result in severe personal injury or death.

WARNING
Warning means that failure to follow this safety statement could result in serious personal injury or death.

CAUTION
Caution means that failure to follow this safety statement may result in minor or moderate personal injury, property, or equipment damage.
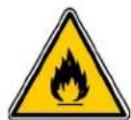
Caution: risk of fire, flammable refrigerant and blowing gas used.
GENERAL PRECAUTIONS
Use this appliance for its intended purpose only and follow these general precautions with those listed throughout this guide.
This appliance is not intended for use by persons (including children) with reduced physical, sensory or mental capabilities, or lack of experience or knowledge, unless they have been given supervision or instruction concerning use of the appliance by a person responsible for their safety.
Children should be supervised to ensure that they do not play with this appliance.

DANGER
This unit contains R600a (Isobutane) which is a flammable hydrocarbon. It is safe for regular use. Do not use sharp objects to expedite defrosting. Do not service without consulting the "R600a specifications" section included in the User Guide. Do not damage the refrigerant circuit.

WARNING
Service must be done by factory authorized service personnel. Any parts shall be replaced with like components. Failure to comply could increase the risk of possible ignition due to incorrect parts or improper service.
CALIFORNIA PROPOSITION 65
This product contains chemicals known to the state of California to cause cancer and birth defects or other reproductive harm.
www.P65warnings.CA.gov

CAUTION
This equipment is to be installed with adequate backflow protection to comply with applicable federal, state and local codes.

WARNING
Keep ventilation openings, in the appliance enclosure or in the built-in structure, clear of obstruction.
Please accord to local regulations regarding disposal of the appliance for its flammable refrigerant and blowing gas. Before you scrap the appliance, please remove the doors to prevent child entrapment.
Do not store explosive substances such as aerosol cans with a flammable propellant in this appliance.

WARNING
Do not use mechanical devices or other means to accelerate the defrosting process, other than those recommended by the manufacturer.

WARNING
Do not damage the refrigerating circuit.
This warning is only applicable for appliances with refrigerating circuits which are accessible by the user.

WARNING
Do not use electrical appliances inside the food/ice storage compartments unless they are of the type recommended by the manufacturer.

WARNING
When positioning the appliance, ensure the supply cord is not trapped or damaged.

WARNING
Do not locate multiple portable socket-outlets or portable power supplies at the rear of the appliance.

WARNING
DO NOT use medical devices or other means to accelerate the defrosting process other than those recommended by the manufacturer. DO NOT use an ice pick or other sharp instrument to help speed up defrosting. These instruments can puncture the inner lining or damage the cooling unit. DO NOT use any type of heater to defrost. Using a heater to speed up defrosting can cause personal injury and damage to the inner lining.
NOTICE
Do not lift unit by door handle.
Never install or operate the unit behind closed doors. Be sure front grille is free of obstruction. Obstructing free airflow can cause the unit to malfunction and will void the warranty.
Failure to clean the condenser every six months can cause the unit to malfunction. This could void the warranty.
Allow unit temperature to stabilize for 24 hours before use.
Do not block any internal fans.
Use only genuine U-Line replacement parts. Imitation parts can damage the unit, affect its operation or performance and may void the warranty.
This appliance is intended to be used in household and similar applications such as:
• Staff kitchen areas in shops, offices and other working environments.
- Farm houses and by clients in hotels, motels and other residential type environments.
• Bed and breakfast type environments.
• Catering and similar non-retail applications.
Disposal and Recycling

DANGER
RISK OF CHILD ENTRAPMENT. Before you throw away your old refrigerator or freezer, take off the doors and leave shelves in place so children may not easily climb inside.
If the unit is being removed from service for disposal, check and obey all federal, state, and local regulations regarding the disposal and recycling of refrigeration appliances, and follow these steps completely:
- Remove all consumable contents from the unit.
- Unplug the electrical cord from its socket.
- Remove the door(s)/drawer(s).
Environmental Requirements
This model is intended for indoor/interior applications only and is not to be used in installations that are open/exposed to natural elements.
This unit is designed to operate between 50°F (10°C) and 100°F (38°C). Higher ambient temperatures may reduce the unit's ability to reach low temperatures and/or reduce ice production on applicable models.
For best performance, keep the unit out of direct sunlight and away from heat generating equipment.
In climates where high humidity and dew points are present, condensation may appear on outside surfaces. This is considered normal. The condensation will evaporate when the humidity drops.
CAUTION
Damages caused by ambient temperatures of 40^ F ( 4^ C) or below are not covered by the warranty.
Electrical

WARNING
SHOCK HAZARD - Electrical Grounding Required. Never attempt to repair or perform maintenance on the unit until the electricity has been disconnected.
Never remove the round grounding prong from the plug and never use a two-prong grounding adapter.
Altering, cutting or removing power cord, removing power plug, or direct wiring can cause serious injury, fire, loss of property and/or life, and will void the warranty.
Never use an extension cord to connect power to the unit.
Always keep your working area dry.
If the detachable type electric supply cord is damaged, it must be replaced by an equivalent cord available from the manufacturer or its service agent.
NOTICE
Electrical installation must observe all state and local codes. This unit requires connection to a grounded (three-prong), polarized receptacle that has been placed by a qualified electrician.
The unit requires a grounded and polarized 220-240 VAC, 50 Hz, 8A power supply (normal household current). An individual, properly grounded branch circuit or circuit breaker is recommended. A GFCI (ground fault circuit interrupter) is usually not required for fixed location appliances and is not recommended for your unit because it could be prone to nuisance tripping. However, be sure to consult your local codes.
See CUTOUT & PRODUCT DIMENSIONS for recommended receptacle location.
Cutout & Product Dimensions
PREPARE SITE
Your U-Line product has been designed for either freestanding or built-in installation. When built-in, your unit does not require additional air space for top, sides, or rear. However, the front grille must NOT be obstructed, and clearance is required for an electrical connection in the rear.

CAUTION
Unit can NOT be installed behind a closed cabinet door.
CUTOUT DIMENSIONS
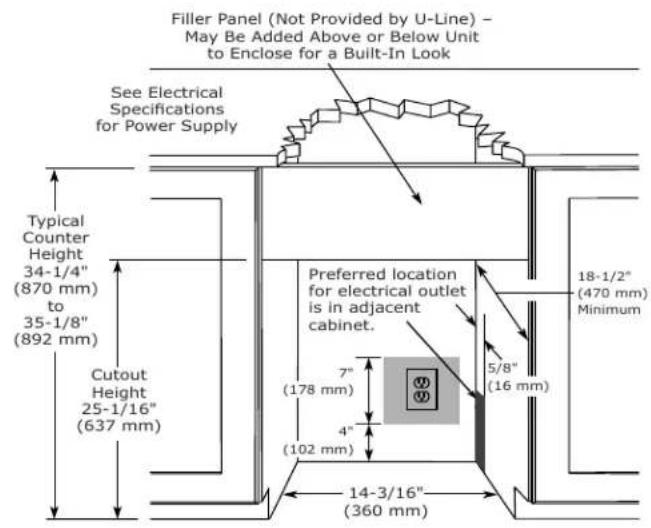
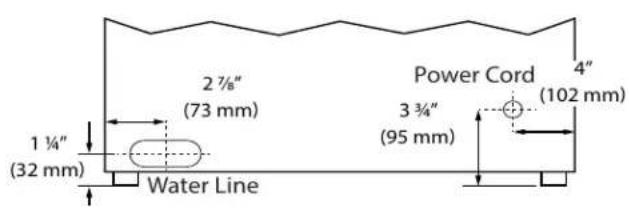
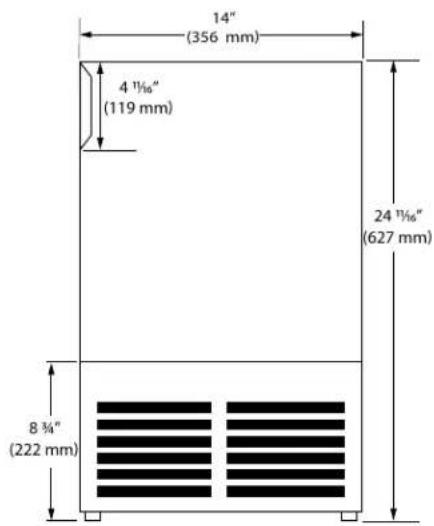
PRODUCT DIMENSIONS
REAR
FRONT
TOP
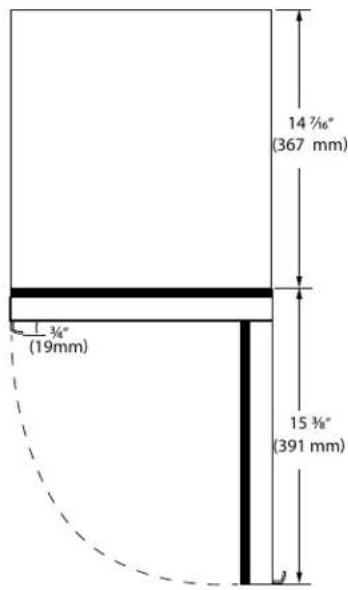
SIDE
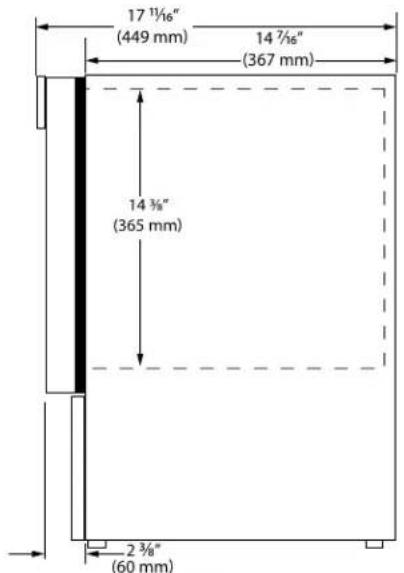
Water Hookup
PREPARE PLUMBING
The water valve uses a standard 1/4" (6.35 mm) compression fitting. U-Line recommends using accessory water hook up kit - part # ULAWATERHOOKUP. The kit includes a 10' (3 m) braided flexible water supply line and a brass hose fitting.

CAUTION
Plumbing installation must observe all state and local codes. All water and drain connections MUST BE made by a licensed/qualified plumbing contractor. Failure to follow recommendations and instructions may result in damage and/or harm.
Water Supply Connection
When connecting the water supply, please note the following:
- Before installing the unit and connecting to the cold water supply, review the local plumbing codes.
- The water pressure should be between a minimum of 20 and a maximum of 120 psi (138 and 827 kPa).
- The water line MUST have a shut-off valve in the supply line.
- The water line should be looped into 2 coils. This will allow the unit to be removed for cleaning and servicing. Make certain that the tubing is not pinched or damaged during installation.

WARNING
Connect to potable water supply only.

CAUTION
Do not use any plastic water supply line. The line is under pressure at all times. Plastic may crack or rupture with age and cause damage to your home.
Do not use tape or joint compound when attaching a braided flexible water supply line that includes a rubber gasket. The gasket provides an adequate seal – other materials could cause blockage of the valve.
Failure to follow recommendations and instructions may result in damage and/or harm, flooding or void the product warranty.
Use new hose set. Do not reuse old hose set.

CAUTION
Turn off water supply and disconnect electrical supply to unit prior to installation.
Use caution when handling back panel. The edges could be sharp.
Turn off water supply and disconnect electrical supply to product prior to attempting installation.
-
Locate water valve inlet and connect to valve.
-
Remove the back panel.
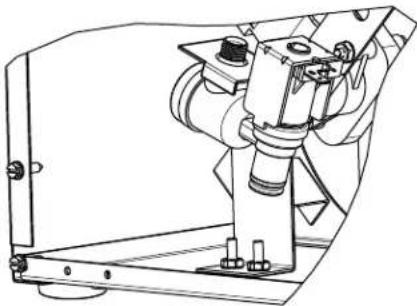
natural_image
Technical line drawing of a mechanical device with no visible text or symbols-
Break away filler feature in bushing with flat screwdriver.
-
Thread water line through back panel hole (with bushing).
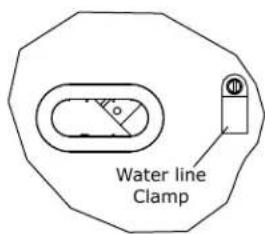
Note: Orientation of hole and location of water line clamp may be different depending on model.
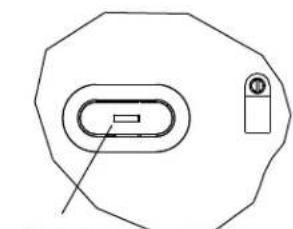
natural_image
Pure technical diagram of a mechanical component with no text or symbolsRemove with flat screwdriver
- Turn on water supply and check for leaks.
- Reinstall back panel.
- Loosen screw on clamp, thread water line through water line clamp, tighten screw.
General Installation
LEVELING INFORMATION
NOTICE
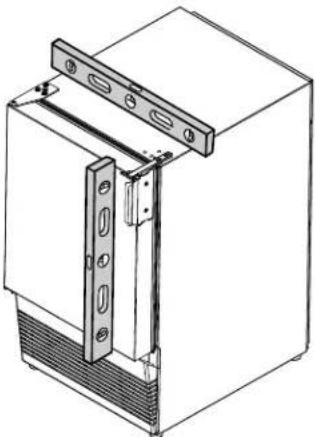
Because these units do not have leveling legs, it is extremely important that they sit on a level surface. If they are not level, the ice mold will not fill evenly.
Use a level to confirm the unit is level. Level should be placed along top edge and side edge as shown.
natural_image
Technical line drawing of a mechanical cabinet or enclosure with mounting brackets and a side panel (no text or symbols)INSTALLATION
- Plug in the power/electrical cord.
- Gently push the unit into position. Be careful not to entangle the cord or water line.
- Re-check the leveling, from front to back and side to side. Make any necessary adjustments.
- Remove interior packing material and wipe out the inside of the unit with a clean, water-dampened cloth.
Grille Installation
REMOVING AND INSTALLING GRILLE

WARNING
Disconnect electric power to the unit before removing the grille.
When using the unit, the grille must be installed.

WARNING
DO NOT touch the condenser fins. The condenser fins are SHARP and can be easily damaged.
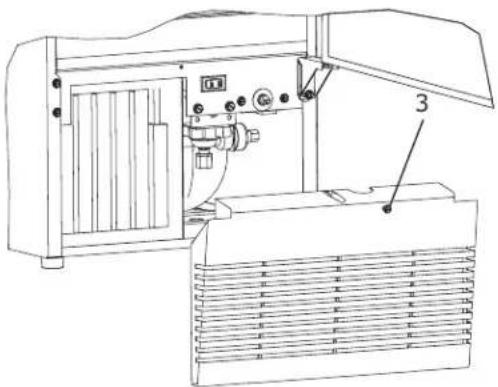
Removing the grille
- Disconnect power to the unit.
- Open unit door.
- Remove the center screw.
- Remove grille by sliding grille up and pulling it toward you.
natural_image
Technical line drawing of an industrial machine with cooling unit and labeled component (no text or symbols beyond label)Installing the grille
- Open unit door.
- Align grille with front of unit slide front tab on grille behind front of base.
- Install center screw.
- Reconnect power to the unit.
Door Swing
Stainless Steel, Black and White
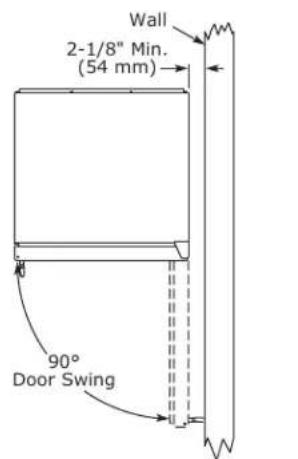
This unit requires zero clearance for the door to open 90° when installed adjacent to cabinets. If installing the unit next to a wall, the door handle requires 2-1/8" (54mm) clearance.
Door Adjustments
DOOR ALIGNMENT AND ADJUSTMENT
Align and adjust the door if it is not level or is not sealing properly. If the door is not sealed, the unit may not cool properly, or excessive frost may form in the interior.
NOTICE
Properly aligned, the door's gasket should be firmly in contact with the cabinet all the way around the door (no gaps). Carefully examine the door's gasket to ensure that it is firmly in contact with the cabinet. Also make sure the door gasket is not pinched on the hinge side of the door.
To align and adjust the door:
- Loosen (do not remove) top and bottom hinge screws using a Torx T-25 screwdriver on the top and a 1/4" socket on the bottom.
- Align door squarely with cabinet.
- Make sure gasket is firmly in contact with cabinet all the way around the door (no gaps).
- Tighten bottom hinge screws.
- Tighten top hinge screws.
REVERSING THE DOOR
Location of the unit may make it desirable to mount the door on the opposite side of the cabinet.
The hinge hardware will be removed and reinstalled on the opposite side of the cabinet.
Remove door latch assembly
Remove door latch assembly and reinstall on opposite side of door (see DOOR LATCH).
TO REVERSE THE DOOR
Remove top hinge and door:
- Hold door to keep it from falling.
- Remove top hinge from cabinet using a Torx T-25 screwdriver to remove three screws.
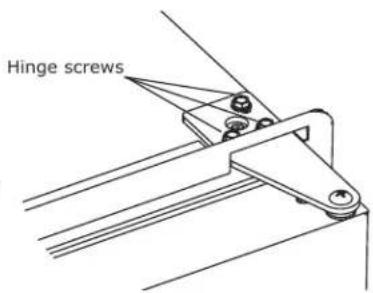
- Remove door by tilting forward and lifting door off bottom hinge. Retain shoulder washers; they will be reused.
- Remove three screws from hinge holes on the opposite side.
- Install three screws into holes where the hinge was removed.
Move bottom hinge:
- Remove bottom hinge from cabinet using a 1/4" socket.
Note: If unit is equipped with a plastic grille, remove the top center screw and the bottom screw on the hinge first. Remove grille and other hinge screw, and proceed to Step 2.
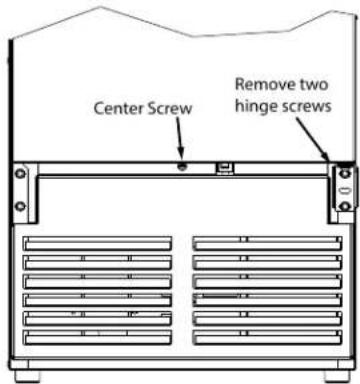
- Remove corresponding screws on opposite side of cabinet.
- Install bottom hinge on opposite side.
Prepare door:
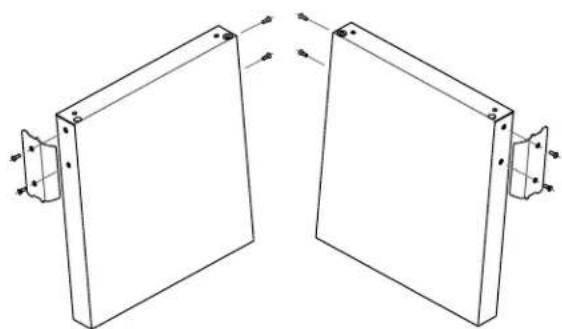
- Take out the two screws holding the stainless handle. Remove handle and reinstall the screws into the holes.
- On the opposite side of the door, remove the two handle screws and use them to install handle.
natural_image
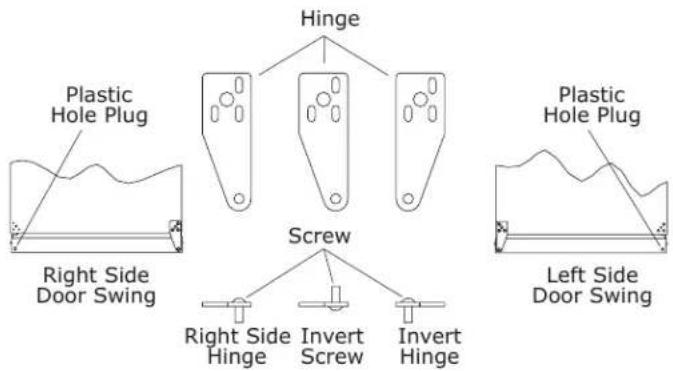
Technical line drawing of two identical rectangular panels with mounting holes and directional arrows indicating alignment (no text or symbols)- Remove plastic plug on top of door and save for re-installation on opposite side.
- Relocate plastic bushings on top and bottom of door to opposite side. Clean out bushing hole in door bottom with a screwdriver if necessary.
Install top hinge:
- Remove pivot screw from top hinge, invert screw and reinstall pivot screw in top hinge.
- Lift the door onto the bottom hinge.
- Align edge of the hinge with the outer edge of the unit.
- Tighten three screws.
- Insert plastic plug in opposite end of door.
Install grille if applicable.
Align and adjust the door:
Align and adjust the door (see DOOR ALIGNMENT AND ADJUSTMENT)
Door Latch
The door latch assembly included with your unit can be installed to prevent the door from opening when the vehicle is in motion.
To install, perform the following:
- Remove the two outer most screws from the non-hinge side.
- Place spacer (2) over mounting holes. Place latch (1) on top of spacer (2).
Note: Spacer (2) only required if included with unit.
- Re-install the screws, but do not tighten all the way.
- Verify door latch engagement and adjust as necessary.
- Tighten screws.
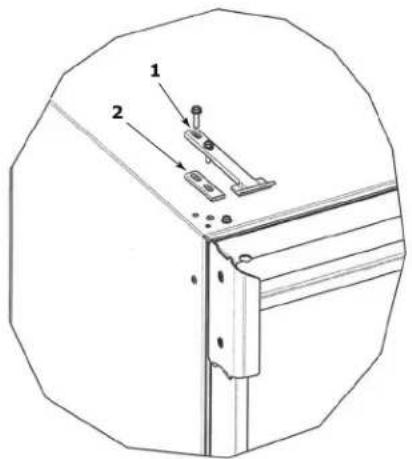
Door latch can be used to prop door open approximately 1/2" (13 mm) when unit is not in use.
First Use
Initial startup requires no adjustments.
NOTICE
U-Line recommends discarding the ice produced during the first two to three hours of operation to avoid possible dirt or scale that may dislodge from the water line.
To turn the unit on or off:
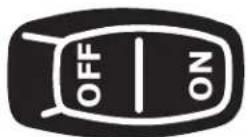
Press the rocker switch located inside the door on the front panel, or behind the grille.
Ice
ICE MAKER OPERATION
When the ice bucket is full, the ice making mechanism will shut off. However, the refrigeration system will continue to cool and maintain the ice supply.
NOTICE
Do not place cans or bottles in the ice compartment because they will freeze.
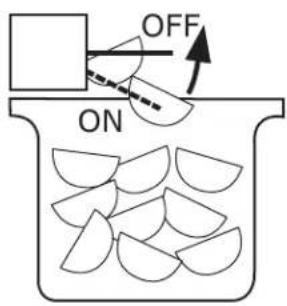
To turn off ice production: Raise the bin arm into an upright and locked position. The unit will preserve temperature for ice storage.
NOTICE
If not intending to use the ice maker, turn the water supply valve off. It is also important to raise the bin arm of the ice maker (see above). Failure to raise the bin arm may result in damage to the water valve.
Certain sounds are normal during the unit's operation. You may hear the compressor or fan motor, the water valve, or ice dropping into the ice bucket.
CAUTION
NEVER use an ice pick, knife or other sharp instrument to separate cubes. Shake the ice bucket instead.
During periods of limited use or high ambient temperatures, it is common for cubes to fuse together. Gently shake the bucket to break apart cubes. If not using the ice maker regularly, empty the ice bucket periodically to ensure fresh cubes.
It is normal for cubes to appear cloudy. The cause is air trapped in the water because of fast freezing. It is not caused by the health, taste or chemical make up of the water. It is the same air that is in every glass of water you drink.
Remove the ice bucket for emptying and cleaning. To remove the ice bucket, raise the bin arm and remove the bucket from the ice compartment. Use the ice bucket for ice storage only.
ICE MAKER ADJUSTMENT
Ice Cube Thickness Adjustment
Interval - As Required
On ice maker equipped models, adjust the cube size by changing water amount injected into the ice maker assembly as follows:
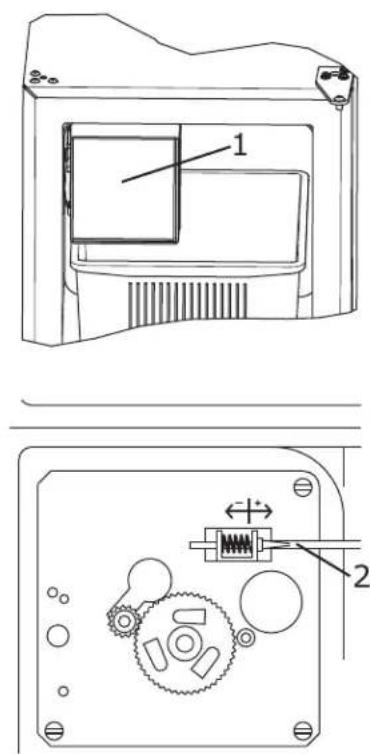
- Remove the ice maker assembly cover (1).
- Find the adjusting screw on the ice maker assembly control box (2). The adjusting screw is just below the minus (-) and plus (+) signs on the control box.

CAUTION
Too large of an adjustment to the screw can cause the water to overflow the ice maker and can cause property damage.
- Turn the adjusting screw toward the minus (-) sign (clockwise) for smaller cubes or toward the plus (+) sign (counterclockwise) for larger cubes.
- Install the ice maker assembly cover.
ADJUSTING ICE HARVEST
- Remove the front grille (see GRILLE INSTALLATION).
- Using a flat tip screwdriver, turn the adjusting screw (3) a small increment clockwise for a COLDER setting (slower ice production) or counterclockwise for a WARMER setting (faster ice production).
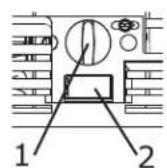
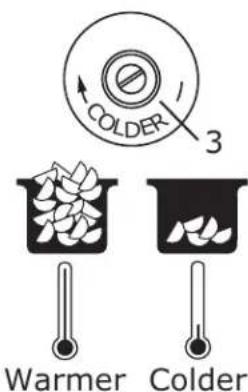
- Reinstall the front grille (two screws).
Airflow and Product Loading
NOTICE
The unit requires proper airflow to perform at its highest efficiency. Do not block the front grille at any time, or the unit will not perform as expected. Do not install the unit behind a door.
Depending on the model, your grille may not match exactly with the below illustrations.
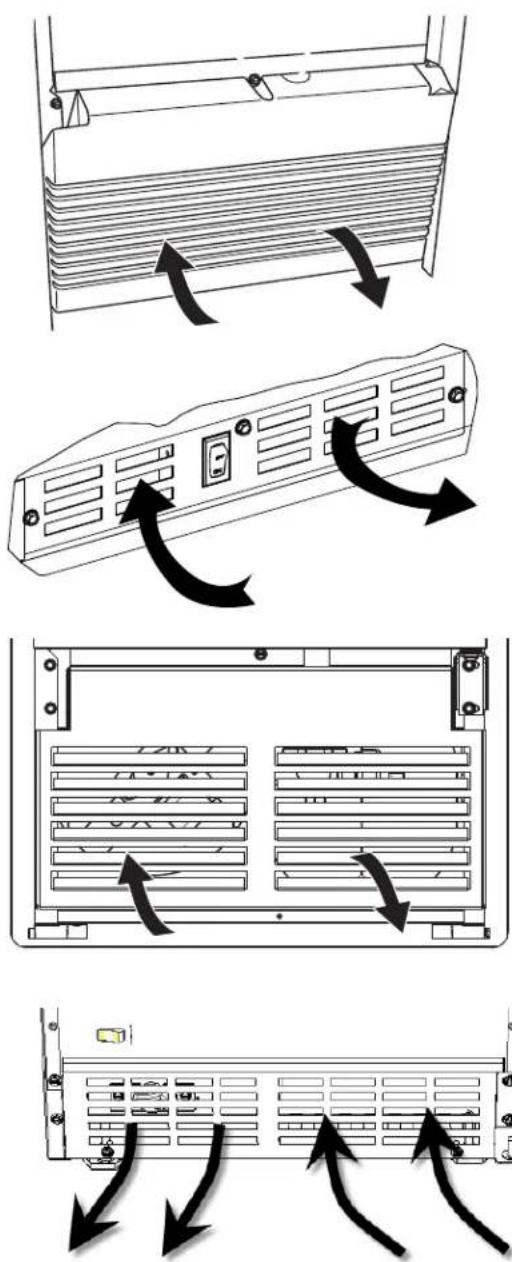
Cleaning
EXTERIOR CLEANING
Vinyl Clad (Black or White) Models
Clean surfaces with a mild detergent and warm water solution. Do not use solvent-based or abrasive cleaners. Use a soft sponge and rinse with clean water. Wipe with a soft, clean towel to prevent water spotting.
Clean any glass surfaces with a non-chlorine glass cleaner.
Stainless Models
Stainless door panels, handles and frames can discolor when exposed to chlorine gas, pool chemicals, saltwater or cleaners with bleach.
Keep your stainless unit looking new by cleaning with a good quality all-in-one stainless steel cleaner and polish monthly. For best results use Claire® Stainless Steel Polish and Cleaner. Comparable products are acceptable. Frequent cleaning will remove surface contamination that could lead to rust. Some installations may require cleaning weekly.
Do not clean with steel wool pads.
Do not use stainless steel cleaners or polishes on any glass surfaces.
Clean any glass surfaces with a non-chlorine glass cleaner.
Do not use cleaners not specifically intended for stainless steel on stainless surfaces (this includes glass, tile and counter cleaners).
If any surface discoloring or rusting appears, clean it quickly with Bon-Ami® or Barkeepers Friend Cleanser® and a nonabrasive cloth. Always clean with the grain. Always finish with Claire® Stainless Steel Polish and Cleaner or comparable product to prevent further problems.
Using abrasive pads such as ScotchBrite™ will cause the graining in the stainless to become blurred.
Rust not cleaned up promptly can penetrate the surface of the stainless steel and complete removal of the rust may not be possible.
Integrated Models
To clean integrated panels, use household cleaner per the cabinet manufacturer's recommendations.
INTERIOR CLEANING
Disconnect power to the unit.
Clean the interior and all removed components using a mild nonabrasive detergent and warm water solution applied with a soft sponge or non-abrasive cloth.
Rinse the interior using a soft sponge and clean water.
Do not use any solvent-based or abrasive
cleaners. These types of cleaners may transfer taste to the interior products and damage or discolor the interior.
DEFROSTING
Manual Defrost Models
This unit is a manual defrost model and will require occasional defrosting. When there is build-up of 1/4" (6 mm) or more of frost, manually defrost the unit.

CAUTION
DO NOT use an ice pick or other sharp instrument to help speed up defrosting. These instruments can puncture the inner lining or damage the cooling unit. DO NOT use any type of heater to defrost. Using a heater to speed up defrosting can cause personal injury and damage to the inner lining.
To defrost:
- Disconnect power to the unit.
- Remove ice bucket and discard ice.
- Place towel or other absorbent material on bottom of ice bin.
- Fill the ice bucket half full with warm, not hot water. This will help the unit defrost faster.
- Place the ice bucket back into the unit on top of the towel or other absorbent material.
- Prop the door in an open position (2 in. [50 mm] minimum).
- After about 1 hour remove the ice bin and discard water.
- Allow the frost to melt naturally.
- After the frost melts completely clean the interior and all removed components. (See INTERIOR CLEANING).
NOTICE
DO NOT clean ice bucket using a dishwasher. The bucket is not dishwasher safe and will be damaged.
- When the interior is dry, reconnect power and turn unit on.
NOTE: To safeguard against contaminates in ice, discard first three batches of ice after defrosting.
Cleaning Condenser
INTERVAL - EVERY SIX MONTHS
To maintain operational efficiency, keep the front grille free of dust and lint, and clean the condenser when necessary. Depending on environmental conditions, more or less frequent cleaning may be necessary.

WARNING
Disconnect electric power to the unit before cleaning the condenser.
NOTICE
DO NOT use any type of cleaner on the condenser unit. Condenser may be cleaned using a vacuum, soft brush, or compressed air.
- Remove the grille. See GRILLE INSTALLATION).
- Clean the condenser coil using a soft brush or vacuum cleaner.
- Install the grille.
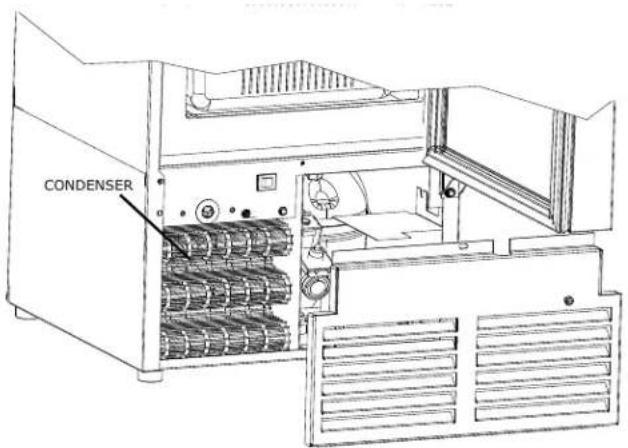
Extended Non-Use
VACATION/HOLIDAY, PROLONGED SHUTDOWN
The following steps are recommended for periods of extended non-use:
- Remove all consumable content from the unit.
- Disconnect the power cord from its outlet/socket and leave it disconnected until the unit is returned to service.
- Turn off the water supply.
- If ice is on the evaporator, allow ice to thaw naturally.
- Clean and dry the interior of the cabinet. Ensure all water has been removed from the unit.
- Disconnect the water and drain line (if applicable) making sure all water is removed from the lines.
- The door must remain open to prevent formation of mold and mildew. Open door a minimum of 2" (50 mm) to provide the necessary ventilation.
WINTERIZATION
If the unit will be exposed to temperatures of 40^ F ( 5^ C) or less, the steps above must be followed. In addition, drain pumps in clear ice machines must be drained according to the following procedure:
- Remove the drain pump from the ice machine.
- Drain the water in the pump's reservoir by turning the pump upside down and allowing the water to drain through the pump's inlet and vent tube fittings.
- After water is drained, reinstall the drain pump and reattach all connections.
For questions regarding winterization, please call U-Line at 414.354.0300.

CAUTION
Damage caused by freezing temperatures is not covered by the warranty.
Do not put anti-freeze in your unit.
Troubleshooting
BEFORE CALLING FOR SERVICE
If you think your U-Line product is malfunctioning, read the CONTROL OPERATION section to clearly understand the function of the control. If the problem persists, read the NORMAL OPERATING SOUNDS and TROUBLESHOOTING GUIDE sections below to help you quickly identify common problems and possible causes and remedies. Most often, this will resolve the problem without the need to call for service.
If your product needs service, please go to www.u-line.com/servicers/ and navigate to the Find a Servicer page to locate a U-Line Authorized servicer. Please make sure to register it at www.U-Line.com/u-lineregistration. If you have any issues following this process you can contact the U-Line Corporation by phone at +1.414.354.0300; please make sure you have your product Model and Serial Numbers handy; They can be found on the Serial number plate located within the interior of your product, most often placed on the ceiling.
All models incorporate rigid foam insulated cabinets to provide high thermal efficiency and maximum sound reduction for its internal working components. Despite this technology, your model may make sounds that are unfamiliar.
Normal operating sounds may be more noticeable because of the unit's environment. Hard surfaces such as cabinets, wood, vinyl or tiled floors and paneled walls have a tendency to reflect normal appliance operating noises.
Listed below are common refrigeration components with a brief description of the normal operating sounds they make. NOTE: Your product may not contain all the components listed.
- Compressor: The compressor makes a hum or pulsing sound that may be heard when it operates.
• Evaporator: Refrigerant flowing through an evaporator may sound like boiling liquid.
- Condenser Fan: Air moving through a condenser may be heard.
- Running Water: As your unit continues to produce ice you will hear water flowing into the collection chambers and running through the evaporator.
TROUBLESHOOTING GUIDE

DANGER
ELECTROCUTION HAZARD. Never attempt to repair or perform maintenance on the unit before disconnecting the main electrical power.
Troubleshooting - What to check when problems occur:
| Problem | Possible Cause and Remedy |
| Unit Does Not Operate. | No electrical supply. Plug unit in or check circuit breaker. |
| Light Remains on When Door is Closed | Turn off light switch if equipped. Check reed switch. |
| Unit Develops Condensation on External Surfaces. | The unit may be exposed to excessive humidity. Moisture will dissipate as humidity levels decrease. |
| Poor Ice Quality. | Ice maker system may be dirty. Clean the ice maker. |
| No Ice Production. | Ensure water is being supplied to the unit. Verify the bin arm on the ice making device is not locked in the up position. If it is, gently push the bin arm down. See Ice Maker Production in the ICE section of this manual. |
| Not Enough Ice. | Ensure the condenser coil is clean and free of any dirt or lint build-up. Check ICE section of this manual for more information. |
| Water in Ice Bin. | Ensure unit is not located in excessive ambient temperatures or in direct sunlight. Ensure the door is closing and sealing properly. Ensure nothing is blocking the front grille, found at the bottom of the unit. Ensure the condenser coil is clean and free of any dirt or lint build-up. |
Wire Diagram
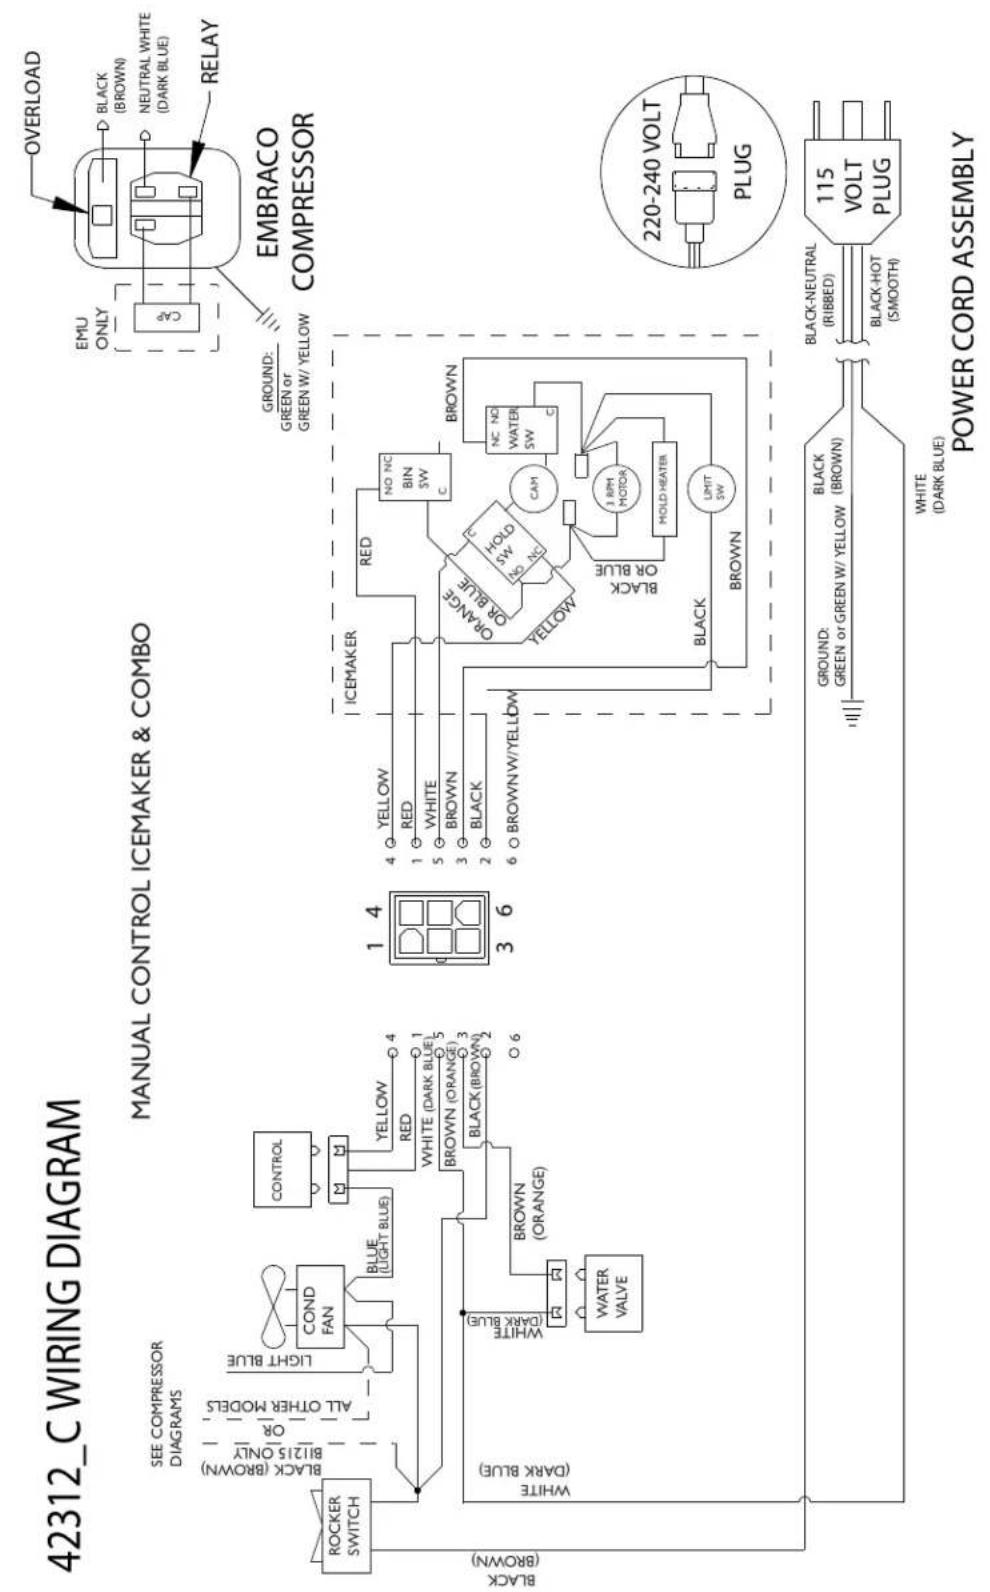
flowchart
graph TD
    A["ROCKER SWITCH"] --> B["SEE COMPRESSOR DIAGRAMS"]
    B --> C["COND FAN"]
    C --> D["CONTROL"]
    D --> E["YELLOW"]
    E --> F["RED"]
    F --> G["WHITE (DARK BLUE)"]
    G --> H["BROWN (ORANGE)"]
    H --> I["BLACK (BROWN)"]
    I --> J["WHITE (DARK BLUE)"]
    J --> K["WATER VALVE"]
    K --> L["BROWN (ORANGE)"]
    L --> M["Black (BROWN)"]
    M --> N["3 6"]

    subgraph ICAMETER
        O["ICEMAKER"] --> P["RED"]
        P --> Q["NO NC BIN SW C"]
        Q --> R["BROWN"]
        S["ORANGE OR BLUE"] --> T["C/C"]
        U["BROWN"] --> V["C/C"]
        W["BROWN"] --> X["C/C"]
        Y["BROWN"] --> Z["C/C"]
        AA["BROWN"] --> AB["C/C"]
        AC["BROWN"] --> AD["C/C"]
        AE["BROWN"] --> AF["C/C"]
        AG["BROWN"] --> AH["C/C"]
        AI["BROWN"] --> AJ["C/C"]
        AK["BROWN"] --> AL["C/C"]
        AM["BROWN"] --> AN["C/C"]
        AO["BROWN"] --> AP["C/C"]
        AQ["BROWN"] --> AR["C/C"]
        AS["BROWN"] --> AT["C/C"]
        AU["BROWN"] --> AV["C/C"]
        AW["BROWN"] --> AX["C/C"]
        AY["BROWN"] --> AZ["C/C"]
        BA["BROWN"] --> BB["C/C"]
        BC["BROWN"] --> BD["C/C"]
        BE["BROWN"] --> BF["C/C"]
        BG["BROWN"] --> BH["C/C"]
        BI["BROWN"] --> BJ["C/C"]
        BK["BROWN"] --> BL["C/C"]
        BM["BROWN"] --> BN["C/C"]
        BO["BROWN"] --> BP["C/C"]
        BQ["BROWN"] --> BR["C/C"]
        BS["BROWN"] --> BT["C/C"]
        BU["BROWN"] --> BV["C/C"]
        BW["BROWN"] --> BX["C/C"]
        BY["BROWN"] --> BZ["C/C"]
        CA["BROWN"] --> CB["C/C"]
        CC["BROWN"] --> CD["C/C"]
        DE["BROWN"] --> DF["C/C"]
        DG["BROWN"] --> DH["C/C"]
        DI["BROWN"] --> DJ["C/C"]
        DK["BROWN"] --> DL["C/C"]
        DV["BROWN"] --> DVB["BROWN"]
    end

    style ICAMETER fill:#f9f9f9,stroke:#333,stroke-width:2px
    style PowerCordAssembly fill:#eef,stroke:#333,stroke-width:2px
Product Liability
Field service technicians are authorized to make an initial assessment in the event of reported damages. If there are any questions about the process involved, the technician should call U-Line for further explanation.
While inspecting for defects or installation issues, photos should be taken to document any damages or issues found.
During the assessment, if the service technician is able to find the source of the damage and it can be resolved by replacement of a part, the servicer is authorized to replace the part in question. The part that caused the damage must be returned to U-Line in its entirety. The part must be clearly labeled with the serial number of the unit it was removed from, the date, and the servicer who removed the part.
If the service technician determines the damage is the result of installation issues (water connection/drain, etc.), the consumer would be notified and the issues shall be resolved at the direction of the consumer.
If damage is evident and the service technician is unable to find the source, U-Line must be contacted at +1.414.354.0300 for further direction.
8900 N. 55th Street • Milwaukee, WI 53223
T: +1.414.354.0300 • F: +1.414.354.5696
Website: www.u-line.com
Right product. Right place.
Right temperature Since 1962.
Warranty Claims
The following information defines the parameters for filing a warranty claim:
- Valid serial number needed
• Valid model number needed - Claims must be submitted online at www.U-LineService.com
- 60 day submittal deadline from date of completed service
• Only one repair or unit per warranty claim - Part order numbers will be required when submitting for warranty labor
Units must be registered prior to warranty submittal. Customers may register at www.U-Line.com. A proof of purchase is required. We also accept the following information to update warranty:
• New construction occupancy documents
- Closing paperwork
• Final billing - Remodel
Warranty parts will be shipped at no charge after U-Line confirms warranty status. Please provide the model, serial number, part number and part description. Some parts will require color or voltage information.
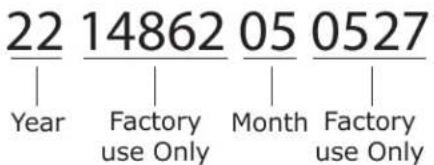
other
| Value | Label | |---|---| | 22 | Year | | 14862 | Factory use Only | | 05 | Month | | 0527 | Factory use Only |Parts
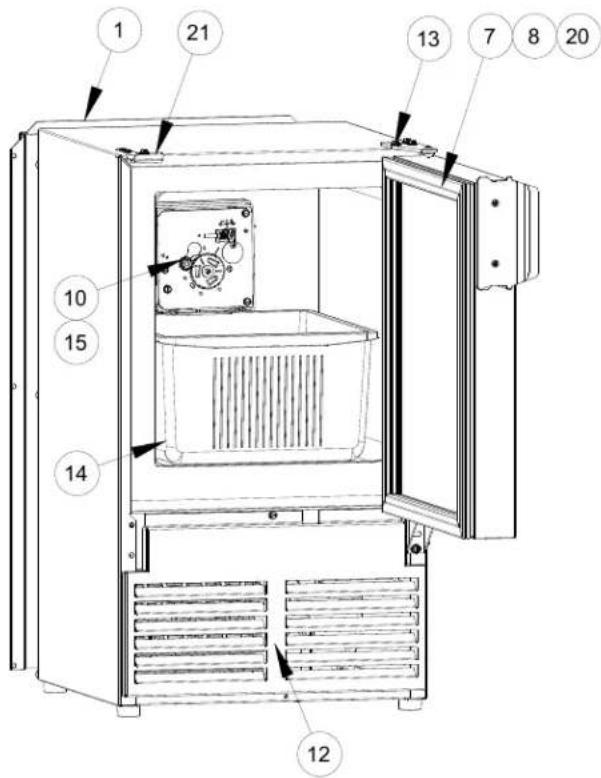
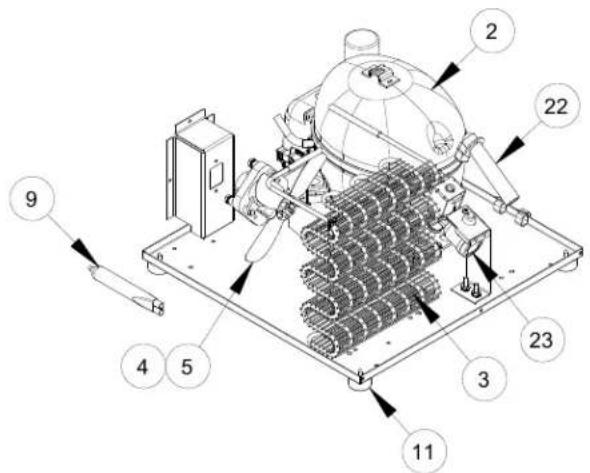
| UMCR014-SS02A | ||
| Item | Description | U-Line P/N |
| 1 | BACK PANEL | 80-54632-00 |
| 2 | COMPRESSOR, 230V UMCR | 80-55671-00 |
| 3 | CONDENSER ASSEMBLY | 80-54601-00 |
| 4 | CONDENSER FAN BLADE | 80-54379-00 |
| 5 | CONDENSER FAN W/BLADE | 80-54378-00 |
| 6 | CONTROL ASSEMBLY, MCR014 * | 80-55673-01 |
| 7 | DOOR ASSEMBLY, UMCR014, SS | 80-55673-00 |
| 8 | DOOR GASKET, 14" | 80-55673-02 |
| 9 | DRIER | 80-54055-00 |
| 10 | FACEPLATE 230V, R600 | 80-54523-02 |
| 11 | FEET (4) | 80-54529-00 |
| 12 | GRILLE W/SCREWS | 80-54657-00 |
| 13 | HINGES W/SCREWS | 80-54574-00 |
| 14 | ICE BUCKET | 80-54611-00 |
| 15 | ICEMAKER, 230V, R600, MANUAL | 80-55669-01 |
| 16 | PACKAGING * | 80-54612-00 |
| 17 | POWER CORD, INTERNAL (230 V) * | 80-55519-04 |
| 18 | WIRE ASSEMBLY, CONTROL * | 80-55638-11 |
| 19 | ROCKER SWITCH * | 80-55603-00 |
| 20 | TRAVEL HANDLE W/SCREWS | 80-54607-00 |
| 21 | TRAVEL LATCH ASSEMBLY | 80-54572-00 |
| 22 | WATER LINE ASSEMBLY | 80-54613-00 |
| 23 | WATER VALVE ASSEMBLY | 80-54630-00 |
* NOT PICTURED
Ordering Replacement Parts
Parts may be ordered online at www.U-Line.com
See our contact information below:
www.U-LineService.com (with service login)
Phone Number: +1.414.354.0300
NOTICE
Use only genuine U-Line replacement parts.
The use of non-U-Line parts can reduce speed of ice production, cause water to overflow from ice maker mold, damage the unit, and void the warranty.
Warranty parts will be shipped at no charge after U-Line confirms warranty status. Please provide the model, serial number, part number and part description. Some parts will require color or voltage information.
If U-Line requires the return of original parts, we will inform you when the parts order is taken. This requirement will be noted on your packing list. A prepaid shipping label will be emailed to you. Please enclose a copy of the parts packing list and be sure the model and serial numbers are legible on the paperwork. Tag the part with the reported defect.
Customers and non-authorized servicers may order non-warranty parts at www.u-line.com. Authorized servicers with a servicer login may order non-warranty parts at www.u-lineservice.com.
R290/R600A Specifications
For R290/R600a refrigerant service tips and more videos, go to: www.u-line.com/videos.

WARNING
Flammability warnings for a pure-iso-butane/propane refrigerant.
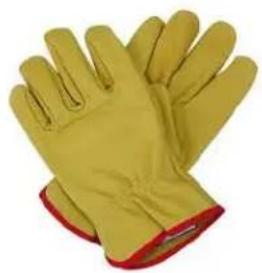
Gloves and Eye Protection must be used.
natural_image
Pair of yellow industrial gloves with red trim, no visible text or symbols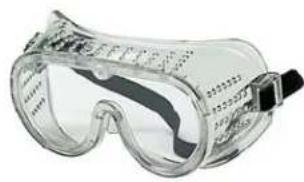
natural_image
Clear safety goggles with exposed wiring and a black clip, no text or symbols visibleR290/R600a is considered non-toxic, but is flammable when mixed with air.
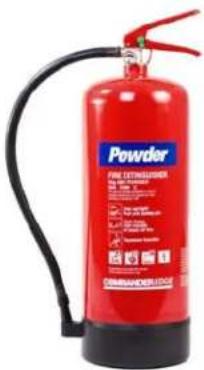
Keep a dry powder type fire extinguisher in the work area.
R290/R600a is heavier than air, do not allow any leakage/migration to low areas such as basements and stairs.
Never use a torch on a fully charged refrigeration system.
Never substitute U-Line OEM replacement parts or methods of construction.
R290/R600a must be stored and transported in approved containers.

WARNING
Only skilled and well trained service technicians permitted to service R290/R600a equipped products.
All tools and equipment must be approved for use with R290/R600a refrigerant.
Local, state and federal laws, standards must be observed along with proper certification and licensing.
Ventilation is required during servicing.
No conversions to R290/R600a from any other refrigerants. OEM R290/R600a equipped unit only.
Service area must be free of ignition sources.
No smoking is allowed in the service area.
All replacement electrical components must be OEM and installed properly (sealed and covered).
If the evaporator is cold prior to service, it must be thawed prior to service.
When using a vacuum pump, start pump before opening refrigeration system.
Vacuum pump and recovery equipment should be at least 10 feet from the work area.
It is recommended that a simple LPG gas detector is on site during service.
Ensure that all R290/R600a is removed from the system prior to brazing any part of the sealed system.
Only a clean, dry, leak-free system should be charged with R290/R600a.
R290/R600a SPECIFICATIONS/LABELING
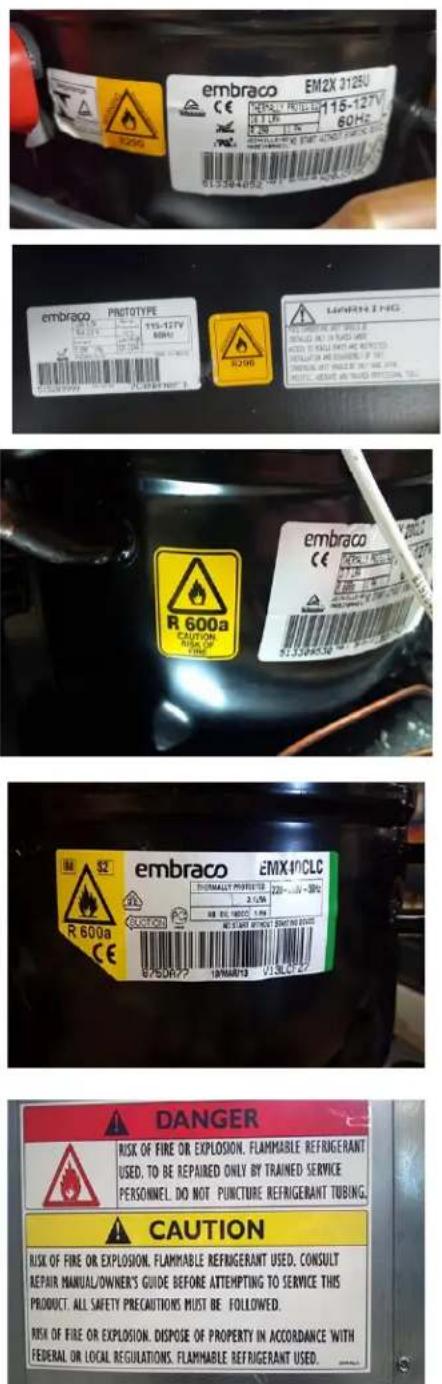
R290/R600a equipped products are labeled (both the unit and the compressor).
R290/R600a is colorless and odorless.
R290/R600a is considered non-toxic, but is flammable when mixed with air.
Do not remove or alter any R290/R600a labeling on the product.
Use only a refrigerant grade R290/R600a from a properly labeled container.
RECOVERING/RECLAIMING R290/R600a
(R290/R600a has been exempted from recovery/reclaiming requirements by the US EPA)
Recovery/Reclaiming equipment must be approved for use with R290/R600a.
Ensure the evaporator is at room temperature prior to recovery/reclaiming R290/R600a.
Use a common piercing pliers or piercing valve to remove R290/R600a from the compressor process tube. (Note: Piercing devices must not be left on the system and must be replaced with a Schrader type valve.)
Evacuate/reclaim via the piecing pliers to ensure the system is empty of R290/R600a before any system work is performed.
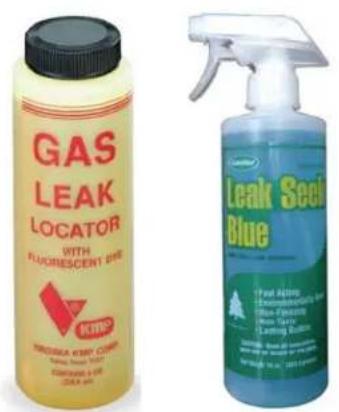
The recovery cylinder must be evacuated (no air inside) prior to accepting R290/R600a.
The recovery cylinder must not be filled more than 45% safe fill level and refrigerants must not be mixed.
The recovery cylinder must be clearly marked with R290/R600a and Flammable Warning labels.
Ensure proper ventilation during recovery/reclaiming of R290/R600a.
Start vacuum pump/recovery pump prior to piercing the compressor process tube.
Follow recovery/reclaim OEM instructions for the specific equipment used.
SYSTEM REPAIR
Ensure no residual R290/R600a refrigerant is left within the system prior to repair (simple venting is not sufficient).
Evacuate and charge with dry nitrogen for leak checks.
Repair leaks or replace system parts as required.
When re-brazing, the system must be purged with dry nitrogen and at least one access point open to the atmosphere.
When re-brazing, proper ventilation is required along with constant monitoring for the presence of R290/R600a refrigerant.
The filter dryer must be replaced any time the sealed system is serviced.
No system should be open to the atmosphere for longer than 15 minutes to avoid moisture migration into the system components.
LEAK DETECTION
After removal of the R290/R600a, the unit can be charged with dry nitrogen or helium.
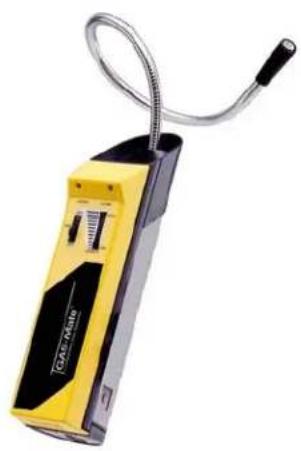
Electronic leak detection or soap solution can be used to check for nitrogen/helium leaks. Evacuate and charge with dry nitrogen for leak checks.
natural_image
Yellow handheld device labeled 'TALO TINIO' with black and silver casing, coiled cable (no visible text or symbols beyond branding)Never use a halide torch or lighted match to check the system for leaks at any time.
The high side of the refrigeration system (compressor discharge to outlet of drier) must be leak tested with the compressor running.
The low side of the refrigeration system (evaporator, compressor and suction line) must be leak tested with the compressor off (equalized pressure).
RECHARGING
No air is ever to be allowed inside the refrigeration system (R-600a refrigerant or dry nitrogen only).
Never use a torch on a fully charged refrigeration system.
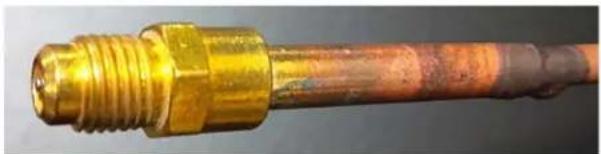
Install a Schrader Type access port on the compressor process stub.
natural_image
Close-up of a metallic threaded pipe fitting with copper-colored insulation (no text or symbols visible)Evacuate the system to 100 microns prior to charging. Weigh in the R290/R600a charge using a refrigerant scale. (run compressor an extra two minutes to clear the charging hoses).
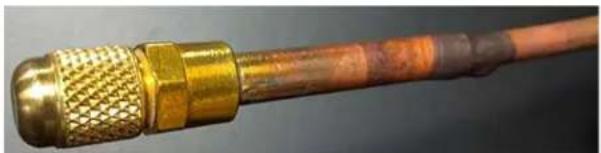
Seal the Schrader Type access port, a proper cap and seal must be used to close the system.
No system should be open to the atmosphere for longer than 15 minutes to avoid moisture migration into the system components.
natural_image
Close-up of a metallic coaxial connector with threaded ends and copper-colored insulation (no text or symbols visible)SUMMARY
Safely handling R290/R600a requires proper procedures and training.
R290/R600a approved service tools must be used.
R290/R600a labeling must not be removed or altered.
Proper ventilation during service is required.
Never apply a torch to a charged R290/R600a refrigeration system.
Use OEM replacement service parts and do not alter the construction of the unit.
No air is ever to be allowed inside the refrigeration system (R290/R600a refrigerant or dry nitrogen only).
Never use a torch on a fully charged refrigeration system. Install a Schrader Type access port on the compressor process stub.
The filter dryer must be replaced any time the sealed system is serviced.
No system should be open to the atmosphere for longer than 15 minutes to avoid moisture migration into the system components.
LEAK DETECTION
After removal of the R290/R600a, the unit can be charged with dry nitrogen or helium.
Electronic leak detection or soap solution can be used to check for nitrogen/helium leaks. Evacuate and charge with dry nitrogen for leak checks.
System Diagnosis Guide
| System Condition | Suction Pressure | Suction Line | Compressor Discharge | Condenser | Capillary Tube | Evaporator | Wattage |
| Normal | Normal | Slightly below room temperature | Very hot | Very hot | Warm | Cold | Normal |
| Overcharge | Higher than normal | Very cold may frost heavily | Slightly warm to hot | Hot to warm | Cool | Cold | Higher than normal |
| Undercharge | Lower than normal | Warm- near room temperature | Hot | Warm | Warm | Extremely cold near inlet - Outlet below room temperature | Lower than normal |
| Partial Restriction | Somewhat lower than normal vacuum | Warm- near room temperature | Very hot | Top passes warm - Lower passes cool (near room temperature) due to liquid | Room temperature (cool) or colder | Extremely cold near inlet - Outlet below room temperature backing up | Lower than normal |
| Complete Restriction | In deep vacuum | Room temperature (cool) | Room temperature (cool) | Room temperature (cool) | Room temperature (cool) | No refrigeration | Lower than normal |
| No Gas | 0 PSIG to 25" | Room temperature (cool) | Cool to hot | Room temperature (cool) | Room temperature (cool) | No refrigeration | Lower than normal |
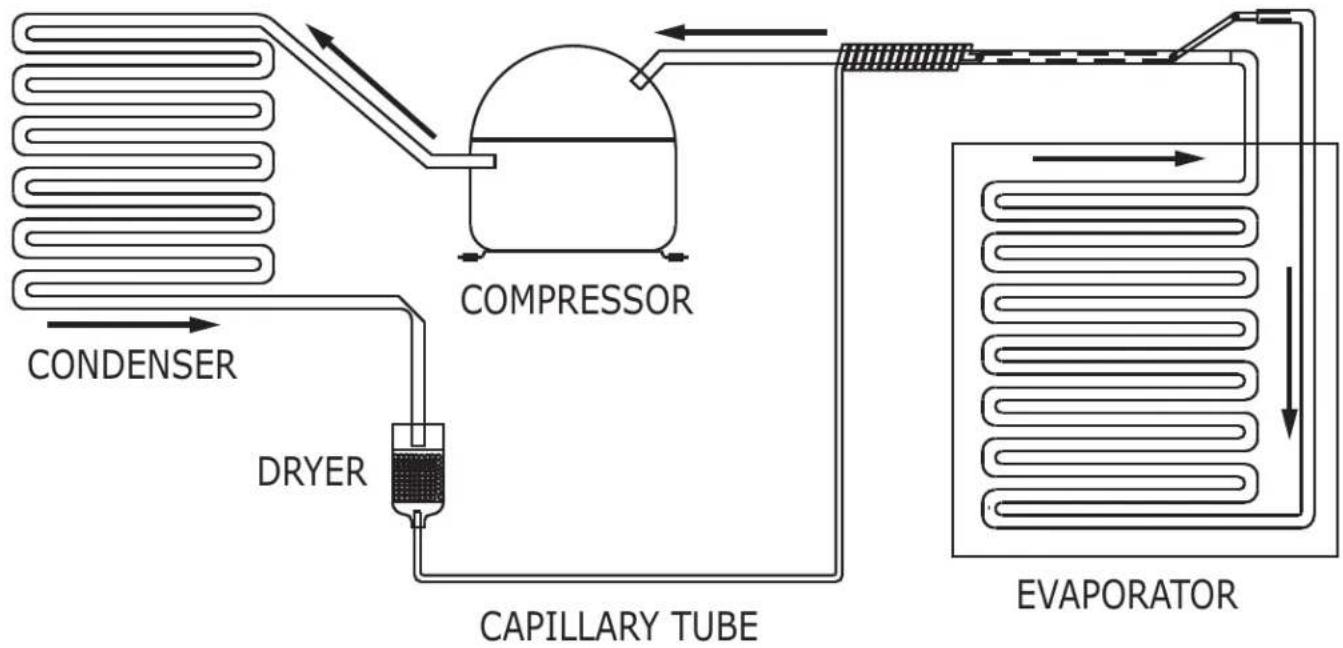
flowchart
graph LR
    A["CONDENSER"] --> B["DRYER"]
    B --> C["CAPILLARY TUBE"]
    C --> D["COMPRESSOR"]
    D --> E["EVAPORATOR"]
    E --> F["Return Line"]
Compressor Specifications

DANGER
Electrocution can cause death or serious injury. Burns from hot or cold surfaces can cause serious injury. Take precautions when servicing this unit.
Disconnect the power source.
Do not stand in standing water when working around electrical appliances.
Make sure the surfaces you touch are not hot or frozen.
| EM2C46CLC-115V | |
| REFRIGERANT | R600a |
| VOLTAGE | 115V - 127V |
| FREQUENCY | 50Hz |
| START WINDING | 5.20 +/- 8% Q at 25 °C (77°F) |
| RUN WINDING | 7.19 +/- 8% Q at 25 °C (77°F) |
| LRA | 8.0A |
| FLA | 2.50A |
| STARTING DEVICE | PTC 8EA5B1 |
| OVERLOAD | 302KFBYY-53 |
*All resistance readings are ± 10%
| EMC46CLT-220V | |
| REFRIGERANT | R600a |
| VOLTAGE | 220-240V |
| FREQUENCY | 50Hz |
| START WINDING | 20.20 +/- 8% Q at 25 °C (77°F) |
| RUN WINDING | 30.80 +/- 8% Q at 25 °C (77°F) |
| LRA | - |
| FLA | - |
| STARTING DEVICE | TSD2-220VT |
| OVERLOAD | 197JDBYY-73 |
*All resistance readings are ± 10%
Troubleshooting - Extended
SPECIFIC ERRORS & ISSUES

CAUTION
Never attempt to repair or perform maintenance on the unit until the main electrical power has been disconnected from the unit.
TROUBLESHOOTING GUIDE
| Concern | Potential Causes | Suggested Remedy |
| Will not eject ice (water frozen). | Control setting too cold. | Adjust control warmer (counterclockwise). |
| Control inoperable (1-2 contacts open) | Replace control. | |
| Bin switch inoperable. | Replace bin switch. | |
| Limit switch defective (open). | Replace limit switch. | |
| Ice maker assembly motor stalled. | Replace motor. | |
| Broken wire in ice maker circuit. | Repair or replace wiring. | |
| Water soaked cabinet insulation. | Replace foamed cabinet assembly. | |
| Dirty condenser. | Clean condenser. | |
| Will not fill with water. | Water supply valve closed. | Open water supply valve. |
| Water switch inoperable (open). | Replace water switch. | |
| Solenoid valve inoperable. | Replace solenoid valve. | |
| Fill tube outlet frozen. | Defrost fill tube. | |
| Broken wire in water fill circuit. | Repair or replace wiring. | |
| Will not stop making ice. | Bin switch inoperable (closed). | Replace bin switch. |
| Bin arm binding. | Lubricate bin arm pivot points or loosen bin arm lever screw. | |
| Water will not stop filling. | Water switch inoperable (closed). | Replace water switch. |
| Solenoid valve inoperable. | Replace solenoid valve. | |
| Stalled ice maker motor. | Replace motor. | |
| Temperature control inoperable. Ice maker is in continuous harvest cycle (contacts 1-2 closed). | Replace temperature control. | |
| Ejector blades will not stop turning. | Control inoperable (1-2 contacts will not open). | Replace control. |
| Hold switch inoperable. | Replace hold switch. | |
| Broken wiring. | Repair or replace wiring. | |
| Short in mold heater. | Replace heater. | |
| Low ice production. | Control set too cold. | Adjust control warmer (counterclockwise). |
| Fan motor stalled. | Replace fan motor. | |
| Ice cubes too large. | Lower water fill adjustment. | |
| Dirty condenser. | Clean condenser. | |
| Bypass valve stuck open (Frost Free units only). | Replace bypass valve (Frost Free units only). | |
| Not freezing (compressor and fan motors operating). | Little or no frost pattern on evaporator. | Check for sealed system leak or restriction. |
| Bypass valve stuck open (Frost Free units only). | Replace bypass valve (Frost Free units only). | |
| Not freezing (compressor not operating - fans operating). | Relay inoperable. | Replace relay. |
| Overload inoperable (open). | Replace overload. | |
| Compressor inoperable. | Replace compressor. | |
| Not freezing (compressor and fans not operating). | Power cord not plugged in. | Plug in power cord. |
| On/Off switch in off position. | Turn switch to on position. | |
| On/Off switch inoperable (open). | Replace On/Off switch. | |
| Hold switch inoperable (open). | Replace hold switch. | |
| Control inoperable (2-3 contacts open). | Replace control. | |
| Broken wire in freeze circuit. | Repair or replace wiring. | |
| Ejector blades not in freeze position (12:00) | Manually advance ejector blades to the 12:00 position (test ice maker and limit switch). | |
| Compressor overheating. | Condenser air flow restricted. | Remove restriction (clean condenser and grille). |
| Condenser fan blade obstructed. | Remove blade restriction. | |
| Condenser fan motor stalled. | Replace fan motor. | |
| Compressor inoperable. | Replace compressor. | |
| Compressor will not stop operating. | Control set too cold. | Adjust control warmer (counterclockwise). |
| Control inoperable (2-3 contacts will not open). | Replace control. | |
| Control sensing bulb not sensing mold temperature. | Fully insert bulb into ice maker tube. Rout bulb away from compressor discharge tube. | |
| Evaporator fan stalled (Frost Free units only). | Remove obstruction or replace motor. | |
| Water leak (under unit). | Water supply line leaking at solenoid valve inlet. | Tighten fitting or replace fitting gasket and/or fitting. |
| Water line leaking at solenoid valve outlet. | Replace water line and fitting. | |
| Water line leaking at fill tube. | Tighten clamp or replace fill tube assembly. | |
| Defrost drain line not in drain pan. | Position drain line in drain pan. | |
| Crack in water line. | Replace water line. | |
| Water leak (inside unit). | Ice maker assembly fill cup obstructed. | Remove obstruction. |
| Fill ice cup and fill tube out of alignment. | Align fill tube and fill cup. | |
| Water level too high. | Adjust water level. | |
| Defrost drain plugged (Frost Free units only). | Ice in drain trough (Frost Free units only) (see below). | |
| Excessive frost buildup. | Door gasket not sealing properly. | Adjust door hinges or replace door gasket. |
| Door out of alignment. | Adjust door hinges. | |
| Water soaked cabinet insulation. | Replace foamed cabinet assembly. | |
| Light stays on when door is closed. | Repair or adjust light bracket. | |
| Noisy. | Copper refrigeration tube touching cabinet. | Carefully adjust tubing. |
| Fan blade touching shroud. | Adjust fan mounting or shroud. | |
| Fan blade obstruction (wiring, foam insulation, packaging material). | Remove obstruction. | |
| Ice buildup in drain trough or drainage problem. | Obstructed drain cup or tube. | Clear obstruction. |
| Drain trough heater failed (Frost Free units only). | Replace drain trough heater (Frost Free units only). | |
| Kinked drain tube. | Align drain trough and drain cup. | |
| Drain trough spout and drain cup not aligned. | Reroute drain tube. | |
| Unit will not defrost (Frost Free units only). | Bypass coil inoperable. | Replace bypass valve. |
| Defrost timer inoperable. | Replace defrost timer. | |
| Bypass valve inoperable. | Replace bypass valve. | |
| Fresh food temperature too cold. | Temperature control set too cold. | Adjust control to warmer setting (counterclockwise). |
| Bin/Freezer door not closing. | Adjust or replace door. | |
| Ice bucket not fully inserted. | Check for ice behind bucket and push ice bucket in place. |
ICE MAKER DIAGNOSIS FLOW CHART
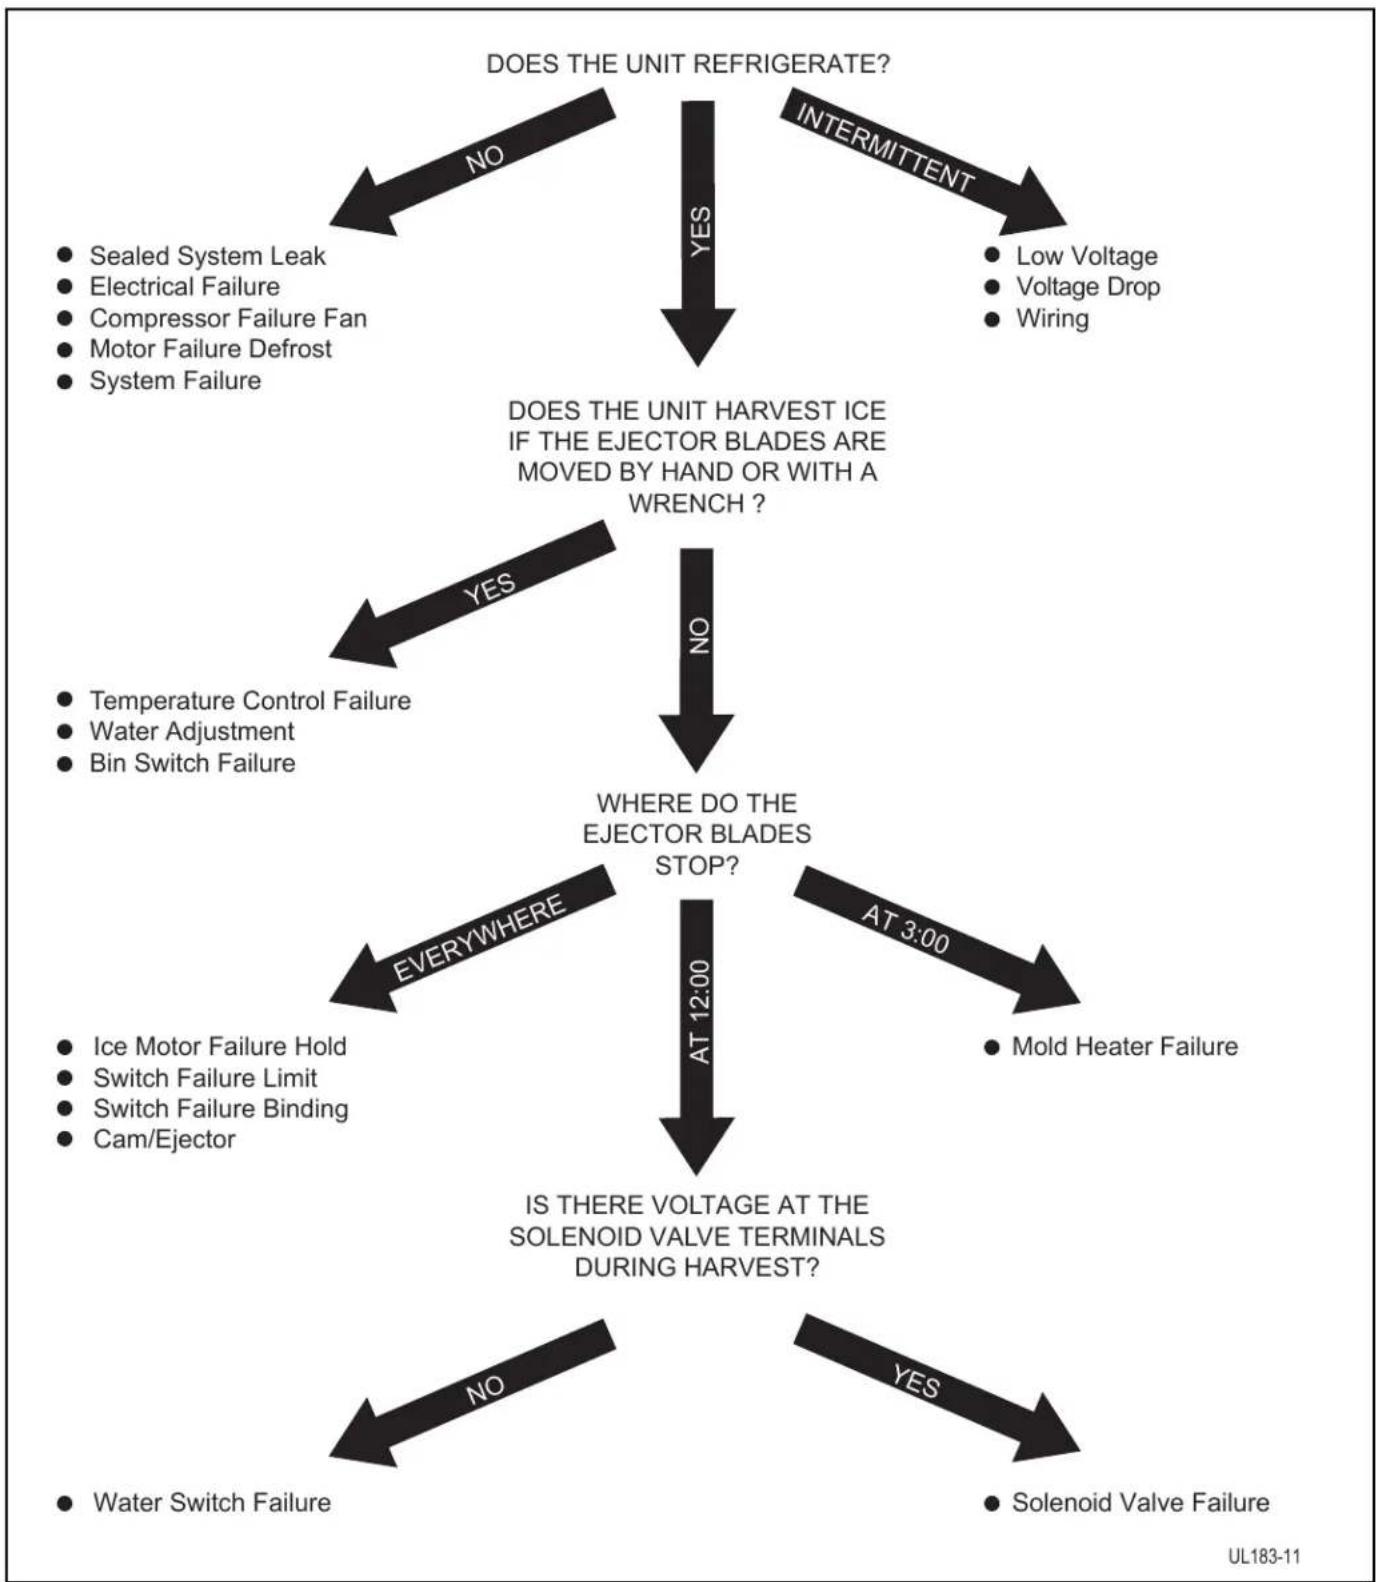
flowchart
graph TD
    A["DOES THE UNIT REFRIGERATE?"] -->|NO| B["INTERMITTENT"]
    A -->|YES| C["DOES THE UNIT HARVEST ICE IF THE EJECTOR BLADES ARE MOVED BY HAND OR WITH A WRENCH?"]
    C -->|NO| D["WHERE DO THE EJECTOR BLADES STOP?"]
    C -->|YES| E["Is THERE VOLTAGE AT THE SOLENOID VALVE TERMINALS DURING HARVEST?"]
    D -->|EVERYWHERE| F["SOLENOID VALVE FAILURE"]
    D -->|AT 3:00| G["Mold Heater Failure"]
    D -->|NO| H["Water Switch Failure"]
    D -->|YES| I["Solenoid Valve Failure"]
    style A fill:#f9f,stroke:#333
    style B fill:#f9f,stroke:#333
    style C fill:#ccf,stroke:#333
    style D fill:#cfc,stroke:#333
    style E fill:#fcc,stroke:#333
    style F fill:#cff,stroke:#333
    style G fill:#ffc,stroke:#333
    style H fill:#fcc,stroke:#333
    style I fill:#fcc,stroke:#333
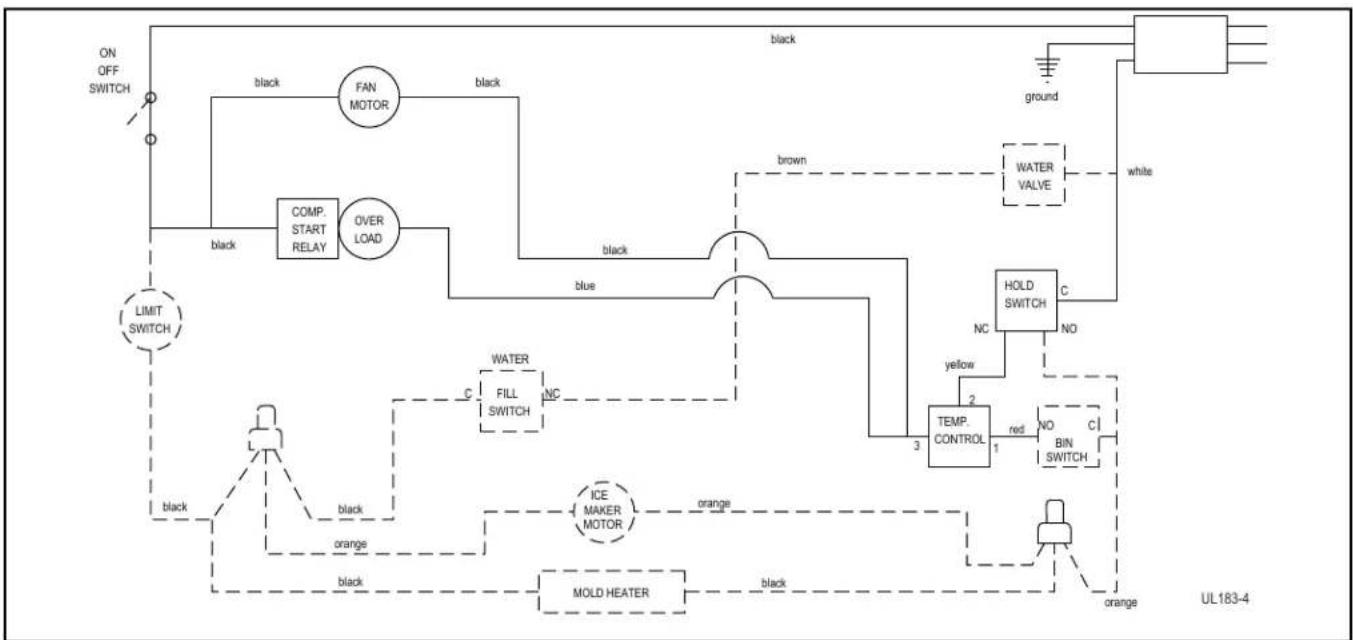
• Temperature control terminals 2 and 3 are closed.
• Power to the condenser.
• Power to the condenser fan.
flowchart
graph TD
    A["ON OFF SWITCH"] --> B["COMP. START RELAY"]
    B --> C["FAN MOTOR"]
    C --> D["OVER LOAD"]
    D --> E["LIMIT SWITCH"]
    E --> F["BLACK"]
    F --> G["BLACK"]
    G --> H["mold heater"]
    H --> I["MOLD MEATER"]
    I --> J["ICE MAKER MOTOR"]
    J --> K["TEMP. CONTROL"]
    K --> L["HOLD SWITCH"]
    L --> M["NO"]
    M --> N["RED"]
    N --> O["MIN SWITCH"]
    O --> P["WHITE"]
    P --> Q["ground"]
    Q --> R["UL183-4"]
Figure 1. Freeze Cycle
Harvest-1 Cycle
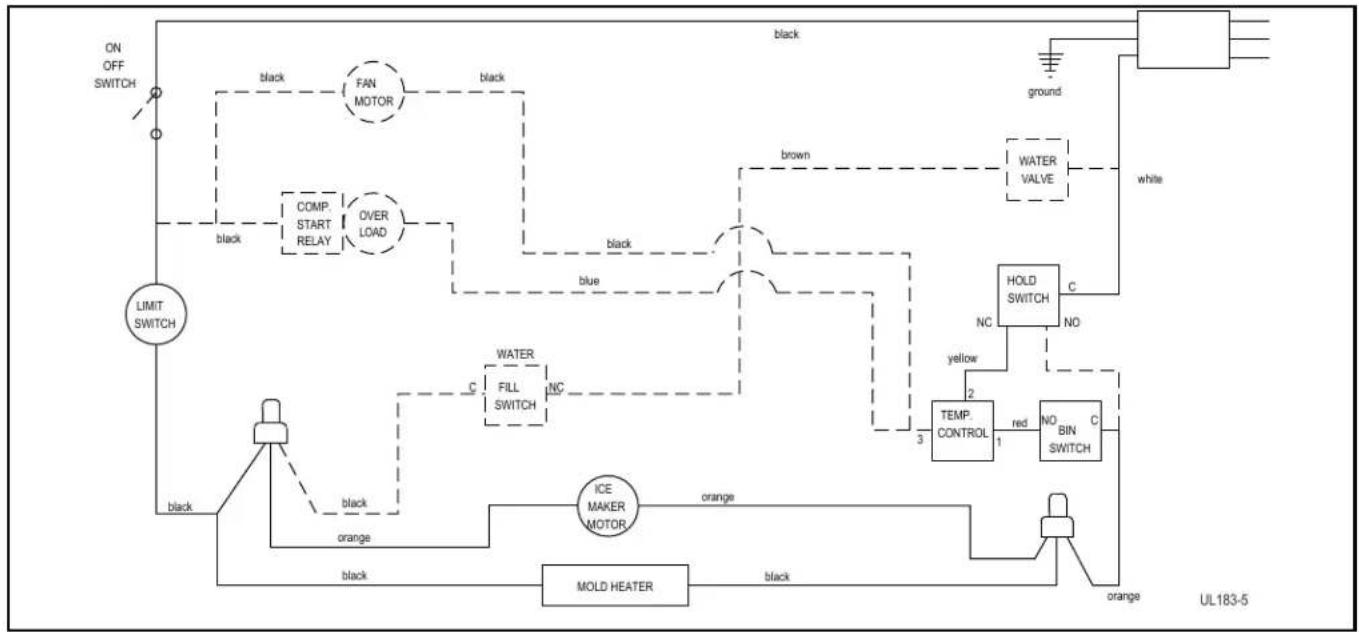
- Temperature control terminals 2 and 3 are open - 2 and 1 close.
• No power to the compressor or condenser fan. - If bin arm is down, power goes through bin arm switch to the ice maker motor. If bin arm is up, the ice maker will not harvest.
flowchart
graph TD
    A["ON OFF SWITCH"] --> B["LIMIT SWITCH"]
    B --> C["COMP. START RELAY"]
    C --> D["FAN MOTOR"]
    D --> E["OVER LOAD"]
    E --> F["WATER VALVE"]
    F --> G["HOLD SWITCH"]
    G --> H["TEMP. CONTROL"]
    H --> I["NO BIN SWITCH"]
    I --> J["RED"]
    J --> K["NO"]
    K --> L["WHITE"]
    L --> M["Ground"]
    M --> N["White"]
    N --> O["Ground"]
    O --> P["Black"]
    P --> Q["Black"]
    Q --> R["Blue"]
    R --> S["Black"]
    S --> T["Black"]
    T --> U["Black"]
    U --> V["Black"]
    V --> W["Black"]
    W --> X["Black"]
    X --> Y["Black"]
    Y --> Z["Black"]
    Z --> AA["Black"]
    AA --> AB["MOLD HEATER"]
    AB --> AC["ICE MAKER MOTOR"]
    AC --> AD["orange"]
    AD --> AE["Black"]
    AE --> AF["Black"]
    AF --> AG["Black"]
    AG --> AH["Black"]
    AH --> AI["Black"]
    AI --> AJ["Black"]
    AJ --> AK["Black"]
    AK --> AL["Black"]
    AL --> AM["Black"]
    AM --> AN["Black"]
    AN --> AO["Black"]
    AO --> AP["Black"]
    AP --> AQ["Black"]
    AQ --> AR["Black"]
    AR --> AS["Black"]
    AS --> AT["Black"]
    AT --> AU["Black"]
    AU --> AV["Black"]
    AV --> AW["Black"]
    AW --> AX["Black"]
    AX --> AY["Black"]
    AY --> AZ["Black"]
    AZ --> BA["Black"]
    BA --> BB["Black"]
    BB --> BC["Black"]
    BC --> BD["Black"]
    BD --> BE["Black"]
    BE --> BF["Black"]
    BF --> BG["Black"]
    BG --> BH["Black"]
    BH --> BI["Black"]
    BI --> BJ["Black"]
    BJ --> BK["Black"]
    BK --> BL["Black"]
    BL --> BM["Black"]
    BM --> BN["Black"]
    BN --> BO["Black"]
    BO --> BP["Black"]
    BP --> BQ["Black"]
    BQ --> BR["Black"]
    BR --> BS["Black"]
    BS --> BT["Black"]
    BT --> BU["Black"]
    BU --> BV["Black"]
    BV --> BW["Black"]
    BW --> BX["Black"]
    BX --> BY["Black"]
    BY --> BZ["Black"]
Figure 2. Harvest-1 Cycle (Hold Switch in Normal Position)
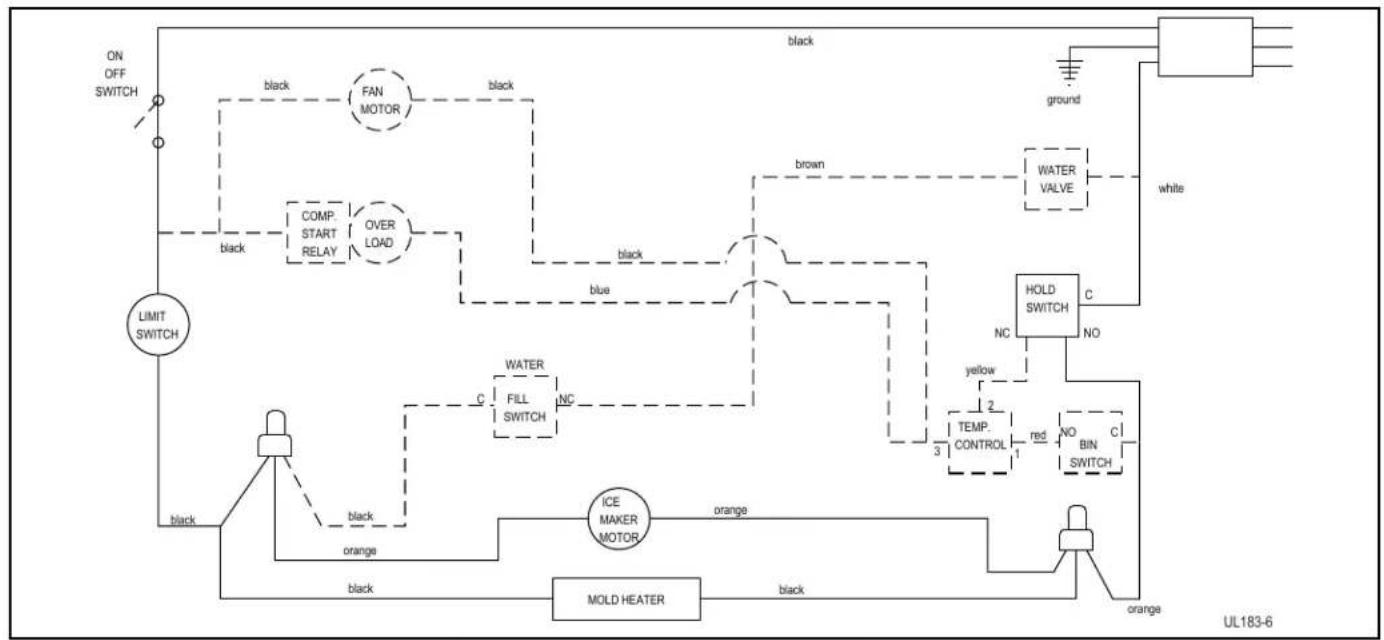
HARVEST-2 CYCLE
- Ice maker ejector blades reach approximately 2:00 position and cam depresses the hold switch. Power goes through the hold switch to the ice maker motor and mold heater.
- Ejector blades stall on ice and ice maker motor pulsates until mold heater warms and ice releases.
flowchart
graph TD
    A["ON OFF SWITCH"] --> B["LIMIT SWITCH"]
    B --> C["COMP. START RELAY"]
    C --> D["FAN MOTOR"]
    D --> E["OVER LOAD"]
    E --> F["ICE MAKER MOTOR"]
    F --> G["MOLD HEATER"]
    G --> H["ORANGE"]
    H --> I["RED CONTROLS"]
    I --> J["TEMP. CONTROL"]
    J --> K["HOLD SWITCH"]
    K --> L["ORANGE"]
    L --> M["ORANGE"]
    M --> N["Ground"]
    N --> O["White"]
    O --> P["WATER VALVE"]
    P --> Q["c"]
    Q --> R["NO"]
    R --> S["MIN SWITCH"]
    S --> T["RED CONTROLS"]
    T --> U["TEMP. CONTROL"]
    U --> V["c"]
    V --> W["NO"]
    W --> X["MIN SWITCH"]
    X --> Y["RED CONTROLS"]
    Y --> Z["TEMP. CONTROL"]
    Z --> AA["c"]
    AA --> AB["NO"]
    AB --> AC["MIN SWITCH"]
    AC --> AD["RED CONTROLS"]
    AD --> AE["TEMP. CONTROL"]
    AE --> AF["c"]
    AF --> AG["NO"]
    AG --> AH["MIN SWITCH"]
    AH --> AI["RED CONTROLS"]
    AI --> AJ["TEMP. CONTROL"]
    AJ --> AK["c"]
    AK --> AL["NO"]
    AL --> AM["MIN SWITCH"]
    AM --> AN["RED CONTROLS"]
    AN --> AO["TEMP. CONTROL"]
Figure 3. Harvest-2 Cycle (Hold Switch in Switched Position)
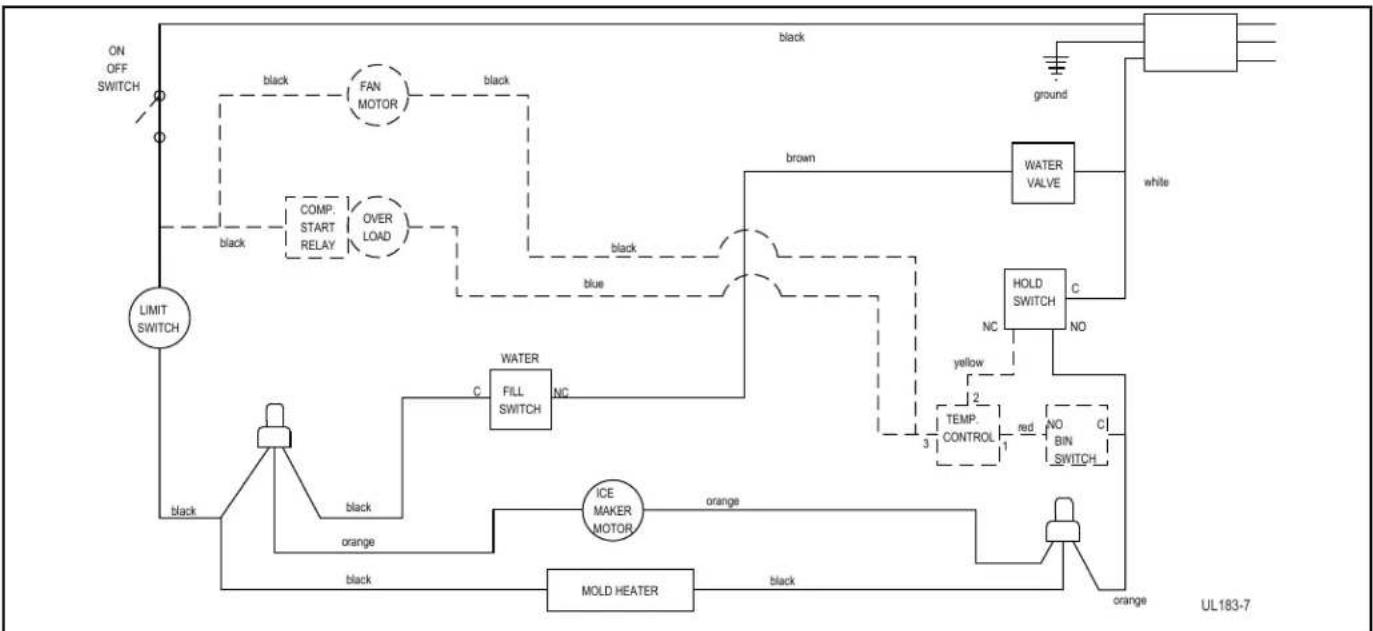
WATER FILL CYCLE
- Ice maker ejector blades reach approximately 10:00 position and cam depresses the water fill switch.
• Power to the water valve. Ice maker mold fills.
flowchart
graph TD
    A["ON OFF SWITCH"] --> B["LIMIT SWITCH"]
    B --> C["COMP. START RELAY"]
    C --> D["FAN MOTOR"]
    D --> E["OVER LOAD"]
    E --> F["WATER VALVE"]
    F --> G["WHITE"]
    G --> H["ground"]
    H --> I["ALABRIC SWITCH"]
    I --> J["RED CONTROLS"]
    J --> K["TEMP. CONTROL"]
    K --> L["NO BIN SWITCH"]
    L --> M["C"]
    M --> N["NO"]
    N --> O["RED CONTROLS"]
    O --> P["TEMP. CONTROL"]
    P --> Q["NO BIN SWITCH"]
    Q --> R["C"]
    R --> S["RED CONTROLS"]
    S --> T["TEMP. CONTROL"]
    T --> U["NO BIN SWITCH"]
    U --> V["C"]
    V --> W["RED CONTROLS"]
    W --> X["TEMP. CONTROL"]
    X --> Y["NO BIN SWITCH"]
    Y --> Z["C"]
    Z --> AA["RED CONTROLS"]
    AA --> AB["TEMP. CONTROL"]
    AB --> AC["NO BIN SWITCH"]
    AC --> AD["C"]
    AD --> AE["RED CONTROLS"]
    AE --> AF["TEMP. CONTROL"]
    AF --> AG["NO BIN SWITCH"]
    AG --> AH["C"]
    AH --> AI["RED CONTROLS"]
    AI --> AJ["TEMP. CONTROL"]
    AJ --> AK["NO BIN SWITCH"]
    AK --> AL["C"]
Figure 4. Water Fill Cycle
EJECT CYCLE
- Ejector blades push ice into bucket and stop at 12:00 position.
• Temperature control terminals 2 and 3 have closed during harvest cycle. - Next freeze cycle begins with power to the compressor and condenser fan.
TEMPERATURE CONTROL SPECIFICATIONS
Double Throw Ice Maker Thermostat Numbers 4548, AR-19-12, 2636, 2690, 2691, 2717, 2783, 2782-S, 2763-S, 2780, 80-26005-02
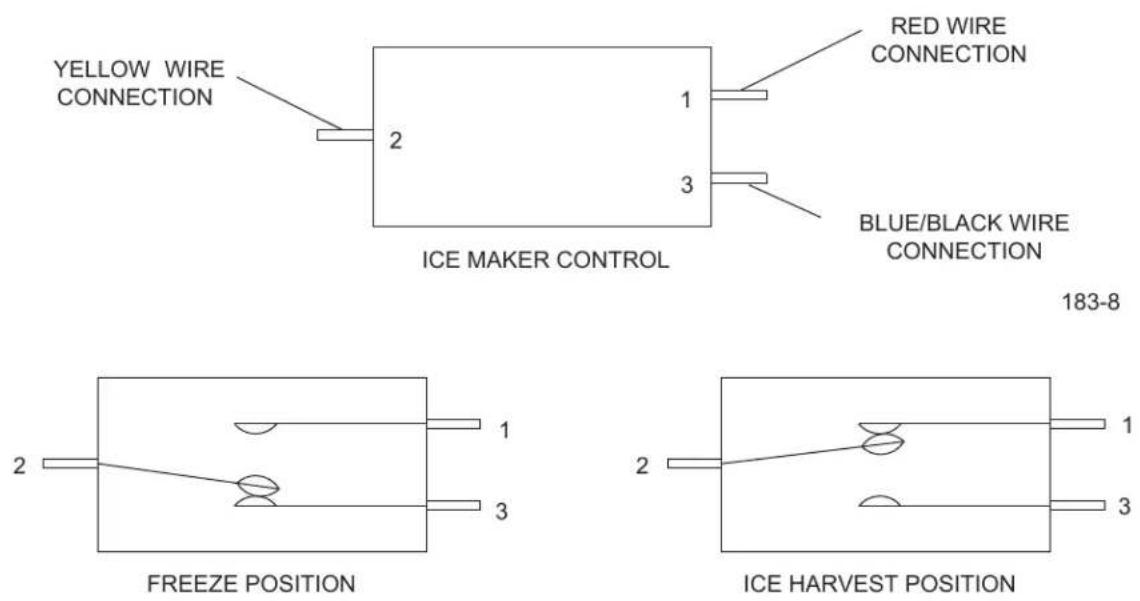
These temperature controls are double throw, single pole controls. The sensing tube is inserted into the ice maker mold and senses mold temperature. After ice is sensed in the mold, the 2-3 contacts open (stopping the compressor) and the 2-1 contacts are closed (starting the ice maker motor).
The 2-3 contacts close (2-1 contacts open) before the end of the ice harvest cycle. The hold switch prevents power going back to the compressor. This prepares the control for the next cycle.
183-8
| CYCLE | OPEN CIRCUIT | CLOSED CIRCUIT |
| FREEZE | 2 - 1 | 2 - 3 |
| HARVEST | 2 - 3 | 2 - 1 |
183-9
Figure 5. Temperature Controls - Manual Defrost Ice Makers
LIMIT SWITCH SPECIFICATIONS
• Normally closed Bi-metal switch
- Open temperature: 104^ F
- Close temperature: 83^ F
The function of this switch is to open in the event of an overheating condition. This bi-metal thermostat is normally closed and does not initiate the ice harvest cycle. The ice harvest cycle is initiated by a double throw, single pole temperature located remotely from the ice maker assembly.
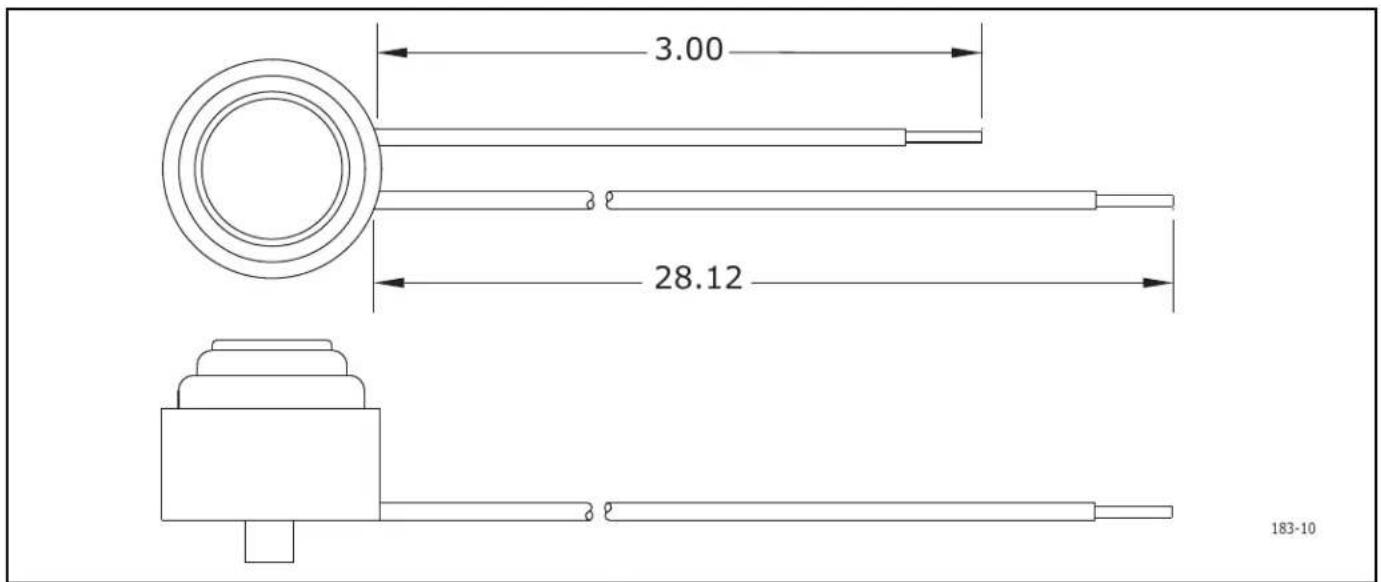
Figure 6. Limit Switch
REPLACING ICE MAKER ASSEMBLY (CO29F ONLY)
- Unplug the unit from the main power source.
- Disconnect ice maker wire harness at plug (1).
- Remove control capillary tube from sensing tube on ice maker assembly (2).
- Remove water inlet tube.
- Remove front cover (3).
- Advance the ejector blade to the 3 o'clock position by turning the 5/16" hex head on the small brass gear counterclockwise (4).
-
Remove three screws from wall of freezer housing (5).
-
Remove ice maker assembly.
- Place new ice maker assembly into position and secure with three screws (5).
- Reconnect wire harness at plug.
- Insert control capillary tube into ice maker sensing tube.
- Insert water inlet tube.
- Apply Permagum ^® to all exit holes.
- Install back panel.
- Plug in unit and test.
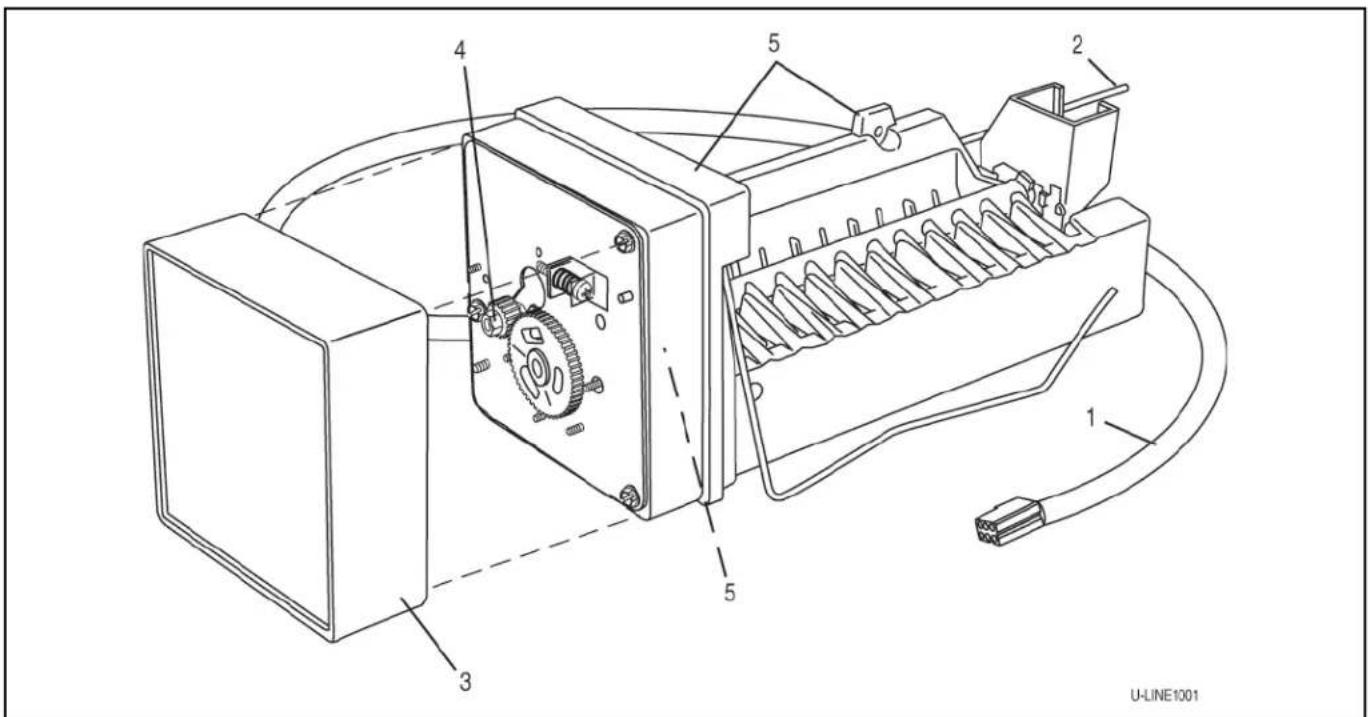
Figure 7. Ice Maker Assembly
REPLACING ICE MAKER ASSEMBLY (ALL MODELS EXCEPT CO29F)
-
Remove back panel.
-
Disconnect all wires at bell connectors (5 wires-Models BI95, BI98 or SP18; or Plug-Models).
-
Remove capillary tube from sensing tube on ice maker assembly (2).
-
Remove water inlet tube.
-
Remove front cover (3)
-
Advance ejector blades to the 3:00 position by turning the 5/16" hex head on the small brass gear counterclockwise (4).
-
Remove two screws from the side wall of evaporator (5).
-
Remove screws from the bottom of the evaporator plate.
-
Remove ice maker assembly from evaporator shelf.
-
Clean alumilastic from evaporator shelf.
-
Apply 1/4" layer of fresh alumilastic to heater side of new ice maker.
-
Replace parts in reverse order of removal.
-
Reconnect all wires.
-
Insert capillary tube into ice maker sensing tube.
-
Insert water inlet tube.
-
Apply permagum to all exit holes. Mount back panel.
-
Mount the back panel.
-
Plug in unit and test.
220 Volt Conversion List
All models listed in this manual are equipped to run on 110/115 volt. This document is a conversion list for the applicable 220 volt parts for the following models:
- SP18
• BI95
• BI98
- SS1095
| 110V P/N | 220V P/N | Description |
| 5263-S | 5195 | Fan Motor |
| 80-39015-00 | 628109 | I.M. motor (ice makers) |
| 402 | 619 | Ice maker assembly -Models SP18, BI95, BI98and model SS1095 |
| 402-29/1175 | 620 | Ice maker assembly -Models SP18, BI95, BI98and model SS1095 |
| 2552A | 2555A | Water valve |
| 5402-S | 5404-S | Compressor (ice makers) |
| 150 | 650 | Faceplate assembly |
| 5414 | 5418 | Relay |
| 5413 | 5417 | Overload |
Defrost
This unit requires manual defrost, periodically.
Inspect the interior walls for frost build up every 3 - 4 weeks. Defrost your unit when 1/4'' of frost builds up on the interior walls. Frost will build up faster in humid environments and when the door is opened frequently.
To defrost, remove ice bucket, turn off unit, leave door open, and allow frost/ice to melt naturally. Do not use tools to chip or scrape the frost as it may damage your unit. Use a towel to absorb melting frost/ice. Before turning the unit back on, make sure all the frost is gone and the unit is dry.
Replace Ice Maker
The new ice maker assembly you have received will have a plug-in connection. In some instances you may need to cut plug off from cable and hard-wire the connections.
REMOVE ICE MAKER
- Unplug the unit.
- Disconnect ice maker wire harness at plug.
- Disconnect thermistor plug.
- Remove water inlet tube.
- Remove front cover.
- Advance ejector blade to the 3 o'clock position by turning the 5/16" hex head on the small brass gear counterclockwise.
- Remove three screws from wall of freezer housing.
- Remove ice maker assembly.
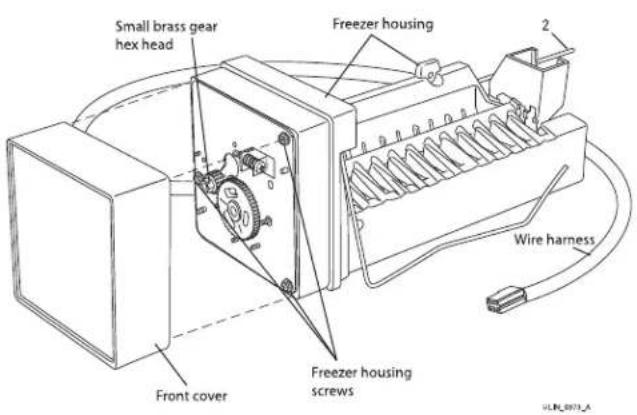
INSTALL ICE MAKER
- If ice maker sits on evaporator (as shown) be sure to apply the included Alumilastic paste.
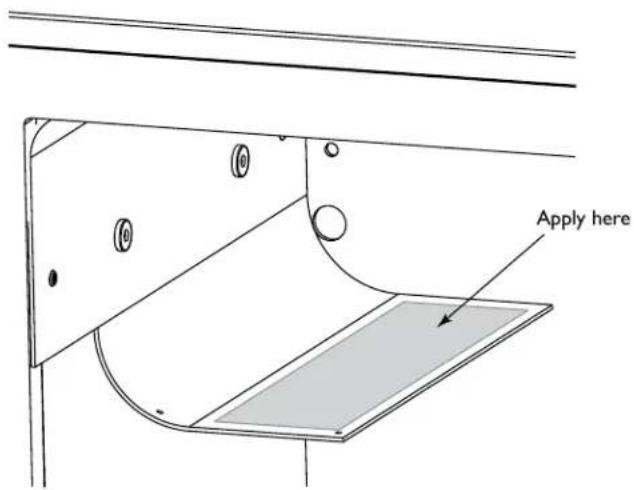
- Reconnect plug.
- Reconnect thermistor plug.
- Insert water inlet tube.
- Apply Permagum ^® to all exit holes on back of unit.
- Install back panel.
- Plug in unit and test.
U-Line Corporation (U-Line) Limited Warranty
One Year Limited Warranty
For one year from the date of original purchase, this warranty covers all parts and labor to repair or replace any part of the product that proves to be defective in materials or workmanship. For products installed and used for normal residential use, material cosmetic defects are included in this warranty, with coverage limited to 60 days from the date of original purchase. All service provided by U-Line under the above warranty must be performed by a U-Line factory authorized servicer, unless otherwise specified by U-Line. Service provided during normal business hours.
Two Year Limited Warranty (5 Class Product)
For two years from the date of original purchase, this warranty covers all parts and labor to repair or replace any part of the product that proves to be defective in materials or workmanship. For products installed and used for normal residential use, material cosmetic defects are included in this warranty, with coverage limited to 60 days from the date of original purchase. All service provided by U-Line under the above warranty must be performed by a U-Line factory authorized servicer, unless otherwise specified by U-Line. Service provided during normal business hours.
Available Second & Third Year Limited Warranty
In addition to the standard one and two year warranties outlined above, U-Line offers a one year extension of the warranties from the date of purchase, free of charge. To take advantage of this extension, you must register your product with U-Line within 60 days from the date of purchase at u-line.com and provide proof of purchase. Nugget Ice Machine proof of purchase must include the purchase of an in-line water filter and filter head to qualify for this additional limited warranty.
Five Year Sealed System Limited Warranty
For five years from the date of original purchase, U-Line will repair or replace the following parts, labor not included, that prove to be defective in materials or workmanship: compressor, condenser, evaporator, drier, and all connecting tubing. All service provided by U-Line under the above warranty must be performed by a U-Line factory authorized servicer, unless otherwise specified by U-Line. Service provided during normal business hours.
Terms
These warranties apply only to products installed in any one of the fifty states of the United States, the District of Columbia, or the ten provinces of Canada. The warranties do not cover any parts or labor to correct any defect caused by negligence, accident or improper use, maintenance, installation, service, repair, acts of God, fire, flood or other natural disasters. The product must be installed, operated, and maintained in accordance with your product's User Guide.
The remedies described above for each warranty are the only ones that U-Line will provide, either under these warranties or under any warranty arising by operation of law. U-Line will not be responsible for any consequential or incidental damages arising from the breach of these warranties or any other warranty, whether express, implied, or statutory. Some states do not allow the exclusion or limitation of incidental or consequential damages, so the above limitation or exclusion may not apply to you. These warranties give you specific legal rights, and you may also have other rights which vary from state to state.
Any warranty that may be implied in connection with your purchase or use of the product, including any warranty of merchantability or any warranty fit for a particular purpose is limited to the duration of these warranties, and only extends to five years in duration for the parts described in the section related to the five year limited warranty above. Some states do not allow limitations on how long an implied warranty lasts, so the above limitations may not apply to you.
• The warranties only apply to the original purchaser and are non-transferable.
• The second, third, and five year warranties cover products installed and used for normal residential or designated marine use only.
• The warranties apply to units operated outside only if designed for outdoor use by model and serial number.
- U-Line Commercial products are covered by the one year and 5 year limited warranties and are not eligible for the second and third year limited warranties.
• Replacement water filters, light bulbs, and other consumable parts are not covered by these warranties.
- The start of U-Line's obligation is limited to four years after the shipment date from U-Line.
• In-home instruction on how to use your product is not covered by these warranties.
• Food, beverage, and medicine loss are not covered by these warranties.
- If the product is located in an area where U-Line factory authorized service is not available, you may be responsible for a trip charge or you may be required to bring the product to a U-Line factory authorized service location at your own cost and expense.
- Units purchased after use as floor displays, and/or certified reconditioned units, are covered by the limited one year warranty only and no coverage is provided for cosmetic defects.
• Signal issues related to Wi-Fi connectivity are not covered by these warranties.
For parts and service assistance, or to find U-Line factory authorized service near you, contact U-Line: 8900 N. 55^th Street, Milwaukee, WI 53223 • u-line.com • onlineservice@u-line.com • +1.414.354.0300
Copyright U-Line Corporation. All Rights Reserved. | Publication Number 30379 | 11/2022 Rev. P
- USER GUIDE & SERVICE MANUAL
- Click on any section below to jump directly there
- Maintenance
- Operating Instructions
- Service
- WELCOME TO U-LINE
- U-Line — RIGHT PRODUCT. RIGHT PLACE. RIGHT TEMPERATURE.®
- PRODUCT INFORMATION
- PROPERTY DAMAGE / INJURY CONCERNS
- GENERAL INQUIRIES
- SERVICE & PARTS ASSISTANCE
- CONNECT WITH US
- Safety and Warning
- NOTICE
- SAFETY ALERT DEFINITIONS
- DANGER
- WARNING
- CAUTION
- GENERAL PRECAUTIONS
- CALIFORNIA PROPOSITION 65
- Disposal and Recycling
- Environmental Requirements
- Electrical
- Cutout & Product Dimensions
- PREPARE SITE
- Water Hookup
- PREPARE PLUMBING
- Water Supply Connection
- General Installation
- LEVELING INFORMATION
- INSTALLATION
- Grille Installation
- REMOVING AND INSTALLING GRILLE
- Removing the grille
- Installing the grille
- Door Swing
- Door Adjustments
- DOOR ALIGNMENT AND ADJUSTMENT
- To align and adjust the door:
- REVERSING THE DOOR
- Remove door latch assembly
- TO REVERSE THE DOOR
- Remove top hinge and door:
- Move bottom hinge:
- Prepare door:
- Install top hinge:
- Install grille if applicable.
- Align and adjust the door:
- Door Latch
- To install, perform the following:
- Note: Spacer (2) only required if included with unit.
- First Use
- Ice
- ICE MAKER OPERATION
- ICE MAKER ADJUSTMENT
- Ice Cube Thickness Adjustment
- Interval - As Required
- ADJUSTING ICE HARVEST
- Airflow and Product Loading
- Cleaning
- EXTERIOR CLEANING
- Vinyl Clad (Black or White) Models
- Stainless Models
- Do not clean with steel wool pads.
- Do not use stainless steel cleaners or polishes on any glass surfaces.
- Using abrasive pads such as ScotchBrite™ will cause the graining in the stainless to become blurred.
- Integrated Models
- INTERIOR CLEANING
- Do not use any solvent-based or abrasive
- DEFROSTING
- Manual Defrost Models
- To defrost:
- Cleaning Condenser
- INTERVAL - EVERY SIX MONTHS
- Extended Non-Use
- VACATION/HOLIDAY, PROLONGED SHUTDOWN
- WINTERIZATION
- Troubleshooting
- BEFORE CALLING FOR SERVICE
- TROUBLESHOOTING GUIDE
- ELECTROCUTION HAZARD. Never attempt to repair or perform maintenance on the unit before disconnecting the main electrical power.
- Product Liability
- Warranty Claims
- Ordering Replacement Parts
- R290/R600A Specifications
- R290/R600a SPECIFICATIONS/LABELING
- RECOVERING/RECLAIMING R290/R600a
- SYSTEM REPAIR
- LEAK DETECTION
- RECHARGING
- SUMMARY
- System Diagnosis Guide
- Compressor Specifications
- Troubleshooting - Extended
- Harvest-1 Cycle
- HARVEST-2 CYCLE
- WATER FILL CYCLE
- EJECT CYCLE
- TEMPERATURE CONTROL SPECIFICATIONS
- LIMIT SWITCH SPECIFICATIONS
- REPLACING ICE MAKER ASSEMBLY (CO29F ONLY)
- REPLACING ICE MAKER ASSEMBLY (ALL MODELS EXCEPT CO29F)
- Volt Conversion List
- Defrost
- Replace Ice Maker
- REMOVE ICE MAKER
- INSTALL ICE MAKER
- U-Line Corporation (U-Line) Limited Warranty
- One Year Limited Warranty
- Two Year Limited Warranty (5 Class Product)
- Available Second & Third Year Limited Warranty
- Five Year Sealed System Limited Warranty
- Terms
Brand : U-Line
Model : UMCR014-SS02A
Category : Ice cream maker