TFEM629WE - Oven Tisira - Free user manual and instructions
Find the device manual for free TFEM629WE Tisira in PDF.

| Product Type | Built-in Electric Oven |
| Brand | Tisira |
| Model | TFEM629WE |
| Energy Source | Electric |
| Dimensions (H x W x D) | 595 x 595 x 550 mm |
| Weight | 30 kg |
| Total Power Consumption | 2.3 kW |
| Energy Efficiency Class | A |
| Oven Capacity | 71 L |
| Cooking Functions | Conventional, Fan-Forced, Grill, Fan-Grill, Defrost, Pizza Mode, Bottom Heat |
| Temperature Range | 50°C – 250°C |
| Display Type | LED Digital Timer & Display |
| Control Type | Knobs & Touch Controls |
| Interior Light | Yes |
| Cleaning Type | Enamel Interior, Easy-Clean |
| Safety Features | Child Lock, Automatic Shut-Off, Cool-Touch Door |
| Spare Parts Availability | Spare parts available through Tisira service network |
| Repairability Index | 7.5 / 10 (estimated) |
| Installation Type | Built-in under counter or in column |
| Warranty | 2 years (standard) |
Frequently Asked Questions - TFEM629WE Tisira
User questions about TFEM629WE Tisira
0 question about this device. Answer the ones you know or ask your own.
Ask a new question about this device
Download the instructions for your Oven in PDF format for free! Find your manual TFEM629WE - Tisira and take your electronic device back in hand. On this page are published all the documents necessary for the use of your device. TFEM629WE by Tisira.
USER MANUAL TFEM629WE Tisira
IMPORTANT // Please ensure that you read through this user manual prior to installation and use. This manual contains important information to ensure optimal performance and keep you safe. Please retain your proof of purchase, as this will be required in the event that you require warranty service. Remember to retain this manual for future reference.
t tisira
CONTENTS
CONTENTS 2
WARNING & SAFETY INFORMATION 3-4
PRODUCT OVERVIEW 5-7
OPPERATING INSTRUCTIONS 8-14
MAINTAINING YOUR COOKER 15-19
INSTALLATION 20-23
TROUBLE SHOOTING 24-25
NOTES 26-27
WARNING & SAFETY INFORMATION
- Read these instructions carefully before installing or using this appliance.
- Do not modify this appliance.
- Do not store or use flammable materials in the appliance storage drawer or near this appliance.
- Servicing should be carried out only by authorised personnel.
- Do not remove the plug by pulling the cable.
- In order to prevent accidental tipping of the appliance, for example by a child climbing onto the open oven door, the anti-tilting chain must be installed. Refer to the instructions on page 23.
- To avoid burns, young children should be kept away.
- This appliance is not intended for use by persons (including children) with reduced physical, sensory or mental capabilities, or lack of experience and knowledge, unless they have been given supervision or instruction concerning use of the appliance by a person responsible for their safety.
- Children should be supervised to ensure that they do not play with the appliance.
- Accessible parts may become hot when the grill is in use. Children should be kept away.
-
Very important: keep this instruction booklet with the appliance for handy references.
-
This appliance is designed for domestic use only.
- Keep packaging out of reach of children at all times.
- Never use your appliance as a work or storage surface.
- Never use your appliance for warming or heating the room.
- Do not use a steam cleaner to clean your cooktop.
INSTALLATION
ELECTRICAL SHOCK HAZARD
- Disconnect the appliance from the mains electricity supply before carrying out any work or maintenance on it.
- Connection to a good earth wiring system is essential and mandatory.
- Alterations to the domestic wiring system must only be made by a qualified electrician.
- Failure to follow this advice may result in electrical shock or death.
CUT HAZARD
• Take care - panel edges are sharp.
- Failure to use caution could result in injury or cuts.
WARNING & SAFETY INFORMATION
- Do not cook on a broken or cracked cooktop. If the cooktop surface should break or crack, switch the appliance off immediately at the mains power supply (wall switch) and contact a qualified technician.
- Switch the cooktop off at the wall before cleaning or maintenance.
HEALTH HAZARD
- This appliance complies with electromagnetic safety standards.
HOT SURFACE HAZARD
- During use, accessible parts of this appliance will become hot enough to cause burns.
- Do not let your body, clothing or any item other than suitable cookware contact the solid element cooking zones until the surface is cool.
- Keep children away.
- Handles of saucepans may be hot to touch. Check that saucepan handles do not overhang other cooking zones that are on. Keep handles out of reach of children.
- Failure to follow this advice could result in burns and scalds.
PRODUCT OVERVIEW
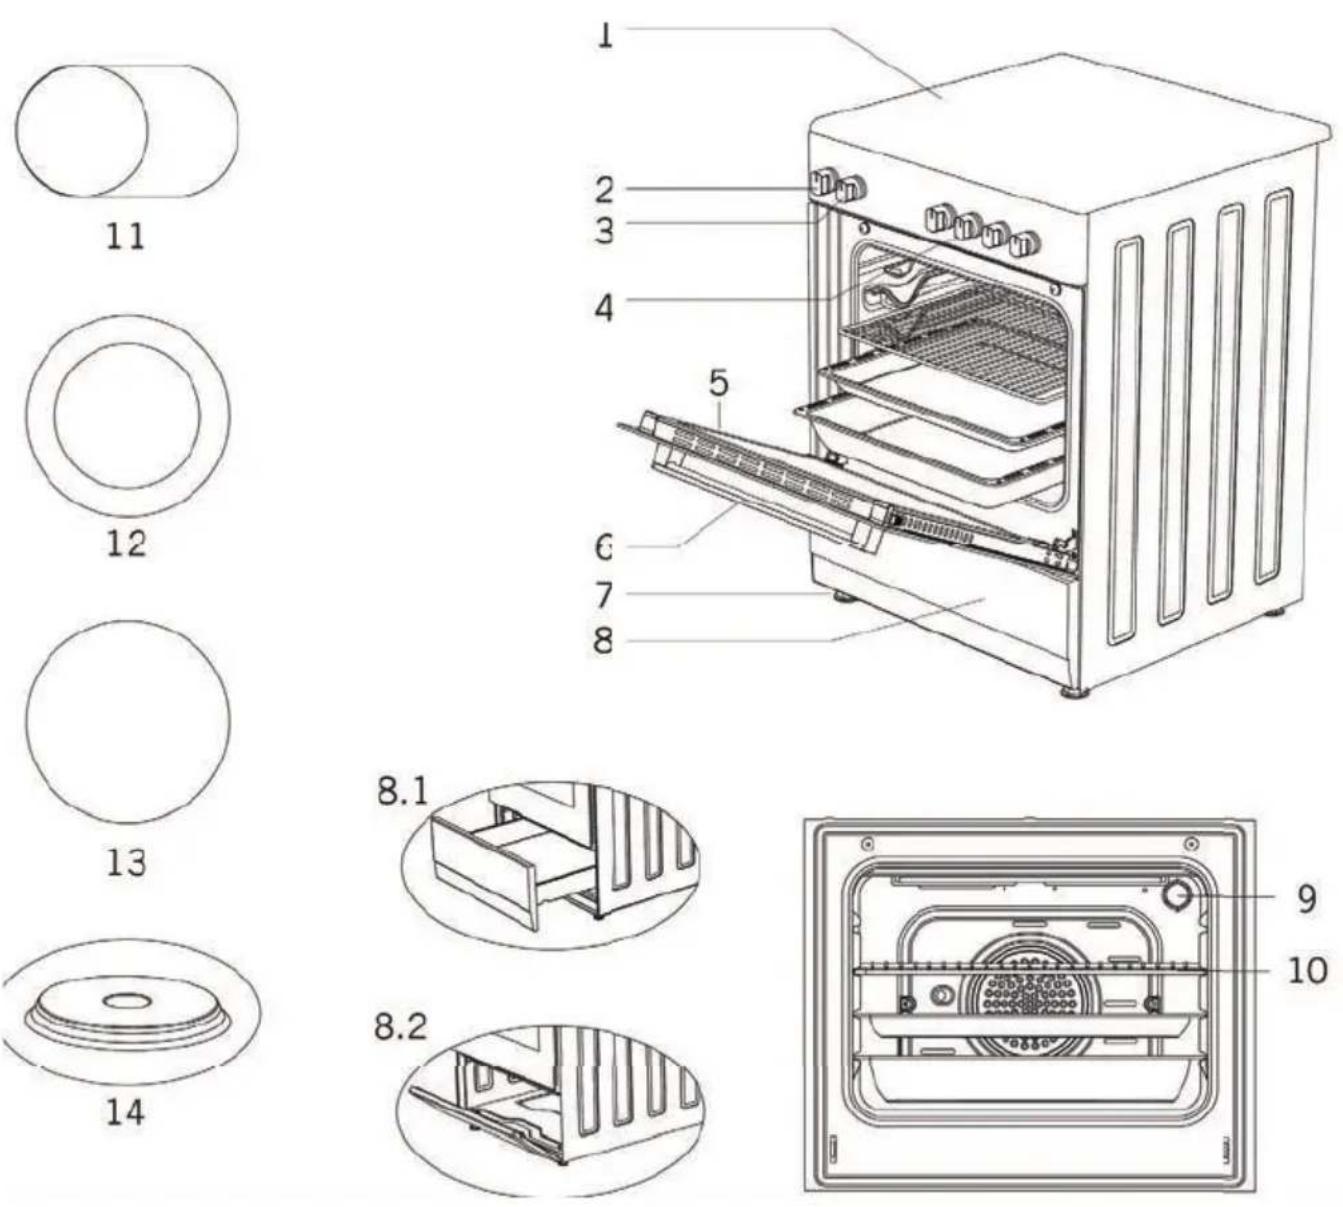
- Cooktop plate
- Thermostat knob
- Command knob for oven
- Command Knobs for Cooktop Zones
- Oven door
- Handle
- Plastic leg
- Lower cabinet door
Do not use cookware with jagged edges or a curved base.
Always lift pans off the electric hob - do not slide, or they may scratch the surface.
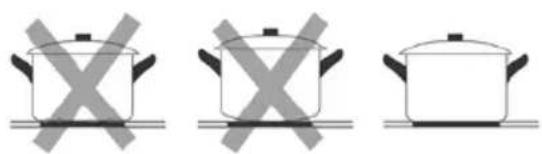
natural_image
Three identical cooking pots with crossed-out X marks, placed on a flat surface (no text or symbols)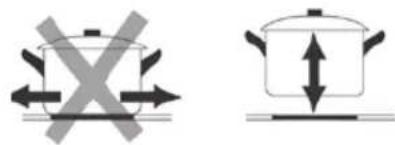
Make sure that the base of your pan is smooth, sits flat against the surface, and is the same size as the cooking zone. Always centre your pan on the cooking zone.
natural_image
Four identical illustrations of a cooking pot with crossed X marks, shown in different orientations (no text or symbols)CONTROL PANEL

- Thermostat
- Function selection button
- Mechanical timer *
-
Rear left electrical heater
-
Front left electrical heater
- Front right electrical heater
- Rear right electrical heater
PRODUCT OVERVIEW
TECHNICAL FEATURES OF YOUR OVEN
| SPECIFICATIONS 60 X 60 | |
| Outer width 600 mm | |
| Outer depth 630 mm | |
| Outer height 855 mm | |
| Lamp power 15-25 W | |
| Bottom heating element 1200 W | |
| Top heating element 1000 W | |
| Turbo heating element 2200 W | |
| Grill heating element 2000 W | |
| Supply voltage 220-240V AC/380-415V AC 50/60 Hz | |
| Hot plate 145 mm 1000 W | |
| Hot plate 180 mm 1500 W | |
| Hot plate rapid 145 mm 1500 W | |
| Hot plate rapid 180 mm 2000 W | |
| Ceramic heater 140 mm 1200 W | |
| Ceramic heater 180 mm 1700 W / 1800 W | |
| Ceramic heater 140 mm / 250 mm 1800 W | |
| Ceramic heater 120 mm / 180 mm 1700 W | |
NOTE // Keep the oven door closed while using the grill function.
OPPERATING INSTRUCTIONS
INSTRUCTIONS FOR USE OF COOKTOP
- Read this guide, taking special note of the warning and safety information.
- Remove any protective film that may still be on your electric hob
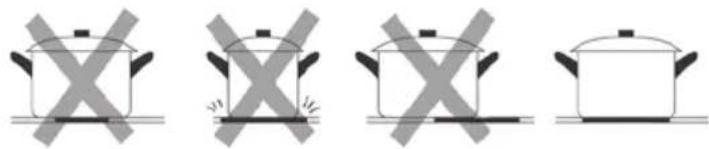
USING YOUR ELECTRIC HOB
TO BEGIN COOKING
- Place a suitable pan onto the cooking zone that you wish to use.
NOTE // Make sure the bottom of the pan and the surface of the cooking zone is clean and dry.
- Place a suitable pan onto the cooking zone that you wish to use.
“MAX” or “6” indicates the highest heat setting, “0” indicates that the cooktop is off.
NOTE // This hob has four heating elements that are built with thermal cut-off protection, and are thermostatically controlled.
NOTE // The element will not operate at maximum power continuously and will automatically drop to half the power once the maximum heat has been reached.
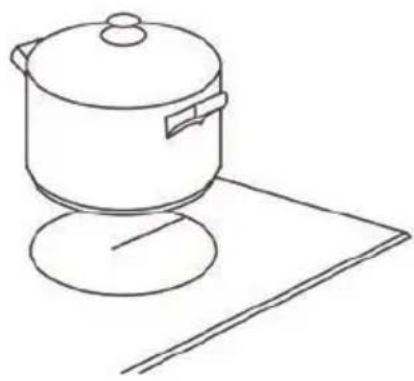
natural_image
Line drawing of a cooking pot on a stand with a sheet of paper nearby (no text or symbols)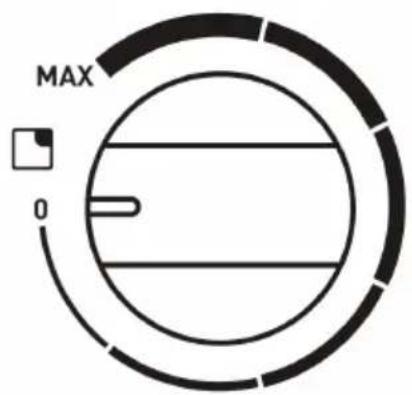
Turn the heating zones off by positioning the heating zone controls to the "O" (off) position.
OPERATING INSTRUCTIONS
INSTRUCTIONS FOR USE OF OVEN
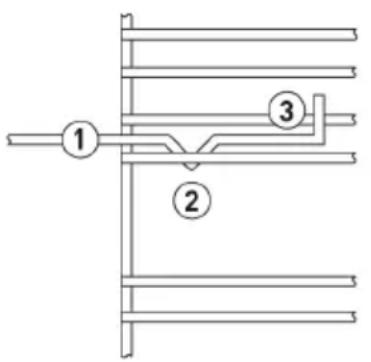
When adjusting or positioning your shelf, please ensure the following:
- Ensure that the shelf / tray is located between the two wire sideracks. (See point 1)
- The shelf stops should be facing downwards and towards the rear. (See point 2)
- The guard rail should always be located at the rear of the oven (See point 3)
IMPORTANT // Prior to first time use, it is recommended that you select the Conventional Cooking function and set it to work at its highest temperature (250°C) for half an hour without anything inside the oven and with its the door shut. At the end of this process, open the oven door and leave it open for a few minutes to allow fresh air to circulate inside the oven.
This procedure will remove the unpleasant odour that is caused by bonding agents used to protect the oven cavity during the enamel coating stage.
NOTICE // Your oven is equipped with a thermostatically controlled cooling fan that will switch on when required to cool the oven. This fan may continue to run even after the oven is switched off, but it will automatically turn off when the cavity is sufficiently cool. Warm air is discharged from the front of the oven during the cooling process.
USING THE THERMOSTAT CONTROL
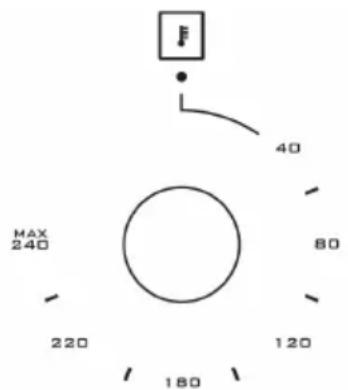
- Set the temperature by turning the thermostat control to the desired level.
- When a temperature is selected, thermostat light will illuminate.
- When the selected temperature is reached, the light will turn off.
ATTENTION // During use, the appliance becomes hot. Care should be taken to avoid touching heating elements inside the oven.
NOTE // Never line the oven with aluminium sheets as this can cause damage to the enamel.
OPERATING INSTRUCTIONS
USING THE OVEN FUNCTION SELECTOR
| SYMBOL FUNCTION DESCRIPTION | ||
| Light | The light mode can be turned on with no heating elements and will turn on with all oven functions. | |
| Defrost | Defrost mode distributes air at ambient temperature inside the oven to defrost food quickly and without protein adulterations. | |
| Fan-Assisted Grill | Fan-assisted Grill mode uses the grill element and oven fan to cook meats, vegetables and poultry. In this mode, heat is radiated down then spread throughout the oven. To achieve the best results, use the middle tray position. | |
| Grill | Grill mode should be used for melting cheese, toasting & browning. Five minutes preheating is required to heat the element. Use the upper shelf position for best results. | |
| Fan Assisted Convection | Fan-assisted convection mode is ideal for delicate foods such as desserts. In this mode, the oven uses the oven fan, bottom and top elements. It is recommended to use the lower shelf position with this mode. | |
| Natural Convection | Natural Convection mode utilises the top and bottom elements. This function is recommended for use with the middle shelf position and is good for slow cooking casseroles, etc. | |
| Bottom Element | Bottom Element mode is recommended for cooking pastry based dishes (flans, quiches and tarts) that require more heat and radiation from below. | |
| Top Element | Top Element mode is recommended for dishes that require more heat from the top; such as gratins, pies, quiches and lasagne. | |
| Fan Forced | Fan-forced mode cooks foods placed on up to 2 different shelves. | |
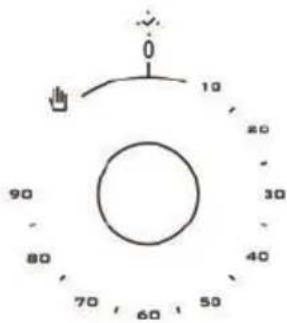
MECHANICAL TIMER
Used for determining the period for cooking in the oven. When adjusted time is expired, power to heaters is turned off and an audible warnig signal is emitted. Mechanical timer can be adjusted to desired period between 0-90 minutes. For cooking periods, see cooking tables.
OPERATING INSTRUCTIONS
TABLE OF COOKING TIMES
The table below provides examples of the function, temperature, tray position and estimated cooking times for various types of food.
IMPORTANT // Please note that this table is a guide only and times can vary according to the type of food, volume and quantity of food being cooked.
Preheating of the oven is recommended for 10-15 minutes or until the oven thermostat light switches off to indicate that the selected temperature has been reached.
NATURAL CONVECTION
| Food to be cooked Tray | Position | Temperature (°C) | Cooking time (mins) |
BAKED GOODS
| Small cakes 3 195 20-30 | |||
| Victoria sponge cake 3 190 25-35 | |||
| Swiss Roll 3 200 20-25 | |||
| Fruit Cake 2 155 120-180 | |||
| Scones 3 260 10-20 | |||
| Meringues 2 95 120-180 | |||
| Shortcrust Pastry 3 210 25-45 | |||
| Puff/Flaky Pastry 2 220 20-35 | |||
| Choux Pastry 3 220 25-35 | |||
| Biscuits | 3 200 15-25 | ||
| Bread 2 250 30-40 | |||
| Pudding | 2 165 60-120 | ||
| Pizza | 3 270 | 25 | |
| Lasagne 3 170 | 75 |
OPERATING INSTRUCTIONS
NATURAL CONVECTION CONTINUED
| Food to be cooked Tray | Temperature (°C) | Cooking time (mins) | ||
| Position | ||||
| MEAT & POULTRY | ||||
| Beef (On the bone) | Rare & Crusty | mins per 500g (+15 mins) | 270 12 mins | per 500g (+12 mins) |
| Rare 220 15 | ||||
| Medium 220 20 mins per 500g (+20 mins) | ||||
| Well Done 180 25 mins per 500g (+25 mins) | ||||
| Lamb | On the bone 220 20 mins per 500g (+20 mins) | |||
| De-boned and rolled | 170 27 mins | per 500g (+27 mins) | ||
| Pork | On the bone 220 25 mins per 500g (+25 mins) | |||
| De-boned and rolled | 180 30 mins | per 500g (+30 mins) | ||
| Veal | On the bone | 220 | 25 mins per 500g (+25 mins) | |
| De-boned and rolled | 30 mins per 500g (+30 mins) | |||
| Chicken | 220 | 20 mins per 500g (+20 mins) | ||
| 170 | 25 mins per 500g (+15 mins) | |||
| Turkey/Duck | 220 | 20 mins per 500g (+20 mins) | ||
| 170 | 25 mins per 500g (+15 mins) | |||
FAN FORCED
| Food to be cooked Tray | Position | Temperature (°C) | Cooking time (mins) |
BAKED GOODS
| Small cakes | All Positions | 175 15-25 | |
| Victoria sponge cake 170 20-30 | |||
| Swiss Roll 180 15-20 | |||
| Fruit Cake 135 60-120 | |||
| Scones 210 8-15 | |||
| Meringues 80 60-120 |
OPERATING INSTRUCTIONS
FAN FORCED CONTINUED
| Food to be cooked Tray Position Temperature (°C) Cooking time (mins) | |||
| BAKED GOODS | |||
| Shortcrust Pastry | All Positions | 190 20-40 | |
| Puff/Flaky Pastry 200 15-30 | |||
| Choux Pastry 200 20-30 | |||
| Biscuits 170 10-20 | |||
| Bread 200 25-35 | |||
| Pudding 150 60-120 | |||
| Pizza 250 20 | |||
| Lasagne 165 60 | |||
MEAT & POULTRY
| Beef (On the bone) | Rare & Crusty | 3 | 230 9 mins | per 500g (+9 mins) |
| Rare 190 | 15 mins per 500g (+8 mins) | |||
| 20 mins per 500g (+10 mins) | ||||
| Medium 160 | 25 mins per 500g (+8 mins) | |||
| Well Done | 190 | 20 mins per 500g (+10 mins) | ||
| Lamb | On the bone | 155 | 27 mins per 500g (+14 mins) | |
| De-boned and rolled | 200 | 25 mins per 500g (+14 mins) | ||
| Pork | On the bone | 160 | 30 mins per 500g (+18 mins) | |
| De-boned and rolled | 200 | 25 mins per 500g (+14 mins) | ||
| 30 mins per 500g (+14 mins) | ||||
| Veal | On the bone | 200 | 20 mins per 500g (+10 mins) | |
| De-boned and rolled | 155 | 25 mins per 500g (+13 mins) | ||
| Chicken | 220 | 18 mins per 500g (+14 mins) | ||
| Turkey/Duck | 155 | 23 mins per 500g | ||
OPERATING INSTRUCTIONS
ACCESSORIES
The accessories can be inserted into the oven in 4 different shelf positions. They can be safely pulled two-thirds of the way out of the oven.
BAKING AND ROASTING SHELF
| Accessory Description | |
 Tray / Glass tray Tray / Glass tray | Used for pastry (cookie, biscuit etc.), frozen foods. |
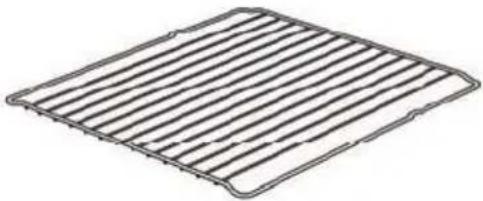 Wire Grill Wire Grill | Used for roasting or placing foods to be baked, roasted and frozen into desired rack. |
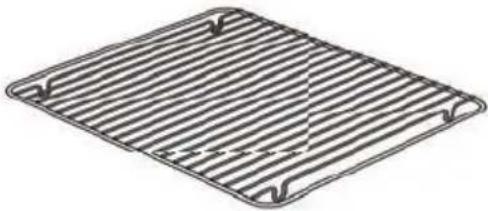 In Tray Wire Grill In Tray Wire Grill | Foods that stick while cooking such as steak are placed on in tray grill. Thus contact of food with tray and sticking are prevented. 5 |
MAINTAINING YOUR COOKER
MAINTENANCE AND CLEANING - OVEN
Before any operation disconnect the appliance from the power supply and wait for it to cool down.
- Do not use steam cleaner
- Do not use harsh abrasive cleaners, flammable agents (such as acid) or sharp metal scrapers to clean this appliance.
- Wash the enamelled parts with lukewarm water and detergent
- Rinse the stainless steel parts well with water and dry them with a soft cloth
- To clean the hob use slightly damp sponges and wiping cloths: if too much water is used it could penetrate the internal parts and damage electrical parts.
- For persistent stains use normal non-abrasive detergents, or hot vinegar
- Clean the glass parts with hot water and a soft cloth
- It is necessary to clean the oven after each use
- Once the oven is cold, you will be able to remove the fat deposits with a sponge or a cloth damp with warm soapy water or a common detergent.
- In order to clean the front glass lid of the oven; remove the fixing screws fixing the handle by means of a screwdriver and remove the oven door. Then clean and rinse it thoroughly. After drying, place the oven glass properly and re-install the handle.
MAINTENANCE AND CLEANING- CERAMIC GLASS SURFACES
- Never pour cold water on hot cookers.
- Do not stand on a ceramic glass plate.
- Sudden pressure, for example, the effect of a falling salt shaker may be critical. So, do not place such objects on a place above the hobs.
- After each use, make sure that the base of the cooking pot and surfaces of cooking zones are clean and dry.
- Do not peel vegetables on the hob surfaces. Sand grains falling from the vegetables may scratch the ceramic glass plate.
- Do not lay flammable materials such as cardboard or plastic on the oven. Objects such as tin, zinc, or aluminium (as well as aluminium foils or empty coffee pots) may melt on hot cooking surfaces and thus cause damage.
- Take care not to let sugary foods or fruit juices contact the hot cooking zones. The ceramic glass surface may be stained by these.
Always clean the appliance immediately after any food spillage.
To maintain safe operation, it is recommended that the product be inspected every five years by an authorised service person.
Note // See illustration on page 17
MAINTAINING YOUR COOKER
MAINTENANCE AND CLEANING - SOLID ELEMENT HOTPLATES
| Concern Steps to follow Explanation | ||
| Everyday soiling on the surface (fingerprints, marks, stains left by food or nonsugary spill-overs on the surface) | 1. Switch the power to the cooktop off2. Apply a cooktop cleaner while the cooktop is still warm (but not hot!)3. Rinse and wipe dry with a clean cloth or paper towel4. Switch the power to the cooktop back on | ·When the power to the cooktop is switched off, the cooking zone may still be hot! Take extreme care as there is no “hot surface” indication.·Heavy-duty scourers, some nylon scourers and harsh/ abrasive cleaning agents may scratch the surface. Always read the label to check if your cleaner or scourer is suitable.·Never leave cleaning residue on the cooktop: the surface may become stained. |
| Spill-overs on the heating zone controls | 5. Switch the power to the cooktop off6. Soak up the spill7. Wipe the control panel area with a clean damp sponge or cloth8. Wipe the area completely dry with a paper towel.9. Switch the power to the cooktop back on | ·Ensure that the control panel area is wiped dry before the cooktop is turned back on. |
MAINTAINING YOUR COOKER
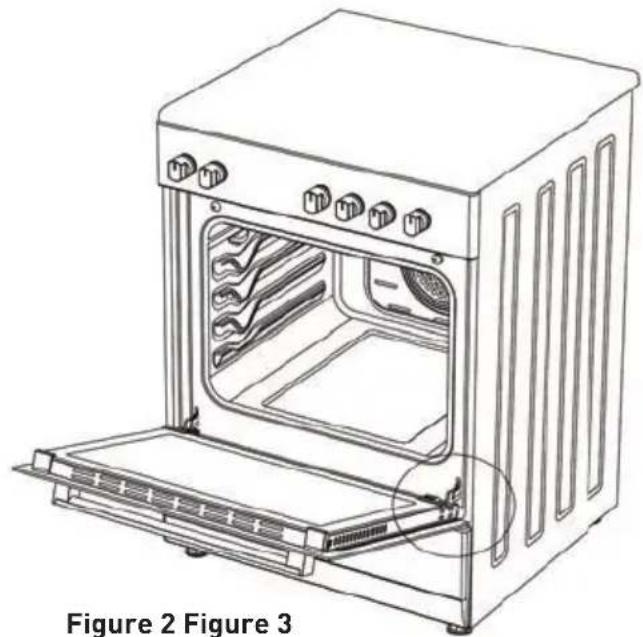
INSTALLATION OF THE OVEN DOOR
natural_image
Line drawing of an oven with internal appliances and a door open, labeled Figure 2 (Figure 3) at the bottom (no text or symbols on the diagram itself)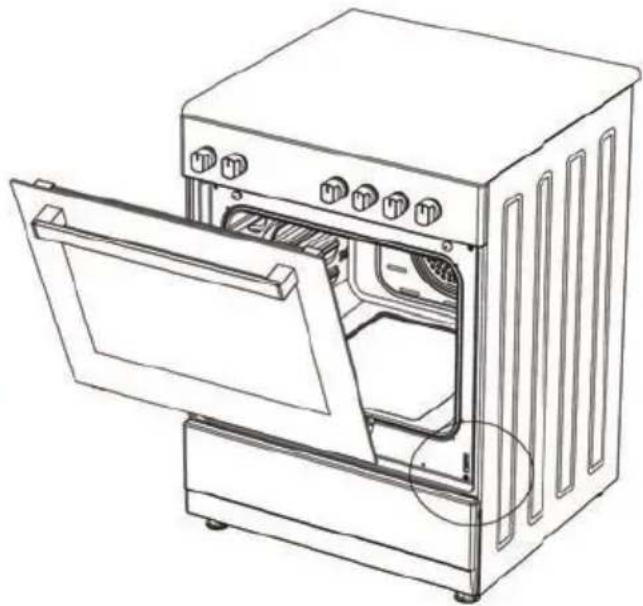
natural_image
Line drawing of an open oven with a door open, showing internal components and ventilation slots (no text or symbols)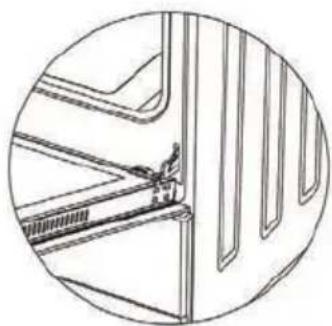
natural_image
Technical line drawing of a mechanical component or bracket assembly (no text or symbols)Figure 2.1
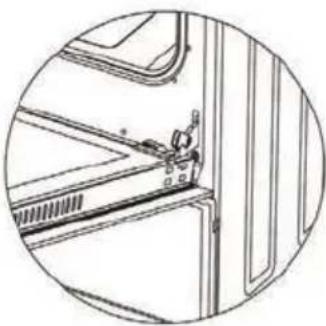
Completely open the oven door by pulling it to yourself. Afterwards, perform the unlocking process by pulling the hinge lock upwards with the help of a screw driver as shown in
natural_image
Technical line drawing of a vehicle cabin or garage door with handle and seat (no text or symbols)Figure 2.2
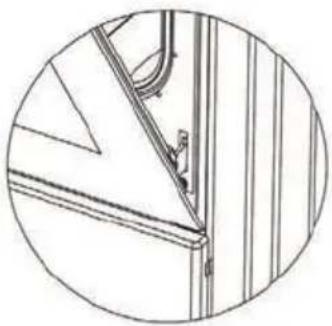
Bring the hinge lock to the widest angle as shown in Figure
2.2. Bring both hinges connecting the oven door to the oven to the same position.
natural_image
Technical line drawing of a mechanical assembly with no visible text or symbolsFigure 3.1
Afterwards, close the oven door as to lean on the hinge lock as shown in Figure 3.1.

natural_image
Technical line drawing of a door frame with mounting bracket and side panel (no text or symbols)Figure 3.2
To remove the oven door, pull it upwards by holding it with both hands when close to the closed position as shown in Figure 3.2.
Figure 2.1
In order to re-place the oven door, perform the above mentioned steps in reverse.
MAINTAINING YOUR COOKER
CLEANING AND MAINTENANCE OF THE OVEN'S FRONT DOOR GLASS
Remove the profile by pressing the plastic latches on both left and right sides as shown in Figure 4 and pulling the profile towards yourself as shown in Figure 5. Then remove the inner-glass as shown in Figure 6. If required, middle glass can be removed in the same way. After cleaning and maintenance are done, remount the glasses and the profile in reverse order. Make sure the profile is properly seated in its place.
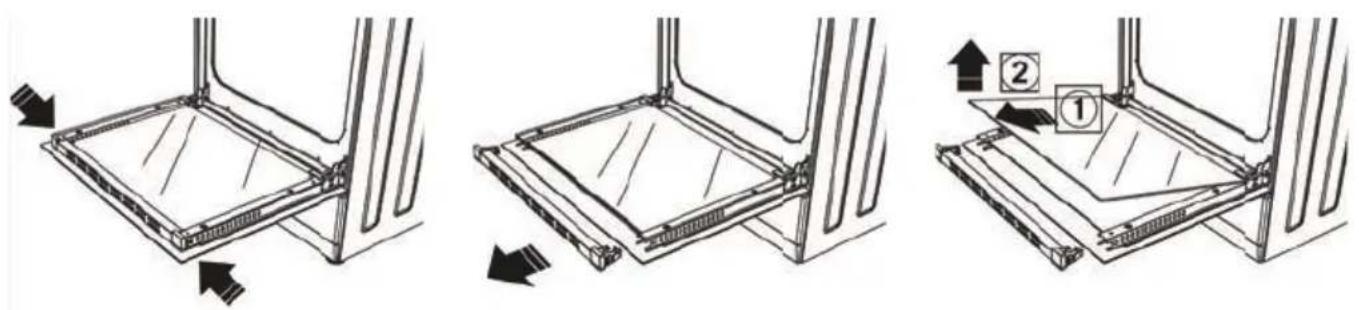
Figure 4 Figure 5 Figure 6
CATALYTIC WALLS
Catalytic walls are located on the left and the right side of cavity under the guides. Catalytic walls banish the bad smell and obtain the best performance from the cooker. Catalytic walls also absorb oil residue and clean your oven while it's operating.
REMOVING THE CATALYTIC WALLS
In order to remove the catalytic walls; the guides must be pulled out. As soon as the guides are pulled out, the catalytic walls will be released automatically. The catalytic walls must be changed after 2-3 years.

natural_image
Line drawing of a window with two hands inserting a rack into the frame (no text or symbols)MAINTAINING YOUR COOKER
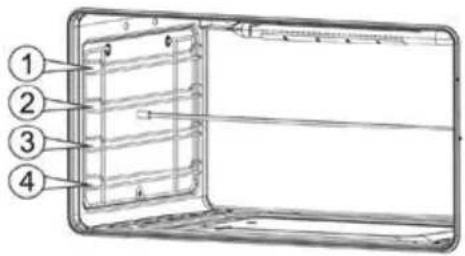
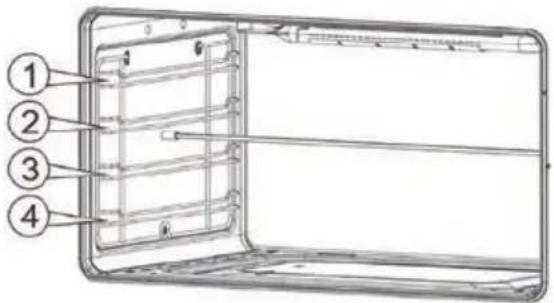
RACK POSITIONS
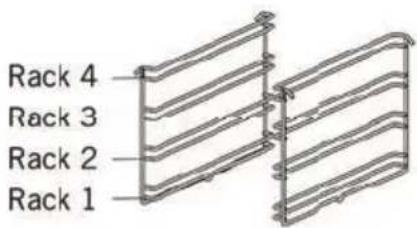
It is important to place the wire grill into the oven properly. Do not allow wire rack to touch rear wall of the oven. Rack positions are shown in the next figure. You may place a deep tray or a standard tray in the lower and upper wire racks.
INSTALLING AND REMOVING WIRE RACKS
To remove wire racks, press the clips shown with arrows in the figure, first remove the lower, and than the upper side from installation location. To install wire racks; reverse the procedure for removing wire rack.
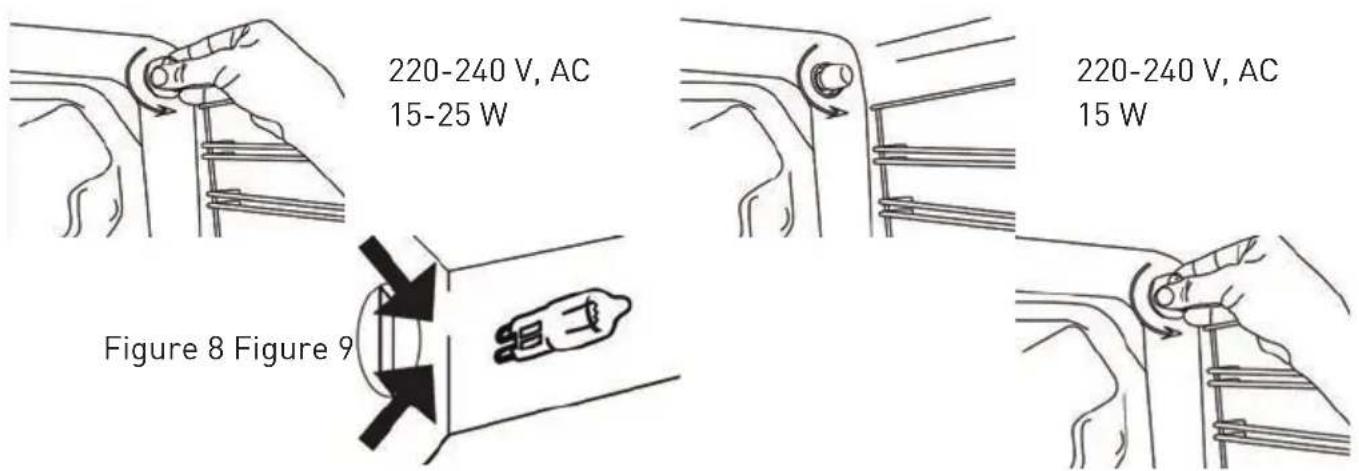
CHANGING THE OVEN LAMP
WARNING // To avoid electric shock, ensure that the appliance circuit is open before changing the lamp. (having circuit open means power is off) First disconnect the power of appliance and ensure that appliance is cold. Remove the glass protection by turning as indicated in the figure on the left side. If you have difficulty in turning, then using plastic gloves will help you in turning.
Then remove the lamp by turning, install the new lamp with same specifications.
Reinstall glass protection, plug the power cable of appliance into electrical socket and complete replacement. Now you can use your oven.
TYPE G9 LAMP TYPE E14 LAMP
INSTALLATION
ELECTRICAL CONNECTION
- Your oven requires 40 Amp fuse for mono phase or 3x16 Amp fuse for 3 phase supply according to electrical power for cooker section has 4 ceramic heater and oven section has electric models. Installation by a qualified electrician is mandatory.
- Your oven is adjusted in compliance with 220-240V / 380-415V AC,50/60Hz. electric supply. If the mains are different from this specified value, contact your authorized service.
- Electrical connection of the oven should only be made to connections / sockets with an earth system installed in compliance with local regulations.
- If there are no connections/sockets with an earth system in place where the oven will be installed, immediately contact a qualified electrician to install. The manufacturer is not responsible for damages that will arise because of the appliance not be connected to an earth system.
- If your supply cable gets damaged, it should be replaced by an authorized service agent or qualified electrician in order to avoid danger or electric shock.
- Electrical cable should not touch the hot parts of the appliance.
- Operate your oven in dry atmosphere.
- When placing your oven to its location, ensure that it is at the counter level. Bring it to the counter level by adjusting the feet if necessary.
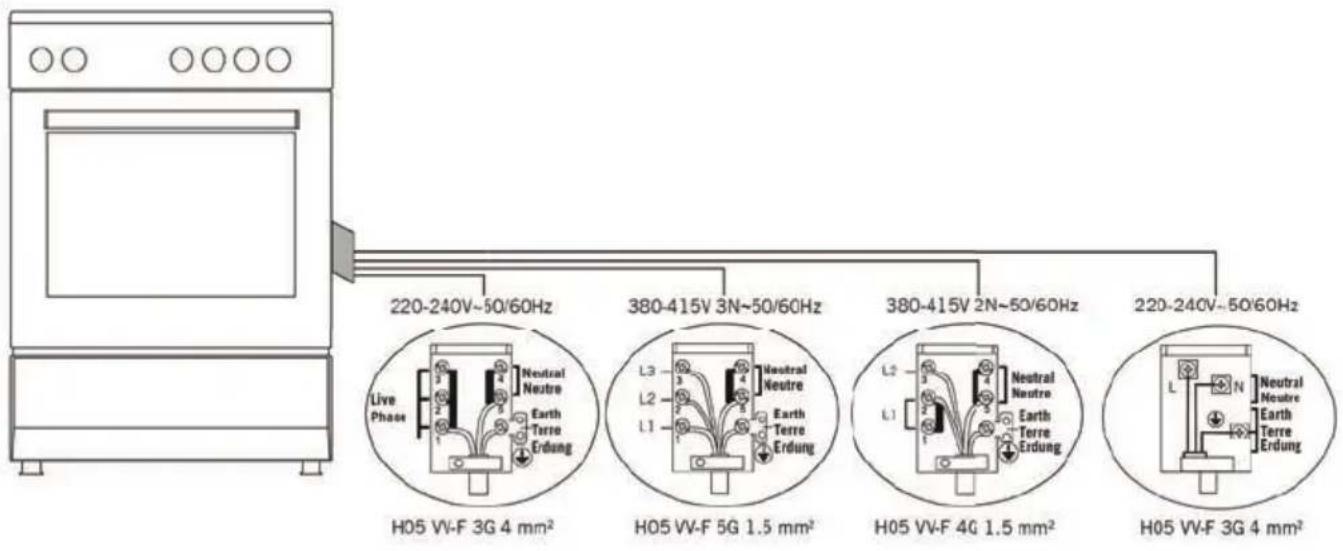
flowchart
graph TD
    A["Machine"] --> B["220-240V~50/60Hz"]
    B --> C["H05 VV-F 3G 4 mm²"]
    B --> D["380-415V 3N~50/60Hz"]
    B --> E["380-415V 2N~50/60Hz"]
    B --> F["220-240V~50/60Hz"]
    C --> G["L3 Neutral Neutre Earth Terre Erdung"]
    C --> H["L2 Neutral Neutre Earth Terre Erdung"]
    D --> I["L3 Neutral Neutre Earth Terre Erdung"]
    E --> J["L2 Neutral Neutre Earth Terre Erdung"]
    F --> K["L3 Neutral Neutre Earth Terre Erdung"]
INSTALLATION
INSTALLATION OF YOUR OVEN
Check if the electrical installation is proper to bring the appliance in operating condition. If electricity installation is not suitable, call an electrician to arrange the utilities as necessary. Manufacturer shall not be held responsible for damages caused by operations performed by unauthorized persons.
WARNING // It is customer's responsibility to prepare the location the product shall be placed on and also to have the electrical installation prepared.
WARNING // The rules in local standards about electrical installations shall be followed during product installation.
WARNING // Check for any damage on the appliance before installing it.
Do not have the product installed if it is damaged. Damaged products cause a risk for your safety.
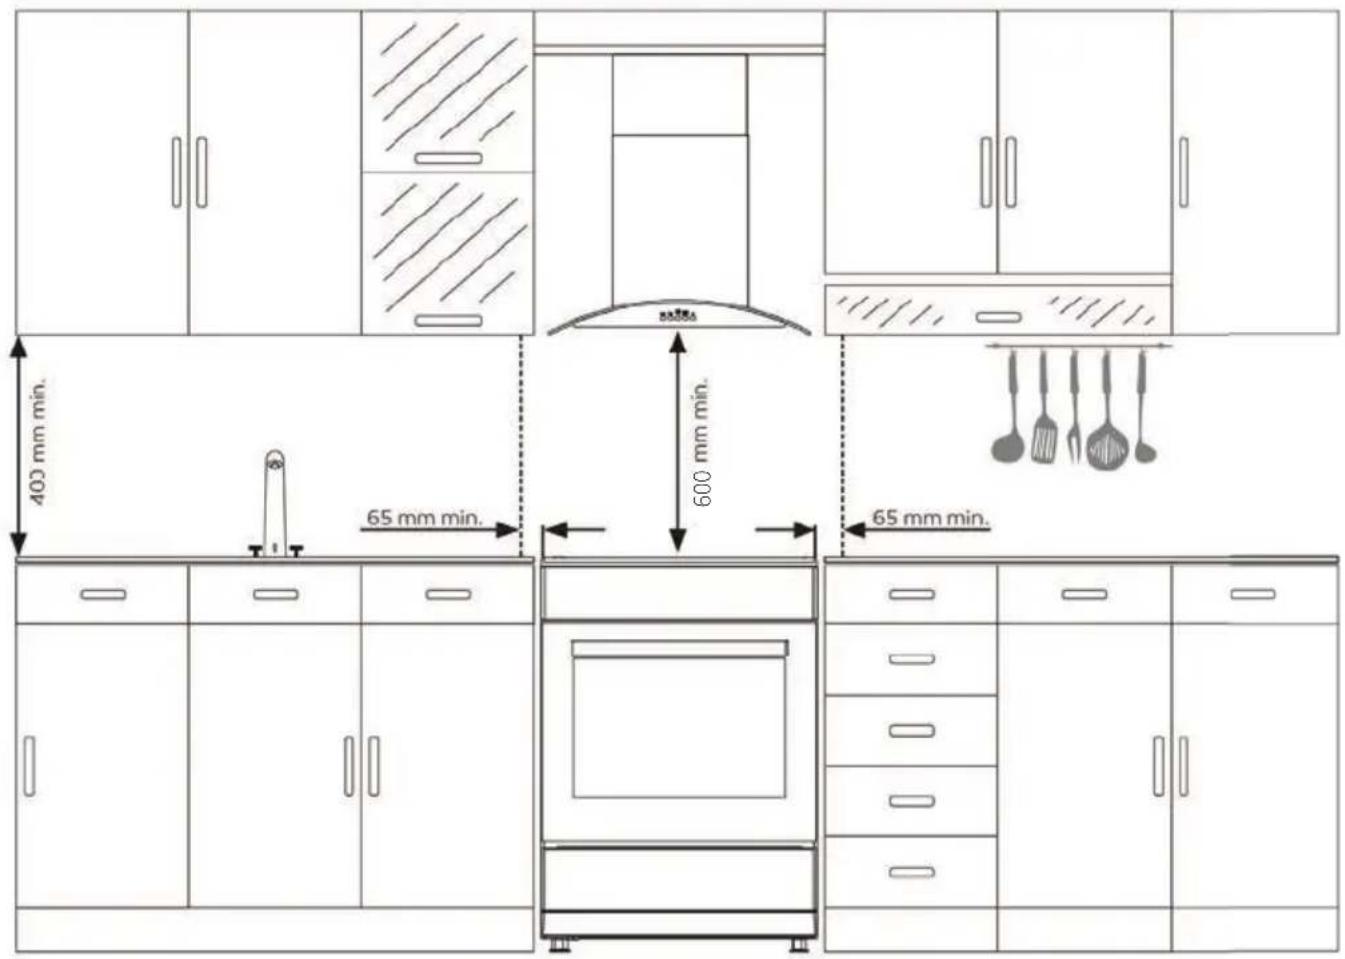
RIGHT PLACE FOR INSTALLATION AND IMPORTANT WARNINGS
Appliance feet should not stay on soft surfaces such as carpets. The kitchen floor shall be durable to carry the unit weight and any other kitchenware that may be used on the oven.
Appliance should be used with a clearance of minimum 400 mm over the upper hob surfaces, and 65 mm from side surfaces inside a kitchen furniture.
The appliance is suitable for use on both side walls, without any support, or without being installed in a cabinet. If a hood or aspirator will be installed above the cooker, follow the instructions of the manufacturer for height of mounting. (min. 600 mm) (see over page)
INSTALLATION
WARNING // The kitchen furniture near the appliance must be heat resistant.
WARNING // Do not install the appliance beside refrigerators or coolers. Heat radiated by the appliance increases the energy consumption of cooling devices.
WARNING // Do not use the door and/or handle to carry or move the appliance.
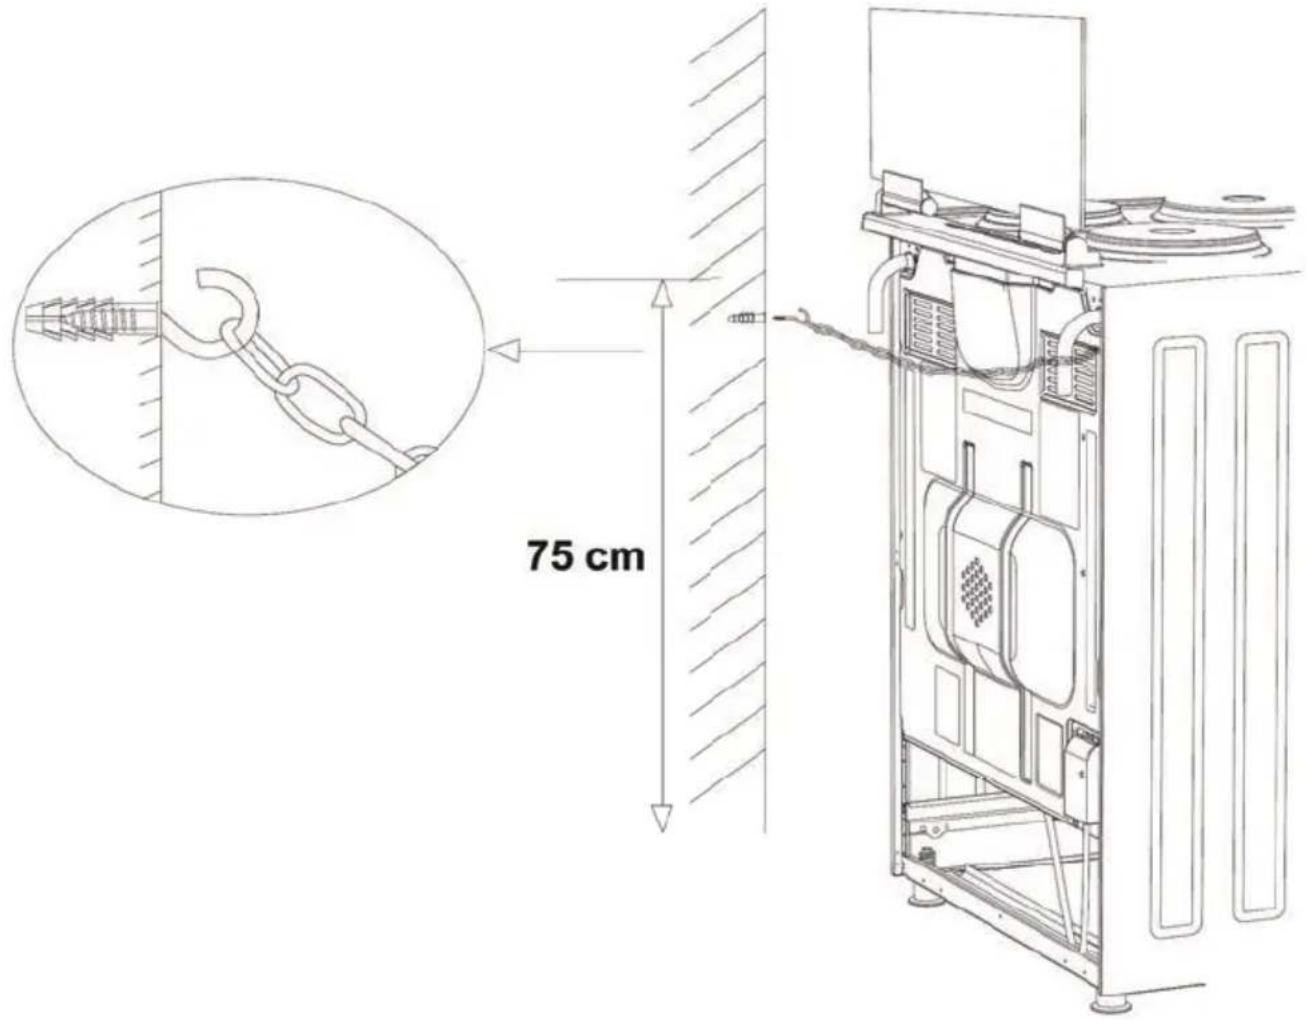
INSTALLATION
CHAIN LASHING ILLUSTRATION
Before using the appliance, in order to ensure safe use, be sure to fix the appliance to the wall using the chain and hooked screw supplied. Ensure that the hook is screwed into the wall securely.
TROUBLE SHOOTING
You may solve the problems you may encounter with your product by checking the following points before calling the technical service.
In case you experience a problem about the oven, first check the table below and try out the suggestions.
| PROBLEM POSSIBLE CAUSE WHAT TO DO | ||
| Oven does not operate. | Power supply not available. Check for power supply. | |
| Oven stops during cooking. | Plug comes out from the wall socket. | Re-install the plug into wall socket. |
| Turns off during cooking. | Too long continuous operation. | Let the oven cool down after long cooking cycles. |
| More than one plugs in a wall socket. | Use only one plug for each wall socket. | |
| Oven door is not opening properly. | Food residues jammed between the door and internal cavity. | Clean the oven well and try to re-open the door. |
| Electric shock when touching the oven. | No proper grounding. Make sure power supply is grounded properly. | |
| Ungrounded wall socket is used. | ||
| Water dripping. | Water or steam may generate under certain conditions depending on the food being cooked. This is not a fault of the appliance. | Let the oven cool down and than wipe dry with a dishcloth. |
| Steam coming out from a crack on oven door. | ||
| Water remaining inside the oven. | ||
TROUBLE SHOOTING
PROBLEM POSSIBLE CAUSE WHAT TO DO
| Smoke coming out during operation. | When operating the oven for the first time | Smoke comes out from the heaters. This is not a fault. After 2-3 cycles, there will be no more smoke. |
| Food on heater. Let the oven to cool down and clean food residues from the heater. | ||
| When operating the oven burnt or plastic odour coming out. | Plastic or other not heat resistant accessories are being used inside the oven. | At high temperatures, use suitable glassware accessories. |
| Oven does not heat. | Oven door is open. Close the door and restart. | |
| Oven controls not correctly adjusted. | Read the section regarding operation of the oven and reset the oven. | |
| Fuse tripped or circuit breaker turned off. | Replace the fuse or reset the circuit breaker. If this is repeating frequently, call an electrician. | |
| Oven does not cook well. | Oven door is opened frequently during cooking. | Do not open oven door frequently, if the food you are cooking does not require turning. If you open the door frequently internal temperature drops and therefore cooking result will be influenced. |
| Internal light is dim or does not operate. | Foreign object covering the lamp during cooking. | Clean internal surface of the oven and check again. |
| Lamp might be failed. Replace with a lamp with same specifications. | ||
NOTES
NOTES
CONTACT DETAILS
AUSTRALIA
ARISIT PTY LIMITED
40-44 Mark Anthony Drive, Dandenong South, VIC 3175, Australia
P // 1300 762 219
F//03 9768 0838
consumer.care@arisit.com
NEW ZEALAND
ARISIT PTY LIMITED
PO Box 68-140
Newton, Auckland 1145,
New Zealand
P // 09 306 1020
F // 09 302 0077
sales@aristonappliances.co.nz
TISRA IS COMMITTED TO ONGOING RESEARCH AND DEVELOPMENT, EVERY EFFORT HAS BEEN MADE TO ENSLURE ALL INFORMATION IN THIS USER MANUAL IS CORRECT AT TIME OF GOING TO PRINT. DIMENSIONS SHOULD BE USED AS A REFERENCE ONLY AND ACTUAL DIMENSIONS SHOULD BE TAKEN FROM THE PHYSICAL PRODUCT ONLY.
MANUFACTURER RESERVES THE RIGHT TO CHANGE SPECIFICATIONS WITHOUT NOTICE.
t tisira
- CONTENTS
- WARNING & SAFETY INFORMATION
- INSTALLATION
- ELECTRICAL SHOCK HAZARD
- CUT HAZARD
- HEALTH HAZARD
- HOT SURFACE HAZARD
- PRODUCT OVERVIEW
- CONTROL PANEL
- OPPERATING INSTRUCTIONS
- INSTRUCTIONS FOR USE OF COOKTOP
- USING YOUR ELECTRIC HOB
- TO BEGIN COOKING
- OPERATING INSTRUCTIONS
- INSTRUCTIONS FOR USE OF OVEN
- USING THE THERMOSTAT CONTROL
- MECHANICAL TIMER
- TABLE OF COOKING TIMES
- NATURAL CONVECTION
- ACCESSORIES
- BAKING AND ROASTING SHELF
- MAINTAINING YOUR COOKER
- MAINTENANCE AND CLEANING - OVEN
- MAINTENANCE AND CLEANING- CERAMIC GLASS SURFACES
- Always clean the appliance immediately after any food spillage.
- CLEANING AND MAINTENANCE OF THE OVEN'S FRONT DOOR GLASS
- CATALYTIC WALLS
- REMOVING THE CATALYTIC WALLS
- RACK POSITIONS
- INSTALLING AND REMOVING WIRE RACKS
- CHANGING THE OVEN LAMP
- ELECTRICAL CONNECTION
- INSTALLATION OF YOUR OVEN
- RIGHT PLACE FOR INSTALLATION AND IMPORTANT WARNINGS
- CHAIN LASHING ILLUSTRATION
- TROUBLE SHOOTING
- NOTES
- CONTACT DETAILS
- ARISIT PTY LIMITED
Brand : Tisira
Model : TFEM629WE
Category : Oven