SFR-019 - Laser level Ozito - Free user manual and instructions
Find the device manual for free SFR-019 Ozito in PDF.

User questions about SFR-019 Ozito
0 question about this device. Answer the ones you know or ask your own.
Ask a new question about this device
Download the instructions for your Laser level in PDF format for free! Find your manual SFR-019 - Ozito and take your electronic device back in hand. On this page are published all the documents necessary for the use of your device. SFR-019 by Ozito.
USER MANUAL SFR-019 Ozito
WARNING! Read all safety warnings and all instructions. Failure to energising power tools that have the switch on invites accidents.
follow the warnings and instructions may result in electric shock. fire
and/or various injury. a. No more any adjusting key of motion before writing the power tool oil, n
and of serious injury. wrench or a key left attached to a rotating part of the power tool may result in
- work area safety personal injury.
rk area clean and well lit. Cluttered or dark areas invite accidents. e. Do not overreach. Keep proper footing and balance at all times. This
narota power tool in avinoelva stmoenhorse, such as in the anohloe hotter control of the newer tool in unavronted situations
For example, we can be a very useful model of the model with an explicit summary.
of halimable liquids, gases of dust. Power tools great sparks 1. Dress property. Do not wear loose clouding or jewellery. Keep your hair,
y ignite the dust or tumes. clothing and gloves away from moving parts. Loose clothes, jewellery or
ldren and bystanders away while operating a power tool. long hair can be caught in moving parts.
ns can cause you to lose control h. Do not let familiarity gained from frequent use of tools allow you to
safety heasma complant and innara tool safety principal. A copalana eolian pur
society deciding comploquent and ignore too safety principles. A careless action can
pol plugs must match the outlet. Never modify the plug in any cause severe injury within a fraction of a second.
not use any adapter plugs with earthed (grounded) power tools. 4. Power tool use and care
ed plugs and matching outlets will reduce risk of electric shock. a. Do not force the power tool. Use the correct power tool for your
in contact with coupled or uniformed syndromes such as plus ampliation. The samek nomsnckel will do the lab better and safety of the role
by contact with earthen of grounded surfaces, such as pipes, application. The correct power tool will do the job better and safer at the rate for which it was designed.
, ranges and refrigerators. There is an increased risk of electric for which it was designed.
our body is earthed or grounded. c. Disconnect the plug from the power source and/or the battery pack from
whose power tools to rain or wet conditions. Water entering a the power tool before making any adjustments, changing accessories.
I will increase the risk of electric shock or storing power tools. Such preventive safety measures reduce the risk of
• that the power tool is not a separate circuit. • that the power tool is starting the power tool accidentally.
buse the cord. Never use the cord for carrying, pulling or
ing the power tool. Keep cord away from heat, oil, sharp edges or d. Store idle power tools out of the reach of children and do not allow
arts. Damaged or entangled cords increase the risk of electric shock. persons unfamiliar with the power tool or these instructions to operate
the power tool. Power tools are dangerous in the hands of untrained users.
a. Maintain power tools Check for misalignment or binding of moving parts
L, watch what you are doing and use common sense when breakone of parts and any other condition that may affect the power tool's
a power tool. Do not use a power tool while you are tired
the influence of drugs, alcohol or medication. A moment of operation, it damaged, have the power tool repaired before use, many
n while operating power tools may result in serious personal injury. accidents are caused by poorly maintained power tools.
g. Use the power tool, accessories and tool bits etc. in accordance with
and protective equipment. Always wear eye protection. Therefore these instructions. taking into account the working conditions and the
t such as dust mask, non-skiu safety shoes, hard hat, or heating work to be performed. Use of the power tool for operations different from
used for appropriate conditions will reduce personal injuries.
unintentional starting. Ensure the switch is in the off-position
n. Keep handles and grasping surfaces dry, clean and tree from oil and connecting to power source and/or battery pack, nicking up or
the tool. Carving power tools with your finger on the switch or grease. Slippery handles and grasping surfaces do not allow for safe handling
WARRANTY

STUD FINDER
9V
INSTRUCTION MANUAL
SPECIFICATIONS
Power: 9V DC Battery
Detection Depth: 19mm (Wood Metal)
50mm (Live Wires)
Sohmm (Live Wires)
Stud Centre Accuracy: ± 3.2mm (Wood)
± 6.4mm (Metal)
Operating Temp: 0 to 40°C
Operating Temp: 0 to 15 o Storage Temp: 90 to 7000
Storage temp.. -20 to 70 °C
Weight: 0.12kg
ozito.com.au

BATTERY & STUD FINDER WARNINGS
WARNING! The appliance is not to be used by persons (including children) with reduced physical, sensory or mental capabilities, or • Studs or joists are normally 410-610mm apart and are 38mm in width. Anything closer together or of a different width may not be a stud.
lack of experience and knowledge, unless they have been given • Doors and windows are commonly constructed with additional studs and
on or instruction. headers for added stability. The unit will detect the edge of these double studs
children should be supervised to ensure that they do not play with the and solid headers as a single wide stud.
- Metallic objects, wiring and plastic pins can also be detected as study. Care
not store or use the tool and battery pack in locations where the should be taken when drilling in areas which may contain these.
perature may reach or exceed 40°C (such as inside sheds or metal • Rubhing or hanning the unit on the wall may generate static electricity and
dings in summer). cause a false positive.
not incinerate the battery pack even if it is seriously damaged or is
pletely worn out. The battery can explode in a fire.
stud finder may not be function properly on foil backed or metallic fabric
aces.
wall surface to be scanned should be flat and dry.
to your free hand away from the unit during scanning to avoid interference.
[Non-Text]


Young ch
roding on anpliance
• Do p
tem
builo
- Do n
com
• The
surfa
• The
- Keep
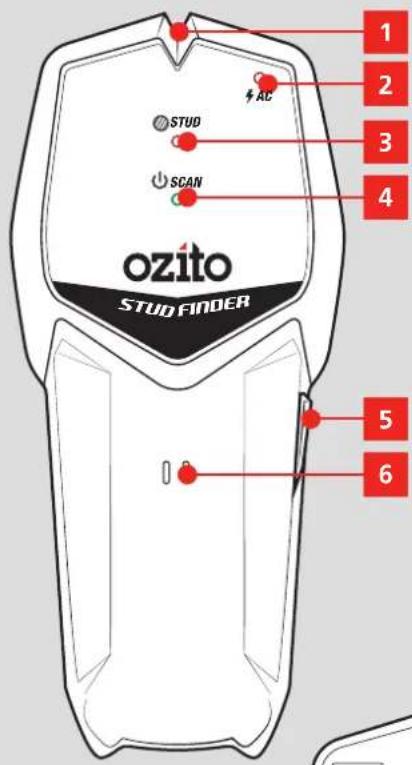
KNOW YOUR PRODUCT
STUD FINDER
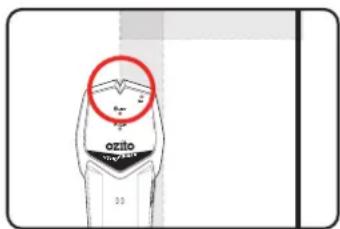
- Marking Groove
- On/Off Button
- Live wire Indicator LED
- Buzzer
- Stud Indicator LED
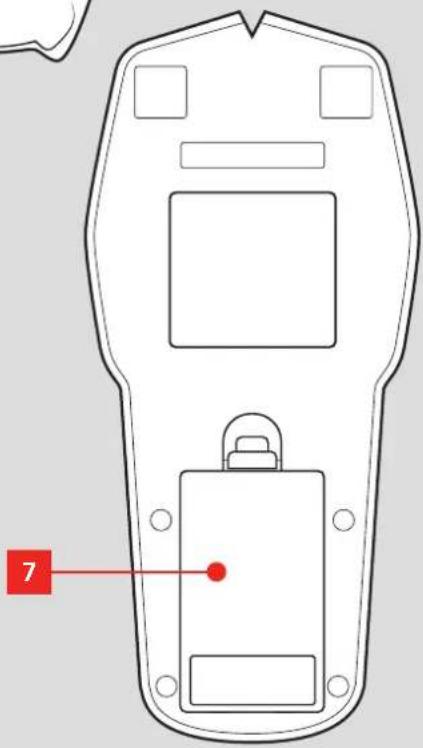
- Battery Compartment
- Scanning Indicator LED
ONLINE MANUAL
Scan this QR Code with your mobile device to take you to the online manual.

YEAR REPLACEMENT WARRANTY*

SETUP & PREPARATION
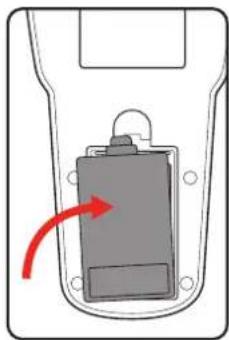
1. INSTALLING BATTERIES
The Stud Finder requires a 9V battery to operate.
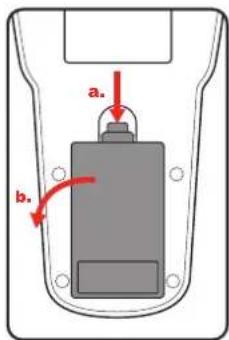
- Push down on the tab and lift out the battery compartment lid.
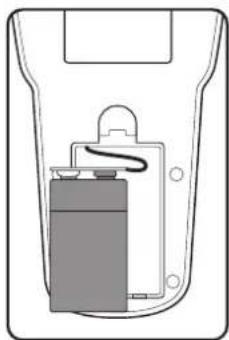
- Attach the 9V battery terminals to the battery clip so that it clicks into place.
natural_image
Diagram of a battery inside a container with a handle and internal structure (no text or symbols)- Tuck the battery and wires into the compartment and replace the lid.
natural_image
Diagram of a car door handle with a red arrow indicating rotation or movement (no text or symbols)Note: The battery will need replacing when the green scanning indicator LED starts flashing.
2. CONTROLS 3. USAGE
On/Off Button
- Press and hold the on/off button to start scanning. The scanning indicator LED will light up.

- Release the on/off button to stop scanning.
Calibration
The unit should be calibrated to the surface being measured before each use.
- Place the unit flat on a wall, then press and hold the on/off button.

- The red stud LED lights up and the buzzer will sound. The unit will begin calibrating.
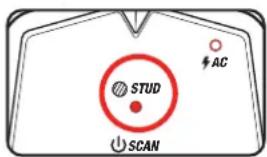
Note: Do not move the unit until calibration is finished.
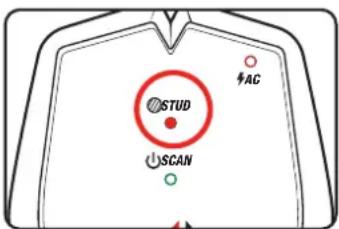
- The red LED will dim and the buzzer stop emitting noise when the calibration process is finished. Hold down the on/off button and proceed with scanning the wall.
Indicator LEDs
- The red stud indicator LED will light up and the unit will emit beeps when a stud or object is encountered
- The red live wire indicator LED will light up and the unit will beep when live AC cables are detected.


WARNING! WIRES DEEPER THAN THE DETECTION LIMIT, IN METAL CONDUITS OR BEHIND PLYWOOD SHEARWALL WILL NOT BE DETECTED. SHIELDED WIRES, DEAD WIRES, OR LIVE WIRES BEHIND CASINGS, METAL WALLS OR THICK, DENSE WALLS WILL ALSO NOT BE DETECTED AS LIVE WIRES. USE CAUTION WHEN DRILLING OR NAILING NEAR THESE.

WARNING! THE STUD FINDER DOES NOT DETECT PLASTIC OBJECTS SUCH AS PIPES OR CLIPS. PRECAUTIONS SHOULD BE TAKEN WHEN DRILLING OR NAILING INTO SURFACES WHERE WATER PIPES MAY BE PRESENT.
The Stud Finder is capable of detecting wood and metal studs, live wires, metal and copper pipes behind plasterboard and other common building materials.
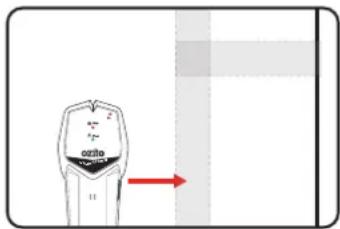
Locating A Stud
- Place the stud finder on the surface you wish to nail or drill into.
- Press and hold the on/off button to calibrate the unit before each use. After calibration is finished, slowly move the unit horizontally.
- The unit will beep and the stud indicator LED will light up when a stud edge is located. Pause and make a mark on the wall at the marking groove.
- The unit will continue to beep as you pass across the stud. Make another mark where the unit stops beeping and the stud inidicator LED switch off.

Note: Repeating steps 2 to 4 from the opposite direction of
the stud will help to identify the edges of the stud more accurately.

WARNING! IF THE LIVE WIRE INDICATOR LED LIGHTS UP, STOP AND MAKE A SEPARATE MARK ON THE WALL. DO NOT DRILL OR NAIL INTO THE SURFACE WHERE THE LIVE WIRE IS DETECTED. FAILURE TO FOLLOW THIS DIRECTION MAY LEAD TO PERSONAL INJURY OR DAMAGE TO PROPERTY AND/OR SURROUNDINGS.
MAINTENANCE DESCRIPTION

WARNING! BEFORE CLEANING YOUR TOOL OR CARRYING OUT ANY MAINTENANCE PROCEDURE, MAKE SURE IT IS DISCONNECTED FROM THE POWER SUPPLY TO PREVENT INJURY AND/OR ACCIDENTS.
Cleaning
Clean the appliance regularly with a dry cloth. Do not use cleaning agents or solvents; these may be aggressive to the plastic parts in the appliance. Ensure that no water can get into the interior of the appliance.
Storage
Store it in a dry location which is not accessible to unauthorised persons.
F SYMBOLS
| V | Volts | DC | Direct current | |
| mm | Millimetres | [HAYS] | Warning | |
 | Read Instruction Manual |  | Regulatory Compliance Mark (RCM) | |
CARING FOR THE ENVIRONMENT

Power tools that are no longer usable should not be disposed of with household waste but in an environmentally friendly way. Please recycle where facilities exist. Check with your local council authority for recycling advice.

Recycling packaging reduces the need for landfill and raw materials. Reuse of recycled material decreases pollution in the environment. Please recycle packaging where facilities exist. Check with your local council authority for recycling advice.
SPARE PARTS
Spare parts can be ordered from the Special Orders Desk at your local Bunnings Warehouse.
For further information, or any parts not listed here, visit www.ozito.com.au or contact Ozito Customer Service:
Australia 1800 069 486
New Zealand 0508 069 486
E-mail: enquiries@ozito.com.au