Ghibli T1 - Vacuum Cleaner CleanStar - Free user manual and instructions
Find the device manual for free Ghibli T1 CleanStar in PDF.

User questions about Ghibli T1 CleanStar
0 question about this device. Answer the ones you know or ask your own.
Ask a new question about this device
Download the instructions for your Vacuum Cleaner in PDF format for free! Find your manual Ghibli T1 - CleanStar and take your electronic device back in hand. On this page are published all the documents necessary for the use of your device. Ghibli T1 by CleanStar.
USER MANUAL Ghibli T1 CleanStar
text_image
CLEANSTAR™ THE STAR IN FLOOR CARE
natural_image
Line drawing of a vacuum cleaner with handle and control panel (no text or symbols)
T1
Use and Maintenance

text_image
GHIBLI®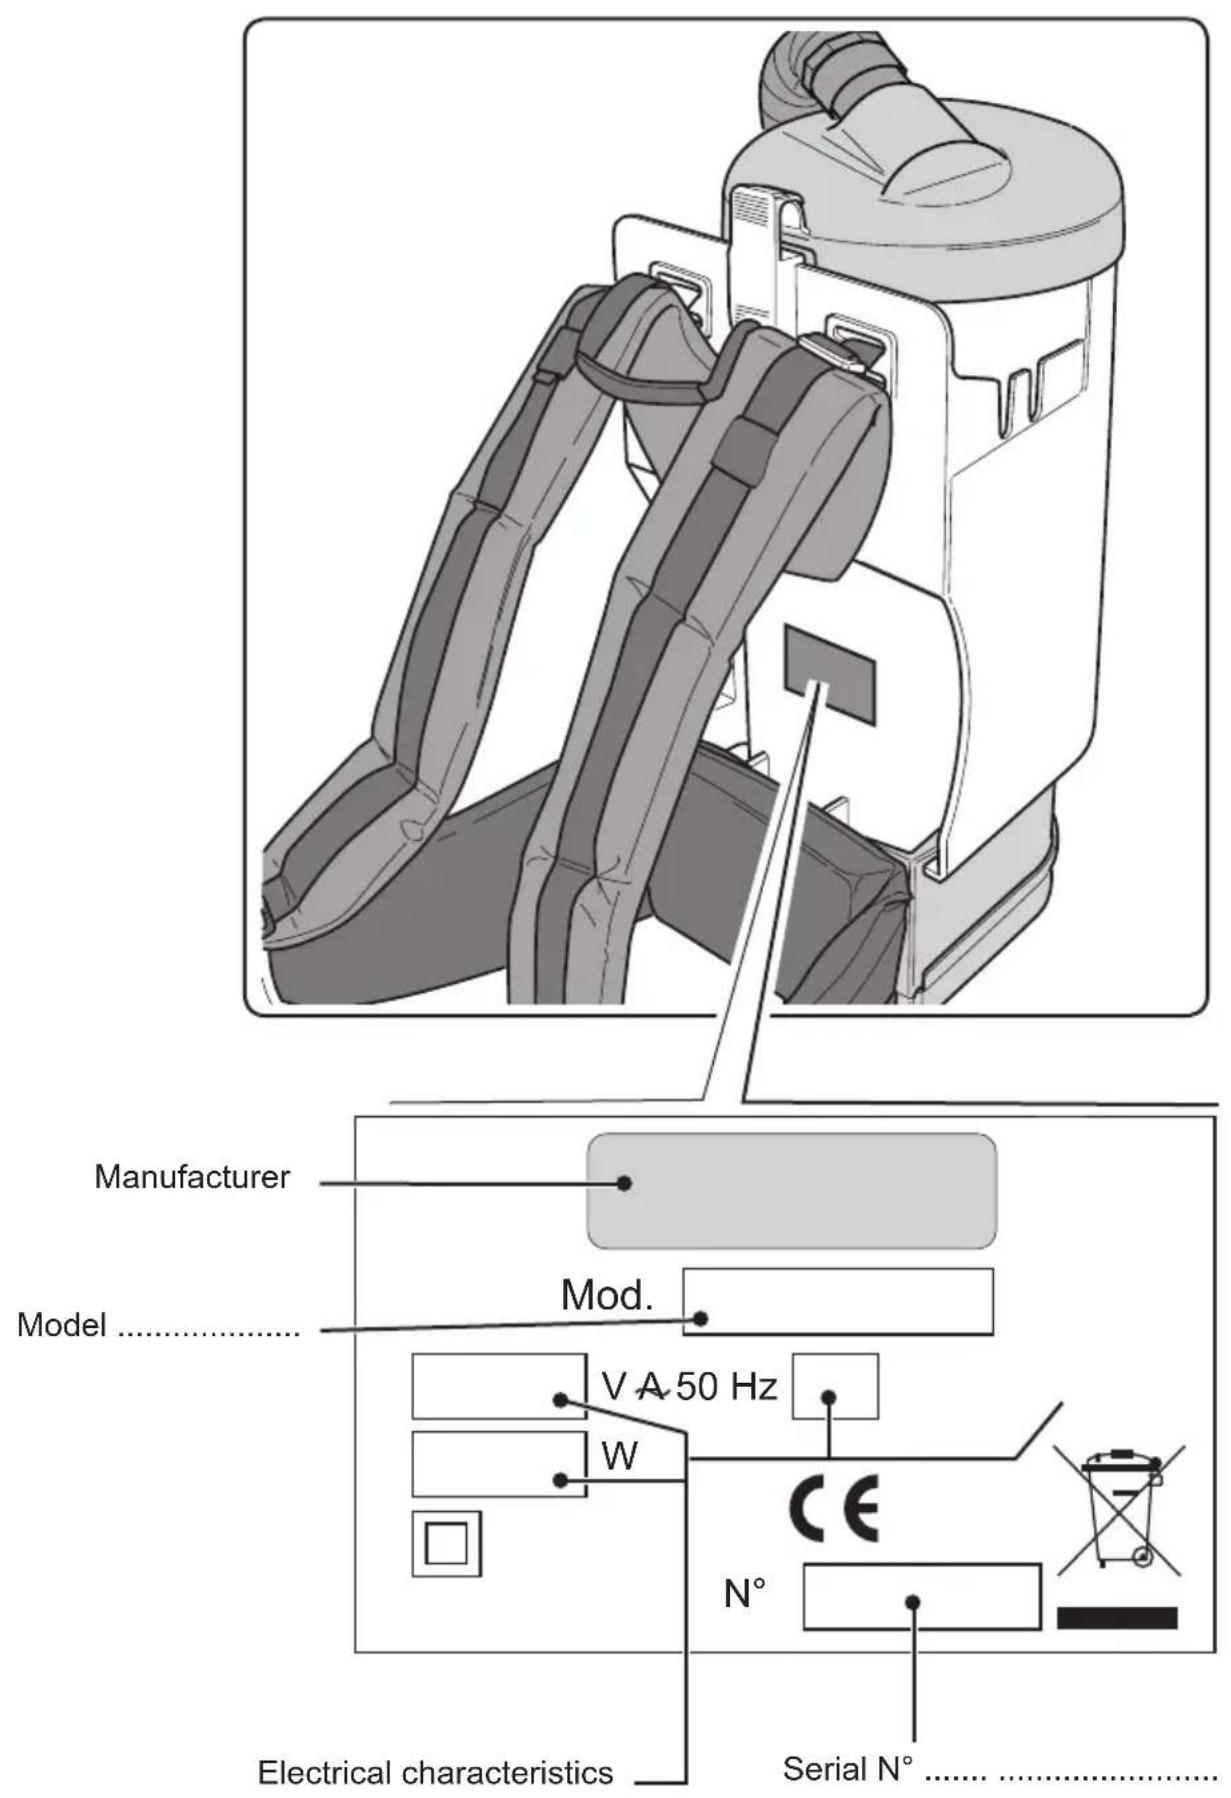
text_image
Manufacturer Model ...... Mod. V A 50 Hz W CE N° Electrical characteristics ...... Serial N° ......

text_image
13 1 14 16 17 Fig. 11
text_image
18 Fig. 12
text_image
19 Fig. 13
text_image
21 10 20 Fig. 14
text_image
Fig. 15 22 23 22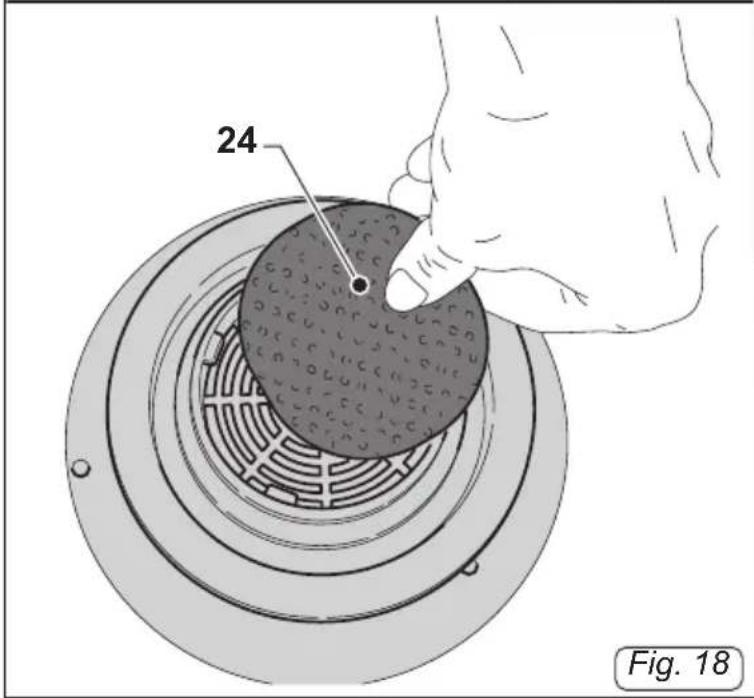
text_image
24 Fig. 18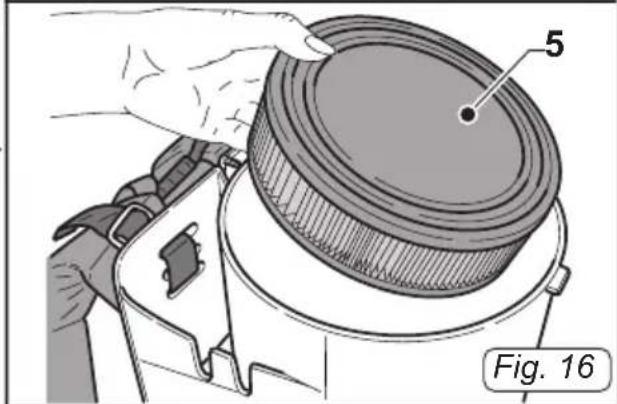
natural_image
Illustration of a hand adjusting a circular component with labeled parts (no text or symbols beyond labels)
natural_image
Illustration of hands using a tool to cut a circular component, labeled with number 5 and figure number Fig. 17 (no text or symbols on the diagram itself)| Technical features Measurements units | ||
| Tension V 240 | ||
| Motor power W 1350 | (1450 watt max. power) | |
| Noise level dB (A) 60 | ||
| Depression mmH | _2O 2900 | |
| Paper bag capacity I 3,3 | ||
| Dimensions mm 240x495h - 2020 | ||
| Weight Kg 4,8 | ||
| Accessories | ∅ | 32 mm |
GENERAL WARNINGS
- This booklet is an integral part of the apparatus and must therefore, be preserved carefully.
- Plastic bags, polystyrene, paper clips, etc. must not be left within the reach of children, as these are potential sources of danger.
- Ensure that the voltage matches that indicated on the data plate before turning the unit on.
- To unplug the unit from the socket, pull the plug itself and NOT the cable.
- Unwind the entire power cable when using the unit.
- Solely approved extension cables can be used. These must be adequate for the power of the unit and must also be in good condition.
- Do not use the unit if either the plug or power cable is not in good condition.
- If the power cable is damaged, this can only be replaced by a technical support centre that is authorised by the manufacturer.
- Do not slide the power cable on sharp edges.
- Do not pinch or crush the power cable.
- Do not use the unit with wet or damp hands.
- Do not leave the unit exposed to the elements.
- Do not use the unit if its operation is faulty. Take this to an authorised technical support centre.
- Should an anomaly arise, contact an authorised technical support centre and always request original spare parts.
- The plug must be removed from the socket before any maintenance or cleaning procedures are implemented.
- Do not wash the unit with jets of water.
- Do not immerse the unit into water or other liquids.
- Clean the unit with a cloth dampened with water;
do not use abrasive detergents, trichloroethene or solvents.
- When depositing the unusable unit at appropriate collection points, the power cord must be removed in order to ensure it is not used.
TYPE OF USE
This unit must solely be used to vacuum dust, crumbs, etc. as it is designed solely for this purpose.

HAZARD:
The manufacturer cannot be held liable for any damage caused by improper or incorrect use.
Any other use relieves the Manufacturer from all responsibility of damage caused to persons and/or things and renders the warranty null and void.
This appliance is not intended for use by persons (including children) with reduced physical, sensory or mental capabilities, or lack of experience and knowledge, unless they have been given supervision or instruction concerning use of the appliance by a person responsible for their safety.
Children should be supervised to ensure that they do not play with the appliance.
INCORRECT USE
Do not use the unit to:
- vacuum any type of liquid;
- vacuum flammable, explosive, corrosive and toxic substances.
- vacuum hot substances.
Do not use the unit in explosive atmospheres.
DISPOSING OF THE UNIT
Proceed in accordance with local legislation in order to protect the environment.
When the unit is unusable and cannot be repaired, the components are to be disposed of accordingly and separately.
Electrical equipment cannot be disposed of as urban waste and relative standards pertaining to collection, which have been introduced by specific legislations, must hered with (Legislative Decree No. 151 dated 25/7/05 - 2002/96/CE - 2003/108/CE)
be
Electrical equipment has a symbol bearing a crossed out wheeled bin. The symbol indicates that the apparatus was introduced on the market after 13 August 2005 and must be disposed off separately.
Improper or illegal disposal of such equipment or using it incorrectly, can be hazardous to persons and the environment due to the substances and materials contained. Administrative and criminal penalties will be imposed for non-compliance with standards pertaining to the disposal of electrical waste.
REFERENCE LEGISLATIONS
The apparatus has been designed in accordance with the Machinery Directive in force and with the standards set out in the EC Declaration of Conformity supplied with the unit.
UNPACKING
After removing the package as indicated in the instructions shown on the package itself, check the integrity of the unit and all components supplied.
If any evident damage is noticed, contact the retailer or an authorised technical support centre.
PREPARING THE UNIT
Checking the filter systems
- Release the lever (1a/1 Fig.1) and remove the cover (2 Fig.2) together with the paper bag (3 Fig.2).
- Remove the cloth filter (4 Fig.3) and ensure that the filter cartridge is inside the unit (5 Fig.4).
- Set the cloth filter back in place (4 Fig.3) and remount the paper bag (3 Fig.5) on the cover (2 Fig.5). Whilst keeping this in place, put back the cover (2 Fig.6) by
hooking the slot (6 Fig.7) found on the cover onto the metal strip (7 Fig.7) found on the body of the unit.
- Block the cover in place by means of the lever (1 Fig.1).
Assembling the pipes
- Insert the sleeve (8 Fig.8) of the flexible pipe supplied into the air suction hole (9 Fig.8).
- Hook the rigid extensions (11 Fig.9) to the ergonomic handle (10 Fig.9) of the flexible pipe.
- Hook the accessory required (suction inlet, brush, crevice tool, etc.) to the rigid extensions (11 Fig.9).
Positioning the power cable
- Connect a cable (25 Fig. 10) to the IEC socket.
- Form a ring with the power cable, hook it onto the tooth (12 Fig.10) and place it as shown in picture 10, block it through the rubber band (12a Fig. 10).
Positioning the unit onto your shoulders
- Lift the unit and place it on your shoulders.
- Use the buckle (14 Fig.11) to adjust the shoulder straps (13 Fig.11).
- Use the buckle (16 Fig.11) to adjust the belt (15 Fig.11).

NOTE:
Elastic straps (17 Fig.11) are found on the belt (15 Fig.11) and these are used when placing accessories such as the brush, the crevice tool, etc.
USING THE UNIT
Starting-up the unit
- Insert the plug (18 Fig.12) into the socket.
- Press the "I" on the switch (19 Fig.13) and this will light up.

NOTE:
You can adjust the suction force by sliding the selector (20 Fig.14) found on the ergonomic handle (10 Fig.14).
The suction force is decreased by opening the window (21 Fig.14).
Turning the unit off
- Press the switch (19 Fig.13) to turn the unit off and the light will also go off.
- Remove the plug (18 Fig.12) from the socket.
CLEANING AND MAINTENANCE

HAZARD:
The plug must be removed from the socket before any maintenance procedure is implemented.
Remove the dust bag paper filter and replace it
- Release the lever (1 Fig.1) and remove the cover (2 Fig.2) together with the paper bag (3 Fig.2).
- Remove the paper bag (3 Fig.2) from the cover (2 Fig.2), lift the flap (22 Fig.15) and fold it into the hole (23 Fig.15), blocking it onto the rubber edge, then throw it away.
- Replace the paper bag and remount all the parts by following the reverse procedure of the dismantling process.
Checking and cleaning the cloth filter
- Release the lever (1 Fig.1) and remove the cover (2 Fig.2) together with the paper bag (3 Fig.2).
- Remove the cloth filter (4 Fig.4) and clean it by removing the dust.

NOTE:
The cloth filter (4) can be washed with warm water and soap, bearing in mind that it must be completely dry before re-using it.
- Remount all the parts by following the reverse procedure of the dismantling process.
Checking and cleaning the filter cartridge
- Release the lever (1 Fig.1), remove the cover (2 Fig.2), the filter bag (3 Fig.2) and the cloth filter (4 Fig.4).
- Remove the filter (5 Fig. 16) from unit.
- Clean the filter from the inside ou a jet of air. If this is too dirty, it must be changed.
- Remount all the parts by following the reverse procedure of the dismantling process.
Checking and cleaning the safety filter
- Release the lever (1 Fig.1), remove the cover (2 Fig.2), the filter bag (3 Fig.2), the cloth filter (4 Fig.4) and the filter cartridge (5 Fig.16).
- Remove the filter (24) and clean it under running water.

WARNING:
- Ensure that the filter (24) is completely dry before remounting it.
- Remount all the parts by following the reverse procedure of the dismantling process.
Cleaning the shoulder straps and belt
- Clean the shoulder straps (13 Fig.11) and the belt (15 Fig.11) with a cloth dampened with water or a neutral detergent.
Cleaning the unit body
- Clean the unit body with a cloth dampened with water or a neutral detergent.

HAZARD:
Do not wash the unit with jets of water.
SPARE PARTS
| Cloth Filter Bag | # CB-T1v2 |
| Synthetic Dust Bags | # AF924S |
| Antibacterial Dust Bags | # AF924AB |
| Carbon Anti-Odour Dust Bags | # AF924C |
| HEPA Filter Cartridge | # T1-HEPA |
| Pre-Motor Filter | # T1-9 |
| Exhaust Filter | # T1-25 |
| Complete Hose | # HBCOM-T1 |
| Orange Safety Compl.Hose | # HOCOM-T1 |
| Wire Reinforced Compl.Hose | # HWCOM-T1 |
| Motor | # T1-20 |
| PROBLEM CAUSE REMEDY | ||
| Vacuum cleaner does not work. | Switch is not pressed.Plug is not inserted.Power cut. | Press the switch.Insert the plug into the socket.Check the power line. |
| Unsatisfactory suction. Paper | bag is full.Filter components are clogged.Clogged accessories or pipes. | Replace the dust bag.Clean the filter components.Check and clean the flexible pipe and the suction outlet. |
Cleanstar Pty Ltd
ABN: 51 121 002 104 ACN: 121 002 104
59 Radford Road, Reservoir VICTORIA 3073
Phone: (03) 9460 5655 Fax: (03) 9460 5666
Email: sales@cleanstar.com.au Web: www.cleanstar.com.au
CONDITIONS OF WARRANTY
This document outlines the terms and conditions of warranty for your Ghibli product. This is an important document that should be kept with your proof of purchase documents in a safe place for future reference should you require service for your product.
Thank you for purchasing your new Ghibli T1 Backpack Vacuum Cleaner. We are confident this product will give you trouble-free use and excellent service, provided the operator uses and maintains the product in accordance with the Instruction Manual. Please read the Instruction Manual carefully before using the product for correct operation and maintenance procedures, and store it in a safe place for future reference.
- This is a parts and labour warranty against faulty or defective parts, materials or workmanship in manufacturing, when the product is used and operated in accordance with the Instruction Manual.
- This product carries a 12 month (1 year) warranty period that commences from the original date of purchase by the first user/purchaser, and is not transferable.
-
The warranty only covers use of the product to remove dry dirt and dust from flooring and other surfaces.
-
This warranty only applies to products purchased and used in Australia.
-
At all times during the warranty period, Cleanstar shall, at its sole discretion, determine whether repair, replacement or refund will apply if the product has a valid warranty claim applicable to it.
-
The repair or replacement of the product under this warranty does not extend the original period of warranty.
-
Please note that this warranty will be voided in the following cases (which are not exhaustive) and the warranty does not apply to the cost of replacing any parts of the product resulting from:
-
Accidental damage;
• Normal wear and tear; - Neglect, misuse or physical abuse by the operator, including failure to properly maintain or service;
• Any alterations, modifications or tampering with the product without the prior written consent of Cleanstar; - Incomplete or improper installation;
- Incorrect, improper or inappropriate operation;
- Insect or vermin infestation;
• Power surges, electrical storm damage or incorrect power supply/voltage; - Excessive use or use for which this product has not been designed;
- Vacuuming up water, liquids, toner, powders, glass, hazardous, flammable or corrosive materials, plaster dust, concrete dust and other similar building or construction materials;
- Failure to comply with the operating instructions contained in the Manual supplied with the product;
• If the product is rented;
• If the product is used outside of Australia; -
If the product was serviced or repaired by anyone other than Cleanstar, or one of Cleanstar's Authorised Service Agents (ASA). Cleanstar is unable to accept any responsibility under this warranty for any repair work not carried out by an ASA or from the use of non-genuine parts.
-
This warranty does not cover service calls, travelling time or consumable parts such as belts, dust bags, filters, hose or hose parts, rods and wands, floor tools and accessories, motor brushes and other like consumable items, unless defective in manufacture. In order to prolong the life of accessories and consumables, regular care and maintenance is recommended.
-
Please retain your original proof of purchase which will be required before you can make a claim under this warranty. If proof of purchase can not be provided at the time of a warranty claim or service, any work carried out on the cleaner is chargeable.
-
Any transportation and delivery costs involved in the repair of defective parts shall be borne by the claimant. In all instances, unless the product is transported by Cleanstar or a Cleanstar authorised representative, the product is transported at the owner's cost and risk while in transit to and from Cleanstar or its ASA.
Our goods come with guarantees that cannot be excluded under the Australian Consumer Law. You are entitled to a replacement or refund for a major failure and for compensation for any other reasonably foreseeable loss or damage. You are also entitled to have the goods repaired or replaced if the goods fail to be of acceptable quality and the failure does not amount to a major failure. The benefits conferred by this warranty are in addition to other rights and remedies under law in respect of the product to which this warranty relates.
TO INQUIRE ABOUT MAKING A CLAIM UNDER THIS WARRANTY, PLEASE FOLLOW THESE STEPS:
a) carefully check the Instruction Manual and the terms of this warranty;
b) have the name and model number of the appliance available;
c) have the proof of purchase available (ie. invoice, receipt, etc) showing where the appliance was purchased from and date of purchase;
d) call Cleanstar on (03) 9460 5655 to speak to one of our customer service staff.