
DFS730 - Heating Escea - Free user manual and instructions
Find the device manual for free DFS730 Escea in PDF.


| Product Type | Freestanding Powerflued Gas Fireplace (DFS730 cabinet with DF700 insert) |
| Brand | Escea |
| Model | DFS730 |
| Max Heat Output | 5.9 kW |
| Star Rating | 4-5 Stars |
| Gas Types | Natural Gas, Propane, ULPG |
| Gas Input (High) - Natural Gas | 25 MJ/hr |
| Gas Input (Low) - Natural Gas | 11 MJ/hr |
| Ignition System | Electronic ignition to pilot system |
| Remote Control | Yes (RF) with thermostat, timer, child lock |
| Electrical Supply | 230V AC, 84W @ 0.35A |
| Flue Type | 4" and 3" flexible aluminium flue |
| Flue Termination | Horizontal or vertical (Power Flue) |
| Fuel Bed Options | Logs or coals |
| Glass | Double glass (primary and secondary) |
| Fascia Types Available | Edge, Slim, Stretch |
| Safety Features | Overheat sensor, flame failure, pressure switch, thermal cut-out |
| Installation Requirement | Must be installed by qualified person per AS/NZS 5601 |
| Service Interval | Annual service recommended |
| Weight (approximate, insert only) | 45 kg (DF700 insert) |
Frequently Asked Questions - DFS730 Escea
User questions about DFS730 Escea
0 question about this device. Answer the ones you know or ask your own.
Ask a new question about this device
Download the instructions for your Heating in PDF format for free! Find your manual DFS730 - Escea and take your electronic device back in hand. On this page are published all the documents necessary for the use of your device. DFS730 by Escea.
USER MANUAL DFS730 Escea
IMPORTANT: There are new false cavity framing requirements that must be adhered to (refer to section B1).
IMPORTANT: The flueing has been significantly changed for DF700, 960, & 990 (refer to section C2).
IMPORTANT: The fascia and secondary glass are critical components of the fire and must be properly fastened prior to running the fire (refer to sections D2 and F1).
Installation / Service Instructions
DF / DFS-Series
Gas Fireplace
Important:
The appliance shall be installed in accordance with;
• This installation instruction booklet
- Local gas fitting regulations
• Municipal building codes
• Electrical wiring regulations
- Any other relevant statutory regulations.
• AS/NZS 5601.1:2013 Gas Installations

WARNING:
This appliance must be installed by a qualified person. Replacement of the appliance mains supply cord should only be made by the manufacturer, its service agent, or a similarly qualified person.
Do not modify this appliance.
This appliance is not intended for use by young children or infirm persons unless they have been adequately supervised by a responsible person to ensure that they can use the appliance safely.
Young children should be supervised to ensure that they do not play with the appliance.
Failure to follow these instructions could cause a malfunction of the heater, which could result in death, serious bodily injury, and/or property damage. Failure to follow these instructions may also void your fire insurance and/or warranty.
Who can install this product:
Installation must be carried out by a registered installer who, on completion of the installation, must issue a:
AUS: Certificate of Compliance
NZ: Certificates that comply with the latest legislation in accordance with national and/or local codes. If these are not issued then the Escea warranty may be void.
Warranty Repair and Annual Servicing:
Please contact Escea if you require warranty work. Warranty repair work must be carried out by a recognised gas fire technician. It is recommended that recognised Escea Gas Fire Technicians are also used to carry out annual servicing requirements (particularly during the warranty period). For contact details of recognised Escea Gas Fire Technicians in your area, or for replacement parts, please contact the retailer from whom the appliance was purchased our visit our website.
The heater must be installed according to these instructions and in compliance with all relevant building, gas fitting, electrical and other statutory regulations (eg. AS/NZS 5601). Any shortcomings in the appliance and flue installation will be the responsibility of the installer, and Escea will not be accountable for any such failings or their consequences.
Manufactured by: Escea Ltd, PO Box 5277 Dunedin NZ, Ph: +64 3 478 8220.
For contact details of your local Escea distributor or dealer in New Zealand, please visit: www.escea.com or email: info@escea.com. From Australia, please visit www.escea.com.au, call AU: 1800 460 832 or WA: 1800 730 140, or email us at info@escea.com
| DF700 PRODUCT SPECIFICATION | ||||
| MODEL NAME DF700 | ||||
| Description of Appliance Powerflued Gas Fire Heater | ||||
| Star Rating 4-5 Stars | ||||
| Max. Heat Output | 5.9kW | |||
| A/NZ Approval No. AS/NZS 5263.1.3 | ||||
| Gas Type Natural Propane ULPG | ||||
| Gas input | High 25 MJ/hr 25 MJ/hr | 24 MJ/hr | ||
| Low 11 MJ/hr 11 MJ/hr | 9.5 MJ/hr | |||
| Inlet Pressure | Max 5.0 kPa 5.0 kPa | 5.0 kPa | ||
| Min 1.13 kPa 2.75 kPa | 2.75 kPa | |||
| Operating Pressure on High 1.0 kPa 2.30 kPa | 2.30 kPa | |||
| Operating Pressure @ Front Burner Jet on High 0.95 kPa 2.29 kPa | 2.29 kPa | |||
| Burner Jet Size | Front: 1.70mm Rear:1.40mm | Front: 1.05mm Rear:0.9mm | Front: 1.05mm Rear:0.85mm | |
| Aeration Collar Hole Size | 1 hole @ ∅3.5mm | No Collars | No Collars | |
| Pilot injector | #42 | #27 | #27 | |
| Appliance Dimensions (mm) | Width | 693.0 mm | ||
| Height | 596.0 mm | |||
| Depth | 387.0 mm | |||
| Weight | Kg | 45 kg | ||
| Ignition System | Electronic Ignition to pilot system | |||
| Escea PCB | ||||
| Ignition Activation | 7 secs (approx) | |||
| Flame Safeguard | Flame Rectification | |||
| Consumption | 84W @ 0.35A 230V | |||
| Remote controls | Yes | |||
| Timers | Yes | |||
| Clock | Yes | |||
| Function lock / child | Yes | |||
| Temperature control | Yes | |||
| Connections | Electric | 230V AC | ||
| Gas | 1/2" BSPP female lower right of fireplace chassis | |||
| Flue Type | 4" and 3" Flexi Flue | |||
| Spigot Location | Rear and centre | |||
| Data badge location | On Chassis Base | |||
| DF960 PRODUCT SPECIFICATION | ||||
| MODEL NAME DF960 | ||||
| Description of Appliance Powerflued Gas Fire Heater | ||||
| Star Rating 4.4-4.9 Stars | ||||
| Max. Heat Output | 7.7kW | |||
| A/NZ Approval No. AS/NZS 5263.1.3 | ||||
| Gas Type Natural Propane ULPG | ||||
| Gas input | High 31 MJ/hr 31 MJ/hr 28 MJ/hr | |||
| Low 15 MJ/hr 14 MJ/hr 12 MJ/hr | ||||
| Inlet Pressure | Max 5.0 kPa 5.0 kPa 5.0 kPa | |||
| Min 1.13 kPa 2.75 kPa 2.75 kPa | ||||
| Operating Pressure on High | 1.0 kPa | 2.30 kPa 2.30 kPa | ||
| Operating Pressure @ Front Burner Jet on High | 0.94 kPa 2.20 kPa 2.20kPa | |||
| Burner Jet Size | Front: 1.85mmRear: 1.70mm | Front: 1.20mmRear: 1.05mm | Front: 1.10mmRear: 1.02mm | |
| Aeration Collar Hole Size for Logs & Embers/Flakes | 1 holes @ ∅4mm | No Collars No Collars | ||
| Aeration Collar Hole Size for Coals | 1 hole @ ∅2.5mm | No Collars | No Collars | |
| Pilot injector | #42 | #27 #27 | ||
| Appliance Dimensions (mm) | Width | 943.0 mm | ||
| Height | 596.0 mm | |||
| Depth | 402.0 mm | |||
| Weight | Kg | 70 kg | ||
| Ignition System | Electronic Ignition to pilot system | |||
| Escea PCB | ||||
| Ignition Activation | 7 secs (approx) | |||
| Flame Safeguard | Flame Rectification | |||
| Consumption | 84W @ 0.35A 230V | |||
| Remote controls | Yes | |||
| Timers | Yes | |||
| Clock | Yes | |||
| Function lock / child | Yes | |||
| Temperature control | Yes | |||
| Connections | Electric | 230V AC | ||
| Gas | 1/2" BSPP female lower right of fireplace chassis | |||
| Flue Type | 4" and 3" Flexi Flue | |||
| Spigot Location | Rear and centre | |||
| Data badge location | On Chassis Base | |||
| DF990 PRODUCT SPECIFICATION | ||||
| MODEL NAME DF990 | ||||
| Description of Appliance Powerflued Gas Fire Heater | ||||
| Star Rating 4.9 stars | ||||
| Max. Heat Output | 8.2kW | |||
| A/NZ Approval No. AS/NZS 5263.1.3 | ||||
| Gas Type Natural Propane ULPG | ||||
| Gas input | High 35 MJ/hr 30 MJ/hr 30 MJ/hr | |||
| Low 16 MJ/hr 12 MJ/hr 12 MJ/hr | ||||
| Inlet Pressure | Max 5.0 kPa 5.0 kPa 5.0 kPa | |||
| Min 1.13 kPa 2.75 kPa 2.75 kPa | ||||
| Operating Pressure on High | 1.0 kPa | 2.3 kPa | 2.3 kPa | |
| Operating Pressure @ Front Burner Jet on High | 0.94 kPa | 2.2 kPa | 2.2 kPa | |
| Burner Jet Size | Front: 2.1mmRear: 1.8mm | Front: 1.2mmRear: 1.02mm | Front: 1.2mmRear: 1.02mm | |
| Aeration Collar Hole Size for Logs & Embers/Flakes | 2 holes @∅7.5mm | Spacer (no restriction) | Spacer (no restriction) | |
| Aeration Collar Hole Size for Coals | 2 holes @∅7.5mm | Spacer (no restriction) | Spacer (no restriction) | |
| Pilot injector | #42 | #27 #27 | ||
| Appliance Dimensions (mm) | Width | 943.0 mm | ||
| Height | 884.0 mm | |||
| Depth | 402.0 mm | |||
| Weight | Kg | 90 kg | ||
| Ignition System | Electronic Ignition to pilot system | |||
| Escea PCB | ||||
| Ignition Activation | 7 secs (approx) | |||
| Flame Safeguard | Flame Rectification | |||
| Consumption | 84W @ 0.35A 230V | |||
| Remote controls | Yes | |||
| Timers | Yes | |||
| Clock | Yes | |||
| Function lock / child | Yes | |||
| Temperature control | Yes | |||
| Connections | Electric | 230V AC | ||
| Gas | 1/2" BSPP female lower right of fireplace chassis | |||
| Flue Type | 4" and 3" Flexi Flue | |||
| Spigot Location | Rear and centre | |||
| Data badge location | On Chassis Base | |||
A Product Description and Installation Process 8
A1 Product Description 8
A2 Recommended Install Process 8
A3 Product Dimensions 9
B Creating the Cavity 10
B1 Cavity Shape 10
B2 Floor Clearances 11
B3 Corner Installations 11
B4 Hearth 12
B5 Cavity Base 12
B6 Wall Linings 12
B7 Television & Mantel Clearances 13
B8 Fascia Dimensions 14
C Installing the Flue
16
C1 Flue Configuration (If less than 4m flue length is required) 16
C2 Flue Configuration (If more than 4m flue length is required) 18
C3 Masonry Vertical Power Flue Kit (up to 6m) 19
C4 Masonry Vertical Power Flue Extension Kit (6 to 12m) 20
C5 Installing the Horizontal Power Flue 21
C6 Installing the Universal Vertical Power Flue (Internal Install) 24
C7 Installing the External Vertical Power Flue (UVP) 26
C8 Installing in Accordance with Relevant Codes 27
C9 Running the Flue 28
C10 Insulation Specification and Installation 29
C11 Running the Power Flue Electrical Cable 29
C12 Setting up the Flue Spigot Plate 30
D Installing the Electricity and Gas to the Appliance
31
D1 Power Supply 31
D2 Removing the Glass 31
D3 Removing the Burners 32
D4 Gas Pipe Sizing 33
D5 Gas Pipe Position 33
E Installing The Appliance
34
E1 Installation 34
E2 Connecting the Flue 34
E3 Removing the Burner Tray 35
E4 Connecting the Power Flue Cable 36
E5 Fixing the Appliance to the Base 36
E6 Network Cable 37
E7 Connecting the Gas Pipe to the Regulator 37
E8 Gas Isolating Valve 37
E9 Pressure Test Point 37
E10 Checking the Operating Pressure 38
E11 Converting the Appliance Gas Type 39
E12 Flame Picture 41
E13 Coal Fuelbed Installation 41
E14 Log Fuelbed Installation 41
E15 Installing the Glass 43
E16 Home Automation Setup 43
F Fitting the Fascia and Finishing Installation 44
F1 Fitting the Fascia 44
F2 Locating Wall Mount Cradle for Remote 44
F3 Operating the Appliance for the First Time 45
F4 Normal Operating Sounds and Smells 45
F5 Cleaning the Glass 46
G Freestanding Unit (DFS730) Installation 47
G1 Product Dimensions 47
G2 Hearth and Clearances 47
G3 Locating the DFS730 47
G4 Gas Pipe Routing Information 48
G5 Flue Installation 49
G6 Horizontal Flue Kit 50
G7 DF700 Fireplace Installation into DFS730 Freestanding Unit 50
H Installation Checklist 51
S Service Manual 52
S1 Error Codes 52
S2 Serial Number 54
S3 Checking Operating Pressure 54
S4 Cleaning the Fascia 54
S5 Removing or Cleaning Fan 55
S6 Removing Electronic Tray 55
S7 Replacing the Thermal Cut Out 56
S8 Removing the Pressure Switch 57
S9 Replacing a Remote 58
S10 Servicing the Horizontal/Universal Vertical Power Flue 59
S11 Annual Service Procedure 60
S12 Wiring Diagram 61
A
Product Description and Installation Process
A1 Product Description
The Escea DF-Series gas fire is a room sealed gas appliance designed to be built into a masonry cavity or a false chimney cavity. DF-series products are provided with standoffs to ensure adequate clearances to combustible materials. DF990 is provided with an additional lintel spacer (see section; creating the cavity). These appliances are flued using co-linear flexible aluminum flue (with PolyPro flue extensions for some models) connected to a Power Flue. The user will control their fire with the Radio Frequency (RF) remote that will normally be located in it's wall mount cradle. In addition to the RF remote the appliance has a single auxiliary On/Off button on the unit. When not in operation it is in a standby mode unless it is physically isolated from the mains supply.
A2 Recommended Install Process
The following diagram illustrates the steps required to install your gas fire. The sequence in which you choose to do these tasks will vary depending on your individual scenario. Please read these instructions fully before proceeding with the installation.
Masonry Installation

Modifying the cavity to suit
Install electrical / gas connections and flue system
Install appliance and finish cavity
Finish installation, fit fascia and test appliance
Section B Section C, D Section E Section F
False Cavity Installation
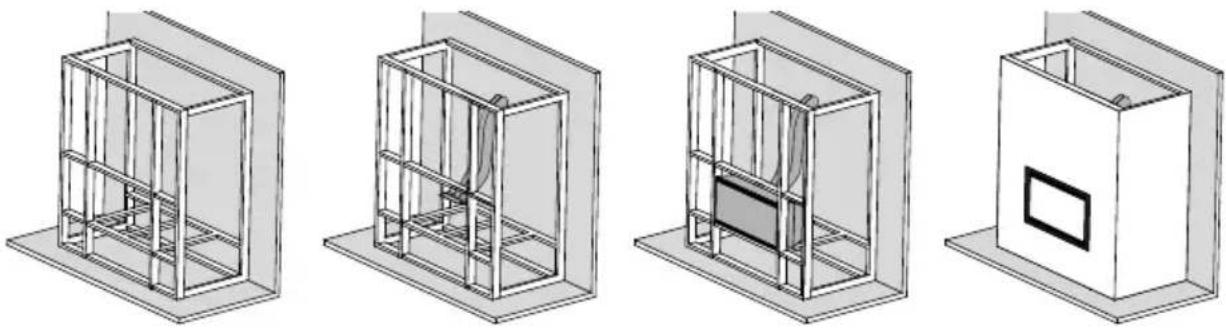
Create The Framed-Cavity
Install electrical / gas connections and flue system
Install appliance and finish cavity
Finish installation, fit fascia, test appli-
ance and clad the
cavity
Section B Section C, D Section E Section F
Important: Installations that are not specifically outlined in this manual should be referred to the Escea Architectural Advisory Team.
Please email aa@escea.com
i.e. Hutch, under bench, recessed, and joinery enclosed installations. i.e. Use of heat sensitive materials such as resin stone or laminated timber. i.e. DF flue installations over 4 metres.
To ensure that your installation is fully complete, please use the "Installation Checklist" on page 51.
A3 Product Dimensions
NOTE: All outside dimensions taken from the appliance are with the standoffs attached

natural_image
Technical line drawing of a mechanical assembly with labeled dimension A (no text or symbols beyond label)| A B C | D* E* | ||||
| DF700 6 | 93mm 387 | mm 596mm | 723mm | 598mm | |
| DF960 | 943mm | 402mm | 596mm | 973mm | 598mm |
| DF990 9 | 43mm | 402mm 884 | mm 973mm | 887mm |
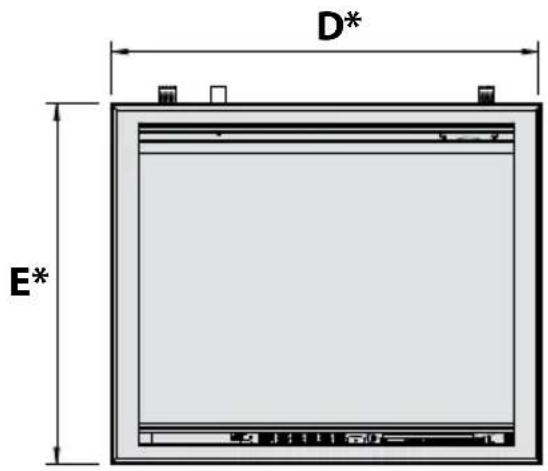

*Slim Fascia Dimensions.
END OF SECTION A
By the end of this section, you should have:
A framed false cavity
OR
☐ A masonry cavity sized to suit the appliance
B
Creating the Cavity
B1 Cavity Shape
The side standoffs installed on the outside must only be removed when being installed into a masonry cavity.

Note: a top is not required when creating the cavity
| Height Width Depth | |||||
| DF700 | False Cavity installation (top standoffs must be adjusted to the upright position when framing) | Framing | 600mm | 695mm | 390mm + minimum 65mm flue clearances |
| Wall Lining | 560mm + allowance for fascia clearance | ||||
| *Masonry install with the side stand-offs and timber standoffs removed. | 560mm + allowance for fascia clearance | 685mm | 385mm | ||
| DF960 | False Cavity installation (timber standoffs must be adjusted to the upright position when framing) | Framing | 600mm | 945mm | 405mm + minimum 65mm flue clearances |
| Wall Lining | 560mm + allowance for fascia clearance | ||||
| *Masonry install with the side stand-offs and timber standoffs removed. | 560mm + allowance for fascia clearance | 935mm | 400mm | ||
| DF990 | False Cavity installation (timber standoffs must be adjusted to the upright position when framing) | Framing | 888mm | 945mm | 405mm + minimum 65mm flue clearances |
| Wall Lining | 848mm + allowance for fascia clearance | ||||
| *Masonry install with the side stand-offs and timber standoffs removed. | 848mm + allowance for fascia clearance | 935mm | 400mm | ||
WARNING: Wall lining MUST NOT be installed until after the fireplace is inserted into the cavity. Please follow the steps in the figures shown.
WARNING: Ensure adequate allowances are made for fascias: see section B9 on page 15.
NOTE: Measure the indicated framing dimensions from the base of the appliance.
NOTE: If cavity dimensions significantly exceed those specified, a register plate is available for purchase through your local Escea retailer (New Zealand Only).
Compulsory False Cavity Requirements
Ensure the fireplace is inserted first before the wall lining is built.
For floor-mounted installations, allow for fascia clearance, see B9 on page 15.
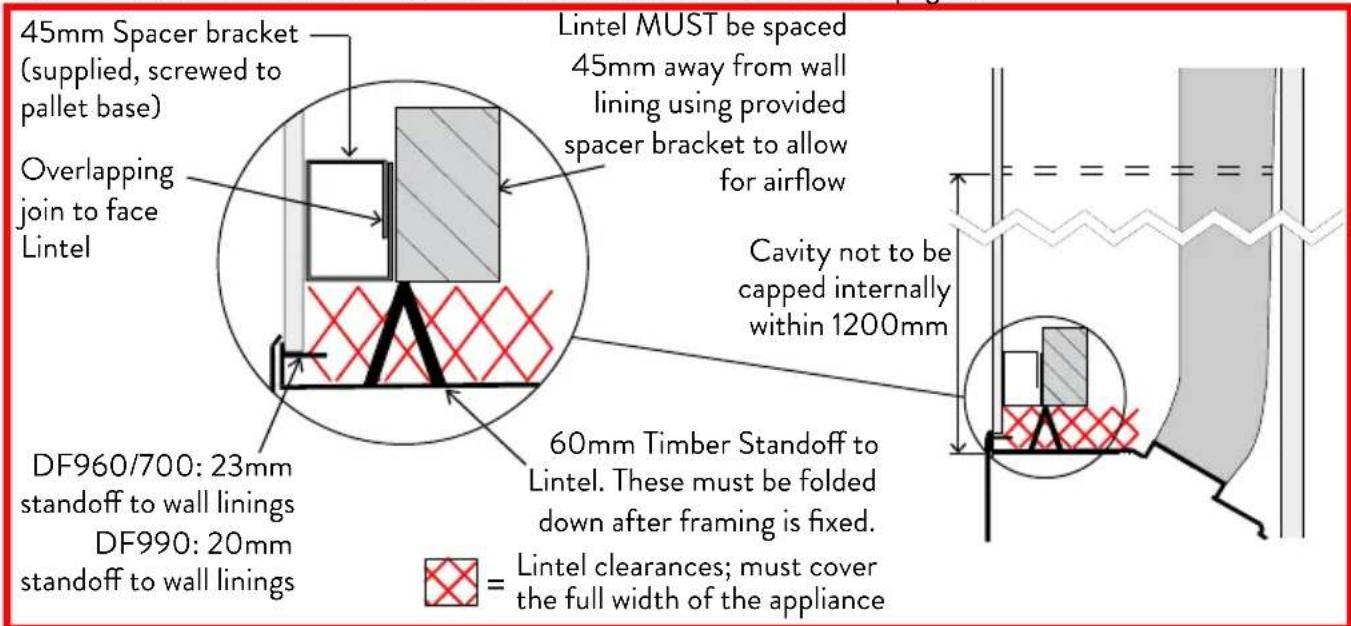
WARNING: DF700, DF960, and DF990: the top standoffs must be adjusted to the upright position before the fireplace installation. All standoffs must remain in place for fireplace installation and then folded down once framing is fixed.
NOTE: Wall lining should hang below the lintel to meet the appliance edge.
NOTE: If your installation requirements do not align with the diagram above, please contact our architectural advisory team: aa@escea.com
B2 Floor Clearances
If the appliance is mounted above a “heat resistant floor” (including but not necessarily limited to: ceramic tiles, concrete, and stone) then it may be positioned with the bottom of the fascia level with the finished floor if desired.(30mm or 55mm spacer required under the fire in this case depending on the fascia type.)
If the appliance is mounted above a “heat sensitive floor” (including but not necessarily limited to: carpets, vinyl, carpet tiles, rugs and mats, timber, joinery, wooden flooring - see materials guide.) then we recommend a distance of 100mm from the bottom of the fascia to the finished floor or hearth.
NOTE: Excerpt from AS/NZS 5601.1-2013 Sec. 6.2.5. "A gas appliance shall be installed such that the surface temperature of any nearby combustible surface will not exceed 65C above ambient."
Refer to section B4 on page 12 for hearths.
B3 Corner Installations
If a cavity is to be created in a corner, the following drawing gives the minimum sized interior wall dimensions.
| A B C | |||
| DF700 775mm 695mm 420mm | |||
| DF960 915mm 945mm 435mm | |||
| DF990 915mm 945mm 435mm | |||

B4 Hearth
A finished floor level hearth is not required, however it may be used for decorative purposes or for protection of soft/ heat sensitive flooring as stated in the section B2 on page 11 to allow a smaller floor clearance. The hearth should not obscure the front face of the fire, must protrude at least 200mm from the face of the fireplace and be at least the width of the appliance.
A raised hearth or joinery should conform to the above guideline.
B5 Cavity Base
This appliance MUST be fully supported on its base. The base must extend over the entire area of the underside of the appliance. The base must also be levelled to prevent vibration from possible fan imbalance. The base of the cavity must be strong enough to support 120kgs.
The fireplace must be seismically restrained in a manner appropriate to the installation location and accessible once the secondary glass is removed.
B6 Wall Linings
NOTE: For false cavity installations, DO NOT line the wall before the fireplace has been fitted into the cavity; the top standoffs are required to be upright for this installation type and then folded down once framing is fixed.
The DF-Series fireplace has standoff rails installed on the outside of the chassis. The standoff rails may only be removed when installing the fire into a masonry cavity. The side-front flanges of the appliance must be on top of the finished wall surface in order for the fascia to mount properly. Take into account any plaster board, tiles, or any other finishing surface that may be intended for the finished wall surface.
The wall board that lines the outside of this opening can be normal dry wall (plaster board) and does not need to be non-combustible.
If, for some reason, the cavity dimensions exceed those specified in section B1 on page 10, a register plate is available (New Zealand only) for purchase through your local Escea distributor.
NOTE: The temperature of the wall lining directly above the heater does get warm and hence may discolour paint finishes that are susceptible to temperature damage or distort vinyl wall coverings. For durability of finishes and surfaces you should contact the relevant manufacturer for their specification.
B7 Television & Mantel Clearances
Television
The diagram (shown below) shows the recommended minimum clearances for the location of any electrical equipment (such as Plasma TV, LCD TV or home theatre) above a DF-Series gas fire. For DF990, a mantel/recess is required to comply with our recommendation of TV installation. Contact architectural advisory at aa@escea.com if you wish to install electrical equipment without a mantel/with a recess.
NOTE: Dimensions from the top edge of the air opening.
NOTE: The television clearance recommendations are to be treated as a suggestion of a suitable installation only. It is the responsibility of the end user to check the installation instructions of their electrical appliances to ensure that the location in relation to the gas fire is suitable. Escea in no way guarantees or takes responsibility that the recommended installation suggestion will be suitable for all electrical or home entertainment appliances.
Mantel
Mantels or protruding ledges above the heater must not be installed lower than the dimension shown to the right of the diagram below.
NOTE: Dimensions are from the top edge of the air opening.

For DF700 & DF960 the minimum height for TV installation without a mantel installed: 200mm For DF990 a mantel is required
B8 Fascia Dimensions
The dimensions of the fascias are shown below.
Warning: The fascia is a critical component of your gas fire. Never run the fire without the fascia properly fastened.
Edge Fascia


natural_image
Technical line drawing of a rectangular frame with corner markers and an arrow labeled 'T' pointing to the edge (no text or symbols beyond the label)| A B C D T | |||||
| DF700 7 | 45mm 639 | mm 640mm | 533mm 35mm | ||
| DF960 9 | 95mm 889 | mm 640mm | 533mm 35mm | ||
Slim Fascia & Stretch Fascia

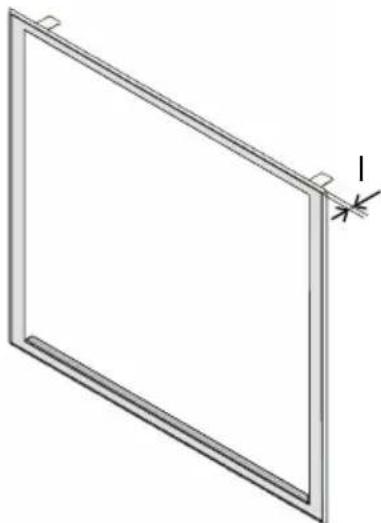
natural_image
Simple line drawing of a rectangular frame with corner markers and an arrow indicating direction (no text or symbols)| Fascia Type | E | F | G | H | I | |
| DF700 | Slim | 723mm | 620mm | 598mm | 529mm | 2.5mm |
| Stretch | 761mm | 632mm | ||||
| DF960 | Slim | 973mm | 870mm | 598mm | 529mm | 2.5mm |
| Stretch | 1011mm | 632mm | ||||
| DF990 | Slim | 973mm | 870mm | 887mm | 817mm | 5.5mm |
B9 Distance from Fireplace to Fascia Base
The installation requires a spacer below the appliance to allow room for the fascia to sit flush with the non combustible floor or a hearth.
The following side-on view shows the measurement from the base of the fireplace to the base of the fascia:

C
Installing the Flue
C1 Flue Configuration (If less than 4m flue length is required)
If your flue system is less than 4m long (as shown in diagrams below), then a simple aluminium flexible flue is required. If you wish to install a longer flue run, see either section C2 on page 18 or C3 on page 19.
Horizontally Terminated: Utilizes the Escea Horizontal Power Flue enclosure kit.
The horizontal offset of the terminal can be any amount up to the total flue length listed below. Please consult with Escea's technical staff if your intended flue configuration steps outside of the bounds of the flue configurations shown below.
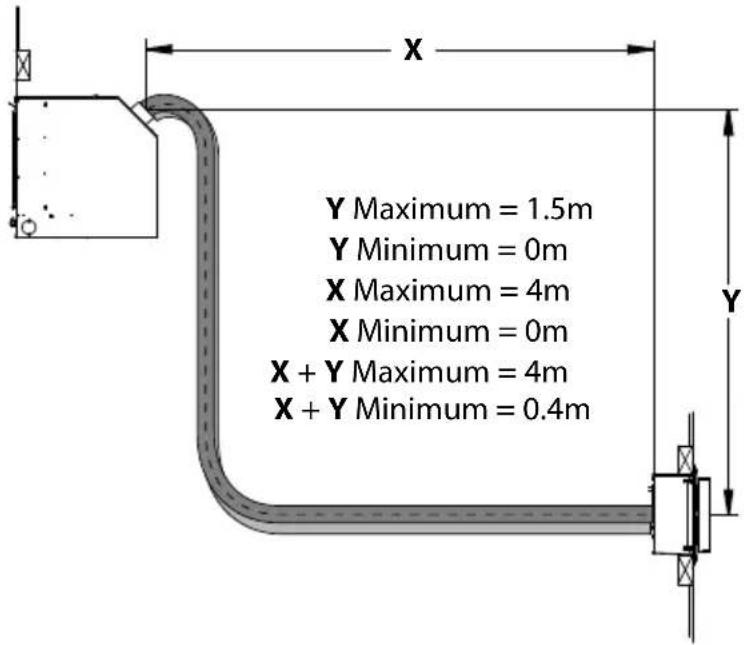


Vertically Terminated: Utilizes the Escea Vertical Power Flue enclosure kit.

C2 Flue Configuration (If more than 4m flue length is required)
If your flue system is greater than 4m long (as shown in diagrams below), then there are the following options:
- DFS Only: Flexible flue with condensate trap and rigid PolyPro tube lengths (see diagrams below).
- DF: For flue run installations beyond 4m and up to 12m, flexi flue must be used for the entire flue run and must be fully insulated from appliance connection to fan unit. For information on the insulation installation see section C10 on page 29. Beyond 12m (up to 40m) please contact the Escea Advisory Team at aa@escea.com.


C3 Masonry Vertical Power Flue Kit (up to 6m)
The following kit enables the installation of the aluminium flexi into vertical masonry chimneys for extending the flue system from the appliance spigot to 6.0 meters while providing the masonry flashing.
Including, but not limited to, installations into: a complete masonry chimney, a flue liner, or a combustible sealed false chimney.
If your flue system is to be run vertically through a purpose-built sealed flue cavity (the cavity must remain sealed up to the terminal); PolyPro and a condensate drain is not required. An extension kit can be purchased to extend the maximum length to 12m, see section C4 on page 20. Only the Universal Vertical Power Flue (UVP-External) kit can be used for this installation type.

NOTE: 225mm wide x 240mm long 906624-Masonry flue liner extension kit can be purchased to add extra protection for the high snow and rainfall areas.
NOTE: If any gap occurs in between the 400mm x 400mm masonry flashing and the chimney due to the chimney dimensions, the suitable chimney cap flashing can be built as keeping the spigot diameter 225mm.
C4 Masonry Vertical Power Flue Extension Kit (6 to 12m)
The following kit enables the installation of the aluminium flexi into vertical masonry chimneys for extending the flue system to 12.0 meters from 906602-Masonry Vertical Power Flue kit that is required and supplemented by the 12m Masonry Vertical Power Flue Extension Kit.
Including, but not limited to, installations into: a complete masonry chimney, a combustible sealed false chimney.
NOTE: This installation type cannot be used on a DFS730. If required, please contact architectural advisory aa@escea.com for more information.
If your flue system is to be run vertically through a purpose-built sealed flue cavity (the cavity must remain sealed up to the terminal); PolyPro and a condensate drain is not required. Only the Universal Vertical Power Flue (UVP-External) kit can be used for this installation type.
The exhaust/inlet flue MUST BE NO longer than 12.0M.
The 100mm flue shroud must cover the entire length of the exhaust flue.
The intake and shrouded exhaust flue must be entirely enclosed within a fully vertical masonry or purposely constructed, a combustible sealed cavity/masonry chimney.
Feed the power flue cable down through the chimney cavity and connect to the appliance and Power Flue.
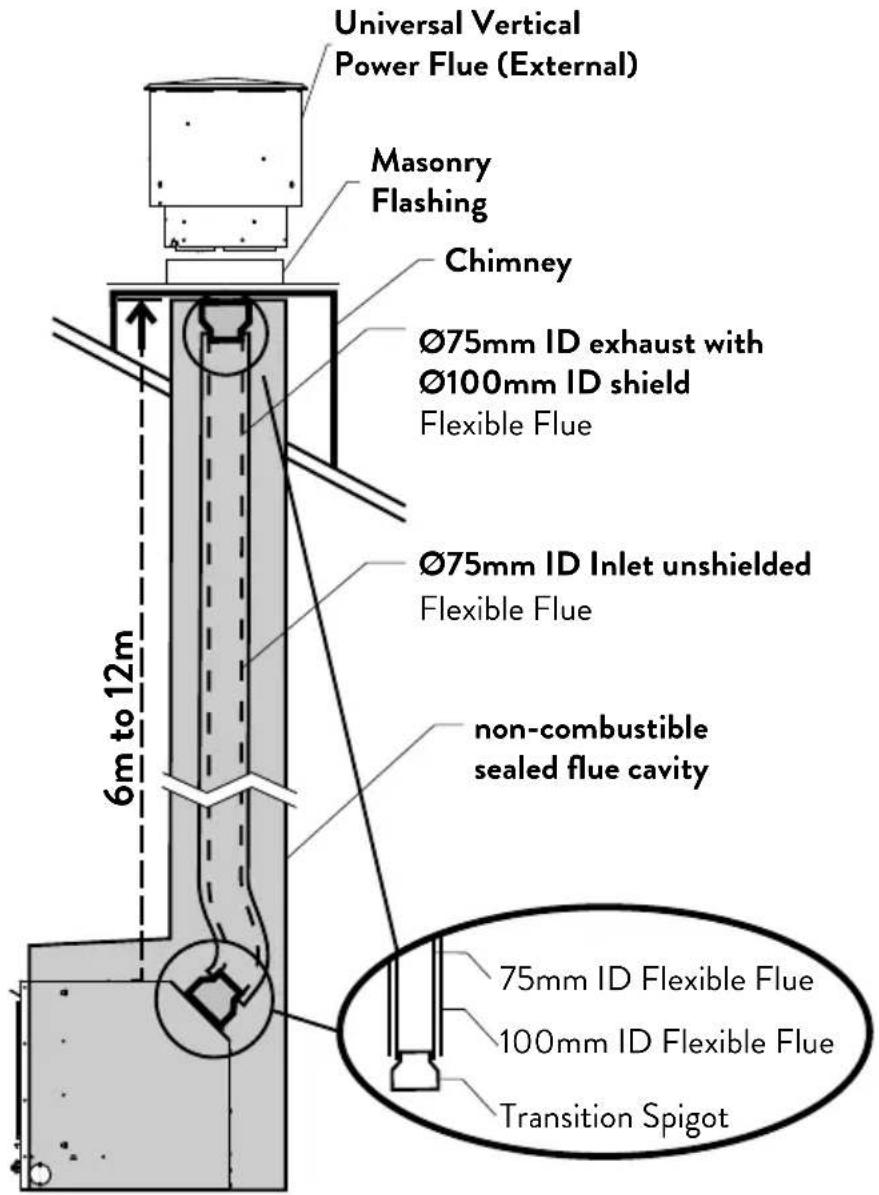
NOTE: This kit supplements and requires 906602-Masonry vertical Power Flue kit.
NOTE: If any gap occurs in between the 400mm x 400mm masonry flashing and the chimney due to the chimney dimensions, the suitable masonry flashing can be built as keeping the spigot diameter 225mm.
C5 Installing the Horizontal Power Flue
NOTE: The appliance is designed only to operate using the approved flexible or PolyPro flue supplied by Escea. Other brands of flue may not fit, and this will affect the appliance warranty.
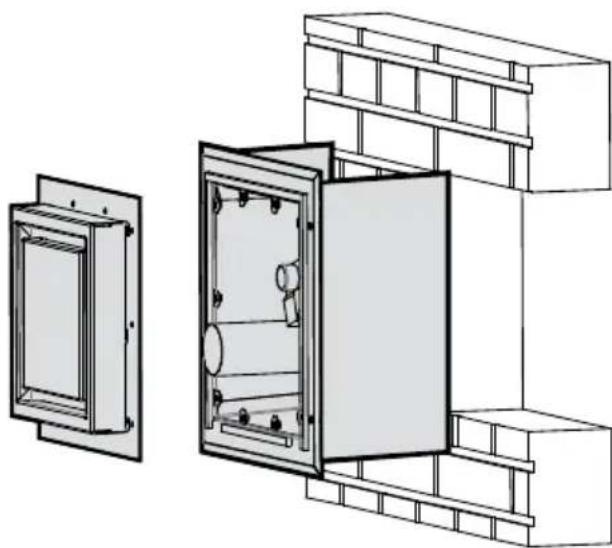
The Horizontal Power Flue Wall Terminal must be installed in the correct orientation (the small horizontal slot should be at the bottom). This allows for the correct operation of the flue system and prevents the ingress of water.
The Horizontal Power Flue Wall Terminal must be weather tight when installation is complete to prevent damage to the dwelling. It must be installed by a suitably qualified person.
natural_image
Architectural diagram showing two views of a cabinet or enclosure with internal components, mounted on a brick wall (no text or symbols)Fit the Horizontal Power Flue Wall Terminal into the
hole and fix in place, making sure the installation is sealed appropriately to prevent the ingress of water from outside the wall cladding. Take notice of the label on the termination which shows the correct orientation of the terminal.
NOTE: It is the responsibility of the installer to ensure the Horizontal Power Flue Wall Terminal is installed to all relevant building codes to ensure weather tightness.

Creating the Hole in the Outside Wall
When cutting the hole in the outside wall, be mindful of how the installation of the Horizontal Power Flue Wall Terminal will be finished; the installation must be weatherproof.
natural_image
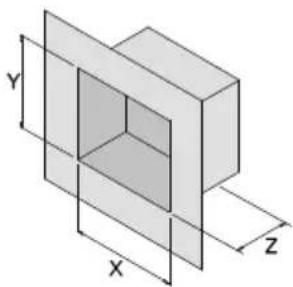
Isometric diagram of a 3D rectangular prism with labeled X, Y, Z axes (no text or symbols on the object itself)Ideal hole/cavity size for horizontal Power Flue
Without Side Brackets With Side Brackets
X 298mm 360mm
Y 298mm 298mm
Z 175mm Excluding allowance for flue which exits here
The Horizontal Power Flue Wall Terminal can be attached to the wall in two ways: A) From the front of the terminal:

B) By attaching the optional wall terminal installation brackets to the sides of the cavity and attaching the Horizontal Power Flue Wall Terminal to these, from the front:

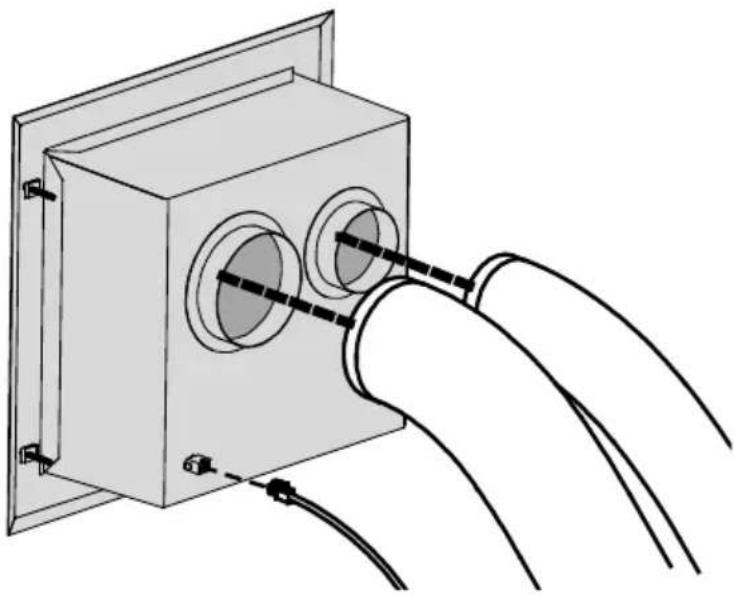
Attach the ∅100mm and ∅75mm flexible aluminium flues to the spigots on the rear of the Horizontal Power Flue Wall Terminal using the hose band clamps supplied. Plug the Power Flue electrical cable into the back of the Horizontal Power Flue Wall Terminal.
For information on the PolyPro flue, see the installation manual which is supplied with the flue components.
Ensure that the electrical cable is firmly secured to the wall terminal or building to prevent damage or disconnection if pulled.
natural_image
Illustration of a hand inserting wires into a wall-mounted electrical outlet (no text or symbols)Fit the Horizontal Power Flue Wall Terminal into the hole and fix it in place, making sure the installation is sealed appropriately to prevent the ingress of water from outside the wall cladding.
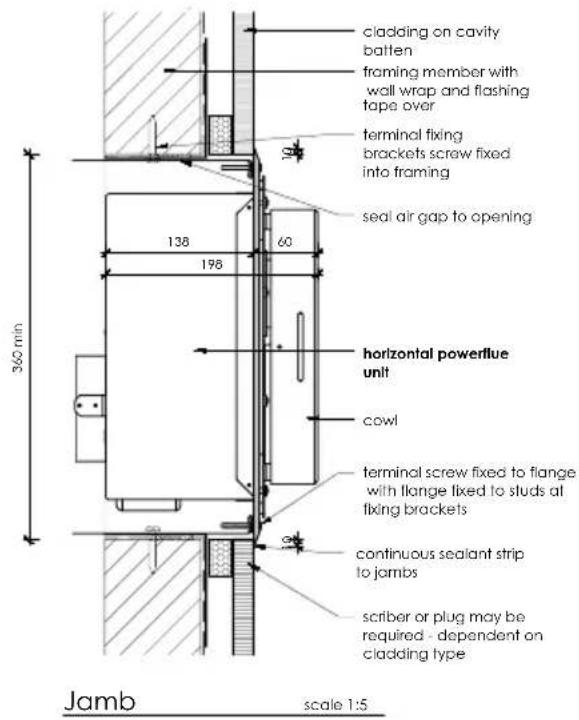
NOTE: It is the responsibility of the installer to ensure the horizontal Power Flue wall terminal is installed to all relevant building codes to ensure weather tightness. This may necessitate the use of appropriate flashing material where appropriate.
IMPORTANT: Ensure that flashings do not restrict the air intake slot around the periphery of the cowl.
How to Flash the Horizontal Power Flue
The following diagrams are excerpts from the Escea architect drawings and are available in full on our website. These diagrams are recommendations, and your installation must comply with any local or national building codes.

C6 Installing the Universal Vertical Power Flue (Internal Install)
NOTE: For information regarding an external install of the UVP, go to section C7 on page 26.
The Universal Vertical Power Flue (UVP) internal configuration is designed to have the fan, mounted within the roof space of the house, and the vertical ∅225mm diameter liner, containing a ∅100mm flexi, penetrate through the roof. The UVP internal conversion kit comes with a 1200mm liner that is specific to the internal installation and must always be used.
Note: The flue setup must comply with either section C1 on page 16 or C2 on page 18.
Use standard methods to flash the roof penetration. The installation must be weatherproof and conform to all local council standards including powered flue termination rules.
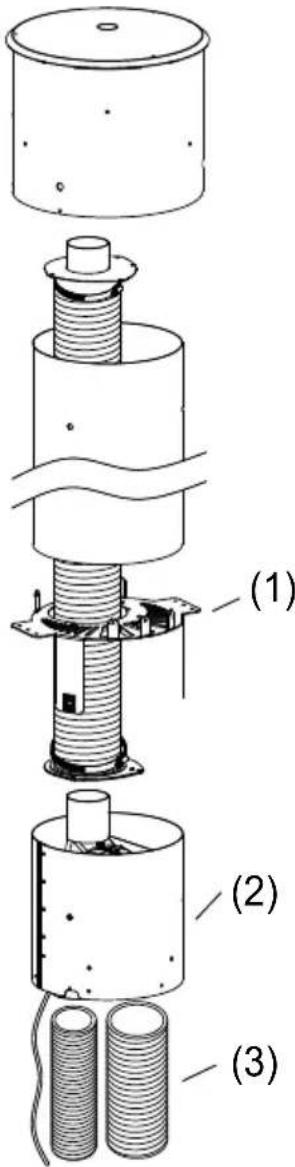
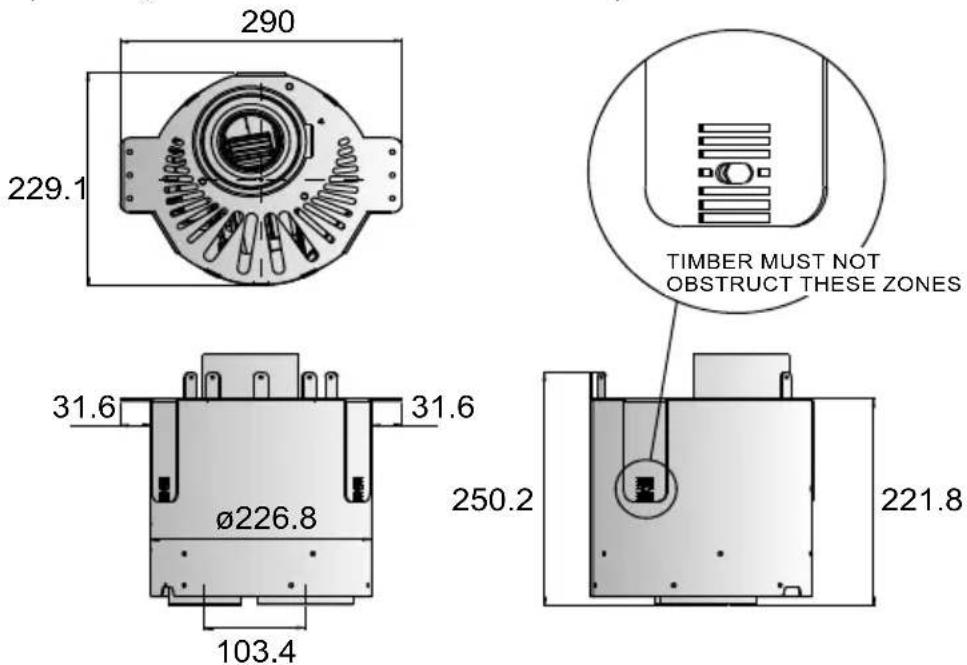
Mount the fan mount bracket (1) to the roof framing and strapping using timber ensuring that the flue is rigid and vertical. Ensure that the mounting timber does not obstruct access to the 3xM5 screw threads on the side of the fan unit.
Aim to have the fan enclosure (2) mounted as high as possible, mainly to allow sufficient fall for condensation drainage if the flexi-flue is to run horizontally.
Ensure there is sufficient space below fan enclosure (2) to have access to fit the flexi-flue tubes (3) and allow flowing bends if required.
NOTE: The UVP-Internal and the flexi flue connections must be installed in a location accessible for service or replacement; a service hatch or removable flashing to allow access is required.
NOTE: When installing the unit onto a flue liner, ensure the length of flue liner above the roof is the minimum required length. ENSURE the ∅25mm restriction plate is installed on the inlet.
The UVP-Internal kit is intended for use within an accessible roof space or 'chimney' construction. Service access must be provided.
Ensure installation complies with relevant building codes and regulations.

C7 Installing the External Vertical Power Flue (UVP)
NOTE: For information regarding an internal install of the UVP, go to section C6 on page 24.
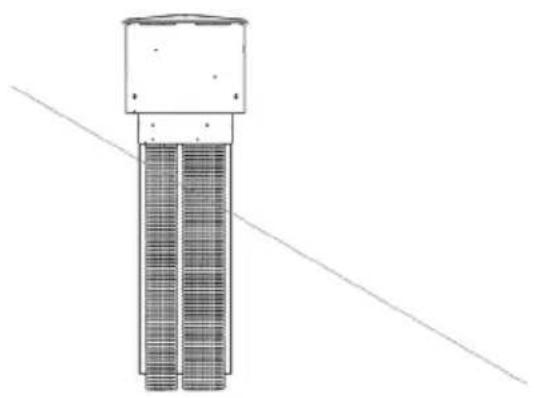
The UVP is designed to have the enclosure containing the fan unit mounted externally; an example is shown below.
Note: When installing the unit onto a flue liner, ensure the length of flue liner above the roof is the minimum required length. ENSURE the ∅25mm restriction plate is installed on the inlet.
natural_image
Technical line drawing of a vertical cylindrical structure with internal grid pattern, no text or symbols presentThe cowl surround should be fixed in place as shown.

natural_image
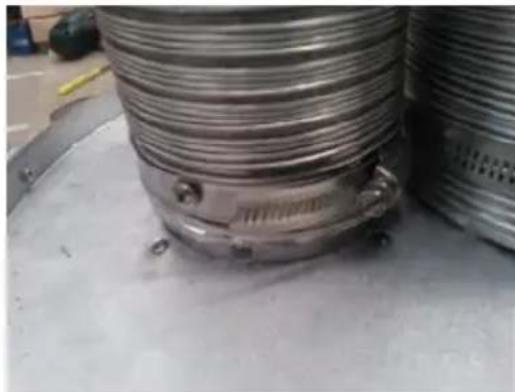
Simple line drawing of a cylindrical object with a flange and base, placed on a flat surface (no text or symbols)Mount the UVP kit to the top of a chimney flashing plate or penetrate the roof with an optional flue liner accessory and fit the UVP kit over the flue liner, sealing the penetration with a decktite or similar flashing. Ensure the terminal is vertical and rigidly mounted and the flexi flue attached below is fixed to the terminal spigots using the supplied hose clamps. The flexi flue is held in place by drilling 3 holes and screwing 3 self tapping screws evenly around each hose band clamp (as shown in the picture below).
natural_image
Close-up of a metallic cylindrical component with mounting holes and bolts, placed on a white surface (no visible text or symbols)C8 Installing in Accordance with Relevant Codes
The location of the Horizontal Power Flue Wall Terminal must be installed in accordance with AS/NZS 5601 and any other relevant building codes. If possible, avoid installing the Horizontal Power Flue Wall Terminal in areas exposed to high winds and extreme weather.
Some of the minimum clearances for a fan assisted wall terminal are listed below; please refer to AS/NZS 5601 Gas installation standard for full guidance on the design of the flue system. Where possible
allow a greater clearance.
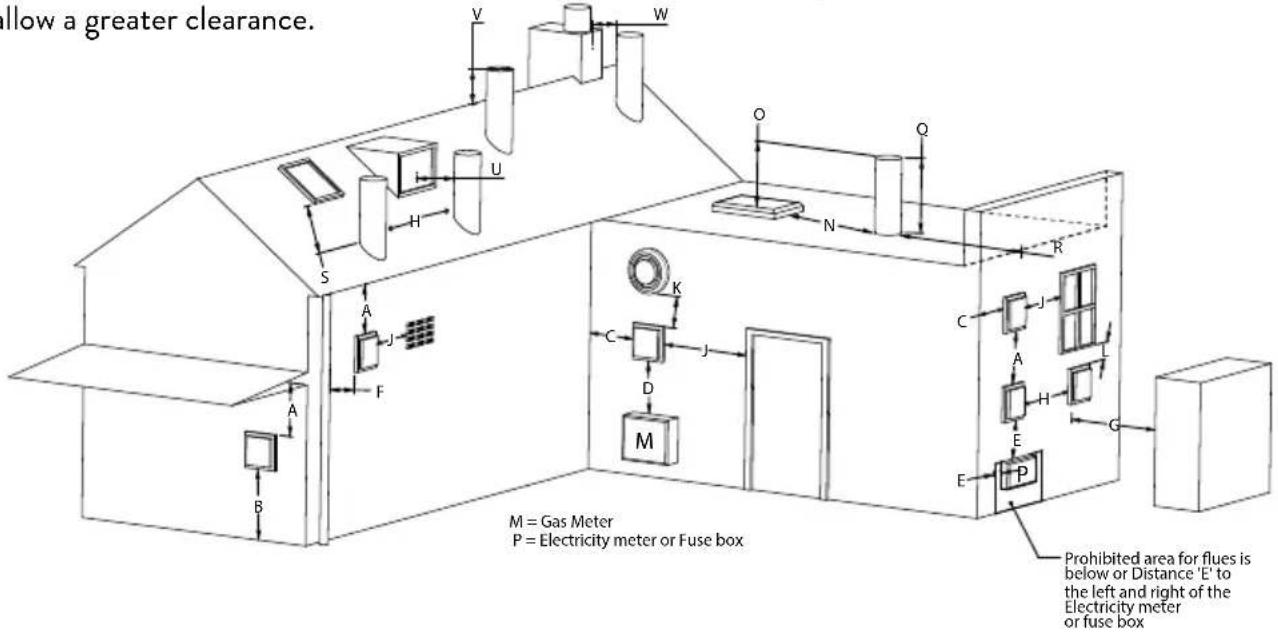
A Below eaves, balconies and other projections 200mm
B From the floor, above a balcony or other surface 300mm
C From a return wall or external corner 300mm
D From a gas meter or regulator vent 1000mm
E From electricity meter or fuse box 500mm
F From a drain pipe or soil stack 75mm
G Horizontally from any building structure or obstruction 500mm
H From any other flue terminal or combustion air intake 300mm
J Horizontally from any openable window, door, non-mechanical air inlet, or any other opening into a building with the exception of sub floor ventilation 300mm
K From a mechanical air inlet or spa blower 1000mm
L Vertically below any openable window, door, non-mechanical air inlet, or any other opening into a building with the exception of sub floor ventilation 300mm
N Horizontally from a roof light 600mm
O Vertically from a roof light 500mm
Q Vertically from a flat roof 500mm
R Horizontally from a vertical structure 500mm
S Below a roof window 2000mm
T Above or either side of a roof window 600mm
U From a dormer window 1500mm
V Above the apex of the roof (see note 1 on following page) 300mm
W From an open flue 1500mm
Notes:
1) Should the flue not extend past the apex of the roof, the bottom opening of the flue should extend at least 200mm from the roof (or 300mm in regions with heavy snow).
2) The installation of a flue into a carport is not recommended.
3) The flue terminal will get very hot when in use. Precautions should be taken to protect people and animals from injury.
C9 Running the Flue
Use the following table to determine the exhaust flue clearances to combustibles:
| Model Clearance to Combustibles | |
| DF700 50mm clearance for first 0.9m | |
| DF960 50mm clearance for first 0.6m | |
| DF990 50mm clearance for first 0.6m |
Run the ∅100mm ID and ∅75mm ID (∅110mm OD and ∅85mm OD) flexible aluminium hoses from the cavity to the rear of where the Horizontal or Vertical Power Flue Terminal will be installed. Allow enough stretch in the flexible aluminium flue to allow it to be able to protrude through the wall/ceiling/roof/flue liner to enable it to be connected to the Power Flue Terminal. The flue should be expanded at each end in order for the flue to be attached to the fire/Power Flue. It is advisable to secure the flexi flue at regular intervals to prevent vibration, movement and sagging. Steel wire or 'builders strapping' may be used for this purpose.
NOTE: The flexible flue is shipped in a 'compressed' form. Extend it to your desired length by stretching.
For information on running the PolyPro flue, see the installation manual which is supplied with the flue components.

C10 Insulation Specification and Installation
Type of Insulation to use
Insulation R-value to be R1.5 and of malleable/flexible construction (rock wool or glass wool) and certified to withstand 230°C.
Insulation Installation
Tape must be used for all overlapping joints and the entire flue must be wrapped. Care must be taken not to compress insulation.
C11 Running the Power Flue Electrical Cable
Note: The Power Flue Terminal is powered from the appliance, and must be connected to the appliance with the supplied electrical cable only.
Note: Ensure that the appliance power supply is disconnected before making the connection to the terminal.
The supplied electrical cable is 7m long, flue extension kits also include a Power Flue electrical cable extension.
Run the electrical cable from the cavity where the appliance will be installed to the hole in the outside wall. Ensure it is not draped over, or in contact with, the outer shell of the appliance or the exhaust flue and kept clear from any other possible heat sources, sharp edges, or moisture. Fix it appropriately and allow enough cable looped to be able to pull both the appliance and the Horizontal Power Flue Wall Terminal out from their installed positions.

If you do not connect the power flue electrical cable to both the fireplace and the Powerflue, this will result in an error when the fireplace is turned on. Test the fan before continuing with the rest of the installation.
C12 Setting up the Flue Spigot Plate
Connect the flexi flue to the spigot plate using the hose band clamps provided while the cavity is still empty. Do not over stretch the aluminium flexi flue.

natural_image
Technical line drawing of a mechanical assembly with two vertical members and mounting base (no text or symbols)D Installing the Electricity and Gas to the Appliance
In order to install gas to the fireplace, check the operating pressure or install the network cable, the glass and burner tray needs to be removed.
D1 Power Supply
While the cavity is being created, consideration must be given to the location of an appropriate power supply. An earthed 230/240 volt mains power connection (typically a standard 3 pin outlet) must be available within 1m of the bottom right of the appliance. This connection must be accessible after the heater has been fully installed so that the appliance can be safely disconnected from the mains power supply prior to servicing.
A mains isolation switch (compliant to AS:NZS 5601 Clause 6.2.8) which is accessible from outside the cavity can also be used to disconnect the power.
Regardless of the method used, it MUST ALWAYS be possible to safely isolate the electrical supply to the appliance after it has been fully installed.
This appliance must not be located immediately below a socket outlet. This appliance will draw a maximum of 2 Amps from a 230/240V supply. No additional power supply is required for the Power Flue.
An electrical wiring diagram is located underneath the electronic tray, and also in the rear of this manual (Service Section S12 on page 61).
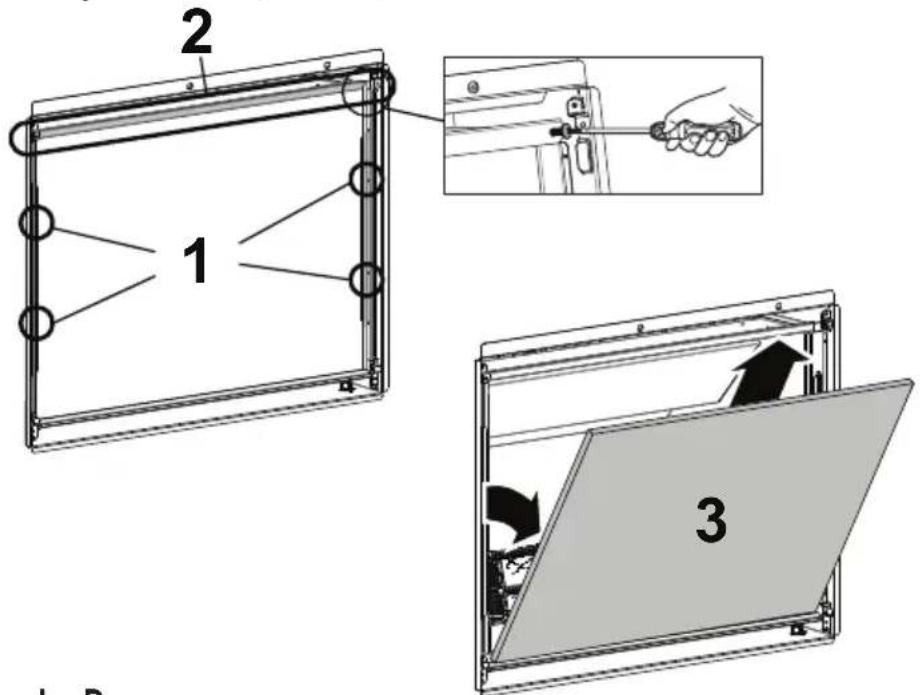
D2 Removing the Glass
The DF-Series fireplace has two layers of glass: the inner glass seals the firebox and is called the primary glass; the outer glass is called the secondary glass.
Secondary Glass
- Turn the upper glass brackets towards the centre of the fire to release the glass.
- Pull the top of the glass toward you slightly, lift the glass out of the bottom glass retainer and carefully set glass aside.

Primary Glass
- Remove the two screws in each of the two side brackets and take the brackets off.
- Remove both machine screws holding in the top bracket and slide forward.
NOTE: Some fireplaces may have an aluminium extrusion instead which is not fixed with screws, that needs to be lifted up to remove.
NOTE: Please slide the top bracket forward with caution to avoid scratches to the finish as the front of the part is visible.
- Pull the top of the glass toward you slightly, lift the glass out of the bottom glass
retainer and carefully set glass aside. Note that the fiberglass tape around the glass can mark carpet and furnishings - use a dropcloth to protect furniture.
D3 Removing the Burners
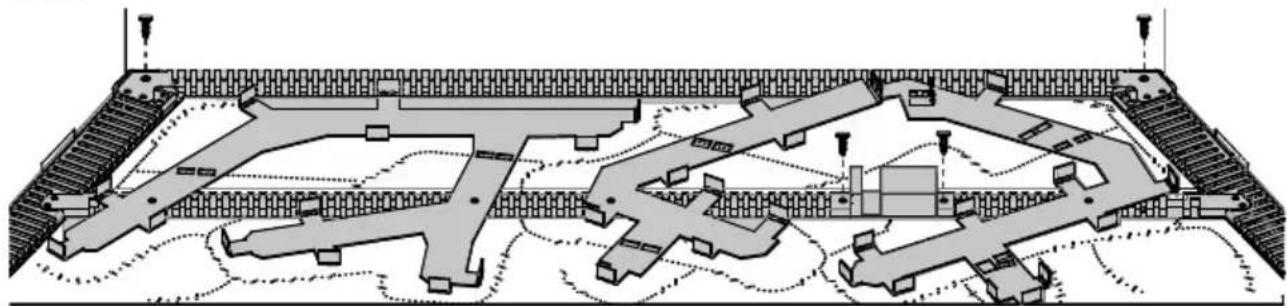
Remove the 2 screws in the rear corners of the infill assembly and the 2 screws either side of the pilot guard (shown in diagram below). Lift the infill assembly up and out of the firebox; place it carefully aside.
natural_image
Architectural floor plan showing building layouts and structural elements (no text or labels)Remove the 2 machine screws at the left hand end of each burner. The burner can now be carefully moved left to detach the burner tube from the burner jets and lifted out of the firebox.

natural_image
Pure technical line drawing of mechanical components without any text, numbers, or symbolsD4 Gas Pipe Sizing
Gas pipe should be sized as per the requirements of AS/NZS 5601. The pipe sizing must be sufficient to deliver the following volume of gas to the heater with all other gas appliances in the home running at the same time:
DF700 Gas Consumption = 25MJ/hr
DF960 Gas Consumption = 31MJ/hr
DF990 Gas Consumption = 35MJ/hr
D5 Gas Pipe Position
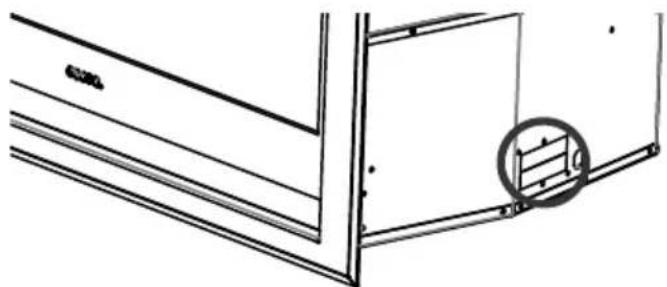
The DF-Series fireplace gas pipe entry point is located in the lower right corner; a sheet of silicone is used as a grommet (circled below).
natural_image
Technical line drawing of a door frame with a circular inset showing a bracket detail (no text or symbols)Get the gas pipe lined up with the silicone grommet so that when the chassis is pushed into the cavity in section E on page 34 the fire will look like the diagram shown below.

E Installing The Appliance
E1 Installation
NOTE: Ensure the wall has been correctly framed to the dimensions specified in section B1 on page 10 before starting the appliance install. The wall must be lined after the fire has been fitted into the cavity with the appliance electrical cord plugged into an outlet, carefully place the appliance in front of the cavity base.
E2 Connecting the Flue
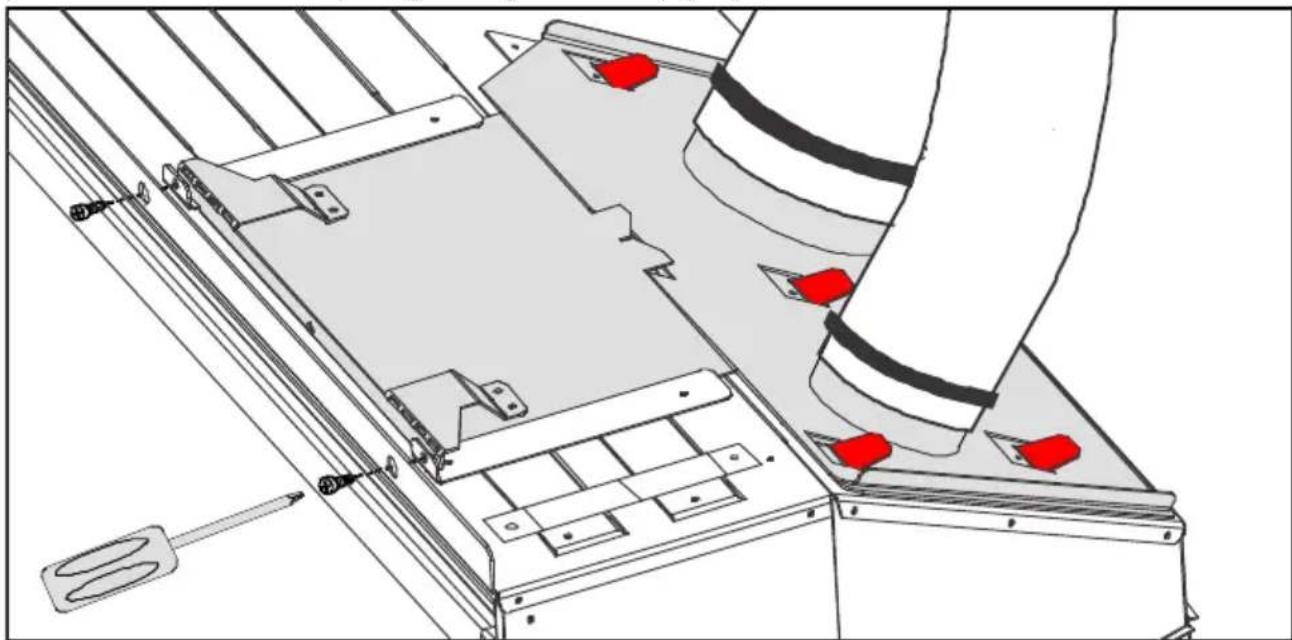
Carefully push the fireplace into the cavity just enough to bring the gas connection through the silicone grommet of the appliance (as shown in the second diagram of section D5 on page 33). The appliance should have enough room above the fireplace to reach in and align the flue spigot plate onto the rails (highlighted in the diagram below). Use the cable tool provided for pulling the flue spigot plate up the railing in a tight cavity. Use the tool as shown in the diagram below: with the cable threaded through the hole in the front face of the flue spigot plate, locate the end of the tool into the “V” in the centre of the main fold in the flue spigot plate.

natural_image
Technical line drawing of a mechanical assembly with no visible text or symbolsMake sure that all six of the fold up tabs (shaded in the diagram below) used for locating the flue spigot plate onto the chassis are poking through the flue spigot plate.
natural_image
Technical line drawing of a mechanical assembly with red components and a tool (no text or symbols)Insert the 2 long self tapping screws into the location shown in the diagram above to secure the flue spigot plate to the chassis.
E3 Removing the Burner Tray
Remove the screws circled in the diagram below.

natural_image
Top-down schematic of a mechanical or electrical component layout with no visible text, numbers, or symbols.The left hand side of the burner tray can now be carefully tilted and lifted out of the firebox slightly to detach the 2 ignition leads, 8-way teddington valve connector and the earth lead.
E4 Connecting the Power Flue Cable
NOTE: Make sure to turn off the power supply before connecting the power flue cable. Feed the Power Flue cable through the silicone grommet on the lower right hand side of the chassis and connect it to the terminal on the electronics tray shown in the diagram below.
NOTE: the burner tray must be removed to access the electronics tray as shown in section E3 on page 35.

Test the fan now to ensure that it will run prior to continuing with installation. Failure to plug in the fan will result in an error code when starting the fireplace.
E5 Fixing the Appliance to the Base
An appropriate fastening can be screwed down to the cavity base through the 2 circled holes in the diagram. For Freestanding installations, 2 machine screws will need to remove from two rivnuts in the support base of the freestanding and re-applied.
Ensure that the fire is seismically restrained in a manner appropriate to the installation location.

E6 Network Cable
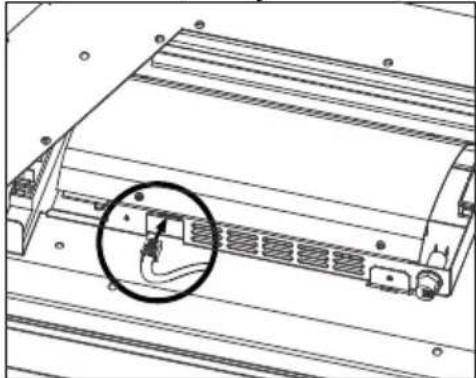
If the appliance is to be wired to a home automation system or internet router/network being installed then provision must be made for the network cable to get to the electronics tray. An opening in a silicone sheet in the rear bottom right hand corner is provided for the gas supply, Power Flue cable, and network cable to pass through the chassis.
Plug the network cable into the electronics tray using the location below as a guide.
natural_image
Technical line drawing of a server rack with a circled cable outlet (no text or symbols)E7 Connecting the Gas Pipe to the Regulator
NOTE: The regulator that is supplied with the fire MUST NOT BE REMOVED. Removal of the regulator, or replacing it with one not intended for use with an Escea fire, will void the limited appliance warranty.
The gas connection on the appliance regulator is a 12 ” female BSPP at the front right of the appliance; the regulator is located on the underside of the main burner tray (circled below). The gas supply section of the piping will need to be flexible inside the chassis to allow for pipe disconnection and burner tray removal.
With the burner tray out, the flexible gas supply pipe may be bent into position to align with the regulator connection point when the burner tray is replaced.
The gas supply can be tightened onto the regulator through the access hatch shaded in the diagram below.

natural_image
Technical line drawing of a mechanical assembly with no visible text or symbolsE8 Gas Isolating Valve
It is recommended that a gas isolating valve be installed as close to the regulator on the gas inlet side as possible with easy access if the fascia is removed. This will allow for easier servicing in the future.
E9 Pressure Test Point
As per AS/NZS 5601, a pressure test point shall be provided by the installer prior to the inlet of the appliance.
E10 Checking the Operating Pressure
WARNING: The regulator that is supplied with the fire MUST NOT BE REMOVED. Removal of the regulator, or replacing it with one not intended for use with an Escea fire, will void the limited appliance
warranty.

☐ Check the inlet pressure to the appliance. Attach manometer tube to the first test point upstream of the appliance (typically at the gas utility meter or auto change device for a propane bottle station)
☐ Run the heater on full (both burners running) and measure inlet pressure with all the other gas appliances in the building running. If pressure does not fall within the maximum or minimum pressures listed on the specification sheet at the start of this manual then reassess installation pipe size or upstream regulator settings.
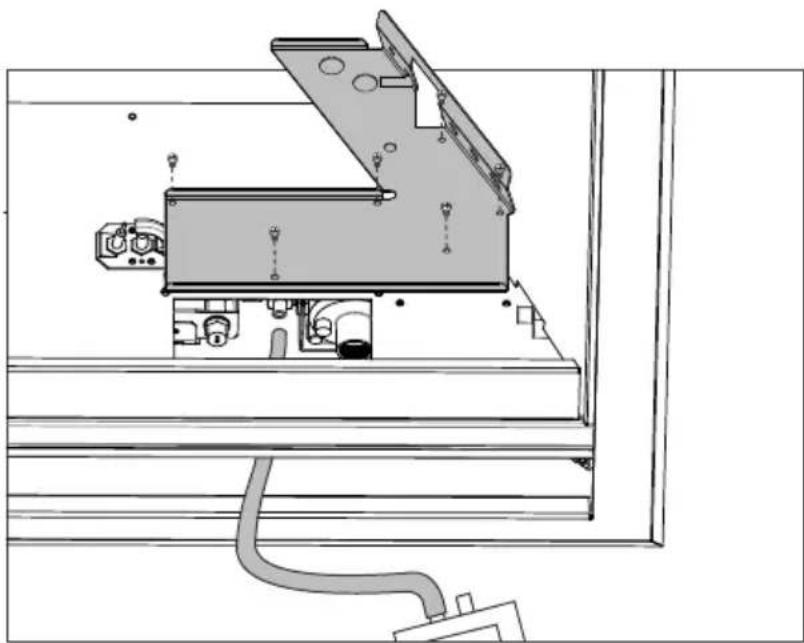
☐ Loosen the operating pressure test point screw. Connect the manometer tube and measure the operating pressure with the fireplace running on full (both burners running) and with all the other gas appliances in the building running. The manometer tube can be applied to the test point by removing the access hatch and feeding the tube through the front (as shown in the diagram below).
natural_image
Technical line drawing of a mechanical assembly with no visible text or symbolsAdjust the operating pressure by feeding a screw driver through the front face of the fireplace and turning the regulator adjustment screw.
☐ Tighten the operating test point screw and leak test both test points using a soapy water solution.
☐ Replace the test point hatch
E11 Converting the Appliance Gas Type
This appliance has been factory set to operate on Natural Gas only. To convert the appliance to operate on propane or ULPG, OR to install a coal fuel bed in a DF960, proceed as follows:
| DF700 ONLY | ||||
| Jets Front Burner Rear Burner Aeration Collar (2x) Pilot Jet | ||||
| NG ∅ 1.70 | mm ∅ 1.40 mm 1 | hole @ ∅ 3.5mm | #42 | |
| Propane | ∅ 1.05 mm | ∅ 0.90 mm | No Collar | #27 |
| ULPG | ∅ 1.05 mm | ∅ 0.85 mm | No Collar | #27 |
| DF960 ONLY | ||||
| Logs & Embers/Flakes | ||||
| Jets | Front Burner | Rear Burner | Aeration Collar (2x) | Pilot Jet |
| NG | ∅ 1.85 mm | ∅ 1.70 mm | 1 hole @ ∅ 4mm | #42 |
| Propane | ∅ 1.20 mm | ∅ 1.05 mm | No Collar | #27 |
| ULPG | ∅ 1.10 mm | ∅ 1.02 mm | No Collar | #27 |
| Coals | ||||
| Jets | Front Burner | Rear Burner | Aeration Collar (2x) | Pilot Jet |
| NG | 1.85 mm | 1.70 mm | 1 hole @ 2.5 mm | #42 |
| Propane | 1.20 mm | 1.05 mm | No Collar | #27 |
| ULPG | 1.10 mm | 1.02 mm | No Collar | #27 |
| DF990 ONLY | ||||
| Jets Front Burner Rear Burner Aeration Collar (2x) Pilot Jet | ||||
| NG | ∅ 2.10 mm | ∅ 1.80 mm | 2 hole @ ∅ 7.5mm | #42 |
| Propane | ∅ 1.20 mm | ∅ 1.02 mm | Spacer(no restriction) | #27 |
| ULPG | ∅ 1.20 mm ∅ 1.02 mm | Spacer(no restriction) | #27 | |
☐ Replace (or remove) the aeration collars using the table above (for the DF960 coals fuelbed on natural gas, ignore the rest of the steps).
☐ Remove the front and rear burner jet and replace with the correct jet as stated in the above table.
☐ Remove the 4 screws (shown below) securing the pilot assembly to the burner tray.
Carefully lift the pilot assembly away from the burner tray to access and unscrew the pilot pipe nut. Slowly pull the pipe, nut and olive away from the pilot assembly to let the pilot jet down. Remove the existing pilot jet and replace with the jet supplied in the conversion kit. Tip: removing the test point hatch and guiding the pilot pipe up from below can make this process easier (shown below).

☐ Remove the left access hatch (shaded in the second diagram of section E9 on page 37). Remove the regulator screw cap and screw out the nylon adjuster screw to remove the existing spring.
☐ Replace the current spring with the purple spring supplied in the conversion kit and refit the nylon adjuster screw.
☐ Refit the access hatch using one screw to hold it in place.
□ Refit the burners.
For DF990: Remove the firebox baffle screw (shown below on the top figure in grey) and then remove the baffle by sliding it upward to release it from the side pins. Remove the heat exchanger restrictors by unscrewing the 4 fasteners (shown below on the bottom figure in grey). Rescrew 4 fasteners and then refit the firebox baffle.

natural_image
Pure technical diagram of a mechanical assembly with no text or symbols
natural_image
Technical diagram of a mechanical assembly with pulleys and a rectangular component (no text or symbols)☐ Operate the fire with the glass off and adjust the operating pressure to 2.3kPa for Propane / ULPG by turning the nylon adjuster screw whilst the appliance is running on maximum.
☐ Turn the fire off and remove the burners and access hatch again to replace the metal regulator cap
☐ Adhere the conversion label over the top of the Natural Gas data label on the appliance data plate.
☐ Refit the access panel (all screws), burners, infill and fuel bed.
□ Adhere the 'Propane' or 'ULPG' label over the top of the existing Natural Gas label on 40the side of the appliance (if accessible).
E12 Flame Picture
An abnormal flame pattern will look long and stringy and may cause soot to build up inside the firebox.
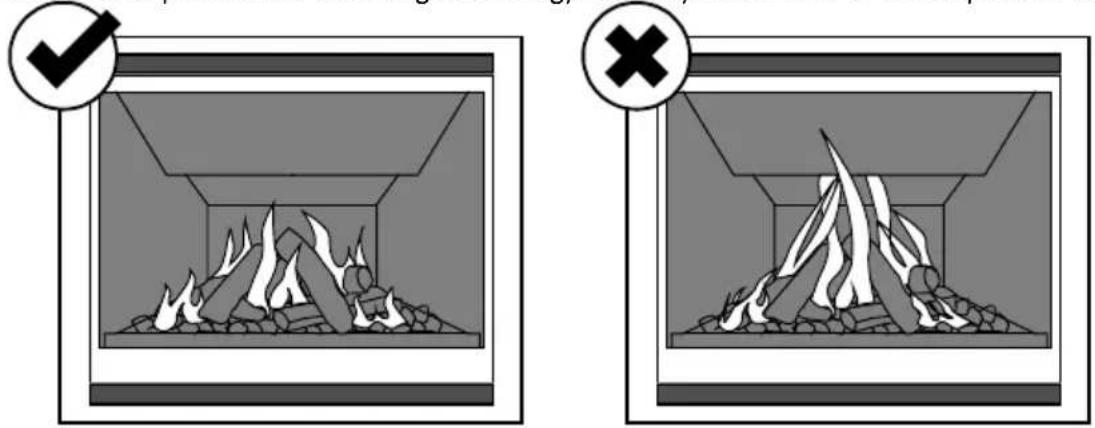
An abnormal flame pattern will likely be the result of incorrect settings (jet size, burner aeration collar, flue restriction), and if present you must check these are correct before proceeding. If an abnormal flame pattern is still present, please contact Escea.
It is the responsibility of the installer to ensure a correct flame pattern.
E13 Coal Fuelbed Installation
NOTE: The log retainer bracket must be removed when installing the coals.
Place all the coals in a single layer atop the burners, covering the entire area except the pilot and pilot guard.
For the DF960 only, the collars on the burner must be changed to install the coal fuelbed (see E11 on page 39).

natural_image
Close-up of a metal container filled with small, dark gray gravel or stone, with no visible text or symbols.E14 Log Fuelbed Installation
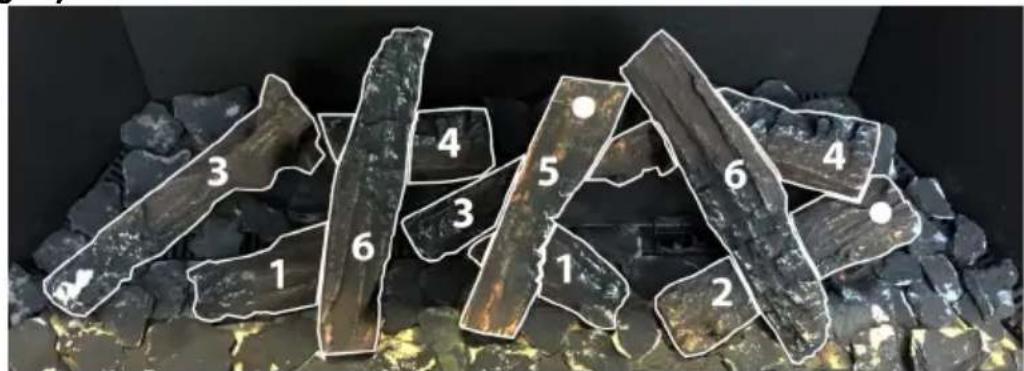
Place logs 1,2,3 and 4 down first, locating them on the log retainer, followed by logs 5 and 6. The final layout should replicate the picture shown below. Place the embers or flakes in a single even layer after the logs have been located correctly (excess embers or flakes should NOT be added if one even layer has been achieved). The embers or flakes must not cover the pilot or pilot guard.
NOTE: Logs must be located correctly as stated/depicted in this section or the warranty may void.
DF700 Log Layout

DF960 Log Layout
DF990 Log Layout

Use the index below as a guide for selecting the correct logs:

E15 Installing the Glass
Refer to section D2 on page 31 and reverse the steps to reinstall the glass.
E16 Home Automation Setup
Escea DF-Series fireplaces have a simple interface for connection to a home automation system. This allows the fireplace to be woken up, started, and then shut down. The “Close to Wake” connection (shown below) is essentially taking one of the 3.3 volt DC pins on the fireplace microcontroller and shorting it to ground.
In order to isolate the fireplace from the automation system, a relay needs to be used (as shown). This allows you to keep the fireplace's 3.3V supply isolated.

flowchart
graph LR
    A["μ"] --> B["+3.3VDC"]
    B --> C["Connector on fireplace"]
    C --> D["Terminal block"]
    D --> E["Required relay"]
    E --> F["From Automation system"]
    G["Connector and terminal block supplied by Escea"] -.-> B
The home automation connection can be found in your fireplace accessory pack (shown right).
This connects to the fireplace via the lower RH outside panel of the fireplace, next to the primary network cable access point, as shown in section D2 on page 31.
Home Automation Operation
Relay closed
The fireplace will start in a medium setting until the remote control talks to the fireplace and picks up the 'ON' signal (which can take up to 4 minutes). Once the remote has communicated with the fireplace it will turn on and begin operating thermostatically. The remote will use whatever temperature the user has previously set and cannot be altered by the home automation system. The fireplace will continue to operate while the relay is closed.
Note: If the fireplace cannot communicate with the remote within 10 minutes of the relay contact closure then the fireplace will shut down and return to standby. The remote controller is required to be within operating range of the fireplace for its safe operation.
Relay open
If the fireplace is operating with a closed relay then, upon opening the relay contacts, the fireplace will shut down and return the remote controller to its standby mode when it next updates (which can take up to 4 minutes). While the relay is open the fireplace will be in standby mode and available for manual operation by the user.
F
Fitting the Fascia and Finishing Installation
F1 Fitting the Fascia
Warning: The fascia is a critical component of your gas fire and is integral to the airflow. Never run the fire without the fascia properly fastened.
Slide the top of the fascia (the side with two prongs facing away from the front face) into the fascia rails attached to the chassis in the two top corners. Push the bottom fascia lip above the chassis base. The fascia MUST now be flush with the wall.

natural_image
Diagram showing a red downward arrow pointing to a mechanical component or assembly (no text or symbols present)F2 Locating Wall Mount Cradle for Remote
The appliance's remote contains the thermostat that will sense the room temperature and communicate this back to the heater via radio frequency.
A wall mount cradle has been provided for the wireless control and where possible the control should be housed in this cradle.
The location of this cradle should be decided by taking into account the following factors:
☐ Simple and convenient access for the user
□ Away from air flow and drafts through the room
☐ The parts of the room that people are likely to spend time
□ Away from direct sun light
☐ A suitable distance away from the heater
□ Ideally 1.2m to 1.5m from the floor

natural_image
3D rendered image of a gray plastic mechanical bracket with cutouts and mounting holes (no text or symbols)The radio frequency signal will go through some walls but for best results Escea suggest that the cradle position is less than 10 metres away from the heater.
The best height off the ground to locate the cradle is about chest height. This gives a good average room temperature and easy access for the user.
Please ensure that the cradle is screwed firmly onto the wall using the screws provided.
F3 Operating the Appliance for the First Time
Remove the battery cover on the rear of the remote. Insert the new "AA" size batteries, paying attention to the polarity.
You should now see on the display of the remote the time showing "0:00".
To turn the fire on, press the “POWER” button once, and within a few seconds the appliance will begin its startup sequence.
NOTE: once the rear burner has lit there will be a fixed 15 second delay before the front burner will light.
When the appliance has lit, set the room temperature by pressing the ‘plus’ or ‘minus’ button repeatedly until the display is showing the desired temperature. The remote will then revert back to the ‘current’ room temperature 30 seconds after making the change.
Run the appliance on full for an hour with the windows and doors open in the dwelling. This will ensure any running-in smells have the chance to dissipate.
The appliance is turned off by pressing the “POWER” button once more. The remote will display the time only.
Run the appliance again and check the operation of the thermostat by increasing and reducing the set temperature. Check the Flame Effect function and the Fan Boost functions work correctly.
For further operation instructions please refer to the User Guide.
F4 Normal Operating Sounds and Smells
Note: Each time the fire is lit from cold the glass may fog up with condensation. This is normal and the condensation will disappear within a few minutes once the glass heats up.
Sounds
It is possible that you will hear some sounds from your gas appliance. This is perfectly normal due to the fact that various types of materials are used within your appliance. Listed below are some examples. These are all normal operating sounds and should not be considered as defects in your appliance.
Fan:
Escea gas appliances use electric fans to push heated air into the room. It is not unusual for the fan to make a “whirring” sound when ON. This sound will increase or decrease in volume depending on the speed setting of your fan.
Gas Control Valve:
As the gas control valves turn ON and OFF, a dull clicking sound may be audible. This is the normal operation of a valve. When the fire is switched off after being run for a while, there may be popping and fluttering noises as the residual gas in the burners burns away. These are normal and are no cause for concern.
Unit Body/Firebox:
Different types and thicknesses of steel will expand and contract at different rates resulting in some “cracking” and “ticking” sounds being heard throughout the heating and cool down processes.
Smells
The first few times the unit is operated, the unit may release an odour and the flames will appear orange due to: the curing of the paint, the burning off of the starch in the gas logs and the oils in the metal. This is a temporary curing process which will disappear with use.
F5 Cleaning the Glass
A deposit on the inside of the inner glass, caused by the starch in the logs, may appear as a build up after several uses. If this film is not removed, it will bake on and may become difficult to remove.
When the inner and outer glass are cold, remove both and place carefully aside. Note that the fiberglass tape around the glass can mark carpet and furnishing so the use of a drop cloth is recommended. Clean the glass, paying particular attention to the inside of the inner glass, with a non-abrasive cleaner. A standard, ammonia-free, glass cleaner is recommended.
DO NOT ATTEMPT TO CLEAN THE GLASS WHILE IT IS HOT. NEVER OPERATE THE UNIT WITH THE GLASS REMOVED.
END OF SECTION F
By the end of this section, you should have:
□ A correctly fitted fascia
☐ The remote control mounted on its cradle on a wall
☐ Operated the fire and verified that it lights reliably and safely
☐ Run the appliance on full for an hour with the doors & windows open
☐ Checked the operation of the thermostat, Flame Effect & Fan Boost functions
G1 Product Dimensions

G2 Hearth and Clearances
A hearth is not required, however it may be used for decorative purposes or for protection of sensitive flooring. The hearth should not obscure the air inlet of the fire.
Do not place items or furnishings on top of the freestanding fireplace, and ensure soft furnishings do not come in contact with the freestanding fireplace.
G3 Locating the DFS730

G4 Gas Pipe Routing Information


G5 Flue Installation
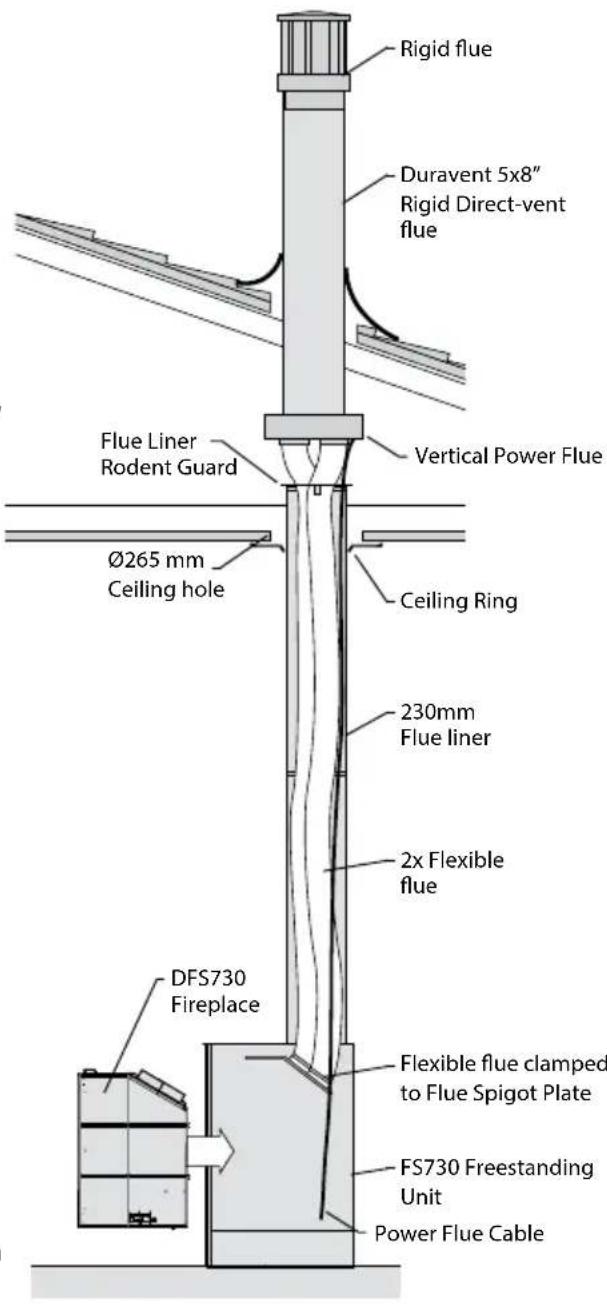
The freestanding unit and flue system should be installed prior to the DF-Series fireplace being installed (for horizontal termination for DFS730: see G6 on page 50).
☐ Place the freestanding unit in the correct location, complying with the clearances specified in the previous section.
☐ Remove 2 screws on each side of the fascia just below the top panel and pull towards you to remove the fascia.
☐ Fix the DFS730 unit to the floor using the four securing holes in each corner of the unit.
☐ Refer to Section B3 on page 11 for flexi flue clearances.
☐ Refer to section C on page 16 of this installation manual for minimum and maximum flue lengths, restrictor settings for your installation, and all other flue information.
☐ Run the black ∅230mm flue liner lengths from the top of the freestanding unit until it penetrates the ∅265mm ceiling hole.
□ Use the supplied ceiling plate for tidying the internal termination point of the ∅230mm flue liner.
□ Run the 2x flexible flues down through the ∅230mm flue liner and attach it to the Flue Spigot Plate as per section C on page 16 of this manual.
☐ Run the Power Flue cable down through the ∅230mm flue liner while tying it onto the ∅75mm Air Flexi Flue as shown on the bottom right corner. It must be kept away from the ∅100mm Exhaust Flexi Flue.
Open the flue liner rodent guard and close around the flexi flue and Power Flue cable. Rivet, screw or cable tie the open end to prevent it from opening. Bend the two perpendicular tabs down and screw into the flue liner using a short self tapping screw. NOTE: Take care when installing the rodent guard to not cause damage to the flexi flue or Power Flue cable.
☐ Install flue termination as per section C on page 16 of this manual NOTE: Ensure a power supply is within 1m of the rear of the appliance.

G6 Horizontal Flue Kit
NOTE: Instructions for installation are provided with the kit.
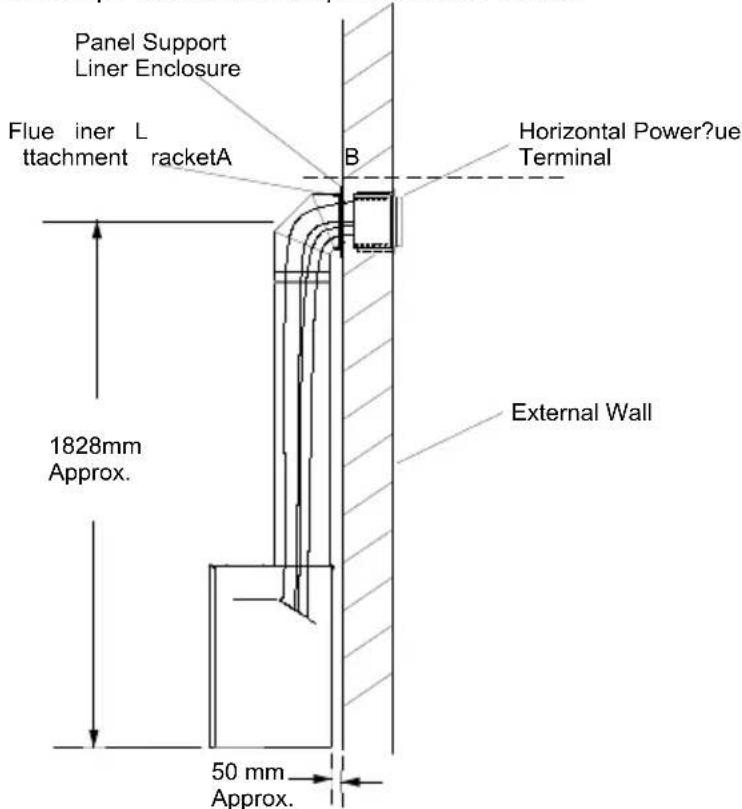
G7 DF700 Fireplace Installation into DFS730 Freestanding Unit
Once the freestanding unit is in place, and the flue system installed, the DF700 fireplace installation can commence.
Note: for the Apartment Flue Kit, see the instructions provided with the kit.
☐ Place the freestanding unit in the correct location, complying with the clearances specified in the previous section.
☐ Remove 2 screws on each side of the fascia just below the top panel and pull towards you to remove the fascia.
☐ Refer to section C on page 16 of this installation manual for minimum and maximum flue lengths, and all other flue information.
☐ Take the plastic grommet in the back panel out. Push the power cable through the hole in the rear, then push the grommet over the power cable and fix the grommet back to the back panel.
☐ Run the Power Flue cable through the silicone grommet on the RH side of the chassis and connect it as per section E4 on page 36.
☐ Install the DF700 fireplace into the freestanding unit while sliding on the flue spigot plate as per section E on page 34.
☐ Run gas piping to the front right of the fireplace as shown, where you will find a hole positioned so the gas pipe can run directly to the regulator and be connected as per section E on page 34.

natural_image
Four-step diagram showing a cabinet interior with an open door, mounted on a chimney, and finally assembled into a oven (no text or symbols present)Go through the following checklist to ensure you have installed the appliance correctly
☐ Correctly sized cavity to suit your fascia and flue configuration
☐ Correct clearances to combustibles and mantles around the fascia
☐ An electrical isolating switch to the appliance, accessible after finished installation
☐ Correctly sized gas supply with a pressure test point, ensuring adequate supply with all other gas appliances in the dwelling running
☐ A weather-tight installed Horizontal or Vertical Flue Terminal with clearance as specified by AS/NZ5601
☐ Power flue cable connected correctly to the Power Flue Terminal and the electronics tray within the appliance
☐ Reasonable access to the Horizontal or Vertical Flue Terminal for maintenance purposes
☐ Flue attached to the rear/bottom of the flue terminal leading back to the appliance
☐ The appliance fixed to the cavity base
☐ The appliance plugged into a mains electricity supply
☐ All gas joints and pressure points leak tested, and soapy water and drop tests completed on gas pipework
☐ Gas type conversion process carried out if required
☐ Log or coal fuel bed correctly installed
☐ Primary and secondary glass correctly fitted
A fitted fascia
☐ The remote control mounted on its cradle on a wall
☐ Operated the fire and verified that it lights reliably and safely
☐ Run the appliance on full for an hour with the doors & windows open
☐ Appliance functions checked, including thermostat operation, Flame Effect and Fan Boost
Home-owner shown how to operate the appliance correctly
☐ Warranty card filled in with installer details and appliance serial number
☐ User Guide made available for end user
☐ Plumbing Industry Commission Compliance Certificate given to end user
IMPORTANT:
- This appliance must be serviced every 12 months.
- Any service operation should be carried out only by a suitably qualified and trained person.
- Gas and electricity supply MUST be isolated before any service operation is carried out on this appliance.
- This manual should be left with the appliance.
• DO NOT MODIFY THIS APPLIANCE.
S1 Error Codes
This gas fire has been designed to show error codes to help explain and identify any fault situation that occurs. These codes will appear on the remote in the form of a large letter “E” with a number beside it. Codes can normally be reset by turning the fireplace off then on again at the mains power wall switch.
The following table shows what each code means and possible ways to rectify the situation. In the case of persistent or repeated shutdown errors, action must be taken immediately to find and repair the fault.
Error Code Suggestion action
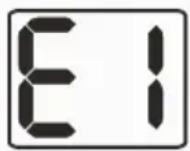
Electronics Over Temp
The electronics have gone over temperature.
- Check for excess lint and dust build-up on the PCB/Controller.
- Ensure correct gaps are present around glass.
- Room air fans may be slowed or stalled. Remove firebox, check that fans are plugged in, clean, and free turning.
Note: This error has a permanent lock out and will require the unit to be reset after the initial error (turning the power to the fire off "at the wall" then on again after a few seconds).

Flame Failure or Power Flue trip
The fire has tried to light three times and failed.
- Check gas supply and check other gas appliances to see if they are affected. If you have two separate LPG cylinders, switch over to the full bottle or contact your gas supplier. You may need to retry igniting the fire a few times after re-establishing gas supply.
- Check correct gas pressure to the appliance with all other appliances running.
- Check the electrode placement in relation to the pilot flame. Ensure it is well enveloped in flame as per the diagram in the installation instructions. Ensure no small coals have dropped onto the ignition electrodes between the burners.
- Ensure the electrode is not contacting any metalwork including the burners and has the correct air gap.
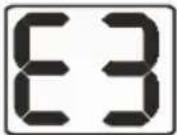 Appliance Over Temperature Sensor Trip Appliance Over Temperature Sensor Trip | The bimetallic snap disk mounted on the exhaust collector box has tripped.Check that fans are plugged in, cleaned, and free turning - room air fans may be slowed or stalled.Check the regulator -being set too high may result in excess heat build-up.Check flues are securely connected at both ends - if the inlet flue is not connected the appliance may draw warm air from the cavity.Check the jets |
 Valve Solenoid Check Failure Valve Solenoid Check Failure | The valve solenoids have failed the pre-ignition test. A wire may have dislodged or the valve solenoid is faulty.Check that the connections to each solenoid are secure and in place. The connections on the ends of the wires may need to be tightened (e.g. with a pair of pliers) to ensure a robust connection to the valve terminal.Disconnect and reconnect the firebox connectors ensuring they are firmly pushed into place.One of the solenoids on the valve inside the fire may have failed. If this is the case, the valve will need to be replaced. |
 Internal Remote Error Internal Remote Error | The remote cannot communicate with the fire.Check if the fire is turned off “at the wall” i.e. a loss of power to the fire or the remote is outside of its effective radio frequency range (too far away from the fire). Typical remote range is 1m to 10m.Ensure there is power to the fire by pressing the auxiliary on/off (red) button on the fire, then press the on/off button on the remote to clear the error. |
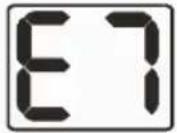 Combustion Air Flow Error Combustion Air Flow Error | Check whether the pressure switch is activating at startup (there is an orange indicator LED in the control tray). If not, check that the pressure switch electrical connection is correct.Check that the hoses are connected at both ends. Ensure the hoses are not kinked.Ensure the pressure switch is mounted vertically and the diaphragm is operational. The black hose should be connected to the low pressure port and the translucent to the high pressure portCheck that both flues are securely connected at both ends to the appliance and the Power Flue wall terminal and that the flue is not damagedCheck that the fan inside the Power Flue wall terminal is running during startup. This fan may need servicing if it is slowed or stalled. |
S2 Serial Number
The serial number for the fire can be found in two places. The first is in the battery compartment of the remote under the batteries. The second is on the data sticker on the chassis under the firebox on the left hand side.
S3 Checking Operating Pressure
See section E9 on page 37 of this manual.
S4 Cleaning the Fascia
The outside of an Escea Fascia must only be cleaned with a soft microfibre cloth. If heavier cleaning is required for the likes of grease or stubborn fingerprint removal we recommend the use of a dedicated stainless steel cleaner for stainless steel fascias or warm soapy water for powder coated fascias. These wipes have been tested by Escea technicians and produce very satisfying results, when used correctly. Instructions for their use follow.
- Ensure that the Gas Fireplace is off and that the fascia is cold to the touch.
- Using the gloves provided with your fascia, a stainless steel cleaner and a clean cloth, apply a small amount of cleaner to the cloth and wipe the fascia with even, straight strokes.
- Make sure your strokes follow the direction of the grain or brush finish. Wiping across the grain can leave small scratches.
- The wipe will leave a very fine film over the fascia, ensure this film is distributed evenly.
- If the film is applied too heavily and is quite visible, you can remove the excess by gently wiping dry with a microfibre cloth. Ensure your strokes still follow the direction of the grain or brush finish.
- Ensure that no film is applied to the glass of your Escea Gas Fireplace. If applied accidentally, wipe off with an absorbent microfibre cloth.
For Powder Coated Fascias:
- Ensure that the Gas Fireplace is off and that the fascia is cold to the touch.
- Using the gloves provided with your fascia, gently clean the fascia with a cloth and warm soapy water.
- Wipe off with an absorbent microfibre cloth.
Cleaning the Log Set and Glass
This is a service procedure that will need to be carried out whenever soot builds up on logs and/or inside of glass. If soot build up becomes excessive or regular then one of the following actions may be required:
- Check gas pressure; operating gas pressure may be too high.
- Reposition log set so that each log is sitting correctly in the log retainer bracket.
- Clear any blockage from primary air port of burner.
- Check flue tube is not damaged or disconnected.
For diagrams and further info on removing your fascia, reverse the steps found in section F on page 44.
- Refer to section D2 on page 31 for instructions on removing the glass. Note that the fiberglass tape around the glass can cause marking on carpet or furnishing.
- Clean the inside and outside of both pieces of glass with normal ammonia-free glass cleaning products. Use a CLEAN DRY cloth only. Stubborn marks may be cleaned with a ceramic glass cleaner.
- Replace in opposite order and test run heater.
S5 Removing or Cleaning Fan
As part of regular service procedure, it is recommended that the fan is removed for cleaning. Dust will build up on the fan rotor and in the cavity where the fan is located. This can be removed by the service person using a hearth brush and a vacuum cleaner.
ISOLATE THE POWER AND GAS SUPPLY TO THE FIRE BEFORE COMMENCING THIS PROCEDURE.
Remove the electronic tray located on the base of the chassis (instructions provided in the next section) before attempting to remove the room air fan. Disconnect the 3-way fan connector and remove the two screws circled in the diagram below (the DF960 and DF990 requires the LH access hatch to be removed in order to get to the LH screw). The room air fan can now be pull towards you and removed through the burner tray hole.
DF700 Fan Screw Locations
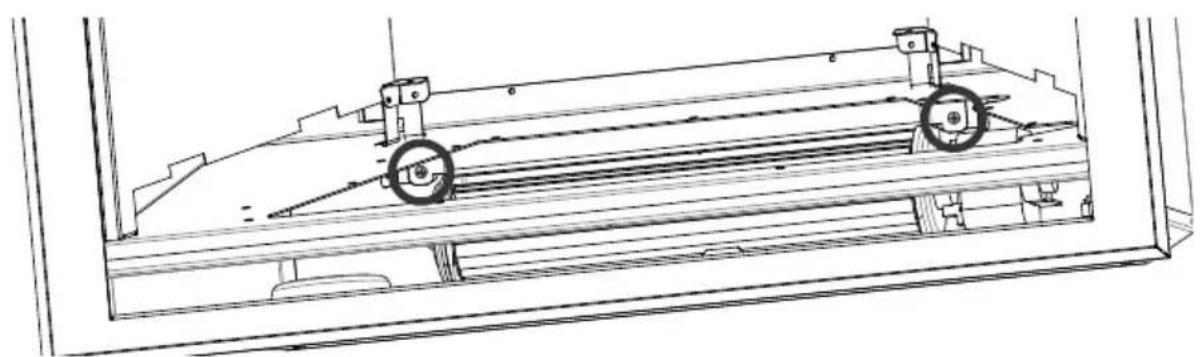
natural_image
Technical line drawing of a mechanical assembly with rollers and supports (no text or symbols)DF960 & DF990 Fan Screw Locations
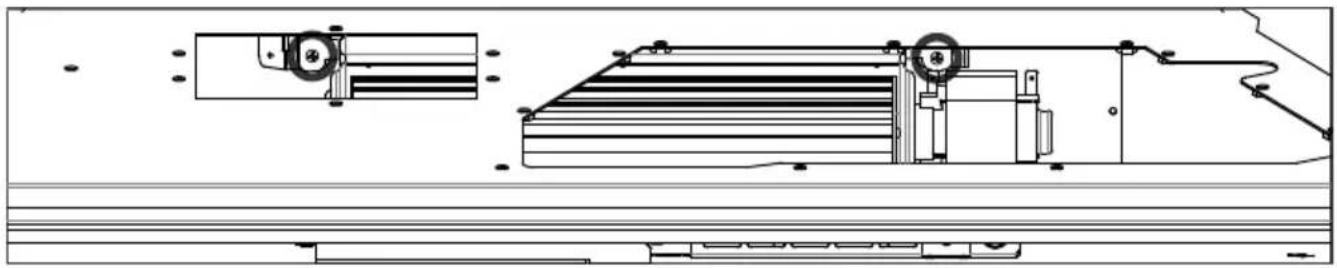
natural_image
Technical line drawing of a mechanical assembly with no visible text or symbolsS6 Removing Electronic Tray
ISOLATE THE POWER TO THE FIRE BEFORE THIS PROCEDURE.
All of the electronic components of the heater have been located on a removable tray.
Remove the 18-way connector & 6-way connector from the end of the tray, the network cable, if installed (both locations circled in diagram shown) and the transformer connector located in the rear LH corner of the electronics tray.
Remove one self tapping screw in the front face of the electronics tray.
The tray can now be slid towards the RH side then lifted out of the burner tray hole in the firebox.

natural_image
Technical line drawing of a mechanical assembly with two magnified views highlighting internal components (no text or symbols)S7 Replacing the Thermal Cut Out
Once the screw is removed from below the stepped firebox baffle, gently lift the baffle up and bring towards you. Remove the 8 machine screws in the access panel (as shown in the diagram below).

natural_image
Technical line drawing of a mechanical assembly with no visible text or symbolsRemove the 2 machine screws from the TCO bracket (as shown in the diagram below)

natural_image
Top-down architectural floor plan showing room layouts and furniture layout (no text or labels)Disconnect the two wires from the TCO and the bracket with the TCO may then be removed from the fire box for replacement.
S8 Removing the Pressure Switch
Remove the two machine screws located in the rear RH side of the firebox to detach the pressure switch bracket. Unplug the white and orange wires along with the two tubes to remove the bracket and pressure switch from the appliance.

natural_image
Technical line drawing of a mechanical assembly with no visible text or symbolsThe bracket with the pressure switch may now be removed from the firebox.
S9 Replacing a Remote
If the wireless control becomes lost or damaged, a new one can be ordered from any Escea retail agent. When you have the new remote, the following procedure needs to be followed to “teach” the remote to only communicate with that fire.
-
Ensure the fire and remote are set to 'OFF' (only the time is displayed on the remote).
-
While the remote is in its 'OFF' mode with only the time showing on the display, press the MINUS, PLUS, and FAN BOOST buttons simultaneously (as shown right) until the characters "03" light up on the display. Release the buttons. The remote will count down and display "GO". The screen will then display all characters and should be reading "00". This will put the remote into test mode. Note: if the digits start counting then the remote is already paired.
-
Press and hold the MINUS button until the two large temperature digits reading "00" start to flash slowly. Release the MINUS button. The remote control is now ready to be linked to the fire.
-
Press and hold the auxiliary on/off button on the fireplace for a minimum of ten seconds or until the two large temperature digits start counting upwards from 00 to 99 repeatedly.
Note: Pressing the red auxiliary button on/off button will start the fire. Once the remote control is counting the fire can be turned off by pressing the red auxiliary button again.
-
Press the large power button in the middle of the remote control to exit the test mode and return to normal operation. The remote should only be displaying the time. Check the fire will start using the remote control by pressing the large power button. Turn it off again using the remote control.
-
The fire is now linked to the remote control.

S10 Servicing the Horizontal/Universal Vertical Power Flue
Ensure the power to the power flue is off by disconnecting the power to the appliance inside. If the appliance has been running, allow the power flue to cool before attempting to service it.
Servicing a Horizontal Power Flue:
If the Power Flue needs servicing, the fan can be accessed from the outside of the installation for horizontal termination and accessed from within the roof space for vertical termination.
Undo the screws on the outside of the Power Flue box and separate the two parts, giving you access to the fan inside.
Removing this plate gives complete access to the fan for servicing or replacement. Check that all the seals are still intact. Check that the fan electrical terminals, motor, and impeller are not corroded. Ensure there are no signs of leakage in or around the terminal.
When reassembling the Power Flue, line up the round silicon grommets with the outlet tube of the fan and push the cowl back into place. Ensure all seals are still in place and replace all of the screws to hold the cowl in the correct position.
Servicing a Universal Vertical Power Flue:
If the UVP is internally installed remove the unit (2 in the right hand image) and replace the complete fan unit.
If the UVP is externally installed the cowl/fan unit pictured below is to be completely replaced by removing it from the liner or flashing.
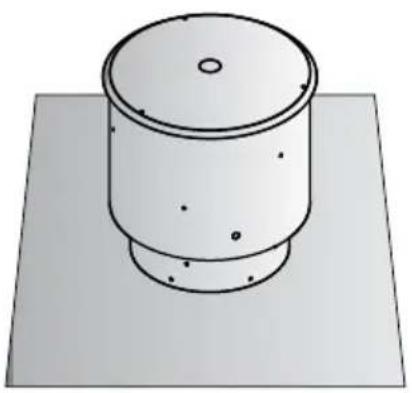
natural_image
Simple line drawing of a cylindrical object with a flange and base, placed on a flat surface (no text or symbols)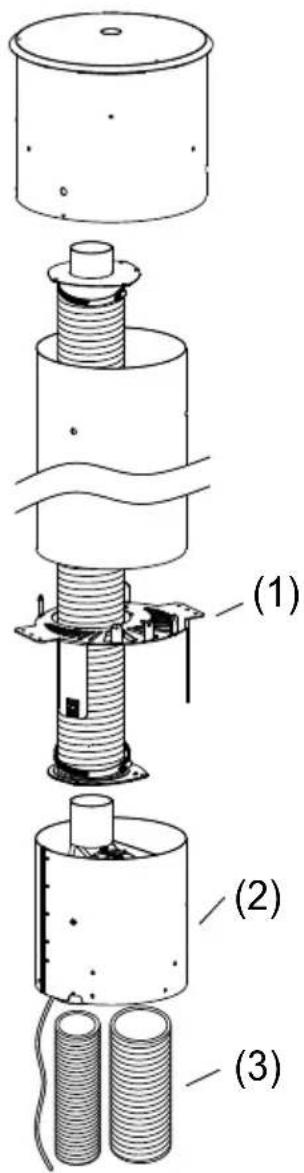
S11 Annual Service Procedure
☐ Isolate power and gas supply to fire.
☐ Remove front glass and clean inside of glass.
☐ Remove fuel bed and brush off any soot.
☐ Clean electrode and pilot hood of any carbon build up and ensure correct gaps between electrode and pilot hood
☐ Remove burners and blow compressed air through the burner ports.
☐ Remove jets and clean injector hole (with solvent if necessary).
☐ Remove the control tray to give access to fan; brush and vacuum any dust build up from fan blades.
□ Vacuum any dust from the cavity that houses the fan and from the underside of the fire box around the valve and solenoids.
☐ If the gas piping includes a flexible hose connected to the regulator, check the hose for signs of wear (discolouration, loss of flexibility, cuts, worn covers, cracks, crushing, kinking, flattening or loose end fittings) and replace if worn, or more than five years old.
☐ Test all joints for gas tightness.
☐ Reassemble heater and check that operating pressure is correct.
☐ Check glass sealing tape and replace if necessary.
☐ Check to make sure that flue system is intact and not in any way blocked.
☐ Trial heater with several start/stop cycles and trial fan-boost, flame effect only and thermostat modes to ensure that all modes function correctly.
☐ Ensure that the fascia is properly installed and is sitting flush with the wall after service.
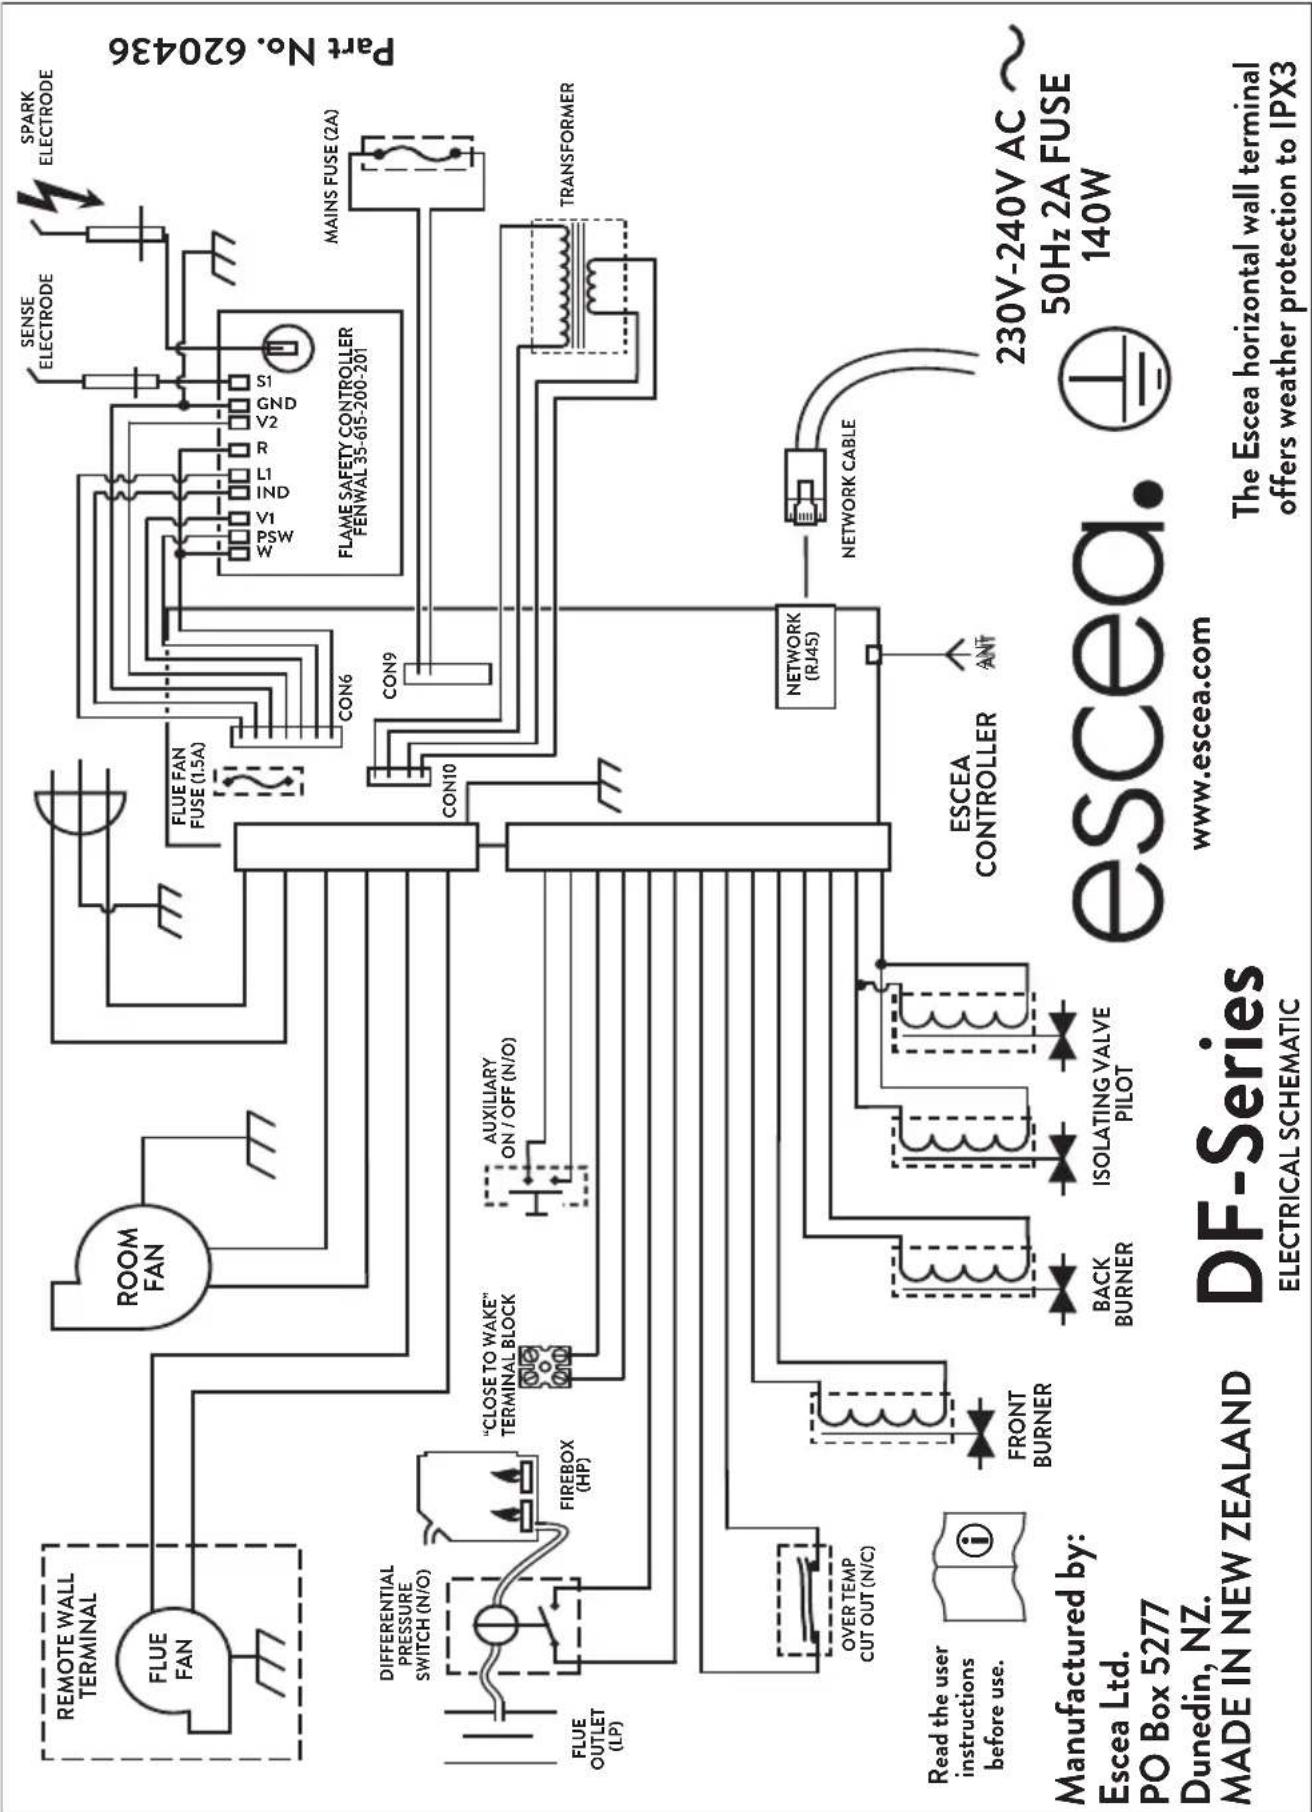
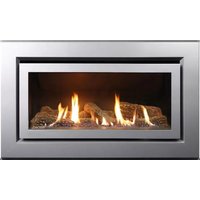
- Important:
- WARNING:
- Who can install this product:
- Warranty Repair and Annual Servicing:
- A Product Description and Installation Process 8
- B Creating the Cavity 10
- C Installing the Flue
- D Installing the Electricity and Gas to the Appliance
- E Installing The Appliance
- F Fitting the Fascia and Finishing Installation 44
- G Freestanding Unit (DFS730) Installation 47
- H Installation Checklist 51
- S Service Manual 52
- A
- Product Description and Installation Process
- A1 Product Description
- A2 Recommended Install Process
- A3 Product Dimensions
- END OF SECTION A
- B
- Creating the Cavity
- B1 Cavity Shape
- Compulsory False Cavity Requirements
- B2 Floor Clearances
- B3 Corner Installations
- B4 Hearth
- B5 Cavity Base
- B6 Wall Linings
- B7 Television & Mantel Clearances
- Television
- Mantel
- B8 Fascia Dimensions
- B9 Distance from Fireplace to Fascia Base
- C
- Installing the Flue
- C1 Flue Configuration (If less than 4m flue length is required)
- C2 Flue Configuration (If more than 4m flue length is required)
- C3 Masonry Vertical Power Flue Kit (up to 6m)
- C4 Masonry Vertical Power Flue Extension Kit (6 to 12m)
- C5 Installing the Horizontal Power Flue
- Creating the Hole in the Outside Wall
- How to Flash the Horizontal Power Flue
- C6 Installing the Universal Vertical Power Flue (Internal Install)
- C7 Installing the External Vertical Power Flue (UVP)
- C8 Installing in Accordance with Relevant Codes
- Notes:
- C9 Running the Flue
- C10 Insulation Specification and Installation
- Type of Insulation to use
- Insulation Installation
- C11 Running the Power Flue Electrical Cable
- C12 Setting up the Flue Spigot Plate
- D1 Power Supply
- D2 Removing the Glass
- Secondary Glass
- Primary Glass
- D3 Removing the Burners
- D4 Gas Pipe Sizing
- D5 Gas Pipe Position
- E1 Installation
- E2 Connecting the Flue
- E3 Removing the Burner Tray
- E4 Connecting the Power Flue Cable
- E5 Fixing the Appliance to the Base
- E6 Network Cable
- E7 Connecting the Gas Pipe to the Regulator
- E8 Gas Isolating Valve
- E9 Pressure Test Point
- E10 Checking the Operating Pressure
- E11 Converting the Appliance Gas Type
- E12 Flame Picture
- E13 Coal Fuelbed Installation
- E14 Log Fuelbed Installation
- E15 Installing the Glass
- E16 Home Automation Setup
- Home Automation Operation
- Relay open
- F
- Fitting the Fascia and Finishing Installation
- F1 Fitting the Fascia
- F2 Locating Wall Mount Cradle for Remote
- F3 Operating the Appliance for the First Time
- F4 Normal Operating Sounds and Smells
- Sounds
- Fan:
- Gas Control Valve:
- Smells
- F5 Cleaning the Glass
- END OF SECTION F
- G2 Hearth and Clearances
- G4 Gas Pipe Routing Information
- G5 Flue Installation
- G6 Horizontal Flue Kit
- G7 DF700 Fireplace Installation into DFS730 Freestanding Unit
- S1 Error Codes
- Error Code Suggestion action
- S2 Serial Number
- S3 Checking Operating Pressure
- S4 Cleaning the Fascia
- For Powder Coated Fascias:
- Cleaning the Log Set and Glass
- S5 Removing or Cleaning Fan
- ISOLATE THE POWER AND GAS SUPPLY TO THE FIRE BEFORE COMMENCING THIS PROCEDURE.
- S6 Removing Electronic Tray
- S7 Replacing the Thermal Cut Out
- S8 Removing the Pressure Switch
- S9 Replacing a Remote
- S10 Servicing the Horizontal/Universal Vertical Power Flue
- Servicing a Horizontal Power Flue:
- Servicing a Universal Vertical Power Flue:
- S11 Annual Service Procedure
Brand : Escea
Model : DFS730
Category : Heating