
Element TT3-AVANT-B - Headphones JPL - Free user manual and instructions
Find the device manual for free Element TT3-AVANT-B JPL in PDF.


| Product Type | Telephone Headset |
| Brand | JPL |
| Model | Element TT3-AVANT-B |
| Wearing Style | Over-the-head, single or double ear (monaural/binaural) |
| Connectivity | Wired with Quick Disconnect cable |
| Microphone Type | Adjustable boom microphone |
| Headband Adjustment | Yes, adjustable for comfort |
| Microphone Boom Rotation | 180° rotation for left/right use |
| Ear Cushion Rotation | 120° rotation for individual comfort |
| Microphone Positioning | 3-10 mm from mouth (2 fingers width) |
| Sound Level Warning | Prolonged exposure to high levels may cause hearing damage |
| Compliance | CF, ACA, RoHS, WEEE |
| Warranty Period | 24 months from date of purchase |
| Maintenance | Replace ear foam cushion and microphone foam every 6 months |
| Disposal | Do not dispose in household waste; recycle per local regulations |
Frequently Asked Questions - Element TT3-AVANT-B JPL
User questions about Element TT3-AVANT-B JPL
0 question about this device. Answer the ones you know or ask your own.
Ask a new question about this device
Download the instructions for your Headphones in PDF format for free! Find your manual Element TT3-AVANT-B - JPL and take your electronic device back in hand. On this page are published all the documents necessary for the use of your device. Element TT3-AVANT-B by JPL.
USER MANUAL Element TT3-AVANT-B JPL
Adjusting the Headband
Place the headset receiver to your ear(s), if using a single ear headset you should set the T-bar above your other ear. Adjust the headband until it is comfortable, ideally ensuring there is virtually no pressure felt on the ear(s).
Most headsets can be worn on either side. To change the microphone side, simply rotate the microphone boom 180° to the other side. The microphone boom will not rotate a complete 360°. See fig.3.
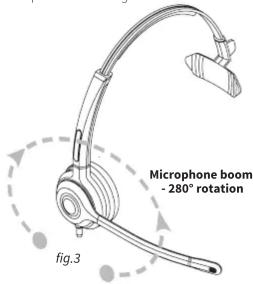
The microphone housing/ear cushion can rotate 120° to enable individual comfort on ear(s). See fig.4.

79108
Adjusting the Microphone Boom
To avoid low or distorted sound, and to provide clear and crisp telephone calls, the microphone should be positioned within 30-40mm of your mouth (2 fingers width). The microphone boom arm will move in a variety of directions to ensure the best fit. See fig.5.

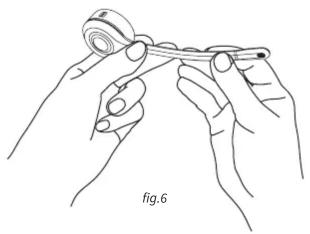
To adjust the microphone boom to the shape of your face, hold the boom arm as shown in fig. 6. Do not hold the microphone end to shape boom.
natural_image
Line drawing of two hands holding a string, no text or symbols presentNOTE:
Disconnect the Quick Disconnect cable, See fig. 7, before separating the microphone boom from the monaural/binaural head and.

Removing the Microphone Boom
To remove the microphone boom from the headband, carefully and gently push inside the ear cushion on the speaker material for approx. 3mm - 5mm. The microphone housing will then come away easily. See fig.8a & 8b.

natural_image
Illustration of a hand holding a headband with a checkmark indicating cancellation (no text or symbols on the devices themselves)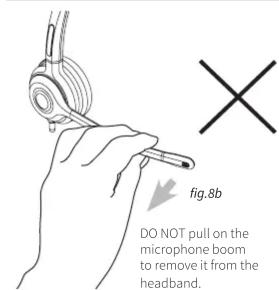
Warranty
Your TT3 headset has been carefully manufactured and 100% tested using high quality assured components. It is protected by warranty against faulty workmanship and materials for a period of 24 months from the date of purchase. In the unlikely event that a failure should occur, the unit will be repaired or replaced free of charge when returned postage paid to the address below, within the 24 month warranty.
This warranty does not cover damage or failure resulting from misuse. Failure to comply with the warnings, care and safety advice listed in this user guide will void the warranty. This warranty does not cover goods damaged in transit. Removing the warranty tab thread on the headset cable will also void warranty. Your statutory rights are in no way affected by this warranty.
For service in or out of warranty please return the unit postage paid to:
JPL Limited, Unit 1, Church Close Business Park, Church Close, Todber, Sturminster Newton, Dorset, DT10 1JH, ENGLAND.
When returning your unit please ensure that the package contains a covering letter stating when and where you purchased the unit and a description of the problem encountered. If the unit is within the warranty period please enclose proof of purchase. Repair or replacement is at the discretion of the manufacturer. In accordance with its policy of progressive design, JPL reserves the right to alter product specifications at any time, without prior notice.
Limited Warranty
Consequential and incidental damages, including without limitation, loss of property and those arising from breach of any express or implied warranty, are not the responsibility of the retailer and to the extent permitted by law, are excluded.
JPL Limited, Unit 1, Church Close Business Park, Church Close, Todber, Sturminster Newton, Dorset, DT10 1JH, ENGLAND.
Telephone: +44 (0)1258 820100
www.jpltele.com

14/04/005.V2



Headset User Guide
Contents
Introduction 2
Connecting boom to headband 4
Features 5
Connection to your desk phone 6
Adjustment 7
Notes 9
Warranty 10
Introduction
Thank you for purchasing this product. Your new headset has been developed using the latest technology, designed for comfort and freedom of movement.
This headset is very easy to use and setup, although to get the best from your new purchase, we recommend you read this user guide carefully before using the headset for the first time.
Unpacking
Remove your headset from its packaging and ensure that along with this user guide, you have the correct specified accessories.
Retain the headset box for storage of your unit, and also in the unlikely event that it needs to be returned for servicing or repair.
Compatibility Guide
Please check that you have the correct bottom cable to connect your new headset to your desk phone. You can check with your supplier or visit www.jpltele.com and follow the links in the compatibility menu.
Warning
Ensure that all electrical connections (including extension leads and interconnections between pieces of equipment) are properly made and in accordance with the relevant manufacturers instructions.
Do not continue to operate the equipment if you are in any doubt about it working normally, or if it is damaged in any way. Disconnect from your telephone equipment and consult your dealer. Do not allow electrical equipment to be exposed to rain or moisture.
Never push anything into holes, slots or any other opening on your headset as this could result in fatal electrical shock.
Do not open the headset housing as doing so will void the warranty.
Never guess or take chances with electrical equipment.
Telephone headsets are capable of producing high levels of sound. Prolonged exposure to high sound levels can cause damage to hearing.

Warning: Before connecting the
Quick Disconnect cable, make sure the microphone boom is securely fastened onto the monaural/binaural headband! Also, before separating the microphone boom from the monaural/binaural headband, make sure the Quick Disconnect cable is disconnected from the bottom lead first!
Safety
For your own safety, this product should only be used with CE ACA and RoHS approved equipment. Using this headset with non-approved equipment can void this products warranty.
Maintenance
To gain optimal performance, hygiene and lifespan from you headset, replace all consumable items; - ear foam cushion, microphone foam (if applicable) and microphone filter every 6 months.
Environmental Notice
This headset has been made to CE, RoHS and WEEE standards. In the interest of recycling raw materials, please do not dispose of this headset in the household waste at the end of its useful life. Disposal can take place at approved recycling or disposing locations in accordance with local regulations.
NOTE:
Before connecting the Quick Disconnect cable to bottom lead, See fig.1, make sure the microphone boom is securely fastened onto the monaural/binaural headband.

Connecting the Microphone Boom to the Headband
Gently push the microphone boom into the headband until it clicks. See fig.2a & 2b.

natural_image
Technical line drawings of two headsets labeled fig.2a and fig.2b, showing different ear profiles (no text or symbols beyond labels)Headset Features

Connecting Your Headset
Does your desk phone have a dedicated headset connection port?
If it does, simply connect your headsets Quick Disconnect cable to your chosen bottom lead (not supplied), then connect the bottom lead to the dedicated port on your desk phone. If you find that when the headset is connected to the phone it is not working as expected then it is very likely you are using an incompatible bottom lead. There are various bottom leads available, these are all designed to connect your headset to specific brands of desk phone, ensuring whatever your setup, your headset will be compatible.
Please contact your dealer to attain the correct bottom lead for your desk phone. Note: All bottom leads are supplied as an accessory at additional cost.
What to do if your desk phone does not support a dedicated headset connection
Your desk phone requires an external headset amplifier. If you already have a headset amplifier, read through the units setup guide and connect your headset accordingly.
Using the Quick Disconnect Lead
Your headset may be equipped with a Quick Disconnect allowing you to move away from your desk (disconnecting the 2 connectors) without losing the call.
To separate the 2 connectors, simply make a straight pull, pulling the lefthand connector to the left and the righthand connector to the right. DO NOT attempt to bend or leaver the connectors apart.
In the event that you do not have a headset amplifier, please contact the supplier of this headset (details found on rear of user guide). They will be able to provide the correct amplifier for your headset and desk phone.
- Adjusting the Headband
- Adjusting the Microphone Boom
- NOTE:
- Removing the Microphone Boom
- Warranty
- Limited Warranty
- www.jpltele.com
- Contents
- Introduction
- Unpacking
- Compatibility Guide
- Warning
- Safety
- Maintenance
- Environmental Notice
- Connecting Your Headset
- What to do if your desk phone does not support a dedicated headset connection
- Using the Quick Disconnect Lead
Brand : JPL
Model : Element TT3-AVANT-B
Category : Headphones