
MTIBM042611 - Security Camera MOTOROLA - Free user manual and instructions
Find the device manual for free MTIBM042611 MOTOROLA in PDF.


| Product Type | Security Camera |
| Brand | Motorola |
| Model | MTIBM042611 |
| Resolution | 1080p Full HD |
| Field of View | 130° diagonal |
| Night Vision | Infrared up to 30 ft |
| Connectivity | Wi-Fi 802.11 b/g/n (2.4 GHz) |
| Power Source | DC 5V, 1A (USB adapter included) |
| Dimensions | 3.5 x 2.5 x 2.5 inches (90 x 65 x 65 mm) |
| Weight | 0.5 lbs (230 g) |
| Motion Detection | Yes, with push notifications |
| Audio | Two-way audio with built-in microphone and speaker |
| Storage | MicroSD card up to 128 GB (not included) |
| Cloud Storage | Optional subscription |
| Weather Resistance | Indoor use only |
| Mounting | Stand or wall mount |
| Supported App | Motorola View app (iOS/Android) |
| Compatibility | Amazon Alexa, Google Assistant |
| Operating Temperature | 32°F to 104°F (0°C to 40°C) |
| Certifications | FCC, CE |
Frequently Asked Questions - MTIBM042611 MOTOROLA
User questions about MTIBM042611 MOTOROLA
0 question about this device. Answer the ones you know or ask your own.
Ask a new question about this device
Download the instructions for your Security Camera in PDF format for free! Find your manual MTIBM042611 - MOTOROLA and take your electronic device back in hand. On this page are published all the documents necessary for the use of your device. MTIBM042611 by MOTOROLA.
USER MANUAL MTIBM042611 MOTOROLA
- Please, read carefully these instructions before operating your camera and save this as reference.
- All examples and images used in this guide are only for reference.
- The content of this guide is subject to changes without previous notice.
1. Precautions
- If the product does not work properly, please contact your dealer or the nearest service center. Never attempt to disassemble the camera yourself. Your warranty will be voided if any problems are caused by unauthorized repair or maintenance.
- Handle with care and prevent dropping the camera.
- When the product is mounted on a wall or ceiling, ensure that the device is properly firmly fixed.
- Prevent touching the lens of the camera.
- If cleaning is necessary, please use a clean cloth to wipe it gently. If the device will not be used for a long time, please cover the lens cap to protect the device from dust.
- Prevent aiming the camera directly to the sun or to very bright environments.
- Do not place the camera in extremely hot or cold environments (operating temperature is -20^ 50^ ), dusty or damp locations.
- Para evitar exceso de calentamiento To avoid increase in heat of product, good ventilation is required.
2. Contents
| 1 | Fixing ring | 3 | Network cable |
| 2 | Mounting base | 4 | Power cable |
NETWORK CONNECTION

- It is recommended to install the network connector cap for exterior installations
- The DC12V power supply is not necessary when the camera is connected directly to a PoE device.
Connecting the network cable

- Remove the connector cap by unscrewing it.
- Run a network cable through the two caps parts and install RJ45 connector to cable and connect both cables together.
- Screw together the cap parts and then screw cap to the camera network connector cable.
4. Installation
Please make sure that the wall or ceiling is strong enough to withstand 3 times the weight of the camera. Please install and use the camera in the dry environment.
- Drill the screw holes and the cable hole on the mounting surface using the available drill template.

- Install rubber plug for exterior installations.
- Route the cables through the cable hole and screw in place base to mounting surface.

- Before adjusting the bracket, preview the image of the of the camera on a monitor and then loosen the fixed ring or screws to adjust the tikt or pan angle of the camera.

NOTE: IF YOUR CAMERA IS NOT VARIFOCAL OR IS MOTORIZED, PLEASE SKIP STEPS 5, 6, 7.
- Loosen the top screw on the sun protector and slide back the protector.

- Focus and zoom adjustment. Remove the lens cover by unscrewing it and then adjust the focus and zoom by turning the screws until the best image is achieved. Tighten these two screws and replace back the lens cover.
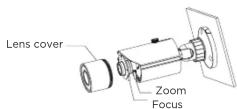
- Slide forward he solar protector and tighten screw.

5. Connecting your camera
Connect the camera with a network cable. Ensure that the camera is connected in the same network as your DVR/NVR device.
- In your DVR/NVR device click on Add Camera.

-
The system will automatically detect all IP cameras connected in your network.
-
Select the camera to add and click on the Add button.
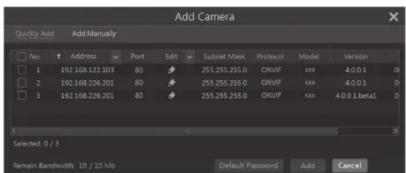
You can click on 📋 to edit the camera's IP address, username and password. The factory default username is admin and the password for the cameras is 123456.
You can also Add a camera to your system by doing it manually.

Input the IP address or domain name (click √ in the IP address column to pop up the domain name input window, input the domain name of the camera in the window and then click "OK" button), port, username and password of the camera and then select the protocol. Click "Test" to test the effectiveness of the input information and then click "Add" button (you can input the camera's information or above such as IP address, username and password before clicking "Add" button).
Motorola Limited Warranty
This Motorola brand Product is produced under license by MDX ELECTRONICS, LLC. Subject to the exclusions below, MDX ELECTRONICS warrants that this Motorola brand product ("Product") will remain free from defects in materials and workmanship under normal consumer usage for 2 years. This Warranty is your exclusive warranty. This Warranty extends only to the first consumer purchaser and is not transferable. MDX ELECTRONICS will at no charge repair or replace any Product that qualifies under this Warranty. We may use functionally equivalent reconditioned, refurbished, or new Products. MOTOROLA and MDX ELECTRONICS are not responsible for defects or damage that result from: (a) improper operation, storage, misuse, abuse, maintenance, alteration, accident or neglect, such as physical damage (cracks, scratches, etc.) to the surface of the product or lens resulting from misuse; (b) subjecting the Product or Accessory to abnormal usage or conditions; (c) service provider alteration of the Product including alteration of the Product's firmware; or (d) other acts which are not the fault of MOTOROLA or MDX ELECTRONICS, are excluded from coverage.
Any implied warranties, including without limitation the implied warranties of merchantability and fitness for a particular purpose, shall be limited to the duration of this limited warranty. This warranty is provided in lieu of all other warranties, express or implied. In no event shall MOTOROLA or MDX ELECTRONICS be liable, whether in contract or tort (including negligence) for damages in excess of the purchase price of the product, or for any indirect, incidental, special or consequential damages of any kind, or loss of revenue or profits, loss of business, loss of information or other financial loss arising out of or in connection with the ability or inability to use the product, to the full extent these damages may be disclaimed by law.
Some jurisdictions do not allow the limitation or exclusion of incidental or consequential damages, or limitation on the length of an implied warranty, so the above limitations or exclusions may not apply to you. This Warranty gives you specific legal rights, and you may also have other rights that vary from one jurisdiction to another.
To obtain support or need of information, doubts or questions, please contact us at:
Tel: 01 800 801 6398 (México)
Tel: +011 52 55 9688-8814 (México, Latin America and Caribe) WhatsApp: +52 155 7657 5586 (México, Latin America, Caribe) Skype: soporte.motorolasecurity
Email: soporte@mdx-motorolasecurity.com 9:00AM - 5:00PM CST (Mon-Fri)
Manufactured, distributed or sold by MDX ELECTRONICS, LLC, official licensee for this product. MOTOROLA and the Stylized M Logo are trademarks or registered trademarks of Motorola Trademark Holdings, LLC. and are used under license. All other trademarks are the property of their respective owners. ©2020 Motorola Mobility LLC. All rights reserved.


Brand : MOTOROLA
Model : MTIBM042611
Category : Security Camera