
MTABM042611 - Security Camera MOTOROLA - Free user manual and instructions
Find the device manual for free MTABM042611 MOTOROLA in PDF.


| Product Type | Security Camera |
| Brand | Motorola |
| Model | MTABM042611 |
| Dimensions | Approx. 7.5 x 7.5 x 12 cm |
| Weight | Approx. 300 g |
| Power Source | AC adapter (input 100-240V, output 5V/1A) |
| Resolution | 1080p Full HD |
| Night Vision | Yes, up to 10 meters |
| Field of View | 110° wide angle |
| Connectivity | Wi-Fi 2.4GHz |
| Audio | Two-way audio with built-in microphone and speaker |
| Motion Detection | Yes, with push notifications |
| Storage | microSD card slot (up to 128GB) or cloud storage |
| Waterproof Rating | IP65 |
| Mounting | Wall mount included |
| Main Functions | Live viewing, recording, alerts, remote access via app |
| Maintenance | Clean lens with soft dry cloth; avoid water jet |
| Safety | Do not expose to extreme temperatures; use only provided adapter |
| Spare Parts | Replacement mounts and cables available online |
| General Info | Designed for indoor/outdoor use; compatible with Motorola app |
Frequently Asked Questions - MTABM042611 MOTOROLA
User questions about MTABM042611 MOTOROLA
0 question about this device. Answer the ones you know or ask your own.
Ask a new question about this device
Download the instructions for your Security Camera in PDF format for free! Find your manual MTABM042611 - MOTOROLA and take your electronic device back in hand. On this page are published all the documents necessary for the use of your device. MTABM042611 by MOTOROLA.
USER MANUAL MTABM042611 MOTOROLA
- Please, read carefully these instructions before operating your camera and save this as reference.
- All examples and images used in this guide are only for reference.
- The content of this guide is subject to changes without previous notice.
Precautions
- If the product does not work properly, please contact your dealer or the nearest service center. Never attempt to disassemble the camera yourself. Your warranty will be voided if any problems are caused by unauthorized repair or maintenance.
- Handle with care and prevent dropping the camera.
- When the product is mounted on a wall or ceiling, ensure that the device is properly firmly fixed.
- Prevent touching the lens of the camera.
- If cleaning is necessary, please use a clean cloth to wipe it gently.
- If the device will not be used for a long time, please cover the lens cap to protect the device from dust. Prevent aiming the camera directly to the sun or to very bright environments.
- Do not place the camera in extremely hot or cold environments (operating temperature is -20°C-50°C), dusty or damp locations.
• To avoid increase of heat of product, good ventilation is required.
Introduction
This camera series has the latest technology and advanced circuit design, which features high definition, sensitivity and low noise and distortion. They support HD video transmission with the common coaxial cable, ensuring the requirement of a HD monitoring in the traditional surveillance system.
Features and definitions:
High Resolution
Uses a high performance sensor, providing high definition and clear image.
High Transmission Performance
Real-time transmission with high speed through long distance.
High Light Compensation (HLC)
Masks and compensates the high lighted areas.
DNR
Reduces noise from brightness and color signal.
OSD
It's easy for user to access the internal setup menu and configure cameras. Access the camera settings by easy steps main menu.
White Balance
Adjust automatically the color temperature according to the environment.
ICR Auto Switch
The ICR filter will filter infrared light during the daytime and change to normal at night to ensure a high sensitivity and clear image is obtained.
AGC
Adjusts the gain of amplifier, enabling the camera to output the standard video signal in different lighting conditions.
Wide Dynamic Range (WDR)
When there are both very bright and very dark areas simultaneously in the field of view, this function will balance the brightness level and provide clear images.
Privacy Masking
This function allows you to block or mask certain area of a scene for privacy purposes.
Backlight Compensation (BLC)
When the back of the captured object is too bright, you can set BLC for the captured object to balance and show a clearer image.
Motion Detection
When there are moving objects captured by the camera, it will send signal to DVR to trigger alarm or other notifications.
Cables and Connections

NOTES:
*The cable's illustrations are only for reference. The video output will be different for different cameras.
* For the camera with video switch cable, there are two kinds of video switches: button switch and dial switch.
Button Switch: The video outputs will be recycled by holding and pressing the button in the video switch cable for 5 seconds.
Dial Switch: The video output will be selected according to the positions of the pin switches which are described on the tag of the video switch cable.
* Some models do not have the video switch cable. These are set by accessing the OSD menu to change video outputs.
Installation
Before you start, please make sure that the wall or ceiling is strong enough to withstand three times the weight of the camera. Please install and use the camera in a dry environment. It is recommended that you install back the lens cover or lower dome less than 4 hours after removing it.
The mounting types of cameras are only for reference.
Mounting for Bullet Camera
- Type A
-
Attach the drill template to the place where you want to fix the camera and then drill the screw holes according to the drill template.
-
Route and connect the cables.
-
Secure the mounting base with the camera to the wall with the screws as shown below.

- Bracket adjustment. Before adjustment, preview the image of the camera on a monitor and then loosen the fixed ring or screws to adjust the view angle of the camera.

- Focus and zoom adjustment (applies only for manual varifocal models). Remove the lens cover and then adjust the focus and zoom screws manually to get a clear image. Once adjustments are made, tighten these two screws and screw back the lens cover.

Mounting for Dome Camera
* Please do not remove the lens protection film until the installation has been completed.
- Type A
- Drill the screw holes and the cable hole on the surface where camera will be mounted according to the drill template.

- Loosen the screws to remove the lower dome section of the camera.

-
Route and connect the cables.
-
Secure the mounting base with camera to the wall with the screws provided.

- Three-axis adjustment. Before adjustment, preview the image of the camera on a monitor and then adjust the camera according to the figure below to get an optimum angle.

- Install the lower dome back to the camera and secure it with the screws. After these steps and ready to use your product, remove the protection film to finish the installation.

- Focus and zoom adjustment (applies only for manual varifocal models). There are two screws that represent the Zoom and the Focus of your camera. Turn the Zoom screw to determine how close or far the image is needed and then turn the focus screw to adjust the focus of the image until the best image is obtained.

- Type B
- Attach the drill template to the place where you want to fix the camera and then drill screw holes according to the template.
- Insert the plastic plugs inside the drilled holes to be used with screws.
-
Route and connect the cables.
-
Secure the camera to the wall or ceiling with the screws provided as shown below.
Rubber plug (f available)
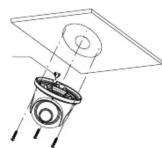
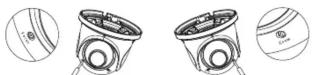
- Adjust the camera to obtain the optimum angle by loosening the fixed screws. Before adjustment, it is recommended to preview the image of the camera on a monitor so perfect adjustments can be achieved. Tighten the lock screws after the proper image and view angle is obtained by the camera.

*If your camera has no fixed screws on any of its sides, proceed to adjust manually your camera by rotating the dome to adjust the view angle.
- Adjust the Focus and Zoom screw to adjust the image as needed (applies only to manual varifocal models).
Turn the Zoom screw to determine how close or far the image is needed and then turn the focus screw to adjust the focus of the image until the best image is obtained.
Main menu
You'll need the camera connected to a DVR or connect an OSD controller in order to be able to access the camera OSD (On screen display) menu.
Connected to the DVR
- Select the preview window of the camera and right click the mouse to show the following menu list on the DVR.

- Click on the icon of the toolbar to open the PTZ menu window (or right click the mouse to select "PTZ Control").

Select the "OSD" tab and then click / to call up the camera main menu.
You can select the menu by clicking ▲ or ▼ to move in that direction. Click ▼ or ▶ key to select the menu on the left. The menus with an arrow icon means it has sub-menu to access.
Click 📄 / 📋 to go to the sub-menu or to confirm the settings. If the model of your camera does have direction keys and an enter key on the cable, then you can also use these direction keys to select in the menu and the enter key to go to the sub-menu or confirm the settings.
Note: This series of the camera must be connected to a DVR which supports calling up the main menu of the camera. Other DVR manufacturers may have different modes to access and use menu operation. Please refer to the relevant User Manual for the DVR for detail instructions.
Motorola Limited Warranty
This Motorola brand Product is produced under license by MDX ELECTRONICS, LLC. Subject to the exclusions below, MDX ELECTRONICS warrants that this Motorola brand product
("Product") will remain free from defects in materials and workmanship under normal consumer usage for 1 year. This Warranty is your exclusive warranty. This Warranty extends only to the first consumer purchaser and is not transferable. MDX ELECTRONICS will at no charge repair or replace any Product that qualifies under this Warranty. We may use functionally
equivalent reconditioned, refurbished, or new Products. MOTOROLA and MDX ELECTRONICS are not responsible for defects or damage that result from: (a) improper operation, storage, misuse, abuse,
maintenance, alteration, accident or neglect, such as physical damage (cracks, scratches, etc.) to the surface of the product or lens resulting from misuse; (b) subjecting the Product or Accessory to abnormal usage or conditions; (c) service provider alteration of the Product including alteration of the Product's firmware; or (d) other acts which are not the fault of MOTOROLA or MDX ELECTRONICS, are excluded from coverage.
Any implied warranties, including without limitation the implied warranties of merchantability and fitness for a particular purpose, shall be limited to the duration of this limited warranty. This warranty is provided in lieu of all other warranties, express or implied. In no event shall MOTOROLA or MDX ELECTRONICS be liable, whether in contract or tort (including negligence) for damages in excess of the purchase price of the
product, or for any indirect, incidental, special or consequential damages of any kind, or loss of revenue or profits, loss of business, loss of information or other financial loss arising out of σ in connection with the ability or inability to use the product, to the full extent these damages may be disclaimed by law.
Some jurisdictions do not allow the limitation or exclusion of incidental or consequential damages, or limitation on the length of an implied warranty, so the above limitations or exclusions may not apply to you. This Warranty gives you specific legal rights, and you may also have other rights that vary from one jurisdiction to another.
To obtain support or need of information, doubts or questions, please contact us at:
Tel: 01 800 801 6398 (México)
Tel: +011 52 55 9688-8814 (México, Latin America and Caribe)
WhatsApp: +52 155 7657 5586 (México, Latin America and Caribe)
Skype: soporte.motorolasecurity
Email: soporte@mdx-motorolasecurity.com 9:00AM - 5:00PM CST (Mon-Fri)
Manufactured, distributed or sold by MDX ELECTRONICS, LLC, official licensee for this product. MOTOROLA and the Stylized M Logo are trademarks or registered trademarks of Motorola Trademark Holdings, LLC. and are used under license. All other trademarks are the property of their respective owners. ©2020 Motorola Mobility LLC. All rights reserved.


- Precautions
- Introduction
- Features and definitions:
- High Resolution
- High Transmission Performance
- High Light Compensation (HLC)
- DNR
- OSD
- White Balance
- ICR Auto Switch
- AGC
- Wide Dynamic Range (WDR)
- Privacy Masking
- Backlight Compensation (BLC)
- Motion Detection
- Cables and Connections
- NOTES:
- Installation
- Mounting for Bullet Camera
- - Type A
- Mounting for Dome Camera
- - Type B
- Main menu
- Connected to the DVR
- Motorola Limited Warranty
Brand : MOTOROLA
Model : MTABM042611
Category : Security Camera