
AR4P11D - Heating ARDES - Free user manual and instructions
Find the device manual for free AR4P11D ARDES in PDF.


| Product Type | Fan Heater |
| Power | 2000 W |
| Heat Settings | 2 (Low, High) + Fan Only |
| Thermostat | Adjustable |
| Safety Features | Overheat Protection, Tip-Over Switch |
| Material | Plastic |
| Dimensions (W x D x H) | 25 x 20 x 15 cm |
| Weight | 1.5 kg |
| Power Supply | 220-240 V ~ 50/60 Hz |
| Cord Length | 1.5 m |
| Oscillation | No |
| Remote Control | No |
| Noise Level | ~45 dB |
| Color | White / Black |
| Fan Only Mode | Yes |
| Cool Touch Handle | Yes |
| Cleaning | Wipe with a damp cloth |
| Repairability | Spare parts available from manufacturer |
| Warranty | 2 years |
| Certification | CE |
Frequently Asked Questions - AR4P11D ARDES
User questions about AR4P11D ARDES
0 question about this device. Answer the ones you know or ask your own.
Ask a new question about this device
Download the instructions for your Heating in PDF format for free! Find your manual AR4P11D - ARDES and take your electronic device back in hand. On this page are published all the documents necessary for the use of your device. AR4P11D by ARDES.
USER MANUAL AR4P11D ARDES
GB This product is only suitable for well insulated spaces or occasional use.
TERMOVENTILATORE CERAMICO CERAMIC HEATER
AR4P11D

natural_image
Line drawing of a portable air conditioner unit with heat exchanger and ventilation slots (no text or symbols)This appliance can be used by children aged from 8 years and above and persons with reduced physical, sensory or mental capabilities or lack of experience and knowledge if they have been given supervision or instruction concerning use of the appliance in a safe way and understand the hazards involved.
Children shall not play with the appliance.
Cleaning and user maintenance shall not be made by children without supervision.
Children of less than 3 years should be kept away unless continuously supervised.
Children aged from 3 years and less than 8 years shall only switch on/off the appliance provided that it has been placed or installed in its intended normal operating position and they have been given supervision or instruction concerning use of the appliance in a safe way and understand the hazards involved. Children aged from 3 years and
less than 8 years shall not plug in, regulate and clean the appliance or perform user maintenance.
CAUTION — Some parts of this product can become very hot and cause burns. Particular attention has to be given where children and vulnerable people are present.
If the power cable gets damaged, it has to be replaced only at a service centre approved by the manufacturer.

DO NOT COVER
WARNING: In order to avoid overheating, do not cover the heater.
Do not place the appliance immediately below a socket outlet.
Do not use this heater in the immediate surroundings of a bath, a shower or a swimming pool.
ATTENTION : read this booklet carefully it contains important instructions for a safe installation, use and maintenance. Important instructions to be kept for future reference.
Keep handy the guarantee, receipt of payment and these instructions for future use and reference.
After removing the packaging, check the appliance for any signs of damage.
In case of visible damage, do not use it and contact a qualified technician.
Do not leave parts of the packaging with in the reach of children. This appliance is not a children's toy: it is an electrical device and must be treated with the necessary caution.
Before connecting the appliance, make sure that the power supply voltage matches the indication on the data plate.
If the plug and socket are not compatible, the socket has to be replaced with a suitable type by skilled persons.
Do not use adapters or extension cables which do not meet current safety standards or that exceed the current carrying capacity limits.
When you don't use the appliance disconnect it from the power supply and assure that the interruptor is off.
Do not tug on the power cable or on the appliance itself to remove the plug from the socket.
The use of any electrical appliance requires that a number of basic rules are observed, namely:
- Never touch the appliance with wet or humid hands.
- Do not leave the appliance exposed to weathering (rain, sunlight).
- Do not subject it to rough handling.
In case of a breakdown or malfunctioning of the appliance, disconnect it at once.
Do not attempt to repair it, but take it to a service centre approved by the manufacturer.
If you decide you do not want to use this appliance any longer, disable it by cutting the power cable - of course, after disconnecting it from the socket.
The power cable should be extended to its full lenght to avoid over heating.
For safety reasons, the appliance should never be opened.
The appliance has been designed and manufactured to operate in the home.
Any other use is considered inappropriate and dangerous.
Do not insert objects through the safety grill or the air inlets.
During use, rest the appliance on a flat surface.
Do not use this heating appliance with programmers, timers, separate remote control systems (different to the ones provided with the appliance) or any other device that automatically turns on the appliance, as there is a risk of fire in the event the appliance is covered or positioned incorrectly.
Do not use the heater in presence of flammable substances (petrol, paints, etc.).
Do not place the cord near sources of heat.
WARNING: DO NOT COVER THIS PRODUCT NEAR CURTAINS OR OTHER COMBUSTIBLE MATERIAL.
WARNING: DO NOT COVER THE APPLIANCE OR OBSTRUCT THE AIR INLETS TO AVOID OVERHEATING.
1 - Display:
A: ECO function icon
B: digits (set temperature / timer / "beep" function)
C: °C / °F icon
D: stand-by icon
E: H (hour) / M (minutes) icon
F: timer icon
G: power level icon
H: antifrost icon
l: fan icon
2 - Pushbuttons:
A: On/stand-by pushbutton
B: MODE pushbutton
C: TIMER pushbutton
D: ECO function pushbutton
E: oscillation pushbutton
F: - pushbutton (decrease)
G: + pushbutton (increase)
3 - Filter
4 - Back grill
5 - Main switch On/Off
Technical data indicated on the appliance.

Instructions for use
GB
- Plug the appliance into the mains socket.
- Turn on the main switch located in the back of the product ("I" position). The appliance emits a "beep" (if "beep" sound is on) and stand-by icon flashes. If the stand-by icon will not displayed, be sure that the appliance is on a horizontal surface.
- Press the On/Stand-by pushbutton to turn the appliance on. It begins heating the room according to the last used settings.
-
Press the MODE pushbutton to select one of the below operating modes:
-
Antifrost function (H icon): the appliance start to work around 10^
- Fan function (I icon): the appliance start to work in cool air function
- Power 1 (G icon - 1 bar on in the display): the appliance work at the minimum heating power level (800W)
- Power 2 (G icon - 2 bars on in the display): the appliance work at the medium heating power level (1200W)
- Power 3 (G icon - 3 bars on in the display): the appliance work at the maximum power level (2000W)
- To distribute the air flow over a wider surface, press the swing pushbutton: it starts to swing from right to left and vice versa. To stop the appliance in the desired position, simply press the oscillation pushbutton again.
- To turn off the product press On-Stand-by pushbutton: the display will show a countdown fro about 30 seconds. After 30 seconds the appliance will be in stand-by mode.
- To completely turn off the product the main switch must be in "0" position (off).
The product is equipped with adjustable thermostat by stopping the air flow as soon as the desired ambient temperature is reached; hot air will start to flow again when the ambient temperature drops. To select the desired temperature press “+” or “-” pushbutton after set the power level (minimum, medium or maximum). The set temperature will displayed on the display.
The set temperature can be displayed in either °C or °F; to set the unit of measurement of temperature turn on the product, push and keep pushing "+" pushbutton until the unit of measurement will flashing on the display. Push "+" pushbutton to select the desired unit of measurement; wait a few seconds for the setting to be memorised.
To activate ECO function press ECO pushbutton. The ECO icon will be displayed. This function will compare the target temperature with the current ambient temperature and it will automatically select the most appropriate heating power level to guarantee an optimum comfort level while reducing the energy consumption. (Attention: this function is available only if one power level 1, 2 or 3 is selected). When the ECO function is on, ECO icon (A) is dispalyed and the appliance may switch automatically to a lower or higher heating level even several time. The corresponding heating level is always shown on the display (G icon).
The appliance is equipped with 24 hours timer that allow to set the automatic start or automatic off of the product. To set the automatic start: when the product is in stand-by mode press TIMER pushbutton; TIMER icon (F) and the time remaining before the appliance will be turned on blink on the display. To adjust the timer press “+” or “-” pushbuttons then wait a few seconds for the setting to be memorised. On display stand-by icon and timer icon blinking indicating that the timer for auto on is set. When the programmed time is reached, the appliance is turned on with the setting used during the previous period of operation. Attention: when the timer for auto start is set do not turn off the product from the main switch.
To set automatic off: when the product is on, press TIMER pushbutton; the TIMER icon (F) and the time remaining before the appliance turn off blink on the display. To adjust the timer press “+” or “-” pushbuttons then 16
wait a few seconds for the setting to be memorised. On display timer icon blinks indicating that the timer for auto off is set. When the programmed time is reached, the appliance is turned off automatically.
To deactivate timer function press TIMER pushbutton twice. When timer is set push TIMER pushbutton one time to check the remaining time. Timer steps (value show on the display): 15M (M=minutes), 30M, 45M, 1,0H (H=hour), 1,5H, 2H, 2,5H, 3H, 3,5H, 4H, 4,5H...until 10H; from 10H to 24H step 1 hour.
Every time one pushbutton is pushed the appliance emit “beep” sound. This function can be activated/deactivated: when product is working push and keep pushing “-” pushbutton until the display will show “b0” or “b1” flashing. Press “-” pushbutton to select “b0” (beep off) or “b1” (beep on); waiting a few seconds for the setting to be memorised.
Maintenance
GB
This appliance does not require any special maintenance.
Disconnect the plug from the socket and let the appliance cool down well before cleaning it.
In order to clean the appliance, use a soft or slight damp cloth.
Never use abrasives or chemical solvents.
Do not use very wet substances, liquids or cloths to prevent water from entering into the apparatus and irreparably damaging it.
NEVER IMMERSE THE APPLIANCE INTO THE WATER.
To clean the filter (picture on the side):
gently remove the back grill by pulling it outwards, remove the filter and clean it using a soft slight damp cloth then replace in the appliance and reseal the back grill.

natural_image
Line drawing of a portable electronic device with ventilation grilles and buttons (no text or symbols)Information requirements for electric local space heaters
| Model identifier(s): AR4P1 | 1D | |||||
| Item | Symbol | Value Unit | Item | Unit | ||
| Heat output | Type of heat input, for electric storage local space heaters only (select one) | |||||
| Nominal heat output | P_nom | 2,0 kW | Manual heat charge control, with integrated thermostat | N.A. | ||
| Minimum heat output (indicative) | P_min | 0,9 kW | Manual heat charge control with room and/or outdoor temperature feedback | N.A. | ||
| Maximum continuous heat output | P_max,c | 2,0 kW | Electronic heat charge control with room and/or outdoor temperature feedback | N.A. | ||
| Auxiliary electricity consumption | Fan assisted heat output N.A. | |||||
| At nominal heat output | eI_max | 0,000 kW | Type of heat output/room temperature control (select one) | |||
| At minimum heat output | eI_min | 0,000 kW | Single stage heat output and no room temperature control | No | ||
| In standby mode | eI_SB | 0,002 kW | Two or more manual stages, no room temperature control | No | ||
| With mechanic thermostat room temperature control | No | |||||
| With electronic room temperature control | Yes | |||||
| Electronic room temperature control plus day timer | No | |||||
| Electronic room temperature control plus week timer | No | |||||
| Other control options (multiple selections possible) | ||||||
| Room temperature control, with presence detection | No | |||||
| Room temperature control, with open window detection | No | |||||
| With distance control option No | ||||||
| With adaptive start control No | ||||||
| With working time limitation Yes | ||||||
| With black bulb sensor | No | |||||
| Contact details POLY POOL S.p.A. - via Sottocorna 21/B, 24020 Parre (BG) - Italy | ||||||
Condizioni
Terms and Conditions
The guarantee is valid for 24 months.
This guarantee applies only if it has been duly filled in and is submitted with the receipt showing the date of purchase.
The guarantee covers the replacement or repair of parts making up the appliance which were faulty at source due to manufacturing faults.
After the guarantee has expired, the appliance will be repaired against payment. The manufacturer declines any responsibility for damage to persons, animals or property due to misuse of the appliance and failure to observe the directions contained in the instructions.
Limits
All rights under this guarantee and any responsibility on our part will be voided if the appliance has been:
- mishandled by unauthorized persons
- improperly used, stored or transported.
The guarantee does not cover damage to the outward appearance or any other that does not prevent regular operation.
If any faults should be found despite the care taken in selecting the materials and in creating the product, or if any information or advice are required, please contact your local dealer.

USER INFORMATION
“Implementation of Directive 2012/19/EU on Waste Electrical and Electronic Equipment (WEEE)”, pertaining to reduced use of hazardous substances in electrical and electronic equipment, as well as to waste disposal”.
The symbol of the crossed-out wheelie bin on the equipment or on its packaging indicates that the product must be disposed of separately from other waste at the end of its service life.
The user must therefore take the dismissed equipment to suitable separate collection centres for electrical and electronic waste, or return it to the dealer in case they purchase a new device of equivalent type, at a one-to-one-ratio.
Suitable segregated collection of the equipment for subsequent recycling, treatment or environmentally-friendly disposal helps prevent damage to the environment and to human health, and encourages the re-use and/or recycling of the materials that make up the equipment.
Abusive disposal of the product by the user shall result in the application of administrative fines in accordance with the laws in force.
Ardes
POLY POOL S.p.A. Via Sottocorna, 21/B
24020 Parre (Bergamo) - Italy
Tel. 035703244 r.a. - Fax 035702716
http://www.ardes.it - e-mail:info@ardes.it
MADE IN CHINA
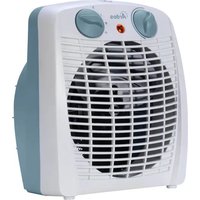


Brand : ARDES
Model : AR4P11D
Category : Heating