UH15-3 - Radio UNIDEN - Free user manual and instructions
Find the device manual for free UH15-3 UNIDEN in PDF.

User questions about UH15-3 UNIDEN
0 question about this device. Answer the ones you know or ask your own.
Ask a new question about this device
Download the instructions for your Radio in PDF format for free! Find your manual UH15-3 - UNIDEN and take your electronic device back in hand. On this page are published all the documents necessary for the use of your device. UH15-3 by UNIDEN.
USER MANUAL UH15-3 UNIDEN
CONTROLS & INDICATORS
Included in your Package
+ UH15 Series Radio
- Operating Guide
- Bell Clips
• DC/USB charge cable*
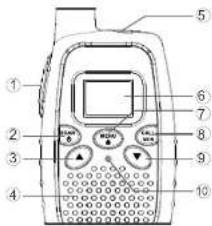
① PTT (Push-to-Talk) /Exit from MENU
2 SCAN
Power On/Off
③ ▲ UP
-
Speaker
-
(Part 2)
5) Accessory Port DC Charging Port*
- Display Screen
7 MENU
MENU Ko
■ Key Lock ⑧ CALL Call tone
① BALE GARTON MON Monitor
9 DOWN
- DOWN - Moverhany
* Requires 3 AA rechargeable batteries to use this feature. NIH rechargeable batteries are recommended.

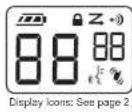
Channel Number

Battery Level

Key Lock is on

VOX is on

CTCSS Code for current Channel

Scan is on

Roger Beep is on

TX/RX Icon
GETTING STARTED
Installing Batteries
Your radio requires 3 AA Alkaline batteries or 3 AA NiMH Rechargeable batteries (not supplied).
- With the back of the radio facing you, locate the latch to release the battery cover and remove the cover.
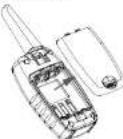
- Install 3 AA Alkaline batteries or 3 AA NiMH rechargeable batteries as shown on the inside of the battery compartment.
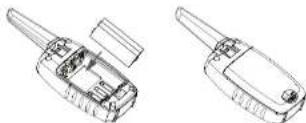
- Replace the battery cover and press down to secure.
Radio Battery Meter
Battery bars indicate the battery level 📄 When the battery meter shows 1 bar, the device goes into low battery mode and indicates low battery in the form of an alert tone.

- Remove the batteries from the radio for storage purposes.
- Balleries may corrode over time and cause permanent damage to your devices.
- Do not mix and use old/new/alkaline/NiMH batteries. - Only charge NiMH rechargeable batteries.
- Charge rechargeable NiMH batteries once every 3 months when not in use.
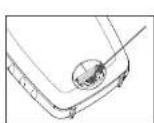
Belt Clip
To attach:
Slide the belt clip down into the catch until it snaps into place. To remove:
Pinch and hold belt clip latch and slide the belt clip up.
3
Charging Rechargeable Batteries

Do not charge alkaline or non rechargeable batteries
表决结果:5票
Plug the DC end of the DC/USB charge cable into the radio's DC charge port, and the USB end to a standard USB charge port, or USB port of an AC adaptor (not included). Plug the AC adaptor into the wall outlet.
• Before operating the radio, charge the rechargeable batteries for 16 hours without interruption.
- Do not transmit when the radio is charging.
Low Battery Alert
If the battery level becomes low, the unit will go into a Battery Low Mode. The Transmit Mode is disabled. Replace Alkaline batteries immediately, or recharge NiMH rechargeable batteries immediately to continue using the radio.
Power Save
Your UH15 Series has a unique circuit designed to dramatically extend the life of the batteries. If there is no transmission nor an incoming call within 5 seconds, your Radio switches to the Power Save mode. The Radio is still able to receive transmissions in this mode.
Back Light
The UH15 has an automatic display back light which remains on for 3 seconds after a key press (all keys except PTT key). The back light will work even if the keypad is locked but will not work during low battery alert mode.
OPERATION
Turning Your Radio On and Off
Press and hold ⬆ to turn the radio On or Off.
When turning on, the radio chirps and the display briefly shows all the display icons before showing the current standby mode of your radio.
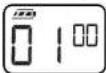
Setting the Volume
Press the UP button to increase the speaker volume. Press the DOWN button to decrease the speaker volume. The speaker volume setting is indicated by 'UL'. The volume level range is from 1 (minimum) to 16 (maximum).
Ex. lowest volume
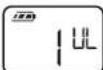
Ex. highest volume

MENU List
Open the MENU
Step through MENU
Exit the MENU
- Press MENU
- Press MENU again
- Press PTT
| One | CHANNEL setting |
| Two | CTCSS Code setting |
| Three | Call Tone setting |
| Four | VOX setting |
| Five | Dual Watch (2nd Channel) setting |
| Six | Squelch Level setting |
| Seven | Duplex Mode (Repeater) setting |
Setting a Channel
The UH15 uses the UHF-CB channels (CH01-CH80). See UHF CHANNELS & FREQUENCIES, page 12 for channel usage.
- Press MENU one time. The current channel flashes
- Press UP or DOWN button to select a desired channel.
- Press PTT to confirm and save the channel setting.
- Press MENU one time. The current channel flashes
- Press UP or DOWN button to select a desired channel.
- Press PTT to confirm and save the channel setting.
Setting the SQUELCH Level 1-6
The squelch mutes the speaker audio unless a strong enough signal is present. The level is preset to a medium setting and can be adjusted if needed.
-
Press MENU six times. 'SL' appears on the display. The current setting (1-6) will flash.
-
Press UP or DOWN to select the receive sensitivity level.
| 1 = High receive Sensitivity (weak signal area) |
| 2~5 = Medium receive Sensitivity |
| 6 = Low receive Sensitivity (strong signal area) |
Talking and Listening
To communicate, all radios in your group must be set to the same Channel (and the same CTCSS Code If It is set).
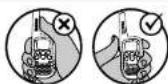
To talk, press and hold PTT. The transmit power is 0.5 Watt. Hold the radio 5 to 7 cm away from your mouth when speaking. When you are finished speaking, release PTT to listen.

For maximum range and extended the life of the batteries, avoid touching the antenna with your hand when transmitting.
7
Checking the Channel Before Transmitting
For uninterrupted communication, do not talk on a channel if someone else is currently talking on it.
To check for activity on a channel before you talk, press and hold MON. If you hear static, the channel is clear to use.
Push to Talk Timeout Timer
To prevent accidental transmissions and save battery life, the radio emits a continuous warning tone and stops transmitting if you press PTT for 60 continuous seconds.
CTCSS (Privacy) Codes
CTCSS is a feature that allows a group to talk to each other without hearing other users on the same channel. The radios in your group must be set to the same CTCSS code. There are 38 codes to choose from. You can set a different code for each channel using this procedure.
-
Set a desired channel to use CTCSS on (example CH 01).
-
Press MENU two times. The code number flashes.
- Press UP or DOWN to select a code from 01 to 39.
Example shows Channel 01 with a CTCSS code of 38.

Set to 00 to disable the feature. 4. Press PTT to save the code setting
NOTE: Set the CTCSS Code to 00 if you want to communicate with another radio which is not using CTCSS.
Scanning Channels
Use scanning to monitor channels for transmissions or to find someone in your group who has accidentally changed channels.
To start scanning:
-
Press and release SCAN. The Z indicator displays.
-
Press and release SCAN again to disable scanning. The Z indicator disappears.
When the radio detects channel activity, it stops scanning and you can hear the transmission. To respond to the transmission press PTT within 5 seconds, the channel will be confirmed.
Scan Advance
If the radio stops scanning on a channel you do not want to listen to, briefly press and release UP or DOWN to resume scanning for the next active channel.
Setting and Transmitting Call Tones
Your radio can transmit different call tones (wake-up tone) to other radios in your group so you can alert them that you want to talk. To set a call tone:
-
Press the MENU three times. 'CA' appears on the display. The current call tone setting flashes.
-
Press UP or DOWN to change and hear the next call tone. There are 10 call tones to choose from (1-10)
NOTE: Set the call tone to 0 to disable the call tone feature. 3. Press PTT to set the new call tone.
Press CALL to transmit the call tone.
NOTE: Current regulations require calling tones to be restricted to one transmission per minute. If a second transmission is attempted within one minute then an error tone will sound.
Voice Operated Transmission (VOX)
Transmission is initiated by speaking into the microphone of the radio instead of pushing the PTT button. To activate VOX:
-
Press MENU four times. ≤ appears on the display. The current setting (oF, 1-3) will flash.
-
Press UP and DOWN button to select the sensitivity level.
-
Press PTT to set the new setting.
| 3 = High Sensitivity (for noisy areas) |
| 2 = Medium Sensitivity |
| 1 = Low Sensitivity (for quieter areas) |
| oF = Turn Off VOX function |
channel with this setting.
-
Press MENU live times. CH appears on the display. The second channel to monitor will flash. (OF, 01 - 80) If the setting is OF, then Dual Watch is disabled.
-
Press UP or DOWN to set the 2nd channel to monitor.
-
Press PTT to save the setting and dual watch will be enabled. The second channel will be monitored intermittently.
To Operate in Duplex Mode (Repeater Mode)
The Duplex function enables you to access local repeater stations. UHF CB Repeaters are used to retransmit or relay your signal. Repeaters will extend the range of your radio and overcome the shielding effect caused by solid obstructions.
NOTE: You can only activate Duplex on Channels 01-08 and 41-48. When Duplex is ON for a repeater channel, the display shows r1-r8 for Channels 01-08 and n1-n5 for Channels 41-48.
Operation With the Aid of a Repeater

Eq. CH01 is being used in your area for repeater use.
-
Press MENU seven times, 'r P' setting flashes.
-
Press UP or DOWN to change the change the setting ON or OFF.
- Press PTT to save.
Key Lock ON/OFF
- To lock the key pad:
Press and held 📄 until the key lock indicator appears.
- To unlock the key pad:
Press and hold ■ until the key lock indicator disappears.
Key Beep ON/OFF
Press and hold the DOWN button while turning the radio ON to switch the keypad tone ON or OFF.
Roger Beep ON/OFF
Press and hold the UP button while turning the radio ON to turn Roger Beep ON or OFF.
計
UHF CHANNELS & FREQUENCIES

Always listen on a channel (or observe the receive signal level mode) to ensure it is not already being used before transmitting. Channels 5 and 35 are used for emergency channels. CTCSS will not operate on these channels.
Please follow these guidelines for channel use in Australia: • Channels 35 and 35 are Emergency Channels. • Channel 1 is a Callon Channel.
- Channels 22 and 23 are for telemetry and telecommand applications, channels 61, 62 and 63 are for future use and TX is inhibited on these channels.
General communication is accepted on all other channels with these provisions.
- Channel 46 - road channel (Australia) - Channels 01-08 (and 91-38), and Channels 41-48 (and 71-76) are repeater channels.

Important Information - 80 Channel UHF-CB channel expansion To provide all users additional channel capacity within the UHF-CB Band. The ADCMA will change the majority of the current wideband 40 channel use to narrowband channel use. This allows for additional channels to be added, up to 80 Channels.
This simply means that the now somewhere radio you have purchased will have more channels than older radios. Please refer to the quick lines show and the other crash for latter channel information.
A list of currently authorised channels can also be obtained from the ACMA website in Australia and the MBIE website in New Zealand. Interference? Poor Audio
When a new narrowband radio resolves a signal from an older wideband radio the speech may sound loud. Narrowband radio speaking in CH41 - CH60 may encounter interference from a newly wideband radio transmitting on high power on an adjacent channel (frequency). When an other wideband radio requires a signal from a new narrowband radio the speech may sound quiet - the wideband radio user simply adjusts their radio volume for best performance. The above striators are not about the radio but a symptom of mixed wideband and narrowband radios in current use. It is expected that this narrowband radio has passed out the issue will be eliminated.
User License Information

USER LICENSE INFORMATION
The citizen band radio service is licensed in Australia by ACMA Radio-communications (Citizen Band Radio Station) Class Licence and in New Zealand by MBIE General User Licence for Citizen Band Radio and operation is subject to conditions contained in those licenses.

WATER WARNING
Dividant does not represent this product to be waterpriser. Do not expose the product to Rain or Moisture.
CTCSS Codes 01 - 38
| Code No | Frequency (Hz) | Code No | Frequency (Hz) | Code No | Frequency (Hz) | Code No | Frequency (Hz) |
| 1 | 67 | 11 | 97.4 | 21 | 136.5 | 31 | 192.8 |
| 2 | 71.9 | 12 | 100 | 22 | 141.3 | 32 | 203.5 |
| 3 | 74.4 | 13 | 103.5 | 23 | 146.2 | 33 | 210.7 |
| 4 | 77 | 14 | 107.2 | 24 | 151.4 | 34 | 218.1 |
| 5 | 79.7 | 15 | 110.9 | 25 | 156.7 | 35 | 225.7 |
| 6 | 82.5 | 16 | 114.8 | 26 | 162.2 | 36 | 233.6 |
| 7 | 85.4 | 17 | 118.8 | 27 | 167.9 | 37 | 241.8 |
| 8 | 86.5 | 18 | 123 | 28 | 173.6 | 38 | 250.3 |
| 9 | 91.5 | 19 | 127.3 | 29 | 179.9 | ||
| 10 | 94.8 | 20 | 131.8 | 30 | 186.2 |
WARRANTY
UHF CB Transceiver SeriesUNIDEN
IMPORTANT: Satisfactory evidence of the original purchase is required for warranty service
Please refer to our Unknown website for any details or warranty conditions offered in addition to those acquired below.
Warrantor: The warrantor is United Australia Pty Limited ABN 58 001 865 498 ('Under').
Terms of Warranty: Union Aust warrants to the original retail purchaser only that the U115 Series (The Product), will be free from defects in materials and craftsmanship for the duration of the warranty period, subject to the limitations and exclusions set out below.
Warranty period: This warranty to the original retail purchaser is only valid in the original country of purchase for a Product first purchased either in Australia or New Zealand and will expire one (1) year from the date of the original retail sale.
If a warranty claim is made, this warranty will not apply if the Product is found by Order to be
(A) Damaged or not maintained in a reasonable manner or as recommended in the relevant bridge Cancer's Manual.
(B) Modified, shared or used as part of any conversion kits, subassemblies of
(C) In property included necessary to instructions contained in the relevant
(D) Repaired by someone other than an authorized Uniden Rexel Agent in
behavior in a cinct of manufacture covered by this warranty, or (E). Excl. in connection with an equipment, needs to be a series per
manufactured by Under
Parts Covered: This warranty covers the Product and included accessories.
User-generated Data: This warranty does not use any external use of or damage to user-generated data (including but without limitation phone numbers, sentences and inspects) that may be altered on your Product.
Statement of Remedy: If the Product is found not to conform to this warranty as stated above, the Warrantor at its discretion, will either repair the defect or replace the Product without any charge for parts or service. This warranty does not include any reimbursement or payment of any consequential damages claimed to add from a Product's failure to comply with the warranty.
Our goods come with guarantees that cannot be excluded under the Australian Consumer Law. You are entitled to a replacement or refund for a major failure and for compensation for any other reasonably foreseeable loss or damage. You are also entitled to have the goods repaired or replaced if the goods fail to be of acceptable quality and the failure does not amount to a major failure.
This warranty is in addition to and site alongside your rights under either the COMPETITION AND CONSUMER ACT 2010 (Australia) or the CONSUMER GUARANTEES ACT (New Zealand); as the case may be, none of which can be excluded.
Procedure for obtaining warranty service: Depending on the country in which the Product was first purchased, if you believe that your Product does not conform with this warranty, you should deliver the Product, together with satisfactory evidence of your original purchase (such as a legible copy of the sales docked) to Unden at the address shown below. You should contact Unden regarding any compensation that may be payable for your expenses incurred in making a warranty claim. Prior to delivery, we recommend that you make a backup copy of any phone numbers, images or other data stored on your Product, in case it is bit or damaged during warranty service.
UNIDEN AUSTRALIA PTY LTD Phone: 1300 366 695 Email: oulservice@uniden.com.au

©2021 Urale-Audamky Limited, Jersey LLC
15141312