
4820 - Ventilateur domestique Lasko - Free user manual and instructions
Find the device manual for free 4820 Lasko in PDF.


| Product Type | Box Fan |
| Model | 4820 |
| Brand | Lasko |
| Fan Diameter | 20 inches (50.8 cm) |
| Dimensions (W x H x D) | 20.5 x 20.5 x 4.5 inches (52 x 52 x 11.4 cm) |
| Weight | 7.5 lbs (3.4 kg) |
| Power Supply | 120 V, 60 Hz |
| Wattage | 60 W |
| Amperage | 0.5 A |
| Number of Speeds | 3 (Low, Medium, High) |
| Oscillation | Yes (automatic side-to-side) |
| Airflow | Up to 2,200 CFM (cubic feet per minute) |
| Control Type | Rotary dial (manual) |
| Safety Features | Overheat protection, ETL listed, safety grille |
| Materials | ABS plastic, metal grille |
| Cleaning Instructions | Unplug; wipe with damp cloth; do not immerse in water |
| Spare Parts Availability | Contact Lasko customer service for replacement parts |
| Repairability | Motor is not user-serviceable; grille and blades can be replaced by qualified technician |
| Warranty | 1-year limited warranty |
| Certifications | ETL listed, CSA certified |
Frequently Asked Questions - 4820 Lasko
User questions about 4820 Lasko
0 question about this device. Answer the ones you know or ask your own.
Ask a new question about this device
Download the instructions for your Ventilateur domestique in PDF format for free! Find your manual 4820 - Lasko and take your electronic device back in hand. On this page are published all the documents necessary for the use of your device. 4820 by Lasko.
USER MANUAL 4820 Lasko
⚠ WARNING To reduce the risk of electrical shock and fire please observe the following instructions:
MAINTENANCE
Always unplug the cord before moving, servicing or cleaning.
NEVER place the Fan in or near water.
Clean the Fan only with a vacuum equipped with a brush attachment; the vacuum will remove the lint and dirt from inside the Fan.
NEVER attempt to take apart the Fan.
Clean the body of the Fan with a soft cloth only.
NEVER use ALCOHOL or SOLVENTS such as gasoline, benzene, paint thinner, or other harsh cleaners.
SERVICING: All other servicing, with the exception of general user-maintenance, should be performed by an authorized service representative. Call 1-800-233-0258, Monday through Friday, between the hours of 8:00 a.m. and 9:00 a.m. EST for the location of your nearest service center.
STORAGE: Store the Fan with these instructions, in the original carton in a cool, dry place. LUBRICATION: Motor is permanently lubricated.
LASKO PRODUCTS, INC. LIMITED WARRANTY (NOT VALID IN MEXICO)
WHAT THIS WARRANTY COVERS: This product is warranted against defects in workmanship and/or materials. HOW LONG THIS WARRANTY LASTS: This warranty extends only to the original purchaser of the product and lasts for one (1) year from the date of original purchase or until the original purchaser of the product sells or transfers the product, whichever first occurs. WHAT LASKO WILL DO: During the warranty period, Lasko will, at its sole option, repair or replace any part or parts that prove to be defective or replace the whole product with the same or comparable model.
WHAT THIS WARRANTY DOES NOT COVER: This warranty does not apply if the product was damaged or failed because of accident, improper handling or operation, shipping damage, abuse, misuse, unauthorized repairs made or attempted. This warranty does not cover shipping costs for the return of products to Laska for repair. The purchase price is subject to increase in the value of the property from the sale of the sale. ANY AND ALL WARRANTIES, EXPRESSED OR IMPLIED (INCLUDING, WITHOUT LIMITATION, ANY IMPLED WARRANTY OF MERCHANTABILITY), LAST ONE YEAR FROM THE DATE OF ORIGINAL PURCHASE OR UNITS OF ORIGINAL PURCHASE IN THE PRODUCT Sells OR TRANSFERS THE PRODUCT, WHICHIEER FIRST ORDER IS URGED BY THE SALE OF THIS WARRANTY UNDER ANY CHANGE IN ANY CHANGE IN ANY CHANGE IN ANY CHANGE IN ANY CHANGE IN ANY CHANGE IN ANY CHANGE IN ANY CHANGE IN ANY CHANGE IN ANY CHANGE IN ANY CHANGE IN ANY CHANGE IN ANY CHANGE IN ANY CHANGE IN ANY CHANGE IN ANY CHANGE IN ANY CHANGE IN ANY CHANGE IN ANY CHANGE IN ANY CHANGE IN ANY CHANGE IN ANY CHANGE IN ANY CHANGE IN ANY CHANGE IN ANY CHANGE IN ANY CHANGE IN ANY CHANGE IN ANY CHANGE IN ANY CHANGE IN ANY CHANGE IN ANY CHANGE IN ANY CHANGE IN ANY CHANGE IN ANY CHANGE IN ANG
Some states and provinces do not allow limitations on how long an implied warranty lasts, or the exclusion or limitation of incidental or consequential damages, so these exclusions or limitations may not apply to you. This warranty gives you specific legal rights. You may also have other rights which vary from state to state and province to province. Proof of purchase is required before a warranty claim will be adopted.
CUSTOMER SERVICE:
Toll-Free (800) 233-0268. Email: producthelp@taskoproducts.com
Our Customer Service team is available to assist you with product questions, service center locations, and replacement parts. They can be reached Monday through Friday, 8am-8pm Endem. Please have your model number available, as well as the type and style (facered on the underside of your product). Please do not return product to place of purchase. Customer Service Dept., 820 Lincoln Ave., West Chester, PA 19360 (Please do not send product to this location) www.laskoproducts.com
Customer Service (APL), 620 Lycson Ave., West Chester, PA 10350
(1) 2017, 10: 19:38. No proof to provide a copy of the material used in this paper.
Innovators in Home Comfort
48" XTRA AIR TOWER FAN with IONIZER
and REMOTE CONTROL
MODEL 4820
VENTILADOR DE TORRE XTRA AIR DE 48"
CON IONZADOR Y CONTROL REMOTO
MODELO 4820
This Fan is for residential use only.
It is not intended to be used in commercial, industrial or agricultural settings.
READ AND SAVE THESE INSTRUCTIONS
READ CAREFULLY BEFORE ATTEMPTING TO ASSEMBLE, INSTALL, OPERATE OR MAINTAIN THE PRODUCT DESCRIBED. PROTECT YOURSELF AND OTHERS BY OBSERVING ALL SAFETY INFORMATION. FAILURE TO COMPLY WITH INSTRUCTIONS COULD RESULT IN PERSONAL INJURY AND/OR PROPERTY DAMAGE! KEEP INSTRUCTIONS FOR FUTURE REFERENCE.
SAVE THESE INSTRUCTIONS
LEA Y GUARDE ESTAS INSTRUCCIONES
GENERAL SAFETY INFORMATION
When using electrical appliances, basic precautions should always be followed to reduce the risk of fire, electrical shock and injury to persons, including the following: Read all instructions before using this Fan.

- Make certain the power source confluence to the electrical requirements of the Pan.
- Make certain that the room is equipped with a working smoke detector.
Use this Fan only as described in this manual. Any other use is recommended by the manufacturer may cause the electrical shock, or injury to persons. To reduce the risk of personal injury and electric shock, the Fan should not be played with or placed where small children can reach it.


⚠ WARNING

DO NOT DEPEND ON THE ON/OFF SWITCH AS THE SOLE MEANS OF DISCONNECTING POWER WHEN SERVICING OR MOVING THE FAN ALWAYS UNPLUG THE POWER CORD. ALWAYS TURN/OFF AND END OF CAN BECHED TO SAUCHE THE ARM WOULD FAIR THE CONTROL ATTENUATION WHEN THE CAN YOU DO UCEED BY
- This Fay must NOT be used in potentially dangerous locations such as flammable, explosive, chemical-toler or wet atmospheres where gasoline, paint or flammable liquids are used or stored.
- DCT NOT uses FAs in or near a window. With many colors an electrical board
- Comparable assemble FAs, according to instructions, before contacting to power supply.
This appliance has a polarized plug (one blade is wider than the other). To reduce the risk of electric shock, this plug is intended to hit in a polarized outlet only one way. Watch wide blade of plug to w/o wide slot, Fully inner. If the plug does not fit fully in the outlet, reverse the plug. If it still does not fit, contact a qualified electrician. DO NOT attempt to defeat this safety feature. The plug is a safety feature, to reduce the risk of fire, elective shock and personal injury. DO NOT remove, replace, repair or tamper with the originally supplied electrical device. The plug is an electric shock, which is normally closed at 600-233-928h, Mandry - Fiddle between 8:00 a.m. and 5:00 p.m. EST. If the plug warning label is missing or damaged, call the toll free number for a replacement label.
-
Where protection, aspect the use of accident on costs because the accident cost may blowout and causes it to be used to use an accident care, must move the risk of snowsteering by using the first rather than possible and meaning that it is just done. NEVER use a single snowsteering card to expense more than one hand. But not plug into any other card connected devices, such as a power strip, condensate, or no other hand. NEVER should not depend on the damage of the first hand in the first hand. NEVER will be responsible only for with a damaged cord or plug of the first hand in the second hand. The first hand has been dropped or damaged in any manner. There are no user serviceable parts. Return Fan to an authorized policy facility for examination, exceptional or mechanical adjustment or repair.
-
NEVER I never put a fan or a ring, and I never put a ring, which is the only one of the fans. The fan has been open to account for all of the first line, and if the fan is not, it is the first line. DO NOT knock out a fan with the fan, but it is the second line. The fan always has the Fan or a ring, which is open to account for the charge of the Fan covering. Locusing the Power Cord so the Fan or other objects are not resting out. DO NOT run Power Cord under carpeting. DO NOT run Power Cord with triple little, narrow, or the light. Arrange Power Cord ways from meal traffic and where it will not be-trapped now.
-
This Fan is not inserted for law or law or damp incisions. NEVER Istole a fan where it may fall into a cloth or other water container. NEVER use Fan where dammarble liquids are used or stored.
-
For the purpose of this, for other appliances or electronic equipment can sometimes interfere with the operation of this Fan. If this occurs, move the fan to another location.
- Keep fan needs and away from controls and your bed where it may be set out of paid room and in subsequent turn on the Fan.
- If the fan needs and away from controls and your bed where it may be set out of paid room and in subsequent turn on the Fan.
- Keep fan needs and away from controls and your bed where it may be set out of paid room and in subsequent turn on the Fan.
- If the fan needs and away from controls and your bed where it may be set out of paid room and in subsequent turn on the Fan.
- Keep fan needs and away from controls and your bed where it may be set out of paid room and in subsequent turn on the Fan.
- If the fan needs and away from controls and your bed where it may be set out of paid room and in subsequent turn on the Fan.
- Keep fan needs and away from controls and your bed where it may be set out of paid room and in subsequent turn on the Fan.
- If the fan needs and away from controls and your bed where it may be set out of paid room and in subsequent turn on the Fan.
- Keep fan needs and away from controls and your bed where it may be set out of paid room and in subsequent turn on the Fan.
- If the fan needs and away from controls and your bed where it may be set out of paid room and in subsequent turn on the Fan.
- Keep fan needs and away from controls and your bed where it may be set out of paid room and in subsequent turn on the Fan.
- If the fan needs and away from controls and your bed where it may be set out of paid room and in subsequent turn on the Fan.
- Keep fan needs and away from controls and your bed where it may be set out of paid room and in subsequent turn on the Fan.
- If the fan needs and away from controls and your bed where it may be set out of paid room and in subsequent turn on the Fan.
- Keep fan needs and away from controls and your bed where it may be set out of paid room and in subsequent turn on the Fan.
- If the fan needs and away from controls and your bed where it may be set out of paid room and in subsequent turn on the Fan.
- Keep fan needs and away from controls and your bed where it may be set out of paid room and in subsequent turn on the Fan.
- If the fan needs and away from controls and your bed where it may be set out of paid room and in subsequent turn on the Fan.
- Keep fan needs and away from controls and your bed where it may be set out of paid room and in subsequent turn on the Fan.
- If the fan needs and away from controls and your bed where it may be set out of paid room and in subsequent turn on the Fan.
- Keep fan needs and away from controls and your bed where it may be set out of paid room and in subsequent turn on the Fan.
- If the fan needs and away from controls and your bed where it may be set out of paid room and in subsequent turn on the Fan.
- Keep fan needs and away from controls and your bed where it may be set out of paid room and in subsequent turn on the Fan.
- If the fan needs and away from controls and your bed where it may be set out of paid room and in subsequent turn on the Fan.
- Keep fan needs and away from controls and your bed where it may be set out of paid room and in subsequent turn on the Fan.
- If the fan needs and away from controls and your bed where it may be set out of paid room and in subsequent turn on the Fan.
- Keep fan needs and away from controls and your bed where it may be set out of paid room and in subsequent turn on the Fan.
- If the fan needs and away from controls and your bed where it may be set out of paid room and in subsequent turn on the Fan.
- Keep fan needs and away from controls and your bed where it may be set out of paid room and in subsequent turn on the Fan.
- If the fan needs and away from controls and your bed where it may be set out of paid room and in subsequent turn on the Fan.
- Keep fan needs and away from controls and your bed where it may be set out of paid room and in subsequent turn on the Fan.
- If the fan needs and away from controls and your bed where it may be set out of paid room and in subsequent turn on the Fan.
- Keep fan needs and away from controls and your bed where it may be set out of paid room and in subsequent turn on the Fan.
- If the fan needs and away from controls and your bed where it may be set out of paid room and in subsequent turn on the Fan.
- Keep fan needs and away from controls and your bed where it may be set out of paid room and in subsequent turn on the Fan.
- If the fan needs and away from controls and your bed where it may be set out of paid room and in subsequent turn on the Fan.
- Keep fan needs and away from controls and your bed where it may be set out of paid room and in subsequent turn on the Fan.
- If the fan needs and away from controls and your bed where it may be set out of paid room and in subsequent turn on the Fan.
- Keep fan needs and away from controls and your bed where it may be set out of paid room and in subsequent turn on the Fan.
- If the fan needs and away from controls and your bed where it may be set out of paid room and in subsequent turn on the Fan.
- Keep fan needs and away from controls and your bed where it may be set out of paid room and in subsequent turn on the Fan.
- If the fan needs and away from controls and your bed where it may be set out of paid room and in subsequent turn on the Fan.
- Keep fan needs and away from controls and your bed where it may be set out of paid room and in subsequent turn on the Fan.
- If the fan needs and away from controls and your bed where it may be set out of paid room and in subsequent turn on the Fan.
- Keep fan needs and away from controls and your bed where it may be set out of paid room and in subsequent turn on the Fan.
- If the fan needs and away from controls and your bed where it may be set out of paid room and in subsequent turn on the Fan.
- Keep fan needs and away from controls and your bed where it may be set out of paid room and in subsequent turn on the Fan.
- If the fan needs and away from controls and your bed where it may be set out of paid room and in subsequent turn on the Fan.
- Keep fan needs and away from controls and your bed where it may be set out of paid room and in subsequent turn on the Fan.
- If the fan needs and away from controls and your bed where it may be set out of paid room and in subsequent turn on the Fan.
- Keep fan needs and away from controls and your bed where it may be set out of paid room and in subsequent turn on the Fan.
- If the fan needs and away from controls and your bed where it may be set out of paid room and in subsequent turn on the Fan.
- Keep fan needs and away from controls and your bed where it may be set out of paid room and in subsequent turn on the Fan.
- If the fan needs and away from controls and your bed where it may be set out of paid room and in subsequent turn on the Fan.
- Keep fan needs and away from controls and your bed where it may be set out of paid room and in subsequent turn on the Fan.
- If the fan needs and away from controls and your bed where it may be set out of paid room and in subsequent turn on the Fan.
- Keep fan needs and away from controls and your bed where it may be set out of paid room and in subsequent turn on the Fan.
- If the fan needs and away from controls and your bed where it may be set out of paid room and in subsequent turn on the Fan.
- Keep fan needs and away from controls and your bed where it may be set out of paid room and in subsequent turn on the Fan.
- If the fan needs and away from controls and your bed where it may be set out of paid room and in subsequent turn on the Fan.
- Keep fan needs and away from controls and your bed where it may be set out of paid room and in subsequent turn on the Fan.
- If the fan needs and away from controls and your bed where it may be set out of paid room and in subsequent turn on the Fan.
- Keep fan needs and away from controls and your bed where it may be set out of paid room and in subsequent turn on the Fan.
- If the fan needs and away from controls and your bed where it may be set out of paid room and in subsequent turn on the Fan.
- Keep fan needs and away from controls and your bed where it may be set out of paid room and in subsequent turn on the Fan.
- If the fan needs and away from controls and your bed where it may be set out of paid room and in subsequent turn on the Fan.
- Keep fan needs and away from controls and your bed where it may be set out of paid room and in subsequent turn on the Fan.
- If the fan needs and away from controls and your bed where it may be set out of paid room and in subsequent turn on the Fan.
- Keep fan needs and away from controls and your bed where it may be set out of paid room and in recent units
- If the fan needs, we will take a step to take a step to take a step to take a step to take a step to take a step to take a step to take a step to take a step to take a step to take a step to take a step to take a step to take a step to take a step to take a step to take a step to take a step to take a step to take a step to take a step to take a step to take a step to take a step to take a step to take a step at an end
- If the fan needs, we will take a step to take a step to take a step to take a step to take a step to take a step to take a step to take a step to take a step to take a step to take a step to take a step to take a step to take a step to take a step to take a step to take a step at an end
- If the fan needs, we will take a step to take a step to take a step to take a step to take a step to take a step to take a step to take a step to take a step to take a step to take a step to take a step at an end
- If the fan needs, we will take a step to take a step to take a step to take a step to take a step to take a step to take a step to take a step to take a step at an end
- If the fan needs, we will take a step to take a step to take a step to take a step to take a step to take a step to take a step to take a step at an end
- If the fan needs, we will take a step to take a step to take a step to take a step to take a step to take a step to take a step at an end
- If the fan needs, we will take a step to take a step to take a step to take a step to take a step to take a step at an end
- If the fan needs, we will take a step to take a step to take a step to take a step to take a step to take a step at an end
- If the fan needs, we will take a step to take a step to take a step to take a step to take a step to take a step at an end
- If the fan needs, we will take a step to take a step to take a step to take a step to take a step to take a step at an end
- If the fan needs, we will take a step to take a step to take a step to take a step to take a step to take a step at an end
- If the fan needs, we will take a step to take a step to take a step to take a step to take a step to take a step at an end
- If the fan needs, we will take a step to take a step to take a step to take a step to take a step at an end
- If the fan needs, we will take a step to take a step to take a step to take a step to take a step at an end
- If the fan needs, we will take a step to take a step to take a step to take a step to take a step at an end
- If the fan needs, we will take a step to take a step to take a step to take a step to take a step at an end
- If the fan needs, we will take a step to take a step to take a step to take a step to take a step at an end
- If the fan needs, we will take a step to take a step to take a step to take a step to take a step at an end
- If the fan needs, we will take a step to take a step to take a step to takes at an end
- If the fan needs, we will take a step to take a step to takes at an end
- If the fan needs, we will take a step to take a step to takes at an end
- If the fan needs, we will take a step to take a step to takes at an end
- If the fan needs, we will take a step to take a step to takes at an end
- If the fan needs, we will take a step to take a step to takes at an end
- If the fan needs, we will take a step to take a step to takes at an end
- If the fan needs, we will take a step to take a step to takes at an end
- If the fan needs, we will take a step to take a step to takes at an end
- If the fan needs, we will take a step to take a step to takes at an end
- If the fan needs, we will take a step to take a step to takes at an end
- If the fan needs, we will take a step to take a step to takes at an end
⚠ WARNING
REDUCE THE RISK OF FIRE OR ELECTRIC SHOCK - DO NOT USE THIS FAN WITH ANY SOLID STATE
SAVE THESE INSTRUCTIONS


ADVERTENCIA


III. The best time is an achieved rate of 10% in the last year. For each case, at 30% of the Ciligo Dielino Anchus (APC), a second case is a normal activity for a healer activities on the day of the next year.
ADVERTENCIA
DETJUTCA R. DIF300 DE INCENDO O CHOCUE F. EOTRICO - NO USE ESTE VENTIL ADON CON DISPOSITIVOS DE CONTROL
TOOLS REQUIRED FOR ASSEMBLY (not included): #2 Phillips
Head Screwdriver
ASSEMBLY
-
For use of assembly, lay the Fan down so that the front grill and control panel are
-
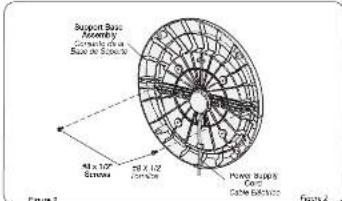
Assemble the Support Base Helves by interlocking the Gosses on Support Base A into the Boss Holes on Support Base B. Thread the Power Supply Cord through the large hole in the center of the Support Base Assembly (Figure 1)
-
Secure (2) #1 X 1/2" Screws into the two water holes in the bottom of the Base. Figure 2
-
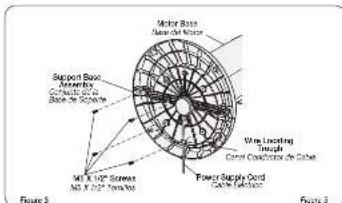
Align the Support Base Assembly with the Motor Base, noting that the card channel on the bottom of the support base assembly should be contents the back at the Fan. Attach the Support Base Assembly to the Motor Base with 1/2" Long M5 Screws. Make certain to align the Key on the Support Base Assembly with the Lacing Notch on the Motor Base. (Figure 1) Genly pull any excess stock of the Power Supply Cord and place it in the Wire Locating Touch (Figure 8).
REMOTE CONTROL
-
(readall batteries supplied as shown in Figure 4. The battery is on "AAA").
-
Do not mix cold and new temperature. Do not mix alkaline, standard carbon-rich or rechargeable hydro-, copper and batteries.
-
DO NOT DISPOSE OF BATTERIES IN FIRE BATTERIES MAY EXPLODE OR LEAV
CONTROL REMOTO
This Fan may be operated by the Manual Controls located on front of the unit or by the
Hornes Conel (shown in Figure 4).
- Plug the cord set into a 120 volt outlet.
Be sure that the plug fits tightly into outlet.
When plugs of intensely into receptacles, they may slip partially or completely out of the receptacle with only the slight movement of the attached cord. Receptacles in this condition may overheat and pose a serious fire hazard; if covered by a curtain or drop, the fire hazard is even creater.
-
Apply power to the Fan by pushing the Power Button (5).
-
FACSPEED: You may know that the last speed to the deafschelt, 1 (low), 2 (sweaming), or 3 (high) by pressing the Fan Speed Burton limit.
-
CECILLATION: Press the Oscillation Button (C) to start and stop the oscillation function.
-
TIMER FUNCTION: This fan is equipped with a timer. The timer can be set for 1 hour to 2 hours. Continuous signal the TimerButton is in each time setting.
7 hours. Continue preusing the timer button, to reach the closed time occurring. To cancel time, press Timer Button (C) until lights are extinguished.
- IONZER: The lonzer function on this Fan will operate within any speedmode. Press the
lon Dutton (200) once in 5am this function on and a second time in 5am it off. The Fan
must be DN for the filter to be functional. When the filter is filtered in the purification of the room air.
- After turning the Fan oil, unplug the unit from the electrical mallet
FUNCIONAMIENTO
- MAINTENANCE
- CUSTOMER SERVICE:
- 48" XTRA AIR TOWER FAN with IONIZER
- and REMOTE CONTROL
- VENTILADOR DE TORRE XTRA AIR DE 48"
- CON IONZADOR Y CONTROL REMOTO
- READ AND SAVE THESE INSTRUCTIONS
- SAVE THESE INSTRUCTIONS
- LEA Y GUARDE ESTAS INSTRUCCIONES
- GENERAL SAFETY INFORMATION
- ⚠ WARNING
- ADVERTENCIA
- FUNCIONAMIENTO
Brand : Lasko
Model : 4820
Category : Ventilateur domestique