
SV32AMUB - Television HANNSPREE - Free user manual and instructions
Find the device manual for free SV32AMUB HANNSPREE in PDF.


| Product Type | LED LCD HDTV |
| Screen Size | 31.5 inches (diagonal) |
| Aspect Ratio | 16:9 |
| Panel Resolution | 1366 x 768 pixels |
| TV System | ATSC (digital), NTSC (analog) |
| Built-in Tuner | Yes (ATSC/NTSC) |
| HDMI Inputs | 5 |
| USB 2.0 Port | 1 (supports JPEG, MP3, video playback, PVR) |
| VGA Input | 1 |
| YPbPr Inputs | 2 |
| Composite Input | 1 |
| SPDIF Digital Audio Output | 1 (optical) |
| Earphone Output | 1 (3.5 mm) |
| Built-in Speakers | Stereo, 10W + 10W |
| Audio Enhancements | SRS TruSurround XT, HELIOS Sound |
| PVR (Personal Video Recording) | Yes (via USB, for DTV) |
| Power Consumption | 55W (typical), <0.5W standby |
| Power Supply | AC 100-240V, 50/60Hz |
| Dimensions (with stand) | 30.9 x 22.6 x 9.4 inches |
| Dimensions (without stand) | 30.9 x 20.2 x 1.4 inches |
| Weight | 26.01 lbs |
| VESA Mount Pattern | 200 x 100 mm (screw M6x12) |
| Cleaning Instructions | Clean with dry cloth; do not use liquid cleaners |
| Safety Precautions | Read manual; do not expose to rain/moisture; unplug during storms |
| Spare Parts / Reparability | Servicing by qualified personnel only; no user-serviceable parts |
Frequently Asked Questions - SV32AMUB HANNSPREE
User questions about SV32AMUB HANNSPREE
0 question about this device. Answer the ones you know or ask your own.
Ask a new question about this device
Download the instructions for your Television in PDF format for free! Find your manual SV32AMUB - HANNSPREE and take your electronic device back in hand. On this page are published all the documents necessary for the use of your device. SV32AMUB by HANNSPREE.
USER MANUAL SV32AMUB HANNSPREE
Regulatory Information 3
Description of Warning Symbols 4
Safety Notices.... 5
Important Safety Instructions 6
Preface 9
Warranty and Service 9
- Getting Started ....12
1.1 Package Contents ...... 12
1.2 Features ....13
1.3 Control Panel 14
1.4 Input and Output Jacks....15
1.5 Remote Control 17
1.6 Inserting the Remote Control Batteries .....19
- Setting up your TV 21
2.1 Basic Connections....21
2.1.1 Power Connection 21
2.1.2 Connecting an Antenna or Cable TV....21
2.2 Connecting External Devices 22
2.2.1 Connecting External Earphones 22
2.2.2 Connecting to AV Devices....23
2.2.3 Connecting a VCR/ Set-Top Box/ DVD Player Using Video Inputs 24
2.2.4 Connecting a PC using VGA 25
2.2.5 Connecting a PC using DVI 25
2.2.6 Connecting HDMI 26
2.2.7 Connecting SPDIF 26
2.2.8 Connecting USB 2.0 27
2.3 Using the TV 28
2.3.1 Turning the TV On and Off 28
2.3.2 Setup Wizard 29
2.3.3 Switching Source Signals....29
2.3.4 Performing an Automatic Channel Search....29
2.3.5 Selecting Channels....30
2.3.6 Adjusting the Volume....30
2.3.7 Editing the Channel List....30
2.3.8 Setting the Favorite Channels 30
2.3.9 Viewing Images and Playing Music....31
Table of Contents
2.3.10 Performing PVR (Personal Video Recording) .....31
- Adjusting On-Screen Display (OSD) Settings 33
3.1 OSD Setting Menus 34
3.2 Adjusting Picture Settings ....34
3.3 Adjusting Audio Settings 35
3.4 Adjusting Channel Settings 36
3.5 Adjusting V-CHIP Settings 37
3.6 Adjusting Setup Settings ....38
3.7 Adjusting PC Settings 39
- Troubleshooting .... 40
- Specifications ....41
- Appendix: Remote Control Guide....43
6.1 Introduction....43
6.1.1 Setting Program Codes....43
6.1.2 Searching Codes 44
6.1.3 Setting Volume Lock....45
6.1.4 Setting Channel Lock....45
6.1.5 Factory Setting Mode....46
6.1.6 Description....48
6.2 Other Descriptions 48
6.2.1 Double Clicking 48
6.2.2 Buttons Information 48
6.2.3 Power-out Protection Capability 48
6.3 Component Program Codes 49
- Setting the TV on the Wall....56
- Using the Cable Organizer ....58
FCC Compliance Statement ^1
This device complies with part 15 of the FCC Rules. Operation is subject to the following two conditions: (1) This device may not cause harmful interference, and (2) this device must accept any interference received, including interference that may cause undesired operation.
Additional Information
This equipment has been tested and found to comply with the limits for a Class B digital device, pursuant to part 15 of the FCC Rules. These limits are designed to provide reasonable protection against harmful interference in a residential installation. This equipment generates, uses and can radiate radio frequency energy and, if not installed and used in accordance with the instructions, may cause harmful interference to radio communications. However, there is no guarantee that interference will not occur in a particular installation. If this equipment does cause harmful interference to radio or television reception, which can be determined by turning the equipment off and on, the user is encouraged to try to correct the interference by one or more of the following measures:
- Reorient or relocate the receiving antenna
- Increase the separation between the equipment and receiver
- Connect the equipment into an outlet on a circuit different from that to which the receiver is connected
- Consult the dealer or an experienced technician for help
Warning: The Federal Communications Commission warns that changes or modifications of the equipment not expressly approved by the party responsible for compliance could void your authority to operate the equipment.
DOC Compliance Notice ^2
This digital apparatus does not exceed the Class B limits for radio noise emissions from digital apparatus as set out in the Radio Interference Regulations of the Canadian Department of Communications. This device complies with Canada ICES-003 Class B.
Description of Warning Symbols

natural_image
Black triangular warning symbol with white lightning bolt symbol (no text)CAUTION
RISK OF ELECTRIC SHOCK DO NOT OPEN

natural_image
Black triangular warning symbol with an exclamation mark (no text or numbers)WARNING

This symbol is used to alert users to pay attention to important descriptions regarding usage, maintenance (repair), and additional important information related to this TV.
CAUTION

This symbol is used to alert users to the risk of electric shocks due to dangerous and uninsulated components.

Installation Safety Notes
Location
Avoid allowing the TV to get prolonged exposure to sunlight or other strong sources of heat. Leave sufficient distance between the TV and the wall to provide enough space for the emission of heat.

WARNING
To reduce the risk of fire or electric shock, do not expose this apparatus to rain or moisture.
Apparatus shall not be exposed to dripping or splashing and no objects filled with liquids, such as vases, shall be placed on the apparatus.

CAUTION
These servicing instructions are for use by qualified service personnel only. To reduce the risk of electric shock, do not perform any servicing other than that contained in the operating instructions unless you are qualified to do so.
Notes:
- The LED-LCD HDTV is for entertainment use only and visual display tasks are excluded.
- This device uses a VGA connector to connect to a PC. To reduce the influence of main frequency on the source signal, use a VGA monitor cable with ferrite shield.
Important Safety Instructions
| 1. | Read these instructions. |
| 2. | Keep these instructions. |
| 3. | Heed all warnings. |
| 4. | Follow all instructions. |
| 5. | Do not use this apparatus near water. |
| 6. | Clean only with dry cloth. |
| 7. | Do not block any ventilation openings. Install in accordance with manufacturer's instructions. |
| 8. | Do not install near any heat sources such as radiators, heat registers, stoves, or other apparatus (including amplifiers) that produce heat. |
| 9. | Do not defeat the safety purpose of the polarized or grounding-type plug. A polarized plug has two blades with one wider than the other. A grounding-type plug has two blades and a third grounding prong. The wide blade or the third prong are provided for your safety. If the provided plug does not fit into your outlet, consult an electrician for replacement of the obsolete outlet.NOTE: Applies to US only. |
| 10. | Protect the power cord from being walked on or pinched, particularly at plugs, convenience receptacles, and the point where they exit from the apparatus. |
| 11. | Only use attachments/accessories specified by the manufacturer. |
 | Use only with the cart, stand, tripod, bracket, or table specified by the manufacturer, or sold with the apparatus. When a cart is used, use caution when moving the cart/apparatus combination to avoid injury from tip-over. |
| 13. | Unplug this apparatus during lightning storms or when unused for long periods of time. |
| 14. | Refer all servicing to qualified service personnel. Servicing is required when the apparatus has been damaged in any way, such as power-supply cord or plug is damaged, liquid has been spilled or objects have fallen into the apparatus, the apparatus has been exposed to rain or moisture, does not operate normally, or has been dropped. |
| 15. | WARNING: To reduce the risk of fire or electric shock, do not expose this apparatus to rain or moisture. |
| 16. | The apparatus shall be connected to a MAINS socket outlet with a protective earthing connection. |
| 17. | Where the MAINS plug or an appliance coupler is used as the disconnect device, the disconnect device shall remain readily operable. |
| 18. | The apparatus should be used in moderate climate. |
| 19. | The apparatus shall not be exposed to dripping or splashing and that no objects filled with liquids, such as vases, shall be placed on the apparatus. |
Personal safety
| 1. To avoid overloading the power supply, never plug too many electrical devices into an outlet, power strip, or extension cable. |
| 2. Dangerous high-voltage electric power components are located inside the TV. To avoid electric shock, do not disassemble the casing. |
| 3. Do not place or drop metals, small objects, or flammable materials into the vent of the TV. |
| 4. If the TV is dropped, falls down, or is otherwise damaged, unplug the power cord immediately and contact an authorized service technician. |
| 5. If any fluid is sprayed or dropped into the TV, contact an authorized service technician. |
| 6. The screen of the TV is made of glass. Avoid hitting or scraping it. If the screen is broken, do not touch the broken glass. |
| 7. Do not allow children to use the TV unattended. |
| 8. Be careful when disconnecting the power plug. Hold the plug. Do not attempt to disconnect the plug by pulling on the power cord. |
Installation
| 1. Do not place the TV in locations where there is excessive steam or dust. |
| 2. Avoid blocking the TV's vents, do not place the TV on a bed, sofa, carpet, or in a sealed cabinet. |
| 3. Install the outdoor antenna away from power transmission lines to avoid possible danger. |
Preface
Thank you for purchasing a Hannspree LED-LCD HDTV. Your new TV will allow you to enjoy superior audio and video while enriching your lifestyle with advanced technology.
Please carefully read this manual in its entirety before setting up, using or operating your TV. To ensure the safe and correct installation and operations of the TV, it is important that the safety and operation instructions in this manual are followed.
This instruction manual is designed to assist you in setting up and using the TV. The information in this manual has been carefully checked for accuracy; however, no guarantee is given to the correctness of the contents. The information in this manual is subject to change without notice.
To the extent allowed by applicable law, Hannspree, Inc. (“Hannspree”) shall not be liable for direct, indirect, special, exemplary, incidental or consequential damages arising from any defect or omission in this manual, even if advised of the possibility of such damages in advance.
Warranty and Service
For complete warranty service information, please refer to the "Warranty card" enclosed with your TV.
As an ENERGY STAR® Partner, Hannspree has determined that this product meets the ENERGY STAR® guidelines for energy efficiency. It meets strict energy efficiency guidelines set by the U.S. Environmental Protection Agency and Department of Energy. ENERGY STAR is a joint program of these government agencies, designed to promote energy efficient products and practices.
Changes to certain fetures, settings, and functionalities of this TV can increase or change the power consumption. Depending upon such changed settings, the power consumption may exceed the limits required for the ENERGY STAR qualification.
Recycling Information
We care very much about our environment protection strategy and firmly believe that it helps us have healthier earth via appropriate treatment and recycling of industrial technology devices at the end-of-life.
These devices contain recyclable materials, which can be re-decomposed and re-integrated into brand-new marvels. On the contrary, other material can be classified to hazardous and poisoned substance.
We strongly encourage you to visit our website or call to find out recycling information and services available in your area.
http://www.hannspree.com/us
888.808.6789
Copyright
© Copyright 2010 Hannspree, Inc.
All rights reserved. This manual is protected by copyright and distributed under licenses restricting its use, copying and distribution. No part of this manual may be reproduced in any form by any means without the prior written authorization of Hannspree. The TV described in this manual may include copyrighted software of Hannspree (or other third parties). Hannspree (or other third parties) preserves the exclusive rights for copyrighted software, such as the right to distribute or reproduce the copyrighted software. Accordingly, and to the extent allowed by applicable law, any copyrighted software contained in the product described herein shall not be distributed, modified, reverse engineered, or reproduced in any manner without the prior written authorization of Hannspree (or of other third parties).
The Hannspree logos presented herein are trademarks of Hannspree. All other product names, trademarks or logos mentioned herein are used for identification purpose only, and may be the trademarks or registered trademarks of their respective owners.
The purchase of the product described herein shall not be deemed to grant, either directly or by implication, estoppel or otherwise, any license under the copyrights, patents, patent applications or trademarks of Hannspree, except for the normal, non-exclusive use that arises by operation of law in the sale of a product.
Trademark Notice
HDMI
Hannspree products incorporate High-Definition Multimedia Interface (HDMI™) technology.
HDMI, the HDMI logo and High-Definition Multimedia Interface are trademarks or registered trademarks of HDMI Licensing LLC.
License Notice and Trademark Acknowledgment
DOLBY.
DIGITAL
Manufactured under license from Dolby Laboratories. Dolby and the double-D symbol are trademarks of Dolby Laboratories.


HIGH-DEFINITION TELEVISION

TruSurround XT
is a trademark of SRS Labs, Inc. TruSurround XT technology is der license from SRS Labs, Inc.
TruSurround XT® creates a truly immersive surround sound experience with rich bass and clear dialog from only two speakers.
1
Getting Started
1.1 Package Contents
Make sure the following components are included in the box. Please contact Hannspree Customer Service immediately if anything is missing or damaged.
Attention Card User Manual Quick Start Guide
Warranty Card Warranty Sticker Remote Control
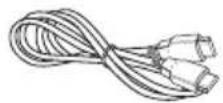
Batteries Cleaning Cloth HDMI Cable
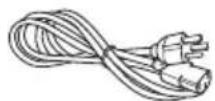
Power Cord
(Attached to the TV)
Customer Service Contact Information:
http://www.hannspree.com/us
888.808.6789
1.2 Features
-
Built-in TV tuner
• Audio/ Video support: -
PC audio input
- YPbPr input
- CVBS input
- 3.5 mm stereo earphone output
- VGA input
- HDMI input
- USB 2.0 (Photo/Music/Movie)
– R/L audio inputs for CVBS and YPbPr - SPDIF/Optical Digital Audio output
-
15W slim woofer (SV42LMUB only)
-
On-Screen Display (OSD) menu system
• Built-in stereo speakers - Noise reduction
• 3 D com b filter
- De-interlace Image
• 3:2/ 2:2 Pull down - Ambient light sensor
• PVR (Personal Video Recording)
• HELIOS (High Effect Linear Sound Optimize System) - SRS TruSurround XT
Note:
The supporting devices mentioned in this manual may vary on different models.
1.3 Control Panel
| Description Button Function | ||
| Power Press to turn the TV/ on or off. | ||
| Input source INPUT | Press to open the input source list or return to the previous screen on the OSD menu. | |
| Menu MENU | Press to open the OSD menu or confirm a selection on the OSD menu. | |
| Next channel | CH^ | Press to increase the channel number or move upward to the previous item on the OSD menu. |
| Previous channel | CH▼ | Press to decrease the channel number or move downward to the next item on the OSD menu. |
| Volume increase | VOL+ | Press to increase the volume or move to the right on the OSD menu. |
| Volume decrease | VOL- | Press to decrease the volume or move to the left on the OSD menu. |
| Remote IR sensor | Receive incoming remote control commands. | |
| Power/ Standby indicator | Indicate power or standby status. | |
| Speakers Deliver high-quality sounds. | ||
1.4 Input and Output Jacks
Left side:
| Description Connector Function | ||
| Service port |  | Service only. Not available for users. |
| USB 2.0 |  | Support JPEG, MP3, and Movie files. (Please refer to page 27 for supported file formats.) |
| Composite inputs | 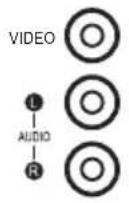 | Connect to an external device, such as a VCR, Set-Top-Box, or a DVD player. |
| Earphone output |  | Connect to earphones or external speakers with built-in amplifiers. |
| HDMI A input |  | Connect to an external device, such as a DVD player, a Set-Top Box, or a PC's DVI/ HDMI port. |
| HDMI B input |  | Connect to an external device, such as a DVD player, a Set-Top Box, or a PC's DVI/ HDMI port. |
Rear side:
| Description Connector Function | ||
| Cable/ Antenna |  DTV / TVCABLE / ANTENNA DTV / TVCABLE / ANTENNA | Connect to an antenna or cable TV. |
| Description Connector Function | |||
| HDMI 1 input | 1 |  | Connect to an external device, such as a DVD player, set-top box, or a PC's DVI/ HDMI port. |
| HDMI 2 input | 2 |  | Connect to an external device, such as a DVD player, set-top box, or a PC's DVI/ HDMI port. |
| HDMI 3 input | 3 |  | Connect to an external device, such as a DVD player, a Set-Top Box, or a PC's DVI/ HDMI port. |
| VGA (PC) input |  VGA VGA | Connect to a PC's VGA port. | |
| Audio input (PC) |  AUDIO IN AUDIO IN | Connect to a PC's audio port. | |
| SPDIF/Optical Digital Audio output |  | Connect to a Sound Bar or a home theater system. | |
| Component inputs (video) | 1 |  VIDEO [IMAGE] VIDEO [IMAGE] | Connect to an external device, such as a VCR, Set-Top-Box, or a DVD player. |
| Component inputs (audio) |   | Connect to an external device, such as a VCR, Set-Top-Box, or a DVD player. | |
1.5 Remote Control
- INPUT: Press to open the input source list.
- Power: Press to turn the TV on or off.
- TV: Press to select the TV mode.
- CABLE: Press to select the Cable TV mode.
- DVD: Press to select the HDMI mode.
- AUDIO: Press to select the SPDIF mode.
- INFO: Press to display program information.
- MENU: Press to display the on-screen display (OSD) menu.
- WHEEL (Up/Down/Left/Right/OK): Press ∧ / ✘ < > to scroll through the on- screen display menu. Press OK to confirm your selection.
- GUIDE: Press to view the Electronic Programming Guide screen.
- RETURN: Press to return to the previous menu.
- Keypad: Use to select a channel directly. Press 0-9 to enter the program numbers (press 1 and 0 for channel 10).
-
Program entry: Press this button for entering DTV minor channel.
-
LAST: Press to return to the last channel selected.
- MUTE: Press to mute audio. Press it again or press the volume adjust buttons to restore sound.
- +VOL-: Press VOL+/- to increase/decrease the volume.
- CH : Press CH / ▲ ▼ to increase/decrease the channel number.
- MTS: Press to toggle the audio mode (Mono/ Stereo/ SAP) in ATV or the audio services in DTV.
- FAV.: Press to switch to favorite channels.
- C.C.: Press to open or close the closed captions.
- ASPECT: Press to adjust the width-to-height ratio of the image.
- SLEEP: Press repeatedly to set the sleep time.
- Record: Press to record the program.
- Stop: Press to stop playing.
- Pause: Press to pause playing.
- Play: Press to start playing.
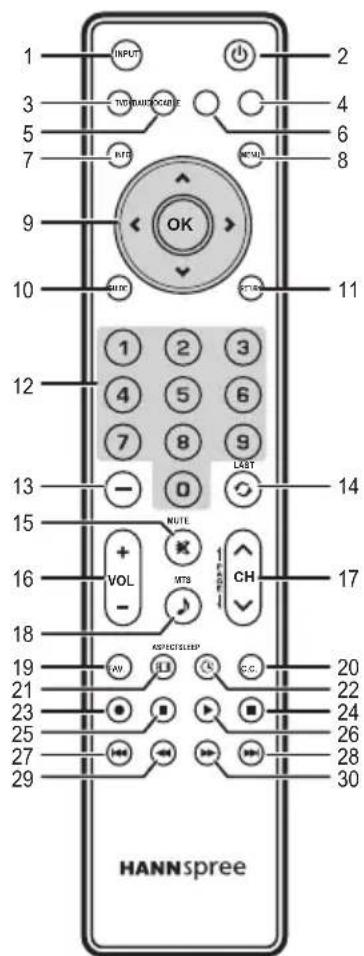
- Previous: Press to skip to the previous section.
- Next: Press to skip to the next section.
- Rewind: Press to go backward.
- Fast-forward: Press to go forward.
Note:
- For best results, use the remote control within a proper distance from the front of the TV. Do not exceed an angle of 30 degrees when pointing at the TV.
- The operational distance may be shortened when the signal sensor is directly exposed to strong light.
- Aim the transmitter on the remote control at the signal sensor and ensure that there are no obstacles between them.
1.6 Inserting the Remote Control Batteries
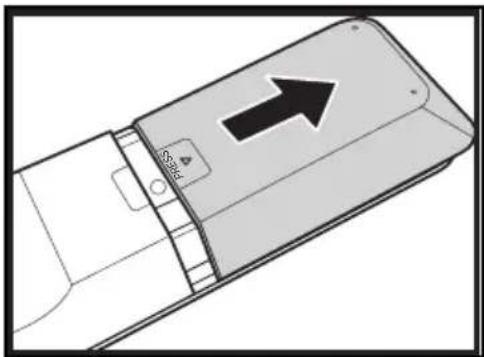
1 Open the battery compartment cover at the back of the remote control.
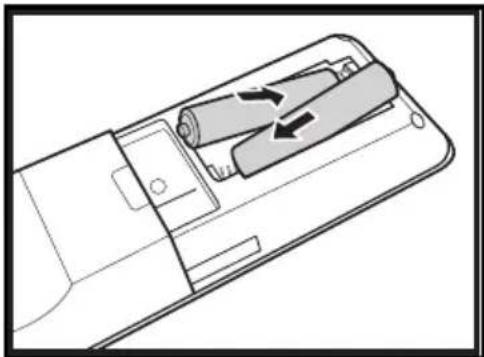
2 Insert the batteries paying attention to the polarity markings (+ and -) inside the battery compartment.
natural_image
Diagram of a remote control panel with two cylindrical components and directional arrows indicating movement (no text or symbols)3 Close the battery compartment cover.
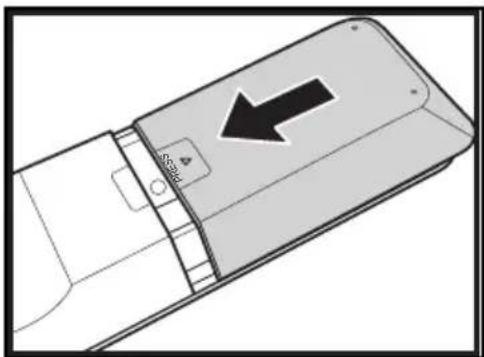
natural_image
Diagram of a device casing with an arrow pointing to a component, no text or symbols present
CAUTION
- If the remote control is not used for a long period, remove the batteries and store them properly.
- Handle damaged or leaking batteries carefully, and wash hands with soap if they come in contact with leaked chemical fluids.
- If your remote control has two batteries, do not mix new and old batteries, or the life of the new batteries will be shortened. Chemical fluids may leak from the old batteries.
- Danger of explosion if battery is incorrectly replaced. Replace only with the same or equivalent type recommended by the equipment manufacturer. Discard used batteries according to manufacturer's instructions.
- Refer to your local recycling or waste disposal rules and contact a local waste disposal vendor to dispose of used batteries.
- The remote control cover may have a magnet in it, so do not place magnetic sensitive items such as watches, credit cards, or flash media close to the cover.
- Do not use force when pulling the remote control cover open; you may damage the hinge.
2
Setting up your TV
2.1 Basic Connections
2.1.1 Power Connection
1 Connect the power cord to the AC IN input jack on the rear of the TV.
2 Insert the plug at the other end of the power cord into a power outlet.
2.1.2 Connecting an Antenna or Cable TV
Connect one end of the VHF/UHF (Antenna) or CATV cable to VHF/UHF jack on the rear of the TV.
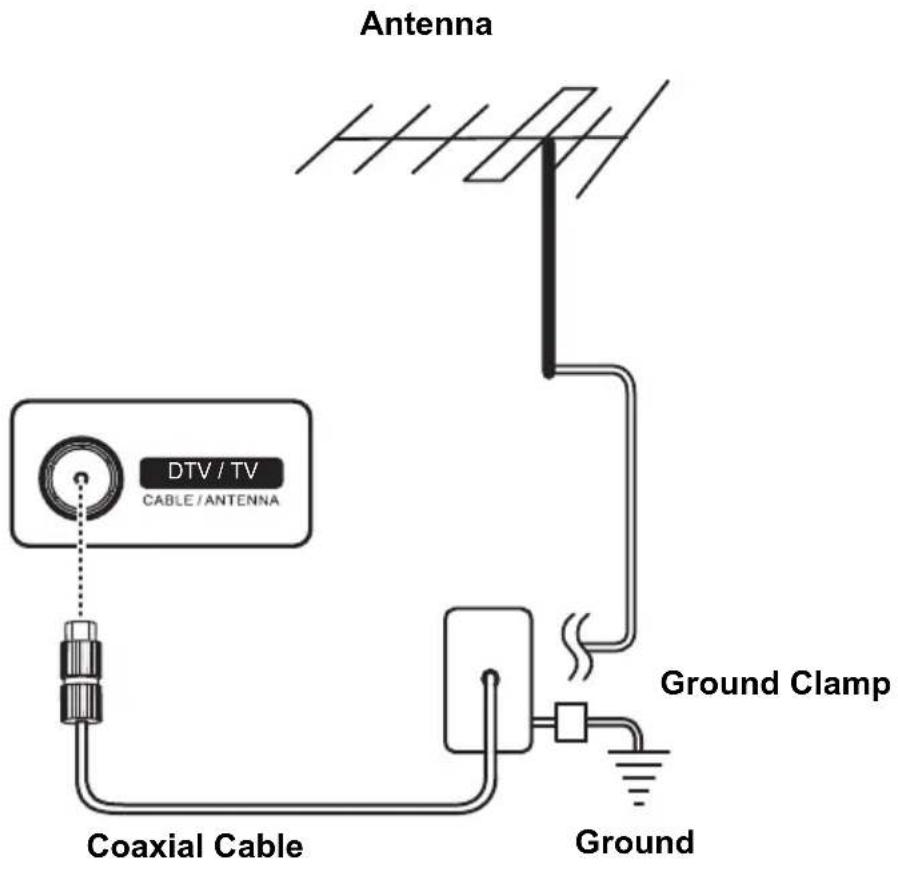
Note:
If you cannot receive channels after connecting to an antenna or cable TV line, try scanning for channels.
2.2 Connecting External Devices
Connect external devices such as VCRs, Set-Top-Box, DVD players, video game consoles, earphones, or a PC to the TV using the appropriate ports on the rear of the TV.
2.2.1 Connecting External Earphones
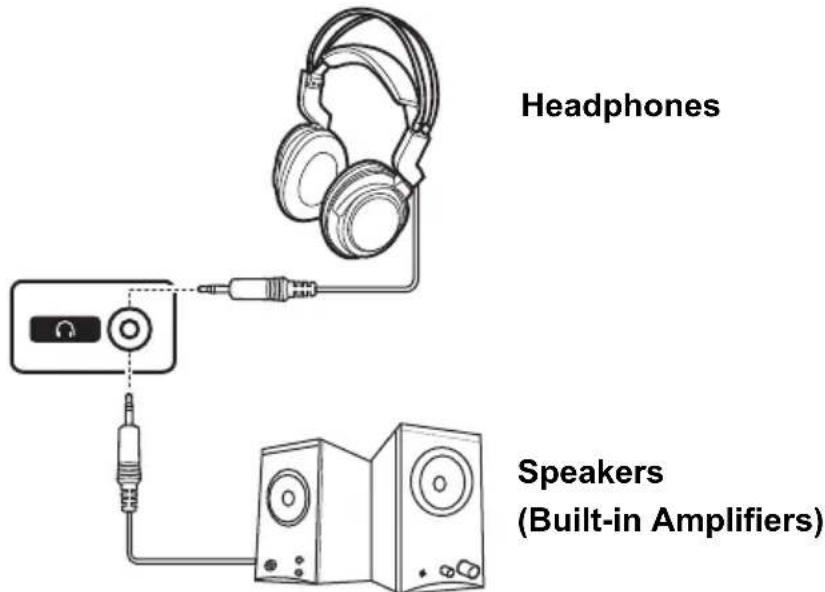
Note:
- External speakers or headphones are not included with the TV.
- The internal TV speakers will not output sound when headphones are plugged in.
- Use external speakers with built-in amplifiers only.
- Only one external device for sound can be connected at a time.
2.2.2 Connecting to AV Devices
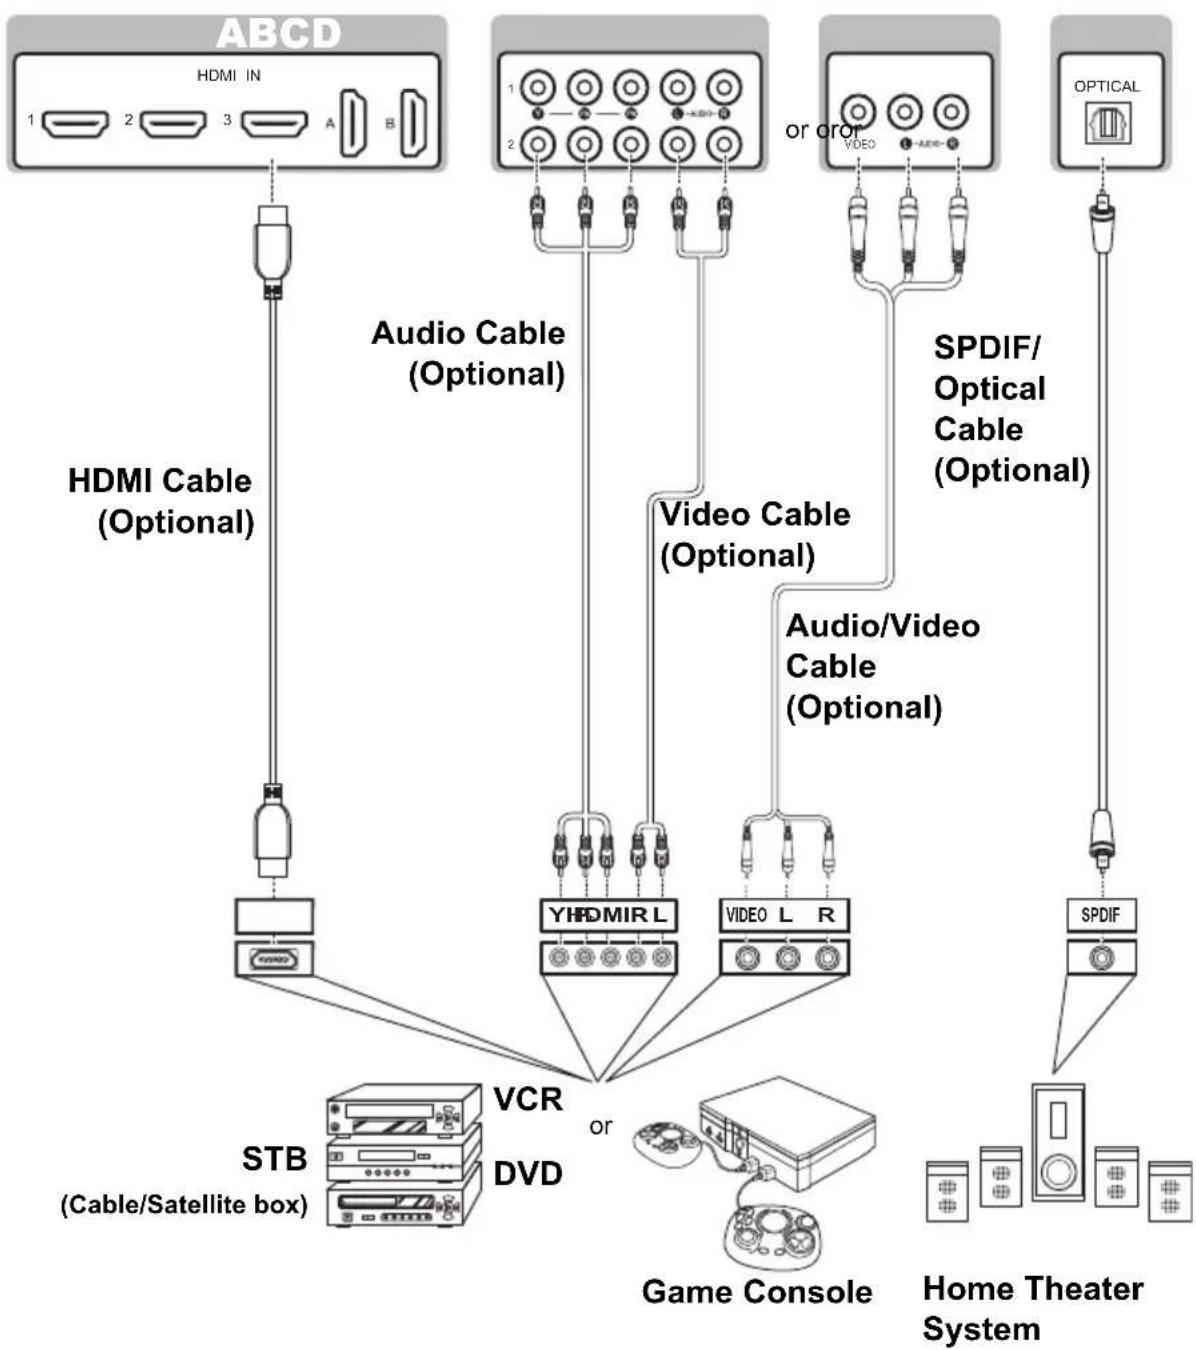
flowchart
graph TD
    A["ABCD"] --> B["HDMI IN 1-3 HDM"]
    B --> C["+"]
    C --> D["+"]
    D --> E["+"]
    E --> F["+"]
    F --> G["+"]
    G --> H["+"]
    H --> I["+"]
    I --> J["+"]
    J --> K["+"]
    K --> L["+"]
    L --> M["+"]
    M --> N["+"]
    N --> O["+"]
    O --> P["+"]
    P --> Q["+"]
    Q --> R["+"]
    R --> S["+"]
    S --> T["+"]
    T --> U["+"]
    U --> V["+"]
    V --> W["+"]
    W --> X["+"]
    X --> Y["+"]
    Y --> Z["+"]
    Z --> AA["+"]
    AA --> AB["+"]
    AB --> AC["+"]
    AC --> AD["+"]
    AD --> AE["+"]
    AE --> AF["+"]
    AF --> AG["+"]
    AG --> AH["+"]
    AH --> AI["+"]
    AI --> AJ["+"]
    AJ --> AK["+"]
    AK --> AL["+"]
    AL --> AM["+"]
    AM --> AN["+"]
    AN --> AO["+"]
    AO --> AP["+"]
    AP --> AQ["+"]
    AQ --> AR["+"]
    AR --> AS["+"]
    AS --> AT["+"]
    AT --> AU["+"]
    AU --> AV["+"]
    AV --> AW["+"]
    AW --> AX["+"]
    AX --> AY["+"]
    AY --> AZ["+"]
    AZ --> BA["+"]
    BA --> BB["+"]
    BB --> BC["+"]
    BC --> BD["+"]
    BD --> BE["+"]
    BE --> BF["+"]
    BF --> BG["+"]
    BG --> BH["+"]
    BH --> BI["+"]
    BI --> BJ["+"]
    BJ --> BK["+"]
    BK --> BL["+"]
    BL --> BM["+"]
    BM --> BN["+"]
    BN --> BO["+"]
    BO --> BP["+"]
    BP --> BQ["+"]
    BQ --> BR["+"]
    BR --> BS["+"]
    BS --> BT["+"]
    BT --> BU["+"]
    BU --> BV["+"]
    BV --> BW["+"]
    BW --> BX["+"]
    BX --> BY["+"]
    BY --> BZ["+"]
    BZ --> CA["+"]
    CA --> CB["+"]
    CB --> CC["+"]
    CC --> CD["+"]
    CD --> CE["+"]
    CE --> CF["+"]
    CF --> CG["+"]
    CG --> CH["+"]
    CH --> CI["+"]
    CI --> CJ["+"]
    CJ --> CK["+"]
    CK --> CR["+"]
    CR --> CS["+"]
    CS --> CT["+"]
    CT --> CU["+"]
    CU --> CV["+"]
    CV --> CW["+"]
    CW --> CX["+"]
    CX --> CY["+"]
    CY --> CZ["+"]
    CZ --> DA["+"]
    DA --> DB["+"]
    DB --> DC["+"]
    DC --> DV["+"]
2.2.3 Connecting a VCR/ Set-Top Box/ DVD Player Using Video Inputs
Connect the TV to a VCR/ Set-Top Box/ DVD player using the video inputs.
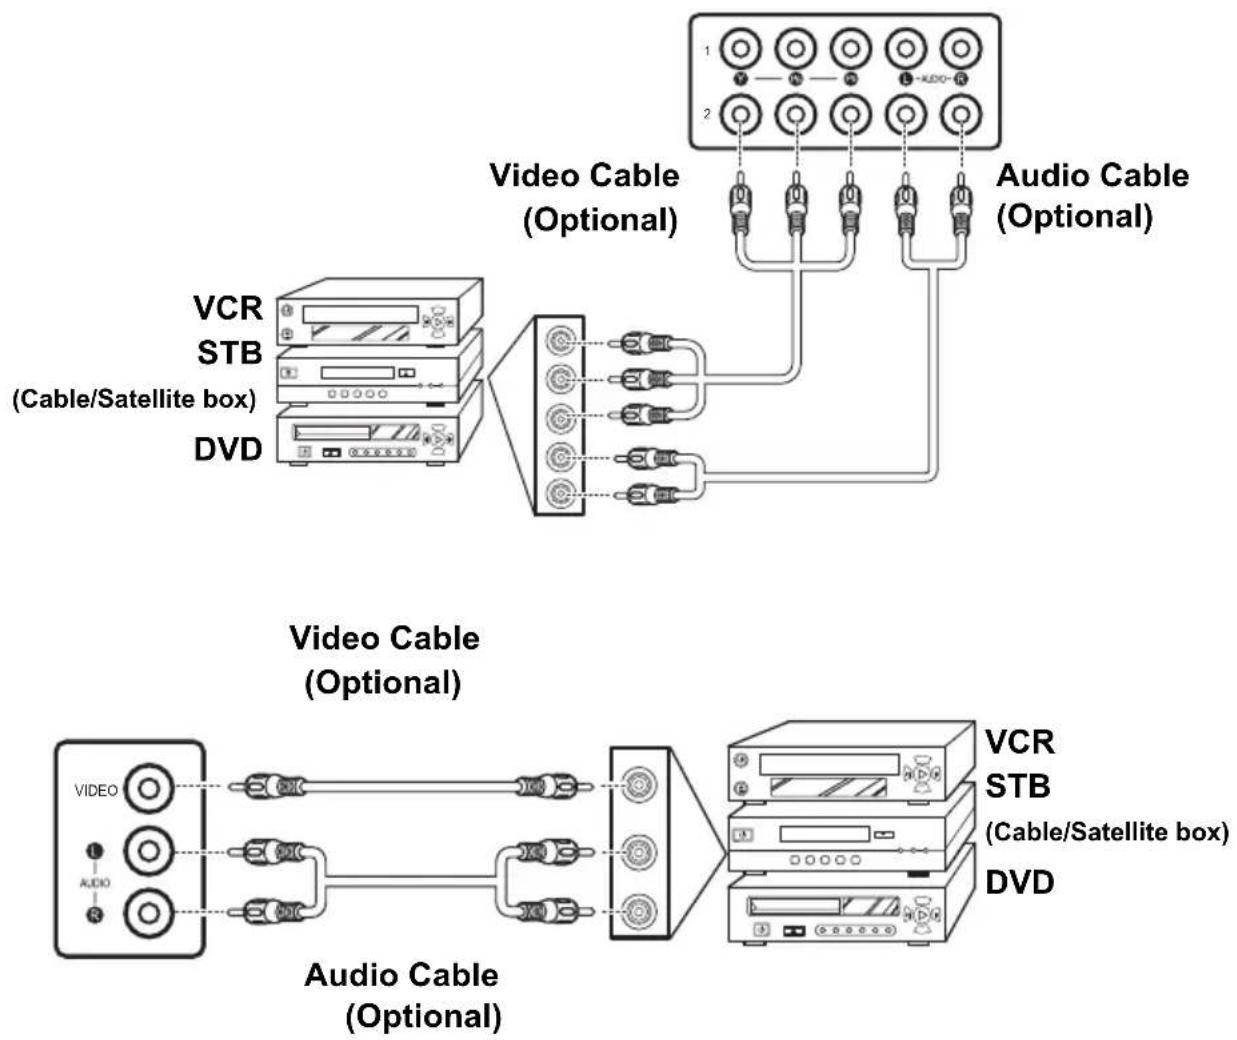
flowchart
graph TD
    A["Video Cable (Optional)"] --> B["Audio Cable (Optional)"]
    C["VCR"] --> D["STB (Cable/Satellite box)"]
    E["DVD"] --> F["Video Cable (Optional)"]
    G["Audio Cable (Optional)"] --> H["Video Cable (Optional)"]
    I["STB (Cable/Satellite box)"] --> J["Video Cable (Optional)"]
    K["DVD"] --> L["Audio Cable (Optional)"]
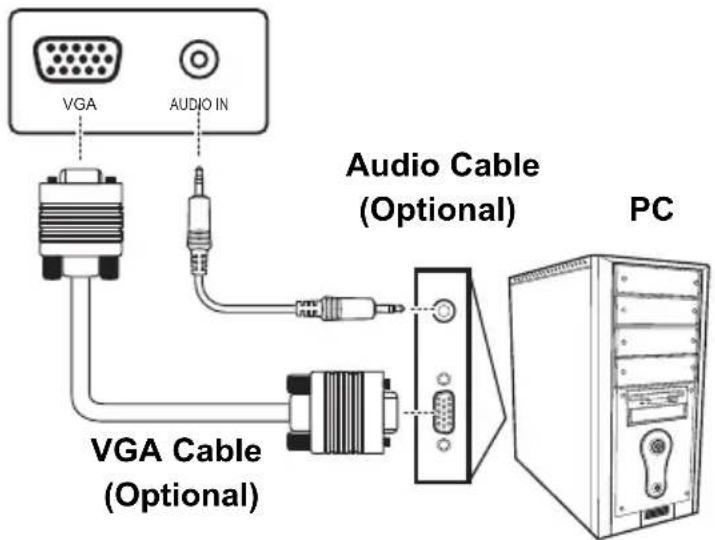
2.2.4 Connecting a PC using VGA
Connect the TV to your PC to use it as the monitor using the VGA port.
1 Connect the VGA port of the TV to the VGA output of the PC.
2 Connect the AUDIO IN of your TV to the line out port of the PC to listen to audio from the PC.
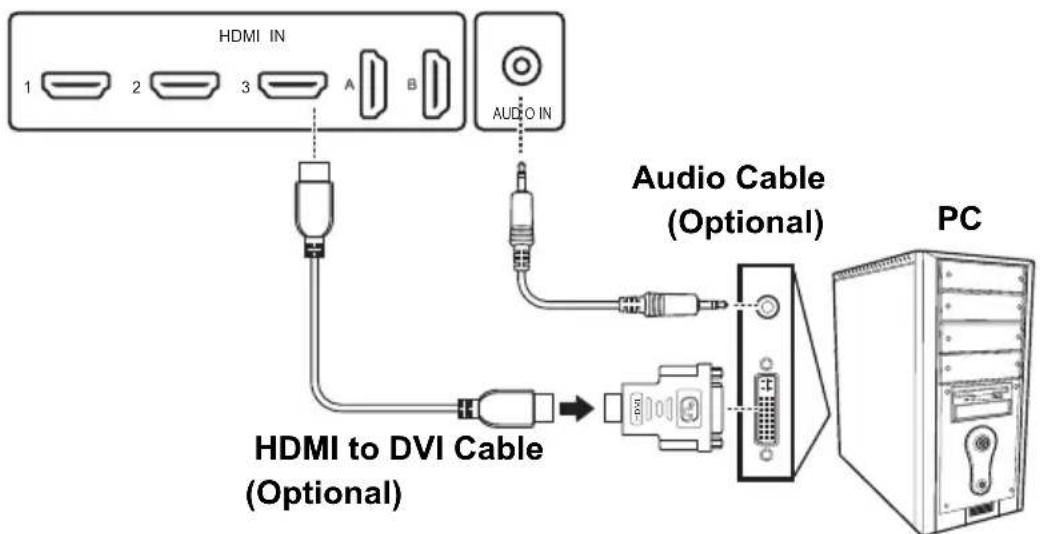
2.2.5 Connecting a PC using DVI
Connect the TV to your PC to use it as the monitor using the DVI port.
1 Connect the HDMI 1 or HDMI 2 port of the TV to the DVI output of the PC.
2 Connect the AUDIO port of your TV to the line out port of the PC to listen to audio from the PC.
2.2.6 Connecting HDMI
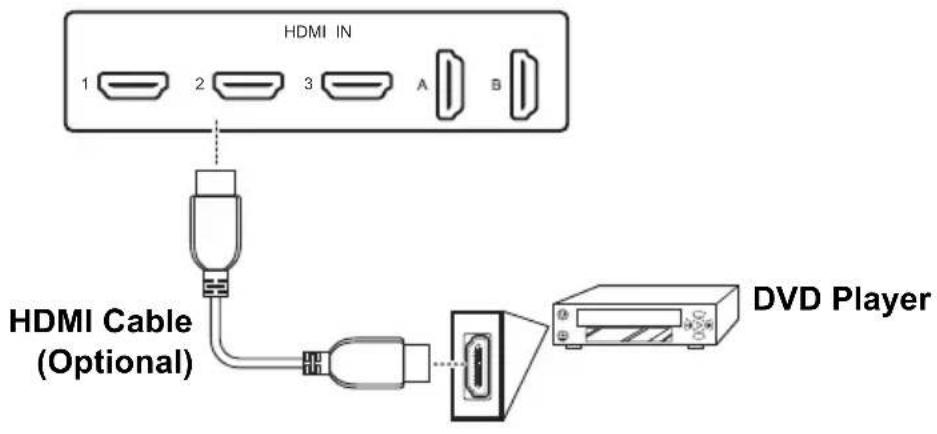
HDMI (High Definition Multimedia Interface) assures that the best video signal is always sent from source to the TV.
Refer to the following illustration to connect an HDMI device to the TV.
Note:
When the HDMI cable is connected, connecting the audio cable is not necessary. However, it is necessary to do so if an HDMI to DVI cable is connected.
2.2.7 Connecting SPDIF
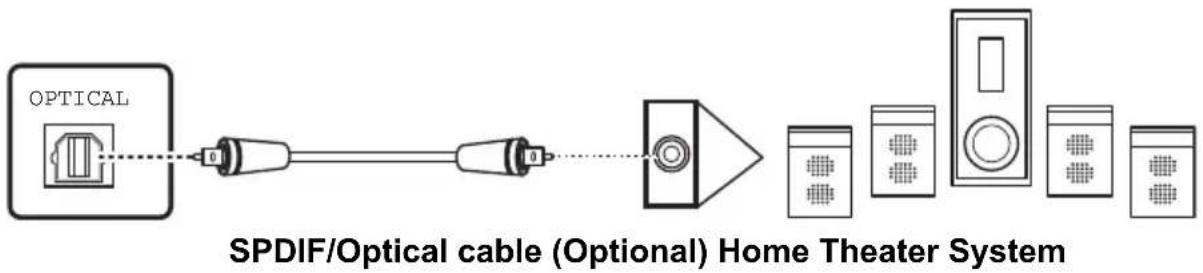
The SPDIF/Optical Digital Audio Output can be used to connect the TV to a sound bar or home theater system that supports Dolby Digital or DTS surround sound.
Refer to the following illustration to connect an SPDIF device to the TV.
flowchart
graph LR
    A["OPTICAL"] --> B["SPDIF/Optical cable (Optional) Home Theater System"]
    B --> C["Power Supply Unit"]
    C --> D["Control Panel"]
    D --> E["Display Control Panel"]
    E --> F["Display Control Panel"]
2.2.8 Connecting USB 2.0
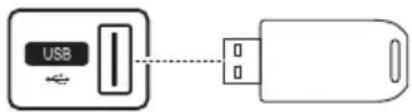
Connect the USB 2.0 flash drive to the TV using the USB port as shown. JPEG, MP3, and Movie files are supported.
Connect the USB 2.0 flash drive to the TV to enjoy the PVR (Personal Video Recording) feature. Please refer to page 31 for PVR operation steps.
USB 2.0 Flash Drive (Optional)
Supported Movie Formats
| File Format | Video Codec | Maximum Video Resolution | Audio Codec | Note |
| .avi | MPEG I/II 720 x 480 | MPEG I/II PCM/ADPCM AC3 AAC | AAC Code only support object type = 2(LC), 5(SBR), 29(PS) | |
| MPEG 4 1920 x 1080 | ||||
| H.264/AVC 1280x720 | ||||
| XviD 1920x1080 | ||||
| .mpeg .mpg .vob .dat | MPEG I/II 1920 x 1080 | MPEG I/II PCM AC3 | ||
| .mkv | MPEG I/II 1920x1080 | MPEG I/II AC3 AAC | AAC Code only support object type = 2(LC), 5(SBR), 29(PS) | |
| MPEG 4 1920x1080 | ||||
| H.264/AVC 1920x1080 | ||||
| XviD 1024 x 756 | ||||
| .mp4 | MPEG 4H.264/AVC | 1920 x 1080 AAC | AAC Code only support object type = 2(LC), 5(SBR), 29(PS) | |
| .ts.tp.trp | MPEG I/IIIH.264/AVC | 1920 x 1080 | MPEG I/IIAAC3AAC | AAC Code only support object type = 2(LC), 5(SBR), 29(PS) |
2.3 Using the TV
2.3.1 Turning the TV On and Off
1 Press on the control panel or remote control. The power LED indicator on the TV changes from amber to blue, indicating that the TV is on.
2 Press ⏻ again. The power LED changes from blue to amber, indicating that the TV is off.
2.3.2 Setup Wizard
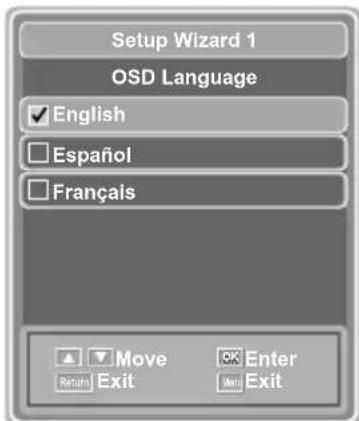
When turning on the TV for the first time, the Setup Wizard is displayed to guide you through the basic configuration of the TV.
1 Press / on the remote control to set the OSD Language. The available options are: English, Español, and Français. Press OK to confirm your selection.
2 Press / on the remote control to set the environment. The available options are: Home and Store. Press OK to confirm your selection.
3 Press / on the remote control to set the Time Zone. The available options are: Eastern, Central, Mountain, Pacific, Alaska, and Hawaii. Press OK to confirm your selection.
4 Press / on the remote control to set the TV RF Source. The available options are: Air and Cable. Press OK to confirm your selection.
5 Press OK on the remote control to start the channel scan. After completion, the TV automatically switches to the first channel found.
2.3.3 Switching Source Signals
Press INPUT on the control panel or remote control to select the incoming signal source to suit your need. Press OK to confirm.
2.3.4 Performing an Automatic Channel Search
Before using the TV to view programs, you need to activate the channel search first if you skip the channel scan in Setup Wizard (see "Setup Wizard" on page 29).
1 Press MENU on the control panel or remote control, then select to enter the Channel menu.
2 Select Antenna to set the signal source to Air or Cable.
3 Select Scan Mode to set the search mode to Auto (scan all channels), Analog (analog channels only), or Digital (digital channels only).
4 Select Auto Scan, and if Cable is selected in the Antenna option, set the analog channel system to Auto, Standard, HRC, or IRC.
5 Select Start and press OK to perform the channel search. The Scanning Message will be shown. After completion, the screen will switch to the first channel found.
2.3.5 Selecting Channels
- Press on the control panel or on the remote control to increase the channel number.
- Press on the control panel or on the remote control to decrease the channel number.
- Enter the specific channel number by pressing the number keys on the remote control.
2.3.6 Adjusting the Volume
1 Press VOL+/VOL- on the control panel or +VOL/- on the remote control to increase/decrease the volume.
MUTE
2 Press to mute sounds, and press again press the volume buttons to restore the original volume.
2.3.7 Editing the Channel List
1 Press MENU on the control panel or remote control, then select to enter the Channel menu.
2 Select Channel List to edit the Channel List.
3 To show/hide a channel from the Channel List, select the channel and S, then press OK to check/uncheck the channel.
2.3.8 Setting the Favorite Channels
1 Press MENU on the control panel or remote control, then select to enter the Channel menu.
2 Select Channel List to edit the Channel List.
3 To add/remove a channel to/from the Favorite List, select the channel and F, then press OK to check/uncheck the channel.
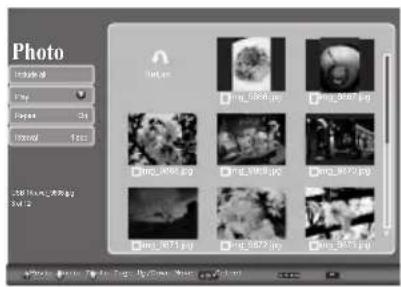
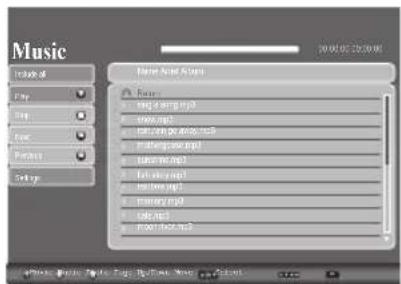
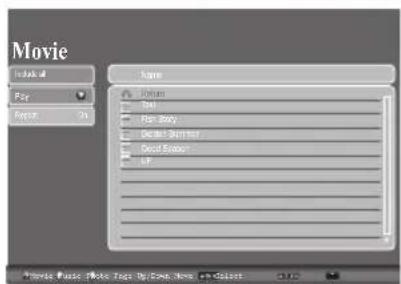
2.3.9 Viewing Images and Playing Music
1 Insert the USB 2.0 flash drive into the USB port.
2 Press INPUT on the remote control to enter the Multimedia screen.
3 Press 1/2/3 on the remote control to select Movie/Music/Photo.
4 Use /ʌ/ /to select a folder (if any) and press OK to open the folder.
5 Use / ∧ / √ to select the desired video, audio or image file.
6 Press OK to view the image or play the music/movie. Use the playback keys on the remote control to play the selected video/audio file.
(Please refer to page 27 for supported movie formats.)
2.3.10 Performing PVR (Personal Video Recording)
The PVR function enables you to capture and playback video to and from the USB 2.0 flash drive.
Important facts:
- Recording function is available for DTV programs only.
- USB 2.0 flash drive is required for recording.
- PVR will stop recording when the USB storage space is full or no TV signal received.
- Record: While viewing DTV programs, press
Record ☑ on the remote control to start recording and save the video in PVR list. Press Stop ☑ stop recording.
to
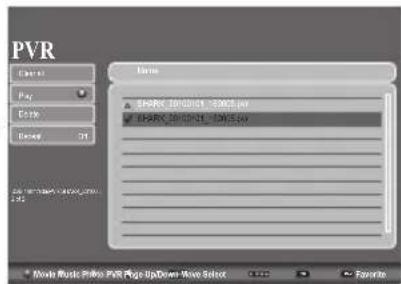
- Playback: While viewing DTV program, press Play
▶ on the remote control to display PVR playlist window. -OR- Select USB Source and press 4 to enter PVR playlist window. Press OK or Play ▶ to playback the selected file. Press Stop or Return to stop playback and return to playlist window.
- Delete: Press FAV on the remote control to select the files you want to delete. Select Delete to remove the recorded file. Select Include All to check all files, then select Delete to remove all recorded files. To uncheck all files, select Clear All.
![PVR Include all Play Paste Focus Off Name • PVR_PVR_00/00/01_1500.2.pvr • PVR_PVR_00/00/01_1500.2.pvr Movie Music Picture PVR Page Up/Down Movie Select [OK]](/content/2026/05/1055347/images/f8b24e456e0666c6b1f5c22466d95a78d50746057a5a59062ec06b0e3577f28c.jpg)
Note:
The PVR function records about 1.2 MB file size per second (depending on the broadcasting program quality and resolution). Total recordable file size is decided by the storage space of the connected USB 2.0 device. The resolution of the program source determines that of the recorded files.
3 Adjusting On-Screen Display (OSD) Settings
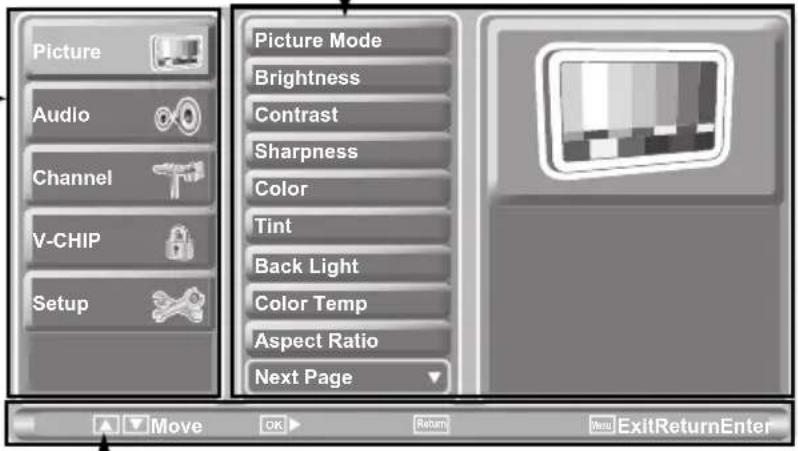
The On-Screen Display (OSD) menu provides a quick and simple method to adjust the TV settings. The OSD menu can be accessed through the buttons either on the control panel or the remote control.
ADJUSTABLE ITEMS:
Displays the settings/ values of the adjustable items.
MAIN MENU:
Displays a list of menu items. The chosen item is marked by a different color than other menu items.
INSTRUCTIONS:
Quick instructions for adjusting the settings.
| Function TV Control Panel Remote Control | ||
| OSD Menu MENU | MENU | |
| Up | CH ^ | Arrow ^ |
| Down | CH √ | Arrow √ |
| Increase | VOL + | Arrow > |
| Decrease VOL - | Arrow < | |
| Select INPUT/ VOL+ | OK/ Arrow > | |
| Return MENU/ VOL- | RETURN | |
3.1 OSD Setting Menus
Follow the instructions indicated on the bottom of the screen. Press ON the control panel or Arrow keys on the remote control to scroll through the menus. Press INPUT on the control panel or OK key on the remote control to select an item. Press MENU to exit the OSD menu.
3.2 Adjusting Picture Settings
1 Press MENU to enter the OSD Main Menu screen.
2 Press / on the remote control to select Picture menu.
3 Press > / OK on the remote control to enter the Picture menu.
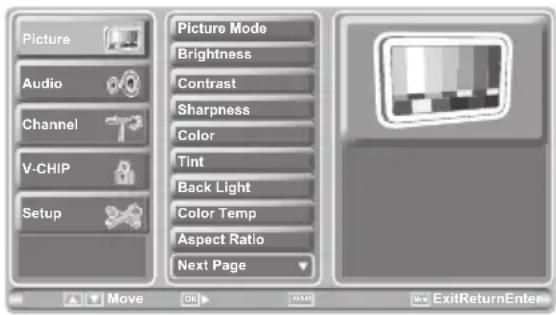
4 Press / on the remote control to select an item.
5 Press > / OK on the remote control to enter the item.
6 Press < / > on the remote control to change the scales or press ∧ / ∨ to select the desired option. Press OK on the remote control to confirm.
7 Press RETURN to return to the Picture menu.
8 Press MENU to exit the Picture menu.
9 The Picture menu can be used to adjust the Picture Mode, Brightness, Contrast, Sharpness, Color, Tint, Back Light, Color Temp, Aspect Ratio, Light Sensor, X-Contrast, Digital NR, Vivid Motion (SV42LMUB only), and Recall settings. Brightness, Contrast, Sharpness, Color, and Tint are only available for adjustments if you select User in Picture Mode. Press < / > on the remote control or VOL+/VOL- on the control panel to adjust these settings.
- The Picture Mode can be set to Vivid, Standard, Movie, or User.
- Press ◀ on the remote control to move the scale in the Back Light settings.
• Color Temp can be set to Warm, Standard, or Cool. - Aspect Ratio can be set to Full, Normal, Zoom, Subtitle, Auto.
• Light Sensor can be set to Off or On.
• X-Contrast can be set to Off or On. -
Digital NR can be set to Off, Weak, Medium, or Strong.
-
Vivid Motion can be set to Off or On.
- Recall can be used to reset the original factory settings.
Note:
The items available on the OSD may vary depending on the input signal source.
3.3 Adjusting Audio Settings
1 Press MENU to enter the OSD Main Menu screen.
2 Press / on the remote control to select Audio menu.
3 Press > / OK on the remote control to enter the Audio menu.
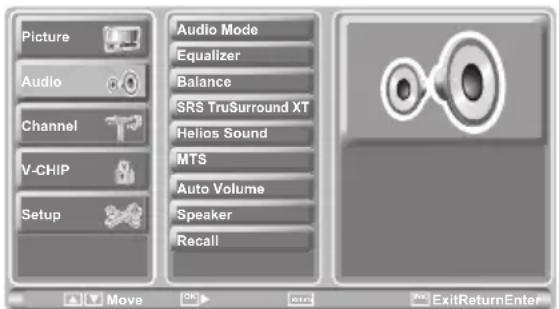
4 Press / on the remote control to select an item.
5 Press > / OK on the remote control to enter the item.
6 Press < / > on the remote control to change the scales or press ∧ / ∨ to select the desired option. Press OK on the remote control to confirm.
7 Press RETURN to return to the Audio menu.
8 Press MENU to exit the Audio menu.
9 The Audio menu can be used to adjust the Audio Mode, Equalizer, Balance, SRS TruSurround XT, Helios Sound, MTS (ATV only), Auto Volume (ATV only), Speaker, and Recall settings. Equalizer is available for adjustment only if you select User in Audio Mode.
- Audio Mode can be set to Dynamic, Standard, Soft, or User.
- Press on the remote control to adjust the scales in Equalizer and Balance.
- SRS TruSurround XT can be set to Off or On.
- Helios Sound can be set to Off or On.
- MTS can be set to Stereo, Mono, or SAP.
•Auto Volume can be set to Off or On.
- Speaker can be set to Off or On.
- Recall can be used to reset the original factory settings.
Note:
- The items available on the OSD may vary depending on the input signal source.
- HELIOS Sound makes individual sounds clearer and lifts the sound position up.
- SRS TruSurround XT creates surround sound effect from only two speakers, providing rich bass and clear vocals.
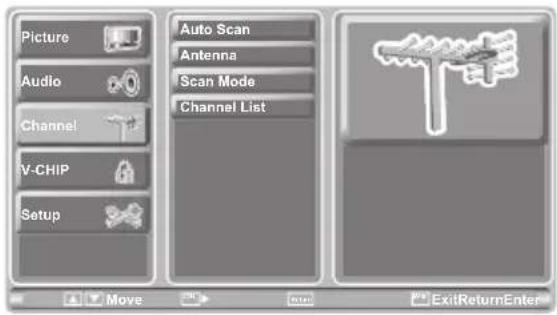
3.4 Adjusting Channel Settings
1 Press MENU to enter the OSD Main Menu screen.
2 Press / on the remote control or CH^ / on the control panel to select Channel menu.
3 Press > / OK on the remote control or INPUT on the control panel to enter the Channel menu.
4 Press / on the remote control or / on the control panel to select an item.
5 Press > / OK on the remote control or INPUT on the control panel to enter the item.
6 Press ∧ / √ to select the desired option. Press OK on the remote control to confirm.
7 Press RETURN to return to the Channel menu.
8 Press MENU to exit the Channel menu.
9 The Channel menu can be used to perform a channel search and edit channel list (see "Performing an Automatic Channel Search" on page 29 and "Editing the Channel List" on page 30).
- Antenna can be set to Air or Cable.
- Scan Mode can be set to Auto, Analog, or Digital.
•Auto Scan can be set to Auto, Standard, HRC, or IRC (under Cable mode only).
Note:
The Channel settings are available when the signal is set to TV source.
3.5 Adjusting V-CHIP Settings
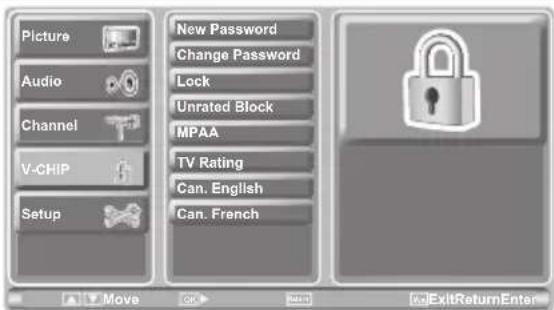
1 Press MENU to enter the OSD Main Menu screen.
2 Press / on the remote control or CH / on the control panel to select V-CHIP menu.
3 Press > / OK on the remote control or INPUT on the control panel to enter the V-CHIP menu.
4 Enter the password to activate the menu of V-CHIP.
5 Press / on the remote control or / on the control panel to select an item.
6 Press > / OK on the remote control or INPUT on the control panel to enter the item.
7 Press OK on the remote control or INPUT on the control panel to confirm.
8 Press RETURN to return to the V-CHIP menu.
9 Press MENU to exit the V-CHIP menu.
10 The V-CHIP menu can used to adjust Enter Password, Change Password, Lock, Unrated Block, MPAA, TV Rating, Can. English, and Can. French settings.
3.6 Adjusting Setup Settings
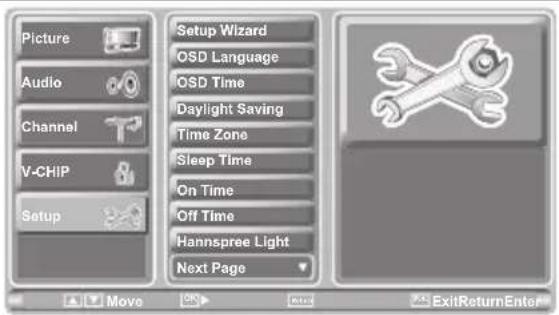
1 Press MENU to enter the OSD Main Menu screen.
2 Press / on the remote control or CH / on the control panel to select Setup menu.
3 Press > / OK on the remote control or INPUT on the control panel to enter the Setup menu.
4 Press / on the remote control or / on the control panel to select an item.
5 Press > / OK on the remote control or INPUT on the control panel to enter the item.
6 Press < / > on the remote control or VOL+/VOL- on the control panel to change the scales or press / to select the desired option. Press OK on the remote control to confirm.
7 Press RETURN to return to the Setup menu.
8 Press MENU to exit the Setup menu.
9 The Setup menu can be used to adjust the Setup Wizard, OSD Language, OSD Time, Daylight Saving, Time Zone, On Time, Off Time, Hannspree Light, Melody, CC Mode, and Analog CC settings.
- Setup Wizard can be used to set up OSD Language, Clock Mode, Time Zone, TV RF Source, and channel scan.
• The available OSD languages are: English, Español, and Français. - OSD Time can be set to 10 secs, 20 secs, 30 secs, or 60 secs.
• Daylight Saving can be set to Off or On. - Time Zone can be set to Eastern, Central, Mountain, Pacific, Alaska, or Hawaii.
- Hannspree Light can be set to Off, Low, Medium, or High.
- Melody can be set to Off or On.
- CC Mode can be set to CC Off, CC on, or On Mute.
- Analog CC can be set to CC1, CC2, CC3, CC4, Text1, Text2, Text3, or Text4.
Note:
The items available on the OSD may vary depending on the input signal source.
3.7 Adjusting PC Settings
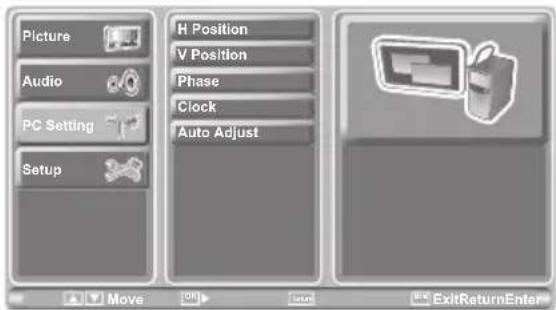
1 Press INPUT on the remote control to select PC as the input source.
2 Press MENU to enter the OSD Main Menu screen.
3 Press / on the remote control or CH / on the control panel to select Picture menu.
4 Press > / OK on the remote control or INPUT on the control panel to enter the PC Settings menu.
5 Press / on the remote control or / on the control panel to select an item.
6 Press > / OK on the remote control or INPUT on the control panel to enter the item.
7 Press < / > on the remote control or VOL+/VOL- on the control panel to change the scales or press / to select the desired option. Press OK on the remote control to confirm.
8 Press RETURN to return to the PC Settings menu.
9 Press MENU to exit the PC Settings menu.
10 The PC Settings menu can be used to adjust the H Position, V Position, Phase, Clock, and Auto Adjust settings.
Note:
The items available on the OSD may vary depending on the input signal source.
Troubleshooting
Situation Solution
| No picture and sound. | Connect the power cord properly.Check if the power LED is on or not.Press on the control panel or remote control.p r e s s INPUT to cycle through connected video sound.Press channel up or channel down to switch to other TV channels.Make sure all cables are connected properly. |
| No picture, or poor picture, sound is OK. | Check the antenna and cable connections.Adjust the brightness in the OSD menus. |
| Picture is not in color. • Adjust the saturation in the OSD menus. | |
| Picture is OK, no sound. | Make sure the source device is functioning properly.Make sure the audio cable is connected securely.Turn the mute off.Press volume up on the control panel or remote control. |
| One of the speakers has no sound. | Adjust the balance in the OSD Audio menu. |
| Cannot receive some TV channels using cable TV. | Try the Auto Scan function in the OSD TV menu. |
| Want to reset TV settings. • Use the Setup Wizard function in the OSD Setup menu. | |
| Cannot operate menus. | If OSD items are colored in gray, the system is in a state such that those settings are not available. |
| Screen image turns over. • Make sure the video signal cable is connected properly. | |
| Snow appears on the screen. | Adjust the location of the antenna, placing it far from roads or sources of interference.Check the antenna and the video signal line connections. |
| Blurred or overlapped images. | Adjust the sharpness setting.Choose programs with high quality signals.Adjust the direction of the antenna or change the video signal cable. |
| Remote control doesn't work. | Make sure the battery is inserted correctly.Replace the battery with a new one.Make sure the TV power cord is plugged in securely.Make sure the path between the remote control and the sensor is clear.Try operating the remote control at a closer distance to the TV. |
| SV32AMUB | ||
| LCD Panel Size 31.5 inch TFT | ||
| Screen Format 16:9 | ||
| Panel Resolution 1366 (H) x 768 | (V) | |
| TV System ATV: NTSC DTV: ATSC | C | |
| Video System | HDMI Input x 5 | |
| YPbPr Input x 2 | ||
| Composite Input x 1 | ||
| VGA (PC) Input x 1 | ||
| Tuner Input x 1 | ||
| USB 2.0 (Movie) | ||
| Photo System USB 2.0 (JPEG) | ||
| Audio System | AV: (RCA x 1) R/L in | |
| HDTV: (RCA x 2) R/L in | ||
| HDMI Input x 5 | ||
| SPDIF/Optical Digital Audio Output | ||
| USB 2.0 (MP3) | ||
| PC Audio in: Phone jackAudio out: Earphone jack | ||
| Analog: MTS Digital: Dolby Digital | ||
| Built-in Stereo Amplifier Output 10W+10W | ||
| AC Input 100V~240V / 50Hz~60Hz | ||
| Power Consumption | 55W | |
| Standby Power Consumption < 0.5W | ||
| AC Power Supply 100~240V | ||
| Dimension W x H x D With stand: | 30.9 x 22.6 x 9.4 (inch)Without stand: 30.9 x 20.2 x 1.4 (inch) | |
| Weight 26.01 lbs | ||
SV32AMUB:
PC Mode Support Timing
| Mode | Resolution(active dot) | Horizontal Frequency(KHz) | Vertical Frequency(Hz) | Nominal Pixel Clock(MHz) | Hsync polarity | Vsync polarity | VGA | HDMI DVI | YPbPr |
| VGASVGA | 640x480@60Hz 31. | 469 59.941 25.1 | 75 - - V V - | ||||||
| 800x600@60Hz 37. | 879 60.317 40.0 | 00 + + V V - | |||||||
| XGA 102 | 4x768@60Hz 48.363 60. | .004 65.000 - - V V - | |||||||
| SXGA | 1280x1024@60Hz | 63.981 | 60.020 | 108.000 | + | + | V | V | - |
| VESA | 1366x768@60Hz 47. | 712 59.789 85. | 500 + + V V - |
Video Support Timing
| Mode | Resolution (active dot) | HDMI/DVI YPbPr | |
| Video | 640x480p@60Hz | V | |
| Video | 720x480i@60Hz | V | |
| Video | 720x480p@60Hz | V | V |
| Video | 1280x720p@60Hz | V | V |
| Video 19 | 20x1080i@60Hz V | V | |
| Video | 1920x1080p@60Hz | V | V |
| Video | 1920x1080p@24Hz | V | |
6.1 Introduction
The electronic equipment type switch buttons are used for switching the current electronic equipment type on the remote control.
The remote control includes 4 electronic equipment types: DVD, AUDIO, CABLE and TV.
The remote control keypad matrix includes 4 electronic equipment type switch buttons (DVD, AUDIO, CABLE and TV). If switching the current electronic equipment is desired, just press the button of the electronic equipment type you wish to switch to, e.g., press the TV button for TV; the corresponding indicator light then comes on for 2 seconds then it goes off after, and now the current electronic equipment mode has been switched to TV.
6.1.1 Setting Program Codes
Electronic equipment code setting mode is used for setting electronic equipment codes for various types of electronic equipment. Electronic equipment codes are 4 digits. Electronic equipment codes can be looked up in the electronic equipment code list of the appendix.
Electronic equipment code setting mode has the following operating procedures:
- Select a 4-digit code from the list (start from the first code if more than one).
- Select the desired corresponding mode of electronic equipment type; for example, DVD players.
- Press DVD button. The indicator light will come on for 2 seconds then it goes off; after 3 seconds, the indicator light will come on again, showing that the setting mode has been entered.
- Hold the electronic equipment button, while pressing digit keys corresponding to the electronic equipment code in sequence. The indicator light will flash once each time when a digit was inputted, and if the indicator light does not come on again after going off, the input code is valid; if the indicator light comes on again after going off for 2 seconds, the code is invalid, and users will be prompted to input other electronic equipment codes.
-
During the setting process, releasing the electronic equipment button exits the setting mode immediately without changing the status prior to setting.
-
During the setting process, only digit keys '0' through '9' are valid inputs, while other buttons are deemed invalid and do not affect the code setting. For example, inputting "02" then pressing RETURN does affect the "02" already input.
6.1.2 Searching Codes
If the desired electronic equipment code for setting can not be found on the list in the appendix, try to use the code-searching function with operating procedures as follows:
- Press the corresponding electronic equipment button. The indicator light will come on for 2 seconds then it goes off; after 3 seconds, the indicator light will come on again, showing that the setting mode has been entered.
- Hold the electronic equipment button while pressing POWER, then input mode codes 9-9-9 in sequence. If the indicator light does not come on again after going off, the code setting is valid; otherwise the indicator light comes on again after going off for 6 seconds, prompting user to re-enter mode codes.
- If setting is successful, the electronic equipment code-searching state is entered upon releasing the electronic equipment button. The POWER signal of all manufacturers' codes under the current electronic equipment mode is then transmitted automatically every 5 seconds.
- During search, the indicator light will flash when the POWER signal of each electronic equipment is transmitted. When one cycle of code-searching is complete, the indicator light will come on for 6 seconds before going off, exiting search mode automatically.
- Pressing CH+/CH- during search transmits the next/previous electronic equipment POWER signal without waiting for 5 seconds, and resets the timer to trigger another 5 seconds interval.
- Pressing POWER during search exits search mode without saving the new electronic equipment code; pressing OK during search saves the most recently searched electronic equipment code and then exits search mode.
- Buttons other than POWER, OK, and CH+/CH- are not functional during search.
6.1.3 Setting Volume Lock
Operating procedures are as follows:
- Press the corresponding electronic equipment button. The indicator light will come on for 2 seconds then it goes off; after 3 seconds, the indicator light will come on again, showing that the setting mode has been entered.
- While holding the electronic equipment button, press VOL+ twice consecutively to assign volume lock to that electronic equipment (meaning the volume buttons will only transmit code values to the assigned electronic equipment even under other electronic equipment modes). The indicator light then goes off and setting mode is exited.
- While holding the electronic equipment button, press VOL- twice consecutively to cancel volume lock under current mode (for example, if volume lock was set under TV mode and you wish to transmit code values under current DVD mode, just perform this unlock operation, while those electronic equipment modes not operated still have volume locked up). The indicator light then goes off and setting mode is exited.
- During the setting process, releasing the electronic equipment button exits the setting mode immediately without changing the status prior to setting.
- Buttons other than VOL+/VOL- are not functional during search. Volume buttons include VOL+, VOL- and MUTE.
6.1.4 Setting Channel Lock
Operating procedures are as follows:
- Press the corresponding electronic equipment button. The indicator light will come on for 2 seconds then it goes off; after 3 seconds, the indicator light will come on again, showing that the setting mode has been entered.
- While holding the electronic equipment button, press CH+ twice consecutively to assign channel lock to that electronic equipment (meaning the channel buttons will only transmit code values to the assigned electronic equipment even under other electronic equipment modes). The indicator light then goes off and setting mode is exited.
-
While holding the electronic equipment button, press CH- twice consecutively to cancel channel lock under current mode (for example, if channel lock was set under TV mode and you wish to transmit code values under current CABLE mode, just perform this unlock operation, while those electronic equipment modes not so operated still have channel locked up). The indicator light then goes off and setting mode is exited.
-
During the setting process, releasing the electronic equipment button exits the setting mode immediately without changing the status prior to setting.
- Buttons other than CH+/CH- are not functional during search. Channel buttons include CH+ and CH-.
6.1.5 Factory Setting Mode
Factory setting operation procedures are as follows:
- Press the corresponding electronic equipment button. The indicator light will come on for 2 seconds then it goes off; after 3 seconds, the indicator light will come on again, showing setting mode has been entered.
- While holding the electronic equipment button, first press < (left arrow), then press OK. The indicator then goes off and setting mode is exited, showing factory setting has been restored.
- During the setting process, releasing the electronic equipment button exits the setting mode immediately without changing the status prior to setting.
- Pressing any of the electronic equipment buttons to enter factory setting operation mode.
- The default current electronic equipment is TV upon first power-on.
| Electronic equipment | Code Note | |
| TV 1001 | Provided by manufacturer | |
| CABLE -- Transmit TV code | ||
| AUDIO -- Transmit TV code | ||
| DVD -- Transmit TV code | ||
- Default volume lock setting:
| Electronic equipment | VOL+, VOL- and Mute Note | |
| TV Transmit TV code | Provided by manufacturer | |
| CABLE Transmit CABLE code Unlocked | ||
| AUDIO Transmit AUDIO code Unlocked | ||
| DVD Transmit DVD code Unlocked | ||
- Default channel lock setting:
| Electronic equipment | CH+ and CH- Note | |
| TV Transmit TV code | Provided by manufacturer | |
| CABLE Transmit CABLE code Unlocked | ||
| AUDIO Transmit AUDIO code Unlocked | ||
| DVD Transmit DVD code Unlocked | ||
Note:
Each re-powering restores factory setting, and all electronic equipment modes transmit TV-mode infrared (IR) signal until being set up through code setting. For example, setting the electronic equipment code of CABLE as '0001' stops transmitting TV code, whereas AUDIO and DVD continue to transmit TV code.
6.1.6 Description
There is no multi-function code setting operation under TV mode but a fixed code for the TV manufacturer. Therefore, code setting and code-searching functions are disabled under this mode; other functions such as volume lock, channel lock and code display are operable.
6.2 Other Descriptions
6.2.1 Double Clicking
At any time, only when a single button is pressed, the corresponding code is just output. Two or more buttons simultaneously pressed do not output any code.
6.2.2 Buttons Information
Except TV equipment, all the buttons on remote controls corresponding to other electronic equipments (AUDIO, CABLE, and DVD) are not necessarily functional, but most of those remote controls only include power control, channel control, volume control, etc.
6.2.3 Power-out Protection Capability
During battery replacement, all settings are only maintained by external capacitors. Data therefore may be lost after power-out, and factory setting will be restored.
6.3 Component Program Codes
| Setup Code for VCR's | |
| ABC 2102 | |
| Admiral 2012, 2022 | |
| Aiko 2025 | |
| Aiwa 2005, 2027 | |
| Alienware 2102 | |
| America Action | 2025 |
| American High | 2004 |
| Amoisonic 2027 | |
| Anam | 2020, 2005, 2024, 2025 |
| Anam National | 2020 |
| Asha 2024 | |
| Audiovox 2005, 2025 | |
| Beaumark 2024 | |
| Bell & Howell | 2017 |
| Broksonic | 2021, 2018, 2022, 2001, 2027 |
| Calix 2005 | |
| Cannon 2004 | |
| Carver 2016 | |
| CCE 2015, 2025 | |
| Changhong | 2012, 2016 |
| Citizen | 2005, 2025 |
| Colt | 2015 |
| Setup Code for VCR's | |
| Craig | 2005, 2011, 2024, 2015 |
| Curtis Mathes | 2913, 2004, 2020 |
| Cybernex | 2024 |
| CyberPower 2102 | |
| Daewoo | 2010, 2017, 2025 |
| Dell | 2102 |
| Denon | 2008 |
| Direc TV | 2059 |
| Durabrand 2007 | 2006 |
| Electrohome | 2005 |
| Electrophonic | 2005 |
| Emerex 2002 | |
| Emerson | 2004, 2005, 2021, 2024, 2010, 2018, 2009, 2022, 2001, 2025, 2027 |
| Fisher | 2011, 2017 |
| Fuji | 2004, 2003 |
| Fujitsu | 2010 |
| Gateway | 2102 |
| GE | 2013, 2004, 2024 |
| General 2010 | |
| Go Video | 2026 |
| Setup Code for VCR's | |
| GoldStar | 2005, 2022, 2006, 2023 |
| HaoJie 2024 | |
| Harman/ Kardon | 2016, 2006 |
| Harwood 2015 | |
| Hewiett Packard | 2102 |
| HI-Q | 2011 |
| Hitachi 2005, 2008 | |
| Howard Computers | 2102 |
| HP | 2102 |
| Hughes Network Systems | 2008, 2059 |
| iBUYPOWER | 2102 |
| JVC | 2010, 2014 |
| KEC | 2005, 2025 |
| Kenwood | 2014, 2006 |
| KLH | 2015 |
| Kodak | 2004, 2005 |
| Kolin | 2009 |
| LG | 2005, 2010, 2008, 2022, 2006 |
| Logik | 2015 |
| LXI | 2005 |
| Magnavox | 2004, 2007, 2016 |
| Magnin 2024 | |
| Marantz 2004, 2016 | |
| Marta 2005 | |
| Matsushita 2004, 2020 | |
| Media Center PC | 2102 |
| MEI 2004 | |
| Memorex | 2004, 2020, 2005, 2012, 2007, 2011, 2024, 2017, 2022, 2027 |
| MGA 2024, 2009 | |
| MGN Technology | 2024 |
| Microsoft 2102 | |
| Mind 2102 | |
| Minolta 2008 | |
| Mitsubishi 2014 | 2009 |
| Motorola 2004, 2012 | |
| MTC 2024 | |
| Multitech 2015 | |
| NEC | 2004, 2005, 2012, 2017, 2014, 2006 |
| Newave 2005 | |
| Nikko 2005 | |
| Noblex 2024 | |
| Northgate | 2102 |
| Setup Code for VCR's | |
| Olympus | 2004 |
| Optimus | 2087, 2020, 2005, 2012, 2017, 2026 |
| Orion | 2021, 2022, 2001, 2027 |
| Panasonic | 2087, 2004, 2020, 2043, 2023 |
| Penney | 2004, 2005, 2024, 2008, 2006 |
| Pentax 2008 | |
| Philco 2004, 2027 | |
| Philips | 2004, 2016, 2059, 2044 |
| Pilot | 2005 |
| Pioneer 2008, 2014 | |
| Polk Audio | 2016 |
| Profitronic | 2024 |
| Proscan | 2013 |
| Protec | 2015 |
| Puslar | 2007 |
| Qisheng | 2013 |
| Quasar | 2004, 2020 |
| Radix | 2005 |
| Randex 2005 | |
| Setup Code for VCR's | |
| RCA | 2013, 2004, 2024, 2008, 2077 |
| Realistic | 2004, 2005, 2012, 2011, 2017 |
| Replay TV | 2043 |
| Runco | 2007 |
| Sampo | 2005, 2012 |
| Samsung | 2024, 2010, 2026 |
| Sanky 2012, | 2007 |
| Sansui | 2014, 2022, 2027 |
| Sanyo | 2011, 2024, 2017 |
| Scolt | 2021, 2010, 2018, 2009 |
| Sears | 2004, 2005, 2011, 2008, 2017 |
| Sharp 2012, | 2022 |
| Shintom | 2015 |
| Shogun | 2024 |
| Singer | 2015 |
| Sonic Blue | 2043 |
| Sony | 2004, 2002, 2003, 2048, 2102 |
| STS | 2008 |
| Sylvania | 2004, 2016, 2009 |
| Tashiko 2005 | |
| Tatung2010, 2014 | |
| Technics 2004, 2020 | |
| Teco | 2004, 205, 2012, 2006 |
| Teknika 2004, 2005 | |
| Tivo | 2048, 2044, 2098, 2059 |
| TMK 2024 | |
| Toshiba | 2010, 2008, 2014, 2009, 2098, 2079, 2102 |
| Totevision 2005, 2024 | |
| Touch2102 | |
| Unitech 2024 | |
| Vector 2010 | |
| Vector Research | 2006 |
| Victor 2014 | |
| Video Concepts | 2010 |
| Videomagic 2005 | |
| Vidosonic 2024 | |
| Wards | 2013, 2004, 2012, 2011, 2016, 2024, 2008, 2015 |
| White Westinghouse | 2022, 2015 |
| Setup Code for VCR's | |
| XR-1000 2004, | 2015 |
| Yamaha 2006 | |
| Setup Code for DVD's | |
| Aiwa 2049 | |
| Akai 2062 | |
| Allegro | 2076 |
| Apex Digital | 2053, 2058, 2067, 2086, 2066, 2084 |
| Blaupunkt | 2058 |
| Blue Parade | 2039 |
| Broksonic | 2055 |
| Changhong | 2046, 2086 |
| CineVision | 2076 |
| Coby 2090 | |
| Curtis Mathes | 2091 |
| CyberHome | 2082, 2081, 2094, 2070, 2093 |
| Daewoo | 2073, 2097, 2076 |
| Denon | 2028 |
| DVD2000 | 2031 |
| Emerson | 2042, 2054 |
| Enterprise | 2042 |
| Funai | 2054 |
| Gateway | 2096, 2088 |
| GE | 2032. 2058 |
| Setup Code for DVD's | |
| Go Video | 2060, 2073, 2092, 2063, 2089, 2076, 2100 |
| Greenhill | 2058 |
| Harman/ Kardon | 2041,2057 |
| Hitachi | 2040, 2052 |
| Hiteker | 2053 |
| Initial 2058 | |
| Integra | 2046 |
| JBL | 2057 |
| JVC | 2038, 2045, 2075 |
| Kenwood | 2028, 2035 |
| KLH | 2085, 2080, 2095 |
| Koss | 2051 |
| Lasonic | 2068 |
| LG | 2042, 2076, 2069 |
| Lite-ON | 2096, 2085 |
| Loewe | 2030 |
| Magnavox | 2029, 2036, 2054 |
| Marantz | 2036 |
| Memorex | 2055 |
| Microsoft | 2032 |
| Mintek | 2058 |
| Mitsubishi | 2099, 2031 |
| Nesa | 2058 |
| Norcent 2078 | |
| Onkyo | 2029, 2046, 2064 |
| Oritron 2051 | |
| Panasonic 2028, 2101 | |
| Philips | 2029, 2036, 2050 |
| Pioneer 2033, 2039 | |
| Polarold 2090, 2086 | |
| Polk Audio 2036 | |
| Portland 2062 | |
| Proscan 2032 | |
| Qwestar 2051 | |
| RCA | 2032, 2039, 2058, 2072 |
| Rio 2076 | |
| Rotel 2045 | |
| Sampo 2061, 2056 | |
| Samsung | 2028, 2040, 2089, 2071 |
| Sansui 2055 | |
| Sanyo 2055 | |
| Sharp 2047, 2061 | |
| Sharper Image | 2093 |
| Sherwood 2062 | |
| Shinco 2058 | |
| Shinsonic 2034 | |
| Sonic Blue 2076, 2092 | |
| Setup Code for DVD's | |
| Sony | 2034, 20864, 2083 |
| SVA 2085 | |
| Sylvania | 2054 |
| Symphonic | 2054 |
| Teac | 2058 |
| Technics | 2028 |
| Theta Digital | 2039 |
| Toshiba 2029, 2055 | |
| V, Inc. | 2019 |
| Urban Concepts | 2029 |
| Xbox | 2032 |
| Yamaha | 2028, 2036, 2037 |
| Zenith | 2029, 2042, 2076 |
| Setup Code for Cable | |
| ABC | 0002, 0003, 0006 |
| Americast | 0039 |
| Bell & Howell | 0006 |
| Bell South | 0039 |
| Clearmaster | 0038 |
| ClearMax 0038 | |
| Coolmax | 0038 |
| Daeryung | 0059, 0037, 0020, 0003 |
| Setup Code for Cable | |
| Digi | 0024 |
| Diector | 0019 |
| Dumont | 0024 |
| Gehua | 0019 |
| General Instrument | 0019, 0033, 0015, 0002, 0006 |
| GoldStar | 0010 |
| Hamlin | 0004, 0014 |
| Hitachi | 0006 |
| Jerrold | 0019, 0033, 0015, 0002, 0005, 0006 |
| KNC 0003 | |
| LG | 0010 |
| Memorex | 0001 |
| Motorola | 0019, 0033, 0015, 0046, 0050 |
| MultiVision | 0005 |
| Pace | 0059, 0012 |
| Panasonic | 0001, 0003, 0008 |
| Panther | 0024 |
| Paragon | 0001 |
| Philips 0017, 0049 | |
| Pioneer | 0059, 0037, 0010, 0022 |
| Pulsar | 0001 |
| Quasar 0001 | |
| RadioShack 0038 | |
| Regal 0016, 0014 | |
| Runco 0001 | |
| Samsung 0001, 0010 | |
| Scientific Atlanta | 0059, 0037, 0020, 0003 |
| Sony 0041 | |
| Starcom 0002, 0006 | |
| Supercable 0015 | |
| Supermax 0038 | |
| Tocom 0005 | |
| Torx0002 | |
| Toshiba 0001 | |
| Trans PX 0015 | |
| Tristar 0038 | |
| TS 0002 | |
| V2 | 0038 |
| Viewmaster | 0038 |
| Vision | 0038 |
| Vortex View | 0038 |
| Zenith | 0001, 0021, 0039 |
| Setup Code for Satellite | |
| AlphaStar | 0030 |
| Chaparral | 0011 |
| Crossdigital | 0043 |
| Setup Code for Satellite | |
| DirecTV | 0018, 0023,0025, 0044,0013, 0029,0057, 0028,0034, 0058,0060, 0043,0007, 0051,0056, 0053,0052, 0042 |
| Dish Network System | 0040, 0031,0054 |
| Dishpro | 0040, 0031,0054 |
| Echostar | 0040, 0031,0054 |
| Expressvu | 0031 |
| GE | 0023 |
| General Instrument | 0036 |
| GOL | 0031 |
| Hisense | 0055 |
| Hitachi | 0034 |
| HTS | 0031 |
| Hughes Network Systems | 0044, 0029,0057, 0053 |
| I-Lo | 0055 |
| JVC | 0031 |
| LG | 0052, 0045 |
| Magnavox | 0028, 0027 |
| Memorex | 0028 |
| Mitsubishi | 0029 |
| Motorola | 0036 |
| Next Level | 0036 |
| Setup Code for Satellite | |
| Panasonic | 0013, 0026 |
| Paysat | 0028 |
| Philips | 0044, 0029, 0057, 0028, 0060, 0027, 0007, 0053 |
| Proscan | 0018, 0023 |
| Proton 0055 | |
| RadioShack | 0036 |
| RCA | 0018, 0023, 0035, 0009, 0051 |
| Samsung | 0047, 0043, 0042 |
| Sony 0025, 0056 | |
| Star Choice | 0036 |
| Tivo | 0044, 0053 |
| Toshiba | 0029, 0057, 0032, 0048 |
| Ultimate TV | 0056, 0051 |
| Uniden | 0028, 0027 |
| US Digital | 0055 |
| USDTV | 0055 |
| Voom | 0036 |
| Zenith 0058 | |
| Setup Code for CD | |
| Aiwa | 3019 |
| Burmester | 3027 |
| California Audio Labs | 3004 |
| Carver 3019, 3022 | |
| Dkk 3001 | |
| DMX Electronics | 3019 |
| Dynamic Bass | 3022 |
| Fisher 3022 | |
| Garrard 3027 | |
| Genexxa 3005 | |
| Harman/ Kardon | 3019, 3020 |
| Hitachi 3005 | |
| Integra 3013 | |
| JVC 3009 | |
| Kenwood | 3030, 3003, 3007, 3006, 3023 |
| Krell 3019 | |
| Linn 3019 | |
| Magnavox 3019 | |
| Marantz | 3030, 3004, 3019 |
| MCS 3004 | |
| Miro 3001 | |
| Mission 3019 | |
| MTC 3027 | |
| NSM 3019 | |
| Onkyo 3013 | |
| Optimus | 3001, 3005, 3007, 3027, 3022 |
| Setup Code for CD | |
| Panasonic | 3004 |
| Parasound | 3027 |
| Philips | 3030, 3019 |
| Pioneer 3038, | 3005 |
| Polk Audio | 3019 |
| Proton | 3019 |
| QED 3019 | |
| Quad | 3004 |
| RCA | 3038, 3005, 3027, 3022, 3008 |
| Realistic | 3027, 3022 |
| Rotel | 3019, 3027 |
| SAE 3019 | |
| Sansui 3019 | |
| Sanyo 3022 | |
| SAST | 3019 |
| Sharp | 3007 |
| Silsonic 3006 | |
| Sonic Frontiers | 3019 |
| Sony | 3028, 3001, 3012 |
| TAG Mclaren | 3019 |
| Tascam 3027 | |
| Teac | 3027 |
| Technics | 3004 |
| Victor | 3009 |
| Wards 3019, 3 | 3008 |
| Setup Code for CD | |
| Yamaha | 3006 |
| Zonda | 3019 |
| Setup Code for Audio Amp's | |
| Bose | 3033 |
| GE | 3011 |
| JVC 3059 | |
| NEC | 3024 |
| Optimus | 3026 |
| Realistic | 3026 |
| Shure | 3024 |
| Sony | 3034 |
| Soundesign | 3011 |
| Victor | 3059 |
| Wards | 3011 |
| Yamaha | 3025, 3016 |
| Setup Code for Audio Amp / Tuner's | |
| ADC | 3029 |
| Aiwa 3052, 3015 | |
| Anam | 3057, 3039 |
| Audiotronic | 3042 |
| Bose | 3043 |
| Capetronic | 3027 |
| Carver 3042 | |
| Denon 3051, 3040 | |
| Fonmix 3051 | |
| Harman/ Kardon | 3014 |
| Hitachi 3047 | |
| Integra 3017 | |
| JBL 3014 | |
| JVC 3010 | |
| Kenwood 3050, 3056 | |
| KLH 3053 | |
| Magnavox | 3042, 3046, 3029 |
| Marantz 3042, 3046 | |
| Onkyo 3035, 3017 | |
| Optimus | 3036, 3029, 3032, 3039 |
| Proscan 3044 | |
| Qisheng 3057 | |
| RCA | 3036, 3057, 3044, 3029, 3039 |
| Silsonic 3021 | |
| Sony | 3037, 3054, 3045, 3058 |
| Soundesign | 3032 |
| Stereophonics | 2025 |
| Sunfire | 3050 |
| Setup Code for Audio Amp / Tuner's | |
| Teac | 3049 |
| Technics | 3043, 3055 |
| Thorens | 3042 |
| Victor 3010 | |
| Wards | 3002 |
| Yamaha | 3021, 3048, 3041 |
7
Setting the TV on the Wall
Appropriate ventilation distances:
Setting up your TV with appropriate ventilation distances. Refer to the illustrations below for the minimal ventilation distances recommended.
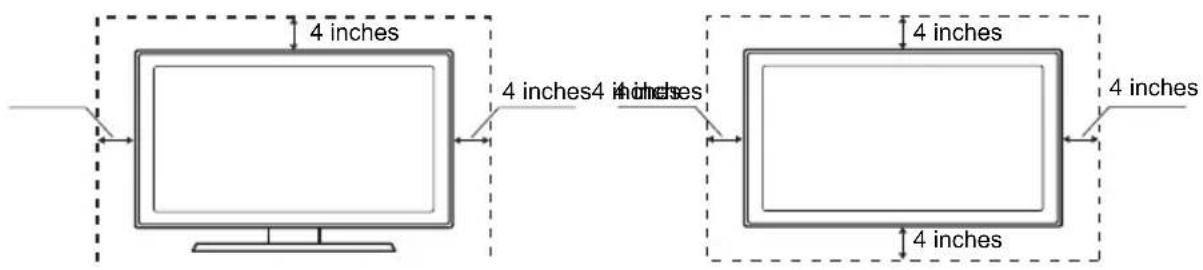
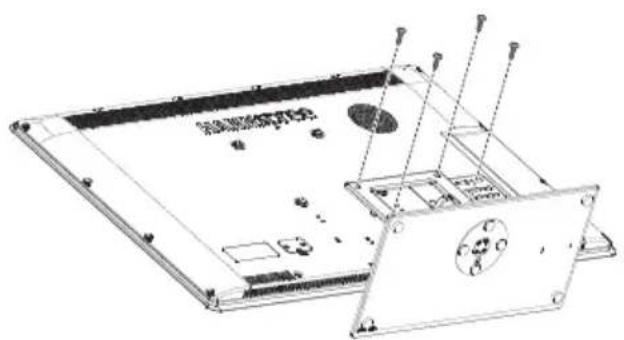
Dissembling the stand base:
1 Disconnect all the cables and cords from the TV to prevent breakage.
2 Carefully place the TV face down on a soft and flat surface (blanket, foam, cloth, etc) to prevent any damage to the TV.
3 Remove the screws so that the stand base can be removed.
4 Gently remove the stand base.
natural_image
Technical line drawing of an electronic device casing with internal components and mounting holes (no text or symbols)(For reference only)
Wall mounting the TV:
| Model | VESA-compatible wall bracket (WxH) | mount holes number | Screw type | Max. loading |
| SV32AMUB 2 | 200*100 mm 4 pcs M6X12 30 kg |
1 Purchase a VESA compatible wall bracket (please refer to the table above).
2 Locate the ideal TV position on the wall.
3 Fix the wall bracket firmly on the wall.
4 Secure the TV to the bracket using the 4 mount screws attached to the mount holes on the back and center of the TV.
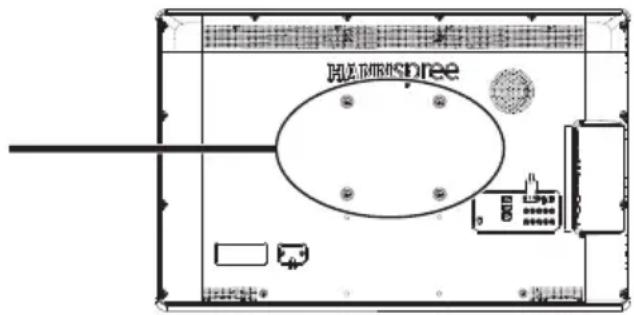
(For reference only)
Note:
- Please read the instructions of your wall bracket to properly wall mount the TV.
- The mount screws are attached to the mount holes. If they are missing, refer to the above table to purchase proper mount screws.
- The TV stand base can be screwed on a table or a hard surface using the hole on the back of the stand base.
Installing the LED-LCD HDTV requires special skill that should only be performed by qualified service personnel. Customers should not attempt to do the work themselves. Hannspree bears no responsibility for improper mounting or mounting that results in accident or injury. You can ask a qualified service personnel about using an optional bracket to mount the TV to the wall.
8
Using the Cable Organizer
1 Insert the cable clamp into the square hold on the rear of the TV. 2 Route the cables through the cable clamp.
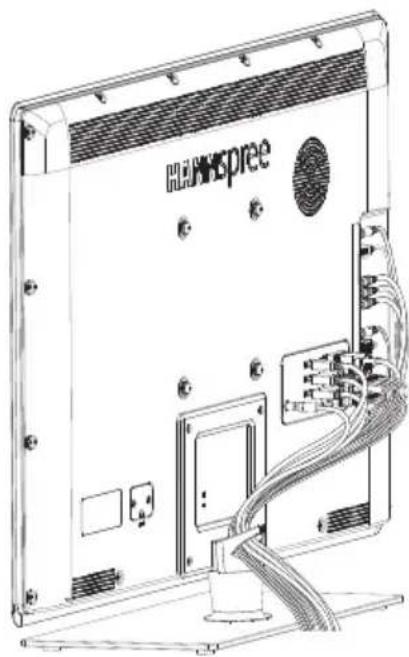
natural_image
Line drawing of a computer monitor rear panel with visible wiring and ports (no text or symbols)- Table of Contents
- FCC Compliance Statement 1
- Additional Information
- DOC Compliance Notice 2
- Description of Warning Symbols
- CAUTION
- WARNING
- Installation Safety Notes
- Location
- Notes:
- Important Safety Instructions
- Personal safety
- Installation
- Preface
- Warranty and Service
- Recycling Information
- Copyright
- Trademark Notice
- HDMI
- License Notice and Trademark Acknowledgment
- Getting Started
- Package Contents
- Features
- Note:
- Control Panel
- Input and Output Jacks
- Remote Control
- Inserting the Remote Control Batteries
- 2
- Setting up your TV
- Basic Connections
- Power Connection
- Connecting an Antenna or Cable TV
- Connecting External Devices
- Connecting External Earphones
- Connecting to AV Devices
- Connecting a VCR/ Set-Top Box/ DVD Player Using Video Inputs
- Connecting a PC using VGA
- Connecting a PC using DVI
- Connecting HDMI
- Connecting SPDIF
- Connecting USB 2.0
- Using the TV
- Turning the TV On and Off
- Setup Wizard
- Switching Source Signals
- Performing an Automatic Channel Search
- Selecting Channels
- Adjusting the Volume
- Editing the Channel List
- Setting the Favorite Channels
- Viewing Images and Playing Music
- Performing PVR (Personal Video Recording)
- Important facts:
- Adjusting On-Screen Display (OSD) Settings
- ADJUSTABLE ITEMS:
- MAIN MENU:
- INSTRUCTIONS:
- OSD Setting Menus
- Adjusting Picture Settings
- Adjusting Audio Settings
- Adjusting Channel Settings
- Adjusting V-CHIP Settings
- Adjusting Setup Settings
- Adjusting PC Settings
- Troubleshooting
- SV32AMUB:
- Introduction
- Setting Program Codes
- Searching Codes
- Setting Volume Lock
- Setting Channel Lock
- Factory Setting Mode
- Description
- Other Descriptions
- Double Clicking
- Buttons Information
- Power-out Protection Capability
- Component Program Codes
- Setting the TV on the Wall
- Appropriate ventilation distances:
- Dissembling the stand base:
- Wall mounting the TV:
- 8
- Using the Cable Organizer
Brand : HANNSPREE
Model : SV32AMUB
Category : Television