
F001-15U1 - Television HANNSPREE - Free user manual and instructions
Find the device manual for free F001-15U1 HANNSPREE in PDF.


User questions about F001-15U1 HANNSPREE
0 question about this device. Answer the ones you know or ask your own.
Ask a new question about this device
Download the instructions for your Television in PDF format for free! Find your manual F001-15U1 - HANNSPREE and take your electronic device back in hand. On this page are published all the documents necessary for the use of your device. F001-15U1 by HANNSPREE.
USER MANUAL F001-15U1 HANNSPREE
- Regulatory Information.... 3
- Description of Warning Symbols 5
- Safety Notices 6
- Preface 13
- Introducing the TV 15
Features.... 15 - Checking Package Contents.... 16
- Getting Started 17
Control Panel 17
Input and Output Jacks 18
Remote Control 19
Inserting the Remote Control Battery/Batteries...... 21 - Making Connections ...... 24
Connecting to an Antenna or Cable TV 24
Connecting to AV Devices 25
Connecting to a VCR/VCD/DVD Player 25
Connecting to a Video Camera 26
Connecting to a Video Game Console 27
Connecting External Speakers or Headphones...... 28
Connecting to a PC 29
Connecting the Power Adapter 30 - Using the TV 31
Using the Remote Control 31
Turning the TV On and Off 31
Selecting Channels 31
Switching Source Signals 31
Adjusting the Volume 31 - Adjusting On-Screen Display (OSD) Settings 32
OSD Setting Menu 33
Brightness 34
Contrast 35
Audio Setting 36
Treble.... 37
Bass 38
Table of Contents
Balance 39
SRS 40
Mute 41
Video Setting 42
Hue 43
Saturation 44
Sharpness 45
Color Temperature 46
TV Setting 47
TV/CATV 48
MTS 49
Auto Program.... 50
Manual Program.... 51
Channel Add/Erase 52
Favorite Channel.... 53
PC Setting 54
Horizontal Position 55
Vertical Position 56
Phase 57
Clock 58
DOS Mode 59
Color Temperature 60
Miscellaneous Setting 62
Language 63
Sleeper.... 64
OSD Display 65
Time Setting 66
More Option 67
11.Taking Care of Your TV & Remote Control.... 77
12.Troubleshooting.... 78
13.Warranty and Service 80
14.Specifications 81
15.Glossary 82
FCC Compliance Statement ^1
This device complies with part 15 of the FCC Rules. Operation is subject to the following two conditions: (1) This device may not cause harmful interference, and (2) this device must accept any interference received, including interference that may cause undesired operation.
Additional Information
This equipment has been tested and found to comply with the limits for a Class B digital device, pursuant to part 15 of the FCC Rules. These limits are designed to provide reasonable protection against harmful interference in a residential installation. This equipment generates, uses and can radiate radio frequency energy and, if not installed and used in accordance with the instructions, may cause harmful interference to radio communications. However, there is no guarantee that interference will not occur in a particular installation. If this equipment does cause harmful interference to radio or television reception, which can be determined by turning the equipment off and on, the user is encouraged to try to correct the interference by one or more of the following measures:
- Reorient or relocate the receiving antenna
- Increase the separation between the equipment and receiver
- Connect the equipment into an outlet on a circuit different from that to which the receiver is connected
- Consult the dealer or an experienced radio/TV technician for help
Warning: You are cautioned that changes or modifications not expressly approved by the party responsible for compliance could void your authority to operate the equipment.
DOC Compliance Notice ^1
This digital apparatus does not exceed the Class B limits for radio noise emissions from digital apparatus as set out in the Radio Interference Regulations of the Canadian Department of Communications. This device complies with Canada ICES-003 Class B.
CE Conformity Statement ^2
This device complies with the requirements set out in the Council Directive on the approximation of the Laws of the Member States relating to Electromagnetic Compatibility (89/336/EEC) and the Amendment Directive (92/31/EEC), Low-Voltage Directive (73/23/EEC) and the Amendment Directive (93/68/EEC).
- applies only to products purchased in Canada
- applies only to products purchased in the European Union
2
Description of Warning Symbols

Before You Proceed
- Read all Safety Notices in Section 2 of this manual and instructions in the User's Manual carefully before either plugging in or turning the TV on.
- Keep this User's Manual in a safe place for future reference. Keep the box and packaging in case the TV needs to be shipped in the future.
- Follow the TV and warning label instructions.
- Any uses, operations, changes, alterations or modifications of the TV that do not follow the instructions in this manual will void this TV's warranty.

natural_image
Black triangular warning symbol with a lightning bolt symbol (no text or numbers)CAUTION
RISK OF ELECTRIC SHOCK DO NOT OPEN

natural_image
Black triangular warning symbol with an exclamation mark (no text or numbers)WARNING

This symbol is used to alert users to pay attention to important descriptions regarding usage, maintenance (repair), and additional important information related to this TV.
CAUTION

This symbol is used to alert users to the risk of electric shocks due to dangerous and uninsulated components.
Electric Power Notice
Electric power may cause personal injury and mechanical damage if misused. Although safety has been taken into consideration during the design and production of this TV, electric shock or fire can result if the TV is misused. To prevent potential danger, read and follow the instructions and warnings contained in this manual when setting up, operating or cleaning the TV. In addition, please read all “Safety Notices” contained in this manual carefully before using the TV.

Power Supply Safety Notes
- To avoid electric shocks, do not use an extended power cord or an outlet that does not match this TV's plug or leaves the plug exposed.
- This TV has a 3-pin grounded plug. The third pin connects to ground; do not remove it or alter it in anyway.
- If the power cord or plug is damaged or worn, unplug it immediately and contact an authorized service technician for maintenance.
- To avoid fire or electric shocks, do not overload electric power outlets.

Installation Safety Notes
Antenna
We suggest that you use an outdoor antenna to get the best signal possible unless you have cable TV or a centralized indoor antenna system. You may, however, use an antenna indoors if it is placed in a location free from interference.
Location
Avoid prolonged exposure to sunlight or other strong sources of heat. Leave sufficient distance between the TV and the wall to provide enough space for the emission of heat.

WARNING
To reduce the risk of fire or electric shock, do not expose this apparatus to rain or moisture.
Apparatus shall not be exposed to dripping or splashing and no objects filled with liquids, such as vases, shall be placed on the apparatus.

Power
To avoid danger of fires or electric shock, only use those adapters listed below, which are compatible with this TV.
• EDAC POWER ELECTRONICS CO., LTD.: EA1050A-120
• LI SHIN INTERNATIONAL ENTERPRISE CORP.: 0218B1260
IMPORTANT SAFETY INSTRUCTIONS

natural_image
Illustration of an open book with a magnifying glass resting on it (no text or symbols visible)1 Read these instructions.
2 Keep these instructions.
3 Heed all warnings.
4 Follow all instructions.
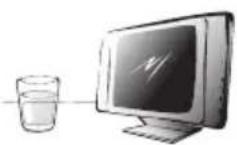
5 Do not use this apparatus near water.

6 Clean only with dry cloth.
natural_image
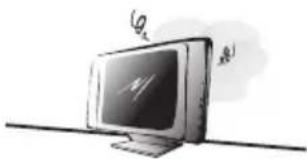
Illustration of a computer monitor with a lightning bolt symbol on top, placed on a surface (no text or labels)7 Do not block any ventilation openings. Install in accordance with manufacturer's instructions.
natural_image
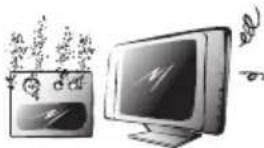
Illustration of a computer monitor and a monitor with floating icons, no text or symbols present8 Do not install near any heat sources such as radiators, heat registers, stoves, or other apparatus (including amplifiers) that produce heat.
natural_image
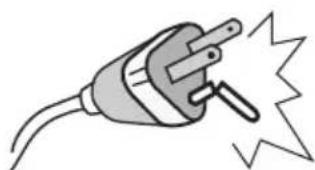
Illustration of a plug with a fuse and explosion effect (no text or symbols)9 Do not defeat the safety purpose of the polarized or grounding-type plug. A polarized plug has two blades with one wider than the other. A grounding-type plug has two blades and a third grounding prong. The wide blade or the third prong are provided for your safety. If the provided plug does not fit into your outlet, consult an electrician for replacement of the obsolete outlet.
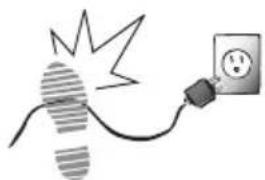 | 10 Protect the power cord from being walked on or pinched, particularly at plugs, convenience receptacles, and the point where they exit from the apparatus. |
 | 11 Only use attachments/accessories specified by the manufacturer. |
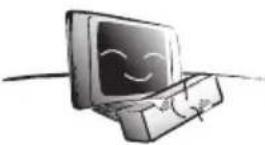
 | 12 Use only with the cart, stand, tripod, bracket, or table specified by the manufacturer, or sold with the apparatus. When a cart is used, use caution when moving the cart/apparatus combination to avoid injury from tip-over. |
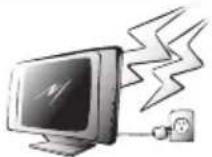 | 13 Unplug this apparatus during lightning storms or when unused for long periods of time. |
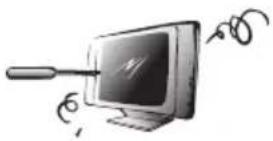 | 14 Refer all servicing to qualified service personnel. Servicing is required when the apparatus has been damaged in any way, such as power-supply cord or plug is damaged, liquid has been spilled or objects have fallen into the apparatus, the apparatus has been exposed to rain or moisture, does not operate normally, or has been dropped. |
CAUTION | These servicing instructions are for use by qualified service personnel only. To reduce the risk of electric shock, do not perform any servicing other than that contained in the operating instructions unless you are qualified to do so. |
CAUTION
Personal Safety
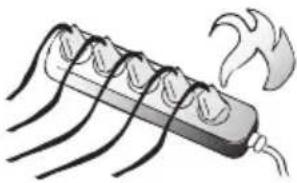 | To avoid overloading the power supply, never plug too many electrical devices into an outlet, power strip, or extension cable. |
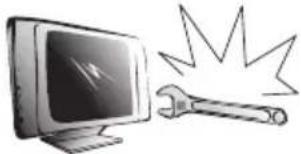 | Dangerous high-voltage electric power components are located inside the TV. To avoid electric shock, do not disassemble the TV in any way. |
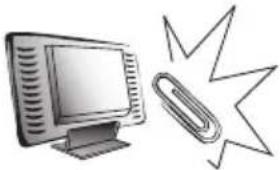 | Do not place or drop metals, small objects, or flammable materials into the vent of the TV. |
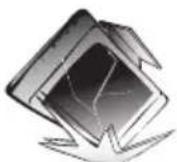 | If the TV is dropped, falls down, or is otherwise damaged, unplug the power cord immediately and contact an authorized service technician. |
 | If any fluid is sprayed or dropped into the TV, contact an authorized service technician. |
 | The screen of the TV is made of glass. Avoid hitting or scraping it. If the screen is broken, do not touch the broken glass. |
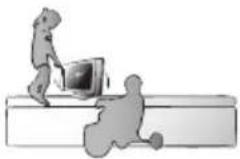 | Do not allow children to use the TV unattended. |
Installation
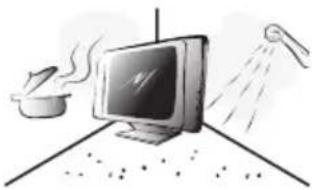 | Do not place the TV in locations where there is excessive steam or dust. |
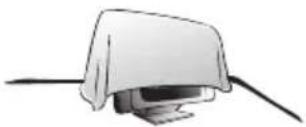 | Avoid blocking the TV's vents, do not place the TV on a bed, sofa, carpet, or in a sealed cabinet. |
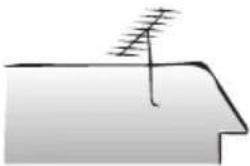 | Install the outdoor antenna (not included) away from power transmission lines to avoid possible danger. |
 | Unplug the power cord and antenna connector when there is a storm or when the TV is not in use for long periods to avoid electric shock from lightning. |
Operation
 | This TV is designed for home power sources as labeled on the casing. Avoid using any other power accessories to avoid electric shock or other damage. |
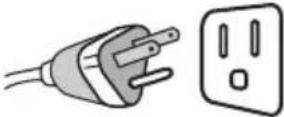 | The plug can be inserted into an outlet in only one direction as shown to the left. Do not alter the plug. Contact an authorized service technician if you cannot plug it in correctly. |
 | If there is any problem that cannot be resolved according to the instructions given in this manual, contact an authorized service technician immediately. Do not attempt any methods not covered in this manual. |
| Maintenance | |
 | Do not attempt to repair the TV by yourself. Contact an authorized service technician. Ask the service technician to complete a safety inspection before switching the power on after completing any maintenance. |
4
Preface
Thank you for purchasing a Hannspree Liquid Crystal Display Television (LCD TV). Your new TV will allow you to enjoy superior audio and video while enriching your lifestyle with advanced technology.
Please carefully read this manual in its entirety before setting up, using or operating your TV. To ensure the safe and correct installation and operations of the TV, it is important that the safety and operation instructions in this manual are followed.
This instruction manual is designed to assist you in setting up and using the TV. The information in this manual has been carefully checked for accuracy; however, no guarantee is given to the correctness of the contents. The information in this manual is subject to change without notice.
To the extent allowed by applicable law, Hannspree California Inc. ("Hannspree") shall not be liable for direct, indirect, special, exemplary, incidental or consequential damages arising from any defect or omission in this manual, even if advised of the possibility of such damages in advance.
Copyright
© Copyright 2004 Hannspree California Inc.
All rights reserved. This manual is protected by copyright and distributed under licenses restricting its use, copying and distribution. No part of this manual may be reproduced in any form by any means without the prior written authorization of Hannspree. The TV described in this manual may include copyrighted software of Hannspree (or other third parties). Hannspree (or other third parties) preserves the exclusive rights for copyrighted software, such as the right to distribute or reproduce the copyrighted software. Accordingly, and to the extent allowed by applicable law, any copyrighted software contained in the product described herein shall not be distributed, modified, reverse engineered, or reproduced in any manner without the prior written authorization of Hannspree (or of other third parties).
The Hannspree logos presented herein are trademarks of Hannspree. All other product names, trademarks or logos mentioned herein are used for identification purpose only, and may be the trademarks or registered trademarks of their respective owners.
The purchase of the product described herein shall not be deemed to grant, either directly or by implication, estoppel or otherwise, any license under the copyrights, patents, patent applications or trademarks of Hannspree, except for the normal, non-exclusive use that arises by operation of law in the sale of a product.
5
Introducing the TV
Thank you for purchasing this LCD TV. Your LCD TV is designed to be safe, versatile, and easy to use. The design makes it a fun addition to any room.
You can watch broadcast or cable television channels, and easily connect a VCR, VCD, DVD player or a game device to the standard RCA and S-Video input ports that are included in the 4-IN-1 A/V cable. You can also connect your TV to a PC and use the TV as an external monitor.
Convenient control buttons located on the TV and a handy remote control let you change channels, adjust the volume, and change display settings through an easy-to-use on-screen display menu system. The built-in stereo speakers provide full rich sound and a convenient audio output port lets you connect to an external audio system or headphones.
Features
• Built-in TV tuner
- 4-IN-1 A/V cable
- On-Screen Display (OSD) menu system
• Built-in stereo speakers
- 3D Comb Filter
- Advanced de-interlacing
6
Checking Package Contents
Make sure the following components are included in the box. Please contact Hannspree Customer Service immediately if anything is missing or damaged.
• TV
- User's manual
- Quick start guide
• Warranty and service manual
- Power cord
- Power adapter
- 4-IN-1 A/V cable
- Remote control and battery/batteries
- RCA jack x 3
- VGA cable
- Stop Card
Control Panel
| Description Icon Function | ||
| Power | ∅ / On/Off | Turns the TV on and off. |
| Power LED | Indicates power status. | |
| Mute (Auto) | MUTE/MUTE/A/AUTO AUTO/∅ | In TV/AV mode, press this button to mute the audio. Automatically adjusts the screen parameter in PC mode. |
| Source | SOURCE/S/∅ | Selects the input source to be displayed(TV/CATV, AV, AV1,AV2 or PC). |
| Menu | MENU/M/∅ | Turns the On-Screen Display (OSD) menu on and off. |
| Select channel | channel up(> / ∧▲)channel down(◀ /▼) | Changes channels. Press channel up to increase the channel number.Press channel down to decrease the channel number. In PC or AV mode, press either button to return to TV mode. |
| Adjust volume | volume up(> / ∧ / ▲)volume down(◀ /∀ / ▼) | Press volume up to increase the audio volume. Press volume down to decrease the audio volume. |
Input and Output Jacks
| Description Connector Function | ||||
| AV1 (R-AUDIO/L-AUDIO/VIDEO)(Selected models only) |  |  |  | Connects to a right audio (red) or left audio (white) cable, or video (yellow) cable. |
| AV2 (AV, AV IN) |  | Use the included 4-IN-1 A/V cable to connect external devices, such as a VCR, VCD, DVD player, CVBS RCA cables or a game device.Audio Input: AV connector audio (white and red) cables.Video Input: AV connector video (yellow) or S-Video cable. | ||
| ANT | 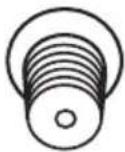 | Connects to an antenna or CATV cable television line. | ||
| DC-IN (DC-12V) |  | Connects to the included power adapter. | ||
| VGA/PC-IN | 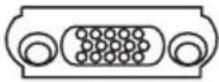 |  | Connects to a PC. | |
| LINE IN |  | Connects to a PC's audio line-out. | ||
| LINE OUT |  | Connects to external stereo speakers. | ||
| Headphone jack |  |  | Connects to headphones or external speakers | |
Remote Control
| Description Icon Function | ||
| Menu | MENU/MENU/M | Press this button to activate the OSD menu system and to adjust various settings and personal preferences. |
| Arrow | ▲/▼/◄/►/</> | Press▲/▼/◄and►to scroll through the on-screen display menus.Favorite channels can be selected using the◄and►buttons on the remote control. |
| Number | 1 2 34 5 67 8 90 | Use to select a channel directly.Press 0-9 to enter the channel number (press 1 and 0 for channel 10). |
| Recall/Last | RECALL/LAST | Press this button to return to the last channel selected. |
| Caption/CC | CC | Press this button to enable the closed captions/subtitles (Only available in the United States of America). |
| MTS | MTS | Press this button to enable the bilingual function when the program has stereo/SAP/MONO capabilities. |
Power Turns the TV power on or off.
| Adjust volume | -VOL VOL+>VOL VOL<▼VOL VOL▲▲VOL VOL▼ | Press volume up to increase the audio volume. Press volume down to decrease the audio volume. |
| Description Icon Function | ||
| Mute | MUTE | Press this button to eliminate sound. Press mute again or press the volume adjust buttons to restore sound. |
| Select channel | ▼CH CH▲▶CH CH▼-CH CH+∨CH CH^ | Changes channels. Press channel up to increase the channel number. Press channel down to decrease the channel number. In PC or AV mode, press either button to return to TV mode. |
| Source | SOURCE | Press this button to cycle the video input sources. The source is displayed on the screen. |
| Auto (selected models only) | AUTO | Press this button to automatically adjust the screen parameters in PC mode. |
| Reset (selected models only) | RESET | Press this button to reset the TV. |
| V-Chip (selected models only) | V-CHIP | This button allows you to change v-chip settings. |
| Sleep (selected models only) | SLEEP | Press this button repeatedly to set the length of time until the TV turns off. |
| Display (selected models only) | DISPLAY | Press this button to show messages on the screen, such as the channel number and other. Press this button again to show the real-time clock. Press this button again to close the display message. |
Inserting the Remote Control Battery/Batteries
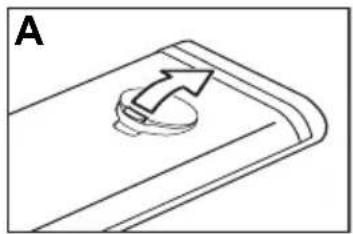
Lithium battery/batteries
1 Open the battery compartment cover at the back of the remote control (A).
2 Slide the battery/batteries, with the positive (+) side facing up, underneath the shorter set of metal contacts (B).
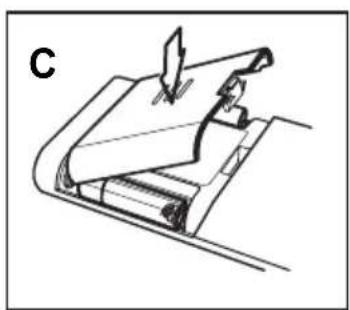
3 Press the battery/batteries firmly into place in the battery compartment (C)
4 Replace the battery compartment cover (D).
natural_image
Simple line drawing of a curved object with an arrow, no text or symbols present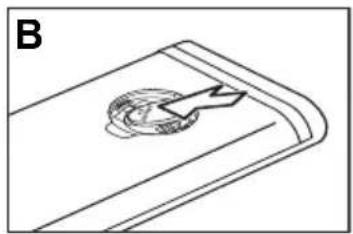
natural_image
Simple line drawing of a curved object with a circular feature and an arrow, labeled 'B' in the top-left corner (no text or symbols on the object itself)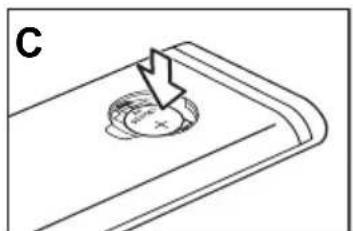
natural_image
Diagram of a mechanical component with a downward arrow and circular feature, no text or symbols present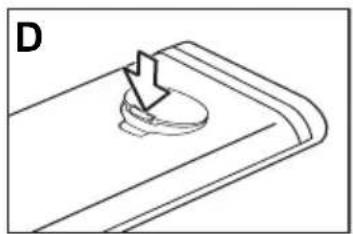
natural_image
Simple line drawing of a mechanical component with a downward arrow and circular base (no text or symbols)Note Your remote control may have either AAA type batteries or CR2032 lithium battery/batteries.
AAA battery/batteries
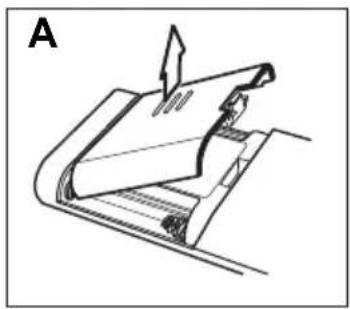
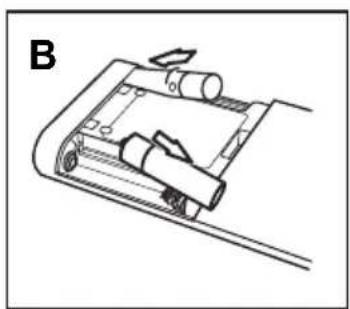
1 Open the battery compartment cover at the back of the remote control (A).
natural_image
Diagram of a mechanical or electronic component with an upward arrow indicating motion (no text or symbols present)2 Insert the battery/ batteries paying attention to the polarity markings inside the battery compartment (B).
natural_image
Technical line drawing of a mechanical device with rollers and a handle (no text or symbols)3 Replace the battery compartment cover (C).
natural_image
Diagram of a mechanical assembly with a tool and paper, no visible text or symbolsNote Your remote control may have either AAA type batteries or lithium battery/batteries.
CAUTION

- If the remote control is not used for a long period, remove the batteries and store them separately.
- Handle damaged or leaking batteries carefully, and wash hands after such handling.
- If your remote control has two batteries, do not mix new and old batteries because the life of the new batteries will be shortened. Chemical fluids may leak from the old batteries.
- Danger of explosion if battery is incorrectly replaced. Replace only with the same or equivalent type recommended by the equipment manufacturer. Discard used batteries according to manufacturer's instructions.
- Refer to your local recycling or waste disposal rules and contact a local waste disposal vendor to dispose of used batteries.
- The remote control may have a magnet in it, so do not place magnetic sensitive items such as watches, credit cards, or flash media close to the cover.
- Do not use force when pulling the remote control cover open; you may damage the hinge.
Connecting to an Antenna or Cable TV
1 Connect one end of the VHF/UHF (Antenna) or CATV cable to ANT Jack (VHF/UHF IN Jack) on the back of the TV.
2 Connect the other end of the VHF/UHF (Antenna) or CATV cable to the antenna socket or CATV cable.
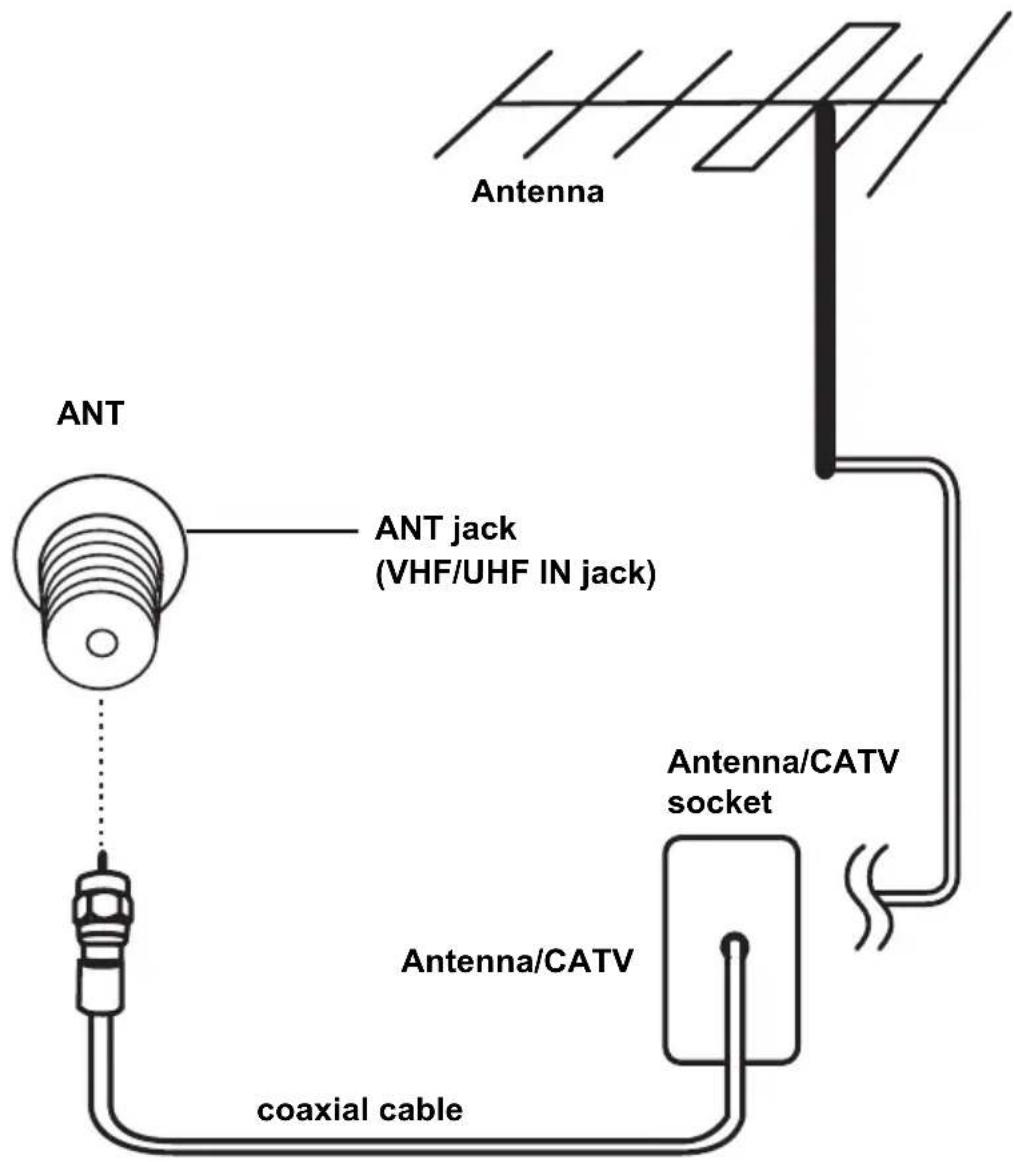
Note If you cannot receive channels after connecting to an antenna or cable TV line, try scanning for channels. See “Auto Program” on page 50.
Connecting to AV Devices
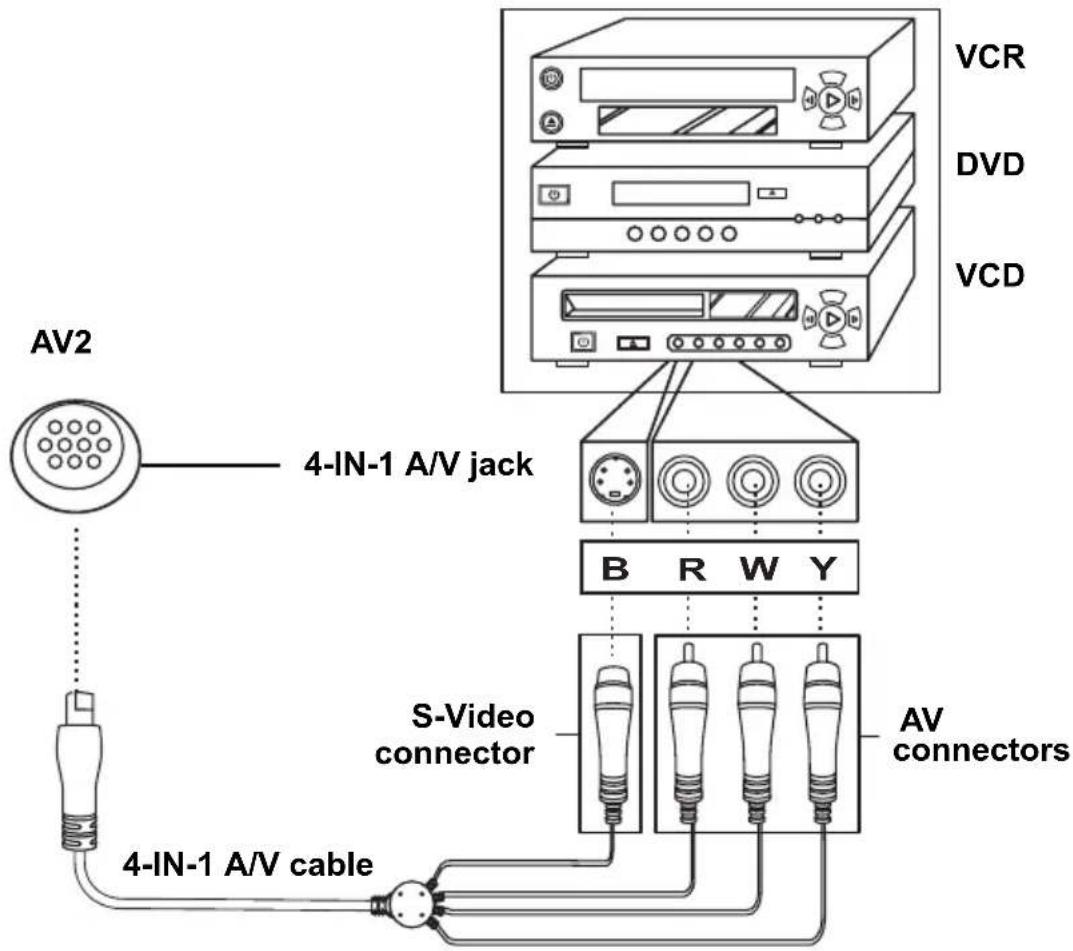
Connect external devices such as a VCR, VCD or DVD player, or video game console to the TV using the supplied 4-IN-1 A/V cable.
Connecting to a VCR/VCD/DVD Player
The illustration presented here shows how to connect the TV to a VCR, VCD or DVD player. Actual connections may vary according to the make and model of the device. Refer to the user's manual included with the device for more detailed instructions.
flowchart
graph TD
    A["AV2"] --> B["4-IN-1 A/V jack"]
    B --> C["4-IN-1 A/V cable"]
    C --> D["S-Video connector"]
    D --> E["AV connectors"]
    F["VCR"] --> G["4-IN-1 A/V jack"]
    H["DVD"] --> I["4-IN-1 A/V jack"]
    J["VCD"] --> K["4-IN-1 A/V jack"]
    L["B"] --> M["4-IN-1 A/V jack"]
    N["R"] --> O["4-IN-1 A/V jack"]
    P["W"] --> Q["4-IN-1 A/V jack"]
    R["Y"] --> S["4-IN-1 A/V jack"]
Note
- The cables are color-coded (black, red, white, yellow). Connect each color-coded cable to the appropriate connector on your device.
- When connecting the S-Video connector and AV connector at the same time, the priority is given to the S-Video connector.
Connecting to a Video Camera
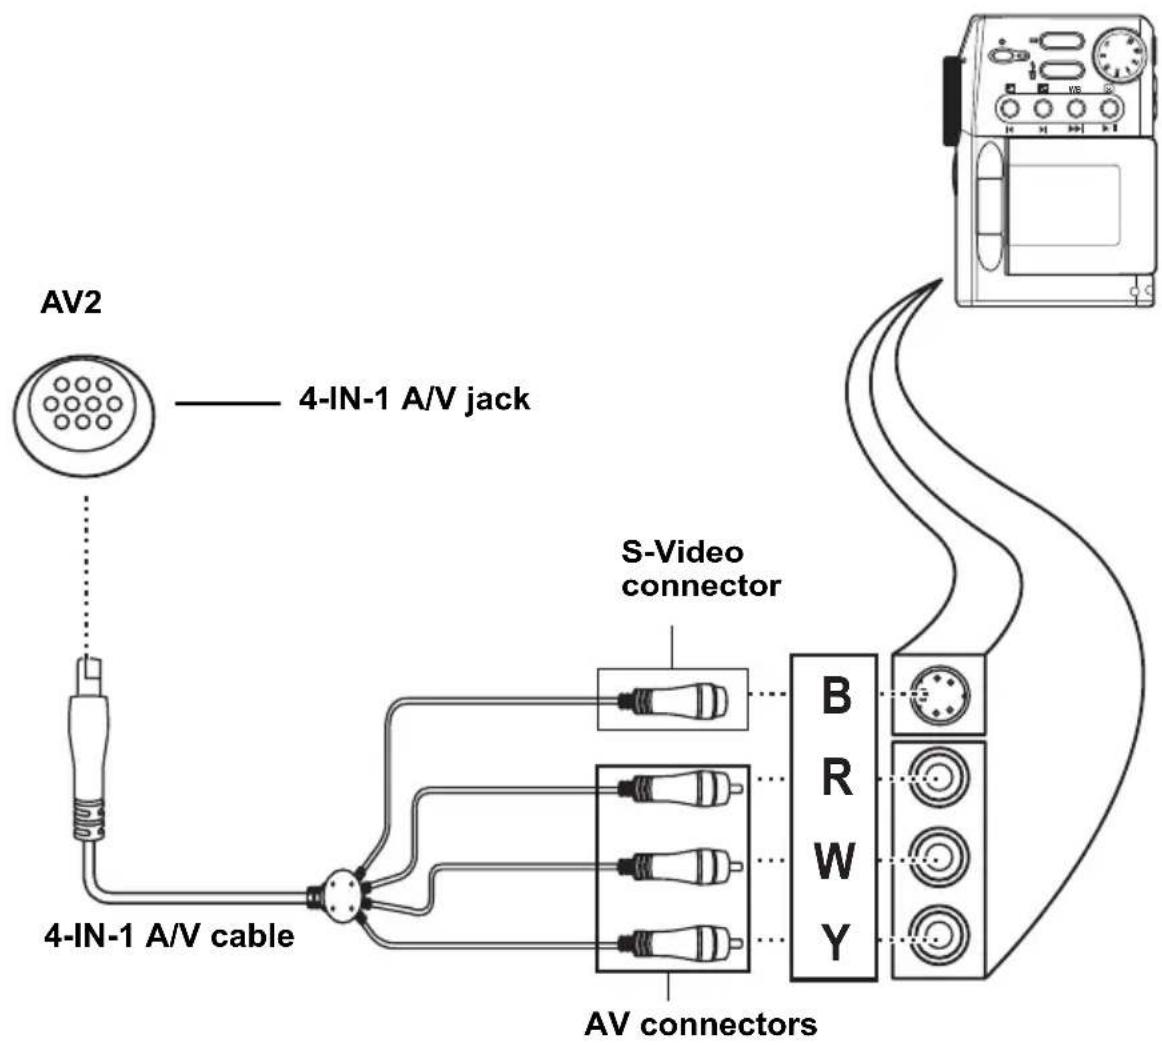
The instructions presented here are a general guide to connecting the TV to a camcorder or other type of digital camera. Actual connections may vary according to the make and model of the device. Refer to the user's manual included with the camcorder or camera for more detailed instructions.
Note
The cables are color-coded (black, red, white, yellow). Connect each color-coded cable to the appropriate connector on your device.
Connecting to a Video Game Console
The instructions presented here are a general guide to connecting the TV to a game console using the RCA Jacks (some game devices may require a unique adapter that is not provided). Actual connections may vary according to the make and model of the game device. Refer to the user's manual included with the game console for more detailed instructions.
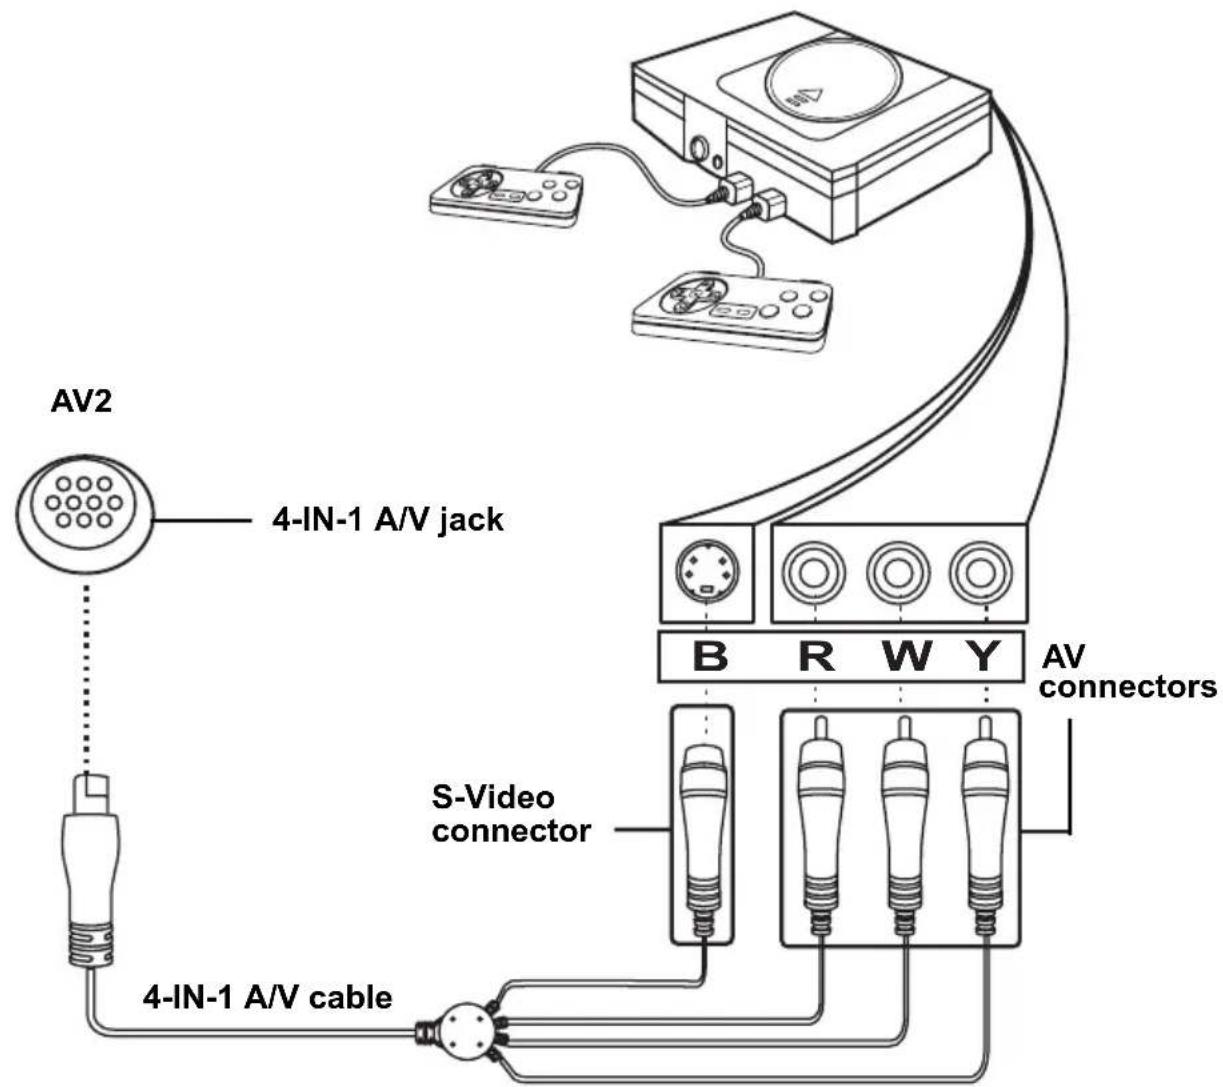
Notes
- Connect the 4-IN-1 A/V cable connectors to the corresponding connectors on your game device adapter.
- If the 4-IN-1 A/V cable does not fit the game device, then insert RCA jack between the 4-IN-1 A/V cable and game device.
Connecting External Speakers or Headphones
External speakers or headphones may be used to listen to the TV rather than using the built-in speakers. Connect external speakers to the speaker line out port or headphones to the headphone port as illustrated.
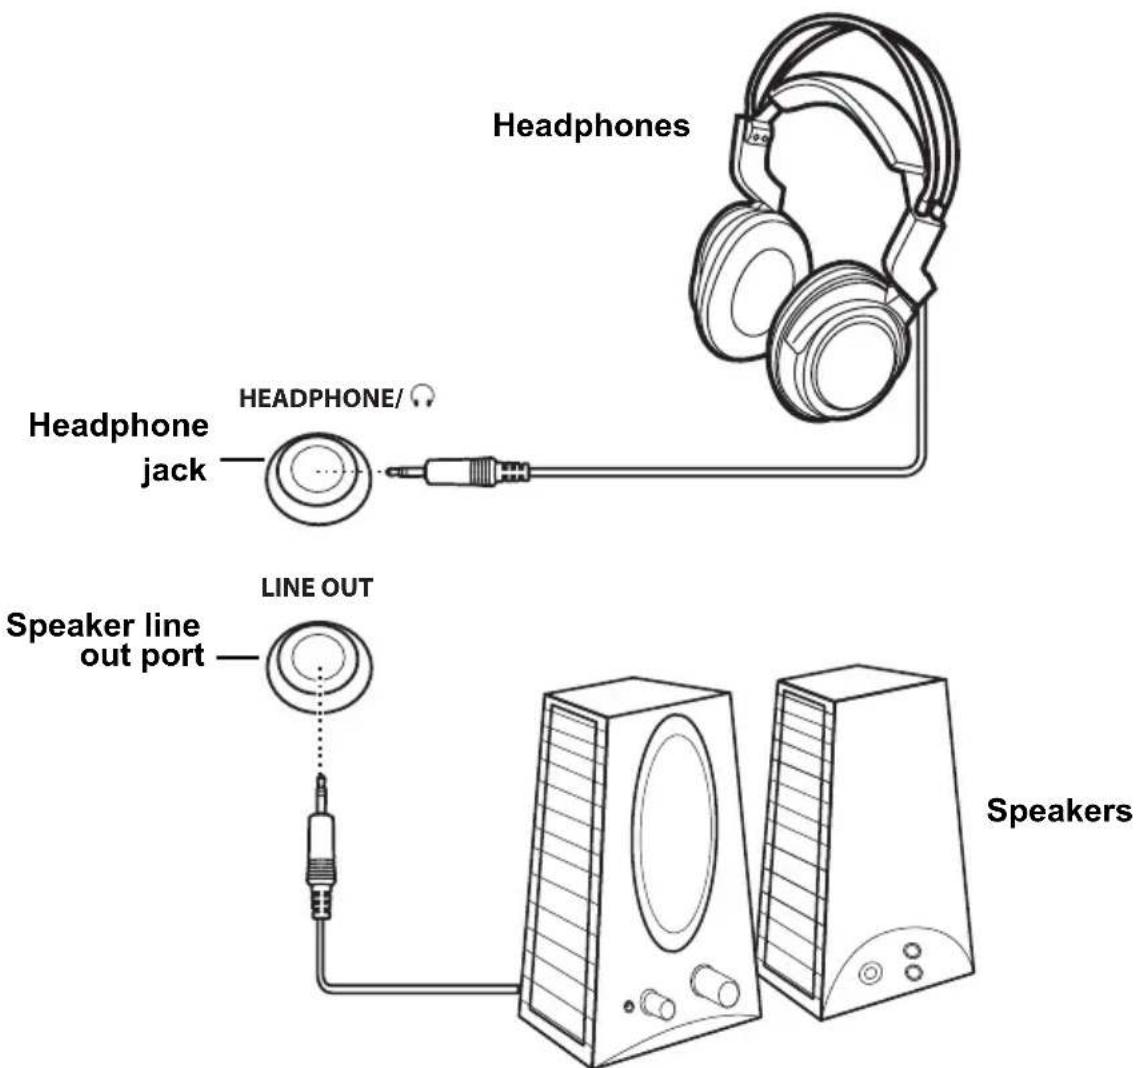
Notes
- External speakers or headphones are not included with the TV.
- The internal TV speakers will not output sound when headphones are plugged in.
- Use external speakers with built-in amplifiers only.
Connecting to a PC
You can connect the TV to a PC and use it as an external monitor. Connect the TV's VGA/PC-IN port to the PC's VGA port. Connect the TV's line in port to the PC's line out port to listen to the PC's audio output on the TV's speakers. Refer to the following illustration.
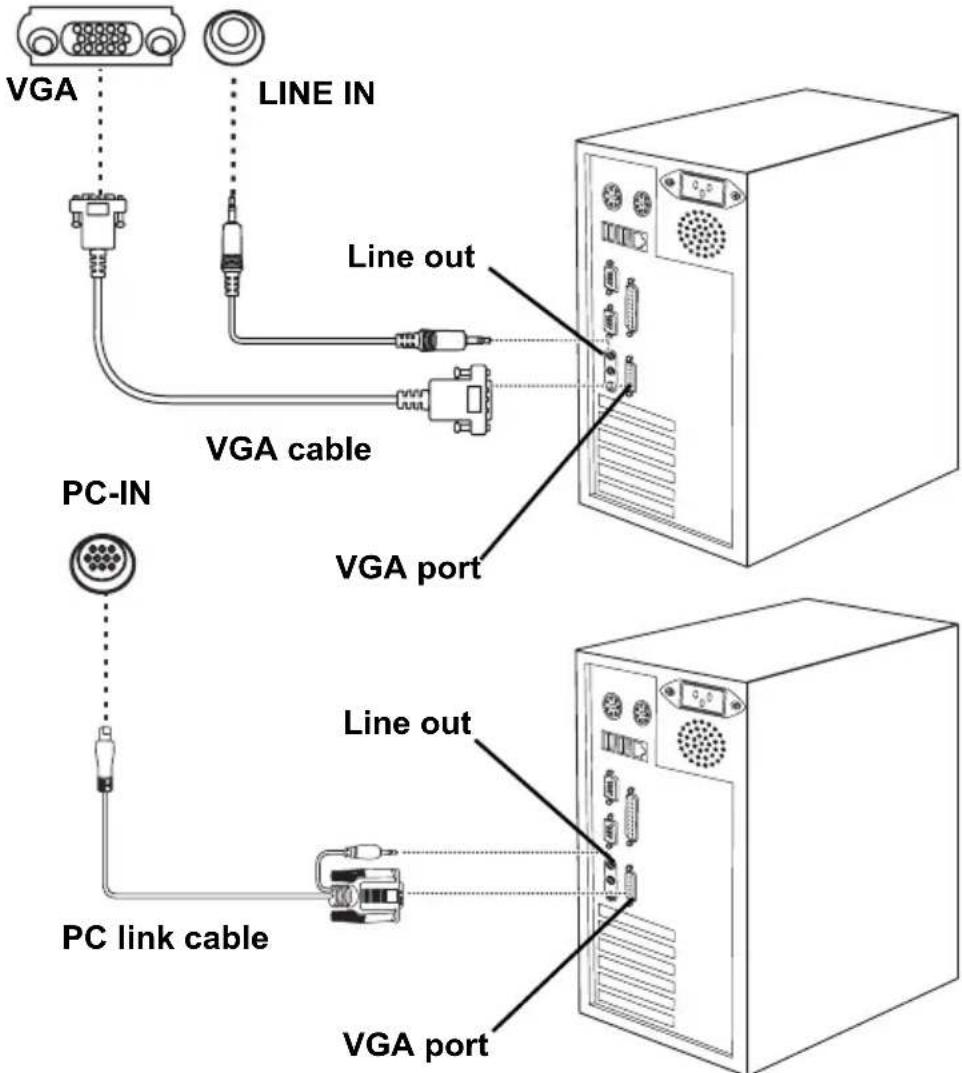
Note You can connect the line out port of a CD-ROM player, stereo, or other device to the TV's line in port to listen to the devices audio output.
Connecting the Power Adapter
1 Connect the power cord to the power adapter as illustrated.
2 Plug the power adapter connector into the DC-IN input jack on the rear panel of the TV.
3 Insert the three-pronged plug at the other end of the power cord into a power outlet.
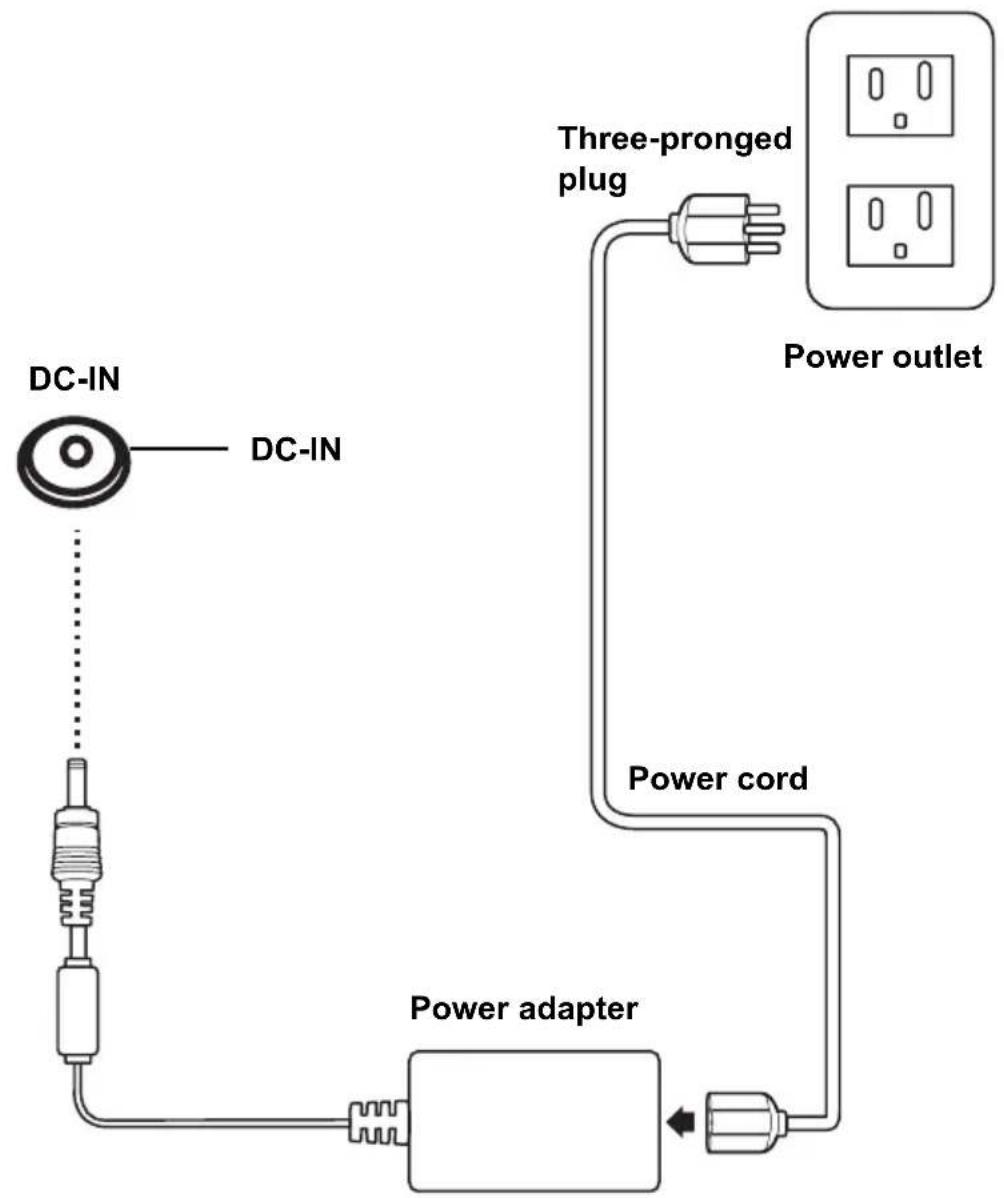
flowchart
graph TD
    A["DC-IN"] --> B["DC-IN"]
    B --> C["Power adapter"]
    C --> D["Three-pronged plug"]
    D --> E["Power outlet"]
    C --> F["Power cord"]
Using the Remote Control
For best results, use the remote control within a distance of 16 feet (5 meters) from the front of the TV. Do not exceed an angle of 30 degrees when pointing at the TV.
Notes
- The operational distance may be shortened when the signal sensor is directly exposed to strong light.
- Aim the transmitter on the remote control at the signal sensor and ensure that there are no obstacles between them.
Turning the TV On and Off
1 Press power on the remote control or control panel to turn on the TV.
2 Press power ⏻/On/Off again; the TV is in off mode.
Selecting Channels
Press channel up or channel down on the control panel to select the channel or enter the specific channel number by pressing the number buttons on the remote control.
Switching Source Signals
Press source to select the incoming source signal.
The current source setting (TV/CATV, AV, AV1, AV2 or PC) appears on the upper left corner of the screen.
Adjusting the Volume
Press volume up to increase the volume. Press volume down to decrease the volume. The volume level is displayed on the screen.
10 Adjusting On-Screen Display (OSD) Settings
The On-Screen Display (OSD) menu system provides a quick and simple method to adjust your TV's settings. This chapter describes how to change each of the available settings.
The OSD can be used with either the remote control or the control panel.
Function Control Panel Icon Button Remote Control Icon
| Menu Menu Menu MENU/ENTER, M | ||
| Channel up | CH (➤ /ʌt / ▲) | Right arrow > / ▶ |
| Channel down | CH (◁ /ʌt / ▼) | Left arrow < / ◀ |
| Enter Menu Enter MENU/ENTER, M | ||
Note
The following sections explain how to adjust settings in the OSD menus using the control panel.
OSD Setting Menu
Press menu to enter the OSD menus. The Main Menu appears.
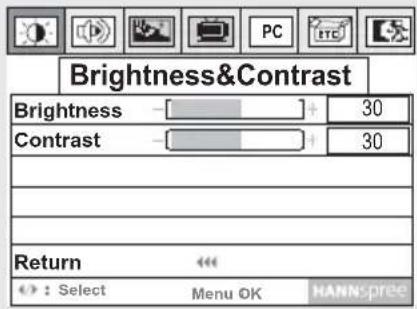
Note
To exit the OSD menus, press channel up or channel down to select Exit ☐. Then press menu to exit the OSD menus. Also, after you finish setting OSD parameters, follow these instructions to exit the OSD menus.
Brightness
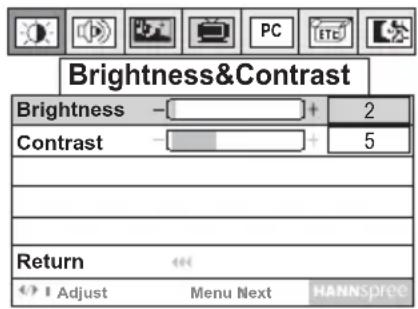
1 Press menu to enter the OSD menus.
2 Press menu again to enter the Brightness & Contrast menu.
3 Press channel up to increase the brightness. Press channel down to decrease the brightness.
4 Press menu to select Return.
5 Press channel down to exit the Brightness & Contrast menu.
Note
The new setting is confirmed automatically when the OSD times out.
Contrast
![Brightness&Contrast Brightness - [ ] + 2 Contrast - [ ] + 5 Return : Adjust Menu Next HANN.pree](/content/2026/06/1202613/images/27e01e05d146951fb617d3403c889f9523fecaed5d71e7e8711379f5fbdf1fc7.jpg)
1 Press menu to enter the OSD menus.
2 Press menu again to enter the Brightness & Contrast menu.
3 Press menu to select Contrast.
4 Press channel up to increase the contrast. Press channel down to decrease the contrast.
5 Press menu to select Return.
6 Press channel down to exit the Brightness & Contrast menu.
Note The new setting is confirmed automatically when the OSD times out.
Audio Setting
Press menu to enter the OSD menus.
1 Press channel up or channel down to select Audio Setting.
2 Press menu to enter the Audio Setting menu.
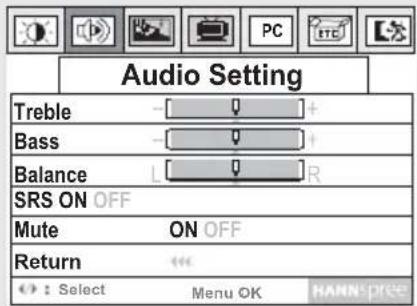
Treble
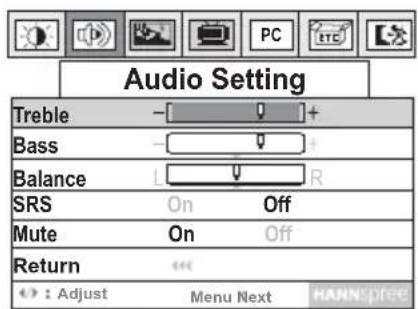
1 Press menu to enter the OSD menus.
2 Press channel up or channel down to select Audio Setting.
3 Press menu to enter the Audio Setting menu.
4 Press channel up to increase the treble. Press channel down to decrease the treble.
5 Press menu to select Return.
6 Press channel down to exit the Audio Setting menu.
Note
The new setting is confirmed automatically when the OSD times out.
Bass
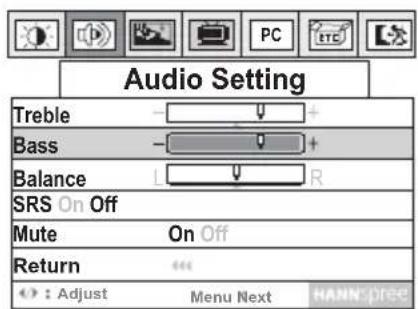
1 Press menu to enter the OSD menus.
2 Press channel up or channel down to select Audio Setting.
3 Press menu to enter the Audio Setting menu.
4 Press menu to select Bass.
5 Press channel up to increase the bass. Press channel down to decrease the bass.
6 Press menu to select Return.
7 Press channel down to exit the Audio Setting menu.
Note The new setting is confirmed automatically when the OSD times out.
Balance
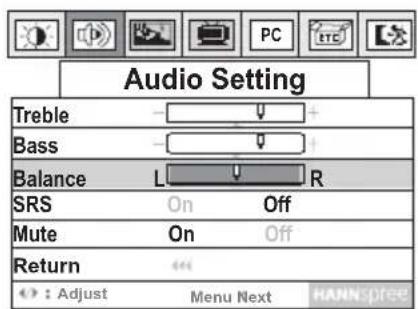
1 Press menu to enter the OSD menus.
2 Press channel up or channel down to select Audio Setting.
3 Press menu to enter the Audio Setting menu.
4 Press menu to select Balance.
5 Press channel up to change the balance to the right speaker. Press channel down to change the balance to the left speaker.
6 Press menu to select Return.
7 Press channel down to exit the Audio Setting menu.
Note
The new setting is confirmed automatically when the OSD times out.
SRS
This option enables the 3D Surround Sound feature.
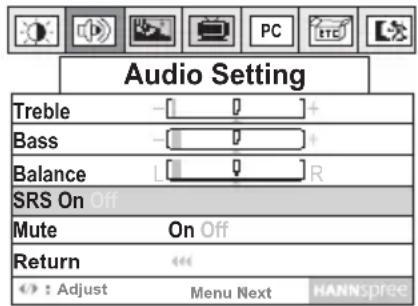
1 Press menu to enter the OSD menus.
2 Press channel up or channel down to select Audio Setting.
3 Press menu to enter the Audio Setting menu.
4 Press menu to select SRS.
5 Press channel down to turn the SRS on. Press channel up to turn the SRS off.
6 Press menu to select Return.
7 Press channel down to exit the Audio Setting menu.
Note
The new setting is confirmed automatically when the OSD times out.
Mute
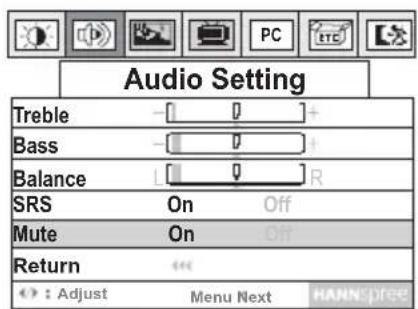
1 Press menu to enter the OSD menus.
2 Press channel up or channel down to select Audio Setting.
3 Press menu to enter the Audio Setting menu.
4 Press menu to select Mute.
5 Press channel down to turn the mute on. Press channel up to turn the mute off.
6 Press menu to select Return.
7 Press channel down to exit the Audio Setting menu.
Note The new setting is confirmed automatically when the OSD times out.
Video Setting
Press menu to enter the OSD menus.
1 Press channel up or channel down to select Video Setting.
2 Press menu to enter the Video Setting menu.
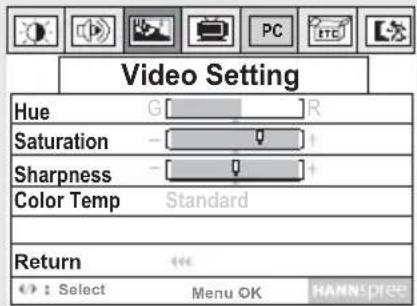
Hue
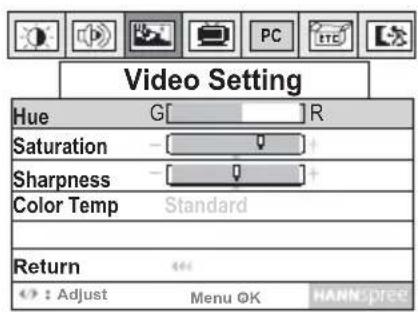
1 Press menu to enter the OSD menus.
2 Press channel up or channel down to select Video Setting.
3 Press menu to enter the Video Setting menu.
4 Press channel down to increase the red hue. The image becomes more red. Press channel up to increase the green hue. The image becomes more green.
5 Press menu to select Return.
6 Press channel down to exit the Video Setting menu.
Note
The new setting is confirmed automatically when the OSD times out.
Saturation
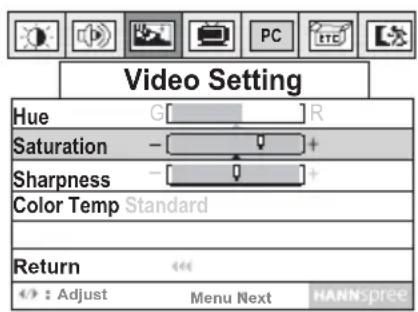
1 Press menu to enter the OSD menus.
2 Press channel up or channel down to select Video Setting.
3 Press menu to enter the Video Setting menu.
4 Press menu to select Saturation.
5 Press channel up to increase the saturation. The screen image becomes more vibrant. Press channel down to decrease the saturation. The screen image becomes less vibrant.
6 Press menu to select Return.
7 Press channel down to exit the Video Setting menu.
Note
The new setting is confirmed automatically when the OSD times out.
Sharpness
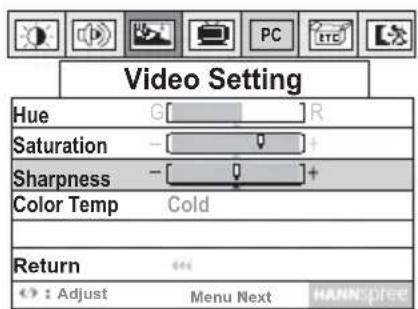
1 Press menu to enter the OSD menus.
2 Press channel up or channel down to select Video Setting.
3 Press menu to enter the Video Setting menu.
4 Press menu to select Sharpness.
5 Press channel up to increase the sharpness. Press channel down to decrease the sharpness.
6 Press menu to select Return.
7 Press channel down to exit the Video Setting menu.
Note The new setting is confirmed automatically when the OSD times out.
Color Temperature
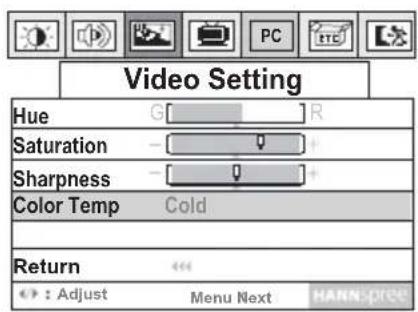
1 Press menu to enter the OSD menus.
2 Press channel up or channel down to select Video Setting.
3 Press menu to enter the Video Setting menu.
4 Press menu to select Color Temp.
The following choices are available.
Warm
Press channel up or channel down to select Warm.
Standard
Press channel up or channel down to select Standard.
Cold
Press channel up or channel down to select Cold.
5 Press menu to select Return.
6 Press channel down to exit the Video Setting menu.
Note
The new setting is confirmed automatically when the OSD times out.
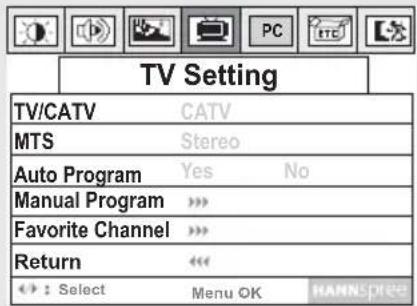
TV Setting
Press menu to enter OSD menus.
1 Press channel up or channel down to select TV Setting.
2 Press menu to enter the TV Setting menu.
TV/CATV
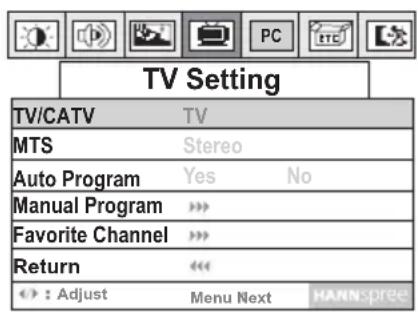
1 Press menu to enter the OSD menus.
2 Press channel up or channel down to select TV Setting.
3 Press menu to enter the TV Setting menu.
4 Select one of the following.
Receiving Broadcast TV
Press channel up or channel down to select TV when using an antenna to receive TV.
Receiving Cable TV
Press channel up or channel down to select CATV STD when connected to cable.
5 Press menu to select Return.
6 Press channel down to exit the TV Setting menu.
Note
The new setting is confirmed automatically when the OSD times out.
MTS
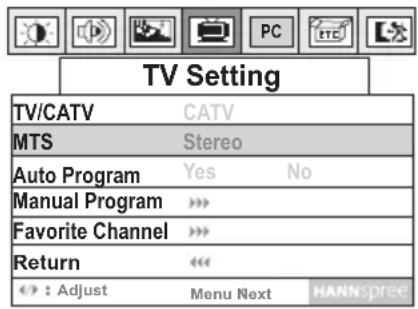
1 Press menu to enter the OSD menus.
2 Press channel up or channel down to select TV Setting.
3 Press menu to enter the TV Setting menu.
4 Press menu to select MTS. The following choices are available.
STEREO
Press channel up or channel down to select Stereo (default), the default audio signal belonging to a particular channel.
SAP
Press channel up or channel down to select SAP (Secondary Audio Program), an audio channel used with the NTSC TV standard for auxiliary transmission of such items as foreign language broadcasting. This option may not be available in your local area.
MONO
Press channel up or channel down to select Mono, which outputs sound through a single channel.
5 Press menu to select Return.
6 Press channel down to exit the TV Setting menu.
Note
The new setting is confirmed automatically when the OSD times out.
Auto Program
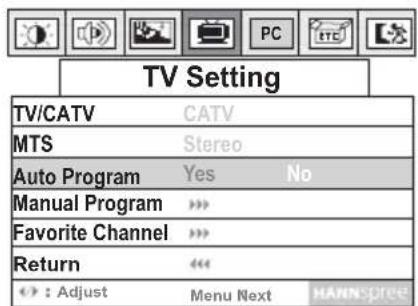
1 Press menu to enter the OSD menus.
2 Press channel up or channel down to select TV Setting.
3 Press menu to enter the TV Setting menu.
4 Press menu to select Auto Program.
5 Press channel down to select Yes.
Channel indicator values range from 2 to 69 (antenna connection) or from 1 to 125 (CATV cable connection).
Manual Program
This function allows you to search preset channels or to erase previously preset channels.
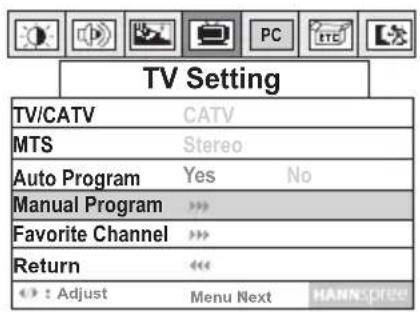
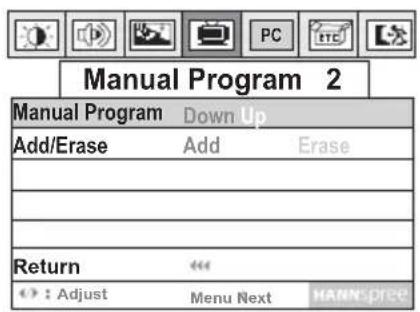
1 Press menu to enter the OSD menus.
2 Press channel up or channel down to select TV Setting.
3 Press menu to enter the TV Setting menu.
4 Press menu to select Manual Program.
5 Press channel up to enter the Manual Program menu.
6 Press channel up or channel down to find the channel you want to add. When you have found the channel, see the next section "Channel Add/Erase" to add or erase the channel.
Channel Add/Erase
After you found a channel using Manual Program, follow the following instruction to add or erase the channel.
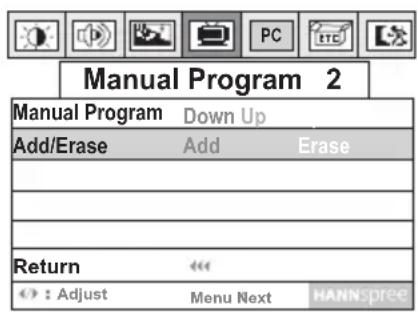
1 Press menu to select Add/Erase.
2 Select one of the following option.
Add Channel
Press channel down to select Add. The channel is added to the channel list.
Erase Channel
Press channel up to select Erase. The channel is erased from the channel list. When you return to the normal TV screen and use channel up and channel down to browse channels, an erased channel (for example, Channel 3) is skipped automatically.
Note
You can still access the erased channel by entering the channel number using the number keys on the remote control.
Favorite Channel
Use the Favorite Channel function to save up to four channels for quick access.(Only available in the United States of America)
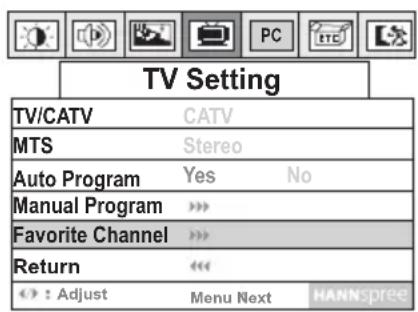
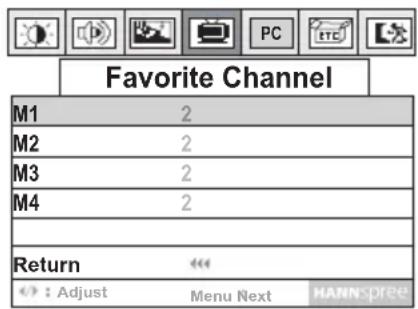
1 Press menu to enter the OSD menus.
2 Press channel up or channel down to select TV Setting.
3 Press menu to enter the TV Setting menu.
4 Press menu to select Favorite Channel.
5 Press channel up to enter the Favorite Channel menu.
6 Press menu to select (M1, M2, M3, or M4) from the list.
7 Press channel up or channel down to select a channel number.
8 Press menu to select Return.
9 Press channel down to return to the previous menu.
Note
Favorite channels can be selected using the◀ and ▶ buttons on the remote control.
PC Setting
1 Connect TV to a PC.
2 Press source to select PC.
3 Press menu to enter the OSD menus.
4 Press channel up or channel down to select PC.
5 Press menu to enter the PC menu.
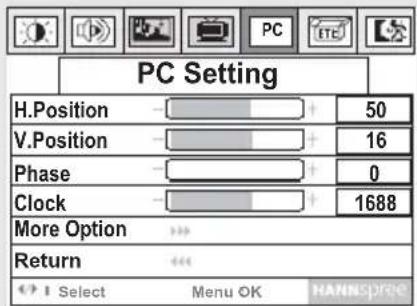
Horizontal Position
![PC Setting H.Position - [ ] + 50 V.Position - [ ] + 16 Phase - [ ] + 0 Clock - [ ] + 1688 More Option >> Return <> : Adjust Menu Next HANNIFEE](/content/2026/06/1202613/images/c2d5de232015c7b2606c3b7462615b37876cda340aba5e39ea65891ff77fcfca.jpg)
1 Press menu to enter the OSD menus.
2 Press channel up or channel down to select PC Setting.
3 Press menu to enter the PC Setting menu.
4 Press channel up to move the display to the right. Press channel down to move the display to the left.
5 Press menu to select Return.
6 Press channel down to exit the PC Setting menu.
Note
The new setting is confirmed automatically when the OSD times out.
Vertical Position
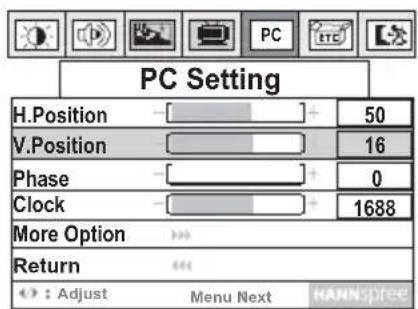
1 Press menu to enter the OSD menus.
2 Press channel up or channel down to select PC Setting.
3 Press menu to enter the PC Setting menu.
4 Press menu to select V.Position.
5 Press channel up to move the display up. Press channel down to move the display down.
6 Press menu to select Return.
7 Press channel down to exit the PC Setting menu.
Note
The new setting is confirmed automatically when the OSD times out.
Phase
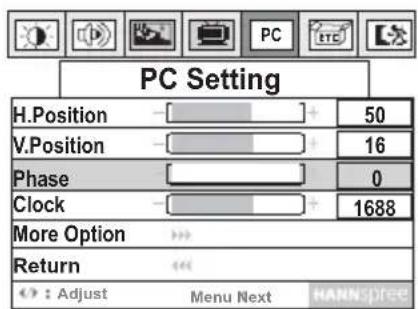
1 Press menu to enter the OSD menus.
2 Press channel up or channel down to select PC Setting.
3 Press menu to enter the PC Setting menu.
4 Press menu to select Phase.
5 Press channel up to increase the phase. Press channel down to decrease the phase.
6 Press menu to select Return.
7 Press channel down to exit the PC Setting menu.
Note
The new setting is confirmed automatically when the OSD times out.
Clock
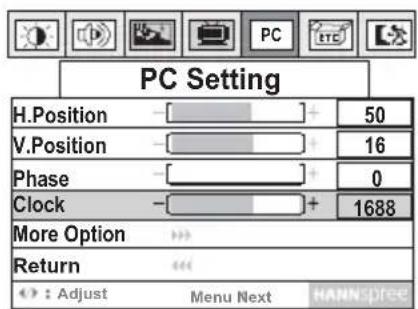
1 Press menu to enter the OSD menus.
2 Press channel up or channel down to select PC Setting.
3 Press menu to enter the PC Setting menu.
4 Press menu to select Clock.
5 Press channel up to increase the clock. Press channel down to decrease the clock.
6 Press menu to select Return.
7 Press channel down to exit the PC Setting menu.
Note
The new setting is confirmed automatically when the OSD times out.
DOS Mode
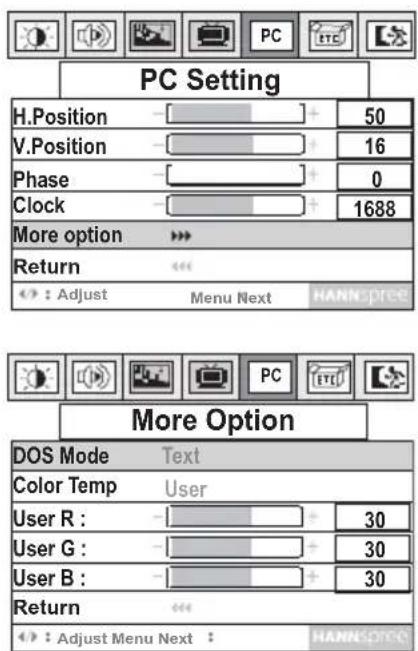
1 Press menu to enter the OSD menus.
2 Press channel up or channel down to select PC Setting.
3 Press menu to enter the PC Setting menu.
4 Press menu to select the More Option.
5 Press channel up to enter more option.
6 Press channel up or channel down to select Text or Graphics mode.
Color Temperature
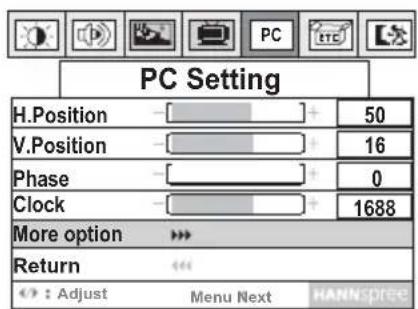
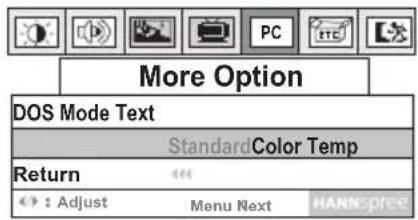
1 Press menu to enter the OSD menus.
2 Press channel up or channel down to select PC Setting.
3 Press menu to enter the PC Setting menu.
4 Press menu to select the More Option.
5 Press channel up to enter More Option.
6 Press menu to select Color Temp.
Warm
Press channel up or channel down to select Warm.
Standard
Press channel up or channel down to select Standard.
Cold
Press channel up or channel down to select Cold.
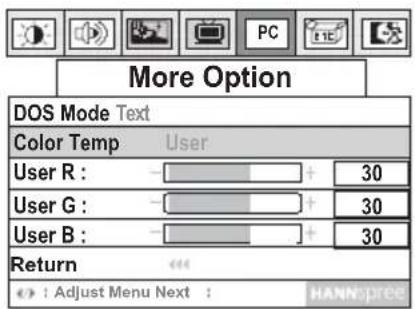
User
The User option enables users to make their own color settings.
Press channel up or channel down to select User. The user menu appears.
- Press menu to select User R, User G, or User B.
- Press channel up or channel down to increase or decrease the selected color temperature.
7 Press menu to select Return.
8 Press channel down to exit the More Option menu.
Note
The new setting is confirmed automatically when the OSD times out.
Miscellaneous Setting
Press menu to enter the OSD menus.
1 Press channel up or channel down to select Miscellaneous.
2 Press menu to enter the Miscellaneous menu.
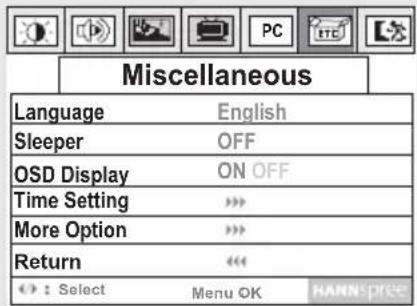
Language
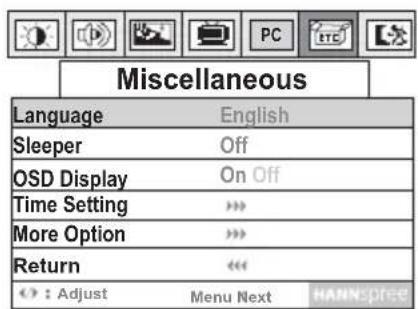
1 Press menu to enter the OSD menus.
2 Press channel up or channel down to select Miscellaneous.
3 Press menu to enter the Miscellaneous menu.
4 Press channel up or channel down to select a language.
5 Press menu to select Return.
6 Press channel down to exit the Miscellaneous menu.
Sleeper
The Sleeper turns the TV off automatically after a set period of time.
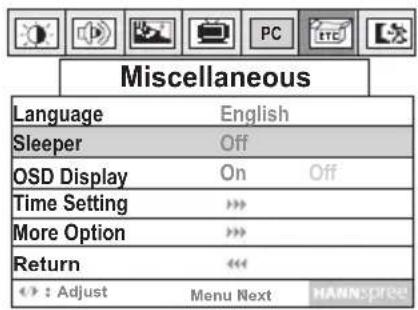
1 Press menu to enter the OSD menus.
2 Press channel up or channel down to select Miscellaneous.
3 Press menu to enter the Miscellaneous menu.
4 Press menu to select Sleeper.
5 Press channel up or channel down to select a power off time:
- OFF
- 30 minutes
- 60 minutes
- 90 minutes
- 120 minutes
6 Press menu to select Return.
7 Press channel down to exit the Miscellaneous menu.
OSD Display
When set to Off, the OSD display (source data on top left corner of the TV screen) turns off after approximately 5 seconds. When set to On, the OSD does not turn off automatically.
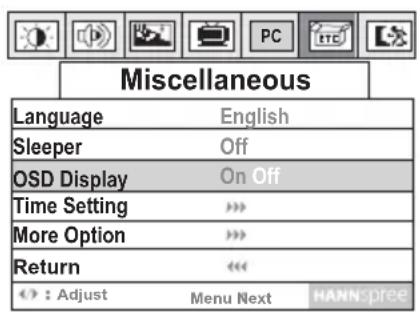
1 Press menu to enter the OSD menus.
2 Press channel up or channel down to select Miscellaneous.
3 Press menu to enter the Miscellaneous menu.
4 Press menu to select OSD Display.
5 Press channel down to select On.
Press channel up to select Off.
6 Press menu to select Return.
7 Press channel down to exit the Miscellaneous menu.
Time Setting
This setting allows you to set the TV clock.
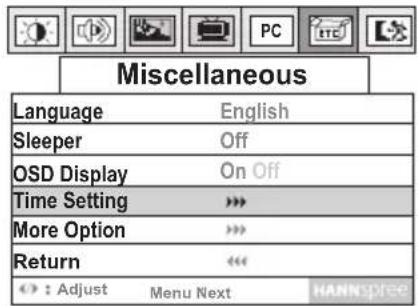
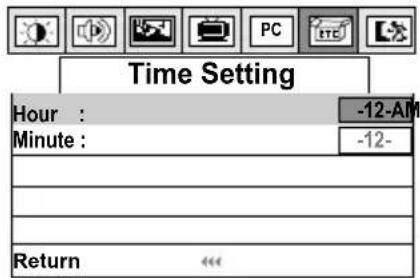
1 Press menu to enter the OSD menus.
2 Press channel up or channel down to select Miscellaneous.
3 Press menu to enter the Miscellaneous menu.
4 Press menu to select Time Setting.
5 Press channel up to enter the Time Setting menu.
6 Press menu to select the Hour or Minute.
7 Press channel up or channel down to decrease or increase the time.
8 Press menu to select Return.
9 Press channel down to exit the Time Setting menu.
Note
The new setting is confirmed automatically when the OSD times out.
More Option
This setting allows you to set the OSD background, closed caption function, parental control features, and reset the TV.
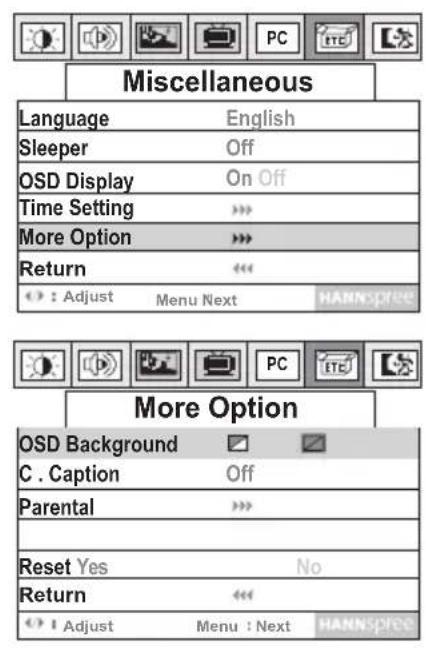
1 Press menu to enter the OSD menus.
2 Press channel up or channel down to select Miscellaneous.
3 Press menu to enter the Miscellaneous menu.
4 Press menu to select More Option setting.
5 Press channel up to enter the More Option menu.
6 Press menu to select OSD Background, C.Caption, Parental, Reset, or Return.
OSD Background
This setting allows you to make the OSD background transparent or opaque.
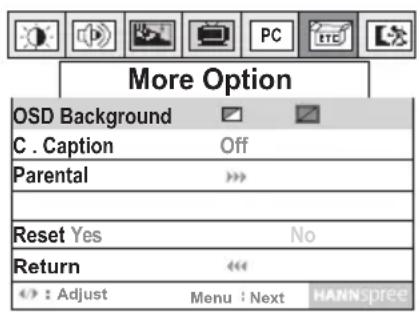
1 Enter the More Option menu.
2 Press channel down to make the background transparent. Press channel up to make the background opaque.
3 Press menu to select Return.
4 Press channel down to exit the More Option menu.
Note The new setting is confirmed automatically when the OSD times out.
C. Caption (Closed Caption)
This setting allows you to select closed caption subtitles or text information broadcast with the program ^1 .
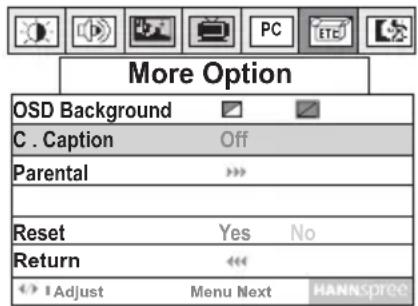
1 Enter the More Option menu.
2 Press menu to select C.Caption.
3 Press channel up to select CC1, CC2, CC3, CC4, Text1, Text2, Text3, Text4, or Off.
4 Press menu to select Return.
5 Press channel down to exit the More Option menu.
Parental
The Parental Control Function (V-CHIP) is used to block program viewing based on the ratings sent by the broadcast stations ^1 . The United States has two rating systems for viewing contents, TV Parental Guidelines, and movie ratings. The TV Parental Guidelines work in conjunction with the V-CHIP to help parents screen out inappropriate television programs from their children. Movie ratings are used for original movies rated by the Motion Picture Association of America (MPAA) as watched on cable TV and not edited for television. The V-CHIP can also be set to block MPAA-rated movies.
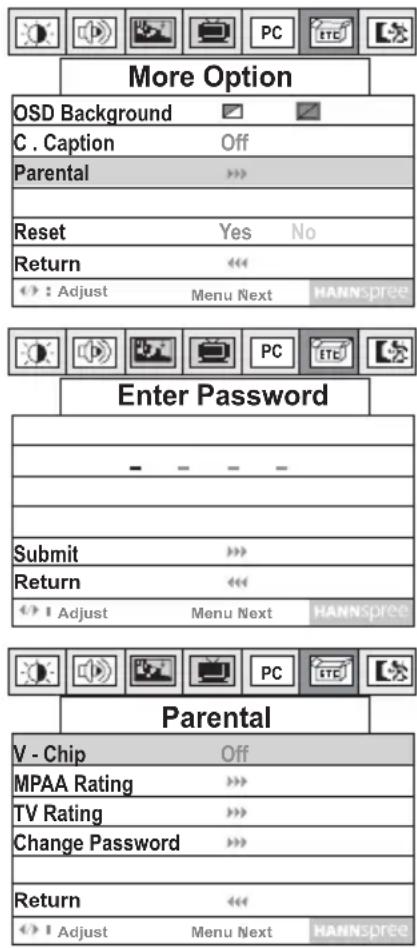
1 Enter the More Option menu.
2 Press menu to select Parental.
3 Enter the password number using the remote control keypad.
4 Press ▶ (on the remote control) to submit the password.
The Parental submenu appears.
Note
To use parental control functions, a password must be entered. The default password is 0000. The password may only be entered using the remote control. If the wrong password is entered, “Wrong Password” is displayed. See “Change Password” on page 75.
- Parental functions are only available in the United States of America and is contingent upon the availability of the TV network programming.
V-Chip
This setting allows you to turn the V-chip functions on or off.
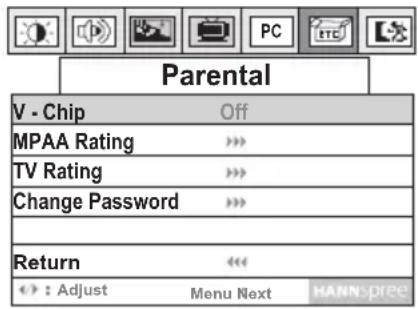
1 Enter the More Option menu.
2 Press menu to select Parental.
3 Enter the password number using the remote control keypad.
4 Press menu to select Submit.
5 Press ▶ (on the remote control) to submit the password.
The Parental submenu appears.
6 Press the menu button to select V-Chip.
7 Press channel up to toggle the V-chip function on or off.
8 Press menu to select Return.
9 Press channel down to return to the More Option menu.
MPAA Rating
The MPAA rating menu allows you to block or unblock broadcast programs based on their movie rating.
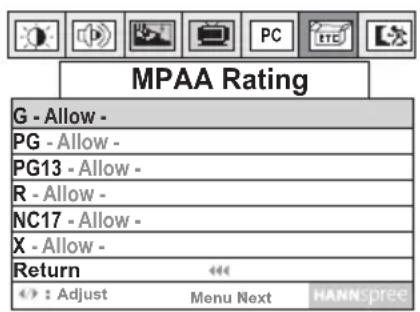
1 Enter the More Option menu.
2 Press menu to select Parental.
3 Enter the password number using the remote control keypad
4 Press menu to select Submit.
5 Press ▶ (on the remote control) to submit the password.
The Parental submenu appears.
6 Press menu to select MPAA Rating.
7 Press channel up to display the MPAA submenu.
8 Press menu to select a rating to change.
9 Press channel up to allow or block the selected rating.
10Press menu to select Return.
11 Press channel down to return to the Parental menu.
TV Rating
The TV Rating menu allows you to block or unblock broadcast programs based on their TV rating.
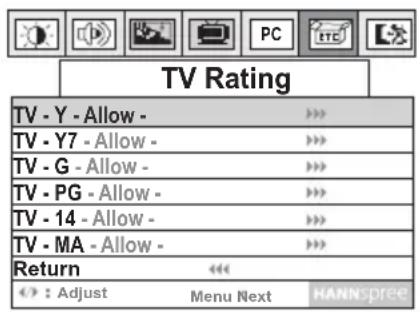
1 Enter the More Option menu.
2 Press menu to select Parental.
3 Enter the password number using the remote control keypad.
4 Press menu to select Submit.
5 Press channel up to submit the password.
The Parental submenu appears.
6 Press menu to select TV Rating.
7 Press channel up to display the TV Rating submenu.
8 Press menu to select a rating to change.
9 Press channel up to allow or block the selected rating. The Blocked Content menu will display.
10Press menu to select Return.
11 Press channel down to return to the Parental menu.
Ratings
| MPAA RatingsG – Suitable for a general audience, all childrenPG – Parental guidance suggestedPG-13 – Parental guidance for children under 13 suggestedR – Restricted viewing. Parental guidance suggested for children under 17NC-17 – No-one under 17 allowed to viewX – Adults only |
| TV RatingsAge basedTV-Y – Suitable for a general audience, all childrenTV-Y7 – Directed at children aged 7 and olderTV-G – General audienceTV-PG – Parental guidance suggestedTV-14 – Parents strongly cautionedTV-MA – Mature audience onlyContent basedFV – Fantasy violenceD – Suggestive dialogueL – Strong languageS – Sexual situationsV – Violence |
Note
More information about the ratings system can be found by visiting these web sites:
http://www.mpaa.org
http://www.tvguidelines.org
Change Password
The Change Password function enables you to change the password needed to access Parental Control features.
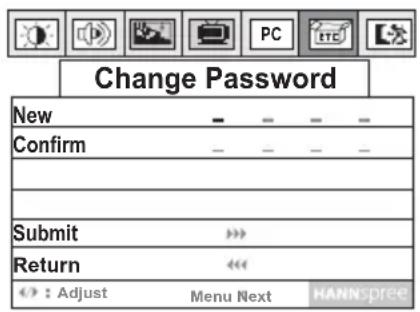
1 Enter the More Option menu.
2 Press menu to select Parental.
3 Enter the password number using the remote control keypad.
4 Press menu to select Submit.
5 Press channel up to submit password.
6 The Parental submenu appears.
7 Press menu to select Change Password.
8 Press channel up to display the Change Password screen.
9 Enter the new password using the keypad on the remote control.
10 Enter the new password again to confirm.
11 Press channel up to submit the new password.
12Press menu to select Return.
13Press channel down to return to the Parental menu.
Notes
- If the two passwords entered do not match, the message “Wrong Password” is displayed.
- Your password is required to access any parental control feature in the future. If you forget your password, refer to “Troubleshooting” on page 79.
Reset
The Reset function returns all of your TV's user settings to their factory defaults.
Warning:
The reset function will erase all of your custom and favorite channel settings, and will reset all display settings (such as contrast, brightness, etc.) to the factory default values. The reset function cannot be reversed once it begins.
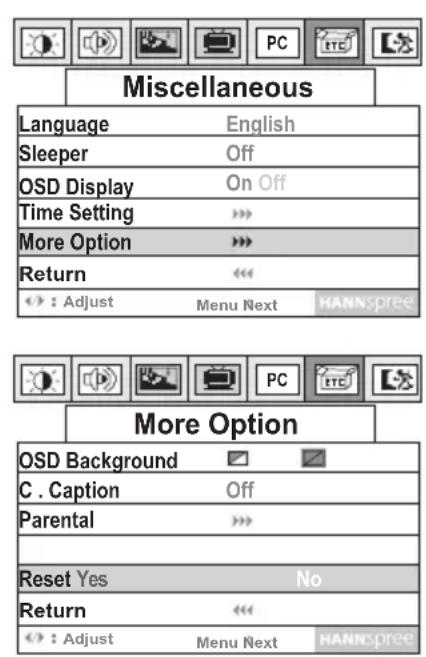
1 Press menu to enter the OSD menus.
2 Press channel up or channel down to select Miscellaneous.
3 Press menu to enter the Miscellaneous menu.
4 Press menu to select More Option.
5 Press channel up to enter the More Option menu.
6 Press menu to select Reset.
7 Press channel down to reset the OSD settings.
By default, No is already selected (highlighted in yellow). The TV immediately resets when Yes is selected and you see the message on the screen.
11 Taking Care of Your TV & Remote Control
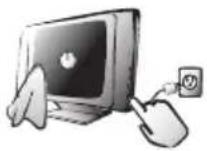
Turn the power off before you begin cleaning the TV.

For best results, use a clean lens cloth to remove dust and fingerprints from the screen.

Do not wipe the shell of the TV with alcohol, methanol, gasoline or oil products to avoid damaging the finish. Wipe the shell with a dry soft cloth and use neutral cleaning fluids.
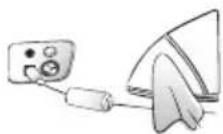
If your model has leather components, wipe the leather parts with a dry cloth and keep the area dry. Place the TV far from sources of steam to avoid making the leather wet.
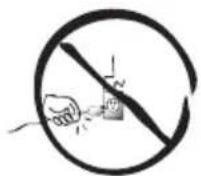
Be careful to disconnect the power plug correctly. Hold the plug. Do not attempt to disconnect the plug by pulling on the power cord.
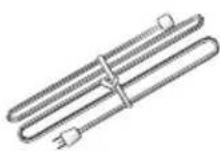
Arrange and store the power cord neatly as shown to the left to avoid knotting or bending which may cause fire due to damage or electric leakage.
Note
Protect the remote control from shock or vibration to avoid damage.
Do not place the remote control in hot or humid locations.
| Situation Solution | |
| No picture and sound. | Connect the power cord properly.Check if the power LED is on or not.Press power on the control panel or remote control.Press source to cycle through connected video sources.Press channel up or channel down to switch to other TV stations.Check the TV/CATV OSD settings. See “TV/CATV” on page 48.Make sure all cables are connected properly. |
| No picture, or poor picture, sound is OK. | Check the antenna and cable connections.Adjust the brightness in the OSD menus.See “Brightness” on page 34. |
| Picture is not in color. | Adjust the saturation in the OSD menus.See “Saturation” on page 44.Make sure all cables are connected properly. |
| Picture is OK, no sound. | Make sure the source device is functioning properly.Make sure the audio cable is connected securely.Turn the mute off.Press volume up on the control panel or remote control.Make sure the MTS option is set to Stereo, SAP, or Mono. See “MTS” on page 49. |
| One of the speakers has no sound. | Adjust the balance in the OSD menus. See “Balance” on page 39.Make sure the audio cable is connected securely. |
| Cannot receive some TV channels using cable TV. | Try the Auto Program function in the OSD “TV Setting” menu. See “Auto Program” on page 50. |
| Want to reset TV settings. | Use the Reset function in the OSD menu.See “Reset” on page 76. |
Situation Solution
| Cannot operate menus. | ·If OSD items are colored in light blue, the system is in a state such that those settings are not available. |
| Forgot parental control password. ·Use the master password 0928 | |
| Screen image turns over. | ·Make sure the video signal cable is connected properly. |
| Snow appears on the screen. | ·Adjust the location of the antenna, placing it far from roads or sources of interference.·Check the antenna and the video signal line connections. |
| Blurred or overlapped images. | ·Readjust the sharpness setting.·Choose programs with high quality signals.·Adjust the direction of the antenna or change the video signal cable. |
| Remote control doesn’t work. | ·Make sure the battery is inserted correctly.·Replace the battery with a new one.·Make sure the TV power cord is plugged in.·Make sure the path between the remote control and the sensor is clear.·Try operating the remote control at a closer distance to the TV. Refer to “Using the Remote Control” on page 31. |
13
Warranty and Service
For complete warranty service information, please refer to the "Warranty and Service Manual" enclosed with your TV.
| 15-inch LCD TV | |
| LCD Panel Size 15-inch TFT | |
| Aspect Ratio 4:3 | |
| Display Resolution 1024 (horizontal) x 768 (vertical) | |
| TV System NTSC | |
| Video System | VGA input (15 pin D-SUB / PC link cable), S-Video Input and Composite Video Input (through the 4-IN-1 A/V cable) |
| Audio System | Line in10-pin mini-DIN (Audio Input with 4-IN-1 A/V cable)3.5 mm ø headphone port x 1 (Audio Output) |
| Built-in Speakers 2W + 2W / 3W + 3W | |
| Power Supply 100-240V, 50/60 Hz, 12V DC | |
| Power Consumption 60 W Maximum | |
| Optional Accessories External Speakers | |
PC Mode Support Timing
| Pixel Format | Hor. Freq. (kHz) | Hor. Polarity Ver. | Freq. (Hz) Vertical Polarity Standard | |||
| 1 | 640*400 | 31.47 | - | 70 | + | DOS_Graphic |
| 2 | 720*400 | 31.47 | - | 70 | + | DOS_Text |
| 3 | 640*480 | 31.47 | - | 60 | - | VESA |
| 4 | 640*480 | 37.861 | - | 72 | - | VESA |
| 5 | 640*480 | 37.5 | - | 75 | - | VESA |
| 6 | 800*600 | 35.156 | + | 56 | + | VESA |
| 7 | 800*600 | 37.879 | + | 60 | + | VESA |
| 8 | 800*600 | 48.077 | + | 72 | + | VESA |
| 9 | 800*600 | 46.875 | + | 75 | + | VESA |
| 10 | 1024*768 | 48.363 | - | 60 | - | VESA |
| 11 | 1024*768 | 56.476 | - | 70 | - | VESA |
| 12 | 1024*768 | 60.023 | + | 75 | + | VESA |
| 13 | 832*624 | 49.7 | - | 75 | - | MAC |
| 14 | 1024*768 | 60.2 | - | 75 | - | MAC |
| 15 | 640*480 | 35 | - | 67 | - | MAC |
Aspect Ratio: The ratio of width to height of a film, image or display screen.
Broadcast TV: Broadcasting video signals using high-frequency electromagnetic waves to distribute television channels to viewers (standard TV broadcast).
CATV: Community Antenna Television, the original name for cable TV. A television distribution system that uses coaxial cable instead of the traditional radio broadcasting (over-the-air) method to deliver television, FM radio, and other services to consumers.
Color Temperature: Adjusting the color temperature enables you to set the intensity of white light. Color temperature is measured in Kelvin (K). Higher color temperatures result in a blue tint. Lower temperatures result in a red tint.
Hue: Colors in a color system are measured by hue, saturation and luminance. Hue indicates the predominant color.
LCD (Liquid Crystal Display): A display technology that uses rod-shaped molecules (liquid crystals) that flow like liquid and bend light.
MTS: Multi-channel Television Sound. Enables reception of audio other than the primary (stereo) audio signal. SAP (Second Audio Program) enables reception of a separate channel that may be a different language or completely different information such as the news.
OSD (On-Screen Display): A control panel on the television screen that allows you to select viewing options.
Saturation: Chromatic purity indicating the amount of white contained in a color. Fully saturated colors are pure colors; less saturated colors appear as pastel shades.
Stereo: is the default audio signal belonging to a particular channel.
S-Video: Separate video, a video cabling standard used to transmit video by keeping brightness (Y) and color information (C) on
separate channels. Most often used with camcorders, VCRs, and quality receivers and amplifiers to provide sharper pictures.

is a trademark of
SRS Labs, Inc.
SRS technology is incorporated under license from SRS Labs, Inc.
- Table of Contents
- FCC Compliance Statement 1
- Additional Information
- DOC Compliance Notice 1
- CE Conformity Statement 2
- 2
- Description of Warning Symbols
- Before You Proceed
- CAUTION
- WARNING
- Electric Power Notice
- Power Supply Safety Notes
- Installation Safety Notes
- Antenna
- Location
- Power
- IMPORTANT SAFETY INSTRUCTIONS
- 4
- Preface
- Copyright
- 5
- Introducing the TV
- Features
- 6
- Checking Package Contents
- Inserting the Remote Control Battery/Batteries
- Lithium battery/batteries
- AAA battery/batteries
- Connecting to an Antenna or Cable TV
- Connecting to AV Devices
- Connecting to a VCR/VCD/DVD Player
- Note
- Connecting to a Video Camera
- Connecting to a Video Game Console
- Notes
- Connecting External Speakers or Headphones
- Connecting to a PC
- Connecting the Power Adapter
- Using the Remote Control
- Turning the TV On and Off
- Selecting Channels
- Switching Source Signals
- Adjusting the Volume
- Adjusting On-Screen Display (OSD) Settings
- OSD Setting Menu
- Brightness
- Contrast
- Audio Setting
- Treble
- Bass
- Balance
- SRS
- Mute
- Video Setting
- Hue
- Saturation
- Sharpness
- Color Temperature
- Warm
- Standard
- Cold
- TV Setting
- TV/CATV
- Receiving Broadcast TV
- Receiving Cable TV
- MTS
- STEREO
- SAP
- MONO
- Auto Program
- Manual Program
- Channel Add/Erase
- Add Channel
- Erase Channel
- Favorite Channel
- PC Setting
- Horizontal Position
- Vertical Position
- Phase
- Clock
- DOS Mode
- User
- Miscellaneous Setting
- Language
- Sleeper
- OSD Display
- Time Setting
- More Option
- OSD Background
- Caption (Closed Caption)
- Parental
- V-Chip
- MPAA Rating
- TV Rating
- Ratings
- Change Password
- Reset
- Warning:
- Taking Care of Your TV & Remote Control
- 13
- Warranty and Service
Brand : HANNSPREE
Model : F001-15U1
Category : Television