
ST24 - Television HANNSPREE - Free user manual and instructions
Find the device manual for free ST24 HANNSPREE in PDF.


| Product Type | LCD HDTV |
| Brand | Hannspree |
| Model | ST24 |
| Screen Size | 23.6 inches (59.9 cm) |
| Resolution | 1920 x 1080 (Full HD) |
| Aspect Ratio | 16:9 |
| Brightness | Adjustable via Backlight setting (0-10) |
| Contrast Ratio | Adjustable in Picture menu |
| Viewing Angle | Wide (typical LCD) |
| Audio Output Power | 3 W x 2 (RMS) |
| Audio Modes | Default, Club, Dance, Live, Pop, Rock, User |
| Video Inputs | HDMI x3, Component (YPbPr), Composite (AV1/AV2), VGA (PC) |
| USB Port | 1 x USB (for photo/music playback) |
| Other Connectors | Antenna (75 Ω), Earphone output, VGA audio input |
| TV Tuner | ATSC/8-VSB (digital) |
| Power Consumption | 50 W (typical), <1 W (standby) |
| Power Supply | 100-240 V ~ 60 Hz |
| VESA Mount | 100 x 100 mm, screw M5 x 10 mm, max load 15 kg |
| Remote Control | Included, batteries AAA (2 pcs) |
| OSD Languages | English, Spanish, French |
| Cleaning | Soft dry cloth; no aggressive cleaners |
| Safety | Keep out of reach of children; do not expose to rain/moisture |
| Energy Star | Certified |
| Weight | Not specified (approx. 5 kg estimate) |
Frequently Asked Questions - ST24 HANNSPREE
User questions about ST24 HANNSPREE
0 question about this device. Answer the ones you know or ask your own.
Ask a new question about this device
Download the instructions for your Television in PDF format for free! Find your manual ST24 - HANNSPREE and take your electronic device back in hand. On this page are published all the documents necessary for the use of your device. ST24 by HANNSPREE.
USER MANUAL ST24 HANNSPREE
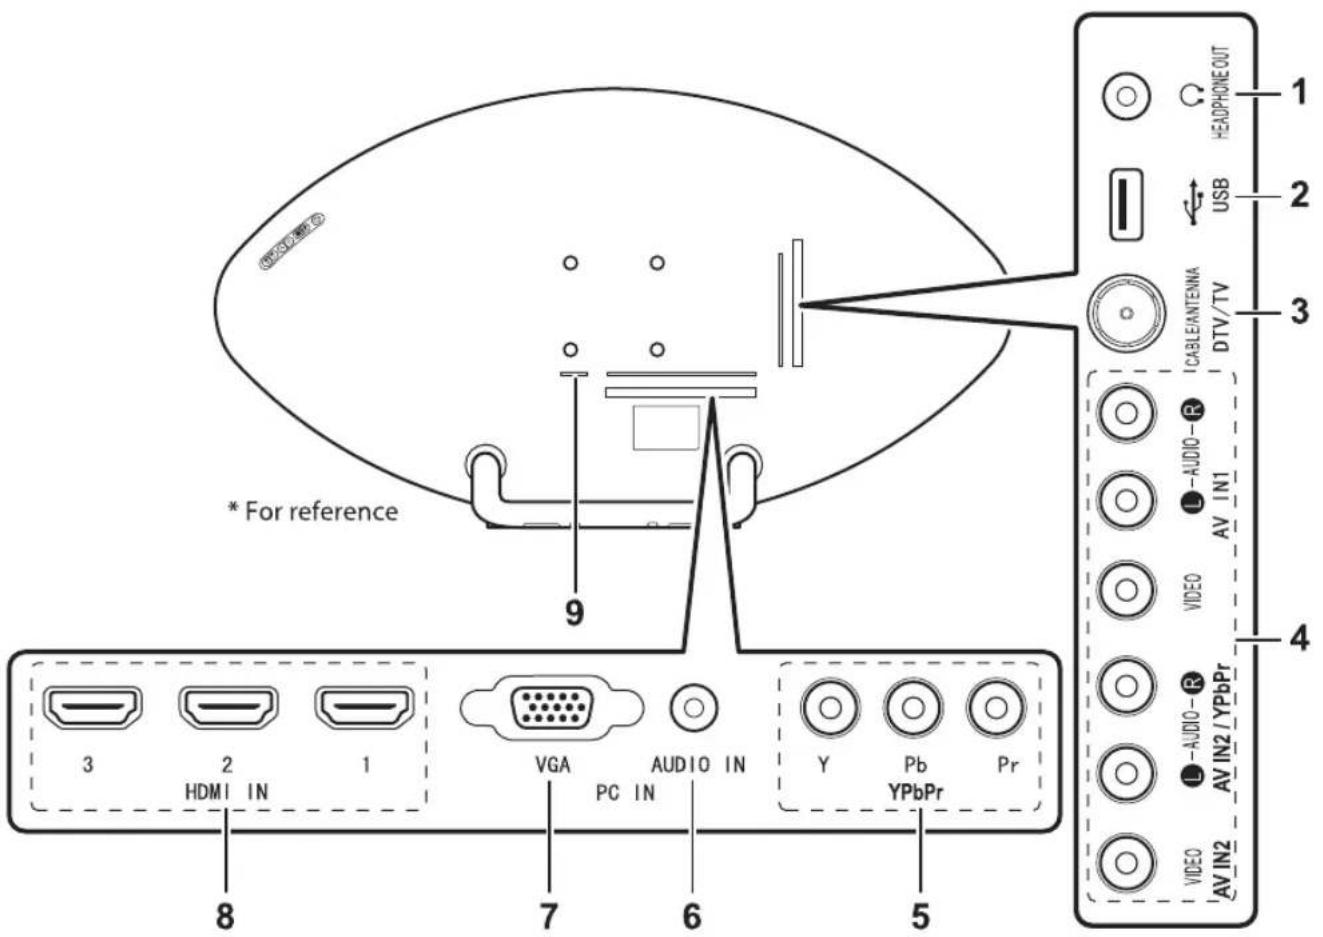
For device connection instructions, please refer to the I/O port descriptions and function table in the enclosed user's manual.

Suggest to put this product in place where used by adult only(such as restaurants, sports fields, clubs....etc.), keep this product out of reach of children to prevent any damage or injury happening.
Contents
Regulatory Information ......2
Safety Notices ......2
Description of Warning Symbols .....2
Preface 4
Warranty and Service ....5
Cleaning 5
- Getting Started ......6
Package Contents• 6
Introducing the TV• 6
Features• 6
Foot Stand Installation• 7
- Disconnecting the Stand......7
- Installing the Wall Mount Kit......8
• Control Panel....9 - Input and Output Jacks......10
-
Remote Control......11
-
Setting up your TV ......12
Power Connection• 12
- Rear Connections....12
• Using the TV....13
Turning the TV On and Off ......13
Running Setup Wizard......13
Selecting Your Content Source....14
Performing an Automatic
Channel Search ....14
Selecting Channels....14
Adjusting the Volume .....15
Setting Up Your Favorite
Channels ....15
Editing the Channel List......15
Adjusting the Backlight .....15
Changing Your Location .....15
Changing the OSD Language .....16
Resetting to Factory Default
Settings......16
-
Adjusting On-Screen Display (OSD) Settings ....17
-
On-Screen Menu Selection......18
• Media Center Menu ....21
Basic Operation ......22
Viewing Photos ......22
Playback Music....22
Customizing Settings ......22
- Troubleshooting ......23
- Support Timing ....24
- Specifications ......25
Regulatory Information
FCC Compliance Statement ^1
This device complies with part 15 of the FCC Rules. Operation is subject to the following two conditions: (1) This device may not cause harmful interference, and (2) this device must accept any interference received, including interference that may cause undesired operation.
Additional Information
This equipment has been tested and found to comply with the limits for a Class B digital device, pursuant to part 15 of the FCC Rules. These limits are designed to provide reasonable protection against harmful interference in a residential installation. This equipment generates, uses and can radiate radio frequency energy and, if not installed and used in accordance with the instructions, may cause harmful interference to radio communications. However, there is no guarantee that interference will not occur in a particular installation. If this equipment does cause harmful interference to radio or television reception, which can be determined by turning the equipment off and on, the user is encouraged to try to correct the interference by one or more of the following measures:
Reorient or relocate the receiving antenna•
Increase the separation between the equipment and receiver•
- Connect the equipment into an outlet on a circuit different from that to which the receiver is connected
Consult the dealer or an experienced technician for help•
Warning: The Federal Communications Commission warns that changes or modifications of the equipment not expressly approved by the party responsible for compliance could void your authority to operate the equipment.
DOC Compliance Notice ^2
This digital apparatus does not exceed the Class B limits for radio noise emissions from digital apparatus as set out in the Radio Interference Regulations of the Canadian Department of Communications. This device complies with Canada ICES-003 Class B.
^1 Applies only to products purchased in the United States of America.
^2 Applies only to products purchased in Canada.
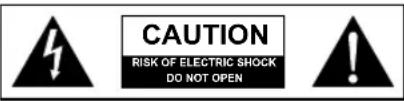
Description of Warning Symbols

WARNING
This symbol is used to alert users to pay attention to important descriptions regarding usage, maintenance (repair), and additional important information related to this TV.

CAUTION
This symbol is used to alert users to the risk of electric shocks due to dangerous and uninsulated components.
Safety Notices

Installation Safety Notes
Location
Avoid allowing the TV to get prolonged exposure to sunlight or other strong sources of heat. Leave sufficient distance between the TV and the wall to provide enough space for the emission of heat.

To reduce the risk of fire or electric shock, do not expose this apparatus to
rain or moisture. Apparatus shall not be exposed to dripping or splashing and no objects filled with liquids, such as vases, shall be placed on the apparatus.

These servicing instructions are for use by qualified service personnel only. To reduce the risk of electric shock, do not perform any servicing other than that contained in the operating instructions unless you are qualified to do so.
Installation
Do not place the TV in locations • where there is excessive steam or dust.
Avoid blocking the TV's vents, do not place the TV on a bed, sofa, carpet, or in a sealed cabinet.
Install the outdoor antenna away • from power transmission lines to avoid possible danger.
Important Safety Instructions
Read these instructions.
Keep these instructions.
Heed all warnings.
Follow all instructions.
Do not use this apparatus near water.
Clean only with dry cloth.
Do not block any ventilation • openings. Install in accordance with manufacturer's instructions.
- Do not install near any heat sources such as radiators, heat registers, stoves, or other apparatus (including amplifiers) that produce heat.
Do not defeat the safety purpose of the polarized or grounding-type plug. A polarized plug has two blades with one wider than the other. A grounding-type plug has two blades and a third grounding prong. The wide blade or the third prong are provided for your safety. If the provided plug does not fit into your outlet, consult an electrician for replacement of the obsolete outlet.
NOTE: Applies to US only.
Protect the power cord from • being walked on or pinched, particularly at plugs, convenience receptacles, and the point where they exit from the apparatus.
Only use attachments/accessories • specified by the manufacturer.
Use only with the cart, stand, • tripod, bracket, or table specified by the manufacturer, or sold with the apparatus. When a cart is
used, use caution when moving the cart/apparatus combination to avoid injury from tip-over.

Unplug this apparatus during • lightning storms or when unused for long periods of time.
Refer all servicing to qualified • service personnel. Servicing is required when the apparatus has been damaged in any way, such as power-supply cord or plug is damaged, liquid has been spilled or objects have fallen into the apparatus, the apparatus has been exposed to rain or moisture, does not operate normally, or has been dropped.
WARNING: To reduce the risk of fire or electric shock, do not expose this apparatus to rain or moisture.
The apparatus shall be connected to a MAINS socket outlet with a protective earthing connection.
Where the MAINS plug or an • appliance coupler is used as the disconnect device, the disconnect device shall remain readily operable.
The apparatus should be used in moderate climate.
The apparatus shall not be exposed to dripping or splashing and that no objects filled with liquids, such as vases, shall be placed on the apparatus.
Personal Safety
To avoid overloading the power • supply, never plug too many electrical devices into an outlet, power strip, or extension cable.
Dangerous high-voltage electric • power components are located inside the TV. To avoid electric shock, do not disassemble the casing.
Do not place or drop metals, small objects, or flammable materials into the vent of the TV.
If the TV is dropped, falls down, or is otherwise damaged, unplug the power cord immediately and contact an authorized service technician.
If any fluid is sprayed or dropped • into the TV, contact an authorized service technician.
- The screen of the TV is made of glass. Avoid hitting or scraping it. If the screen is broken, do not touch the broken glass.
- Do not allow children to use the TV unattended.
Be careful when disconnecting the • power plug. Hold the plug. Do not attempt to disconnect the plug by pulling on the power cord.

If the remote control is not used • for a long period, remove the batteries and store them properly.
- Handle damaged or leaking batteries carefully, and wash hands with soap if they come in contact with leaked chemical fluids.
- If your remote control has two batteries, do not mix new and old batteries, or the life of the new batteries will be shortened. Chemical fluids may leak from the old batteries.
- Danger of explosion if battery is incorrectly replaced. Replace only with the same or equivalent type recommended by the equipment manufacturer. Discard used batteries according to manufacturer's instructions.
• Refer to your local recycling or waste disposal rules and contact a local waste disposal vendor to dispose of used batteries. - The remote control cover may have a magnet in it, so do not
place magnetic sensitive items such as watches, credit cards, or flash media close to the cover.
- Do not use force when pulling the remote control cover open; you may damage the hinge.
Trademark Notice
HDMI
Hannspree products incorporate High-
Definition Multimedia Interface (HDMI™) technology.
HDMI, the HDMI logo and High-Definition Multimedia Interface are trademarks or registered trademarks of HDMI Licensing LLC in the United States and other countries.
License Notice and Trademark Acknowledgment
DOLBY. Manufactured under DIGITAL | license from Dolby Laboratories. Dolby and the double-D symbol are trademarks of Dolby Laboratories.


Copyright
© Copyright 2011 Hannspree, Inc.
All rights reserved. This manual is protected by copyright and distributed under licenses restricting its use, copying and distribution. No part of this manual may be reproduced in any form by any means without the prior written authorization of Hannspree. The TV described in this manual may include copyrighted software of Hannspree (or other third parties). Hannspree (or other third parties) preserves the exclusive rights for copyrighted software, such as the right to distribute or reproduce the copyrighted software. Accordingly, and to the extent allowed by applicable law, any copyrighted software contained in the product described herein shall not be distributed, modified, reverse engineered, or reproduced in any manner without the prior written authorization of Hannspree (or of other third parties).
The Hannspree logos presented herein are trademarks of Hannspree. All other product names, trademarks or logos mentioned herein are used for identification purpose only, and may be the trademarks or registered trademarks of their respective owners.
The purchase of the product described herein shall not be deemed to grant, either directly or by implication, estoppel or otherwise, any license under the copyrights, patents, patent applications or trademarks of Hannspree, except for the normal, non-exclusive use that arises by operation of law in the sale of a product.
RECYCLING INFORMATION
We care very much about our environment protection strategy and firmly believe the actions we take, help us create a healthier Earth.
These devices contain recyclable materials, which can be re-decomposed and re-integrated into brand-new products. On the contrary, other material can be classified to hazardous and poisoned substance.
We strongly encourage you to visit our website or call to find out recycling information and services available in your area.
www.hannspree.com/us
888.808.6789
Notes:
The LCD TV is for entertainment use only and visual display tasks are excluded.
This device uses a VGA connector to connect to a PC. To reduce the influence of main frequency on the source • signal, use a VGA monitor cable with ferrite shield.
The appliance coupler is used as the disconnect device and shall remain readily operable.
The LCD TV shall be connected to a MAINS socket outlet with a protective earthing connection.
Preface
Thank you for purchasing a Hannspree LCD HDTV. Your new TV will allow you to enjoy superior audio and video while enriching your lifestyle with advanced technology.
Please carefully read this manual in its entirety before setting up, using or operating your TV. To ensure the safe and correct installation and operations of the TV, it is important that the safety and operation instructions in this manual are followed.
This instruction manual is designed to assist you in setting up and using the TV. The information in this manual has been carefully checked for accuracy; however, no guarantee is given to the correctness of the contents. The information in this manual is subject to change without notice.
To the extent allowed by applicable law, Hannspree, Inc. ("Hannspree") shall not be liable for direct, indirect, special, exemplary, incidental or consequential damages arising from any defect or omission in this manual, even if advised of the possibility of such damages in advance.
Warranty and Service
For complete warranty service information, please refer to the "Warranty card" enclosed with your TV.
As an ENERGY STAR ^® Partner, Hannspree has determined that this product meets the ENERGY STAR ^® guidelines for energy efficiency. It meets strict energy efficiency guidelines set by the U.S. Environmental Protection Agency and Department of Energy. ENERGY STAR is a joint program of these government agencies, designed to promote energy efficient products and practices.
Changes to certain fetures, settings, and functionalities of this TV can increase or change the power consumption. Depending upon such changed settings, the power consumption may exceed the limits required for the ENERGY STAR qualification.
Packing Material Disposal:
Please refer to your local laws and directives to ensure an environmentally safe disposal.
Keep this manual for later use.
Cleaning
Instruction for cleaning the TV
1 Clean your TV frequently with a soft cloth to remove dust and dirt. More persistent dirt can be removed with a moist cloth with soft soap.
2 Do not use detergents or any other aggressive cleaning. This might damage the housing or screen surface.
1. Getting Started
Package Contents
Make sure the following components are included in the box. Please contact Hannspree Customer Service immediately if anything is missing or damaged.
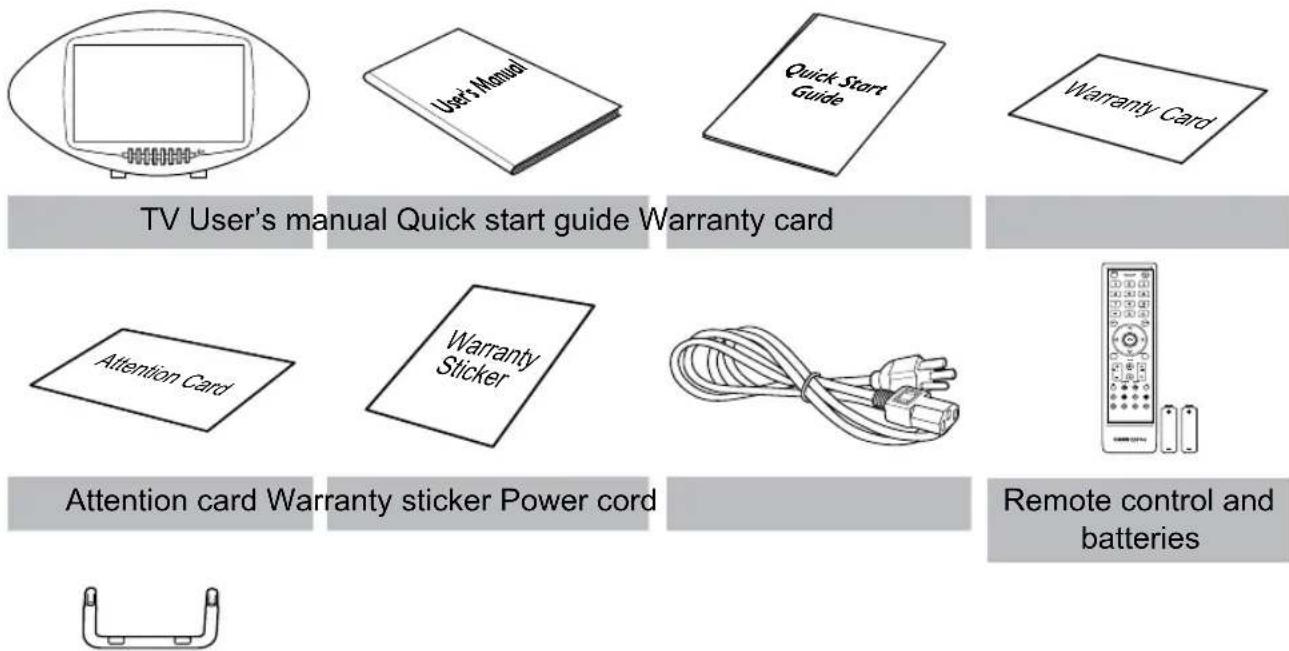
TV stand
Introducing the TV
You can watch ATSC/8-VSB broadcast, cable, or digital television channels, and easily connect a VCR, STB or DVD player to the HDTV (Component), AV (Composite) and HDMI input ports (location of these ports depends on model). You can also use the TV as a monitor for your PC by connecting it through the VGA port.
Convenient control buttons located on the TV and a handy remote control let you change channels, adjust the volume, and change display settings through an easy-to-use on-screen display menu system. The built-in stereo speakers provide full rich sound and a convenient audio output port lets you connect to an external audio system or earphones.
Features
TV Tuner: Built-in TV Tuner (ATSC/8-• VSB)
Audio/Video support:•
- VGA (PC) input
- HDMI inputs
– HDTV (Component) input - AV (Composite) input
- R/L audio inputs
- VGA(PC) audio input
- 3.5 mm stereo earphone output
- USB input
On-Screen Display (OSD) menu system•
Built-in stereo speakers•
Image Enhancement Technology•
- 3:2/2:2 pull down (24P)
- 3D Comb Filter
Noise Reduction•
Advanced 3D de-interlacing•
- Edge Enhancement
- Full-HD TV
• Multimedia function (Photo, Music)
Note:
- The supporting devices mentioned in this manual may vary on different models. For more information, please refer to the manufacturer's user manual or the Quick Start Guide of your TV model.
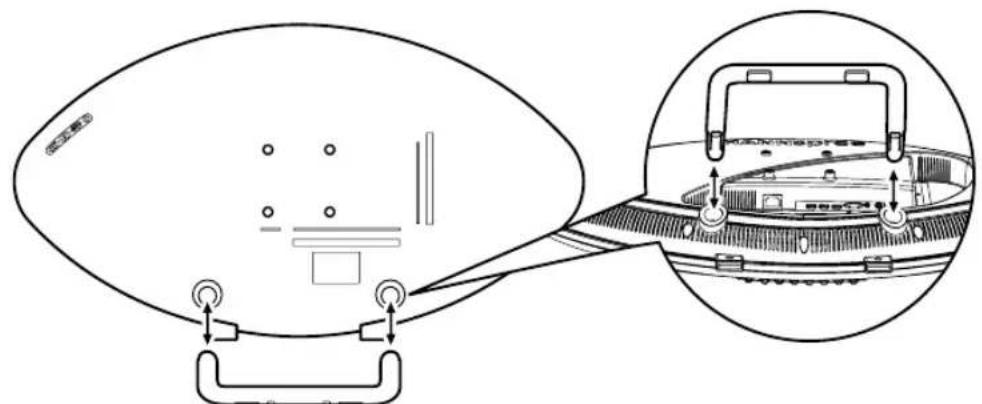
* For reference
Foot Stand Installation
1 Carefully place the TV screen side down on a cushioned surface to protect the screen from damage.
- Install only with another person's assistance.
■ Make sure to distinguish between the front and back of the stand when assembling them.
2 Attach the foot stand as shown in the illustration.
Disconnecting the Stand
1 Carefully place the TV screen side down on a cushioned surface to protect the screen from damage.
2 Remove the stand from the TV.
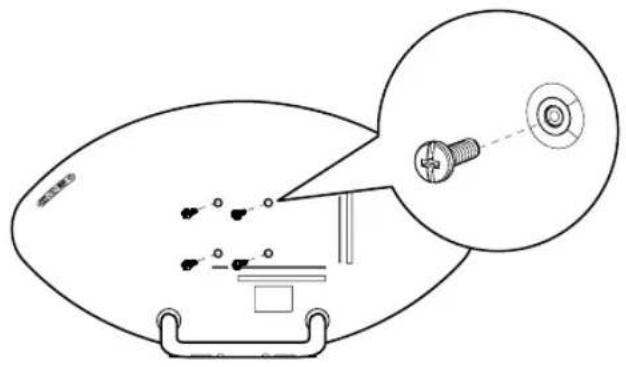
Installing the LCD TV requires special skill that should only be performed by qualified service personnel. Customers should not attempt to do the work themselves. Hannspree bears no responsibility for improper mounting or mounting that results in accident or injury. You can ask a qualified service personnel about using an optional bracket to mount the TV to the wall.
Installing the Wall Mount Kit
Wall mount kits (sold separately) allow you to mount the TV on the wall. For detailed information on installing the wall mount, see the instructions provided with the wall mount kits. Contact a technician for assistance when installing the wall mounted bracket. Hannspree is not responsible for any damage to the product or injury to yourself or others if you select to install the TV on your own.

■ Do not install your wall mount kit while your TV is turned on. It may result in personal injury due to electric shock.
| Model Name | VESA-compatible wall bracket (WxH) | Mount holes number | Screw type | Maximum loading |
| 23.6” TV 10 | 0x100 mm 4 | Machine screw metric 5 x 10 mm | 15 kg |
1 Purchase a VESA compatible wall bracket, which passes UL Certification.
2 Locate your ideal TV position on the wall.
3 Fix the wall bracket firmly on the wall.
4 Secure the TV to the bracket using the 4 mount holes on the back and center of the TV.
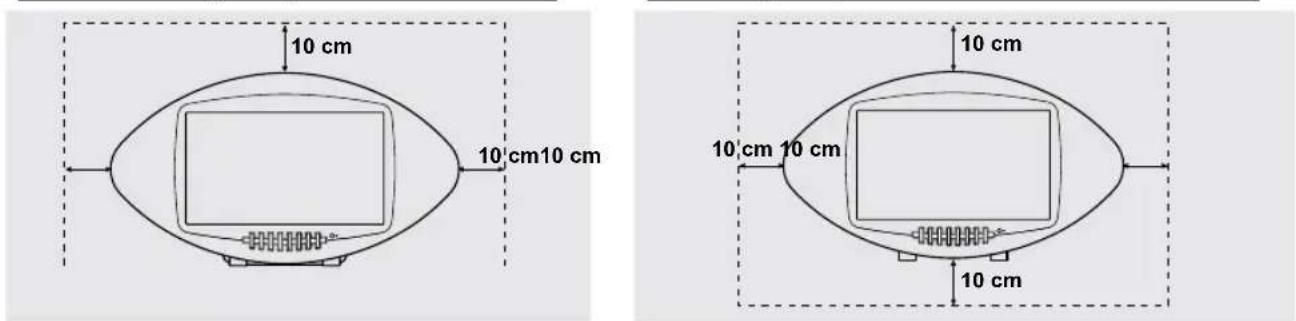
Securing the Installation Space
Keep the required distances between the product and other objects (e.g. walls) to ensure proper ventilation. Failing to do so may result in fire or a problem with the product due to an increase in the internal temperature of the product. Install the product so that the required distances shown in the figure are kept.
■ When using a stand or wall-mount, use parts provided by Hannspree only.
When installing the product with a stand When installing the product with a wall-mount
Note:
Please read the instructions of your specific wall bracket to properly wall mount the TV.
Control Panel
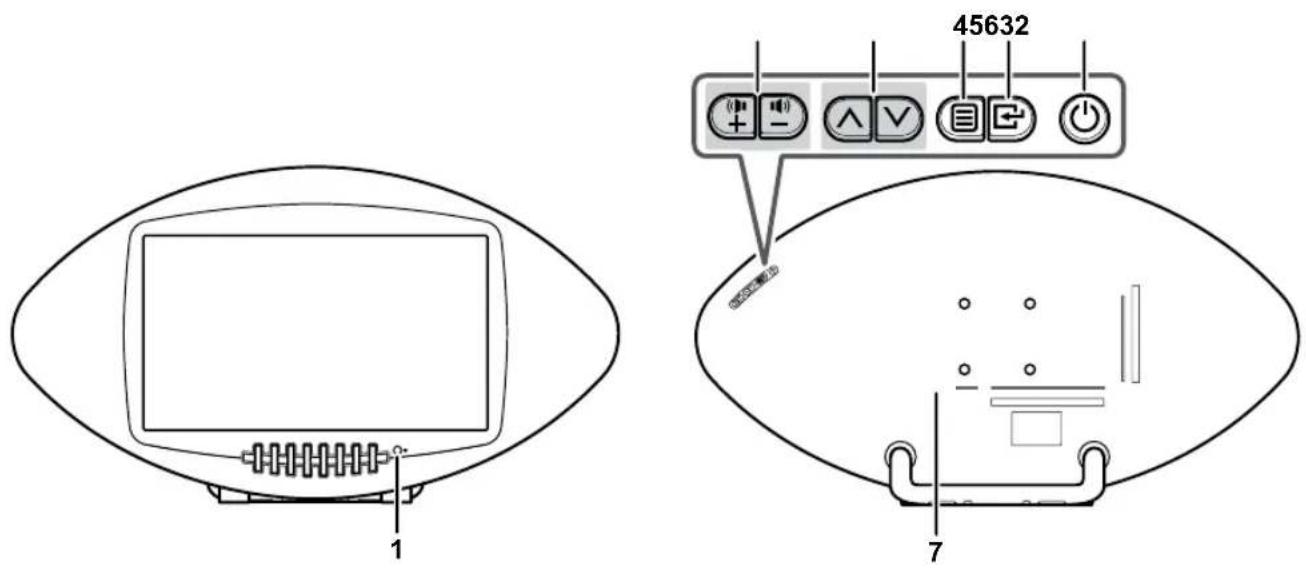
No. Description Button Function
| 1 | Power/Standby indicator and Remote IR sensor | Indicate power on or standby status.Receive incoming remote control commands. |
| 2 Volume adjust | + | Press to increase the volume or toggle the selection/move to the right on the OSD menu. |
| - | Press to decrease the volume or move to the left on the OSD menu. | |
| 3 Channel select | ^ | Press to increase the program number or move upward to the previous item on the OSD menu. |
| √ | Press to decrease the program number or move downward to the next item on the OSD menu. | |
| 4 Menu | 目 | Press to turn the on-screen display (OSD) menu on / off. |
| 5 Input | E | Press to select the proper input source. |
| 6 Power | () | Press to turn the TV on or off. |
| 7 AC power switch Press to turn on or off the power supply. | ||
Input and Output Jacks
Please refer to the front cover illustration for the Input & Output location.
No. Description Connector Function
| 1 Earphone Output |  | Connect to earphones or external amplified speakers. | ||
| [TTX3] | ||||
| 2 USB Connect to a USB flash | [AWCY] | |||
| 3 Cable/Antenna Connect to an antenna or cable TV. |  | |||
| 4 Composite Input (AV1/AV2) |  |  |  | |
| VIDEO | L-AUDIO-R AV IN1 | |||
 |  |  | ||
| VIDEO AV IN2 | L-AUDIO-R AV IN2 / YPbPr | |||
| 5 Component Input |  |  |  | |
| Y | Pb | Pr | ||
6 VGA Audio Input Connect to :  line / audio port. line / audio port. | ||||
7 VGA (PC) Input Connect to :  port. port. | ||||
| 8 HDMI 1/HDMI 2/ HDMI 3 Input | [DB4Z] |  | [TH5] | Connect a HDMI equipment or an HDMI- DVI adapter cable to devices such as a DVD player or set-top box. |
| 3 | 2 | 1 | ||
9 AC IN Input Connect to the  power cord. power cord. | ||||
Remote Control
1 INPUT
Press to select the input signal.
2 Keypad
Press to select a program directly. Press 0-9 to enter the program numbers (press 1 and 0 for program 10).
3 DASH
Press to select the DTV sub-channel.
4 INFO
Press to display program information (if available).
5 OK
Press to enter a submenu or activate a setting.
6 GUIDE
Press to display detailed programming information for channels (only for DTV).
7 MUTE
Press to toggle the sound off and back on again.
8 Volume adjust
Press + to increase audio volume. Press - to decrease audio volume.
9 FAV.
Press to display stored favorite channel list.
10 ASPECT
Press to select the picture format.
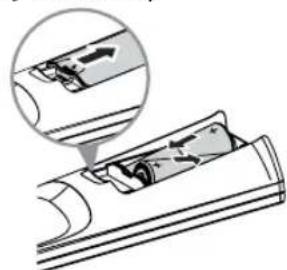
Inserting Batteries (Battery size: AAA)
natural_image
Diagram of a device interior with a magnified view showing internal components (no text or symbols)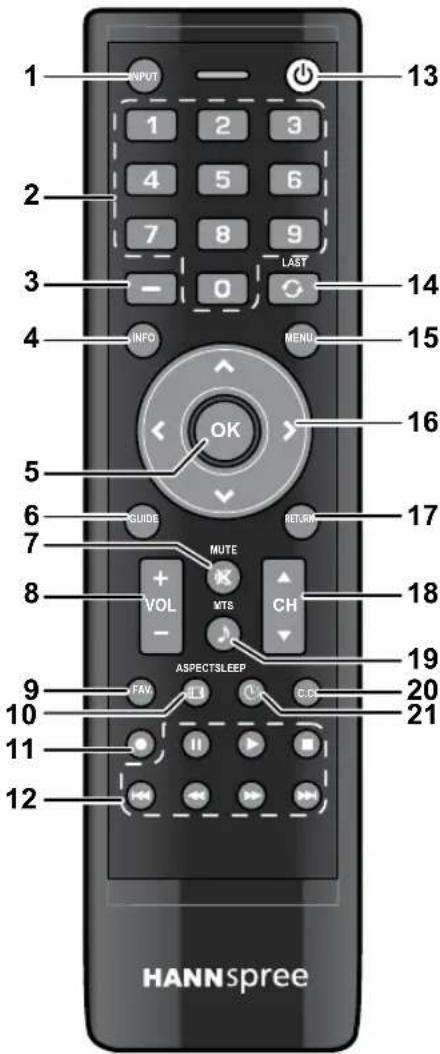
11 Channel list
Press to show channel list.
12 Media buttons
Press the control buttons to perform specific tasks in the TV, USB, or HDMI-CEC mode.
13 Power ⏻
Press to turn the TV on or off.
14 LAST
Press to return to the last selected channel.
15 MENU
Press to access the main menu or to return to the previous menu.
16 Arrows
Press <> to navigate in the main menu, select menu options, set functions, and change values.
can also be used to open the corresponding submenu.
17 RETURN
Press to return to the previous menu screen.
18 Select program
Press ▲ to increase the program number. Press ▼ to decrease the program number.
19 Dual sound ♪
Press to change the multi sound selection of the TV channel.
20 Closed caption (C.C.)
Press to open or close the closed captions.
21 SLEEP
Press to set the sleep timer.
Notes:
For best results, use the remote control within a proper distance from the front of the TV. Do not exceed an angle of 30 degrees when pointing at TV. The operational distance may be shortened when the signal sensor is directly exposed to strong light.
Aim the transmitter on the remote control at the signal sensor and ensure that there are no obstacles between them.
2. Setting up your TV
Power Connection
1 Connect the power cord to the AC IN input jack on the rear of the TV.
2 Insert the plug at the other end of the power cord into a power outlet.
3 Press the AC power switch to turn on the power supply.
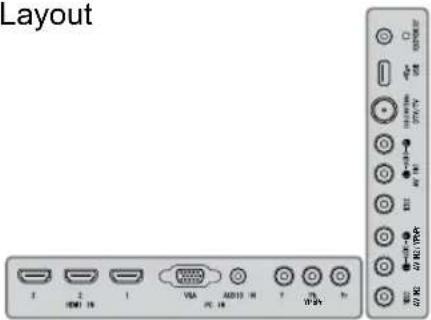
Rear Connections
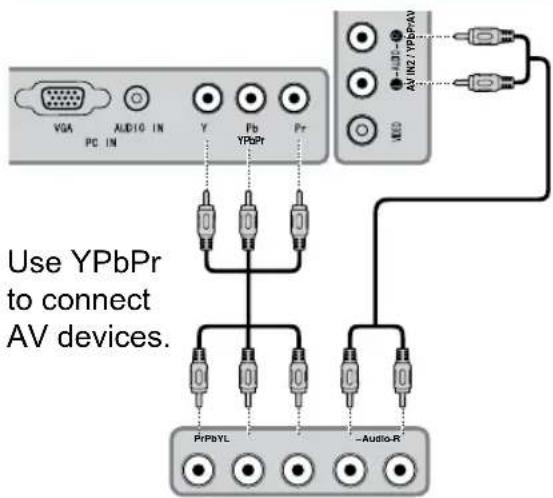
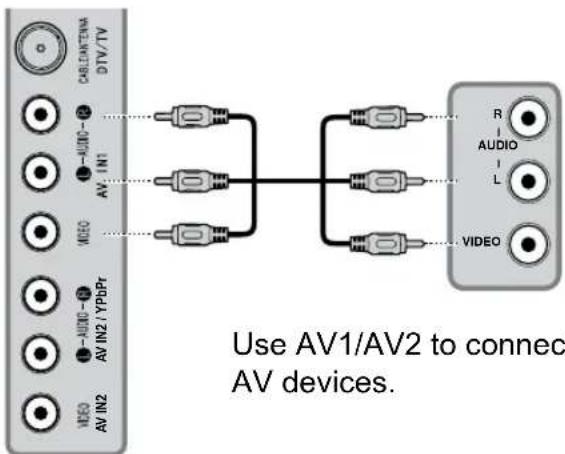
See the illustration and table below for device connection instructions.
Connection Order
HDMI is the best way to connect a device. If it is not available, move down the list in order until you find a connection that is available on each device.

* Typical Layout
1 HDMI
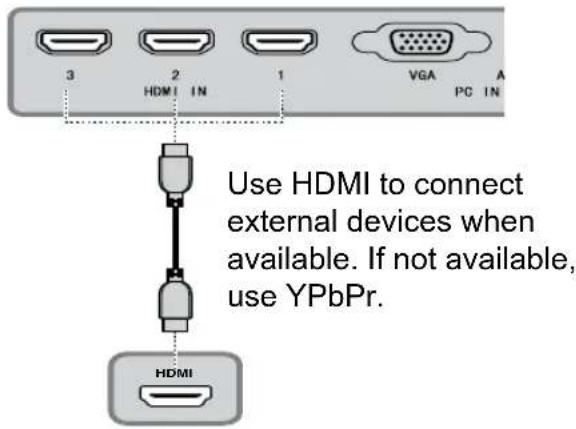
2 YPbPr
3 AV1/AV2
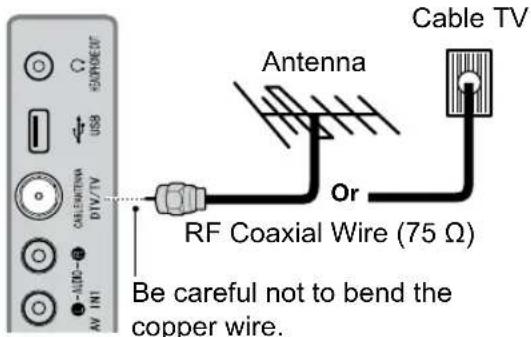
Antenna/Cable
Use this connection when you need to connect directly to an antenna or cable system instead of using a cable box.
Using the TV
Turning the TV On and Off
1 Press ⏻ on the control panel or remote control to turn the TV on. The power LED indicator turns blue, indicating that the TV is on.
2 Press ⏻ again. The power LED turns red, indicating that the TV is off.
Running Setup Wizard
The Setup Wizard is displayed on the screen when you turn on your LCD TV for the first time.
Note:
Press ↗/▼ on the remote control to move through the menu. Press OK to select.
1 Select your language for the on-screen display (OSD) menu.
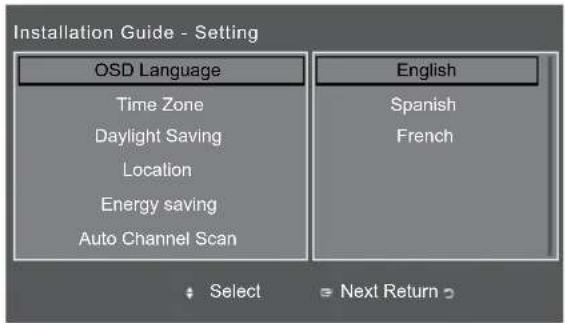
2 Select your time zone.
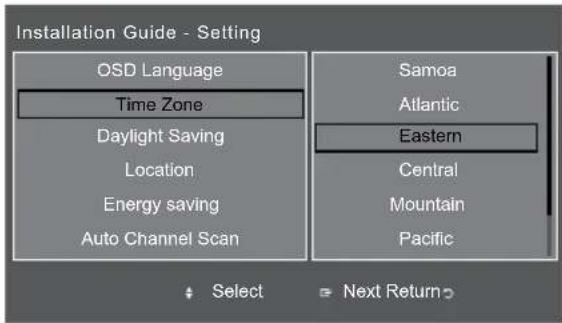
3 Select your daylight saving mode.
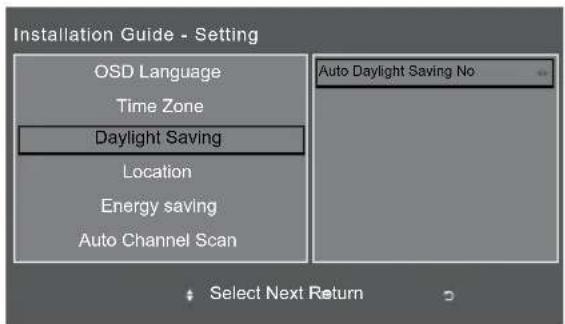
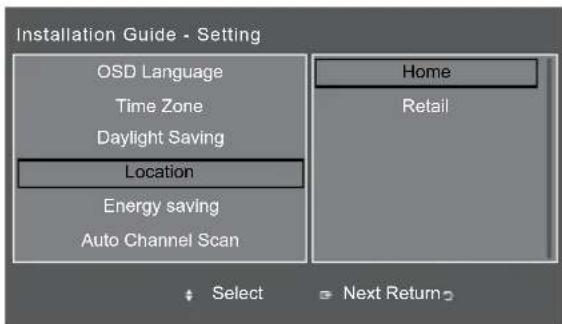
4 Select your TV mode.
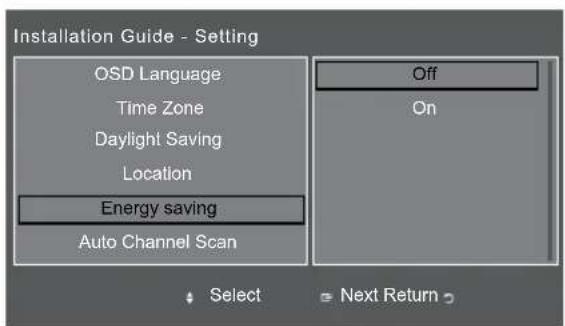
5 Select your energy saving mode.
6 Select your tuner mode. Press OK for channel scan.
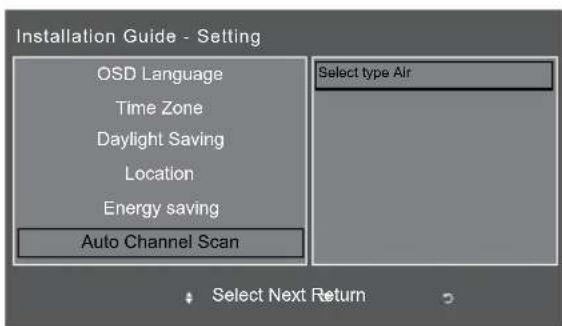
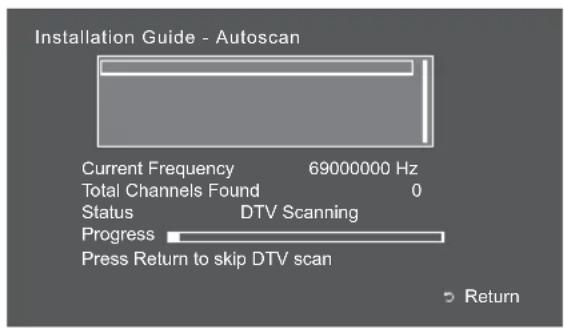
7 The channel scan may take a while to complete. Once the automatic search ends, the TV automatically switches to the first channel found.
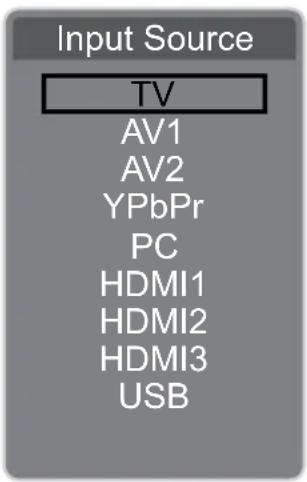
Selecting Your Content Source
You can watch cable or broadcast TV, play DVD or connect to your PC.
To select the source signal:
- Press INPUT on the remote control. The Input Source menu appears.
Press ⚠️/▼ to highlight the desired source, then press OK to confirm.
Performing an Automatic Channel Search
Before using the TV to view programs, you need to activate the channel search first.
1 Press MENU on the remote control or the control panel to display the main menu.
2 Select Channel (☐) > Auto Scan.
3 Press OK on the remote control to run the channel search.
Selecting Channels
- Press CH▲ or CH▼ on the remote control or CH ∧ or CH ∨ on the control panel to increase / decrease the program number.
Press the numeric buttons on the remote control.
Adjusting the Volume
1 Press VOL + on the remote control or the control panel to increase the volume.
2 Press VOL - on the remote control or the control panel to decrease the volume.
3 Press ✗ to eliminate sounds, and press ✗ again or press the volume buttons to restore the original volume.
Setting Up Your Favorite Channels
1 Press MENU on the remote control or the control panel to display the main menu.
2 Select Channel (☐) > Fav List Edit and press OK to enter its submenu.
3 Press ▲/▼ to scroll through the channel list and press OK to select it.
4 Press MENU on the remote control to close the menu.
Editing the Channel List
1 Press MENU on the remote control or the control panel to display the main menu.
2 Select Channel (☐) > Channel List Edit and press OK to enter its submenu.
3 Select the desired channel and press OK to confirm.
■ To view the selected TV channel, select View and press OK to start viewing the selected channel.
■ To skip viewing the selected TV channel, select Delete and press OK to confirm.
■ To add the channel manually into the channel list, select Add and press OK to confirm.
4 Press MENU on the remote control to close the menu.
Adjusting the Backlight
1 Press MENU on the remote control or the control panel to display the main menu.
2 Select Picture (11) > Backlight and press OK to enter its submenu.
3 Press ◀/〉 to adjust the brightness of the screen and press OK.
4 Press MENU on the remote control to close the menu.
Changing Your Location
1 Press MENU on the remote control or the control panel to display the main menu.
2 Select Setup (☐) > Location.
3 Toggle OK or > to select your location (Home or Retail).
4 Press MENU on the remote control to close the menu.
Changing the OSD Language
1 Press MENU on the remote control or the control panel to display the main menu.
2 Select Setup (💡) > Language.
3 Toggle OK or > to select the desired language.
4 Press MENU on the remote control to close the menu.
Resetting to Factory Default Settings
1 Press MENU on the remote control or the control panel to display the main menu.
2 Select Picture (☐), Audio (☐), Channel (☐), or Setup (☐) > Restore Default.
3 Press OK or > to reset the respective menu settings.
3. Adjusting On-Screen Display (OSD) Settings
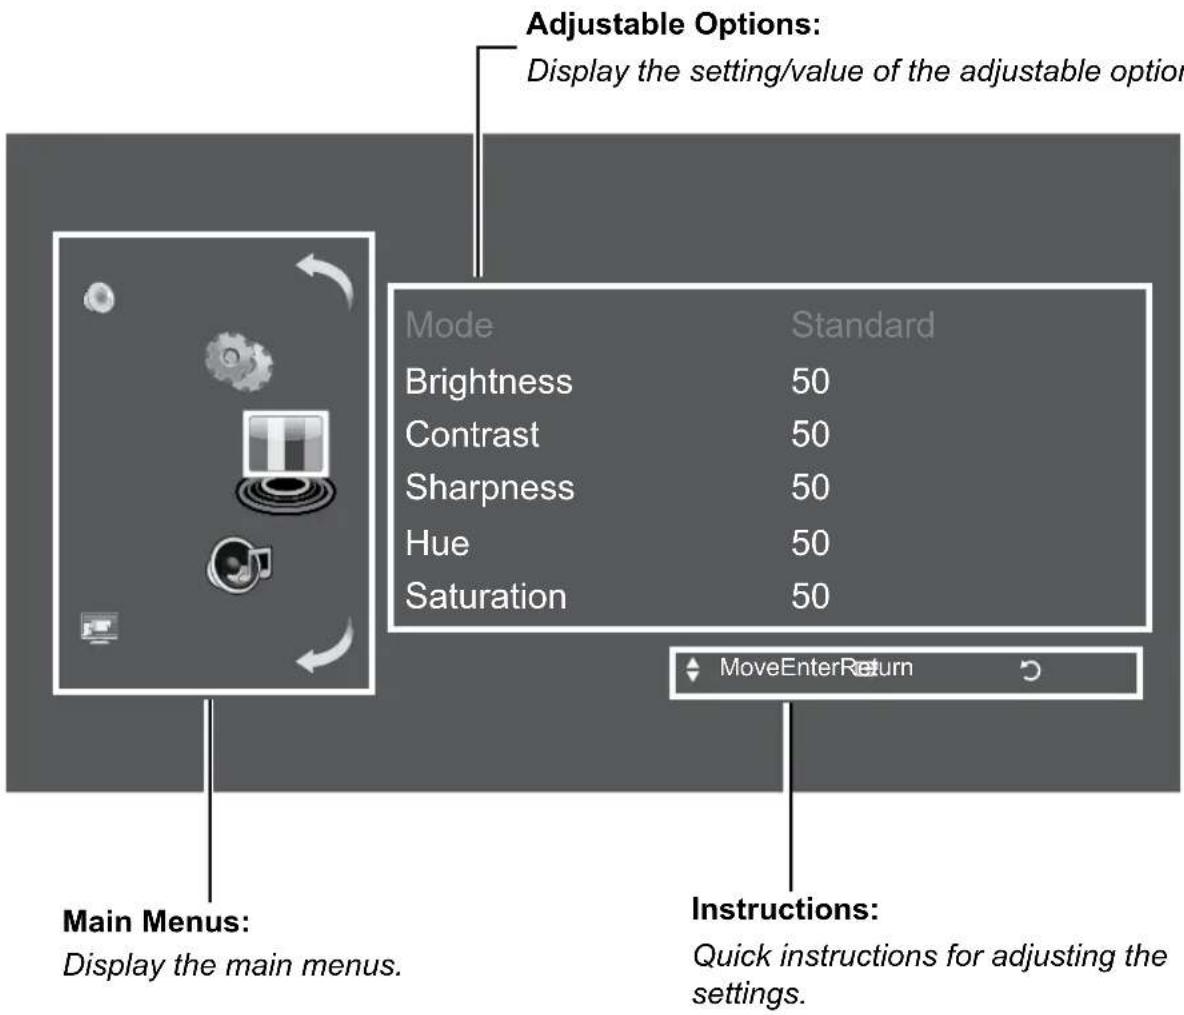
The On-Screen Display (OSD) menu system provides a quick and simple method to adjust the TV settings. The OSD menu can be accessed conveniently through the buttons on the remote control.
Before going into details of each OSD option, you may get acquainted with the placement of the OSD system:
| Function TV Control Panel Remote Control | ||
| OSD Menu MENU MENU | ||
| Up | CH ∧ | Arrow ↗ |
| Down | CH √ | Arrow √ |
| Increase VOL+ | Arrow > | |
| Decrease VOL- | Arrow ◀ | |
| Select VOL+ OK | ||
| Return VOL- RETURN | ||
On-Screen Menu Selection
Follow the instructions indicated on the bottom of the OSD Function Menu.
Press CH ∧/CH ∨ on the control panel or the △arrow keys to scroll through the menus.
- Press VOL+ on the control panel or OK to enter a corresponding submenu.
- Press VOL+/VOL- on the control panel or the </>arrow keys to adjust the desired setting, and press VOL+ on the control panel or OK to confirm the selection. On certain menu options, press VOL+ on the control panel or the >arrow key to select the desired setting.
Toggle • MENU to exit the OSD menu.
| Picture | |
| Option Description | |
| Picture Mode | Select a preset view option optimized for different viewing conditions (Vivid/Standard/Soft/User). |
| Brightness Adjust the brightness | ss of the picture (0~100). |
| Contrast Adjust the contrast of | the picture (0~100). |
| Saturation Adjust the sharpness | or softness of the display (0~100). |
| Hue | Adjust the balance of the red, green, and blue colors in the display (0~100). |
| Sharpness Adjust the sharpness | or softness of the display (0~100). |
| Color Temp | Select the color temperature of the display (Normal/Warm/Cool). |
| Backlight Adjust the backlight setting of the display (0~10). | |
| DNR | Reduce the noise level (Off/Low/Middle/High). |
| Aspect Ratio | Select the aspect ratio of the display (Auto/Normal/Wide/Zoom/Cinema). |
Auto Norm 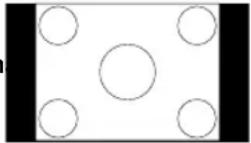 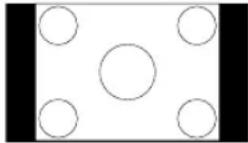 | |
Wide Zoon 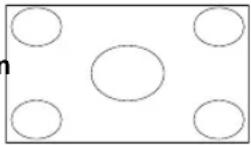 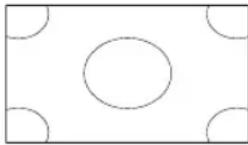 | |
Cinema 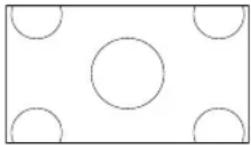 | |
| Restore Default Reset all Picture settings to the factory default settings. | |
| Note: The options available on the OSD may vary depending on the input signal source. | |
| Audio | |
| Option Description | |
| Equalizer | Select a preset audio option optimized for different sounding conditions (Default/Club/Dance/Live/Pop/Rock/User) and adjust the equalizer for 200HZ, 300HZ, 1KHZ, 3KHZ, 8KHZ, or 15KHZ settings (-6~6). |
| Balance | Adjust the sound balance between the left and right speakers (L50~L1, 0, R1~R50). |
| MTS | Select an MTS (Multi-channel Television Sound) option (Mono, Stereo, SAP). |
| DTV AudioLang (for DTV only) | Some video formats support multiple audio language. Use this setting to select the preferred audio language. |
| Restore Default Reset all Audio | settings to the factory default settings. |
| Note: The options available on the OSD may vary depending on the input signal source. | |
| Channel (only for TV connection) | |||
| Option Description | |||
| System Select the tuner mode type (Air/Cable). | |||
| Auto Scan Automatically scan the channel search based on the selected tuner mode. | |||
| Manual Scan Source Select the TV scan mode (DTV/ | ATV). | ||
| Manual (for Cable mode only) | Select the correct signal source (STD/HRC/IRC). | ||
| Channel List Edit View View the selected TV channel. | |||
| Delete | Skip viewing the selected TV channel. | ||
| Add | Add the channel manually into the channel list. | ||
| Fav List Edit Select the favorite TV channels. | |||
| Restore Default Reset all Channel settings to the factory default settings. | |||
| Note: The OSD menu will appear when the input source is TV. | |||
| PC Setting [icon]only for VGA connection) | |||
| Option Description | |||
| Auto Adjust Synchronize the display automatically. | |||
| Position H Adjust the position of the image left and right (0~100). | |||
| Position V Adjust the position of the image up and down (0~100). | |||
| Phase Adjust to reduce horizontal noise (0~63). | |||
| Clock Adjust to reduce vertical noise (0~100). | |||
| Note: The OSD menu will appear when the input source is Computer. | |||
| Setup | ||
| Option Description | ||
| Language Set the on-screen display language. | ||
| V-Chip | V-Chip Lock | Enable/Disable the TV programs or movies to be locked according to TV rating setting (Off/On). |
| TV Parental Guidelines(only available when V-Chip Lock is set to On) | Allow/Block access of the TV programs according to U.S. TV programs ratings. | |
| MPAA Rating(only available when V-Chip Lock is set to On) | Allow/Block access of the movies according to U.S. movies ratings. | |
| Canadian English(only available when V-Chip Lock is set to On) | Allow/Block access of the TV programs and movies according to Canadian English ratings. | |
| Canadian French(only available when V-Chip Lock is set to On) | Allow/Block access of the TV programs and movies according to Canadian French ratings. | |
| Downloadable U.S. Rating(only available when V-Chip Lock is set to On and only for DTV) | Download a new rating system via digital broadcasting in the U.S. when available. | |
| Change PIN(only available when V-Chip Lock is set to On) | Set the new password. | |
| Closed Caption Caption Mode $ | Select the Closed Caption service. | |
| Digital Caption Options | Customize the display types and font styles in digital programs. | |
| Location Set your current location (Home/Retail). | ||
| Energy saving | Set to reduce the TV's power consumption by lowering the backlight level. (On/Off). | |
| Time Sleep Timer Set the timer | to turn the TV off at | the preset time(Off/5 min./10 min./15 min./30 min./45 min./60 min./90 min./120 min./150 min./180 min./240 min.). |
| OSD Time Set the time | to hide the on-screen display (OSD) menu at the preset time (5S/10S/15S/20S/25S/30S/35 S/40S/45S/50S/55S/60S/65S/70S/ 75S/80S/85S/90S/95S/100S105S/1 10S/115S/120S). | |
| Transparency Set the on-screen | display (OSD) transparency (0~10). | |
| Restore Default Reset all Setup | settings to the factory default settings. | |
| Factory Setting | Reset the TV to factory default and erase all stored channels. | |
| Notes:The options available on the OSD may vary depending on the input signal source.•The default password for V-Chip is 0000. • | ||
Media Center Menu
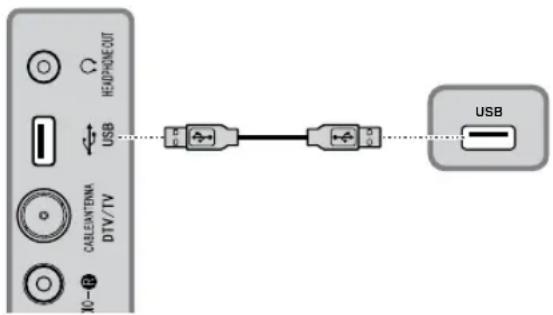
Your TV is equipped with a USB connector that enables you to view photos or listen to music stored on a USB storage device.
| Device File Format | |
| File System FAT16, | FAT32, NTFS |
| Photo File Format J | JPEG(*.jpg) |
| Music Format MP3(*.mp3) | |
Basic Operation
1 Turn on the TV.
2 Plug a USB device to the USB connector on the TV.
3 Press INPUT on the remote control. The Input Source menu appears.
4 Press ▲/▼ to select USB, then press OK to confirm.
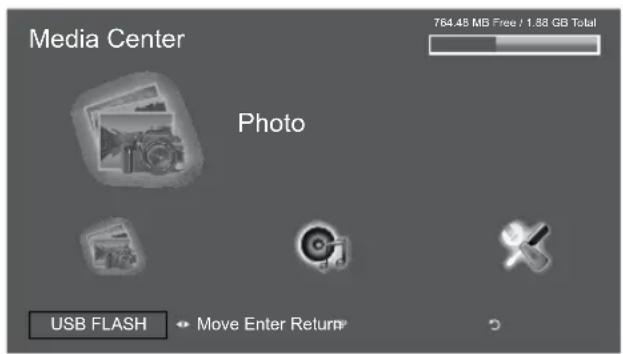
5 The USB thumbnail mode browser appears. Select the media type of the file you wish to play.
6 Use «/» to browse the files and press OK to confirm.
Viewing Photos
1 Select Photo ( ) and press OK to enter the main Photo content browser.
2 In the main Photo content browser, use «/» to select a photo.
3 Press OK to view in full screen.
■ To begin the slide show, press OK. A slide show begins from the selected photo.
■ To pause the slide show, press OK again.
■ To stop the slide show, press ■
Playback Music
1 Select Music (💡) and press OK to enter the main Music content browser.
2 In the main Music content browser, use «/» to select a song.
3 Press OK to play, and an automatic playback begins from the selected song.
■ Press the media buttons (■/▶/■/|◀/▶) on the remote control to pause, stop, or skip to the next/previous song. You can also press OK to pause/resume the music playback.
Customizing Settings
1 Select Setup (✗) and press OK to enter the Setup menu.
2 In the Setup menu, use ▲/▼ to select the menu item and use ◀/▶ to change the setting.
■ Slide Show Speed: Set the slideshow transition speed (Normal/Slow/Fast).
■ Music Repeat Mode: Set the repeat mode for the music playback (On/Off).
■ Slide Show Effect: Set the slideshow transition effect (No Effect/Bottom to Top/Top to Bottom/Random Box/Waterfall/Random).
■ Information: Press OK to view the information on the USB drive.
4. Troubleshooting
| Situation Solution | |
| No picture and sound. | Connect the power cord properly.•Check if the power LED is on or not.•Press ⏻ on the control panel or remote control.•Press INPUT on the remote control or control panel to select the connected video sources.•Press CH▲ or CH▼ on the remote control or CH ∧ or CH ∨ on the control panel to switch to other TV programs.Make sure all cables are connected properly.• |
| No picture, or poor picture, sound is OK. | Check the antenna and cable connections.•Adjust the Brightness in the Picture menu. |
| Picture is not in color. | Adjust the Color Temp in the Picture menu. |
| Picture is OK, no sound. | Make sure the source device is functioning properly.•Make sure the audio cable is connected securely.•Turn the mute off.•Press VOL+ on the control panel or the remote control. |
| One of the speakers has no sound. | Adjust the Balance in the Audio menu. |
| Cannot receive some TV channels using cable TV. | Try the Auto Scan function in the Channel menu. |
| Want to reset TV settings. | Use the Restore Default function in the Picture, Audio, Channel, and Setup menus. |
| Cannot operate menus. | If OSD items are colored in gray, the system is in a state such that those settings are not available. |
| Screen image turns over. | Make sure the video signal cable is connected properly. |
| Snow appears on the screen. | Adjust the location of the antenna, placing it far from roads or sources of interference.•Check the antenna and the video signal line connections. |
| Blurred or overlapped images. | Adjust the sharpness setting.•Choose programs with high quality signals.•Adjust the direction of the antenna or replace the video signal cable. |
| Remote control doesn't work. | Make sure the battery is inserted correctly.•Replace the battery with a new one.•Make sure the TV power cord is plugged in.•Make sure the path between the remote control and the sensor is clear.•Try operating the remote control at a closer distance to the TV. |
5. Support Timing
PC Mode Support Timing
| Mode | Resolution Frequency 23.6” TV | |
| 1 640 x 480 60Hz V | ||
| 2 800 x 600 60Hz V | ||
| 3 1024 x 768 60Hz V | ||
| 4 1280 x 1024 60Hz V | ||
| 5 1440 x 900 60Hz V | ||
| 6 1680 x 1050 60Hz V | ||
| 7 1920 x 1080 60Hz V |
Video Mode Support Timing
| Resolution (active dot) HDMI/Component | |
| 480i V | |
| 576i V | |
| 480p V | |
| 576p V | |
| 720p V | |
| 1080i V | |
| 1080p V | |
6. Specifications
| Model No. 23.6" TV | |
| DISPLAY | |
| Screen Size 59.9 cm / 23.6 inches | |
| Aspect Ratio 16:9 | |
| Resolution 1920 x 1080 | |
| OSD Language English, Spanish, French | |
| ENHANCEMENT | |
| Sound Output (RMS Watts) 3 W x 2 | |
| Sound Mode Default, Club, Dance, Live, Pop, Rock, User | |
| Picture Format Auto, Normal, Wide, Zoom, Cinema | |
| Picture Mode Vivid, Standard, Soft, User | |
| CONNECTION | |
| Rear Connectors Component Input | PC IN: D-SUB and PC AudioHDMI 1HDMI 2HDMI 3 |
| Side Connectors Earphone Output | USBTuner Input (75 Ω)Composite Inputs (AV1/AV2) |
| POWER | |
| Power Consumption (Typical) 50W | |
| Standby < 1 W | |
| Main Power 100-240V~ 60Hz | |
| Ambient Temperature | 0 °C ~ 40 °C |
- Contents
- Regulatory Information
- FCC Compliance Statement 1
- Additional Information
- DOC Compliance Notice 2
- Description of Warning Symbols
- WARNING
- CAUTION
- Safety Notices
- Installation Safety Notes
- Location
- Installation
- Important Safety Instructions
- NOTE: Applies to US only.
- Personal Safety
- Trademark Notice
- HDMI
- License Notice and Trademark Acknowledgment
- Copyright
- RECYCLING INFORMATION
- Notes:
- Preface
- Warranty and Service
- Packing Material Disposal:
- Cleaning
- Instruction for cleaning the TV
- Getting Started
- Package Contents
- Introducing the TV
- Features
- Note:
- Foot Stand Installation
- Disconnecting the Stand
- Installing the Wall Mount Kit
- Securing the Installation Space
- Input and Output Jacks
- Remote Control
- INPUT
- Keypad
- DASH
- INFO
- OK
- GUIDE
- MUTE
- Volume adjust
- FAV.
- ASPECT
- Channel list
- Media buttons
- Power ⏻
- LAST
- MENU
- Arrows
- RETURN
- Select program
- Dual sound ♪
- Closed caption (C.C.)
- SLEEP
- Setting up your TV
- Power Connection
- Rear Connections
- Connection Order
- HDMI
- YPbPr
- AV1/AV2
- Antenna/Cable
- Using the TV
- Turning the TV On and Off
- Running Setup Wizard
- Selecting Your Content Source
- Performing an Automatic Channel Search
- Selecting Channels
- Adjusting the Volume
- Setting Up Your Favorite Channels
- Editing the Channel List
- Adjusting the Backlight
- Changing Your Location
- Changing the OSD Language
- Resetting to Factory Default Settings
- Adjusting On-Screen Display (OSD) Settings
- On-Screen Menu Selection
- Media Center Menu
- Basic Operation
- Viewing Photos
- Playback Music
- Customizing Settings
- Troubleshooting
- Support Timing
- Specifications
Brand : HANNSPREE
Model : ST24
Category : Television