Performance HD41H - Security Camera HONEYWELL - Free user manual and instructions
Find the device manual for free Performance HD41H HONEYWELL in PDF.

| Brand | Honeywell |
| Model | Performance HD41H |
| Product Type | Security Camera |
| Resolution | 1080p Full HD |
| Field of View | 90° horizontal |
| Night Vision | Up to 30m with IR LEDs |
| Weather Resistance | IP66 rated |
| Power Supply | DC 12V / PoE (Power over Ethernet) |
| Connectivity | Ethernet (RJ45) and Wi-Fi 802.11b/g/n |
| Storage | MicroSD card slot (up to 128GB) and cloud options |
| Motion Detection | Yes, with customizable zones |
| Audio | Two-way audio with built-in microphone and speaker |
| Dimensions (W x H x D) | 7.2 x 7.2 x 12.5 cm |
| Weight | 350 g |
| Mounting | Wall or ceiling mount included |
| Night Vision Range | 30 meters |
| Video Compression | H.265+ |
| Frame Rate | 30 fps |
| Operating Temperature | -30°C to 60°C |
| Smart Features | Compatible with Honeywell Home app, Alexa, Google Assistant |
| Privacy Shutter | Yes, physical |
| Warranty | 2 years limited |
| Certifications | CE, FCC, RoHS |
Frequently Asked Questions - Performance HD41H HONEYWELL
User questions about Performance HD41H HONEYWELL
0 question about this device. Answer the ones you know or ask your own.
Ask a new question about this device
Download the instructions for your Security Camera in PDF format for free! Find your manual Performance HD41H - HONEYWELL and take your electronic device back in hand. On this page are published all the documents necessary for the use of your device. Performance HD41H by HONEYWELL.
USER MANUAL Performance HD41H HONEYWELL
Installation and servicing should be performed only by qualified and experienced personnel to conform to all local codes and to maintain your warranty.
WARNING!
This device is configured for 12 V DC operation only, do NOT connect to higher voltage. Use only with NRTL approved 12 V DC power supplies. To prevent potential ground loop issues a separate PSU should be used for each camera. A multiple output PSU may be used if the multiple output PSU has isolated and protected (2 A Max) outputs.
WARNING! 12 V DC models require the use of CSA Certified /UL Listed Class 2 power adapters to ensure compliance with electrical safety standards.
IMPORTANT SAFETY INSTRUCTIONS
- Read and keep these instructions.
- Please ensure that your installation area can safety support three times the weight of the camera.
- Do not install the camera in extreme temperature conditions. Only use the camera where temperatures are within the limits shown in the specifications section of the user guide. Be especially careful to provide ventilation when operating under high temperatures.
- Do not aim the camera towards an extreme light source to prevent damaging the image sensor.
• This camera—HD41H(X)—is rated for indoor operation;
do not expose this camera to rain or moisture.
- Do not drop the camera or subject to physical shock. - Do not use a strong or erosive detergent when cleaning
the camera.
FCC Compliance Statement
Information to the User: This equipment has been tested and found to comply with the limits for a Class A digital device. Pursuant to Part 15 of the FCC Rules, these limits are designed to provide reasonable protection against harmful interference when the equipment is operated in a commercial environment. This equipment generates, uses, and can radiate radio frequency energy and, if not installed and used in accordance with the instruction manual, may cause harmful interference to radio communications. Operation of this equipment in a residential area is likely to cause harmful interference in which case the user will be required to correct the interference at his own expense.
Caution Changes or modifications not expressly approved by the party responsible for compliance could void the user's authority to operate the equipment.
Manufacturer's Declaration of Conformance
The manufacturer declares that the equipment supplied with this guide is compliant with the essential requirements of the EMC Directive 2004108/EC and the General Product Safety Directive (GPSD) 200195/EC, conforming to the requirements of standards EN 55022 for emissions, EN 50130-4 for immunity, EN 60065 for Electrical Equipment Safety, and EN 50581 for RoHS.
WARNING: This is a Class A product. In a domestic environment this product may cause radio interference in which case the user may be required to take adequate measures.
Need Help?
Cal 1.800.323.4576 for sales, service and customer support. https://www.honeywellsystems.com/ss/techsupp/index.htm
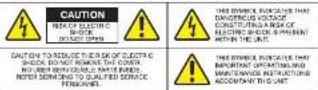
CAUTION TO REDUCE THEIR SK OF ELECTR SHOCK, DO NOT REMOVE THE COVER. NO LAYER REFLECTURE NAME INDED. NOVER SODING TO QUALIFIED SERVICE PERSONAL.
THIS SYMBOL INDICATES THAT IMPORTANT OPERATING AND MAINTENANCE INSTRUCTIONS ACCOMPANY THIS UNIT
TROUBLESHOOTING
Resolving problems
The following table is intended to help identify the causes of malfunctions and correct them, where possible.
| Malfunction | Solution |
| No image | Check the power and video connections on both camera and monitor. |
| Ensure the 12 V DC power source is properly connected (check polarity). | |
| The image is dim | Ensure the scene is adequately illuminated. |
| Adjust (open) the lens iris (manual adjustment). | |
| Poor image | Adjust the focus and ensure the lens is clean. |
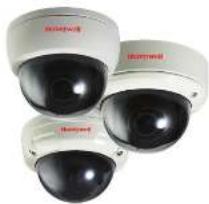
Honeywell
Performance Series
natural_image
Three identical security cameras with red branding, shown from different angles (no visible text or symbols on the cameras themselves)Operation Manual
- HD41H(X)
700 TVL, 2.8-12 mm Manual IRIS Vanfoosi Lens
HD51H(X)
700 TVL, 2.8-12 mm Manual IRIS Varifocal Lens
Varce-Resistant Dome Housing
- HD50H(X)
700 TVL, 3.6 mm Fixed Lens, Vandal-Resistant Dome Housing
Document 800-18920 - Rev. B 07/2014


[NO TEXT]
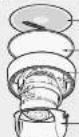
Operation

Plastic Anchora
B.B.B

(
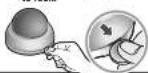
① Stick the guide pattern on the wall or ceiling.
2 Drill four holes according to the guide pattern then insert anchors into the drilled holes.
3 Route and connect the corresponding power / video cables.
4 Attach the camera base to the ceiling or wall using the four supplied screws.
5 Adjust desired focus and scene by turning and moving the 3-axis camera bracket by hand.
5 Align dome cover over base and snap into place to lock.

c Anchora
B
1


L-Wrench

Plastic Anchor
B B B A

( )
1 Stick the guide pattern on the wall or ceiling.
2 Drill four holes according to the guide pattern then insert anchors into the drilled holes.
3 Route and connect the corresponding power / video cables.
4 Attach the camera base to the ceiling or wall using the four supplied screws.
5 Adjust desired focus and scene by turning and moving the 3-axis camera bracket by hand.
6 Put the dome cover over the bass.
7 Fix the dome cover on the base with the L-Wrench.

[Figure]
The image is too blurry to recognize any text content.
[Non-Text]

[Figure]
[Non-Text]
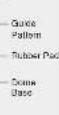
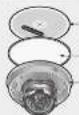
- Mounting Brow
— Osten Cover
— L-Wirchen
- Guide Pattern - Rubber Pad - Scene Base - Mounting Screw - Scene Cover - L-Wrone
CONNECTIONPACKAGE INCLUDES / INSTALLATION
• The wire is polarized.
• Use 12 V DC power source.
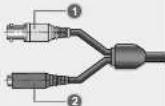
No. Function Terminal Color Remarks
| 1 | Video Output | Yellow | 1.0 Vp-p |
| 2 | Power Input | Red | 12 V DC(±20%) |
Video Output
OND
二中
•
-
SPECIFICATIONS
HP41H/HP41HX
HP51HX HP50H
HOSQHX
| Image Sensor | 1/3 inch HPI Sensor (High Pixels Image Sensor) | |
| Effective Pixels Array | 800 [μF] x 480 [V] | |
| Video Output | CVBS: 1.0 Vp-a (75 Chms, composites) | |
| Sync. System | Internal Sync. | |
| Lens | 2.8 - 12 mm (Verifocus) | 3.6 min (Fixed) |
| S/N Ratio | 46.4 dB Min. (AGC off) | |
| Horizontal Resolution | 700 TV Lines | |
| Min. Illumination | 0.5 Lax | |
| OFF-LOW Optical Lens | ||
| White Balance | Auto | |
| AGC | Auto | |
| Day & Night | Color | |
| Input / Output Connector | Power (Ras Jack), Video (Yellow Jack) | |
| Supply Voltage | 12 V DC (±20%) | |
| Power Consumption | 50 mA / 0.8 W (Max.) | |
| Operating Temperature | 14°F to 122°F (-10°C to 150°C) / Humidity: 30% - 60% RH | |
| Storage Temperature | -4°F to 131°F (-26°C to 45°C) / Humidity: 50% - 90% RH | |
| Dome Size (Ω) | 3.94" (100 mm) | 3.35" (85 mm) |
| Weight | Approx. 0.723 lb (0.528 kg) Approx. 1.122 lb (0.672 kg) | Approx. 0.859 lb (0.425 kg) |