
ION612 - Dehumidifier Ionmax - Free user manual and instructions
Find the device manual for free ION612 Ionmax in PDF.


| Product Type | Dehumidifier |
| Brand | Ionmax |
| Model | ION612 |
| Dimensions (W x D x H) | 35.5 x 24.5 x 56.2 cm |
| Weight | 12.5 kg |
| Power Supply | 220-240 V, 50 Hz |
| Power Consumption | 250 W |
| Dehumidification Capacity (30°C, 80% RH) | 12 L/day |
| Water Tank Capacity | 2.5 L |
| Refrigerant | R290 |
| Noise Level | 42 dB(A) |
| Airflow | 150 m³/h |
| Humidity Control | Electronic, 40-80% RH |
| Timer | 1-24 hours |
| Auto Defrost | Yes |
| Castors | Yes (4 castors) |
| Filter Type | Washable mesh filter |
| Maintenance | Clean filter monthly; empty tank when full |
| Safety Features | Auto shut-off when tank full; overload protection |
| Spare Parts | Filters, water tank, castors available from Ionmax |
Frequently Asked Questions - ION612 Ionmax
User questions about ION612 Ionmax
0 question about this device. Answer the ones you know or ask your own.
Ask a new question about this device
Download the instructions for your Dehumidifier in PDF format for free! Find your manual ION612 - Ionmax and take your electronic device back in hand. On this page are published all the documents necessary for the use of your device. ION612 by Ionmax.
USER MANUAL ION612 Ionmax
User's Manual
IMPORTANT SAFETY INSTRUCTIONS .... 1
FEATURES 2
SPECIFICATIONS 2
PRODUCT DESCRIPTION 3
THE CONTROL PANEL 4
UNIT SETUP....5
TO OPERATE SAFELY 5
OPERATING INSTRUCTIONS 6-8
TO EMPTY THE BUCKET 9
CONTINUOUS DRAIN OPTION....9
MAINTENANCE 10
TROUBLESHOOTING 11-12
WARRANTY DETAILS 13
Please read the user manual to ensure safe and proper usage.
Please read the instructions carefully before using and keep user manual where it is easily accessible for future reference.
PLEASE NOTE:
The user manual may be altered at any time to assist in quality improvement. The design and product development may be upgraded without public notice.
PLEASE READ ALL INSTRUCTIONS CAREFULLY BEFORE OPERATING.
WARNING - This appliance is intended for use in a domestic environment and light office use only. Any other use is not recommended by the manufacturer and may cause fire, electrical shocks or other injury to person or property.
When using electrical appliances, basic safety precautions should always be followed:
- Do not operate the unit with a damaged cord or plug, after it malfunctions or has been dropped or damaged in any way. Return to an authorized service facility for examination and repair.
- This unit should always be kept in an upright position to avoid any damage. The appliance must be placed on a level flat surface during operation.
- Check the household voltage to ensure it matches the units rated specification before operating.
- Operate this unit in an ambient temperature between 1° C and 40° C.
- Ensure that the air inlets and outlets are not blocked or covered.
- Do not place the unit too close to curtains or other objects - min 40cm.
- When using the "LAUNDRY MODE" to speed up the drying of wet clothes in the room, please keep the clothing at a safe distance from the unit to prevent water from dropping onto the unit.
- Never place anything on top of the unit and do not cover with any kind of material while in use.
- This product is intended for domestic and light office use ONLY and not for commercial, industrial or outdoor use.
- To protect against electrical shocks, do not immerse unit, plug or cord in water, or spray with liquids.
- Never unplug the power cord without press the "ON/OFF" key to off first, as this could damage the unit.
- Always unplug the unit when not in use or moving location. To disconnect from the power supply, grip the plug and pull from the power socket. Never pull by the cord.
- Always empty the water tank before storing the unit away.
- Close supervision is necessary when any appliance is used by or near children and pets.
- Do not run power cord under carpeting, or cover with rugs or runners. Arrange the cord away from areas where it may be tripped over.
- Never operate or store the unit in direct sunlight.
- To repair the unit, take it to a qualified service engineer. Repairs carried out by unqualified people may cause damage to the unit or injury to persons or property and void the warranty.
- Where possible, avoid the use of an extension cable as they may overheat and cause a risk of fire. Only use an extension cord after ensuring it is in perfect condition.
- Do not use the unit without the air filter.
This appliance is not intended for use by persons (including children) with reduced physical, sensory or mental capabilities, or lack of experience and knowledge, unless they have been given supervision or instruction concerning use of the appliance by a person responsible for their safety. Children should be supervised to ensure that they do not play with the appliance.
SAVE AND READ THESE IMPORTANT SAFETY INSTRUCTIONS
FEATURES
- Compressorless dehumidifier - uses desiccant rotor technology
-
Moisture removal - 7 litres/day (20°C RH60%)
• Water tank capacity - 2 litres
• Silver Nano technology filter
Kills bacteria on contact, improving the quality of air in your home or office -
Built-in ioniser
- Electronic louvre
- Laundry mode - helps to dry out damp clothes
- Up to 8 hour timer - for added convenience
- Temperature range for use 1°C - 40°C
• Light & portable with carry handle
- Removable water bucket with handle
- Operating light
• Auto restart after power cut
Once the power is restored after a power failure, the appliance will continue to operate at the selected settings prior to the power failure.
SPECIFICATIONS
Model: Ionmax lon612
Water tank capacity: 2 Litres
Power Consumption: 360W- 620W
Voltage: 220-240V \~ 50Hz
Net Weight: 6 Kg

![graph TD A["Ioniser Indicator"] --> B["Water Full Indicator"] B --> C["Check Indicator"] C --> D["Timer Indicators"] D --> E["Louvre Setting Indicators"] E --> F["Function Indicators"] F --> G["ionmax"] G --> H["ON/OFF"] H --> I["Power button"] I --> J["Auto Dry Mode button"] J --> K["Continuous / L…](/content/2026/05/1054622/images/f5ae4a2986d16fcade0f9adba6755b3d569ce28909ea0dffe1ccca2550d56cf2.jpg)
UNIT SETUP

- Place the unit in an upright position on a stable, flat surface.
- Please ensure the unit is a safe distance away from a wall or furniture (see the right graphic).
- Please keep clothes at a safe distance of 60 cm from air outlet of the unit to prevent water dripping into the unit.
- For best results, position the dehumidifier somewhere central like a landing or a hallway.
As long as the internal doors are open the excess moisture from all of the rooms in the house will migrate naturally towards the dehumidifier and be processed.

CAUTION: Do not place the dehumidifier in a broom cupboard, boiler room, small unventilated rooms etc. Avoid placing the dehumidifier in small confined areas or in close proximity to a radiator or heat source such as tumble driers, cookers etc. to avoid the dehumidifier from overheating.

Do not use this dehumidifier in dusty or industrial environments where particles can get into the dehumidifier. This will cause a malfunction and void your warranty.

TO OPERATE SAFELY
Do not insert small objects into the unit or this will damage it and cause a hazard.
Do not remove bucket when running or water may leak.

Keep suitable space as above
Ensure bucket is fitted correctly, if the bucket is full or is not in place, the "FULL" lights and the machine stops.

ON and OFF
Connect the power plug to the appropriate electrical socket outlet.
Press the ON/OFF button to turn the appliance ON.
Press the ON/OFF button again to turn the appliance OFF.
Note: In the event of a power failure
Once the power is restored after a power failure, the appliance will continue to operate at the selected settings prior to the power failure.
This includes the drying mode, swing function and time remaining in timer mode.
Note: After turning the appliance OFF
After turning the appliance OFF using the ON/OFF button, the fan will continue to run for a two minute period. This is a normal procedure and helps to cool & protect the internal components.
During these two minutes DO NOT remove the power plug from the electrical socket outlet; wait for the fan to stop running.
ION
- Press the "ION" button to turn the ioniser on and off. When the LED is on, the unit releases negative ions from the air outlet to purify the air.
Tip: Whilst the dehumidifier is running on fan mode only, turning on the ioniser effectively purifies the air with negative ions and silver ion filtration.
Negative ions have a normalising effect on our bodies, providing the ideal conditions for the body to function better, helps breathing and relaxation.
AUTO DRY
- For automatic dehumidification to preset Relative Humidity (RH) levels once level reached. Unit runs in fan only mode to circulate air and detect RH changes.

| MODE | DESCRIPTION |
| Auto55~60%RH | To keep the room at a comfortable Relative Humidity (RH) levelThe unit automatically keeps room humidity at 55~60% RH.The fan speed & heater power are adjusted automatically.Note: Use this mode for maximum energy saving and for quiet operation. |
| Low (Quiet)55~60%RH | To run low fan speedThe unit automatically dehumidifies in low fan speed and low noise.Note: Use this mode on a daily normal household use to keep the humidity to a healthy level of 55%RH (Bacteria and mould will not breed at this level). |
| High40~45%RH | Super dry mode to prevent condensationThe unit automatically keeps room humidity at 40~45%RH to prevent condensation in the room.Note: Use this to control a very damp room in the first couple of days and then switch to Auto or Low mode to save energy. |
(Note: RH indicated has a ±10% RH tolerance and may vary depending on room temperature)
LAUNDRY MODE
- For drying clothes or continuous operation. Power level varies with room temperature and humidity level.

| MODE | DESCRIPTION |
| Saving | Suitable for summer or to save powerThe unit automatically provides warm dry air to assist in clothes drying with lower power consumption. |
| Turbo | Suitable in winter to dry clothes fasterThe unit automatically provides heated air to dry clothes faster with higher power consumption. |
Note: It typically takes 2 – 8 hours to dry your laundry. You may want to put your dehumidifier on the timer when using Laundry mode to avoid wasting energy.
Avoid using the Laundry modes for normal daily use. You may use for extreme drying of very damp rooms over 2 – 3 days and then switch to the recommended Low mode.
AUTO SWING LOUVRE
- Press the "SWING" button to select air louvre angle.
| MODE | DESCRIPTION | |
| Up | The automatic louvre swings in an upward range of approx 100 ° | 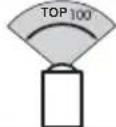 |
| Front | The automatic louvre swings in a front range of approx 50 ° |  |
| Wide | The automatic louvre swing in a wide range of approx 150 ° |  |
| Hold | The automatic louvre stops swinging when you press "SWING" button and turns the LED off. | |
3D Louvre Adjustment
| Wide airflow --- rotate to the WIDE position |  |
| Spot airflow --- rotate to the SPOT position |  |
Note: Do not touch the louvre with your hands while it is swinging. The range of swing will change.
TIMER MODE
- Press the "TIMER" button to select your desired running time (2,4 or 8 hours). The unit will automatically switch off at the end of the selected time period. As the time counts down, the LED (4 or 2 hours) lights will indicate the time remaining.
- When no "TIMER" is set (the LED is off), the unit will run continuously, or until the drain bucket becomes full.
![graph LR A["2H"] --> B["4H 8H"] B --> C["OFF (LED OFF)"] C --> D](/content/2026/05/1054622/images/ade5b2d2309d2844da55dc34588a70d882e9ed7a9fb79654a8a56975f0568371.jpg)
TO EMPTY THE BUCKET
- When the bucket is full, the "FULL" LED illuminates and the unit will stop running in a few minutes
- Do not move the unit or remove the bucket if the machine is still operating, as water may leak, damage the unit or cause an electric shock.
- To remove the bucket, pull it out gently by gripping the bottom of the bucket, and lift carefully.
- Remove the cover of bucket first, then pour the water away, clean the bucket and restore the cover and the bucket to the correct position.

Pull bucket out
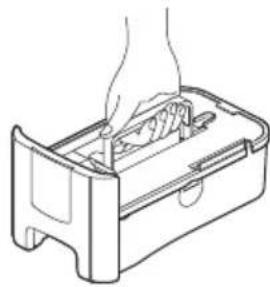
Lift by the handle

Remove the cover

Pour the water away

Refit the cover and the handle

Install the bucket
NOTE :
- Clean the bucket with clean water if needed. Do not use detergent, solvent, abrasive or hot water to avoid damage to the appliance.
- Do not remove or damage the float in the bucket, or the unit cannot work correctly.
- The bucket cover must be well fitted in position.
- The "FULL" LED illuminates if the bucket is not well in place.
CONTINUOUS DRAIN OPTION
You may use a hose with an inner diameter of 12mm for continuous drainage:
- Use a screwdriver to remove the knockout at the back. Attach the hose to the connector through the hole.
- The hose must lead to an appropriate drain at a downward slope with no sharp bends.
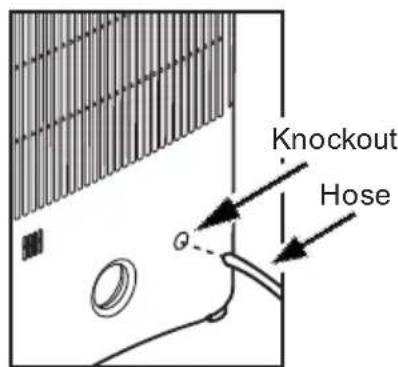
Note:
- Ensure the bucket is well fitted in position before inserting the hose.
- Before removing the bucket, ensure that the hose is disconnected.
Cleaning the unit
- Turn off the unit, wait for the fan to stop and unplug from the power socket.
-
Clean the casing using a soft damp cloth with warm water and mild detergent. Do not use solvents or abrasive materials.
-
Dry thoroughly with a soft dry cloth after cleaning.
-
In order to avoid damage, do not wash the machine with water, or let water drip into the air inlet or outlet.

Cleaning the filter
If the filter is covered with dust, the airflow and the performance of the unit will be affected. Check the filter periodically to ensure any dust is removed (It is recommended to check and clean the air filter every 2 weeks or an appropriate frequency depending on your usage and air environment).
- Turn the appliance OFF and ensure the plug is removed from the socket outlet.
- Remove the filter located at the back of the appliance.
- Clean the filter using a vacuum cleaner.
- Restore the filter into the appliance.

CAUTION: Never run the unit without the filter. Dust build up in the unit can cause malfunction and overheating.

Before storing
- Turn off the unit, wait for it to stop and unplug from the power socket.
- Clean and dry the bucket. Leave the unit to drain for approximately one day.
- Clean the filter and the unit. Cover the unit to prevent it from gathering dust. Store upright in a cool dry place.
- Do not expose to direct sunlight.
Smell coming from the dehumidifier
When you first use the dehumidifier and periodically afterwards you might notice a smell coming from the dehumidifier. This is caused by the Zeolite desiccant material and is not a sign that the dehumidifier is faulty, nor is it harmful to humans or pets. The smell occurs because the Zeolite absorbs odours from items like cigarettes, cosmetics, hair sprays, building materials and new furniture and then when the desiccant is heated the smell is discharged into the room. This smell has been described as being like a burning smell or a sour smell. It is normal, will not last long and is not a sign of a fault.
Amount of water collected
When you first use your dehumidifier, it will work harder to reduce the room humidity to its target of e.g. 55-60%RH (on Auto mode). This is the time when it will produce the most water and need emptying most frequently. As the room becomes dryer, the dehumidifier collects less water and runs at a lower fan speed. This is normal. When the target relative humidity has been reached the air coming out of the dehumidifier will not be heated and it will only be running in low fan mode. This is because there is no need for dehumidification at this point and the dehumidifier is sampling the air to check the current relative humidity to see if dehumidification is required.
If you find that you still have condensation on your windows or you need to dry the air further, then using the High mode will force the dehumidifier to dry the air further to 40-45%RH. This may be more common if you have single glazed windows or if the outside air temperature drops to freezing.
Ventilation
The dehumidifier must not be placed in a confined space. Move the dehumidifier to a well ventilated area for example in a hallway, landing or a ventilated room. Ensure that it is not in close proximity to any form of heat source, such as a radiator or appliances that generate heat (e.g. tumble dryer or cooker). The air inlet and outlet must not be obstructed.
The following conditions are normal:
- The fan is still running about 2 minutes after turning off the the unit.
- The unit works within room temperature about 1\~40°C. It may stop operation out of this range or when the air inlet or outlet is covered. (The "CHECK" LED light will illuminate)
- The unit includes heater function that could increase the room temperature.
If your Dehumidifier stops working or "CHECK" LED is on, please check the following items first.
| Problem | Possible Causes | What to Do |
| Dehumidifier doesn't start (no LEDs on) | The unit is unplugged | Make sure the plug is pushed completely into the outlet. |
| The fuse is blow n or circuit breaker is tripped | Check the house fuse / circuit breaker box and replace fuse or reset the breaker. | |
| The unit falls down or is not level on the floor / surface | Place the unit on a stable, level surface. | |
| Very little water is collected | The room humidity has reached the setting | It is normal, you may choose Hi or Turbo mode if you need a drier humidity level. |
| The ambient temperature is too high, such as over 40°C | Do not use it in a small and closed place where heat accumulates.Move to a cooler place, wait at least 10 minutes to resume operation. | |
| “FULL” LED on | The bucket is full or not in place | Empty the bucket, check the float in position, and replace the bucket. |
| “CHECK” on | The air inlet or outlet is covered / blocked | Make sure there is nothing blocking the air inlet and air outlet of the unit. Clean the filter. Unplug and wait at least 10 minutes to resume operation. |
| Filter clogged with dust | ||
| Leaking | The unit is not level | Check the unit is placed on a level surface and not accidentally sitting on a cable etc. |
| The drainage is clogged or loose | Check the drainage hose and its connection. | |
| Unit is noisy | Unit is not on a horizontal flat and level surface. | Move and restart the unit. |
| Air filter is dirty. | Clean the filter. |
NOTE:
- If the "CHECK" LED is on, turn off the unit, unplug from the power socket, check and clean the filter. If it is dirty, remove any obstacle that covers the air inlet or outlet, and wait for at least ten minutes before plugging in and switching back on.
- Please contact your retailer if the problem continues. Do not try to repair it yourself, as as this could cause an electrical shock and void your warranty.
andatech
WARRANTY DETAILS
Congratulations on your purchase! It is our aim to provide you with quality products that you can trust. Our products come with guarantees that cannot be excluded under the Australian Consumer Law. You are entitled to a replacement or a refund for a major failure and for compensation for any other reasonably foreseeable loss or damage.
You are also entitled to have the goods repaired or replaced if the goods fail to be of acceptable quality and the failure does not amount to a major failure.
The Guarantee
The product is guaranteed to be free from defects in workmanship and parts for a period of 12 months from date of purchase for domestic use and 3 months for commercial use. Defects that occur within this warranty period, under normal use and care, will be repaired, replaced or refunded at our discretion, solely at our option with no charge for parts and labour. The benefits conferred by this warranty are in addition to all rights and remedies in respect of the product that the consumer has under the Trade Practices Act and similar state laws.
Proof of Purchase
This warranty is valid for the original purchase and is not transferable. Please keep your purchase docket or receipt as proof of purchase and as proof of date on which the purchase was made. The purchase docket (or a copy) or receipt must be presented with the warranty when making a claim under this warranty.
Service during the Warranty Period
Please ensure that the RA# (Return Authorization Number) is clearly stated on the outside of the packaging. Don't have one? Call us on 1300 800 200 and we'll get you one. Please ensure the product is properly packaged so as to ensure that no damage occurs to the product during transit.
Extent of Warranty
This warranty is limited to defects in workmanship or parts. All defective products or parts will be repaired or replaced. This warranty does not cover manuals and packaging.
Normal Wear and Tear
This warranty does not cover normal wear and tear to the product or parts.
Exclusions
This warranty does not cover:
- Any defect caused by an accident, misuse, abuse, improper operation, lack of reasonable care, unauthorised modification, loss of parts, tampering or attempted repair by a person not authorised by the distributor.
- Any product that has been damaged by a lightning strike either directly or indirectly or a mains power surge or liquid ingress.
• The product if it is located outside of Australia. - Any damage caused by improper power input or improper cable connection.


- PLEASE NOTE
- PLEASE READ ALL INSTRUCTIONS CAREFULLY BEFORE OPERATING
- SAVE AND READ THESE IMPORTANT SAFETY INSTRUCTIONS
- FEATURES
- SPECIFICATIONS
- UNIT SETUP
- TO OPERATE SAFELY
- ON AND OFF
- NOTE: IN THE EVENT OF A POWER FAILURE
- NOTE: AFTER TURNING THE APPLIANCE OFF
- ION
- AUTO DRY
- LAUNDRY MODE
- AUTO SWING LOUVRE
- 3D LOUVRE ADJUSTMENT
- TIMER MODE
- TO EMPTY THE BUCKET
- NOTE
- CONTINUOUS DRAIN OPTION
- CLEANING THE UNIT
- CLEANING THE FILTER
- BEFORE STORING
- SMELL COMING FROM THE DEHUMIDIFIER
- AMOUNT OF WATER COLLECTED
- VENTILATION
- ANDATECH
- WARRANTY DETAILS
- THE GUARANTEE
- PROOF OF PURCHASE
- SERVICE DURING THE WARRANTY PERIOD
- EXTENT OF WARRANTY
- NORMAL WEAR AND TEAR
- EXCLUSIONS
Brand : Ionmax
Model : ION612
Category : Dehumidifier