
MEGA View 588 - Media player MSI - Free user manual and instructions
Find the device manual for free MEGA View 588 MSI in PDF.

| Product Type | Portable Multimedia Player and Recorder |
| Brand | MSI |
| Model | MEGA View 588 |
| Dimensions | 124 x 76 x 24.5 mm |
| Weight | Approximately 245 g (with battery) |
| Power Supply | AC Adapter (100-240V) or Li-ion rechargeable battery (2200mAh, 3.7V) |
| Battery Life | Video playback: ~5 hours; Music playback: ~7.5 hours |
| Display | 3.5-inch LCD |
| Hard Disk Capacity | 20 GB |
| Video Playback | MPEG-4 SP, DivX 3.11/4.x/5.x, Motion JPEG, WMV-9 SP@ML (up to 30 fps) |
| Audio Playback | MP3 (MPEG1 Layer2/3), WAV (LPCM/ADPCM), WMA (WMA-9 Layer 2a) (up to 320 kbps) |
| Photo Viewer | JPEG and GIF (best viewed at 1600x1200 for JPEG, 800x600 for GIF) |
| Recording | Voice, AV, and FM radio recording |
| Connectivity | USB 2.0 (host and device), AV-in/out, line-in, earphone jack, SD/MMC card slot |
| Additional Features | FM radio (optional), remote control, OTG (On-The-Go), alarm clock, DivX certified |
| Operating System Support | Windows 98SE (driver required), ME, 2000, XP Home/Pro |
| Cleaning Instructions | Use a clean dampened cloth; do not use liquids or aerosol sprays |
| Safety Warnings | Keep away from humidity and prolonged sun exposure; do not pour liquids; use only supplied charger |
| Parts and Repairability | Removable battery; one-year warranty on device, 7 days on accessories; upgradeable firmware and software |
| General Information | Includes stereo earphones, AC adapter, AV cables, remote control, USB cables, handy bag, driver CD, and battery |
Frequently Asked Questions - MEGA View 588 MSI
User questions about MEGA View 588 MSI
0 question about this device. Answer the ones you know or ask your own.
Ask a new question about this device
Download the instructions for your Media player in PDF format for free! Find your manual MEGA View 588 - MSI and take your electronic device back in hand. On this page are published all the documents necessary for the use of your device. MEGA View 588 by MSI.
USER MANUAL MEGA View 588 MSI
Safety Instructions....3
Chapter 1. Introduction ...... 4
How to Use This Guide....5
Accessories....5
Chapter 2. Get Started ...... 6
Overview....6
Operating Menu Displays 8
Main Menu 8
Video/ Music/ Photo Menu....8
FM Radio (optional) 9
Voice/ AV Recording 9
Setting Menu 9
USB Hard Disk 10
Lock Switch 10
SD/ MMC Card Slot.... 10
Remote Control.... 11
Li-ion Battery Recharging.... 12
Battery Consuming Reference.... 12
Battery Replacing.... 13
Support CD 14
Chapter 3. Connect & Remove from PC .... 15
Connect MEGA VIEW 588 to Computer.... 15
For Systems with Windows 98SE.... 16
Format MEGA VIEW 588....16
Safely Remove MEGA VIEW 588 from Computer.... 17
Chapter 4. Basic Usage.... 18
Power On and Off 18
Volume Adjustment.... 18
PMPSync Utility 19
Video 26
Music....31
Photo 33
FM Radio (optional).... 35
Voice Recording....37
AV Recording....38
Signal Input and Output 40
On-To-Go Function....41
Setting 42
Appendix A. Specifications 47
Upgrade Software....48
Upgrade MCU Firmware 49
Upgrade USB Firmware....50
COPYRIGHT NOTICES
The material in this document is the intellectual property of MICRO-STAR INTERNATIONAL. We take every care in the preparation of this document, but no guarantee is given as to the correctness of its contents. Our products are under continual improvement and we reserve the right to make changes without notice.
TRADEMARKS
All trademarks are the properties of their respective owners.
MICRO-STAR INTERNATIONAL Statement
All contents are subject to change without notice.
One year guarantee is for the device only. Warranty for accessories expired within seven days of purchase date.

廢電池請回收
For better environmental protection, waste batteries should be collected separately for recycling or special disposal.
WEEE Statement
English: To protect the global environment and as an environmentalist, MSI must remind you that...Under the European Union ("EU") Directive on Waste Electrical and Electronic Equipment, Directive 2002/96/EC, which takes effect on August 13, 2005, products of "electrical and electronic equipment" cannot be discarded as municipal waste anymore and manufacturers of covered electronic equipment will be obligated to take back such products at the end of their useful life. MSI will comply with the product take back requirements at the end of life of MSI-branded products that are sold into the EU. You can return these products to local collection points.
- Always read the safety instructions carefully.
- Keep this User's Guide for future reference.
- Keep MEGA VIEW 588 away from humidity.
- Keep MEGA VIEW 588 away from long exposure to the sun light.
- Never pour any liquid into MEGA VIEW 588 to avoid damages or electrical shock.
- If any of the following situations occurs, get MEGA VIEW 588 checked by a service personnel:
● Liquid has penetrated into MEGA VIEW 588.
● MEGA VIEW 588 has been exposed to moisture.
- MEGA VIEW 588 has not worked well or you can not get functions to work correctly according to User's Guide.
● MEGA VIEW 588 has dropped and damaged.
- DO NOT use MEGA VIEW 588 in the following situations:
● While driving or riding a vehicle.
● While operating something dangerous.
● While walking on street.
- Be in any situations or environments require concentration.
- If you need to format MEGA VIEW 588 hard disk, please select FAT32 format. DO NOT PARTITION MEGA VIEW 588 HARD DISK!
- DO NOT use any liquids or aerosol sprays to clean this device. Use a clean dampened cloth instead.
- Adjust to proper volume while listening with earphone to avoid permanent harm to hearing capability.
- Caution: Use a wrong battery may cause explosion! Follow the instruction on the battery section to use battery properly!
- The used battery is not garbage and should be recycled.
Chapter 1. Introduction
Thank you for purchasing MEGA VIEW 588. We are proud to tell you that MEGA VIEW 588 is thoroughly tested and certified product. The new MEGA VIEW 588 will improve the convenience of storing your personal data and enjoyment of using various video/ audio functions.
MEGA VIEW 588 is a high performance portable multimedia player and recorder which comes with a Li-ion rechargeable removable battery. On MEGA VIEW 588, you can play audio or video files in various formats, and record audio/video. MEGA VIEW 588 is also a portable USB storage to which you are able to manage and store personal data.
Following are the main features of MEGA VIEW 588:
■ Video Player – supports MPEG-4 SP, DivX 3.11/4.x/5.x, Motion JPEG, and WMV-9 SP@ML format video playback.
■ Audio Player – supports MP3 (MPEG1 Layer2, Layer3), WAV (LPCM, ADPCM), and WMA (WMA-9 Layer 2a) format audio files playback.
■ Photo Viewer – supports JPEG and GIF photos. You can download photos to MEGA VIEW 588 and browse them.
- Recording – supports recording function for audio and video. You can use this function to record voice, music, and video.
■ USB Storage – supports USB 2.0 profile. You can store data to built-in hard disk and view them on computer with Windows Explorer. Supports OTG function, link with USB device to store data into MEGA VIEW 588.
■ SD/ MMC Card Slot – supports SD/ MMC card. You can insert and play video, photo, and music files of SD/ MMC card by MEGA VIEW 588.
We sincerely thank you for choosing MEGA VIEW 588. We hope that you will continue to turn to us for quality products as your needs and interests grow.
How to Use This Guide
This User's Guide provides instructions and illustrations on how to install and operate MEGA VIEW 588. With step-by-step instructions, we will guide you through MEGA VIEW 588 driver installation process. If you are not familiar with computer operating systems, we suggest you to learn more from its manual and help documents before installing MEGA VIEW 588 driver.
Chapter 1, Introduction, shows all MEGA VIEW 588 accessories in the package. Please check out when you open the packing box. If any item is damaged or missing, please contact your vendor directly.
Chapter 2, Get Started, introduces the function keys of MEGA VIEW 588, the LCD Display status in different modes, and how to recharge.
Chapter 3, Connect and Remove from Computer, describes how to connect and remove MEGA VIEW 588 from your computer.
Chapter 4, Basic Usage, describes how to operate all functions of MEGA VIEW 588. We suggest you to read this chapter carefully before using MEGA VIEW 588.
Appendix A, Specifications, provides MEGA VIEW 588 specifications. Update Firmware and Software, describes how to upgrade firmware and software.
Accessories
■ Stereo Earphones
■ AC Adapter
■ AV-in/ out Cable
■ Line-in Cable
■ Remote Control
■ USB Cable (the long one)
■ USB Host Cable (the short one)
■ Handy Bag
■ Driver and Recovery CD
■ Battery
* MEGA VIEW 588 battery should be charged only with provided adapter!
** MEGA VIEW 588 accessories may be different from listed above.
Chapter 2. Get Started
Overview
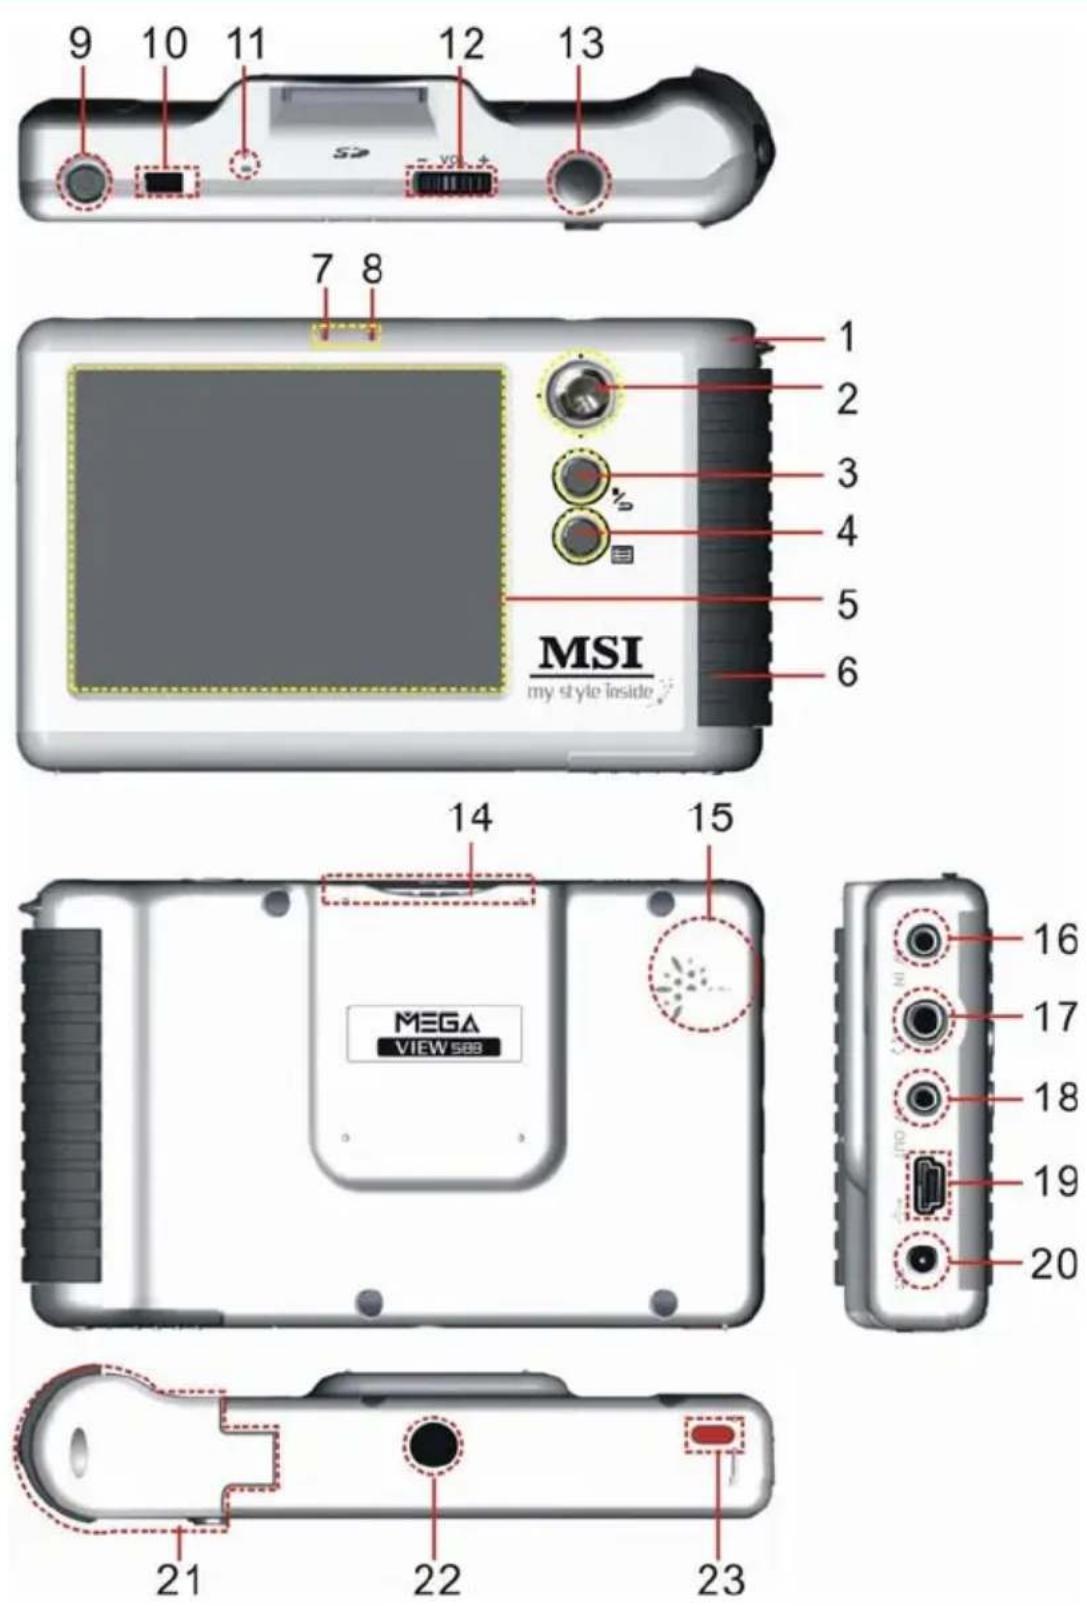
- Strap Hole Tie a strap here.
-
Navigation key The 5-way key moves among selections.
-
■/⊃ Stop/ ESC.
-
Go back to main menu.
-
LCD Display Show menus and playing.
-
Hold Handle The hold handle of MEGA VIEW 588.
-
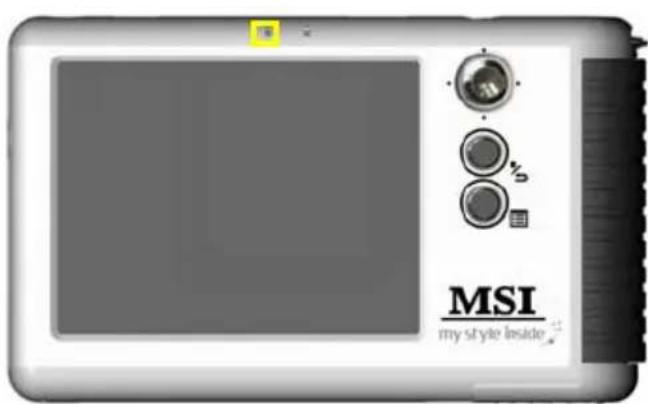
Power LED This LED is on when MEGA VIEW 588 is power on, blinking when charging battery.
-
Record LED This LED is on when recording.
-
Power On/ Off Press to power on/ off MEGA VIEW 588.
-
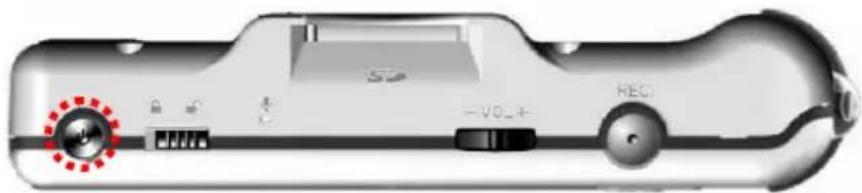
Lock Switch When this Switch is locked, all key press commands are disabled to prevent unwanted key pressing.
-
MIC Built-in Microphone for voice recording.
-
Volume Control Pull it to the right to increase volume, to the left to decrease volume. Press it down to mute.
-
REC[●] Press to start or stop the recording.
-
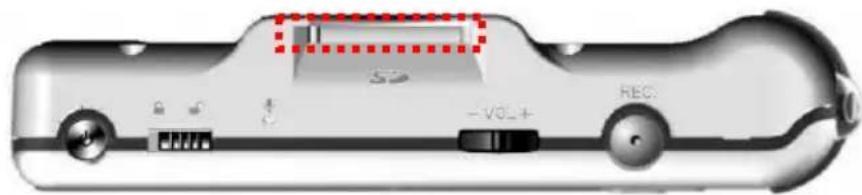
SD/ MMC slot SD/ MMC card slot for data reading and playing.
-
Speaker Built-in speaker.
-
AV Line-in Jack Plug AV cable here to enable AV Line-in recording.
-
Earphone Jack Plug the earphones here.
-
AV Line-out Jack Plug AV cable here to enable AV Line-out to external display (TV).
-
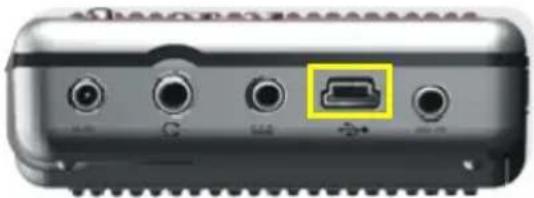
USB Connector Connect the mini USB connector of the supplied USB cable here, and the other end to PC host.
-
DC-in Jack Plug in the supplied AC Adapter here to recharge.
-
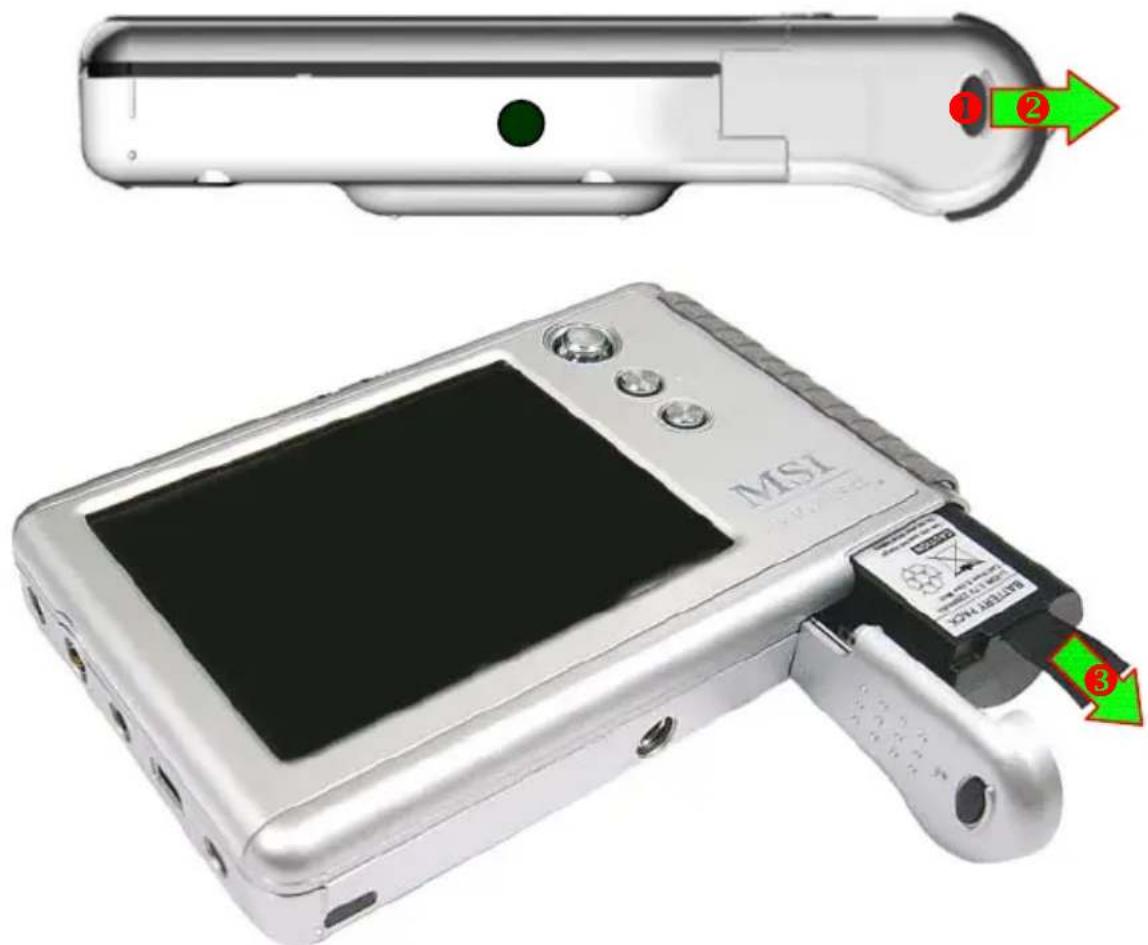
Battery cap Press the latch and push the cap forward to replace the rechargeable battery.
-
Tripod Screw Hole Secure a tripod here to hold MEGA VIEW 588.
-
CIR Receiver Receive command signals from remote control.
Operating Menu Displays
Power on MEGA VIEW 588, you will see main menu on LCD display after boot-up animation. Following are the instructions for each menu option.
Main Menu
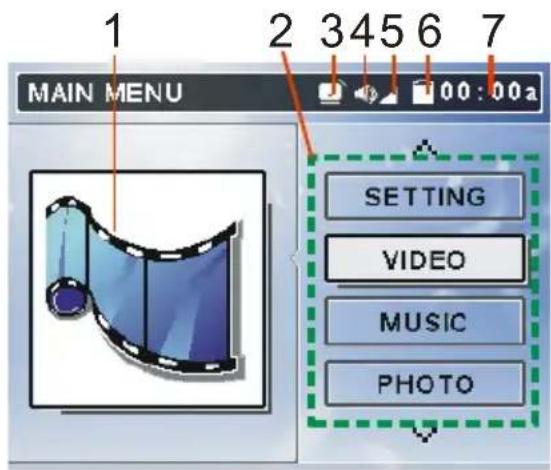
- Function Icon: Indicate selected function.
- Menu List: List function options, such as Video, Music, Photo, etc.
- Alarm: Indicate alarm clock is set.
- Voice: Indicate voice on or off.
- Volume: Show volume status.
- Battery: Show battery status.
- Time: Show current time (tuning required).
Video/ Music/ Photo Menu
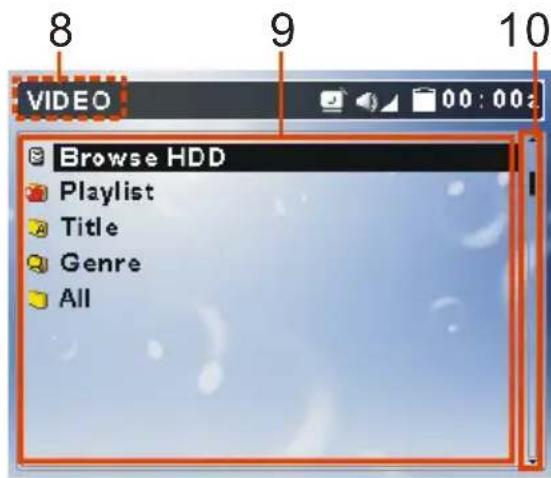
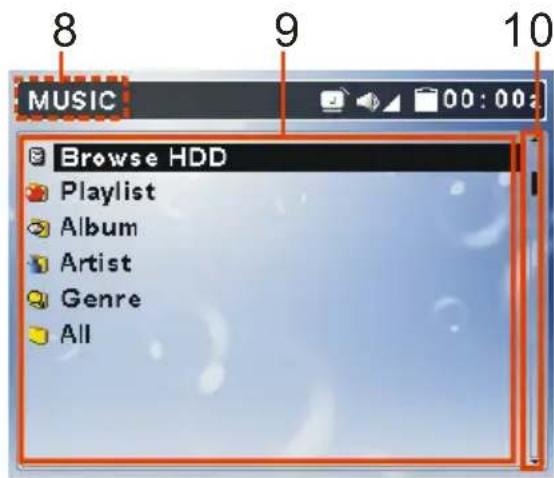
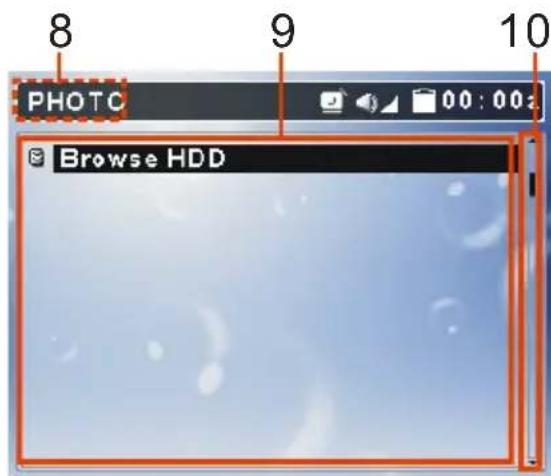
- Menu Title: Show the selected menu title.
- List: All files in a selected menu.
- Scroll bar: Indicate more files available.
FM Radio (optional)

- Memorized Stations: 8 FM stations can be set to memory.
- Channel Frequency: Current FM tune-in frequency.
- Select Scan or Fine Tune to be the adjust way.
Voice/ AV Recording
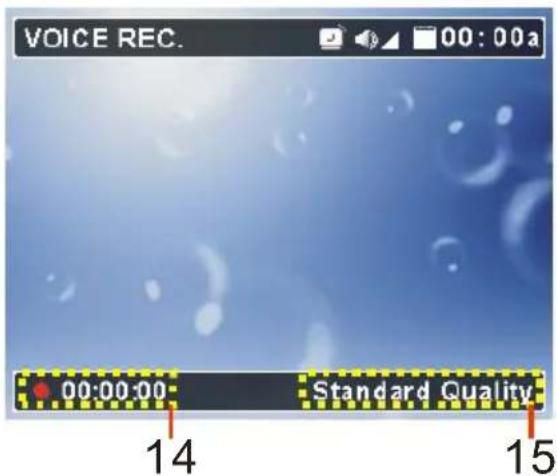
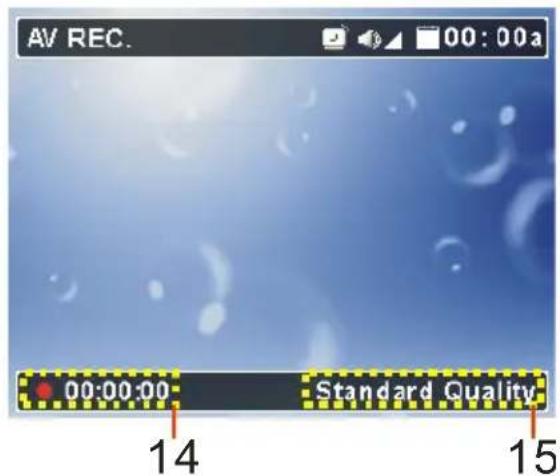
- Recording Time: Recording elapse (hh: mm: ss).
- Recording Quality: Indicate selected and operating recording quality.
Setting Menu
- Scroll bar: Mean more tabs are available.
- Tabs: Include Display, Photo, Record, System, and Info Tabs.
- Setting Items: List tab item for adjusting.
- Setting Options: Show setting options.
USB Hard Disk
MEGA VIEW 588 is built-in with a mini hard disk. You can use MEGA VIEW 588 as an USB hard disk to store your data. Simply connect MEGA VIEW 588 to your computer with the USB cable, and use Windows Explorer to manage your data.
Lock Switch
MEGA VIEW 588 has a Lock Switch to avoid accidental operation. Slide the Lock Switch to lock position while power is on; you will see the following right figure to indicate all function keys are disabled. Slide the Lock Switch to unlock position to continue.

SD/ MMC Card Slot
MEGA VIEW 588 has an SD/ MMC slot. You can insert a Secure Digital Card and MultiMedia Card into the slot. Then you can view or play Photos, videos, or music files in your memory cards with MEGA VIEW 588.
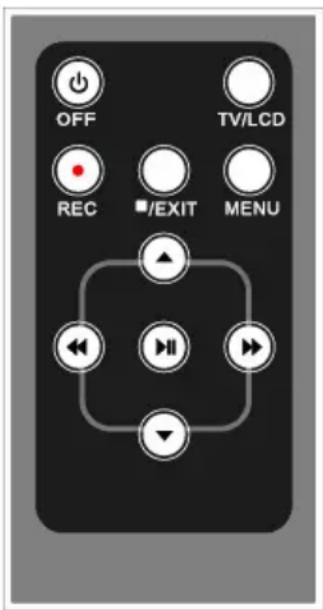
MEGA VIEW 588 remote control is for you to operate MEGA VIEW 588 from a longer distance.
Button definition:
■ OFF: press to power off MEGA VIEW 588.
■ TV/LCD: press to switch the output device between TV and MEGA VIEW 588.
■ REC •: press to start to record of each function.
■ /Exit: press to stop playback or go back to previous menu.
■ MENU: press to go back to Main Menu.
■ ▲/ ▼: press to select previous/ next item on menu list. These two buttons function the same as pushing Navigator key up/ down.
- ◀/ ▶: press to rewind/ fast-forward the playback. These two buttons function the same as pushing Navigator key left/ right.
- ▶II: press to play or pause the playback. The button functions the same as press down Navigator button.
Note: Power button on the remote control can only power off MEGA VIEW 588, not power it on.
Li-ion Battery Recharging
MEGA VIEW 588 comes with a Li-ion rechargeable and removable battery. Charge the battery until full when you use MEGA VIEW 588 for the first time by following the steps below:
-
Connect the supplied AC Adapter to AC outlet, and plug in the other end of the AC Adapter to the DC-in jack of MEGA VIEW 588.
-
While recharging, Power LED will keep blinking. If you power on MEGA VIEW 588 while recharging, you will see the below right power charging figure on LCD display.
natural_image
Exterior view of a white stationery device labeled 'MSI' with control knobs and buttons (no readable text beyond branding)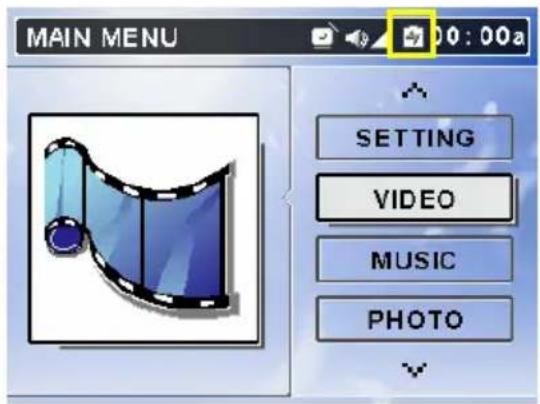
- When the battery is full, the Power LED will stop blinking. To stop recharging, disconnect the Adapter from MEGA VIEW 588.
Note 1: Charge MEGA VIEW 588 only with the supplied AC Adaptor.
Note 2: Do NOT open the battery cap while the power is on!
Note 3: You can still operate MEGA VIEW 588 while it is being recharged; but the recharging time will be longer.
Battery Consuming Reference

MEGA VIEW 588 uses a 2200mAh , 3.7V, 1 Cell rechargeable Li-ion battery. The battery consuming reference will vary in different operating modes. A fully recharged battery consumption reference is as following:
● Video Playback/ Video Record: can be used for about 5 hours.
● Music Playback/ Music Record: can be used for about 7.5 hours.
Battery Replacing
The battery of MEGA VIEW 588 is removable. If you have two batteries you can remove the battery and replace with another one. To open the battery cap, hold down the power cap button and push it forward to open. Pull out the battery inside and insert another one.
MEGA VIEW 588 package includes a Utility CD. Insert the supplied CD into your CD-ROM, and the CD will auto run Setup program. On computer screen, you will see the display shown as below.
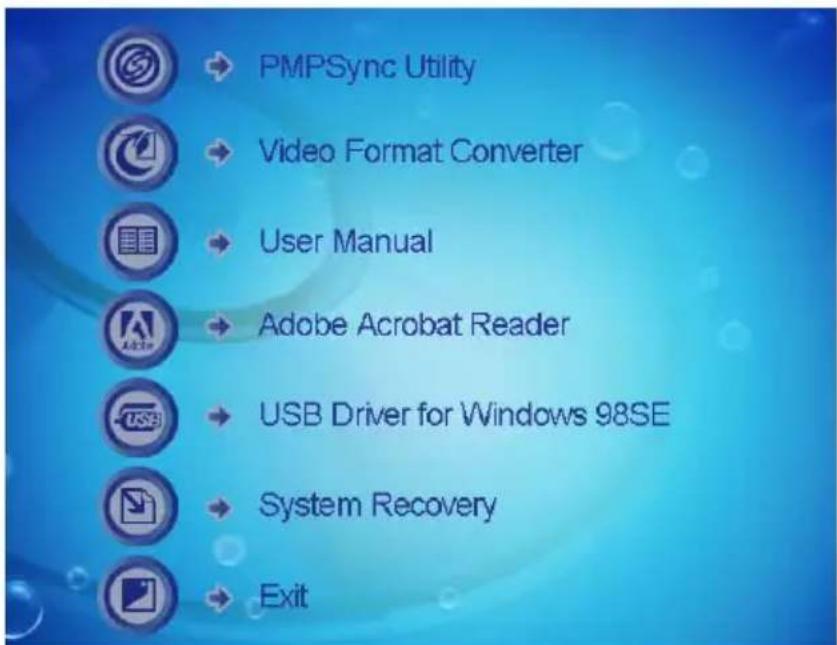
- PMPSync Utility: PMPSync Utility for MEGA VIEW 588 file management and synchronizing.
- Video Format Converter: Video converter utility for converting video files into specific format.
Note: To have better converting performance, this converter program supports only Windows XP with Windows Media Player 10. For other Windows operation systems, you can download DivX converter from http://www.divx.com!
- User Manual: User manual in PDF format.
- Adobe Acrobat Reader: Adobe Reader for opening PDF files.
- USB Driver: USB Driver for Windows 98 operating system.
- System Recovery: Restore MEGA VIEW 588 system back to manufacture default.
Note: Leave MEGA VIEW 588 as the only device connected to computer before running System Restore!
- Exit: Exit and close the Setup program.
Chapter 3. Connect & Remove from PC
Connect MEGA VIEW 588 to Computer
- Press ⏻ button to power on MEGA VIEW 588.
- Plug the mini end of the supplied USB cable to MEGA VIEW 588, and the other end to your computer.
natural_image
Back panel of a wireless router with ports and a highlighted connector (no text or symbols visible)- Once MEGA VIEW 588 is connected to your computer, it should be detected by your computer operating system automatically. You will see the following message showing on MEGA VIEW 588.

Note: For Windows 98SE users, a driver is required to activate MEGA VIEW 588 on your computer.
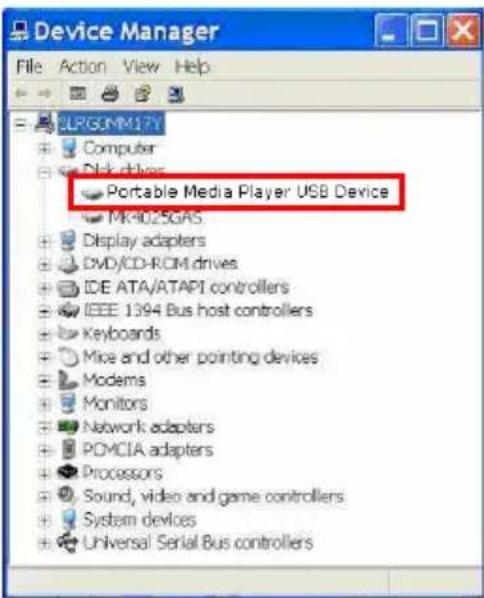
- After connection is initialized, your computer operating system will recognize MEGA VIEW 588 as a hard disk. Go to [Device Manager] by clicking “Start” → “Setting” → “Control Panel” → “System” → “Hardware”, and look for [MEGA VIEW 588 USB Device] under [Disk Drive] to check connection status. If the connection is failed, you will not find [MEGA VIEW 588 USB Device]. Repeat step 2 to reconnect MEGA VIEW 588 to your computer.
- After your computer operating system recognizes MEGA VIEW 588 as a hard disk, you can move, copy, or delete files with Windows Explorer.
For Systems with Windows 98SE
After connecting MEGA VIEW 588 to a Windows 98SE operating system computer, the Windows system will detect MEGA VIEW 588 and ask to install driver. Place the supplied driver CD in the CD-ROM drive, and refer to the Support CD section to complete the driver installation.
Format MEGA VIEW 588
We strongly suggest not to format MEGA VIEW 588 hard disk! MEGA VIEW 588 display interfaces will not function correctly if the hard disk is formatted. If you do need to format MEGA VIEW 588 hard disk, connect MEGA VIEW 588 to your computer first and format it with Windows formatting tool. When formation is completed, please refer to Support CD and Appendix A sections to recover the system files, software, and firmware.
Note: If you format MEGA VIEW 588 hard disk, all data will be erased!
Note: Use Windows Disk Defragmenter or other defragmenter tool to reduce MEGA VIEW 588 hard disk fragment to improve hard disk access speed and for longer battery life.
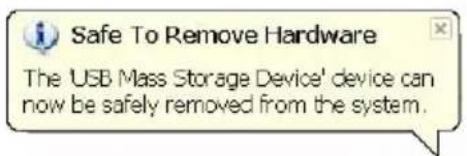
Safely Remove MEGA VIEW 588 from Computer
After managing files or update firmware, please follow the steps below to safely remove MEGA VIEW 588 from computer:
- When MEGA VIEW 588 is connected to computer, will be shown on computer system tray. To remove MEGA VIEW 588, close all the related programs first. Double click the icon to bring up Safely Remove Hardware dialog box. Click on USB Mass Storage Device and Stop button.
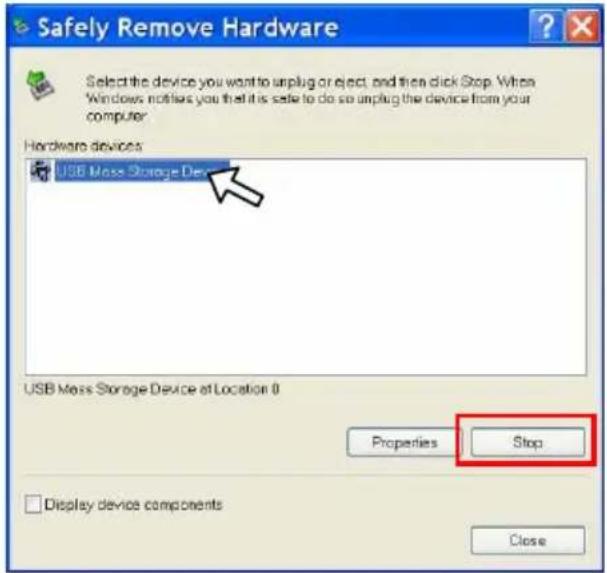
- You will see following window, click on USB Mass Storage Device and OK button.
![Stop a Hardware device Confirm devices to be stopped, Choose OK to continue Windows will attempt to stop the following devices. After the devices are stopped they may be removed safely. USB Mass Storage Device Generic volume - [F:] Portable Media Player USB Device OK Cancel](/content/2026/05/1054291/images/715f8f22549d262c84aef028c1a5bcbadab80e6a8764af169da13aef1632b03f.jpg)
- When you see following message MEGA VIEW 588 can now be safely removed from computer.
Chapter 4. Basic Usage
Power On and Off
- Press ⏻ button once to power on MEGA VIEW 588. After animation, you will see the main menu and can use MEGA VIEW 588.
Note: If you locked Lock Switch before powering on, power would not be turned on. Unlock the Lock Switch and go on.
- To power off MEGA VIEW 588, press ⏻ button again. You will see following message, and MEGA VIEW 588 will be shut down.

Note: If MEGA VIEW 588 can not be shut down by one short press, press and hold the power button for 4 seconds to force power off.
Volume Adjustment
- To change volume level, push Volume Control to left/right. The volume status icon changes while adjusting volume. There are 16 volume levels.

- To mute the volume, press Volume Control button down. Volume status icon will be seen as following.

Note: If earphones are plugged, the icon will be like

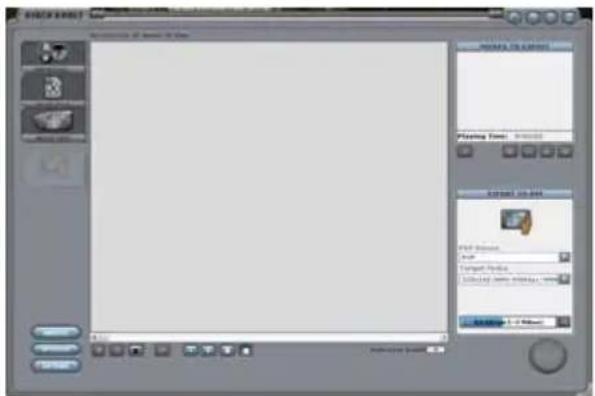
PMPSync Utility
MEGA VIEW 588 supports files to be sorted by categories, such as Title, Artist, Category, or Playlist with the bundled PMPSync utility. With the utility, you can define or edit category tags to append to each file and transfer them to MEGA VIEW 588. Only files transferred with the utility can be sorted in categories predefined with the utility or ID3 tags.
Note: Only MP3 music will be sorted via ID3 tags. The other supported types of music and video files will need PMPSync to define tags.
Install & Execute
To install PMPSync Utility, refer to Support CD section. To execute PMPSync utility, click the shortcut on the desktop, or click by Start → Programs → PMPSync → PMPSync. The display will be shown as the figure below.
Buttons
Buttons on PMPSync are categorized and described as following. Please read and operate the tool by refer to the descriptions:
■ Tool Bar

-
Media Import: Select source device to be PC, and import multimedia files from any directory in computer.
-
Export to PMP: Export imported multimedia files to MEGA VIEW 588.
- Delete: Delete selected files from list. If source device is PC, the files are only removed from the list. When source device is MEGA VIEW 588, a dialog box will show to confirm. Press OK to delete the files from MEGA VIEW 588.
- Setting: Set Synchronize mode.
- Help: Help file or other information of PMPSync.
■ Source Buttons
1.

2.

- PC: Select your PC as file source to import to PMPSync.
- PMP: Select Player as file source to import.
■ Media Tabs

- Music: Press Music button to see music files on the list.
- Video: Press Video button to see video files on the list.
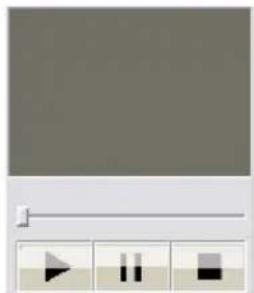
■ Media Player
Preview window for media play. Select a music/video file and press to play. Press and button can pause and stop the playback.
■ Media List Panel
| Supported Media | File Name | Title | Category |
Files imported to PMPSync will be listed in Media List Panel for creating and editing category tags. Category tags will vary from media types.
■ Add and Remove Buttons

Add: Press Add button to upload selected file(s) to Playlist.
Remove: Press Remove to remove selected file(s) from Playlist.
■ Playlist Panel
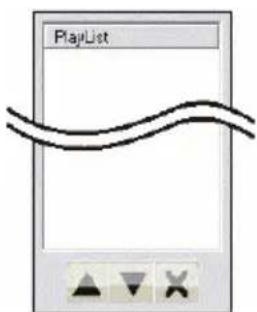
Playlist: List all files which will be added to playlist. You can use ▲ move up, ▼ move down, or ✗ clear playlist to empty.
Edit Tags for Files in PC:
-
To run PMPSync, click the shortcut on the desktop, or click Start → Programs → PMPSync → PMPSync.
-
Turn on MEGA VIEW 588 and connect it to PC with the supplied USB cable.
-
Press button to select the source device to be PC.
-
Press button to bring up Import Window to import files from PC.

-
Select Video or Music tab on Viewing Panel for the types of files that you will edit.
-
Click on folder on file explorer to locate media files. Only select Music tab, all music files in the folder will be shown on Viewing Panel.

- In the Viewing Panel, select one or multiple files for later editing.
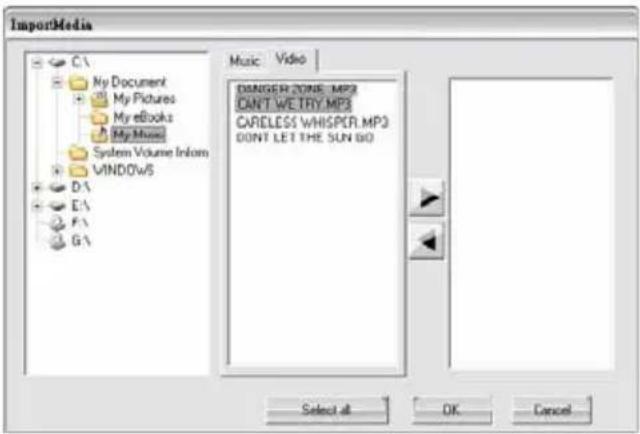
Note: You can use Shift or CTRL key on keyboard to select multiple files.
- Press ▶ button to add selected files to File Listing Panel. Or press Select all to import all files in the directory.
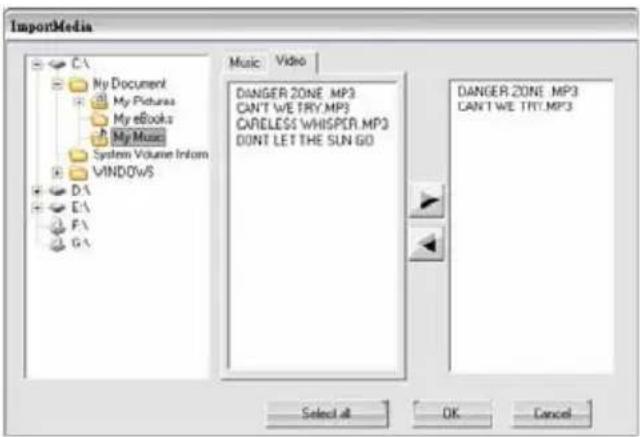
-
Repeat Step 5\~8 if you want to add more files. To remove files from list, highlight them and press ▶ button.
-
Press OK button to go to main window. You will see files showing on Media List Panel as below with their category tags. If a file is not defined with any tag, “unknown” will be shown in the associated category.
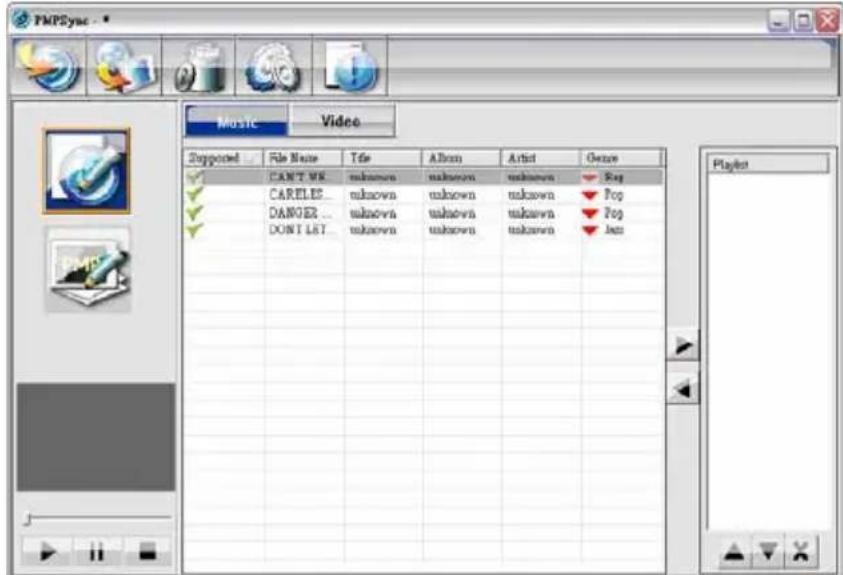
Note: If a MP3 file is predefined with ID3 Tags, the tags will be shown under each category.
Note: The √ mark on Supported Media column denotes the checked files can be playback without converting. But sometimes it may work incorrect.
Note: Each field of ID3 Tag can have 128 uni-code characters at most.
- If you need to preview video or music file on the editing list press button on Media Player at left hand side to listen to it. During playing, you will see the file name, elapsed time, and total time.
natural_image
Pure graphical interface elements without any text, numbers, or symbols- To edit tags, double click on a category of a file and type in tags. If a selected file is MP3 music, you can right click on it and select Edit ID3 Tag to edit tags on a separate window.
- For Category tag of Video and Genre of Music, click the down arrow and select one of the default options from the drop-down list.
Video Convert
If the imported file is not support by MEGA VIEW 588, you can right click on the file on the list and select “Video Convert” to convert the video file into supported format and play it on MEGA VIEW 588.
Edit Tags of a File in MEGA VIEW 588:
You can also edit tags for the files in MEGA VIEW 588 if they are loaded from other sources than PMPSync for easier file navigation. To edit tags of a file, click on [icon] button to set source device as MEGA VIEW 588 and follow the steps of “Edit Tags of a File in PC”.
Edit Playlist:
After editing tags on PMPSync, you can group edited files into playlist and playback the list on MEGA VIEW 588. Only one playlist will be transferred to and playback on MEGA VIEW 588. To edit playlist:
- Select all files that you want to group them into list. Click ➤ button to add them to Playlist Panel. The playlist may show as the figure below.
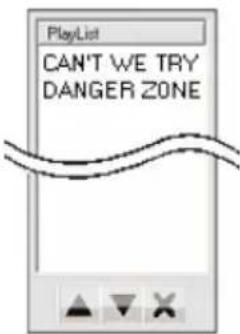
- Use Move Up, Move Down, or Clear buttons to manage files and play them in sequence.
Note: the playlist can include 2048 files at most.
Transfer Files to MEGA VIEW 588:
-
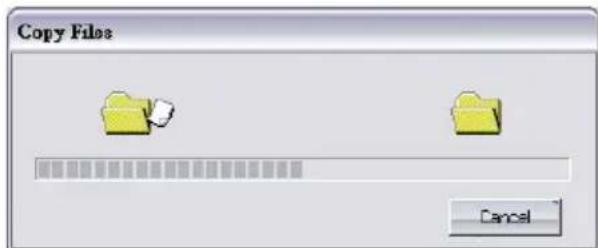
Click button on Tool Bar to transfer files and playlist from PC to MEGA VIEW 588.
-
A progress bar will be shown on display on transferring. When it disappears, selected files are transferred to MEGA VIEW 588.
- Disconnect MEGA VIEW 588 from PC. You can find the transferred playlist in Playlist folder.
Note: Press Setting button to choose Overwrite or Rename on SyncMode to overwrite or rename the file with same name in Playlist folder. And choose Overwirte or Append on Sync Playlist to overwrite or append the playlist.
Video
MEGA VIEW 588 supports of MPEG-4 SP, DivX 3.11/4/5, Motion JPEG, and WMV-9 SP@ML video files. Video can be playback at up to 30fps. Only supported file will be shown from list and played on MEGA VIEW 588.
Play Video on MEGA VIEW 588
- Execute PMPSync to edit video file tags.
- Connect MEGA VIEW 588 to computer by referring to Chapter 3.
- Upload files with tags from computer to MEGA VIEW 588 by PMPSync.
- If the uploading video file is not supported by MEGA VIEW 588, you can use the bundled video converter tool to convert it to a supported format. Read the User Guide of the tool to know how to use it.
- Refer to the Safely Remove MEGA VIEW 588 from Computer section to disconnect MEGA VIEW 588 after files are transferred.
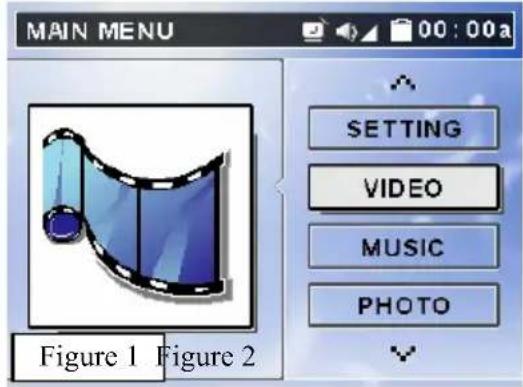
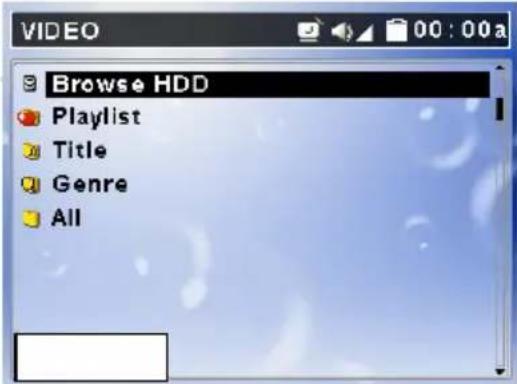
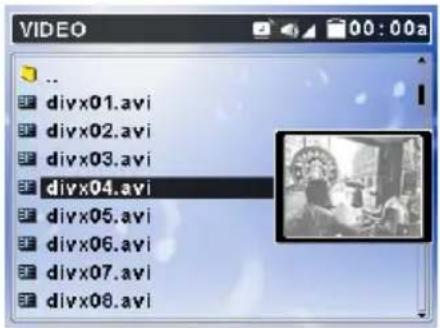
- On main menu, push Navigation key up or down to Video as Figure 1. Press down Navigation key to enter Video menu as showing in Figure 2.
- Push Navigation key up or down to select a category and press down
Navigation key to enter, select a file from the list. If there were many files, you could push and hold down or up Navigation key for quickly scroll to next or previous page.
- You can preview the highlighted video by pushing Navigation key to the right. Press ■/⊃ button once to stop previewing.
- Press down Navigation key to play/ pause the selected video. When press to pause, you will see below message showing playback status and elapse time on the display. It will disappear automatically in few seconds.

- If the file selected to play is not supported by MEGA VIEW 588, you will see a message as below.

-
Push Navigation key to the right to fast-forward video playback, push to switch among FFx2, x4, x8, x16, and x1. (Push once to fast-forward by 2x, twice to fast-forward 4x, etc.) Press down Navigation key to playback the video in normal speed.
-
Push Navigation key left to rewind the playback, push to switch among RWx2, x4, x8, x16, and x1. (Push once to rewind by 2x, push twice to rewind 4x, etc.) Press down Navigation key to playback the video in normal speed. When press to fast-forward or rewind, you will see below message showing playback status and elapse time on the display.

- To adjust brightness of the display, push Navigation key up or down. There
are 16 levels, please find the level that meets your need. Display brightness status bar will disappear in few seconds if no keystroke is triggered.

natural_image
Simple black-and-white progress bar with sun icon and horizontal bar (no text or symbols)- If a playing video is stopped or power is turned off, MEGA VIEW 588 will automatically set a resume point. When you attempt to play the file again, a “Continue?” prompt will be shown as below for continuing the playing. Choose Yes to resume the video playing.

Note: There is only one resume break on MEGA VIEW 588. If you play another video, the bookmark will be reset.
- If any file is not needed, you can delete it from file list. Push Navigation key up or down to select the file, push Navigation key left to see below left figure. Push Navigation key left/ right to select Yes, and press Navigation key down to confirm to delete, you will see the below right figure.


Manage Files on MEGA VIEW 588
To add files to MEGA VIEW 588, you can also use Windows Explorer. Simply transfer files from computer to MEGA VIEW 588. In Video function, you will see only the supported video files from “Browse HDD” folder on MEGA VIEW 588, etc.
Note: Files transferred with Windows Explorer will only be found in Browse HDD folder, not shown in categories. Use PMPSync to transfer files to have files sorted into categories.
Play a DivX® Video:
MEGA VIEW 588 is certified by DivX's Portable Profile logo program to guarantee playback DivX®.v3.11, v4.x, and v5.x file format with up to D1 (704x576) resolution for Portable and Handheld devices. You can transfer DivX format videos to MEGA VIEW 588, and play them later on.
-
Connect MEGA VIEW 588 to computer, move or copy DivX® format video files to MEGA VIEW 588. Disconnect from computer after transfer is completed.
-
On MEGA VIEW 588 main menu, highlight Video and press down Navigation key to enter Video menu.
-
Select a DivX file and press Navigation key. If the file is purchased from the Internet with DivX® DRM protection, you will see the message as below. Select YES with Navigation key and press down Navigation key to start to play, or select NO to quit the file and get back to video list menu.

- With DivX DRM protection, video playing may be limited by views. Video will no longer be able to be played after the rental is expired, and you will see the message below when you still intend to play it. Press down Navigation key to quit the file and go on.

Select Audio Track and Subtitle Track of DivX®. File:
DivX ^® video may support multiple language audio and subtitle tracks. You can select different language audio and subtitle track to meet your need and enjoy the video playback.
- If the video embedded language audio tracks, “Please select Audio Track” will display on LCD when you press Navigation key to play the DivX® video. Choose one track and press down Navigation key to start to play.
| Please select Audio Track : | |
| Track 1 | Track 2 |
| Track 3 | Track 4 |
| Track 5 | Track 6 |
| Track 7 | Track 8 |
| Press Enter to Select | |
- If the video embedded subtitle tracks, “Please select Subtitle Track” message will display on LCD when you press Navigation key to play the DivX® video. Choose one track and press down Navigation key to play.
| Please select Subtitle Track: | |
| Track 1 | Track 2 |
| Track 3 | Track 4 |
| Track 5 | Track 6 |
| Track 7 | Track 8 |
| No Subtitle | |
| Press Enter to Select | |
Note: The tracks now can only be shown as Track 1, Track 2, and etc. This function will be updated by DivX ^® Network in the near future.
- You can change audio track and subtitle during DivX video playing. During playing, press down Navigation key to pause first. Push up Navigation key to select an audio track and press down Navigation key to switch audio track. Push down Navigation key to choose a subtitle and press down Navigation key to play with selected subtitle.
Music
MEGA VIEW 588 supports MP3 (MPEG1 Layer2, Layer3), WAV (LPCM, ADPCM), and WMA (WMA-9 Layer 2a) files playback. MP3 and WMA can be playback at up to 320 Kbps. Only supported files will be shown from list and played on MEGA VIEW 588.
Play Music on MEGA VIEW 588
- Execute the bundled PMPSync software to edit video file tags.
- Connect MEGA VIEW 588 to computer by referring to Chapter 3.
- Upload the files with tags from computer to your MEGA VIEW 588 with the PMPSync.
- After files are transferred, disconnect MEGA VIEW 588.
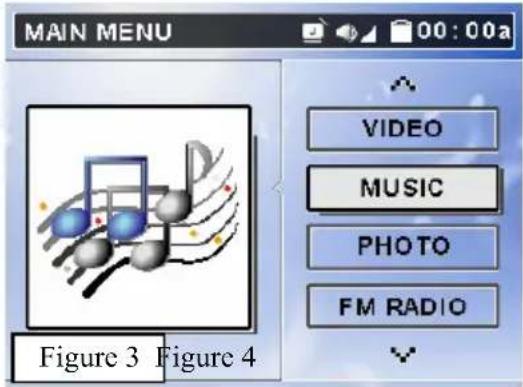
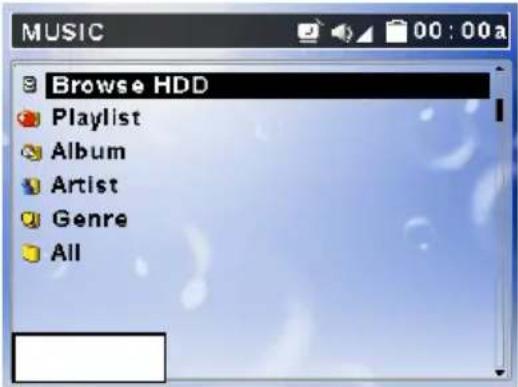
- On main menu, push Navigation key up or down to Music as Figure 3. On Music option, press down Navigation key to Music menu as Figure 4. All the Music files are sorted into folders by their information.
- Push Navigation key up or down to select a category and press down Navigation key to enter, select a file from list. Push and hold down or up Navigation key to quickly scroll to next or previous page.
- You can press Navigation key to the right to pre-listen the highlighted file.
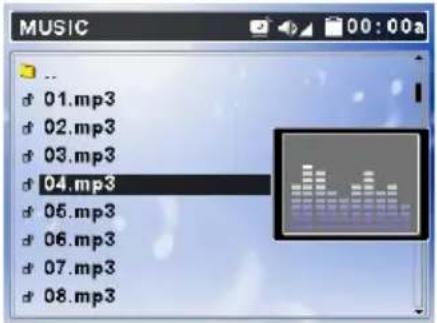
- Press down Navigation key to play the song with Virtual Music Player.
- If the selected file is not supported by MEGA VIEW 588, you will see a message as below.

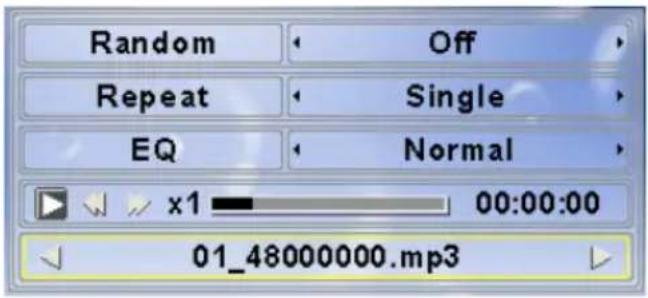
- Push Navigation key up or down to choose from Random/ Repeat/ EQ/ Playback Status/ Song. You can adjust these items by referring to the table below according to your preference.
| Random Push | Navigation key right or left: On/Off |
| Repeat Push | Navigation key right or left: Single/All/Off |
| EQ | Push right or left: Normal, Jazz, Rock, Classic, Dance |
| Playback Status | Press down Navigation key to play/ pause playbackPush right: 2X/ 4X fast-forward/ PlayPush left: 2X/ 4X rewind/ Play |
| Song Push left | go to previous songPush right: go to next song |
- Press ■/⊃ button once to stop music playing and go back to list.
- If any file is not needed, you can delete it from file list. Push Navigation key up or down to select the file, push Navigation key left to see below left figure. Push Navigation key left/ right to select Yes, and press Navigation key down to confirm to delete, you will see the below right figure.


MEGA VIEW 588 supports JPEG and GIF file format. Only supported files will be shown from list and viewed on MEGA VIEW 588.
View Photo or Picture
- Connect MEGA VIEW 588 to computer and upload the files from computer to MEGA VIEW 588.
- Disconnect MEGA VIEW 588 after files are transferred.
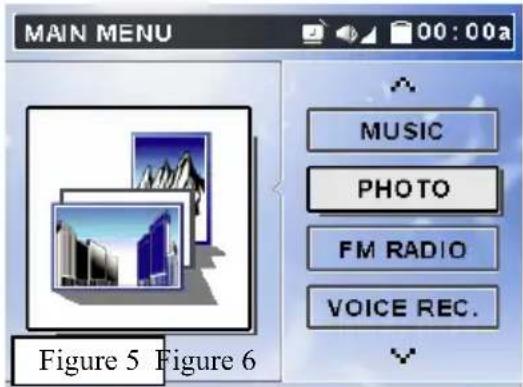
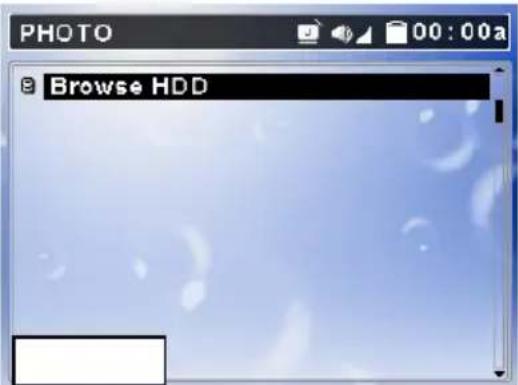
- On main menu, push Navigation key up or down to Photo as Figure 5. On Photo, press button to enter Photo menu as Figure 6.
- Push Navigation key up or down to select a category and press down Navigation key to enter, select a file from list. You can preview selected file by pushing Navigation key to the right. Press down Navigation key, you can see the file in full screen.

- If you want to rotate the photo, push Navigation key to the right. One press will make the photo rotate 90 degrees. Press down Navigation key again, the photo will be displayed normally.
-
While viewing the photo in full screen, you can push Navigation key up or down to view previous or next photo. Or press down Navigation key to start Slide Show. Files slide in certain seconds adjusted in Setting Menu\ Photo\ Slide Interval.
-
If you already transported music files from computer to MEGA VIEW 588 by PMPsync tool and adjust Setting Menu\ Photo\ Slide Music to On, you can hear those files while the photos sliding.
-
You can set a picture to be wallpaper. Highlight the desired picture on list, press Navigation key left to read the message. Select Set as Wallpaper and select Yes to set your personalized wallpaper.

- While viewing one photo in full screen (not in slide show mode), you can push Navigation key left to browse photos by 3X3 format. Then you will see 9 frames on the display. The first or last photo of a folder will be highlighted in red frame.

natural_image
Grid of nine product and technology images including a baby, camera, lens, smartphone, laptop, car, and coffee cup (no visible text or symbols)Note: The icon with exclamation mark in the middle of bottom line denotes the file format is not supported by MEGA VIEW 588.
-
Push Navigation key to the right or left to select previous or next photo. Push Navigation key up or down to select last 9 or next 9 photos. Press down Navigation key to view the selected photo in full screen.
-
Press ■/⊃ button to stop photo viewing.
Note: Photos/ pictures are best viewed at resolution of 1600x1200 for JPEG, and 800x600 for GIF format.
- If any file is no need, you can delete it from file list. Push Navigation key up or down to select the file, push Navigation key left to see below left figure. Push Navigation key left/ right to select Delete? and select Yes, then press Navigation key down to confirm, you will see the below right figure.

FM Radio function is optional on MEGA VIEW 588. If you purchase a MEGA VIEW 588 with FM radio function, follow instructions below.
Search a FM Station
- Fist of all, plug earphones to earphone jack. The earphones are also used as antenna for MEGA VIEW 588. "Plug in Earphone!" message will appear on LCD display if you do not plug it in. Radio quality might vary from regions and angles. Disconnecting earphones may cause radio noise.

- Push Navigation key up or down to select FM Radio as Figure 7, and then press down Navigator key to get into FM Radio shown as Figure 8.
- You can see default stations showing on display. Press down Navigator key to select Frequency Bar to search a different radio station.

- Push Navigation key down to select Scan or Fine Tune. When Scan is selected, an available station can be found by pushing Navigation key to the right or left. If Fine Tune is selected, frequency bar will be adjusted by 0.1 MHz on each Navigation key left or right move.
- On searching, you can see frequency showing on display.
Store a FM station
- To store a FM station, on Frequency Bar, press down Navigator key on a
found radio station, station number 1 will be flashing.
- Select station number from 1 to 8 by pushing Navigation key to left or right, and press down Navigator key to save frequency to the assigned station number.
- Repeat steps 1-2 to store other stations.
Select a stored FM station
- To select a stored station, push Navigation key up to Station List.
- Push Navigation key to the left or right to select a number and press down Navigator key to listen to the selected station.
Record voice from a FM station
- You can also record radio broadcast into .mp3 format with MEGA VIEW 588. Select a station and press REC[•] button to record.
- You will see Record Quality and Record Time on the display, and Record LED will be on.

- To stop recording, press REC[•] button again. Upon recording stopped, saving information will be shown as following figure. You will see a recorded file under Music\record folder and file name starts with [FM000000.mp3], [FM000001.mp3], and so forth.
Play a Recorded FM File
- To play a recorded FM file, exit FM mode and go to Music mode.
- Find recorded file name on the file list of Music mode.
- Select a file and press down Navigator key to play.
MEGA VIEW 588 also works as a voice recorder.
Record Voice
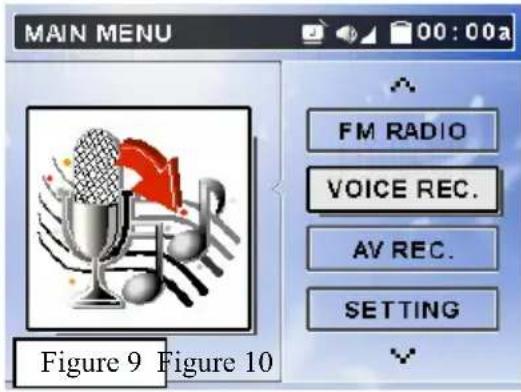
- Push Navigation key up or down to select Voice Record as figure 9. On Voice Record, press down Navigation key to enter voice, as figure 10.
Note: To prevent battery runs out while recording resulting system failure, we suggest to plug in AC Adaptor on recording.
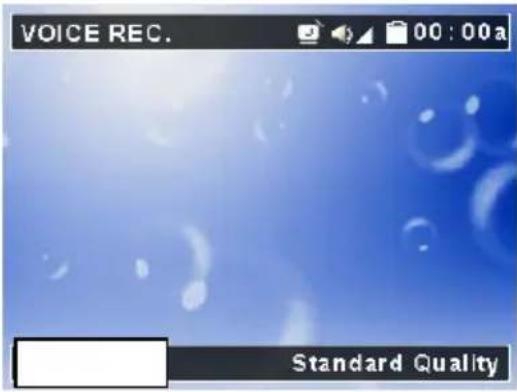
- Press REC[•] button to start to record, and the Record LED will stay on.


- To stop recording, press REC[•] button. You will see a recorded file under Music\record folder and file name starts with [Vo000000.mp3], [Vo000001.mp3], and so forth.
Note: The maximum length of Voice Recording depends on hard disk free space. Voice Recording can not exceed 24hrs or 2GB.
Play a Recorded Voice File
- To play a recorded voice file, exit Record mode and go to Music mode.
- Find recorded file name on the file list of Music mode.
- Select a file and press down Navigation key to play.
MEGA VIEW 588 can also record AV signal from other devices.
Record AV
- Connect MEGA VIEW 588 AV-in Jack to an AV output device, such as TV or DVD player with the supplied AV cable. Match video line-in component cable to AV signal connectors on the same row by color or text.
Note: To prevent battery runs out while recording resulting system failure, we suggest to plug in the AC Adaptor to supply electricity.
Note: We recommend setting resolution and AV quality in Setting to Best before recording from TV.
-
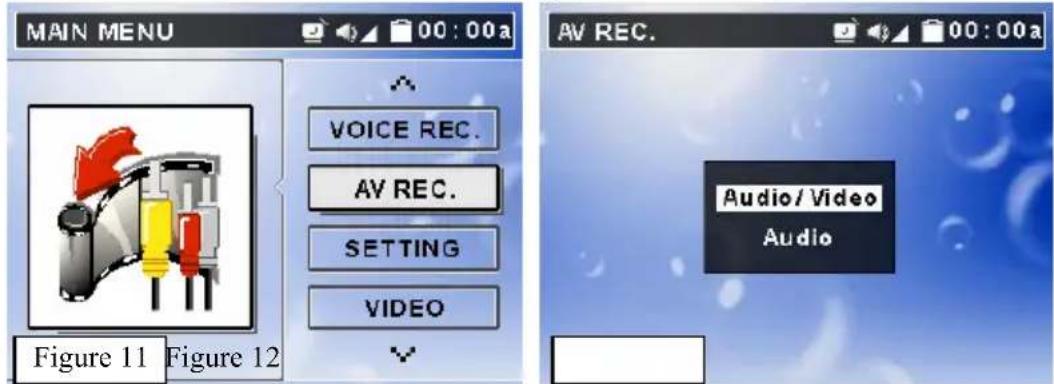
On main menu, push Navigation key up or down to select AV Record as Figure 11. On AV Record, press down Navigation key, as Figure 12.
-
You will first read a prompt for Audio/Video or Audio options. Select one with Navigation key, and press down Navigation key to confirm.

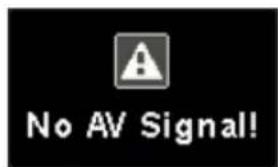
- Select Audio/Video option to record external video, refer to “Input Other Video Device Signal” of Signal Input and Output section. If the AV cable is not well connected, you will see the following message on the display.
- Before recording video, you will see below message. Select an option to record, and recording will stop automatically when time is up. Select by
Navigation key and press down Navigation key. If continuous is selected, when store content capacity exceeds 2GB capacity or 3 hours, the recording will be saved and continue to record the signal to another file, unless you press ■/⇨ button or MEGA VIEW 588 runs out of battery.
| Record Duration | |
| 30 mins | 60 mins |
| 90 mins | 120 mins |
| 150 mins | 180 mins |
| continuous | |
-
Select Audio option, you can record external audio, plug 3.5mm end of the supplied line-in cable to Audio-out jack of external audio device, and 2.5mm end to AV-in jack of MEGA VIEW 588.
-
Press REC[●] button to start to record, and Record LED will be on.

- To stop recording, press REC[•] button. If the recording option is set to Audio/Video, a file will be generated in Video\Record folder. File name starts with [AV000000.asf], [AV000001.asf], and so forth. If the recording option is set to Audio, recorded files will be created in Music\Record folder with file name starting as [AU000000.mp3], [AU000001.mp3].

Note: The maximum length of AV Recording file depends on hard disk free space and can not be exceeded 3hrs or 2GB.
Play a Recorded AV File
- To play a recorded AV or audio file, go back to main menu and select Video or Music mode by referring to Video or Music section.
- Find the recorded file name in Video\Record folder or Music\Record folder.
- Select the record file and press down Navigation key to play the file.
Signal Input and Output
You can view MEGA VIEW 588 signal output in a large video device, such as a TV set to share your enjoyment with more friends. Also, you can input signals of a video device to MEGA VIEW 588, and record the signal into files with AV Recording function.
Output Signals to a TV:
- Connect MEGA VIEW 588 AV-out Jack to a TV with the supplied AV cable. Note the AV cable should be connected correspondingly in color or text to TV AV-in Jack.
- Turn on your TV and switch it to Video (AV signal) mode.
- Change Setting Menu\Display\Display option on MEGA VIEW 588 to TV, you will see then the display switch to TV.
- On Video menu, select and play a file on MEGA VIEW 588. Now you can watch the video file on TV and adjust settings on MEGA VIEW 588 with supplied remote from distance.
Input Other Video Device Signal:
- Connect MEGA VIEW 588 AV-in Jack to a video device, such as TV set or DVD Player, with the supplied AV cable. Note the AV cable should be connected correspondingly in color or text to video device AV-out Jack.
- Turn on the video device and have the video or channel you want to record be played.
- Enter MEGA VIEW 588 AV Recording function, select "Audio/Video". Now you can find the signal playing on MEGA VIEW 588.
- Refer to AV Recording section to have the signal recorded into files and saved on MEGA VIEW 588. You can playback the recorded files anytime on-the-go, or transfer them to computer to share with friends.
The USB On-The-Go function is a new technology, also called OTG. MEGA VIEW 588 support OTG function and can directly backup data from portable disks and digital cameras without going through PC. To transfer files from portable devices, find the following steps:
- Connect USB host cable, the short one, to MEGA VIEW 588 USB port. Then MEGA VIEW 588 is ready to for USB device.
- Connect your USB device, such as digital camera or USB stick, to the other end to the USB host cable as you connect it to your PC.
Note: The USB device and MEGA VIEW 588 should be turned on before connection.
- You will see the figure below when connection initialed. To copy all the files from USB device connected to MEGA VIEW 588, press REC Key as the message mentions.

- Files on the USB device will be saved to a folder under USB OTG folder of MEGA VIEW 588, folder name will be USB00001, USB00002, etc.
- If the connected USB device doesn't support OTG function, the following message will show on the display.

Note: MEGA VIEW 588 supports limited USB device. For more up-to-date compatibility list, please visit http://www.msi.com.tw
Note: We strongly recommend keeping MEGA VIEW 588 battery recharging while USB device is connected to it.
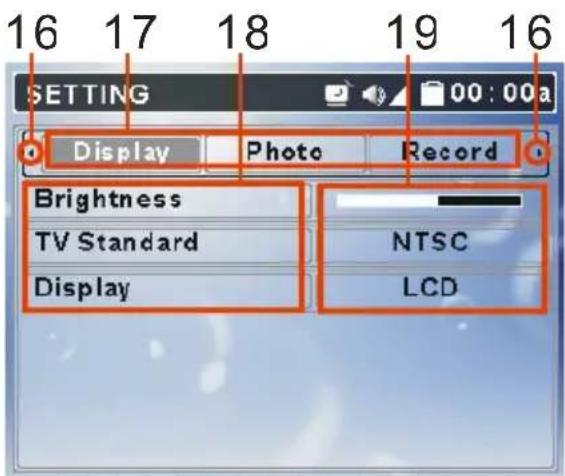
MEGA VIEW 588 Setting menu includes Display, Photo, Record, System, and Info Tab.
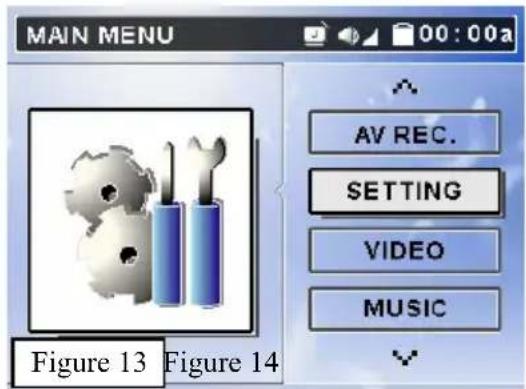
- Select Setting by pushing Navigation key up or down as Figure 13. Press down Navigation key, the screen will show as Figure 14.
- Push Navigation key right or left to select Display, Photo, Record, System, and Info Tab with various setting options in each tab.
Note: Exit the Setting Menu by pressing ■/⇨button, the new values will be saved and applied.
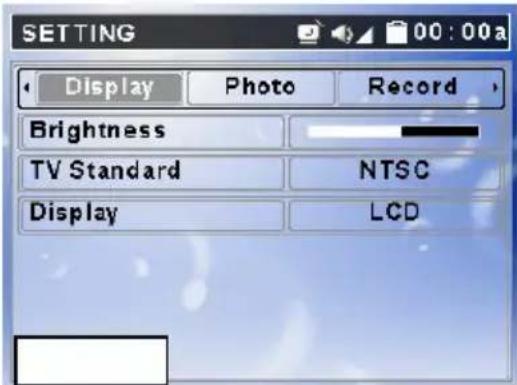
Display Tab
Display Tab includes Brightness, TV Standard, and Display items.
- Enter Setting menu, and you are default starting from Display tab, show as Figure 14.
- Push Navigation key down to select among Brightness, TV Standard, and Display. You can change settings by referring to the table below.
| Setting Item | Method and Purpose Options | |
| Brightness | Push Navigation key to right or left to adjust display brightness | Adjust brightness by need |
| TV Standard | Push Navigation key to right or left to select video standard | NTSC/ PAL |
| Display | Push Navigation key to right or left to select output device | LCD/TV |
Photo Tab
You can adjust photo settings, such as Slide Music, Slide Repeat, and Slide Interval in Photo tab to meet your demand.
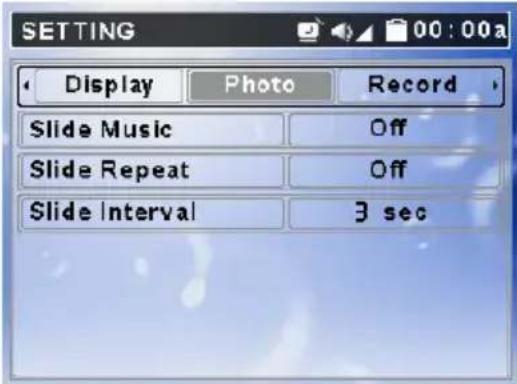
- In Setting Menu, push Navigation key right or left to go to Photo as figure above.
- Push Navigation key up or down to select among Slide Music, Slide Repeat, and Slide Interval. You can change setting by referring to the following table.
| Setting Item | Adjust way and purpose Options | |
| Slide Music | Push Navigation key right or left to enable or disable the background music | On, Off |
| Slide Repeat | Push Navigation key right or left to enable or disable the repetition | On, Off |
| Slide Interval | Push Navigation key right or left to adjust the interval between each photo | 3/ 5/ 10/ 20/ 30 sec. |
Record Tab
You can adjust Resolution, AV Quality, and Voice Quality in Record tab.
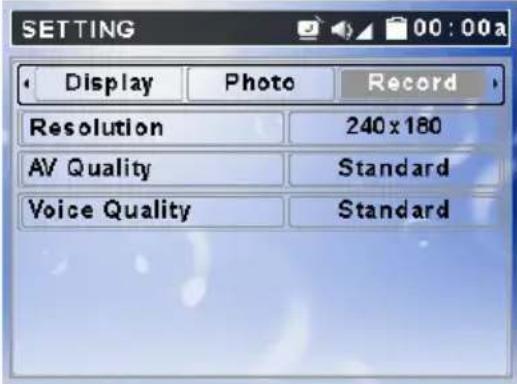
-
In Setting Menu, push Navigation key right or left to Record tab. Display will show as above.
-
Push Navigation key up or down to select a setting item. You can change the setting by referring to the table below.
Note: The better resolution and quality you choose, the bigger file size it will be.
| Setting Item | Method and purpose Options | |
| Resolution | Push Navigation key right or left to adjust record resolution | 240x180, 280x210, 312x234, 320x240 |
| AV Quality | Push Navigation key right or left to adjust AV quality | Standard, Fine, Better, Best |
| Voice Quality | Push Navigation key right or left to adjust voice quality | Standard, Fine, Better, Best |
MEGA VIEW 588 can record video at up to 30fps. You can choose options among Best, Better, Fine, or Standard quality to meet your demand. Performance for each setting item is as following table:
| Setting Item\Quality | Best | Better | Fine | Standard |
| AV Resolution | 320x240 2 | 88x216 272 | x204 240x1 | 80 |
| AV Quality: Video (kbps) | 2000 | 1600 | 1200 | 800 |
| AV Quality: Audio (kbps) | 128 | 112 | 96 | |
| Voice Quality (kbps) | 192 | 128 | 96 |
64 64
System Tab
You can adjust various system options in System tab.
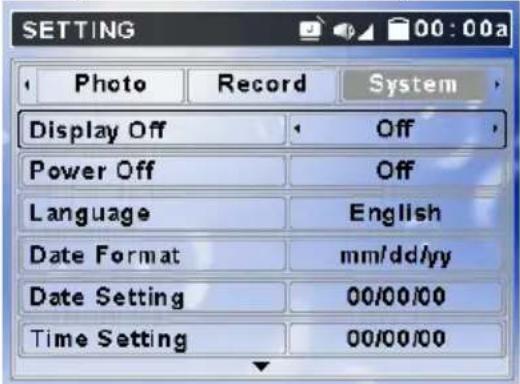
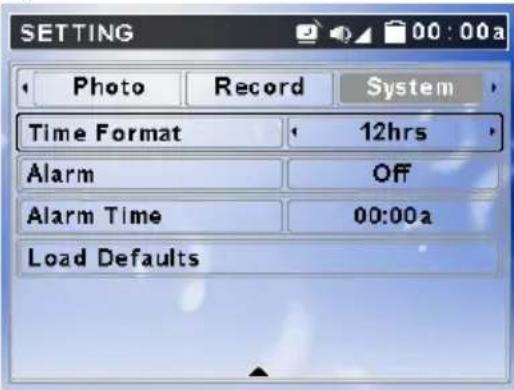
Change System Setting
-
In Setting Menu, push Navigation key right or left to System tab. The display will show as above.
-
Push Navigation key up or down to select Display Off, Power Off, Language, Date Format, Date Setting, Time Setting, Time Format, Alarm, Alarm Time, and Load Defaults. Refer to the table to adjust items.
| Setting Item | Method and Purpose Options | |
| Display Off | Push Navigation right or left to set Display shut down on idling to save battery consuming | Off /3 sec/5 sec/10 sec /15 sec/30 sec/1 min |
| Power Off | Push Navigation right or left to set power off automatically | Off/15 sec/30 sec/1 /2 /5 /10 min |
| Language | Push Navigation right or left to select language | Vary from versions |
| Date Format | Push Navigation right or left to select date format on display | yy/mm/dd, mm/dd/yy, dd/mm/yy |
| Date Setting | Push Navigation right or left to select year/ month/day Push Navigation up or down to change property | Set the exact date |
| Time Setting | Push Navigation right or left to select hour/ minute/sec Push Navigation up or down to change property | Set the exact time |
| Time Format | Push Navigation right or left to select time format on display | 12hrs/ 24 hrs |
| Alarm | Push Navigation right or left to enable or disable the alarm function | Off/ On |
| Alarm Time | Push Navigation right or left to select hour/ minute/sec Push Navigation up or down to change property | Set the alarm time |
| Load Defaults | Push Navigation key right and select YES to load default setting when needed. | Yes/ No |
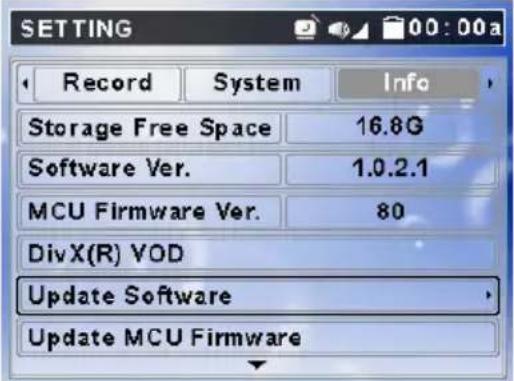
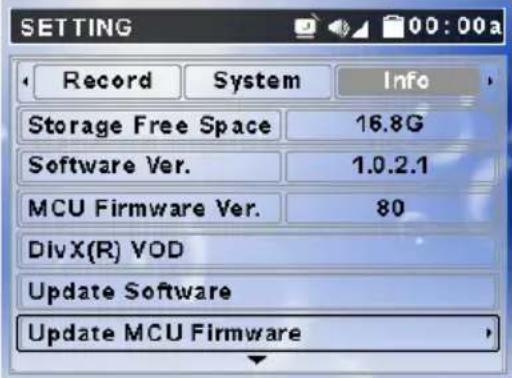
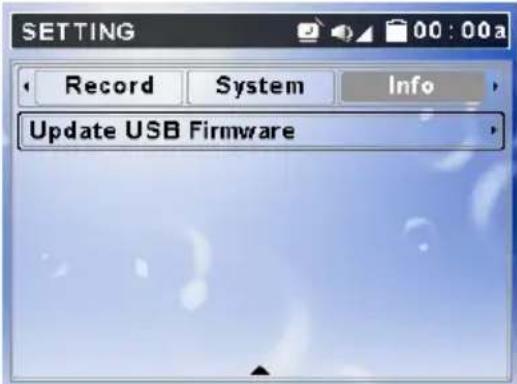
Info Tab
You can find out information of HDD Free Space, Version, and DivX (R) VOD, and Update Software, Update Firmware in Info tab.
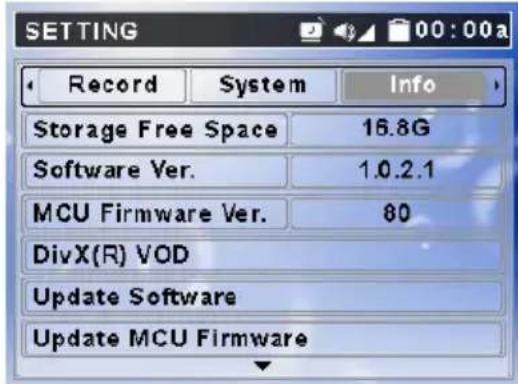
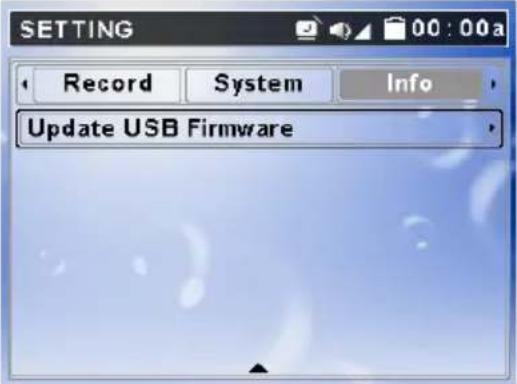
Change Info Setting
- In Setting Menu, push Navigation key right or left to select Info tab. The display will show as above.
- Push Navigation key up or down to select among HDD Free Space, Version, DivX (R) VOD, Update Software, Update MCU Firmware, and Update USB Firmware. You can find the information or change setting according to the table below.
| Setting Item Method and | Purpose Options | |
| Storage Free Space Shows | free space in HDD. NA | |
| Software Ver. Shows software versions. | NA | |
| MCU Firmware Ver. Shows | MCU firmware versions. NA | |
| DivX (R) VOD | Push Navigation key to the right to read DivX information and the registration code. | NA |
| Update Software | Please refer to Appendix A for how to upgrade the software. | Yes/ No |
| Update MCU Firmware | Please refer to Appendix A for how to upgrade the MCU firmware. | Yes/ No |
| Update USB Firmware | Please refer to Appendix A for how to upgrade the USB firmware. | Yes/ No |
Note: Update Software, Update MCU Firmware, and Update USB Firmware are advanced operations! Only advanced users should do!
Appendix A. Specifications
| MEGA VIEW 588 | |
| Dimension 124 x 76 x 24.5 mm | |
| Weight About 245 g (with battery) | |
| Operating Temperature 5 °C ~ 35°C | |
| Storage Temperature -20°C ~ +70 °C | |
| Operating Humidity 15% ~ 90% | |
| Audio Spec Earphone Output: 30mW rms (15mW / channel) Frequency: 20 to 20K Hz SNR: ~85dB | |
| Supports OS Windows 98SE, Windows ME, Windows 2000, Windows XP Home/ Pro (Windows 98SE system requires driver installation.) | |
| USB Profile Meet USB 2.0 Profile | |
| LCD Display 3.5” | |
| Hard Disk 20 GB | |
| I/O Input | Output: mini-USB connector, Earphone Jack, AV-in Jack, AV-out Jack, AC Adaptor connector, CIR, Speaker, and Microphone |
| EMI and Safety | BSMI, FCC, CB, CE, VCCI, CCC |
| Battery | Li-ion rechargeable battery, 2200mAh/ 3.7V Video Playback: 5 hours Audio Playback: 7.5 hours |
| Power Adapter | 100 ~240 V (vary from country to country) |
* Battery life test is under the condition of Temperature/Humidity 25°C, 50%RH, System Setting: Brightness: 8/16 Level, Volume: 50%, Audio Output: Headphone, Test File: Resolution: 320x240, Video bitrate:559Kbps, Audio bitrate: 64Kbps, File size: 546MB, MP4+MP3, Power Sources: Battery, Test Duration: 2 hours.
Upgrade Software
MEGA VIEW 588 software can be upgraded. Software version update might include interfaces modification and function update. You need a computer and the supplied USB cable for the following procedures:
Note: To prevent battery runs out while upgrading resulting system failure, we recommend to plug the AC Adaptor to provide electricity.
Note: If you need to update both firmware and software, update firmware first.
- Connect MEGA VIEW 588 to your computer with the USB cable.
- Power on MEGA VIEW 588 to initialize it on your computer.
- Download a MEGA VIEW 588 upgrade file from internet and save it into MEGA VIEW 588 root directory. Double click to run the upgrade file, and select "Replace all" on pop-up message to replace old files.
- Safely remove MEGA VIEW 588 from your computer.
- Select Setting from main menu and press down Navigation key to enter.
- Push Navigation key left or right to select Info tab.
- Push Navigation key up or down to select Update Software.
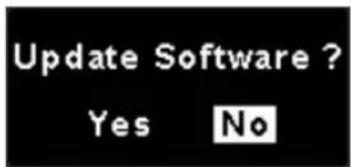
- Push Navigation key to the right. Message "Update Software? Yes No" will show on the display.
-
Push Navigation key right or left to select Yes and press down Navigation key to start to upgrade software. Or select No and enter to cancel upgrade.
-
When software upgrade completes, system will restart.
Upgrade MCU Firmware
Firmware of MEGA VIEW 588 can be upgraded. Firmware is more like BIOS of mainboard, it might let the hardware device work better. You need a computer and the supplied USB cable for the following procedures:
Note: To prevent battery runs out while upgrading and causes system failure, it is recommended to plug the AC Adaptor to provide electricity.
Note: If you need to update both firmware and software, update firmware first.
- Connect MEGA VIEW 588 to your computer with the USB cable.
- Power on MEGA VIEW 588 to initialize it on your computer.
- Download a MEGA VIEW 588 upgrade file from internet and save it into MEGA VIEW 588 root directory. Double click to run the upgrade file, and select "Replace all" on pop-up message to replace old files.
- Safely remove MEGA VIEW 588 from your computer.
- Select Setting from main menu and press down Navigation key to enter.
- Push Navigation key left or right to select Info tab.
- Push Navigation key up or down to select Update Firmware.
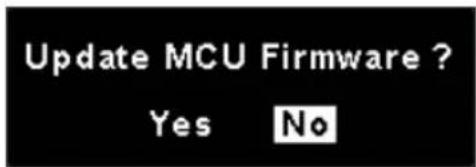
- Push Navigation key to the right. Message "Update MCU Firmware? Yes No" will appear on the display.
-
Push Navigation key right or left to select Yes and press down Navigation key to start to upgrade firmware. Or select No and enter to cancel upgrade.
-
When firmware upgrade completes, system will restart.
Upgrade USB Firmware
Firmware of MEGA VIEW 588 USB chip can be upgraded to support latest USB products. You need a computer and the supplied USB cable for the following procedures:
Note: To prevent battery runs out while upgrading and causes system failure, it is recommended to plug the AC Adaptor to provide electricity.
Note: Update USB Firmware is for supporting more USB devices.
- Power on MEGA VIEW 588.
- Select Setting from main menu and press down Navigation key to enter.
- Push Navigation key left or right to select Info tab.
- Push Navigation key up or down to select Update USB Firmware.
- Push Navigation key to the right, below message will appear on the display to tell you to connect MEGA VIEW 588 to your computer.

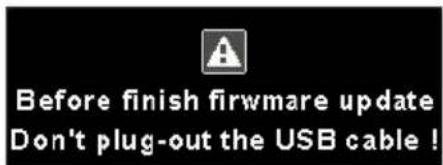
- Connect MEGA VIEW 588 to your computer with the USB cable, then you will see the message below to remind you not to disconnect the USB cable, or the system might be failure.
-
Download USB firmware upgrade file of MEGA VIEW 588 from internet, unzip the file into a folder and remember the location.
-
Go to the location and find the EndUser.exe file. Double click on it to run the upgrade tool, you will see a screen as below.
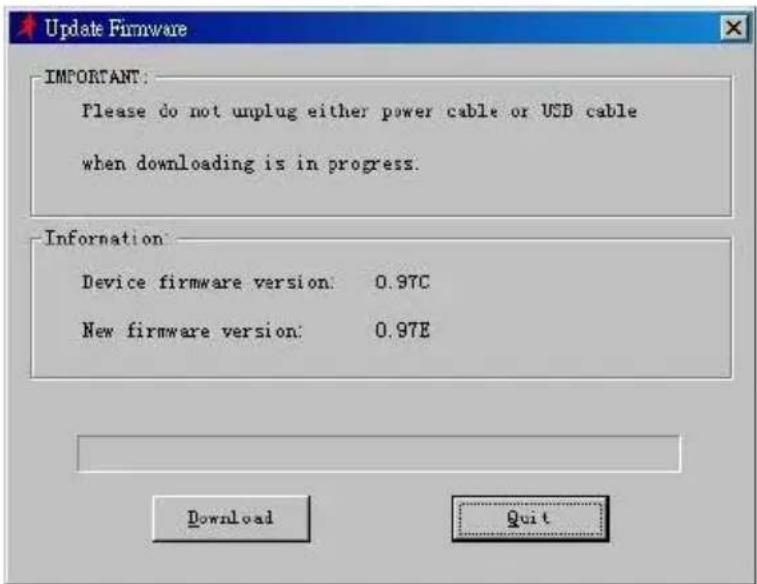
-
Check if New firmware version is newer than Device firmware version, bigger number or character means newer version. If yes, click Download button to upgrade the USB firmware.
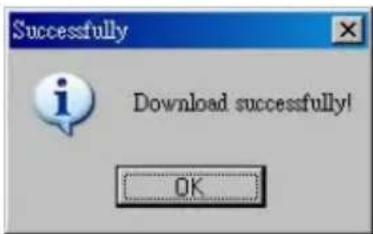
-
After the procedure is done, you will see the message box as below. Click on OK to close the box. Then click Quit button to exit the tool.
-
Safely remove MEGA VIEW 588 from your computer.
-
Turn off MEGA VIEW 588 and turn it on again after 5 seconds. Then the USB function would work via new firmware.

- Safety Instructions....3
- Chapter 1. Introduction ...... 4
- Chapter 2. Get Started ...... 6
- Chapter 3. Connect & Remove from PC .... 15
- Chapter 4. Basic Usage.... 18
- Appendix A. Specifications 47
- COPYRIGHT NOTICES
- TRADEMARKS
- MICRO-STAR INTERNATIONAL Statement
- 廢電池請回收
- WEEE Statement
- Chapter 1. Introduction
- How to Use This Guide
- Accessories
- Chapter 2. Get Started
- Overview
- Operating Menu Displays
- Main Menu
- Video/ Music/ Photo Menu
- USB Hard Disk
- Lock Switch
- SD/ MMC Card Slot
- Button definition:
- Li-ion Battery Recharging
- Battery Consuming Reference
- Battery Replacing
- Chapter 3. Connect & Remove from PC
- Connect MEGA VIEW 588 to Computer
- For Systems with Windows 98SE
- Format MEGA VIEW 588
- Safely Remove MEGA VIEW 588 from Computer
- Chapter 4. Basic Usage
- Power On and Off
- Volume Adjustment
- PMPSync Utility
- Install & Execute
- Buttons
- ■ Tool Bar
- ■ Source Buttons
- ■ Media Tabs
- ■ Media Player
- ■ Media List Panel
- ■ Add and Remove Buttons
- ■ Playlist Panel
- Edit Tags for Files in PC:
- Video Convert
- Edit Tags of a File in MEGA VIEW 588:
- Edit Playlist:
- Transfer Files to MEGA VIEW 588:
- Video
- Play Video on MEGA VIEW 588
- Manage Files on MEGA VIEW 588
- Play a DivX® Video:
- Select Audio Track and Subtitle Track of DivX®. File:
- Music
- Play Music on MEGA VIEW 588
- View Photo or Picture
- Search a FM Station
- Store a FM station
- Select a stored FM station
- Record voice from a FM station
- Play a Recorded FM File
- Record Voice
- Play a Recorded Voice File
- Record AV
- Play a Recorded AV File
- Signal Input and Output
- Output Signals to a TV:
- Input Other Video Device Signal:
- Display Tab
- Photo Tab
- Record Tab
- System Tab
- Change System Setting
- Info Tab
- Change Info Setting
- Appendix A. Specifications
- Upgrade Software
- Upgrade MCU Firmware
- Upgrade USB Firmware
Brand : MSI
Model : MEGA View 588
Category : Media player