
D25580 - Hammer DEWALT - Free user manual and instructions
Find the device manual for free D25580 DEWALT in PDF.


| Product Type | Rotary hammer (SDS Max) |
| Brand | DeWalt |
| Model | D25580 |
| Power Input | 120 V, 60 Hz, 8.5 A |
| Impact Energy | 2.5 J (1.8 ft-lbs) |
| No Load Speed | 0 – 780 RPM |
| Blows Per Minute | 0 – 3,900 BPM |
| Chuck Type | SDS Max |
| Drilling Capacity (Concrete) | 1-5/8 in (41 mm) |
| Drilling Capacity (Steel) | 1/2 in (13 mm) |
| Drilling Capacity (Wood) | 1-1/2 in (38 mm) |
| Weight | 14.1 lbs (6.4 kg) |
| Length | 19.5 in (495 mm) |
| Power Cord Length | 15 ft (4.6 m) |
| Modes | Rotary only, hammer only, rotary hammer |
| Variable Speed Trigger | Yes |
| Side Handle | Included, adjustable |
| Depth Rod | Included |
| Carrying Case | Included |
| Maintenance | Regularly clean air vents; replace brushes |
| Safety | Always wear eye protection and use side handle |
| Spare Parts Available | Brushes, chuck, piston, o-rings |
| Repairability | Service center supported; user replaceable brushes |
Frequently Asked Questions - D25580 DEWALT
User questions about D25580 DEWALT
0 question about this device. Answer the ones you know or ask your own.
Ask a new question about this device
Download the instructions for your Hammer in PDF format for free! Find your manual D25580 - DEWALT and take your electronic device back in hand. On this page are published all the documents necessary for the use of your device. D25580 by DEWALT.
USER MANUAL D25580 DEWALT
Questions? See us on the World Wide Web at www.dewalt.com
MANUAL DE INSTRUÇÕES
Definitions: Safety Guidelines
The definitions below describe the level of severity for each signal word. Please read the manual and pay attention to these symbols.
▲DANGER: Indicates an imminently hazardous situation which, if not avoided, will result in death or serious injury. ▲WARNING: Indicates a potentially hazardous situation which, if not avoided, could result in death or serious injury. ▲CAUTION: Indicates a potentially hazardous situation which, if not avoided, may result in minor or moderate injury. NOTICE: indicates a practice not related to personal injury which, if not avoided, may result in property damage.

WARNING: To reduce the risk of injury, read the instruction manual.
General Power Tool Safety Warnings
WARNING! Read all safety warnings and all instructions Failure to follow the warnings and instructions may result in electric shock, fire and/or serious injury.
SAVE ALL WARNINGS AND INSTRUCTIONS FOR FUTURE REFERENCE
The term "power tool" in the warnings refers to your mains-operated (corded) power tool or battery-operated (cordless) power tool.
1) WORK AREA SAFETY
a) Keep work area clean and well lit. Cluttered or dark areas invite accidents.
b) Do not operate power tools in explosive atmospheres, such as in the presence of flammable liquids, gases or
dust. Power tools create sparks which may ignite the dust or fumes.
c) Keep children and bystanders away while operating a power tool. Distractions can cause you to lose control.
2) ELECTRICAL SAFETY
a) Power tool plugs must match the outlet. Never modify the plug in any way. Do not use any adapter plugs with earthed (grounded) power tools. Unmodified plugs and matching outlets will reduce risk of electric shock.
b) Avoid body contact with earthed or grounded surfaces such as pipes, radiators, ranges and refrigerators. There is an increased risk of electric shock if your body is earthed or grounded.
c) Do not expose power tools to rain or wet conditions. Water entering a power tool will increase the risk of electric shock.
d) Do not abuse the cord. Never use the cord for carrying, pulling or unplugging the power tool. Keep cord away from heat, oil, sharp edges or moving parts. Damaged or entangled cords increase the risk of electric shock.
e) When operating a power tool outdoors, use an extension cord suitable for outdoor use. Use of a cord suitable for outdoor use reduces the risk of electric shock.
f) If operating a power tool in a damp location is unavoidable, use a residual current device (RCD) protected supply. Use of an RCD reduces the risk of electric shock.
3) PERSONAL SAFETY
a) Stay alert, watch what you are doing and use common sense when operating a power tool. Do not use a power tool while you are tired or under the influence of drugs, alcohol or medication. A moment of inattention while operating power tools may result in serious personal injury.
b) Use personal protective equipment. Always wear eye protection. Protective equipment such as dust mask, non-skid safety shoes, hard hat, or hearing protection used for appropriate conditions will reduce personal injuries.
c) Prevent unintentional starting. Ensure the switch is in the off position before connecting to power source and/or battery pack, picking up or carrying the tool. Carrying power tools with your finger on the switch or energising power tools that have the switch on invites accidents.
d) Remove any adjusting key or wrench before turning the power tool on. A wrench or a key left attached to a rotating part of the power tool may result in personal injury.
e) Do not overreach. Keep proper footing and balance at all times. This enables better control of the power tool in unexpected situations.
f) Dress properly. Do not wear loose clothing or jewellery. Keep your hair, clothing and gloves away from moving parts. Loose clothes, jewellery or long hair can be caught in moving parts.
g) If devices are provided for the connection of dust extraction and collection facilities, ensure these are connected and properly used. Use of dust collection can reduce dust-related hazards.
a) Do not force the power tool. Use the correct power tool for your application. The correct power tool will do the job better and safer at the rate for which it was designed.
b) Do not use the power tool if the switch does not turn it on and off. Any power tool that cannot be controlled with the switch is dangerous and must be repaired.
c) Disconnect the plug from the power source and/or the battery pack from the power tool before making any adjustments, changing accessories, or storing power
4) POWER TOOL USE AND CARE
tools. Such preventive safety measures reduce the risk of starting the power tool accidentally.
d) Store idle power tools out of the reach of children and do not allow persons unfamiliar with the power tool or these instructions to operate the power tool. Power tools are dangerous in the hands of untrained users.
e) Maintain power tools. Check for misalignment or binding of moving parts, breakage of parts and any other condition that may affect the power tool's operation. If damaged, have the power tool repaired before use. Many accidents are caused by poorly maintained power tools.
f) Keep cutting tools sharp and clean. Properly maintained cutting tools with sharp cutting edges are less likely to bind and are easier to control.
g) Use the power tool, accessories and tool bits etc., in accordance with these instructions taking into account the working conditions and the work to be performed. Use of the power tool for operations different from those intended could result in a hazardous situation.
5) SERVICE
a) Have your power tool serviced by a qualified repair person using only identical replacement parts. This will ensure that the safety of the power tool is maintained.
SPECIFIC SAFETY RULES
Safety Warnings for Demolition Hammers
- Wear ear protectors. Exposure to noise can cause hearing loss.
- Use auxiliary handles supplied with the tool. Loss of control can cause personal injury.
- Hold power tool by insulated gripping surfaces only, when performing an operation where the cutting accessory may
contact hidden wiring or its own cord. Cutting accessory contacting a "live" wire may make exposed metal parts of the power tool "live" and shock the operator.
- Be certain that the material being drilled does not conceal electric or gas service and that their locations have been verified with the utility companies.
- Keep a firm grip on the tool at all times. Do not attempt to operate this tool without holding it with both hands. Operating this tool with one hand will result in loss of control. Breaking through or encountering hard materials such as re-bar may be hazardous as well. Tighten the side handle securely before use.
- Ensure the chisel is secured in place beforeoperating the tool.
- In cold-weather conditions or when the tool has not been used for a longer period of time, let the tool run with no load for several minutes before use.
- When working above ground level ensure the area below is clear.
- Do not touch the chisel or the parts close to the chisel immediately after operation, as they may be extremely hot and cause burns to the skin.
• Always direct the power cable to the rear, away from the chisel. - Do not operate this tool for long periods of time. Vibration caused by hammer action may be harmful to your hands and arms. Use gloves to provide extra cushion and limit exposure by taking frequent rest periods.
- An extension cord must have adequate wire size (AWG or American Wire Gauge) for safety. The smaller the gauge number of the wire, the greater the capacity of the cable, that is 16 gauge has more capacity than 18 gauge. An undersized cord will cause a drop in line voltage resulting in loss of power and overheating. When using more than one extension to make up the total length, be sure each individual extension contains
at least the minimum wire size. The following table shows the correct size to use depending on cord length and nameplate ampere rating. If in doubt, use the next heavier gauge. The smaller the gauge number, the heavier the cord.
| Voltage (Volts) | Total length of cord in meters (m) | |||
| 120 - 127V 0 - | 77 - 15 15 | -30 30 - 5 | 0 | |
| 220 - 240V 0 - | 15 15 - 30 | 30 - 60 60 | -100 | |
| Rated Ampere range | Minimal cross-sectional area of the cord in meters ( mm^2 ) | |||
| 0 - 6A | 1.0 | 1.5 | 1.5 | 2.5 |
| 6 - 10A | 1.0 | 1.5 | 2.5 | 4.0 |
| 10 - 12A | 1.5 | 1.5 | 2.5 | 4.0 |
| 12 - 16A | 2.5 | 4.0 | Not Recommended | |
▲WARNING: Always use eye protection. All users and bystanders must wear eye protection that conforms to ANSI Z87.1. ▲WARNING: Always wear proper personal hearing protection that conforms to ANSI S12.6 (S3.19) during use. Under some conditions and duration of use, noise from this product may contribute to hearing loss.
▲WARNING: Some dust created by power sanding, sawing, grinding, drilling, and other construction activities contains chemicals known to cause cancer, birth defects or other reproductive harm. Some examples of these chemicals are:
- lead from lead-based paints,
- crystalline silica from bricks and cement and other masonry products, and
• arsenic and chromium from chemically-treated lumber (CCA).
Your risk from these exposures varies, depending on how often you do this type of work. To reduce your exposure to these chemicals:
work in a well ventilated area, and work with approved safety equipment, such as those dust masks that are specially designed to filter out microscopic particles.
- Avoid prolonged contact with dust from power sanding, sawing, grinding, drilling, and other construction activities. Wear protective clothing and wash exposed areas with soap and water. Allowing dust to get into your mouth, eyes, or lay on the skin may promote absorption of harmful chemicals.
WARNING: Use of this tool can generate and/or disburse dust, which may cause serious and permanent respiratory or other injury. Always use NIOSH/OSHA approved respiratory protection appropriate for the dust exposure. Direct particles away from face and body.
WARNING: ALWAYS USE SAFETY GLASSES. Everyday eyeglasses are NOT safety glasses. Also use face or dust mask if cutting operation is dusty. All users and bystanders MUST ALWAYS wear certified safety equipment:
• ANSI Z87.1 eye protection (CAN/CSA Z94.3),
• ANSI S12.6 (S3.19) hearing protection,
• NIOSH/OSHA/MSHA respiratory protection.
WARNING: Wear appropriate hearing protection during use. Under some conditions and duration of use, noise from this product may contribute to hearing loss.
- The label on your tool may include the following symbols. The symbols and their definitions are as follows:
V.....volts A ..... amperes
Hz ..... hertz W..... watts
min......minutes \~ ....alternating current
==.....direct current ..... alternating or direct current
Class I Construction no ..... no load speed
(grounded) ⊕ ..... earthing terminal
☐ ......Class II Construction ▲ ...... safety alert symbol
(double insulated) BPM.. beats per minute
.../min ...per minute RPM .. revolutions per minute
IPM .....impact per minute
DESCRIPTION (FIG. 1)
⚠ WARNING: Never modify the power tool or any part of it. Damage or personal injury could result.
FIG. 1

A. Side handle
C. Main handle
B. Switch
D. Tool sleeve
INTENDED USE
This demolition hammer is designed for professional light or medium chipping, chiselling and demolition applications in concrete, brick and masonry.
DO NOT use under wet conditions or in presence of flammable liquids or gases.
These demolition hammers are professional power tools.
DO NOT let children come into contact with the tool. Supervision is required when inexperienced operators use this tool.
ASSEMBLY AND ADJUSTMENTS
WARNING: To reduce the risk of injury, turn unit off and disconnect machine from power source before installing and removing accessories, before adjusting or changing set-ups or when making repairs. Be sure the trigger switch is in the OFF position. An accidental start-up can cause injury.
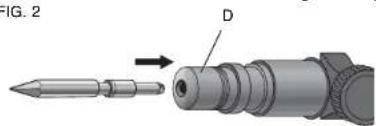
Inserting and Removing Chisels (fig. 2)
WARNING: Always wear gloves when you change accessories. The exposed metal parts on the tool and accessory may become extremely hot during operation.
- Clean and grease the bit shank.
- Insert the bit shank into the tool holder/locking sleeve (D).
natural_image
Mechanical component diagram showing a pin inserted into a cylindrical shaft with a labeled part D (no text or symbols present)- Push the bit down and turn it slightly until it fits into the slots.
- Pull on the bit to check if it is properly locked. The hammering function requires the bit to be able to move axially several centimetres when locked in the tool holder.
- To remove a bit pull back the tool holder/locking sleeve (D) and pull out the bit.
Fitting the Side Handle (fig. 3)
⚠ WARNING: Do not use the tool without the side handle properly assembled.
The side handle (A) can be fitted to suit both RH- and LH-users.
-
Loosen the side handle.
-
For RH-users: slide the side handle clamp over the collar behind the tool holder, handle at the left.
For LH-users: slide the side handle clamp over the collar behind the tool holder, handle at the right.
- Rotate the side handle to the desired position and tighten the handle.

natural_image
Technical illustration of a mechanical device with labeled parts (A and Fig. 3), no readable text or symbols beyond labelsOPERATION
WARNING: To reduce the risk of injury, turn unit off and disconnect tool from power source before installing and removing accessories, before making any adjustments or removing/installing attachments or accessories.
⚠ WARNING: Always observe the safety instructions and applicable regulations.
⚠ WARNING: Be aware of the location of pipework and wiring.
WARNING: Apply only a gentle pressure to the tool (approx. 5 kg). Excessive force does not speed up chiselling but decreases tool performance and may shorten tool life.
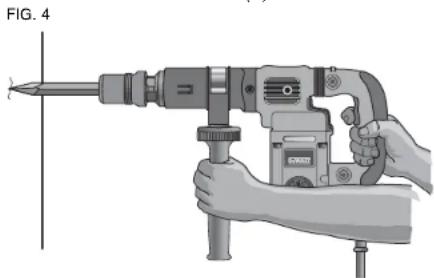
⚠ WARNING: Always hold the tool firmly with both hands and ensure a secure stance (fig. 4). Always operate the tool with the side handle properly mounted.
Proper Hand Position (fig. 1, 3)
⚠ WARNING: To reduce the risk of serious personal injury, ALWAYS use proper hand position as shown.
⚠ WARNING: To reduce the risk of serious personal injury, ALWAYS hold securely in anticipation of a sudden reaction.
Proper hand position requires one hand on the side handle (A), with the other hand on the main handle (C).
natural_image
Illustration of a hand using a drill pen to adjust a tool, no text or symbols presentSwitching On and Off (fig. 1)
-
To run the tool, press the switch (B).
-
To stop the tool, release the switch.
Chipping and Chiselling (fig. 1)
WARNING: Do not use this tool to mix or pump easily combustible or explosive fluids (benzine, alcohol, etc.). Do not mix or stir inflammable liquids labelled accordingly.
- Insert the appropriate chisel.
- Adjust the side handle (A) as required.
- Switch on the tool and start working.
- Always switch off the tool when work is finished and before unplugging.
MAINTENANCE
Your DEWALT power tool has been designed to operate over a long period of time with a minimum of maintenance. Continuous satisfactory operation depends upon proper tool care and regular cleaning.
This machine is not user-serviceable. Take the tool to an authorized DEWALT service center after approximately 100 hours of use for preventive maintenance. If problem occurs before this time contact an authorized DEWALT service center.
⚠ WARNING: To reduce the risk of injury, turn unit off and disconnect tool from power source before installing and removing accessories, before making any adjustments or removing/installing attachments or accessories.
Motor Brushes
The tool will automatically switch off when the carbon brushes are worn. DEWALT uses an advanced brush system which automatically stops the work when the brushes wear out. This prevents serious damage to the motor. New brush assemblies are available at authorised DEWALT service centers. Always use identical replacement parts
Lubrication
Your power tool requires no additional lubrication.
Cleaning
⚠ WARNING: Blow dirt and dust out of the main housing with dry air as often as dirt is seen collecting in and around the air vents. Wear approved eye protection and approved dust mask when performing this procedure.
A WARNING: Never use solvents or other harsh chemicals for cleaning the non-metallic parts of the tool. These chemicals may weaken the materials used in these parts. Use a cloth dampened only with water and mild soap. Never let any liquid get inside the tool; never immerse any part of the tool into a liquid.
Accessories
⚠ WARNING: Since accessories, other than those offered by DEWALT, have not been tested with this product, use of such accessories with this tool could be hazardous. To reduce the risk of injury, only DEWALT, recommended accessories should be used with this product.
Recommended accessories for use with your tool are available at extra cost from your local dealer or authorized service center.
Repairs
To assure product SAFETY and RELIABILITY, repairs, maintenance and adjustment (including brush inspection and replacement) should be performed by authorized service centers or other qualified service personnel, always using identical replacement parts.
Specifications
| D25580-B3 | |
| Voltage | 120V |
| Watts | 1050 |
| BPM | 3600 |
Chisel positions 6
Tool Holder 17 mm hex
Collar Diameter 65 mm
C. Agarradera principal
B Conmutador
MONTAJE Y AJUSTES
natural_image
Technical illustration of a mechanical device with labeled component A (no text or symbols beyond label)FUNCIONAMIENTO
natural_image
Illustration of a hand using a drill pen to lift a vertical blade (no text or symbols visible)A. Empunhadura lateral C. Empunhadura principal
B Interruptor D. Manga
natural_image
Mechanical device diagram labeled FIG. 3 showing a cylindrical component with threaded ports and a marked section A (no text or symbols beyond labels)Como instalar a empunhadura lateral (fig. 3)
natural_image
Illustration of a hand using a drill pen to lift a vertical pole (no text or symbols visible)BOSQUES DE CIDROS, ACCESO RADIATAS NO. 42
IMPORTED BY/IMPORTADO POR:
BLACK & DECKER DO BRASIL LTDA.
ROD. BR 050, S/N° - KM 167
DIST. INDUSTRIAL II
UBERABA - MG - CEP: 38064-750
CNPJ: 53.296.273/0001-91
INSC. EST.: 701.948.711.00-98
S.A.C.: 0800-703-4644
MAQUINAS Y HERRAMIENTAS BLACK & DECKER CHILE S.A.
AVDA. EDUARDO FREI M. #6001 EDIFICIO 67
CONCHALI-SANTIAGO
CHILE
HECHO EN CHINA
FABRICADO NA CHINA
MADE IN CHINA
DEWALT Industrial Tool Co., 701 East Joppa Road, Baltimore, MD 21286
(JUL10) Part No. N073506 D25580 Copyright @ 2010 DEWALT
The following are trademarks for one or more DEWALT power tools: the yellow and black color scheme; the "D" shaped air intake grill; the array of pyramids on the handgrip; the kit box configuration; and the array of lozenge-shaped humps on the surface of the tool.

- Definitions: Safety Guidelines
- General Power Tool Safety Warnings
- SAVE ALL WARNINGS AND INSTRUCTIONS FOR FUTURE REFERENCE
- 1) WORK AREA SAFETY
- 2) ELECTRICAL SAFETY
- 3) PERSONAL SAFETY
- 4) POWER TOOL USE AND CARE
- 5) SERVICE
- SPECIFIC SAFETY RULES
- Safety Warnings for Demolition Hammers
- DESCRIPTION (FIG. 1)
- INTENDED USE
- ASSEMBLY AND ADJUSTMENTS
- Inserting and Removing Chisels (fig. 2)
- Fitting the Side Handle (fig. 3)
- OPERATION
- Proper Hand Position (fig. 1, 3)
- Switching On and Off (fig. 1)
- Chipping and Chiselling (fig. 1)
- MAINTENANCE
- Motor Brushes
- Lubrication
- Cleaning
- Accessories
- Repairs
- MONTAJE Y AJUSTES
- FUNCIONAMIENTO
- Como instalar a empunhadura lateral (fig. 3)
Brand : DEWALT
Model : D25580
Category : Hammer