
XL-PM6 - Mp3 player JVC - Free user manual and instructions
Find the device manual for free XL-PM6 JVC in PDF.


| Type of product | Portable MP3 Player (CD compatible) |
| Brand | JVC |
| Model | XL-PM6 |
| Dimensions (approx) | 130 x 140 x 25 mm |
| Weight (approx) | 200 g (without batteries) |
| Power supply | 2 x AA batteries or AC adapter (3V, not included) |
| Playback formats | MP3, WMA, audio CD |
| Anti-skip protection | Yes (approx. 40 seconds) |
| Output | 3.5 mm headphone jack |
| Display | LCD with track and time information |
| Controls | Play/Pause, Stop, Skip, Volume, Repeat, Shuffle |
| Battery life | Approx. 20 hours (MP3 playback) |
| Maintenance | Clean with dry soft cloth; do not use solvents |
| Safety | Keep away from moisture and extreme temperatures; unplug when not in use |
| Reparability | No user-serviceable parts; contact authorized service center |
| General information | Portable design; compatible with CD-R/RW discs |
Frequently Asked Questions - XL-PM6 JVC
User questions about XL-PM6 JVC
0 question about this device. Answer the ones you know or ask your own.
Ask a new question about this device
Download the instructions for your Mp3 player in PDF format for free! Find your manual XL-PM6 - JVC and take your electronic device back in hand. On this page are published all the documents necessary for the use of your device. XL-PM6 by JVC.
USER MANUAL XL-PM6 JVC
Concerning Compact Discs
Only compact discs bearing this mark can be used with this unit.

However, continued use of irregular shape CDs (heart-shape, octagonal, etc.) can damage
the unit.
CD-R and CD-RW discs recorded with the audio CD format can be played back, though some may not be played back because of the disc characteristics or recording condition.

The Non-DVD side of a "DualDisc" does not comply with the "Compact Disc Digital Audio" standard. Therefore, the use of Non-DVD side of a DualDisc on this product may not be recommended.
How to hold a disc

If the disk surface is dirty
Wipe it with a damp cloth and then wipe dry
Wipe it with a clean cloth and then wipe dry, from the center toward the outer edge.
Wipe from the

If moisture has formed on a disc
When moisture has formed because the disc was brought suddenly into a warm room from a cold environment, wipe off the moisture using a soft dry cloth. When storing discs
When storing discs Avoid locations which are
- Avoid locations which are
- Exposed to direct sunlight. - Susceptible to high levels of humidity or
- Susceptible
- Directly exposed to heat from a heating
- Directly e. appliance
• On top of a car dashboard or near the
- On top of a rear window
Handling precautions
- On the label side (the side with writing)
Do not write anything using a pencil,
ball-point pen, etc. Do not use adhesive
paper or labels.
- On the disc (shiny) side
Handle this side carefully to keep it free
from fingerprints or scratches. Do not
use record cleaners, solvents, etc.
- Do not attach labels or stickers to CDs.
Do not use CDs with exposed adhesive from tape or leftover sealed-off stickers.
From tape or leftover peeled-off stickers.
- Do not use scratch-proof protectors or
covers other than those specified for use with this unit.
JVC
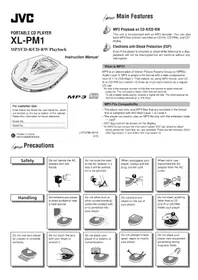
PORTABLE CD PLAYER XL-PM6S/XL-PR70B
For Customer Use:
Enter below the Model No. and Serial No. which are located on back of the lid. Retain this information for future reference. Model No. (2) 10.000 Ser
* Only XL-PR70B supports WMA.
Stereo headphones
1
Thank you for purchasing this JVC product. Please read these instructions carefully before operating the unit to be sure to obtain optimum performance and a longer service life from the unit.
Operation to be sure to obtain optimum performance and a longer service life from the unit.
Operation to be sure to obtain optimum performance and a longer service life from the unit.
LVT1297-001A [J.C.UJ]
0205SKMCREORI EN ©2005 Victor Company of Japan, Limited
Power Supply Preparations
The illustration of the grip band is omitted.
Using dry-cell batteries (not supplied)
Two "AA" (LR6) alkaline batteries.
This indicator appears when the batteries are almost out of power.
Power will be cut off a short while later

Turning off the Anti-Shock Protection EX will save the battery power
more or less. For details, see "Anti-shock Protection EX" on page 7
(Available for an Audio CD only)
(Available for an Audio CD only)
Using the AC adaptor (not supplied)
AC power outlet

- Even if the unit is turned off, small power is consumed as long as the AC adaptor is connected to the AC power outlet. - When you want to purchase the AC adaptor, see page 4.
AC adaptor (for multi voltage area only) (not supplied)
Make sure the present voltage of your AC adaptor fits to your local voltage before plugging it into the AC power outlet. If it doesn't, shift the AC line-voltage selector with a screwdriver so that it corresponds to your local voltage.

If the power plug will not fit your socket, use the AC plug adaptor. How to use the AC plug adaptor (not supplied)


When you want to purchase the AC adaptor and the AC plug adaptor, see page 4.
Specifications
Portable CD player
Type: Compact disc player Signal detection system: Non-contact optical pickup (semiconductor laser) Number of channels: 2 channels (stereo) Frequency response: 20 Hz to 20 kHz Wow & Flutter: Below measurable limit Output: 9 mW/ch at 10% THD/16 Ω matching FM tuning range: 87.5 MHz - 108.0 MHz (XL-PR70B only) Duration of battery: Approx. 20 hours when using two alkaline batteries (LR6) (with Anti-Shock Protection EX OFF) Power supply: DC 3 V ("AA" or "LR6" size battery × 2), DC 2.4 V (rechargeable battery × 2), DC IN 4.5 V Dimensions (W×H×D): 138 mm × 26 mm × 138 mm (5-7/16" × 1-1/16" × 5-7/16") (excluding buttons and controls) Weight: XL-PM6S 250 g (0.56 lbs), XL-PR70B 260 g (0.58 lbs)
(with grip band, without batteries)
AC adaptor (not supplied)
Input power source: AC 120 V, 60 Hz (for the U.S.A. and Canada), AC 110 V - 127 V / 220 V - 240 V, 50/60 Hz (for multi voltage area) Output voltage: DC 4.5 V, 600 mA
10
Design and specifications are subject to change without notice.
• Microsoft and Windows Media are either registered trademarks or trademarks of Microsoft Corporation in the United States and/or other countries.
Microsoft and Windows Media are either registered trademarks or trademarks of Microsoft Corporation in the United States and/or other countries.
Corporation in the United States and/or other countries.
Put the grip band on your hand
Adjust the grip band to your hand size.
Maintenance
Unit
Wipe the unit with a soft cloth. Remove stubborn dirt using a cloth which has been dipped in water
or soapy water and wrung out, and then wipe dry.
- If you intend to use a chemically treated cleaning cloth, read its directions first. - Do not use alcohol or paint thinners.
Lens

Precautions
Safety
- Care of AC adaptor - The cord of the AC adaptor should be routed so that they are not likely to be walked on or pinched by items placed upon or against them. Never take hold of the AC adaptor if your hand is wet, and always grasp the plug when connecting or disconnecting it.
- Disconnect when not in use - When not in use, be sure
disconnect the AC adaptor from the AC power outlet.
- Batteries - If the unit is not used for a long period of time or is used only from an AC power source, remove all the batteries to prevent potential damage due to battery leakage. Do not mix old and new batteries or different types of batteries.
Installation
■ Environment 1. Condensation - Moisture may form on the lens in the following conditions:
- immediately after a heater has been turned on,
- immediately after a heater has been in a steamy or very humid room,
- when the unit is suddenly moved from a cold environment to a warm one. If moisture forms inside this unit, it may not operate properly. To correct this problem, wait about one hour for the moisture to evaporate.
Placement
- Foreign Material - Care should be taken so that objects do not fall into and liquids are not spilled into the unit. Do not subject this unit to excessive smoke, dust, mechanical vibration, or shock.
- Magnetism - The unit should be situated away from equipment or devices that generate strong magnetic fields.
- Stacking - Do not place any objects on top of the unit.
(See page 2 for details.) Clean the cabinet, panel, and controls with a soft cloth lightly moistened with a mild detergent solution. Do not use any type of abrasive pad, scouring powder, or solvent
such as alcohol or benzene.
Service
- Damage Requiring Service - The unit should be serviced by qualified service personnel when: (a) The AC adaptor is damaged; (b) Objects have fallen or liquid has been spilled into the unit; or (c) The unit has been exposed to rain; (d) The unit does not appear to operate normally or exhibits a marked change in performance; or (e) The unit has been dropped, or the enclosure damaged.
WARNING:
WARNING. TO REDUCE THE RISK OF FIRE OR ELECTRIC SHOCK, DO NOT EXPOSE THIS APPLIANCE TO RAIN OR MOISTURE.
CAUTION
CAUTION: THIS PRODUCT UTILIZES A LASER. USE OF CONTROLS OR ADJUSTMENTS OR PERFORMANCE OF PROCEDURES OTHER THAN THOSE SPECIFIED HEREIN MAY RESULT IN HAZARDOUS RADIATION EXPOSURE. DO NOT OPEN COVERS AND DO NOT REPAIR YOURSELF. REFER SERVICING TO QUALIFIED PERSONNEL.
This Class B digital apparatus complies with Canadian ICES-003.
This digital apparatus does not exceed the Class B limits for radio noise emissions from digital apparatus as set out in the interference-causing equipment standard entitled “Digital Apparatus”, ICES-003 of the Department of Communications.
THE FOLLOWING NOTICES ARE APPLIED ONLY FOR THE U.S.A.
CAUTION!
This equipment has been tested and found to comply with the limits for a Class B digital device, pursuant to Part 15 of the FCC Rules.
These limits are designed to provide reasonable protection against harmful interference in a residential installation. This equipment generates, uses and can radiate radio frequency energy and, if not installed and used in accordance with the instructions, may cause harmful interference to radio communications. However, there is no guarantee that interference will not occur in a particular installation. If this equipment does cause harmful interference to radio or television reception, which can be determined by turning the equipment off and on, the user is encouraged to try to correct the interference by one of the following measures:
- Reorient or relocate the receiving antenna.
- Increase the separation between the equipment and receiver.
ceiver.
- Connect the equipment into an outlet on a circuit
different from that to which the receiver is connected.
- Consult the dealer or an experienced radio/TV technician
for help.
Any unauthorized changes or modifications to this equip-
ment would void the user's authority to operate this device.
Rechargeable batteries
Listening precautions


Do not play your headphones or earphones at a high volume.
Hearing experts advise against continuous extended play.
6 1 0 1 7
If you experience a ringing in your ears, reduce volume or discon-
tinue use.
(1) 2017年1月1日
Do not use while operating a motorized vehicle. It may create a
traffic hazard and is illegal in many areas.
You should use extreme caution or temporarily discontinue use
You should use extreme caution or temporarily discontinue use in potentially hazardous situations.
in potentially hazardous situations.
Even if your headphones or earphones are an open-air type of
signed to let you hear outside sounds, don't turn up the volume
so high that you can't hear what's around you.
Sound can be deceiving. Over time your hearing "comfort level"
sounds can be deceiving, over time your hearing, comfort level adants to higher volumes of sound. So what sounds "normal" can
adapits to higher volumes of sound. So what sounds "Northin" can actually be loud and harmful to your hearing.
actually be loud and harmful to your hearing.
Guard against this by setting your equipment at a safe level BE-
For your hearing adapt
To establish a safe level:
- Start your volume control at a low setting,
- Slowly increase the sound until you can bear it comfortably and
clearly, and without distortion.
Once you have established a comfortable sound level
- Set the dial and leave it there
- Set the dial and leave it there.
• Rechargeable batteries (not supplied) can be used
• To use the mechanical batteries, follow the instructions. To use the rechargeable batteries, follow the instruction manual attached to the rechargeable batteries and charger (not sup
plied).
Dry cell batteries
To prevent damage to the batteries and electrolyte leakage, based
To prevent damage to the batteries and electrolyte leakage, need the following points
the following points,
- Align the and polarities properly when inserting the bat-
teries.
- Do not mix different types or makers of batteries or old and
new batteries.
- Remove the batteries if you do not plan to use the unit for
a long period of time.
- Do not throw batteries into a fire, and do not short circuit, dis-
- DO NOT THROW batteries into a fire, and do NOT SHORT-CIRCUIT, dis-
assemble or subject them to excessive heat.
- Do not attempt to recharge dry cell batteries.
Carrying dry cell batteries around
When putting dry cell batteries in a pocket or bag, ensure that no other metal objects such as a necklace are placed together with them. Contact with metal may cause short-circuiting which, in turn, may cause a fire.
AC adaptor
- Handle the AC adaptor carefully. Improper handling is dan-
gerous.
- Do not touch it with wet hands.
- Do not place heavy objects on top of it.
- Do not forcibly bend it.
- Be sure to connect only the specified AC adaptor with the unit.
- Disconnect the AC adaptor from the power outlet if the unit is
not going to be used for a long time.
Unit
No altering or remodeling
This can cause malfunctioning
No dropping or strong impacts
No dropping of strong
This may damage the unit. Locations to be avoided
Locations to be avoided
Avoid using the unit in the following locations since they can
cause malfunctioning.
- Bathrooms and other moisture-prone places
- Warehouses and other dusty places
- Very hot places near heating appliances
Do not leave the unit exposed to direct sunlight for
Do not leave the unit exposed to direct sunlight for long periods of time.
long periods of time
This may deform or discolor the cabinet and may also cause
malfunctioning.
When purchasing AC adaptor /
When purchasing AC adapter, AC plug adaptor
AC plug adaptor
Be absolutely sure to purchase the AC adaptor designed espe-
cially for this unit.
AC adaptor: AA-B4513 (for the U.S.A. and Canada)
AA-R4518 (for multi voltage area)
AC plug adapter: QAM0060.001 (for multi voltage area)
AC plug adaptor. QAM0000-001 (I) For details, should with sound decal
For details, check with your dealer.
CAUTION: - Do not block the ventilation opening or holes. (If the ventilation openings or holes are blocked by a newspaper or cloth, etc., the heat may not be able to get out.) - Do not place any naked flame sources, such as lighted candles, on the apparatus. - When discarding batteries, environmental problems must be considered and local rules or laws governing the disposal of batteries must be followed.
Basic Play
The illustration of the grip band is omitted.
WMA can be played back only with XL-PR70B.
![graph TD A["Follow the steps in the numerical order."] --> B["3. OFF HOLD ON"] B --> C["4. VOLUME VOLUME"] C --> D["6. VOLUME VOLUME"] D --> E["1. Firmly connect HBS"] E --> F["2. Label side"] F --> G["5. For Audio CD: 001 02 53 Track number in play; 01 00 MP3/WMA Lights when a MP3/WMA disc is used;…](/content/2026/05/1053868/images/628b3f0f2267fe448b9afc5fc025beb523290763827070d848e33505bbf1641d.jpg)
| Operation | Button | Display/reference | |
| Audio CD | MP3/WMA | ||
| To pause | During play. ▶/IIIPress again to restart play. | 00700:18- | 01 004 00:07- |
| To stop | During play. ■ | Total number of tracks | Total number of groups |
| 010 44:48 | 10 035 | ||
| Total playing time | Total number of tracks | ||
| To turn off the unit | While stopped, ■ | No indication | |
| Fast forward/reverse | Skip functionDuring play. ➕/IIIReverseForward ➕/IISearch functionKeep depressed during play. | • To skip back to the previous track, quickly press ➕/ltwice.• During Program play, the button is used to fast forward or back through the programmed sequence of tracks.• During Random play, the skip button cannot be used to skip back to tracks that were played previously in the random sequence. | |
| Group skip (MP3/WMA only) | During play or while stopped, GROUP UP ➕/IIForward ➕/IIGROUP DOWN ➕/II | Group number02 0 0 1 | |
| (XL-PR70B only)To switch over the mode from FM to CD | In FM mode, | ||
Other Play Methods
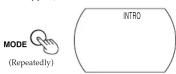
Intro play
You can successively play the first 10 seconds of every track.
1 While stopped.
2

To cancel
Press MODE repeatedly until "INTRO" goes out.
Notes:
- You can also select Intro play during playback.
In this case, Intro play will start from the next track after the
current track has finished.
- You can also select Intro play during Program play mode.
Random play
The following table

After playing all tracks, the unit stops
To compare!
Press MODE until "RND" goes out, or press ■ to stop the disc.
Notes:
- You can also select Random play in stop mode.
- During Program play, you can not select Random play
Repeat play
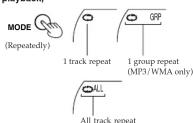
You can repeat one track or all tracks.
During playback,
To cancel
Press MODE repeatedly until the repeat indicator goes out.
Notes:
- You can also select Repeat play during Program play. - You can also select Repeat play while stopped.
Program play
You can program up to 64 tracks in any desired order including
the same tracks.
For Audio CD, go to step 3.
Though the display differs a little, operation is the same.
1 While stopped,
(MP3/WMA only)

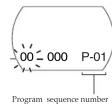
2 (MP3/WMA only) Select the desired group number. (e.g.02)

3


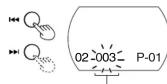
4 Select the desired track.
5

The track is registered.
6 For MP3/WMA, repeat steps 2-5 to select other tracks.
For Audio CD, repeat steps 4 and 5.
When you program exceeding 64 tracks, the program sequence number returns to "01" and will overwrite the previous setting.
7

• To confirm the program
While stopped, press PROGRAM repeatedly. At this time, you can add and change the program, if required.
• To delete the entire program
• While stopped, press STOP.
- Turn off the unit.
• (XL-PR70B) Change the source to FM.
Hyper-Bass Sound effect

Anti-Shock Protection EX
This function achieves excellent performance against sound intensity.
This function achieves excellent performance against sound interruption caused by vibrations. You will be able to enjoy listening
to music during (not vigorous) jogging.
By utilizing the high-performance servo circuit, audio data will be stored in the memory ahead of time.
For Audio CD: Up to 40 seconds worth (Anti-Shock Protection
on/off selectable)
For MP3/WMA: Up to 100 seconds worth at 128 kbps (Anti-Shock Protection is fixed to an.)
Normally, this function is in effect

As the audio data is gradually stored, the indicator changes as follows:

To cancel
(Audio CD only)

The "ANTI SHOCK" indicator goes out.
To activate again (Audio CD only)
Notes:
- During this operation, the disc rotates at a higher rate than usual in order to collect extra audio data. This may cause the batteries to run out faster and could result in a slight increase in disc rotation noise.
- This function can be switched ON and OFF during playback.
However, this may cause a slight interruption in the sound between the different speed changes.
cause the disc's rotational speed changes
Preventing Accidental Operation (Hold
mode)
This function causes the unit to ignore accidental button presses.
Hold mode prevents the following:
- Powering on the unit accidentally (which can cause the batteries to go dead).
- Play being cut off unexpectedly
To use the Hold mode
• To prevent the unit from powering on accidentally, set the

• To prevent the unit from powering on accidentally, set the
Hold the switch to the ON position while the unit is turned off.
• To prevent the unit from unexpected operation during play, set the HOLD switch to the ON position after you start playing.
Set the HOLD switch to the ON position after you start playing the disc.
- When the unit is in Hold mode, "HOLD" and "—" light as
follows.
Power on : "→" stays lit.
Power off : "HOLD" and "●" light up for a few seconds
when ▶/■ is pressed.
Notes:
- Before turning on the unit, be sure that HOLD is OFF.
Otherwise, you cannot turn on the unit.
About MP3/WMA files
MP3/WMA File Compatibility
- This player can read MP3/WMA files that are recorded in the format that is compliant with ISO 9660.
- The player can read or play an MP3 file with the extension code — ".mp3" and a WMA file with the extension code — ".wma".
• Track title can be displayed
• ID3* tags can be shown on the display
* An MP3/WMA file can contain file information called "ID3 Tag" where its album name, artist, title,
etc. are recorded.
Playing order of MP3/WMA files
The illustration below shows the normal playing order of the MP3/WMA files. You will see that the MP3/WMA files are played back in the order from the higher hierarchy to the lower one.
![graph TD A["Group"] --> B["MP3/WMA file"] C["MP3/WMA file"] --> D["Group"] E["MP3/WMA file"] --> F["Group"] G["MP3/WMA file"] --> H["Group"] I["MP3/WMA file"] --> J["Group"] K["MP3/WMA file"] --> L["Group"] M["MP3/WMA file"] --> N["Group"] O["MP3/WMA file"] --> P["Group"] Q["MP3/WMA file"] --> R["Gr…](/content/2026/05/1053868/images/89fbaee9d977401ba2c48c06d54b4aaa1c17dd1d808d210bbc2515a349e0865f.jpg)
Tuner Operation (XL-PR70B only)
You can listen to FM stations by tuning in manually, automatically, or using preset memory. For best reception, extend the headphone cord (antenna).
Manual/Auto tuning
1

When the power is turned on and you want to change the mode from CD to FM, keep the button depressed. When the power is turned off, press the button.
If the CD mode becomes active, keep the button depressed to switch over the mode to FM.
2 Select a station.

Manual tuning
Press ▶▶▶ or ◀◀▶ repeatedly to select a station you want.
Auto tuning
Hold down ▶▶▶ or ◀◀◀ for a while and then release it. The frequency automatically changes up or down to find the next station.
The frequency automatically changes up or down to find the next station.
Presetting stations
You can preset up to 20 stations (frequencies).
1 Select the station you want to preset.
Use Manual or Auto tuning mentioned earlier.
2

3 Select the preset number (01~20) you want.

4 Press PROGRAM.
Preset tuning
Select the preset number you want in the FM reception mode.

Changing the FM reception mode
When a broadcast is in stereo, "ST." lights up and you can hear stereo effects. However, if an FM stereo broadcast is hard to receive or noisy, you can select monaural (MONO) mode. Recep-
stereo effects. However, if an FM stereo broadcast is hard to re-
If the reception is weak or noisy, you can select monaural (MONO) mode.
tion improves, but you lose the stereo effect.
To select the monaural mode

To cancel the monaural mode
Press MODE once again. "MONO" will go
The monaural mode is cancelled also by changing the frequency.
Turning off the unit

- CONCERNING COMPACT DISCS
- JVC
- PORTABLE CD PLAYER XL-PM6S/XL-PR70B
- POWER SUPPLY PREPARATIONS
- USING DRY-CELL BATTERIES (NOT SUPPLIED)
- USING THE AC ADAPTOR (NOT SUPPLIED)
- AC ADAPTOR (FOR MULTI VOLTAGE AREA ONLY) (NOT SUPPLIED)
- SPECIFICATIONS
- PORTABLE CD PLAYER
- AC ADAPTOR (NOT SUPPLIED)
- PUT THE GRIP BAND ON YOUR HAND
- MAINTENANCE
- UNIT
- PRECAUTIONS
- SAFETY
- INSTALLATION
- PLACEMENT
- SERVICE
- WARNING
- CAUTION
- RECHARGEABLE BATTERIES
- LISTENING PRECAUTIONS
- DRY CELL BATTERIES
- CARRYING DRY CELL BATTERIES AROUND
- AC ADAPTOR
- WHEN PURCHASING AC ADAPTOR
- AC PLUG ADAPTOR
- BASIC PLAY
- OTHER PLAY METHODS
- INTRO PLAY
- PROGRAM PLAY
- HYPER-BASS SOUND EFFECT
- ANTI-SHOCK PROTECTION EX
- ABOUT MP3/WMA FILES
- MP3/WMA FILE COMPATIBILITY
- PLAYING ORDER OF MP3/WMA FILES
- TUNER OPERATION (XL-PR70B ONLY)
- MANUAL/AUTO TUNING
- PRESETTING STATIONS
- CHANGING THE FM RECEPTION MODE
Brand : JVC
Model : XL-PM6
Category : Mp3 player