
XTL-W7000 - Car radio SONY - Free user manual and instructions
Find the device manual for free XTL-W7000 SONY in PDF.


| Product Type | Car Stereo / Receiver |
| Brand | Sony |
| Model | XTL-W7000 |
| Dimensions (W x H x D) | Approx. 178 x 50 x 160 mm (Standard DIN) |
| Weight | Approx. 1.5 kg |
| Power Supply | 12V DC (car battery) |
| Maximum Output Power | 4 x 50W (peak) |
| Continuous Power Output (RMS) | 4 x 22W |
| Playback Formats | CD, CD-R/RW, MP3, WMA |
| Radio Tuner | FM/AM with RDS |
| Bluetooth | Yes (Hands-free calling & audio streaming) |
| USB Port | Front USB for music playback |
| Auxiliary Input | 3.5mm front AUX |
| Display | LCD with white illumination |
| Equalizer | 7-band graphic EQ with presets |
| Remote Control | Included (wired or wireless) |
| Steering Wheel Control Ready | Yes (adapter may be required) |
| Safety Features | Detachable faceplate for theft prevention |
| Cleaning Instructions | Use a soft dry cloth; avoid solvents |
| Spare Parts Availability | Contact Sony service center for replacement parts |
| Repairability | Professional repair recommended; user-serviceable fuses only |
Frequently Asked Questions - XTL-W7000 SONY
User questions about XTL-W7000 SONY
0 question about this device. Answer the ones you know or ask your own.
Ask a new question about this device
Download the instructions for your Car radio in PDF format for free! Find your manual XTL-W7000 - SONY and take your electronic device back in hand. On this page are published all the documents necessary for the use of your device. XTL-W7000 by SONY.
USER MANUAL XTL-W7000 SONY
Operating Instructions
GB
操作說明
CT
For installation and connections, see the supplied Installation/Connections manual. For installation and connections, see the supplied Installation/Connections manual.
XTL-W7000
Features
Welcome!
Thank you for purchasing this Sony Mobile Colour TV.
Features
- In-dash TV with 7 inch motorized TFT monitor.
- One touch tilt for easy access to car air conditioner.
- Tilt angle/Back & Forth position adjustment.
- Sony BUS system control. High brightness and wide viewing angle monitor. 2 A/V inputs (Front and Rear), 1 Back camera (optional) input, and 1 A/V output.
- PAL or NTSC colour system compatible (A/V input and Back camera (optional) input). Built-in TV tuner, FM modulator, and monaural speaker. 4ch TV diversity antenna system.
- Supplied film-type TV antenna and card remote commander.
Table of Contents
Features 2
Precautions.... 4
Getting Started
Preparations 5
Location of Controls 8
Setting a Security Code 10
To set a security code 10
Entering the security code 11
Basic Operation
Storing Channels 12
Watching a TV Programme 14
Watching Other Video Components 16
Advanced Operation
Adjusting the Picture Characteristics 17
Selecting the Screen Mode 18
Using the Navigation System 19
Displaying the Image of the Back Camera.... 20
Other Features
Changing the Setting 21
How to set preferences 21
Additional Information 23
Precautions on the card remote commander.... 23
About the liquid crystal display (LCD) panel 23
Replacing the lithium battery 24
Removing the unit 24
Troubleshooting Guide 25
Specifications 26
Precautions
To avoid the risk of injury or accident, read the following precautions before installing and operating the unit.
On safety
Comply with the Traffic Laws in your country.
- While driving
- You must not watch or operate the monitor. It may lead to distraction and cause an accident. Park your car in a safe place to watch the monitor and operate the unit.
- While operating
- Do not insert your hands, fingers or foreign object into the unit while the monitor is functioning. It may cause injury or damage to the unit.
- Keep small articles out of the reach of children.
- If your car was parked in direct sunlight resulting in a considerable rise in temperature inside the car, allow the unit to cool off before operating it.
Watching TV/video pictures
The TV/video pictures appear only after you park the car and set the parking brake. When the car starts moving, the TV/video pictures automatically disappear after displaying the following caution.
PICTURE OFF FOR YOUR SAFETY!
Do not operate equipment connected to the TV tuner unit or watch the monitor while driving.
On installation
- We recommend this unit to be installed by a qualified technician or service personnel.
- If you try to install this unit by yourself, refer to the supplied "Installation/Connections" manual and read it carefully. Make sure to install this unit properly. Improper installation may cause battery drain or a short circuit.
- If the unit does not work properly, check the connections first (refer to the supplied "Installation/Connections" manual). If everything is in order, check the fuse.
- Replacing the fuse
- When replacing the fuse, be sure to use only a fuse of the same rating (ampere rating).

- Using a different fuse or bridging the contacts with wire can lead to serious damage.
- Protect the unit surface from damage.
- Do not expose the unit surface to chemicals such as insecticide, hair spray, insect repellent, etc. - Do not leave rubber or plastic materials in contact with the unit for a long time. Otherwise the finish of the unit may be impaired, or deformation may occur.
- When installing, be sure to turn the ignition key to the off position. If the ignition is on, trying to install this unit may cause battery drain or a short circuit.
- When installing, be sure not to damage any car parts such as pipes, tubes, fuel tank or wiring by using a drill. It can cause a fire or an accident.
- Moisture condensation If the ambient temperature of the unit changes rapidly, moisture condensation may occur inside the display window. Wait for a while until the moisture evaporates.
Installing location
- Do not install this unit where:
- the driver's view will be obstructed when the monitor is in either open or close position. - the operation of the car or the airbag system will be obstructed. - the operation of the vehicle, especially the steering wheel, shift lever or brake pedal will be obstructed.
If you have any questions or problems concerning your unit, please consult your nearest Sony dealer.
Preparations
Notes
- When the Reset button is pushed, all stored settings are lost and will have to be reprogrammed.
- When the reset procedure is completed, press OPEN/CLOSE and verify that the monitor opens up properly.
- When resetting the unit, be sure to close the monitor. When you push the Reset button while the monitor is open, press OPEN/CLOSE to close the monitor. Otherwise, the buttons except for OPEN/CLOSE on the monitor and card remote commander will not work.
Resetting the unit
Before operating the unit for the first time, or after replacing the car battery or changing the connections, you must reset the unit.
Use a pointed object such as a ball point pen to push the Reset button. To avoid a possible of damage, you should not use a needle or push the button too strongly.
Push Reset.
Notes
- The card remote commander cannot be used for opening up or closing the monitor.
- If movement of the monitor during opening or closing has been impeded by the gear shift lever or another obstacle, press OPEN/CLOSE again.
Opening up the monitor
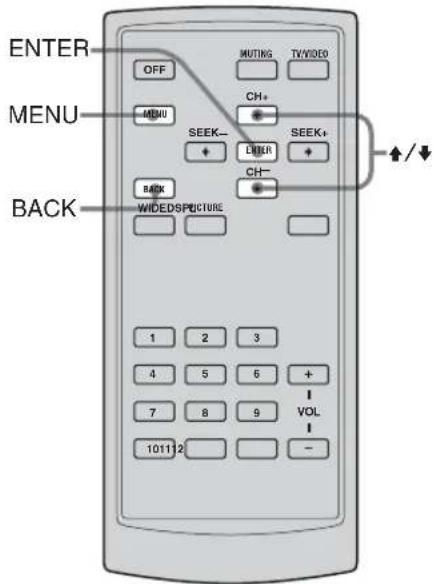
Press OPEN/CLOSE on the monitor.
The monitor slides out of the main unit, and the picture comes on.

Preparations
Note
Do not move the monitor by hand.
Tip
If you hold down ANGLE and release, the monitor will be tilted forward.
If you press ANGLE, after no operation is made for about 10 seconds, the monitor will be tilted backwards.
Adjusting the monitor angle
You can adjust the angle of the monitor for the best viewing.
Press ANGLE repeatedly.
The buttons adjust monitor angle in some steps.

Pressing ANGLE changes the monitor angle backward or forward.
The beep will sound each time you press ANGLE. And when the monitor cannot be angled any more, another beep will sound and the monitor begins to tilt in the opposite direction.
The adjustment is memorized, and the monitor will automatically move to the same angle when it is opened up again.
Adjusting the monitor position
You can adjust the monitor position by sliding it forward or backward.
This can be done from the setup menu. For details, see "Changing the Setting" on page 21.
Tip
If no operation is performed for about 25 seconds, the monitor will return to its original position.
Tilting the monitor forward
To easily operate the buttons on the dashboard, the monitor can be tilted forward.
Press TILT.

The monitor will tilt forward.
To return to the original position, press TILT again.
Notes
- When the monitor is closed, the card remote commander cannot be used.
- If the monitor's movement during opening or closing is obstructed by the gear shift lever or another obstacle, press OPEN/CLOSE again.
- If OPEN/CLOSE is pressed while the monitor is opening or closing, the monitor may not stop at the original angle. In such a case, press ANGLE to adjust the angle.
* Warning when installing in a car without an ACC (accessory) position on the ignition key
After turning off the ignition, be sure to press and hold OPEN/CLOSE on the unit or OFF on the card remote commander for 2 seconds until the illuminations on the main unit disappear.
Otherwise, this will cause battery drain.
To turn on the unit when it is off, press OPEN/CLOSE or TV/VIDEO on the unit. (You cannot turn on the unit with the card remote commander.)
Tips
- If there is a broadcasting station of the same frequency as the transmitted frequency set on the TV unit, the sound of TV or the connected device may be difficult to be heard, or noise may occur. In this case, change the transmitted frequency on the built-in RF modulator of the TV unit. For more information about how to change the frequency, see "Changing the transmitted frequency on TV unit" on page 22 of the supplied "Installation/Connections" manual. (The default setting is "88.3MHz".)
- You can change the output level of the TV unit according to the input level of the FM tuner of a car audio. For more information about how to change the setting, see "Changing the output level on the TV unit" on page 22 of the supplied "Installation/Connections" manual. (The default setting is "MID".)
Closing the monitor
Press OPEN/CLOSE.
The monitor retracts into the unit.

Shutting down
- If you press OFF on the card remote commander while the monitor is open, the sound is turned off, and the unit switches to the standby mode.
- If you set "AUTO CLOSE" to "ON", power to the unit is automatically turned off and the monitor retracts into the unit when you set the ignition key of the car to OFF. For details, see "Changing the Setting" on page 21.
To output the audio of other manufacture's Master-units using the RF modulator
If you connect a genuine car audio or a car audio without the TV control function to the TV unit, its audio can be output through the TV unit's built-in monaural speaker. You can also receive and hear the sound from the FM tuner of the car audio by converting the audio signal to FM.
Preparations
- To use this function, connect the FM antenna of the car audio referring to page 9 of the supplied "Installation/Connections" manual. Without a proper connection, this function will not be effective.
- You may need to change the transmitted frequency or output level (see "Tips").
1 Press TV/VIDEO repeatedly to select the function of the connected device.
2 Press CUSTOM on the unit. "RF OUTPUT ON" appears in the monitor. If you have changed the function of the CUSTOM button, select RF OUTPUT ON or OFF from a Menu screen.
3 Select the FM tuner from the car audio source, and tune in to "88.3 MHz".
Once the audio is output, adjust the volume level with the car audio.
Location of Controls
Main unit
Monitor closed

① VIDEO 1 IN jacks (VIDEO, AUDIO (L/R)) 2 CUSTOM button 3 TILT button
4 OPEN/CLOSE button 5 Reset button
Monitor opened

1 TV/VIDEO button 2 VOL +/- buttons
3 SEEK +/- buttons 4 ANGLE button
Card remote commander
The unit can be operated with the card remote commander.
![graph TD A["1"] --> B["OFF"] C["2"] --> D["MENU"] E["3"] --> F["BACK"] G["4"] --> H["WIDEDS PICTURE"] I["5"] --> J["101112"] K["6"] --> L["101112"] M["7"] --> N["101112"] O["8"] --> P["MUTING"] Q["9"] --> R["TV/VIDEO"] S["10"] --> T["SEEK+"] U["11"] --> V["ENTER"] W["12"] --> X["CH+"] Y["13"] --> Z[…](/content/2026/05/1053207/images/ae43413f3fe5cca74313b642791bb9d422b8ef258d51f2825e52ef958bae5bd1.jpg)
1 OFF button 2 MENU button 3 ↑/↓ CH +/- buttons 4 BACK button 5 WIDE button 6 PICTURE button 7 Number buttons
8 MUTING button
Turning off the sound temporarily.
When you press the button, the sound is turned off and "MUTING" appears in the display.
To restore the sound, press the button again (or VOL +).
9 TV/VIDEO button 10 ENTER button 11 ↔/→ SEEK -/+ buttons 12 DSPL button 13 VOL +/- buttons
Tips
- See "Replacing the lithium battery" for details on how to replace the battery (page 24).
- If an optional Master-unit is connected using Sony BUS system, function of some of the buttons will change as follows:
- The TV/VIDEO button will function as a NAVI button (when "NAVI/CAMERA" is set to "NAVI").
- The OFF button will turn off the monitor.
- The SEEK -/+ and the Number buttons will be invalid.
Setting a Security Code
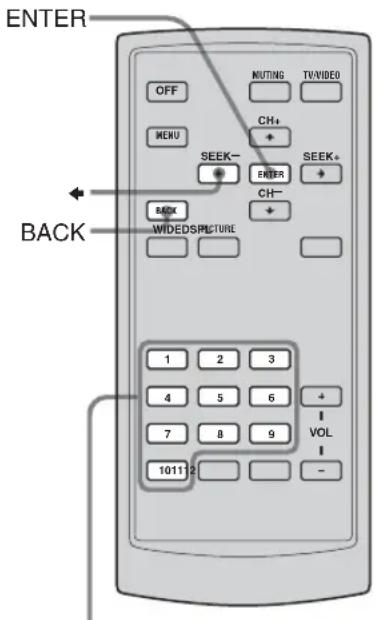
Number buttons (1-10)
Note
The security code input function operates only when the unit is turned on after the unit is disconnected from the battery, and any electrical charge remaining in the unit is completely dissipated.
If the unit is turned on again after a brief interval while there still is a remaining charge, the normal display will be shown and the security code input will not be required.
However, you need to input the security code after you press the reset button.
By setting a security code (password consisting of a 4-digit number), you can prevent the unit from being used by persons other than the owner.
If an optional Master-unit is connected using Sony BUS system, this function does not work.
To set a security code
Follow the steps below with the card remote commander while "TV", "VIDEO1" or "VIDEO2" is selected.
1 Press and hold ENTER for 2 seconds or more.
"CODE EDIT" appears in the display.
2 Press the number button (1-10) to enter the 4-digit number.
If you want to enter "0", press 10.
To move to the previous digit, press ◈.
3 Press ENTER.
The security code is now set. Once a security code is set, an indication requesting input of the security code appears on the display window when the unit is connected to the battery after having been disconnected from the battery for a long period of time.
To cancel the code entry mode
Press BACK in step 2.
To clear a security code
1 Press and hold ENTER for 2 seconds or more after the security code is set.
"CODE CLEAR" appears in the display.
2 Press the number button (1-10) to enter the 4-digit number.
If you want to enter "0", press 10.
To move to the previous digit, press .
3 Press ENTER.
"CODE CLEAR?" appears in the display.
4 Press ENTER.
The security code will be cleared.
To cancel the code entry mode
Press BACK in step 2 or 3.
Tip
If the entered security code is not correct, the indication "CODE ERROR!" flashes and the unit returns to the input standby condition.
Notes
- The security code will not be erased even if the Reset button is pressed.
- You need to input the security code each time after you press the reset button.
Entering the security code
Once a security code is set, an indication requesting input of the security code appears on the display window when the unit is connected to the battery after having been disconnected from the battery for a long period of time (see "Note" on the preceding page). Input the code with the card remote commander as follows.
1 Press the number button (1-10) to enter the 4-digit number.
If you want to enter "0", press 10. To move to the previous digit, press ←.
2 Press ENTER.
The unit will be in the condition of standby. (The unit power is off.)

Storing TV stations automatically (Best Tuning Memory (BTM))
You can store up to 12 VHF/UHF stations. You can have the unit automatically select the stations with the strongest signals and store them in order.
1 Open up the monitor by pressing OPEN/CLOSE.

2 Press TV/VIDEO repeatedly to select "TV".
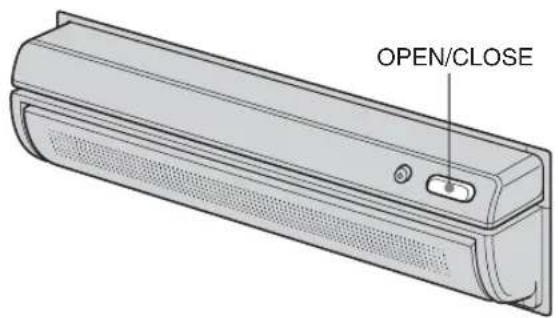
3 Press MENU.
4 Press ↑ or ↓ to select ☑, then press ENTER.
5 Press ↑ or ↓ to select "PRESET", then press ENTER.
6 Press ↑ or ↓ to select "BTM" (Best Tuning Memory).
7 Press ENTER.
Stored stations are memorized in order. When the storing procedure is completed, the regular display appears again.
8 When the storing procedure is finished, press MENU.
To return to the previous screen
Press BACK.
Tip
You can store a channel directly by pressing the number buttons on the card remote commander.
1 Press SEEK +/- on the card remote commander or SEEK +/- on the main unit to receive the TV station.
2 Press and hold the number button until "MEMORY" appears in the TV screen. The number of the selected number button appears, and the station is stored to that button.
Storing a channel manually
1 Open up the monitor by pressing OPEN/CLOSE and select "TV".
2 Press MENU.
3 Press ↑ or ↓ to select ▶, then press ENTER.
4 Press ↑ or ↓ to select "PRESET", then press ENTER.
5 Press ↑ or ↓ to select "MANUAL".
6 Press ↑ or ↓ or number buttons to select the programme number you want to store the new channel on, then press ENTER.
7 Press ← or → to select a channel.
8 Press ENTER.
The number of the selected number button appears, and the station is stored on that button.
9 When the storing procedure is finished, press MENU.
Watching a TV Programme
Note
The TV picture does not appear while the car is moving for safety reasons.

1 Open up the monitor by pressing OPEN/ CLOSE.
2 Select "TV".
Pressing TV/VIDEO switches the indication in the following order.

3 Press the programme number buttons (1 through 12) or CH+/- to select the desired TV station.
The TV programme number appears for four seconds in the upper right corner of the display each time you select a station.
4 Adjust the volume.
Press VOL repeatedly.
Receiving a TV station manually
Press and hold SEEK +/− on the card remote commander or main unit.
Turning on the on-screen display
Press DSPL.
If you press it once, a channel display will appear, and a preset list will appear if you press it twice.
To turn off the display, press it again.
Moreover, you can turn off the picture by pressing and holding DSPL. In this case, only the sound can be heard.
To restore the picture, press and hold DSPL again or press TV/VIDEO.
Turning off the TV
Press OFF on the card remote commander.
If you cannot receive the stored stations while travelling
Press SEEK -/+ momentarily to search for the station automatically.
When the unit receives a station, it stops scanning. Press the button repeatedly until the desired station is received.
Selecting the area for tuning (PAL system only)
You can select the area for using the unit.
1 Press MENU. 2 Press ↑ or ↓ to select □, then press ENTER. 3 Press ↑ or ↓ to select "SYSTEM", then press ENTER. 4 Press ↑ or ↓ to select the area.
You can select the area from "CCIR", "ITALY", "UK/HKG (Hong Kong)", "CHINA", "AUSTRALIA" or "NEWZEALAND".
5 Press ENTER. 6 Press MENU.
Watching Other Video Components
Note
The TV picture does not appear while the car is moving for safety reasons.
You can watch DVDs, Video CDs, etc. recorded in either the PAL or NTSC colour system. Make sure that you have connected a video player to the TV tuner unit correctly. For details, refer to the supplied "Installation/Connections" manual.

1 Open up the monitor by pressing OPEN/ CLOSE.

2 Select "VIDEO1" or "VIDEO2".
Pressing TV/VIDEO switches the indication in the following order.

3 Turn the video player on and begin playback.
4 Adjust the volume.
Press VOL repeatedly.
Adjusting the Picture Characteristics

You can adjust the picture characteristics according to the programme type, picture tone or personal preferences.
Press PICTURE.
Pressing PICTURE switches the picture in the following order:
![graph TD A["CINEMA"] --> B["DYNAMIC"] B --> C["USER"] C --> D["STANDARD"] D --> E["Provides a clear picture with a clear black and white definition."] B --> F["Provides beautiful images with bright, clear colours."] C --> G["You can adjust the picture characteristics and store the setting."] D --> H…](/content/2026/05/1053207/images/7c86d2d8c52eea5c271925b69254c9e0ea82863bad014d5975945c01e94bfe74.jpg)
Tip
If you select "USER", you can adjust the picture characteristics (more precisely) and store the setting as a user preset. See "Changing the Setting" on page 21 for details.
Selecting the Screen Mode

Tips
- Images may appear coarse-grained when viewed in the ZOOM mode.
- This unit complies with the specifications of typical wide-screen TV sets.
- Changing the screen mode will also change the scale of the map on your navigation system.
Besides the normal mode (4:3) the screen can also be set to wide screen, full, zoom and cinema mode.
The screen mode can be selected using the card remote commander, after opening up the monitor.
Press WIDE.
Pressing WIDE switches the screen mode in the following order:
FULL (Full screen)
An image with an aspect ratio of 4 to 3 enlarged to the left and right edges of the screen.

NORMAL (Normal (regular) screen)
An image with an aspect ratio of 4 to 3 (regular image).

WIDE (Wide screen)
An image with an aspect ratio of 16 to 9.

ZOOM (Zoom screen)
An image with an aspect ratio of 4 to 3 enlarged to the left and right edges of the screen, with the overflowing parts of the top and bottom cut off to fill the screen.

CINEMA (Cinema mode)
An image with an aspect ratio of 4 to 3, with only the left and right sides of the image being enlarged to fill the screen.

Using the Navigation System

Tip
If you register the NAVI function to the CUSTOM button, you can switch to the NAVI function with the CUSTOM button. See "Changing the Setting" on page 21 for details.
Note
You cannot connect the navigation system and the back camera simultaneously.
You can display navigation information by connecting a commercially available navigation system. Make sure that you have connected a navigation system to the TV tuner unit correctly.
1 Open up the monitor by pressing OPEN/CLOSE.

2 Press MENU.
3 Press ↑ or ↓ to select ☐, then press ENTER.
4 Press ↑ or ↓ to select "NAVI/CAMERA", then press ENTER.
5 Press ↑ or ↓ to select "NAVI".
6 Press ENTER.
7 Press MENU.
To return to the previous screen Press BACK.
Switching to the NAVI function
Press and hold TV/VIDEO for two seconds.
To cancel the NAVI function, press and hold TV/VIDEO for two seconds again. If you set "NAVI/CAMERA" to "CAMERA", you cannot select the NAVI function (page 22).
Displaying the Image of the Back Camera
Note
You cannot connect the back camera and the navigation system simultaneously.
Tip
About the "INSTALL" mode
If you set "INSTALL", you can adjust the position of a back camera while viewing the image of the camera without setting the shift lever to the "R (reverse)" position. However, note that the image of the back camera will not be displayed without setting the parking brake.
You can display the image of a back camera (when you connect an optional back camera). Make sure that you have connected a camera cable to the unit correctly.
If you switch to "CAMERA (camera mode)", the image of the back camera will be displayed when a back lamp lights up (or the shift lever is set to the "R (reverse)" position). For details about connecting the camera cable, refer to the supplied "Installation/Connections" manual.
1 Open up the monitor by pressing OPEN/CLOSE.

2 Press MENU. 3 Press ↑ or ↓ to select ☐, then press ENTER. 4 Press ↑ or ↓ to select "NAVI/CAMERA", then press ENTER. 5 Press ↑ or ↓ to select "CAMERA". 6 Press ENTER. 7 Press MENU.
To return to the previous screen, press BACK.
Changing the Setting

Tip: When you change the setting of the built-in RF modulator, see also page 22 of the supplied "Installation/Connections" manual.
Settings can be changed using the card remote commander, after opening up the monitor.
How to set preferences
1 Press MENU.

BRIGHT -··|··+
COLOR -···|···+
HUE R · · | · · G
SHARPNESS -··|··+
DIMMER LEVEL MID
DIMMER AUTO

2 Press ↑ or ↓ to select the desired item.
:Display menu
:Receive menu
Setup menu
3 Press ENTER.
4 Press ↑ or ↓ to select the desired setting.
5 Press ENTER.
6 Press / or ←/→ to select (or adjust) the setting option.
7 Press ENTER.
8 Press MENU.
To return to the previous screen, press BACK.
Changing the Setting
| Settings | Settings options | |
| 1(Display menu) | WIDE MODE | FULL, NORMAL, WIDE, ZOOM, CINEMACHanging the screen mode. |
| PICTURE MODE | STANDARD, CINEMA, DYNAMIC, USERAdjusting the picture characteristics."BRIGHT", "COLOR", "HUE (NTSC system only)" and "SHARPNESS" can be adjusted only when you set to "USER".To adjust the desired item, press ◆ or ►."HUE" is displayed for NTSC system only. | |
| BRIGHT | ||
| COLOR | ||
| HUE (NTSC system only) | ||
| SHARPNESS | ||
| DIMMER LEVEL | HIGH, MID, LOWChanging the dimmer level."LOW" is the brightest and "HIGH" is the darkest. | |
| DIMMER | AUTO, ONChanging the dimmer setting.If you select "AUTO", the monitor dims when the car lights are turned on(only when connected to the car power supply). | |
| 2(Receive menu) | PRESET*1, *2 | BTM, MANUALSelecting the channel preset mode |
| SYSTEM*1 (PAL system only) | CCIR, ITALY UK/HKG (Hong Kong), CHINA, AUSTRALIA, NEWZEALANDSelecting the area for tuning.This setting is displayed for PAL system only. | |
| 3(Setup menu) | SLIDE | Sliding the monitor position forward or backward.To adjust the position, press ◆ or ►. |
| CUSTOM | RF OUTPUT*, WIDE MODE, PICTURE MODE, DISPLAY OFF, NAVI*, BTM*, MUTING*.Setting the function of the CUSTOM button. | |
| BEEP*2 | ON, OFFTurning the beep sound on or off.Even if you set to "OFF", the beep sound activates other than operation. | |
| VIDEO1 SKIP*2 | ON, OFFSkipping the "VIDEO1" or "VIDEO2".If you set to "ON", "VIDEO1" or "VIDEO2" will not be displayed by pressing TV/VIDEO. | |
| VIDEO2 SKIP*2 | ||
| NAVI/CAMERA | NAVI, CAMERA, OFF, INSTALLSelecting the navigation system or back camera.When you do not connect either a back camera or navigation system, set to "OFF".If you switch to "INSTALL", you can adjust the position of a back camera while viewing the image of camera. (It will not be displayed without setting the parking brake.) | |
| AUTO CLOSE | ON, OFFChanging the setting of the monitor whether it retracts into the unit automatically.If you set to "ON", and when you set the ignition key to OFF, power to the unit is automatically turned off and the monitor retracts into the unit. | |
| RF OUTPUT*2 | ON, OFFTurning the built-in RF modulator on or off.We recommend you to set to "OFF", when listening to radio. | |
| RF FREQUENCY*2 | frequency range from 88.3MHz to 89.9MHzAdjusting the RF frequency of the built-in RF modulator. | |
| RF LEVEL*2 | HIGH, MID, LOWAdjusting the output level of the built-in RF modulator. | |
*1 It is displayed when "TV" is selected. *2 It is not displayed when you connect this unit to other components with Sony BUS system control.
Additional Information
Precautions on the card remote commander
- Do not leave the card remote commander on the dashboard, on the steering wheel, or in other locations exposed to direct sunlight. Especially in summer, temperature could become very high in such locations, which may cause deformation of the commander.
- When parking the car in sunlight, remove the card remote commander from its mounting location and store it in a location such as the glove compartment.
- In direct sunlight, the signals from the card remote commander may not be received properly by the unit. In such case, move the card remote commander closer to the remote sensor on the main unit.
About the liquid crystal display (LCD) panel
- Do not press on the LCD panel on the monitor unit as doing so can distort the picture or cause a malfunction. The picture may become unclear, or the LCD panel may be damaged.
- Notes on cleaning – Clean the LCD panel with a slightly damp soft cloth.
- Do not use solvents such as benzine, thinner, commercially available cleaners, or antistatic spray.
- Do not use this unit in temperatures under 5°C or over 45°C.
- If your car was parked in a cold or hot place, the picture may not be clear. The monitor is not damaged. The picture will become clear after the temperature in your car becomes normal.
Additional Information
Replacing the lithium battery
Under normal conditions, battery will last for approximately 1 year. (The battery life may be shorter, depending on the conditions of use.) When the battery becomes weak, the range of the card remote commander becomes shorter. Replace it with a new CR2025 lithium battery. Use of any other type of battery may cause a fire or explosion.

Notes on lithium battery
- Keep the lithium battery out of the reach of children. Should the battery be swallowed, immediately consult a doctor.
- Wipe the battery with a dry cloth to assure a good contact.
- Be sure to observe the correct polarity when installing the battery.
- Do not hold the battery with metallic tweezers, otherwise a short-circuit may occur.
WARNING
Battery may explode if mistreated. Do not recharge, disassemble, or dispose of in fire.
Removing the unit
1 Remove the protection collar.
1 Engage the release keys together with the protection collar.

Orient the release key correctly.
2 Pull out the release keys to remove the protection collar.

2 Remove the unit.
1 Insert both release keys together until they click.

Face the hook inwards.
2 Pull the release keys to unseat the unit.
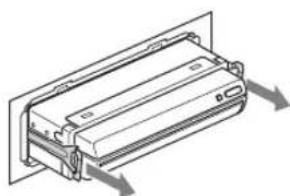
3 Slide the unit out of the mounting.

Troubleshooting Guide
No picture, no sound.
→The power cord or battery has been disconnected. →The fuse has blown. →Press TV/VIDEO.
Good picture, but no sound.
→Press VOL + on the monitor, or on the card remote commander. →Press MUTING to cancel the muting function.
Dotted lines or stripes.
→This may be caused by local interference such as a car engine or motorcycle. Adjust the aerials for minimum interference.
The picture is blurred, or has double images or ghosts.
→Connect the aerials securely. →This may be caused by reflections from nearby mountains or buildings.
No picture, or no sound when you connect the optional equipment.
→The cord has been disconnected. Connect the cord securely. →Press TV/VIDEO.
Cannot select a channel or cannot view a TV programme.
→Select the TV. →Press TV/VIDEO and select "TV". →The battery on the card remote commander may be exhausted. →Store TV stations automatically again (page 12).
No response when pressing the buttons on the card remote commander.
→The battery on the card remote commander may be exhausted.
No beep sound when controls are operated.
→The beep sound has been turned off. →Set "BEEP" to "ON" (page 22).
Cannot select "VIDEO1" and "VIDEO2".
→Check if the connections are made correctly. →If "VIDEO1 SKIP" or "VIDEO2 SKIP" is set to "ON", "VIDEO1" or "VIDEO2" cannot be selected. →Set "VIDEO1 SKIP" or "VIDEO2 SKIP" to "OFF" (page 22).
Specifications
Monitor section
Display type: Wide LCD colour monitor
Picture size: 7 in.; 154 × 87 mm, 180 mm
(W× H, diagonally)
System TFT active matrix
Number of pixels
336,960 pixels
TV tuner section
Television system
M system (NTSC)/
B, G, I, D, K system (PAL)
Colour system
TV: NTSC (NTSC system)/PAL
(PAL system)
VIDEO: NTSC/PAL (Compatible)
Channel coverage
NTSC system only:
VHF: 2 - 13 CH
UHF: 14 - 69 CH
PAL system only:
| CCIR VHF: 2 - 12 CHUHF: 21 - 69 CH |
| CHINA VHF: 1 - 12 CHUHF: 13 - 57 CH |
| UK/HKG (Hong Kong) VHF: —UHF: 21 - 69 CH |
| ITALY VHF: A - H2 CHUHF: 21 - 69 CH |
| NEWZEALAND VHF: 1 - 11 CHUHF: 21 - 69 CH |
| AUSTRALIA VHF: 0 - 12 CHUHF: 28 - 69 CH |
General
Power requirements
12 V DC, from car battery (negative ground)
Outputs Video/Audio (Sony BUS
compatible, 1)
Sony BUS (1)
Inputs Video/Audio (Sony BUS
compatible, 2)
Composite (either commercially
available navigation system or
back camera can be connected, 1)
Sony BUS (1)
TV antenna (1)
Speaker type 20 × 40 mm (monaural)
Dimensions with monitor retracted
Approx. 178 × 50 × 190.5 mm
(W × H × D)
Current drain Approx. 2 A
Mass Approx. 1.9 kg
Supplied accessories
Card remote commander RM-X701
(1) (incl. 1 lithium battery)
RCA interconnects (Audio L/R × 1,
Video × 1)
TV antenna VCA-119 (left/right) (1)
Parts for installation and
connections (1 set)
Installation/Connections manual (1)
Operating Instructions (1)
Design and specifications are subject to change without notice.

- Lead-free solder is used for soldering certain parts. (more than 80 %)
- Halogenated flame retardants are not used in the certain printed wiring boards.
- Halogenated flame retardants are not used in cabinets.
- VOC (Volatile Organic Compound)-free vegetable oil based ink is used for printing the carton.
- Packaging cushions do not use polystyrene foam.
- Printed on 100% recycled paper using VOC (Volatile Organic Compound)-free vegetable oil based ink.
Features
Welcome!
Thank you for purchasing the Sony Car Color TV.
Features
The monitor slides out of the main unit, and the picture appears.

Preparation
Note
Do not move the display with your hands.
Tips
Power off
1 VIDEO 1 IN jack (VIDEO, AUDIO (L/R)) ② CUSTOM button 3 TILT button
4 OPEN/CLOSE button 5 RESET button
Display on
1 TV/VIDEO key ② VOL (volume) +/- buttons
2 Select "TV".
NORMAL (normal screen)
WIDE (wide screen)
The aspect ratio of the image is 16:9.

ZOOM (zoom screen)
CINEMA (cinema mode)
Using the navigation system

Tips
Point the release key in the correct direction.
2 Pull out the release key to remove the protective ring.

2 Remove the device.
1 Insert the release keys together until they click into place.

Point the hooks inward.
2 Push out the release key to remove the device.
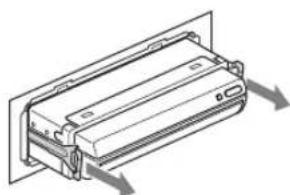
3 Push the device out of the mounting position.

Troubleshooting Guide
No image and no sound.
- FEATURES
- WELCOME
- TABLE OF CONTENTS
- GETTING STARTED
- BASIC OPERATION
- ADVANCED OPERATION
- OTHER FEATURES
- PRECAUTIONS
- ON SAFETY
- WATCHING TV/VIDEO PICTURES
- PICTURE OFF FOR YOUR SAFETY
- ON INSTALLATION
- INSTALLING LOCATION
- PREPARATIONS
- NOTES
- RESETTING THE UNIT
- OPENING UP THE MONITOR
- NOTE
- TIP
- ADJUSTING THE MONITOR ANGLE
- PRESS ANGLE REPEATEDLY
- ADJUSTING THE MONITOR POSITION
- TILTING THE MONITOR FORWARD
- PRESS TILT
- WARNING WHEN INSTALLING IN A CAR WITHOUT AN ACC (ACCESSORY) POSITION ON THE IGNITION KEY
- TIPS
- CLOSING THE MONITOR
- PRESS OPEN/CLOSE
- SHUTTING DOWN
- TO OUTPUT THE AUDIO OF OTHER MANUFACTURE'S MASTER-UNITS USING THE RF MODULATOR
- LOCATION OF CONTROLS
- MAIN UNIT
- MONITOR CLOSED
- MONITOR OPENED
- CARD REMOTE COMMANDER
- SETTING A SECURITY CODE
- TO SET A SECURITY CODE
- PRESS AND HOLD ENTER FOR 2 SECONDS OR MORE
- PRESS THE NUMBER BUTTON (1-10) TO ENTER THE 4-DIGIT NUMBER
- PRESS ENTER
- TO CANCEL THE CODE ENTRY MODE
- TO CLEAR A SECURITY CODE
- ENTERING THE SECURITY CODE
- STORING TV STATIONS AUTOMATICALLY (BEST TUNING MEMORY (BTM))
- STORING A CHANNEL MANUALLY
- WATCHING A TV PROGRAMME
- RECEIVING A TV STATION MANUALLY
- TURNING ON THE ON-SCREEN DISPLAY
- TURNING OFF THE TV
- IF YOU CANNOT RECEIVE THE STORED STATIONS WHILE TRAVELLING
- SELECTING THE AREA FOR TUNING (PAL SYSTEM ONLY)
- WATCHING OTHER VIDEO COMPONENTS
- ADJUSTING THE PICTURE CHARACTERISTICS
- PRESS PICTURE
- SELECTING THE SCREEN MODE
- PRESS WIDE
- FULL (FULL SCREEN)
- NORMAL (NORMAL (REGULAR) SCREEN)
- WIDE (WIDE SCREEN)
- ZOOM (ZOOM SCREEN)
- CINEMA (CINEMA MODE)
- USING THE NAVIGATION SYSTEM
- SWITCHING TO THE NAVI FUNCTION
- PRESS AND HOLD TV/VIDEO FOR TWO SECONDS
- DISPLAYING THE IMAGE OF THE BACK CAMERA
- ABOUT THE "INSTALL" MODE
- CHANGING THE SETTING
- HOW TO SET PREFERENCES
- PRESS MENU
- PRESS ↑ OR ↓ TO SELECT THE DESIRED ITEM
- PRESS ↑ OR ↓ TO SELECT THE DESIRED SETTING
- PRESS / OR ←/→ TO SELECT (OR ADJUST) THE SETTING OPTION
- ADDITIONAL INFORMATION
- PRECAUTIONS ON THE CARD REMOTE COMMANDER
- ABOUT THE LIQUID CRYSTAL DISPLAY (LCD) PANEL
- REPLACING THE LITHIUM BATTERY
- NOTES ON LITHIUM BATTERY
- WARNING
- REMOVING THE UNIT
- REMOVE THE PROTECTION COLLAR
- REMOVE THE UNIT
- TROUBLESHOOTING GUIDE
- NO PICTURE, NO SOUND
- GOOD PICTURE, BUT NO SOUND
- DOTTED LINES OR STRIPES
- THE PICTURE IS BLURRED, OR HAS DOUBLE IMAGES OR GHOSTS
- NO PICTURE, OR NO SOUND WHEN YOU CONNECT THE OPTIONAL EQUIPMENT
- CANNOT SELECT A CHANNEL OR CANNOT VIEW A TV PROGRAMME
- NO RESPONSE WHEN PRESSING THE BUTTONS ON THE CARD REMOTE COMMANDER
- NO BEEP SOUND WHEN CONTROLS ARE OPERATED
- CANNOT SELECT "VIDEO1" AND "VIDEO
- SPECIFICATIONS
- MONITOR SECTION
- TV TUNER SECTION
- GENERAL
- PREPARATION
- POWER OFF
- NORMAL (NORMAL SCREEN)
- REMOVE THE DEVICE
- NO IMAGE AND NO SOUND
Brand : SONY
Model : XTL-W7000
Category : Car radio