
CAF1020 019 - Vacuum Cleaner CANDY - Free user manual and instructions
Find the device manual for free CAF1020 019 CANDY in PDF.


| Product Type | Vacuum Cleaner |
| Brand | Candy |
| Model | CAF1020 019 |
| Color | Red and Black |
| Type | Cylinder (Canister) |
| Dust Capacity | 1.5 L (bagless) |
| Power Consumption | 750 W |
| Suction Power | 250 air watts |
| Noise Level | 78 dB |
| Filtration System | HEPA washable filter |
| Cord Length | 6 m |
| Auto Cord Rewind | Yes |
| Carry Handle | Yes |
| Weight | 5.2 kg |
| Dimensions (LxWxH) | 400 x 250 x 300 mm |
| Floor Types | Carpet and Hard Floor |
| Accessories Included | Crevice tool, upholstery brush, floor brush |
| Filter Cleaning | Washable, clean monthly |
| Dust Bin Cleaning | Empty after each use |
| Overload Protection | Automatic thermal cut-out |
| Spare Parts | Filters (ref. CAF1020FILTER) |
| Repairability | User replaceable filters and brush |
| Country of Origin | China |
Frequently Asked Questions - CAF1020 019 CANDY
User questions about CAF1020 019 CANDY
0 question about this device. Answer the ones you know or ask your own.
Ask a new question about this device
Download the instructions for your Vacuum Cleaner in PDF format for free! Find your manual CAF1020 019 - CANDY and take your electronic device back in hand. On this page are published all the documents necessary for the use of your device. CAF1020 019 by CANDY.
USER MANUAL CAF1020 019 CANDY

CHINA WORKS
IMPORTANT SAFETY REMINDERS
This cleaner should only be used for domestic cleaning, as described in this user guide. Please ensure that this guide is fully understood before operating the appliance. Use only attachments recommended or supplied by Candy.
Warning: Electricity can be extremely dangerous. This appliance is double insulated and must not be earthed. This plug is fitted with a 13 amp fuse (UK only).
Important: The wires in the mains power lead are coloured in accordance with the following code:
Blue - Neutral Brown - Live
STATIC ELECTRICITY: Some carpets can cause a small build up of static electricity. Any static discharge is not hazardous to health.
AFTER USE: Switch the cleaner off and remove the plug from the electricity supply. Always switch off and remove the plug before cleaning the appliance or attempting any maintenance task.
Safety with children, elderly or the infirm: Do not let children play with the appliance or its controls. Please supervise the use of the appliance by older children, the elderly or the infirm.
CANDY SERVICE: To ensure the continued safe and efficient operation of this appliance we recommend that any servicing or repairs are only carried out by an authorised Candy service engineer.
IT IS IMPORTANT THAT YOU DO NOT:
• Position the cleaner above you when cleaning the stairs. • Use your cleaner out of doors or on any wet surface or for wet pick up. - Pick up hard or sharp objects, matches, hot ashes, cigarette ends or other similar items. - Spray with or pick up flammable liquids, cleaning fluids, aerosols or their vapours as this may cause risk of fire / explosion. - Run over the supply cord when using your cleaner or remove the plug by pulling on the supply cord. - Stand on or wrap the power cord around arms or legs when using the cleaner. • Use the appliance to clean people or animals. - Continue to use your cleaner if it appears to be faulty. If the supply cord is damaged stop using the cleaner IMMEDIATELY. To avoid a safety hazard, an authorised Candy service engineer must replace the supply cord.
GETTING TO KNOW YOUR CLEANER
A. Cleaner main body B. Dust container C. Dust container front handle* D. Dust container top handle E. Dust container release button F. On-off / power control* slider G. Cleaner carry handle / cord rewind button
H. Parking slots
I. Exhaust filter
J. Hose
K. Hose release button
L. Handle
M. Suction control
N. Standard tube*
O. Telescopic tube*
P. Telescopic tube adjuster
Q. Carpet & floor nozzle
R. Surface selector pedal
S. Pre motor filter
T. Pre motor filter mesh*
U. 2 In 1 accessory
V. Pet hair remover mini turbo nozzle*
W. Allergen remover mini turbo nozzle*
X. Grand turbo nozzle®
Y. Hard floor caresse nozzle*
(*Certain Models Only)
ASSEMBLING YOUR CLEANER
Remove all components from the packaging.
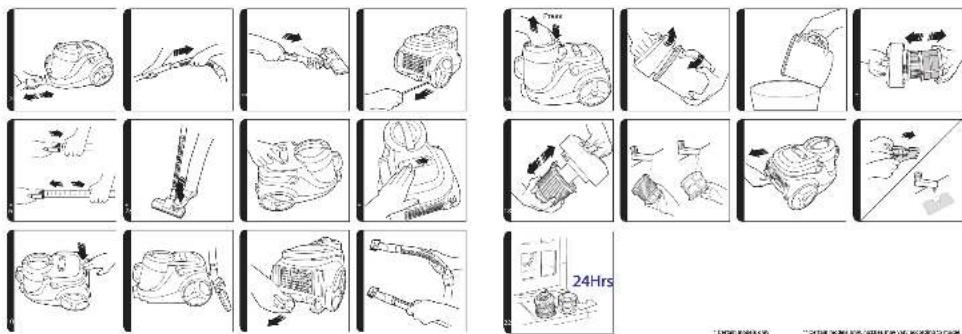
- Connect the hose to the cleaner main body, ensuring it clips and locks into position. To release: simply press the button on the hose end and pull. [2]
- Connect the handle to the tube upper end. [3]
- Connect the tube lower end to the carpet and floor nozzle. [4]
USING YOUR CLEANER
- Extract power cord and plug it into the power supply. Do not pull the cord beyond the red marker. [5]
- Adjust the telescopic tube* to the desired height by moving the telescopic tube adjuster* up and raise or lower the hose handle to the most comfortable cleaning position. [6]
- Select the type of surface to be cleaned by pressing the pedal in the nozzle. [7] Hard Floor – Brushes are lowered to protect the floor. Carpet - Brushes are raised for the deepest clean.
- Switch the cleaner on by sliding the On-Off control to the ON position. [8]
- Adjust the power level by further sliding the On-Off / variable power control* slider on cleaner mainbody. [9]
- Switch off at the end of use by sliding the On-Off control to the OFF position. Unplug and press the carry handle/cord rewind button to wind the power cord back into the cleaner. [10]
- To store your cleaner, adjust the telescopic tube* to the lowest height setting and park the nozzle in the park position on the cleaner main body. [11]
ACCESSORIES AND NOZZLES
All accessories can be fitted to the end of the handle or the end of the tube.
2 in 1 Accessory
Remove the 2-in-1 accessory from the rear of the cleaner [12] and fit it onto the end of the handle. [13]
Crevice Tool – For corners and hard-to-reach areas. [1U]
Dusting Brush – For bookshelves, frames, keyboards, and other delicate areas. To extend the brushes, push the button on the body of the tool. [1U]
Pet Hair Remover Mini Turbo Nozzle* - Use the mini turbo nozzle on stairs or for deep cleaning on textile surfaces and other hard-to-clean areas. Particularly suitable for pet hair removal. [1V]
Allergen Remover Mini Turbo Nozzle* – Use the mini turbo nozzle on stairs or for deep cleaning on textile surfaces and other hard-to-clean areas, particularly suitable for allergen removal. [1W]
Grand Turbo Nozzle® – Use the turbo nozzle for deep cleaning on carpets. [1X]
Hard Floor Caresse Nozzle – For parquet floors and other delicate floors. [1Y]
IMPORTANT: Do not use the Grand turbo and mini turbo nozzles on rugs with long fringes, animal hides, or carpet pile deeper than 15mm. Do not keep the nozzle stationary while the brush is rotating.
CLEANER MAINTENANCE
Emptying the Dust Container
When the dust reaches the max level indicator in the container, empty the dust container. IMPORTANT: To maintain optimum performance, do not allow the dust to sit higher than the max level.
- Release the Dust Container by pressing the Dust Container Release Button. Lift the Dust Container from the cleaner main body. [14]
- Hold the Dust Container over a bin with one hand, and remove the Dust Container lid by rotating it anti-clockwise. [15]
- Empty the dust from the bin. [16]
- Close and refit the dust container to the cleaner.
Cleaning the washable filters
The cleaner is fitted with a pre-motor filter and an exhaust filter. To maintain optimum cleaning performance, regularly remove the filter and tap it against the side of the bin to release dust. The filters should be washed every 5 container empties or when the filter has excessive dust level.
IMPORTANT: All bagless cleaners require regular filter cleaning. Failure to clean your filters may result in air blockage, overheating, and product failure. This may invalidate your guarantee.
IMPORTANT: Regularly check and maintain the filters.
IMPORTANT: Always ensure the filter pack is fully dry before use.
To access the Pre-Motor filter:
- Remove the Dust Container from the cleaner main body. [14]
- Hold the Dust Container over a bin with one hand, and remove the bin lid by rotating it anti-clockwise. [15]
- Remove the filter mesh by rotating it clockwise from the bin lid. [17]
- Remove the pre-motor filter by rotating it clockwise from the bin lid. [18]
- Gently tap and wash the filter mesh* and filter, do not use hot water or detergents. [19] Remove excess water from the filter mesh* and filter and leave to dry fully before re-using. [22]
- Reassemble the pre-motor filter pack (filter mesh* and filter) once fully dry and refit to the cleaner.
To access the exhaust filter:
- Press the exhaust filter grid latch to access the exhaust filter from the rear of the cleaner. [20]
- Remove the exhaust filter from the grid. [21]
- Gently tap and wash the exhaust filter, do not use hot water or detergents. Remove excess water from the exhaust filter and leave to dry fully before re-using. [22]
- Refit the exhaust filter to the grid once fully dry and refit the exhaust grid.
IMPORTANT: Do not use the product without the exhaust filter fitted.
Removing a blockage
- Check if the dust container is full. If so, refer to 'Emptying the dust container'.
- If the dust container is empty but suction is still low:
A. Do the filters need cleaning? If so, refer to 'Cleaning the washable filters'. B. Check if there is any other blockage in the system - Use a rod or pole to remove any blockage from the extension tube or flexible hose. C. Check if the pre-motor filter is fitted and the filter door is closed.
Warning (Certain models only*) - If the cleaner is used for a significant period of time when the dust container is full, filters are dirty, and there is a blockage in the system, a thermal cut out will switch the cleaner off to prevent overheating. If this should happen, switch the cleaner off, unplug it, and correct the fault. It will take about 30 minutes for the cut out to automatically reset.
USER CHECKLIST
Should you have a problem with the product, complete this simple user checklist before calling your local Candy service.
- Is there a working electricity supply to the cleaner? Please check with another electrical appliance. • Is the dust container over-filled? Please refer to 'Cleaner Maintenance'. • Is the filter blocked? Please refer to 'Cleaner Maintenance'.
- Is the hose or nozzle blocked? Please refer to 'Removing a blockage from the system'.
- Has the cleaner overheated? If so, it will take approximately 30 minutes to automatically reset.
IMPORTANT INFORMATION
Candy Spares and Consumables
Always replace parts with genuine Candy spares. These are available from your local Candy dealer or direct from Candy. When ordering parts always quote your model number.
Candy Customer Helpline Service
Should any faults occur with your cleaner during the first 12 months contact the Candy Customer Helpline on the number below.
Tel: 08444 995 599
Email: customer.services@hoovercandy.com
Candy have a computerised nationwide service network of over 500 engineers who will quickly respond to your call and guarantee your repair for 12 months.
Quality and the Environment
Safety
Although safety certification of electrical appliances is not required by law in the UK, Candy believes that independent approval is the best way of demonstrating safety in design and manufacture. The British Electrotechnical Approvals Board (BEAB), the independent UK national authority for the safety of domestic electrical appliances, ensures that European safety standards are met and maintained throughout the production life of an appliance.
All appliances that pass the requirements are permitted to carry the BEAB mark of safety.
Quality
BSI ISO 9001
Candy's factories have been independently assessed for quality. Our products are made using a quality system which meets the requirements of ISO 9001.
The Environment:
This appliance is marked according to the European Directive 2002/96/EC on Waste Electrical and Electronic Equipment (WEEE).
By ensuring this product is disposed of correctly, you will help prevent potential negative consequences for the environment and human health, which could otherwise be caused by inappropriate waste handling of this product.
The symbol on the product indicates that this product may not be treated as household waste. Instead, it shall be handed over to the appliance collection point for recycling of electrical and electronic equipment.
Disposal must be carried out in accordance with the local environmental regulations for waste disposal.
For more detailed information about treatment, recovery, and recycling of this product, please contact your local city office, your household waste disposal service, or the shop where you purchased the product.
Your Guarantee
The guarantee conditions for this appliance are as defined by our representative in the country in which it is sold. Details regarding these conditions can be obtained from the dealer from whom the appliance was purchased. The bill of sale or receipt must be produced when making any claim under the terms of this guarantee.
Subject to change without notice.



- IMPORTANT SAFETY REMINDERS
- BLUE - NEUTRAL BROWN - LIVE
- IT IS IMPORTANT THAT YOU DO NOT
- GETTING TO KNOW YOUR CLEANER
- ASSEMBLING YOUR CLEANER
- USING YOUR CLEANER
- ACCESSORIES AND NOZZLES
- IN 1 ACCESSORY
- CLEANER MAINTENANCE
- EMPTYING THE DUST CONTAINER
- CLEANING THE WASHABLE FILTERS
- TO ACCESS THE PRE-MOTOR FILTER
- TO ACCESS THE EXHAUST FILTER
- REMOVING A BLOCKAGE
- USER CHECKLIST
- IMPORTANT INFORMATION
- CANDY SPARES AND CONSUMABLES
- CANDY CUSTOMER HELPLINE SERVICE
- TEL
- EMAIL: CUSTOMER.SERVICES@HOOVERCANDY.COM
- QUALITY AND THE ENVIRONMENT
- SAFETY
- QUALITY
- THE ENVIRONMENT
- YOUR GUARANTEE
Brand : CANDY
Model : CAF1020 019
Category : Vacuum Cleaner