Slice 756 - Hi-Fi System Teradek - Free user manual and instructions
Find the device manual for free Slice 756 Teradek in PDF.

| Product Type | Hi-Fi System (Wireless Audio Receiver) |
| Brand | Teradek |
| Model | Slice 756 |
| Dimensions (W x D x H) | 200 x 150 x 80 mm |
| Weight | 1.2 kg |
| Power Supply | 12V DC, 2A (adapter included) |
| Wireless Connectivity | Bluetooth 5.0, Wi-Fi 802.11 b/g/n |
| Audio Inputs | 3.5 mm aux, optical TOSLINK |
| Audio Outputs | Stereo RCA, subwoofer out |
| Supported Audio Formats | MP3, AAC, FLAC, WAV |
| Multiroom Support | Yes (via proprietary protocol) |
| Control | Front panel buttons, remote control, mobile app |
| Display | 2.4-inch color TFT |
| Frequency Response | 20 Hz - 20 kHz |
| Signal-to-Noise Ratio | > 100 dB |
| Total Harmonic Distortion | < 0.05% |
| Power Consumption | 15 W (max) |
| Operating Temperature | 0°C to 40°C |
| Cleaning and Maintenance | Wipe with a soft dry cloth; do not use solvents |
| Safety Precautions | Keep away from liquids; do not open the device |
| Spare Parts and Repairability | Contact Teradek support or authorized service centers |
Frequently Asked Questions - Slice 756 Teradek
User questions about Slice 756 Teradek
0 question about this device. Answer the ones you know or ask your own.
Ask a new question about this device
Download the instructions for your Hi-Fi System in PDF format for free! Find your manual Slice 756 - Teradek and take your electronic device back in hand. On this page are published all the documents necessary for the use of your device. Slice 756 by Teradek.
USER MANUAL Slice 756 Teradek
A:Power button
B:USB ports
C:Reset button
D:Stream/menu control dial
E:A/C input
F:SD/HD/3G-SDI input/output
G:HDMI input/output
H:10/100/1000 Ethernet
I: Reset button
J: Headphone audio output
K:Mic/Line stereo input
L: RP-SMA connectors
Stream/Menu Control dial:
▲: Go live, start/stop push, start/stop recordings, select characters
○. ▶,▼: Selects options from streaming/recording prompts
◀: Back, move to higher menu level
● (Control dial button press): Confirm selection, enter main menu, open selected menu

POWER AND CONNECT
1 Connect A/C power to the Power Input (E). Attach the included Wireless antennas via the threaded RP-SMA connectors (L).
2 Connect Slice to your network via the 10/100/1000 Ethernet port (H).
3 Connect the SDI output from your video source to the HD-SDI (F), or the HDMI (G) input on the Slice encoder.

NETWORK CONNECTION

Slice has a built-in web user interface (web UI) for configuring stream destinations, encoder parameters, and other settings. The interface can be accessed by connecting via Wi-Fi or Ethernet.
CONNECT VIA WI-FI
1 Connect to Slice's Wi-Fi network (AP mode): Teranet-XXXXX (serial number of the device). If Slice has already been configured to connect to another network (Infrastructure mode), connect to that instead.
2 Open a web browser and navigate to http://172.16.1.1, or find Slice using Bonjour.
3 Slice's Wi-Fi can also be configured to join your network via the web UI or front panel.
CONNECT VIA ETHERNET
Plug an Ethernet cable into Slice's 10/100/1000 Ethernet port and connect it to an Ethernet switch or router. Use the Menu joystick to navigate to the Network Setup menu, and verify that Ethernet is enabled and set to DHCP.
2 Connect your computer to the same network as Slice. From the main status screen, press ▼ on Slice's menu joystick to display Slice's IP address on the front panel.
3 Open a web browser and navigate to Slice's IP address, or find Slice using Bonjour.
HEVC AND H.264

Slice 700 series encoders support 1080p, 60fps encoding using both HEVC and H.264 codecs. HEVC provides the most efficient encoding for both low bitrate and high quality applications, while H.264 supports a wider variety of streaming platforms and is one of the most common video codecs worldwide.
The codec can be switched between HEVC and H.264 from the Encoder Settings and Video Stream Output settings pages on the web UI, or from the Video Setup menu on the front panel.
NEED MORE HELP?
1 Support: http://support.teradek.com → Contains tips, information and all the latest firmware & software updates. TERADEK SUPPORT STAFF: support@teradek.com or call 888-941-2111 ext2 (Mon-Fri 9am to 6pm PST)
4 STREAM TO THE INTERNET
DECODER SETUP
7
1 Open Slice's web UI, then select the Video Stream Output menu if it is not already displayed.
2 Select Internet Streaming as the Stream Mode and choose a platform - Facebook, Ustream, Livestream, YouTube, Twitch - or select manual RTMP.
3 Enter your credentials and choose a channel/event, or enter the RTMP destination info and click Apply.
4 Open the Encoder settings menu and select your desired bitrate and resolution.
5 Go Live by clicking the Broadcast button 📋 or press the front panel Stream Joystick.
Ensure that Slice's encoder and decoder are on the same network. To configure:
1 Connect to Slice encoder (see previous sections) and open the web UI.
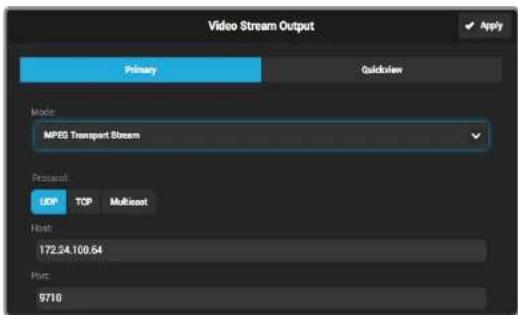
2 Open the Video Stream Output menu, then select MPEG Transport Stream as the streaming mode (the protocol value will be set to UDP by default when you select MPEG Transport Stream).
3 Enter the decoder's IP address in the Host field, then set the port, if desired. The default port is 9710.
4 Click Apply.
5 MONITOR WITH AN IOS DEVICE
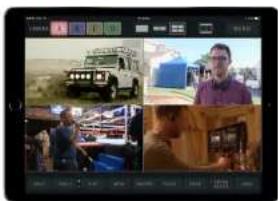
1 Download VUER from the iTunes App Store.
2 Connect your iOS device to the same network as Slice, then launch VUER.
3 From the VUER app, tap CAMERA on the upper, left hand corner, choose your device(s), then tap Done. VUER can monitor up to four devices simultaneously (iPad Air and newer).
6 RECORDING
Slice supports broadcast recording to an external USB drive. To enable recording:
1 Insert a compatible USB drive into one of the USB ports (B).
2 When prompted, select Yes to enable recording.
3 Select the recording trigger you would like to use. Recordings can be triggered from a compatible camera (ARRI/Canon, RED, or SONY), automatically when you begin a broadcast, or manually via the control dial's Select button. Once enabled, recordings are saved to the selected storage media when triggered.
You can also enable or disable recording from the web UI.
RECORDING CONSIDERATIONS
- Recordings can be manually triggered via the front panel, or by the broadcast state in Internet
Streaming mode. Each time a broadcast starts, a new recording is created. - If a broadcast is interrupted for connectivity reasons, recording continues.
- If a recorded file exceeds your storage media's file size limits, a new file will be created and recording continues.
- Recording resolution and quality matches your configured Broadcast settings.
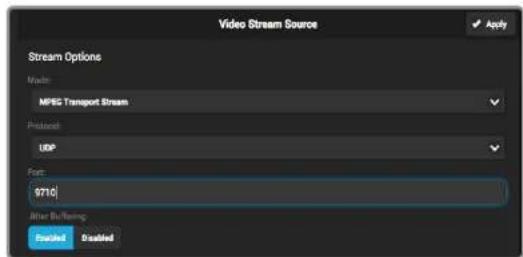
5 Connect to Slice decoder (see previous sections) and open the web UI.
6 Open the Video Stream Source menu, then select MPEG Transport Stream as the streaming mode. Adjust the protocol and port values so that they match the values entered in the Slice encoder's web UI, then click Apply.
NEED MORE HELP?
- Support: http://support.teradek.com → Contains tips, information and all the latest firmware & software updates. TERADEK SUPPORT STAFF: support@teradek.com or call 888-941-2111 ext2 (Mon-Fri 9am to 6pm PST)