
QM201901 - Screen Qian - Free user manual and instructions
Find the device manual for free QM201901 Qian in PDF.


| Product Type | LED Monitor |
| Model | QM201901 |
| Brand | Qian |
| Screen Size | 19.5 inches (16:9 aspect ratio) |
| Display Panel | TFT-LCD with LED backlight |
| Resolution | 1600 x 900 pixels |
| Brightness | 300 cd/m² (max) |
| Contrast Ratio | 1000:1 (typical) |
| Response Time | 5 ms (typical) |
| Viewing Angle | Horizontal: 160°, Vertical: 150° |
| Display Colors | 16.7 million |
| Dot Pitch | 0.276 mm |
| Video Inputs | 1x VGA, 1x HDMI |
| Audio Jack | 3.5 mm audio out (optional speakers) |
| Power Supply | External adapter; Input: 100-240V AC 50/60Hz 1.1A; Output: 12V DC 3.3A |
| Power Consumption | <23 W (typical), <0.5 W standby |
| Dimensions (with stand) | 525 x 110 x 360 mm (WxDxH) |
| Net Weight | 2.5 kg |
| Gross Weight | 3.2 kg |
| VESA Mount | 100 x 100 mm (compatible) |
| OSD Languages | 12 languages |
| Key Features | Auto adjustment, color temperature control, OSD menu, VESA DPMS power saving |
| Package Includes | Monitor with pedestal, VGA cable, power cord, user manual, warranty policy |
Frequently Asked Questions - QM201901 Qian
User questions about QM201901 Qian
0 question about this device. Answer the ones you know or ask your own.
Ask a new question about this device
Download the instructions for your Screen in PDF format for free! Find your manual QM201901 - Qian and take your electronic device back in hand. On this page are published all the documents necessary for the use of your device. QM201901 by Qian.
USER MANUAL QM201901 Qian
natural_image
Illustration of a computer monitor displaying an orange circular logo with white cross design (no text or symbols)MOD. QM201901
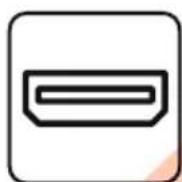
HDMI

VGA
Please read carefully before using your equipment and save it for future reference. (Page 23)
MANUAL DE USUARIO/USER MANUAL
COMPATIBILIDAD ELECTROMAGNETICA PRECAUCIONES IMPORTANTES.
1 Introducción
Función:
Auto ajuste
Color automático
Salida

3. Funcionamiento


flowchart
graph TD
    A["PICTURE"] --> B["COLOR"]
    B --> C["SIZE&POSITION"]
    C --> D["SETUP"]
    D --> E["INFORMATION"]
    F["Color Temp"] --> G["Red"]
    F --> H["Green"]
    F --> I["Blue"]




Auto Ajuste.
Col. Agua Blanca Industrial, Zapopan
Col. Agua Blanca Industrial, Zapopan
2.2 Connecting the Power and Video Signal Cables
2.3 Turning on the Equipment
2.4 Self inspection
2.5 Image adjustment
3. Operation
3.1 OSD button.
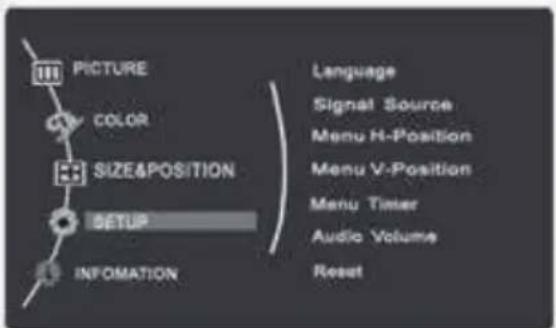
3.2 OSD menu and operation menu introduction
3.3 Precautions
3.4 Setting Display mode
4 Technical specifications
4.1 Specifications of the TFT-LCD / LED monitor
4.2 Pin assignment of signal cable
4.3 Visual inspection
5 Troubleshooting
6 Warranty
This device has been tested and meets the standards established for Class B digital devices, in accordance with Part 15 of the FCC rules. These standards are designed to provide reasonable protection against harmful interference in a residential installation. This device generates and can radiate radio frequency energy and if not installed and used in accordance with the instructions, may cause interference in radio communications.
If this device causes harmful interference to radio or television reception, which can be determined by turning the device on or off, user is encouraged to try to correct the interference by one or more of the following measures:
- Change the orientation or location of the receiving antenna.
- Increase the distance between the device and the receiver.
- Connect the device to a different output socket than the one connected to the receiver.
- Consult your dealer or an experienced Radio / TV technician for help.
CAUTION: Any changes or modifications not expressly illustrated in this manual may void the warranty.

NOTE: Any unshielded cable is not allowed to be used in the device!

WARNINGS:
- Before using this device, read the instructions in this manual.
-
Please keep the manual carefully for future reference.
-
Unplug the device from the power outlet before cleaning. Do not use liquid cleaners or Aerosol cleaners. Use a damp or wet cloth to clean. Please use LCD screen detergent for cleaning if it is still dirty.
-
Do not use parts not recommended by the manufacturer, otherwise it may cause a hazard.
-
When unplugging the power cord from the monitor or adapter, please hold the plug with your hand, do not pull the cord directly.
-
Do not place any object on the power cord, Do not trample it either.
-
Do not use the device near water sources, e.g. bathtub, basin, kitchen sink or washing machine. Do not place the device on a wet floor, or near a swimming pool, etc. Do not touch the screen with your fingers or other hard objects.
-
Slots and openings on the housing and its back or bottom are provided for ventilation. To ensure reliable operation of the components and to protect them from overheating, these openings should not be blocked or covered placing the device on a bed, sofa, rug or other similar surface. The device should never be placed near or over a radiator or heater and should not be placed in a built-in installation unless proper ventilation is provided.
-
Make sure the device is at least 5 cm away from the wall or surrounding objects when it is in use.
-
The power supply must respond to that stated on the rating plate. If you have any questions about the power supply, please refer to the dealer or local power supply provider.
-
As a safeguard measure, the monitor or adapter is equipped with a power cord with three-terminal plug, the third terminal is grounded, if the plug cannot be inserted into the outlet, please contact an electric technician for replacing the original outlet while keeping the safeguard measure in effect.
-
Ensure that the power socket and cord in use are able to take the sum of the rated currency of all the products.
-
Do not put the device at the place where user is subject to mal-function.
-
Observe all the warnings and instructions described in the manual.
-
Do not overload the power outlet or use any extension cord, otherwise it may cause fire or electric shock.
-
Do not attempt to repair this device yourself since opening or removing covers may expose you to dangerous voltage or other hazards. Refer servicing to qualified service personnel.
-
Unplug this monitor or AC adaptor from the wall outlet and refer servicing to qualified service personnel under the following conditions:
a. When the power cord or plug is damaged or worn.
b. If the device has been dropped or its housing has been damaged.
c. When the performance of the device deteriorates distinctly.
- The power cord is the main feature to turn on/off the device; unplug it if the device is not used for a long period of time.
- Store the device at a place of good ventilation; avoid strong sunlight, high temperature or humidity.
- Store the device at a place at -20^ 55^ room temperature.
Otherwise, it may cause permanent damage.
1. INTRODUCTION
1.1. General
Thank you for the purchasing of the latest LED monitor model, with the advantages of high display performance and light weight etc, meanwhile with the power saving and no-radiation features, the latest LED will bring comfortable, safe and environmental protection brand new visual experience. Your purchase and use of this product is very appreciated!
1.2. Features
- High performance intelligent multi-frequency scanning, use the active matrix, thin film transistor liquid crystal display (TFT), LED backlight.
- Micro Computer digital technology control, no radiation, no glare, built-in multimedia speaker system (optional).
• Built-in AV signal connection terminal and 8 terminal (option). - Comply with VESA DPMS International Power Saving Regulation.
- Support DDC 1/2B and Windows PNP Plug & Play.
- Microprocessor based with OSD (On Screen Display) control, be able to adjust the image to optimum.
- Built-in hoisting hole complying with International Standard (VESA), which is able to hang the display on the wall.
1.3. Packing List
Please make sure that the following items are included in your LED display before carrying out the installation:
- LED Monitor (with pedestal) • VGA signal cable, HDMI cable (option)
- Power cord cable
- User's manual / Warranty Policy
If any of the items are missing, please contact your dealer for technical support and customer service.

NOTE: Be sure to save original box and all packing material for transport in the future if needed!
2. INSTALLATION

- 1 VGA Port: Connect the VGA Signal Output Socket
- 1 HDMI Port: Connect the HDMI Signal Output Socket
- Power Input: Connect the Input of the Power Adapter to the Monitor
2.1 HDMI or VGA Input Connection
Connect the equipment cable to your monitor through the HDMI or VGA cable (depending on the case).
2.2 Connecting the Power and Video Signal Cables
Before connecting the monitor through the power and video signal cables, it is recommended to turn off your equipment (PC). Insert the corresponding cables, the power cable to the power supply, and the video signal cable to the VGA or HDMI port (depending on the case) to the video card of the computer, make sure that in any case the cables are firmly connected
2.3 Turning on the Equipment
Turn on the monitor and the computer, the LED indicator turns blue or green depending on the case, when the connection and operation is normal, if the connector turns red, please check the video cable connection.
2. INSTALLATION
2.4 Self-inspection
If the monitor inspects there is no horizontal and vertical signal, it will prompt to check the video input, please refer to the illustration below, and the monitor will enter into power saving mode after several seconds, the indicator will light red. The screen will restore the normal display once receiving video signal.

NO SIGNAL
2.5 Image adjustment
Please adjust the image according to your needs; please refer to "Operation" in section three.
3.1 OSD Button
(1) Power Switch ( ⏻ )
Digital control light-touch-switch, used for turning on or off monitor power.
(2) Power indicator
When the monitor is under normal working condition, the indicator will light green (or blue); If the monitor is under saving mode, the indicator light red or off. And the indicator will turn off under the power off mode. (When the power indicator is off, it means that the monitor is under off mode, please disconnect the power cable when the monitor is not used for safety purpose.)
(3) AUTO Button
Auto adjust / exit
(4) - Button
Select and adjust the OSD items(Decreasing the value)
(5) Menu Button
Activate OSD, enter sub menu, select items, confirm selection
(6) + Button
Select and adjust the OSD items (Increase the value)
MENU Adjustment setting:
- Press Menu into Main Function choice Menu
- Press + or - to switch the image of Main Function changing settings
-
Press Menu to switch to sub-menu changing setting and to Press + or - into this Menu.
-
Press + or - to adjust the setting
- Press AUTO to return back to Main Menu
3.2 (1) OSD menu and operation menu introduction
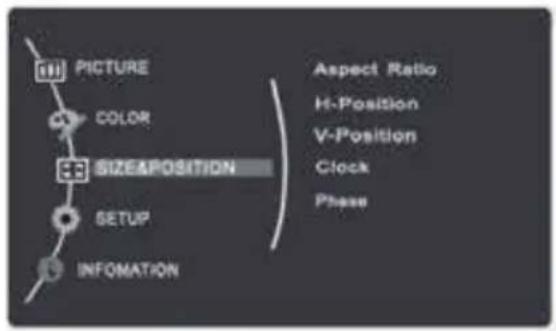
Press MENU to access the OSD menu (main menu), see the following image:

With + or - select the desired items, and then press the MENU button for adjustment, with + or - button adjust the display items to optimum, press again for confirmation and exit adjustment.
Color adjustment menu
Brightness: use + or - to adjust the brightness to optimum Contrast: use + or - to adjust the contrast to optimum Exit: Return to the previous menu.

Image adjustment menu
H-Position adjustment: Use + or - to adjust horizontal position to optimum. V-Position adjustment: Use + or - to adjust vertical position to optimum. Phase adjustment: Use + or - to adjust the focus and definition to optimum. Clock adjustment: Use + or - to adjust the clock image display to track stability
Sharpness: 1 2 3 4 5 6
Exit: Return to the previous menu

Function:
Auto adjust Auto Colour Exit

OSD Tool Adjustment Menu:
OSD H-Position adjustment: use + or - to adjust the Horizontal position.
OSD V-Position adjustment: use + or - to adjust the Vertical position.
OSD Timer: ON OFF
Exit: Back to Previous menu
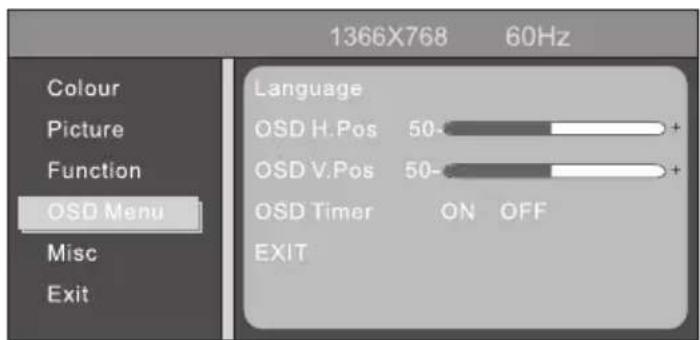
MISC:
Mode Select 4:3 16:9 Reset YES NO Volume Exit

Exit
Exit: Exit OSD menu

3. Operation
This key is digital control, which is used to activate or deactivate the display power supply.
3.2 Light Indicator
When the monitor is operating normally, the indicator light looks green (or blue); When the monitor is under power saving, the indicator light turns red or dies out, when it is turned off, the indicator light goes out, but the adapter continues on, for safety the power supply of the adapter must be cut off.
3.3 FUNCTION KEYS
3.3.1 AUTO / SELECT key
With VGA mode: Without Display menu, this key is used for automatic adjustment, under the display menu, this key is used as confirmation. In VGA + HDMI mode, this key is used to select between the VGA and HDMI signal.
3.3.2 + / - > / < key
In OSD menu, these two keys are used for scan and select menus from left or right to adjust the volume. If the monitor does not have an audio signal, the - /
3.3.3 MENU key
Menu key, used to enter the menu and exit the menu
3.4 OSD MENU
3.4.1 MAIN MENU
Item:
-
Color adjustment; 2. Image adjustment; 3. Auto adjustment;
-
Adjustment Element; 5. Others; 6. Exit.
3.4.2 Submenu
Item:
- Brightness
- Contrast ratio
- Automatic image adjustment
- Automatic color adjustment,
-
Color temperature
-
Red 7. Green 8. Blue 9. Aspect ratio
- H position 11. V position 12 Clock 13. Phase 14. Language
- Position menu H
- Position menu V
- OSD Timer
- Reset.


Show monitor information.

Adjust color

Auto Adjust.

Change the screen mode.

The monitor will be displayed out of range if the monitor exceeds the maximum resolution.
| Main Menu | Submenu | Function |
| Image | Brightness | Adjust monitor brighthness |
| Contrast | Adjust monitor contrast | |
| Automatic image adjust | Auto adjust image position | |
| Automatic image color | Auto adjust color image | |
| Color | Color temperature | Choose color temperature |
| Red | This settings can be adjusted when color temperature is selected | |
| Green | ||
| Blue | ||
| Size and position | Aspect ratio | Image aspect ratio |
| H position | Adjust horizontal image position | |
| V position | Adjust vertical image position | |
| Clock | Show the clock | |
| Phase | Adjust image phase | |
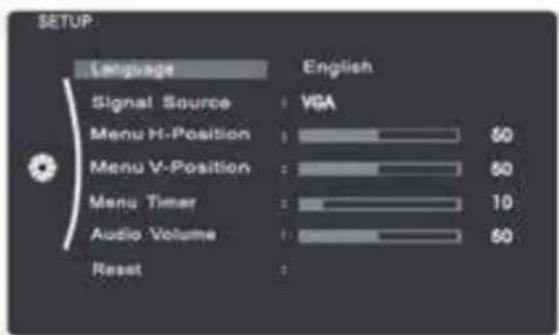
| Setup | Language | Adjust the language of the menus |
| Menu position H | Adjust the horizontal size of the menu | |
| Menu position V | Adjust the vertical size of the menu | |
| Timer menu | Adjust the timer | |
| Reset | Reset to factory settings | |
| Information | On screen information display |
3.3 Precautions
When the video signal from the computer exceeds the frequency range of monitor (refer to product specification), the micro-computer of monitor will turn off the sync signal of horizontal and vertical for the purpose of monitor protection, please refer to the illustration below. The monitor will enter saving mode after few seconds, and the power indicator will light red. Please set the output frequency of your computer within the acceptable range of monitor so that the monitor can work normally.
![[!] OUT OF RANGE](/content/2026/05/1052421/images/de5e827de3f0766d228a4005315a88ebc9dc97d54cfba533b7d43e1709440e66.jpg)
3.4 Setting of Display Mode
With standard VESA and DDC function, the monitor will scan frequency, output power, performance etc and transfer to PC after turning on when you use the video card with VESA DDC 1/2B function. And it will identify the connection mode of display and select the proper resolution.
The preset mode before leaving factory is as below:
| Mode | Resolution | Horizontal (KHz) | Vertical (KHz) |
| 1 | 640 x 400 | 31.469 | 70.087 |
| 2 | 640 x 480 | 31.469 | 59.940 |
| 3 | 640 x 480 | 37.861 | 72.809 |
| 4 | 640 x 480 | 37.500 | 75.000 |
| 5 | 720 x 400 | 31.469 | 70.087 |
| 6 | 800 x 600 | 35.156 | 56.250 |
| 7 | 800 x 600 | 37.879 | 60.317 |
| 8 | 800 x 600 | 48.077 | 72.188 |
| 9 | 800 x 600 | 46.875 | 75.000 |
| 10 | 1 024 x 768 | 48.363 | 60.004 |
| 11 | 1 024 x 768 | 56.476 | 70.069 |
| 12 | 1 024 x 768 | 58.038 | 71.918 |
| 13 | 1 024 x 768 | 60.023 | 75.029 |
| 14 | 1 024 x 768 | 48.019 | 60.000 |
| 15 | 1 024 x 768 | 47.700 | 60.000 |
| 16 | 1 152 x 864 | 67.500 | 75.000 |
| 17 | 1 280 x 800 | 49.702 | 74.900 |
| 18 | 1 280 x 800 | 62.795 | 60.000 |
| 19 | 1 366 x 768 | 47.700 | 60.000 |
| 20 | 1 280 x 1 024 | 47.700 | 60.000 |
| 21 | 1 440 x 900 | 55.000 | 60.000 |
| 22 | 1 600 x 900 | 60.000 | 60.000 |
4. TECHNICAL SPECIFICATIONS
| PANEL | |
| Aspect Ratio | 16:9 |
| Visual Area | 432 mm*239.7 mm |
| Visual Angle | H:160° V:150° |
| Resolution | 1 600*900 |
| Dot Size | 0.276 mm |
| Display Color | 16.7 M de Colors |
| Brightness (Max) | 300 cd/m2 |
| FUNCTION / OPERATION / CHARACTERISTICS / ENERGY | |
| Typical Response Time | 5 m/s |
| Typical Contrast | 1000: 1 |
| Connector | VGA/HDMI |
| Language | 12 Different Languages for the OSD |
| Mounting | VESA 100 mm*100 mm (2 mounting holes) |
| Current Input Adapter | 100 Vca - 240 Vca 50 Hz/60 Hz 1.1 A |
| Current Output Adapter | 12 Vcc 3.3 A |
| Input Voltage Monitor LED | 12 Vcc 3.3 A |
| Power Consumption | <23 W |
| Standby Power Consumption | 0.5 W |
| Audio Connection | 3.5 mm |
| ACCESSORIES / PACKAGING / WEIGHT | |
| Package Contents | Power Cable / VGA CableUser Manual / Warranty Policy |
| Product Size | 525 mm*110 mm*360 mm |
| Net Weight | 2.5 kg |
| Weight with Packaging | 3.2 kg |
4.2 Pin assignment of the signal cable
| Pin | Signal D-Sub | Pin | Signal D-Sub |
| 1 | Red | 9 | Energy DDC |
| 2 | Green | 10 | Ground |
| 3 | Blue | 11 | Ground |
| 4 | Ground | 12 | SDA/DCC |
| 5 | Test | 13 | H Sync |
| 6 | Ground red | 14 | V Sync |
| 7 | Ground green | 15 | SCL/DCC |
| 8 | Ground blue |

4.3 Visual Inspection
Even normal pixels on the LCD screen reach 99.9% or higher, there may be 0.01% or less of pixels that are displayed clearly or darkly while they are displayed.
If the monitor can not function normally, please refer to the following methods for common problems quickly, if you need help please call the distributor where you purchased the monitor.
A. There is no image of the screen / LED without Light.
Please check to see if the power cord function is securely connected to the monitor and wall outlet, and, if the display function is in power saving mode.
B. No image on the screen / Red LED light
See if the PC display card has been untied and check the connection between the signal cables and the screen.
C. The screen is not clear or the image is too long or too small
Enter the OSD image adjustment menu, and then select "Auto Adjust" to make the display to adjust automatically to optimum.
D. The image is too light or too dark.
Enter the OSD brightness adjustment menu, and then select the "Up/Down" to adjust the brightness and contrast to optimum.
E. The screen is overheated
Please keep at least 5cm around the screen for ventilation and do not place anything on the monitor.
F. Dark screen after power on / facula
This is normal. Due to the difference in temperature, the backlight will not give out light at the beginning of turning it on, but the backlight lamp will come back to work normally, after 20 minutes, the darkness and facula will disappear at this time.
G. The image is distorted to flash and shake
Check the set of the computer and choose the proper resolution, then reajust and renovate the resolution.
H. The color is abnormal
Check the connection of the signal cable, if there is no curved or broken pin, it must be replaced, enter the OSD color adjustment menu to set the display color to the optimum.
Qian S.A. de C.V., will warranty this product in all its parts and workmanship for the period of 12 months, counting from the date of purchase against defects in manufacture and operation during normal and domestic use of this product.
Qian S.A. de C.V. warranty the buyer the absence of manufacturing and operation anomalies including parts and components of the product or in relation to materials.
- This policy covers only products marketed by Qian S.A. de C.V., through its authorized distributors within the Mexican Republic and United States of America.
- For the validation of this, the defective product must be presented together with this warranty policy completely filled out and stamped by the distributor that made the sale or the invoice, receipt, or proof of purchase in the place where the product was purchased, or in the National Service Center.
| Product: | Distributor Seal |
| Date of Purchase: | |
| Model: | |
| Brand: Qian.mx |
- Qian S.A. de C.V. may use new parts, refurbished or used in good condition to repair or replace any product at no additional cost to the consumer, as long as the warranty period specified in this policy has not been completed.
- If the product does not have repair, change a similar product or superior characteristics is generated.
- The repair time will not exceed 30 calendar days from the date of receipt of the product by Qian S.A. de C.V. or its Authorized Service Center.
- Qian S.A. de C.V. will cover shipping costs required for presentation of the product within the network of authorized service centers.
Exclusions:
Qian S.A. de C.V. will not validate this warranty policy in the following cases:
- When the product has been used under normal conditions..
- When the product had not operated according to the instructions of use that accompanies it.
- When the product has been altered or repaired by unauthorized persons by Qian S.A. de C.V.
For warranty purposes, as well as procurement of components, consumable parts and accessories www.qian.mx can request information or contact any Authorized Service Center Qian S.A. de C.V.
Col. Agua Blanca Industrial, Zapopan
Col. Agua Blanca Industrial, Zapopan
AC safety warnings (Alternate Current)

WARNING: Place the monitor near an Alternating Current outlet. The AC power cord is the main means of disconnecting your monitor and should always be within reach. For your safety, the power cord included with the system is grounded. Connect the power cord only to grounded outlets to avoid the risk of electric shock.

WARNING: Always disconnect the Alternating Current power cord when installing or removing the monitor cover.

WARNING: Do not start the monitor without the cover.

WARNING: The user should not perform any type of repair of the power supply. To avoid damage to the power supply, entrust your repair or replacement to only a qualified person. The user can carry out the maintenance of the rest of the components.

WARNING: Electrostatic discharge (ESD) can damage additional cards and other components. If you do not have an ESD station, use a wrist strap attached to the metal part of the monitor.


- QM201901
- COMPATIBILIDAD ELECTROMAGNETICA PRECAUCIONES IMPORTANTES.
- Introducción
- Función:
- Funcionamiento
- Operation
- Technical specifications
- Troubleshooting
- Warranty
- WARNINGS:
- INTRODUCTION
- General
- Features
- Packing List
- INSTALLATION
- HDMI or VGA Input Connection
- Connecting the Power and Video Signal Cables
- Turning on the Equipment
- Self-inspection
- Image adjustment
- OSD Button
- Power Switch ( ⏻ )
- Power indicator
- AUTO Button
- - Button
- Menu Button
- + Button
- MENU Adjustment setting:
- (1) OSD menu and operation menu introduction
- Color adjustment menu
- Image adjustment menu
- Function:
- OSD Tool Adjustment Menu:
- MISC:
- Exit
- Light Indicator
- FUNCTION KEYS
- AUTO / SELECT key
- + / - > / < key
- MENU key
- OSD MENU
- MAIN MENU
- Submenu
- Precautions
- Setting of Display Mode
- TECHNICAL SPECIFICATIONS
- Pin assignment of the signal cable
- Visual Inspection
- Exclusions:
Brand : Qian
Model : QM201901
Category : Screen