
R9829997 - Projector accessory Barco - Free user manual and instructions
Find the device manual for free R9829997 Barco in PDF.


| Product Type | Projector Accessory (Lens Safety Cable Kit) |
| Brand | Barco |
| Model | R9829997 |
| Kit Contents | Safety cable (750 mm, ∅3 mm), cable clamp M4, shackle 7x70 mm, 20× cable clips (16×16 mm, ∅4 mm) |
| Applicable Projectors | UDX, UDM, XDL, HDX, HDF, RLM series and variants |
| Configurations | A, B, C depending on carrying handle/hoisting eye and lens barrel length |
| Safety Purpose | Secures lens when projector is mounted above people |
| Weight Capacity | Suitable for lenses over 11 kg (e.g., TLD+ Ultra 0.8–1.16) |
| Cable Length | 750 mm |
| Cable Diameter | 3 mm |
| Material | Steel cable, plastic clips, metal shackle |
| Tools Required | 10 mm Allen wrench for XDL projectors |
| Additional Parts (XDL) | XDL safety cable bracket kit (not included) |
| Mounting Points | Carrying handles, rigging frame bars, hoisting eyes, fixation rings |
| Installation | Refer to manual sections 1.2–1.7 for detailed steps |
| Usage | Professional event projection |
Frequently Asked Questions - R9829997 Barco
User questions about R9829997 Barco
0 question about this device. Answer the ones you know or ask your own.
Ask a new question about this device
Download the instructions for your Projector accessory in PDF format for free! Find your manual R9829997 - Barco and take your electronic device back in hand. On this page are published all the documents necessary for the use of your device. R9829997 by Barco.
USER MANUAL R9829997 Barco
TLD+ Zoom Lens Safety Cable
natural_image
Product photo of a wire harness with attached clips and a grid of square buttons (no text or symbols visible)Installation Manual
The lens safety cable
1
When to use the safety cable?
The lens safety cable must be used in any circumstance where the projector is mounted above people. [to secure the mounted lens in the lens holder.
Why replace the existing safety cable?
Up until recently, all lenses for event projectors weighed 7 kg or less. The lens safety cable included with events projector was able to secure every single lens available in the Barco gamma.
Due to the release of the TLD+ Ultra 0.8–1.16 lens, there are now lenses available that weigh more than 11 kg, which this safety cable can no longer support in a safe fashion.
In order to safely handle all lenses that are available, a new safety cable must be used, which is install the lens in a new fashion.
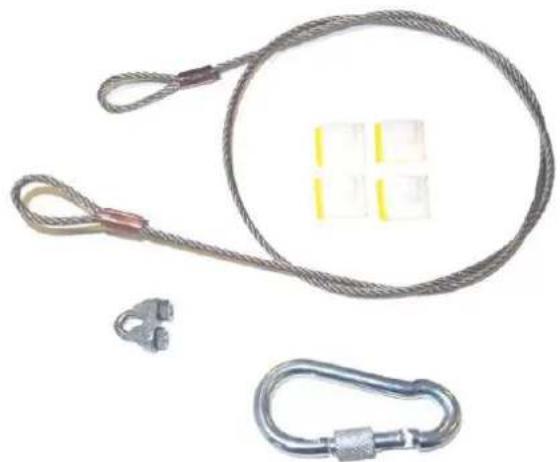
Content of the kit
• Safety Cable (750 mm, ∅3 mm)
- Cable clamp M4
- Shackle 7x70 mm
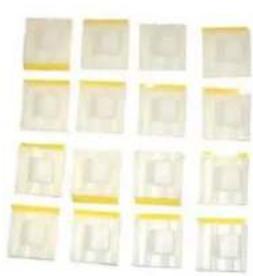
• 20 x Cable clip (16x16 mm, ∅4 mm)
The lens safety cable
natural_image
Grid of 16 identical white rectangular objects with yellow borders, arranged in two rows (no text or symbols visible)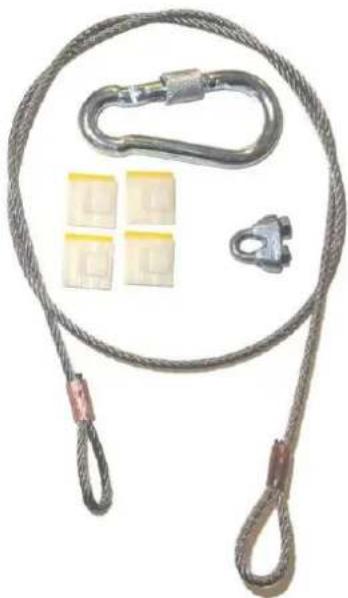
natural_image
Coiled rope with attached metal chain, four yellow plastic clips, and a separate clamp (no text or symbols)Image 1-1
1.1 Configuration differences
Configuration differences
There are three different configurations for the safety cable. The configuration used depends on the used carrying handle or hoisting eye and on the length of lens used.
Configuration A applies to the following setups:
- All UDX projectors and variants, when connecting to the bottom bar of the rigging frame.
- All UDM projectors and variants, when connecting to the bottom bar of the rigging frame.
• All XDL projectors and variants. - All HDX projectors and variants, when connecting to the bottom carrying handle.
- All HDF projectors and variants, when connecting to the bottom carrying handle.
- All RLM projectors
Configuration B applies to the following setups:
- All UDX projectors and variants, when connecting to the upper bar of the rigging frame.
- All UDM projectors and variants, when connecting to the upper bar of the rigging frame.
- All HDX projectors and variants, when connecting to the top carrying handle.
- All HDF projectors and variants, when connecting to the HDF hoisting eye.
• All RLM projectors
Configuration C applies to all projectors, but is only applicable for lenses with a very short barrel.
1.2 Mounting the safety cable to the lens

CAUTION: This procedure is only applicable for configurations A & B. For configuration C, see "Mounting the safety cable to a short barrel lens", page 8.
How to mount the cable
- Paste four cable clips on the lens as illustrated (reference 1). Orient the open side of the clips towards the front of the lens.
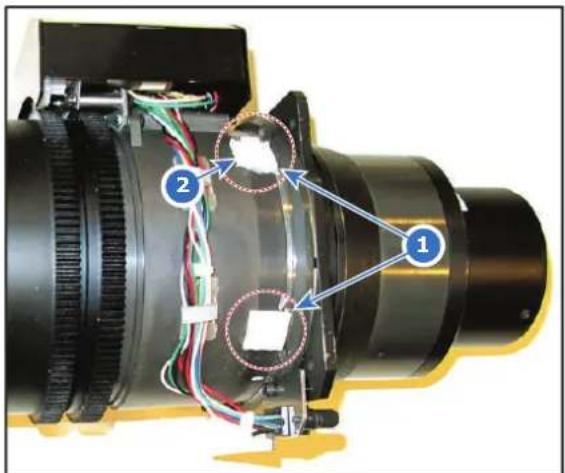
Image 1-2
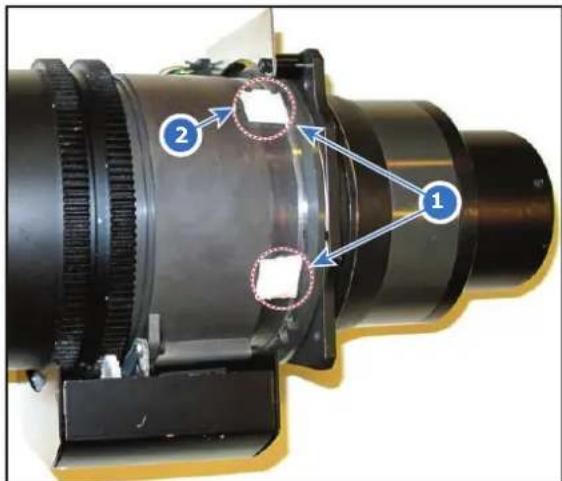
Image 1-3
-
Snap the first loop end of the safety cable into one of the following clips and let the loop end point downwards.
-
Configuration A: Use the upper clip on the side of the cable bundle (reference 2, Image 1-2).
-
Configuration B: Use the upper clip on the non-wired side (reference 2, Image 1-3).
-
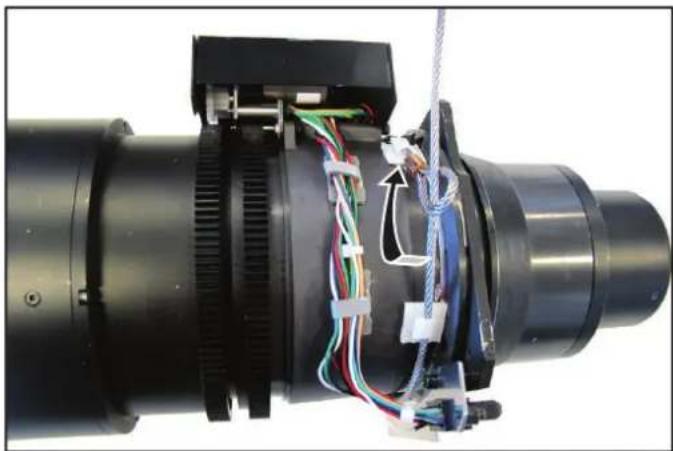
Slide the rest of the cable around the lens counterclockwise. Click the cable into every clip it passes in this loop.

Note: Make sure the cable passes between the lens and the cable bundle.
- Slide the cable through the loop end at the beginning of the cable.
natural_image
Close-up of a mechanical assembly with visible wiring and components (no text or symbols)Image 1-4: Example of configuration A
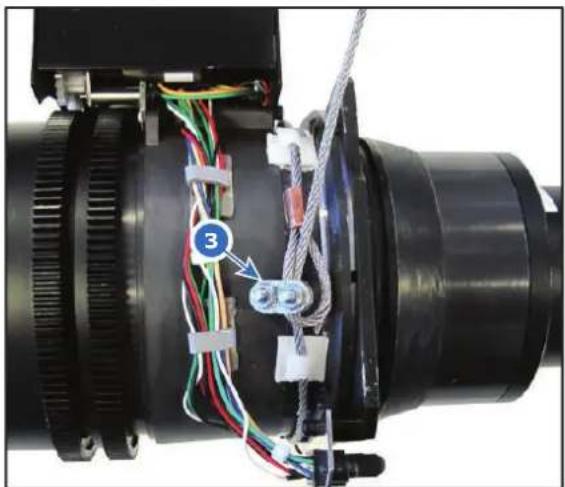
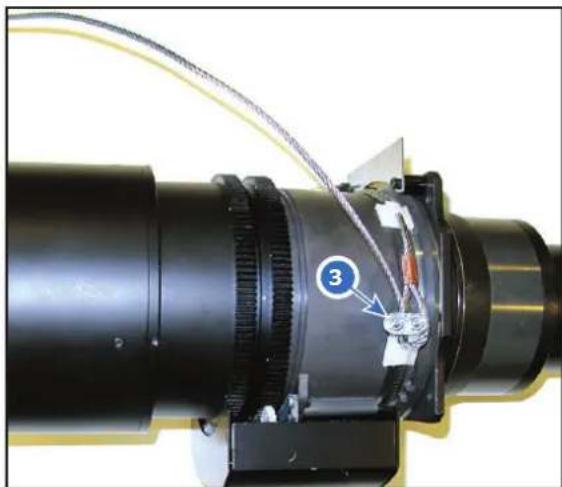
- Install a U-bolt on the lens holder, with the open ends oriented outwards (reference 3). Make sure that both a part of the loop end and the outgoing part of the safety cable are placed in the enclosure.
natural_image
Close-up of a mechanical assembly with colored wires and connectors, no visible text or symbolsImage 1-5: Example of Configuration A
natural_image
Close-up of a mechanical optical component with labeled parts (3), showing internal structure and wiring (no readable text or symbols)Image 1-6: Example of Configuration B
- Close the U-bolt and tighten it.
Note: Make sure the safety cable is tightened around the lens before tightening the U-bolt nuts.
- Place the shackle through the free loop end of the safety cable.
1.3 Mounting the safety cable to a short barrel le

CAUTION: This procedure is only applicable for Configuration C. For configurations A & B, see "Mounting the safety cable to the lens", page 6.
How to mount the cable
- Paste two cable clips on both sides of the lens as illustrated (reference 1). Orient the open side of the clips towards the outside of the lens.
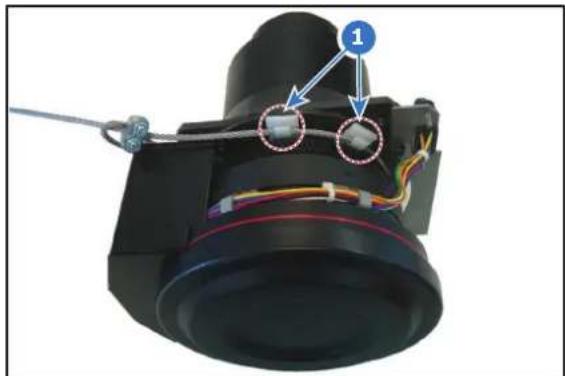
natural_image
Close-up of a camera lens assembly with visible wiring and components (no text or symbols)Image 1-7
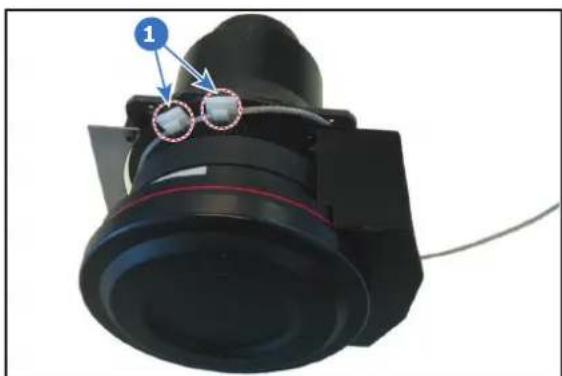
natural_image
Close-up of a black mechanical component with a blue circular annotation and red border, showing no visible text or symbols.Image 1-8
- Paste two extra cable clips on the motor block of the lens. Orient the open side to the outside of the lens.
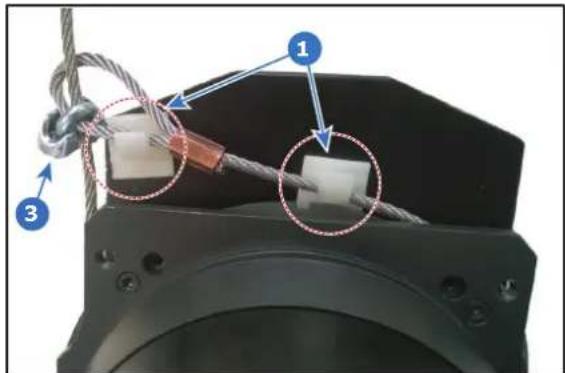
Image 1-9
- Carefully slide the safety cable through the cable clips. Make sure the cable is placed between the motor block and the cover plate.
- Slide the cable through the loop end at the beginning of the cable.
- Mount a U-bolt on the cable, with the open ends oriented outwards (reference 3, Image 1-9). Make sure that both a part of the loop end and the outgoing part of the safety cable are placed in the enclosure.
- Close the U-bolt and tighten it.

Note: Make sure the safety cable is tightened around the lens before tightening the U-bolt nuts.
The result should look similar to the following example.
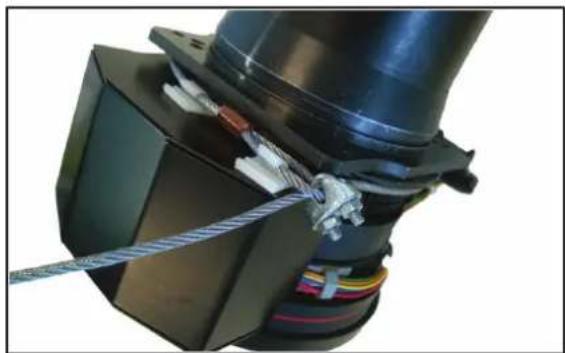
natural_image
Close-up of a mechanical assembly with a black component and coiled cable (no visible text or symbols)Image 1-10
1.4 Installing the lens with safety cable on an HC UDX or UDM projector

This procedure assumes you know how to install a lens into the projector. If not, refer to the installation manual of the projector.
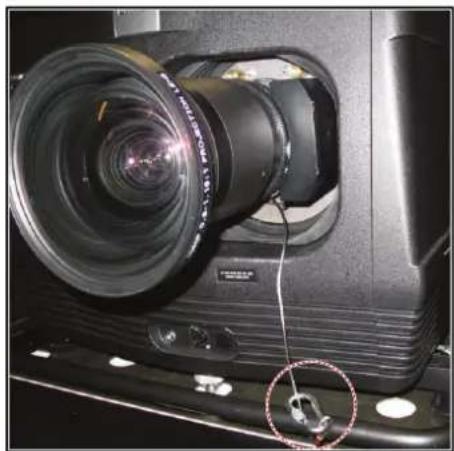
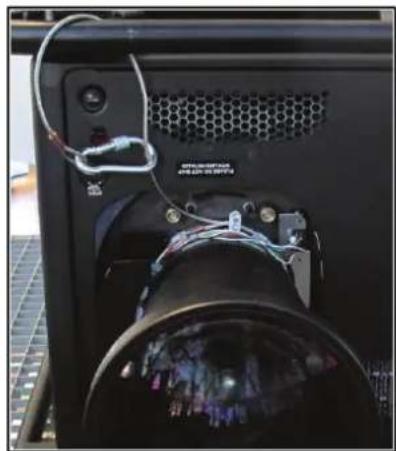
How to install on HDX, UDX and UDM projectors
- Place the lens in the lens holder, using the lens locking mechanism.

Caution: Always make sure the lens is really secured by trying to pull the lens out of the lens holder.
- Lead the cable end with the shackle around one of the following carrying handles or rigging frame bar:
- Configuration A: Around the bottom carrying handle or rigging frame bar.
- Configuration B: Around the top carrying handle or rigging frame bar.
- Configuration C: Around the top carrying handle or rigging frame bar.
-
Snap the shackle to the straight part of the cable.
-
Secure the shackle by screwing the safety ring of the shackle over the open end.
natural_image
Close-up of a projector with lens and cable, showing no visible text or symbolsImage 1-11: Example using the bottom carrying handle on an HDX
natural_image
Close-up of a black cylindrical device with attached wires and a sensor array, mounted on a metal frame (no visible text or symbols)Image 1-12: Example using the top carrying handle on and HDX
1.5 Installing the lens with safety cable on an XC projector

This procedure assumes you know how to install a lens into the projector. If not, refer to the installation manual of the projector.
Required tools
Allen wrench 10 mm
Required parts
XDL safety cable bracket kit
How to install on XDL projectors
-
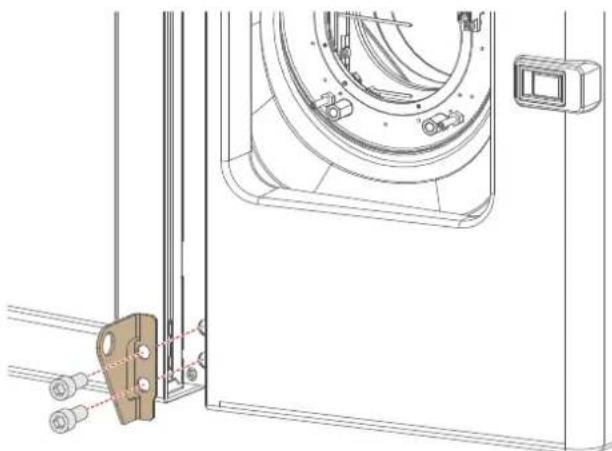
Make sure the transport protection bars are removed from the projector. If not, refer to the installation manual of the projector.
-
Mount the lens safety cable bracket onto the projector frame. Mount it on the place where the transport protection bar used to be. Use a 10 mm Allen wrench.
natural_image
Technical line drawing of a mechanical assembly with mounting bracket and housing (no text or symbols)Image 1-13
- Place the lens in the lens holder, using the lens locking mechanism.

Caution: Always make sure the lens is really secured by trying to pull the lens out of the lens holder.
-
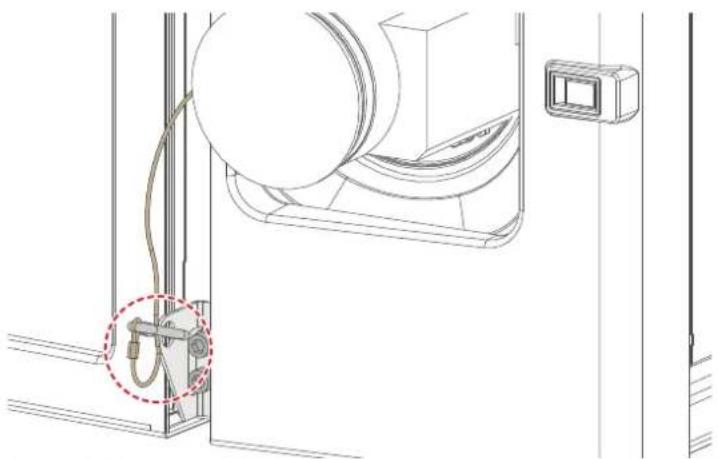
Snap the shackle through the fixation ring of the safety cable bracket.
-
Secure the shackle by screwing the safety ring of the shackle over the open end.
The lens safety cable
natural_image
Technical line drawing of a mechanical assembly with a zoomed-in detail view (no text or symbols)Image 1-14
1.6 Installing the lens with safety cable on an HD projector

This procedure assumes you know how to install a lens into the projector. If not, refer to the installation manual of the projector.
How to install on HDF projectors
- Place the lens in the lens holder, using the lens locking mechanism.

Caution: Always make sure the lens is really secured by trying to pull the lens out of the lens holder.
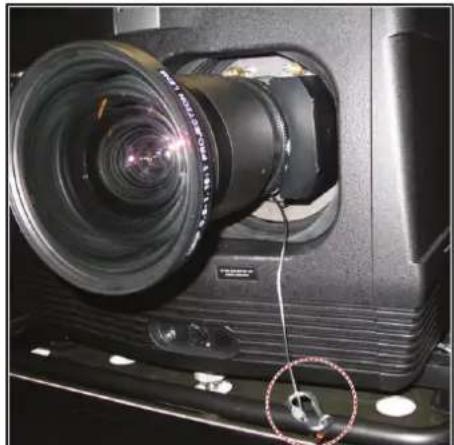
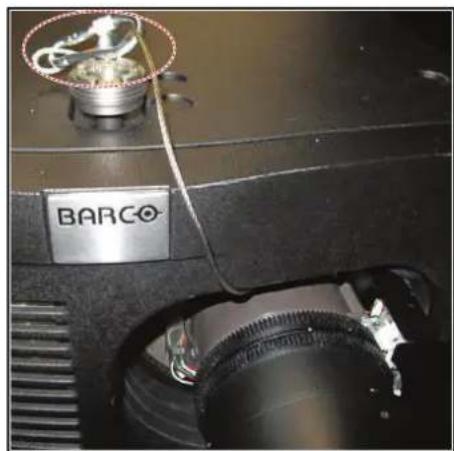
- Lead the cable end with the shackle around one of the following carrying handles:
- Configuration A: Around the bottom carrying handle.
- Configuration B: Through the front hoisting eye on the top plate.
- Configuration C: Around the bottom carrying handle or the front hoisting eye on the top plate.

Tip: Temporarily remove the shackle to allow the cable to slide through the hoisting eye.
-
Snap the shackle to the straight part of the cable.
-
Secure the shackle by screwing the safety ring of the shackle over the open end.
natural_image
Close-up of a projector with lens and cable, showing internal components and a red circle highlighting a small object (no text or symbols visible)Image 1-15: Example using the bottom carrying handle
natural_image
Close-up of a mechanical component with a metallic component and a label marked 'BARCO' (no readable text or symbols beyond the label)Image 1-16: Example using the hoisting eye
1.7 Installing the lens with safety cable on an RL projector

This procedure assumes you know how to install a lens into the projector. If not, refer to the installation manual of the projector.
How to install on RLM projectors
- Place the lens in the lens holder, using the lens locking mechanism.

Caution: Always make sure the lens is really secured by trying to pull the lens out of the lens holder.
-
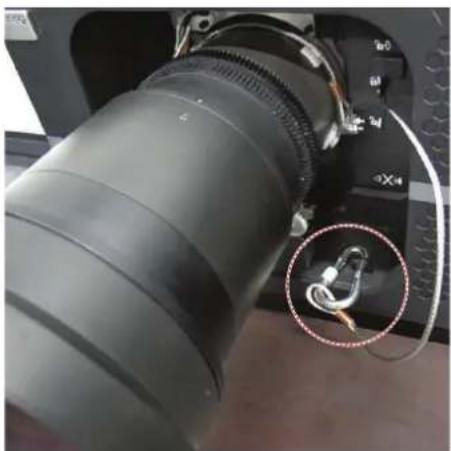
Snap the shackle through the fixation ring near the lens opening.
-
Secure the shackle by screwing the safety ring of the shackle over the open end.
natural_image
Close-up of a DSLR camera lens with a highlighted cable connector (no text or symbols visible)Image 1-17: Example using the fixation ring
- TLD+ Zoom Lens Safety Cable
- The lens safety cable
- 1
- When to use the safety cable?
- Why replace the existing safety cable?
- Content of the kit
- Configuration differences
- Configuration differences
- Mounting the safety cable to the lens
- How to mount the cable
- Mounting the safety cable to a short barrel le
- Installing the lens with safety cable on an HC UDX or UDM projector
- How to install on HDX, UDX and UDM projectors
- Installing the lens with safety cable on an XC projector
- Required tools
- Required parts
- How to install on XDL projectors
- Installing the lens with safety cable on an HD projector
- How to install on HDF projectors
- Installing the lens with safety cable on an RL projector
- How to install on RLM projectors
Brand : Barco
Model : R9829997
Category : Projector accessory