
CDX-424RF - Mobile Device Charger SONY - Free user manual and instructions
Find the device manual for free CDX-424RF SONY in PDF.


| Product Type | Mobile Device Charger |
| Brand | Sony |
| Model | CDX-424RF |
| Dimensions (L x W x H) | Approximately 10 cm x 5 cm x 2 cm |
| Weight | Approximately 100 g |
| Input Voltage | 100-240 V AC, 50/60 Hz |
| Output Voltage | 5 V DC |
| Output Current | 2.1 A (max) |
| Number of USB Ports | 2 |
| Charging Technology | Smart IC with auto-detection |
| Compatible Devices | Smartphones, tablets, and other USB devices |
| Protection Features | Overcurrent, overvoltage, short circuit, and temperature protection |
| Material | Fire-resistant ABS plastic |
| LED Indicator | Yes, blue LED for power status |
| Cable Length | 1.2 m (detachable) |
| Operating Temperature | 0°C to 40°C |
| Storage Temperature | -20°C to 60°C |
| Humidity Range | 10% to 90% (non-condensing) |
| Certifications | CE, FCC, RoHS |
| Maintenance | Wipe with a dry cloth; do not use liquids |
| Safety Instructions | Do not expose to water or high temperatures; use only with compatible devices |
| Spare Parts Availability | Contact Sony support for replacement cables or adapters |
| Repairability | Not user-serviceable; refer to authorized service centers |
| Warranty | 1 year limited warranty |
Frequently Asked Questions - CDX-424RF SONY
User questions about CDX-424RF SONY
0 question about this device. Answer the ones you know or ask your own.
Ask a new question about this device
Download the instructions for your Mobile Device Charger in PDF format for free! Find your manual CDX-424RF - SONY and take your electronic device back in hand. On this page are published all the documents necessary for the use of your device. CDX-424RF by SONY.
USER MANUAL CDX-424RF SONY
Compact Disc Changer System
Operating Instructions GB
For installation and connections, see the supplied installation/connections manual.
Thank you for purchasing the SONY CD changer system. This unit lets you enjoy CD sound with the changer.
You can use this unit with the FM receiver of your car audio.
Table of contents
Getting Started
Resetting the hideaway unit 4
Preparing the CD changer .... 4
Changing the transmitting frequency .... 5
CD Changer
Listening to a CD 6
Playing tracks in random order — Shuffle Play .... 7
Playing tracks repeatedly — Repeat Play .... 7
Changing the output level 7
Additional Information
Precautions 8
Notes on compact discs 8
Maintenance 8
Location of controls 9
Specifications 10
Troubleshooting guide 11
Index 12
Getting Started
Resetting the hideaway unit
Before operating the unit for the first time or after replacing the car battery, you must reset the hideaway unit.
Press the RESET button with a pointed object, such as a ballpoint pen.

Preparing the CD changer
1
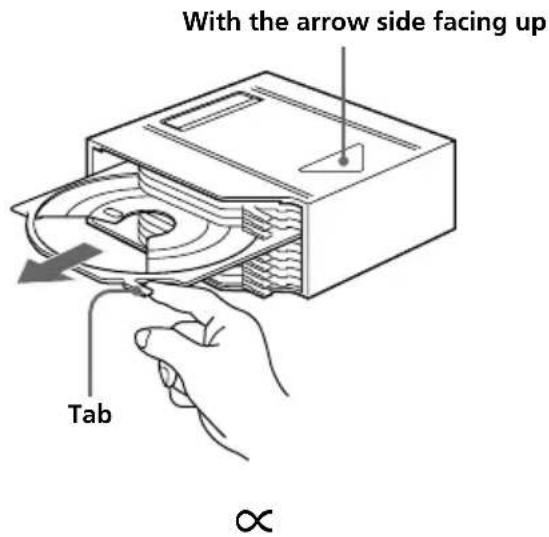
Labelled surface up

2

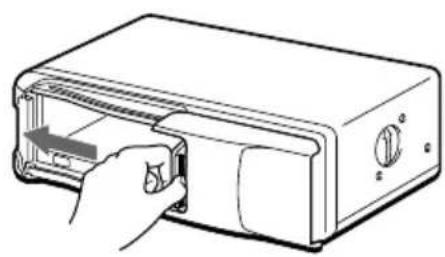
Release, and slide open

natural_image
Line drawing of a hand inserting a device into a microwave oven (no text or symbols)

4
natural_image
Line drawing of a hand inserting a card into a microwave oven (no text or symbols)Use the supplied disc magazine or the disc magazine XA-250. The disc magazine XA-10B can not be used with this unit. If you use any other magazine, it may cause a malfunction.
Notes
- To listen to an 8 cm CD, use the separately sold Sony CD, adapter CSA-8. Be sure to always use the specified adapter, as failing to do so may cause a malfunction of the unit. If you use any other adapter, the unit may not operate properly. When using the Sony CD adapter, make sure that the three catches on the adapter are firmly latched onto the 8 cm CD.
- Do not insert the Sony CD adapter CSA-8 in the magazine without a disc, malfunction may result.
If the disc magazine does not lock properly
Take out the disc magazine, press ⒽEJECT, and reinsert it.
Use the unit with the door closed
Otherwise, foreign matter may enter the unit, and contaminate the lenses inside the CD changer.
Notes on the disc magazine
- Do not leave the disc magazine in locations with high temperatures and high humidity, such as on a car dashboard or in the rear window where the disc magazine will be subjected to direct sunlight.
- Do not place more than one disc at a time onto a tray, otherwise the changer and the discs may be damaged.
- Do not drop the disc magazine or subject it to a violent shock.
When the tray comes out
Normally, the trays will not come out of the magazine. However, if they are pulled out of the magazine, it is easy to re-insert them.

natural_image
Diagram of a device with a triangular play button and a circular component, no text or symbols presentWith the cut-away portion of the tray facing you, insert the right corner of the tray in the slot, then push in the left corner until it clicks.
Note
Do not insert the tray upside down or in the wrong direction.
Changing the transmitting frequency
Because this unit processes CD playback sound through an FM tuner, there may be interference noise during CD playback. In this case change the frequency of the modulated RF signal transmitted from hideaway unit. The initial setting is 88.3 MHz.
1 Press REP for two seconds until frequency appears.
2 Press either the left or right side of AMS to select the frequency.
Each time you press AMS, the frequency changes as follows:
:88.3 MHz89.9 MHz89.7 MHz
89.5 MHz → 89.3 MHz → 89.1 MHz →
88.9 MHz → 88.7 MHz → 88.5 MHz →
88.3 MHz
▶▶▶: 88.3 MHz → 88.5 MHz → 88.7 MHz →
88.9 MHz → 89.1 MHz → 89.3 MHz →
89.5 MHz → 89.7 MHz → 89.9 MHz →
88.3 MHz
3 Press REP for two seconds.
Note
Be sure to set the frequency of your FM tuner to that of the newly selected frequency.
CD Changer
Listening to a CD
1 Turn on the FM tuner of the car audio.
2 Adjust the selected transmitting frequency with the wired remote.
(88.3 MHz/88.5 MHz/88.7 MHz/88.9 MHz/89.1 MHz/89.3 MHz/89.5 MHz/89.7 MHz/89.9 MHz)
3 Press ▶II.
CD playback starts.
When the unit is used in a car without an accessory position on the ignition switch Be sure to press OFF on the wireless remote to turn the system off to avoid battery wear while the engine is not running.
If the POWER SELECT switch on the hideaway unit is set to the OFF position and the display on the wired remote is turned off, you will not be able to start CD playback with the wireless remote. In this case, press ▶II on the wired remote.
4 Adjust the volume with the volume control on the car audio.
All the tracks play from the beginning.
Locating a specific track
— Automatic Music Sensor (AMS)
During playback, press either side of AMS once for each track you wish to skip.
To locate previous tracks

To locate succeeding tracks
Locating a specific point in a track
— Manual Search
During playback, press and hold DISC+ or DISC-. Release the button when you have found the desired part.
To search forward

To search backward
Locating a specific disc
— Disc Select
During playback, press DISC+ or DISC- once for each disc you wish to skip.
To locate succeeding discs

To locate previous discs
Stopping CD play
Press OFF.
Notes
- When CD playback is stopped, you may hear some noise from the speakers. To prevent this from happening, turn the volume down before stopping CD playback.
- If you turn off the ignition switch of your car without stopping CD playback, it will automatically resume CD playback from where it was stopped when you turn on the ignition switch again.
Listening to the radio or a tape
Be sure to stop CD playback before you start listening to the radio or a tape.
Note
Be sure to stop CD playback, otherwise there may be some interference with radio reception.
Playing tracks in random order — Shuffle Play
You can select:
- SHUF 1 to play the tracks on the current disc in random order.
- SHUF 2 to play all the discs in random order.
Press SHUF repeatedly until the desired setting appears (SHUF 1 or SHUF 2).

Shuffle play starts.
To go back to the normal playback mode, press SHUF until "SHUF" disappears.
Playing tracks repeatedly
— Repeat Play
You can select:
- REP 1 to repeat the track.
- REP 2 to repeat the disc.
Press REP repeatedly until the desired setting appears (REP 1 or REP 2).

flowchart
graph LR
    A["REP 1"] --> B["REP 2"] --> C["Cancel (REP off)"]
Repeat play starts.
To go back to the normal playback mode, press REP until "REP" disappears.
Changing the output level
You can select the output level from the CD changer. Normally the system is used in the initial output level; change the level if necessary.
1 Press REP for two seconds.
2 Press REP momentarily.

Initial setting
3 Press either the left or right side of AMS to select the output level.
To decrease the output level

To increase the output level

4 Press REP for two seconds.
Additional Information
Precautions
- If your car was parked in direct sunlight resulting in a considerable rise in temperature inside the car, allow the system to cool off before operating it.
- If no power is being supplied to the system, check the connections first. If everything is in order, check the fuse.
- Avoid installing the CD changer, wireless remote, and wired remote in places:
— subject to temperatures exceeding 55°C.
— subject to direct sunlight.
— near heat sources (such as heaters).
— exposed to rain or moisture.
— exposed to excessive dust or dirt.
— subject to excessive vibration.
If you have any questions or problems concerning your unit that are not covered in this manual, please consult your nearest Sony dealer.
Notes on compact discs
A dirty or defective disc may cause sound drop-outs during playback. To enjoy optimum sound, handle the disc as follows.
Handle the disc by its edge, and do not touch the unlabelled surface.
This way

natural_image
Line drawing of a hand pressing down on a circular object (no text or symbols)Do not stick paper or tape on the discs.
Not this way
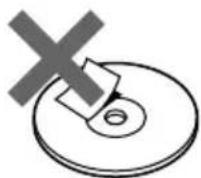
Do not expose the discs to direct sunlight or heat sources such as hot air-ducts. Do not leave discs in a car parked in direct sunlight where there can be a considerable rise in the temperature inside the car.

Before playing, clean the discs with an optional cleaning cloth. Wipe each disc in the direction of the arrows.
Do not use solvents such as benzine, thinner, commercially available cleaners, or antistatic spray intended for analog discs.
This way

natural_image
Illustration of hands using a tool to cut a circular object with arrows indicating direction (no text or symbols)Moisture condensation
On a rainy day or in a very damp area, moisture may condense on the lenses inside the unit, and the unit will not operate properly. In this case, remove the disc magazine and wait for about an hour until the moisture has evaporated.
Maintenance
Fuse replacement
If the fuse blows, check the power connection and replace the fuse. If the fuse blows again after replacement, there may be an internal malfunction. In this case, consult your nearest Sony dealer.
Warning
Use the specified amperage fuse.
Use of a higher amperage fuse may cause serious damage.
Location of controls
Wired remote (RM-X64)
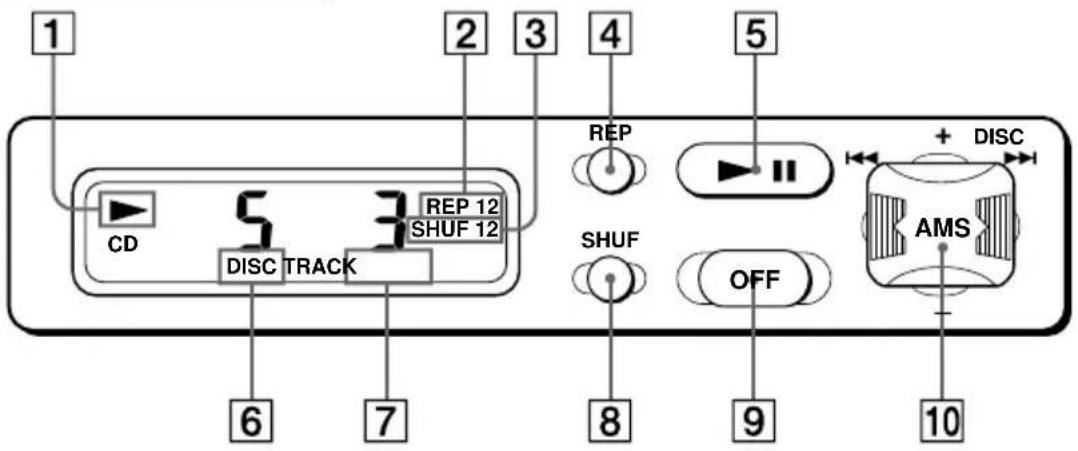
Refer to the pages for details.
1 ▶ (play/pause) indication
Lights during CD playback and flashes when the pause button is pressed.
2 REP (repeat play) indication
3 SHUF (shuffle play) indication
4 REP (repeat play/control mode set) button 5, 7
5 ▶II (play/pause) button 6
If pressed during playback, the CD will pause. If pressed again, playback will continue.
6 DISC (disc number) indication
7 TRACK (track number) indication
8 SHUF (shuffle play) button 7
9 OFF button 6
10 AMS/DISC (Automatic Music Sensor/manual search/disc select) button 5, 6, 7
Specifications
CD changer (CDX-424RF)
System Compact disc digital audio system
Frequency response 10 - 20,000 Hz
Wow and flutter Less than measurable limit
Signal-to-noise ratio 94 dB
Output terminals BUS control output
terminal (8 pin)
Analog audio output
terminal (RCA pin)
Current drain 800 mA (at playback)
800 mA (at disc loading / ejecting)
Operating temperature -10^ to +55^
Dimensions Approx. 262 · 90 · 181.5
mm (w/h/d)
Mass Approx. 2.1 kg
Hideaway unit
Frequency 88.3 MHz/88.5 MHz/
88.7MHz/88.9MHz/
89.1 MHz/89.3 MHz/
Wired remote (RM-X64)
Dimensions Approx.
148 · 30 · 15 mm
(w/h/d)
Mass Approx. 120 g
General
Supplied accessories Disc magazine (1)
Parts for installation and
connections (1 set)
Optional accessories CD single adaptor CSA-8
Disc magazine XA-250
Design and specifications are subject to change without notice.
Troubleshooting guide
The following checklist will assist in the correction of most problems which you may encounter with your unit.
Before going through the checklist below, refer to the connection and operating procedures.
General
| Problem | Cause/Solution |
| The unit does not function. | • The built-in micro computer has malfunctioned.→Press the RESET button on the hideaway unit.• The connecting cords are not connected properly. |
| The sound skips. | • The CD changer is installed in an unstable location.→Re-install it in a stable location.• The Disc(s) is dirty or defective.→Clean or replace it (them). |
| The disc magazine is not locked in changer. | Take out the disc magazine, press EJECT, and reinsert the disc magazine until it is locked securely. |
Error displays
The following indication will flash for about five seconds.
| Display Cause | Solution | |
| E-01 | The disc magazine is not inserted in the CD changer. | Insert the disc magazine with discs into the CD changer. |
| E-02 | No disc is inserted in the disc magazine. | Take out the magazine and insert a disc(s). |
| E-04 | The disc is dirty. | Clean the disc. |
| The disc is inserted upside down. | Insert the disc correctly. | |
| E-99 | The CD changer cannot be operated because of some problem. | Press the RESET button of the hideaway unit. |
If the solutions mentioned above do not help to improve the situation, consult your nearest Sony dealer.
Index
A, B, C, D, E
CD playback 6
Change
Frequency 5
Output level 7
F, G, H, I, J, K, L, M, N
Fuse 8
O, P, Q
Output level 7
R
Radio 5
Repeat play 7
Reset 4
s
Shuffle play 7
T, U, V
Tape play 6
W, X, Y, Z
Wired remote 9
¡Bienvenido!
natural_image
Illustration of a hand using a CD to disassemble or rotate into a CD inside a box (no text or symbols)natural_image
Line drawing of a hand inserting a component into a microwave oven (no text or symbols)3

natural_image
Line drawing of a hand inserting a component into a device (no text or symbols)natural_image
Simple line drawing of a computer monitor and a circular device with a scroll wheel (no text or symbols)natural_image
Simple line drawing of a hand pressing down on a circular object (no text or symbols)natural_image
Illustration of a CD, stacked books, and a cross symbol (no text or labels)natural_image
Illustration of hands using a tool to cut a circular component with arrows indicating direction (no text or symbols)- Compact Disc Changer System
- Table of contents
- Getting Started
- CD Changer
- Additional Information
- Resetting the hideaway unit
- Preparing the CD changer
- Notes
- If the disc magazine does not lock properly
- Use the unit with the door closed
- Notes on the disc magazine
- When the tray comes out
- Note
- Changing the transmitting frequency
- Press REP for two seconds until frequency appears.
- Press either the left or right side of AMS to select the frequency.
- Press REP for two seconds.
- Listening to a CD
- Locating a specific track
- Locating a specific point in a track
- Locating a specific disc
- Stopping CD play
- Listening to the radio or a tape
- Playing tracks in random order — Shuffle Play
- Playing tracks repeatedly
- — Repeat Play
- Changing the output level
- Precautions
- Notes on compact discs
- Moisture condensation
- Maintenance
- Fuse replacement
- Warning
- Location of controls
- Specifications
- CD changer (CDX-424RF)
- Hideaway unit
- Wired remote (RM-X64)
- General
- Troubleshooting guide
- Error displays
- Index
- R
- s
- ¡Bienvenido!
Brand : SONY
Model : CDX-424RF
Category : Mobile Device Charger