ZJ7000SJSS - Warming Drawer Monogram - Free user manual and instructions
Find the device manual for free ZJ7000SJSS Monogram in PDF.


| Product Type | Electric Warming Drawer |
| Brand | Monogram |
| Model Number | ZJ7000SJSS |
| Installation | Built-in under counter |
| Maximum Load | 50 lbs (22.7 kg) |
| Temperature Range | Proof: 75–95°F (24–35°C) Low: 140–160°F (60–71°C) Med: 160–195°F (71–91°C) High: 195–230°F (91–110°C) |
| Control Type | Rotary knob with ON/OFF switch |
| Moisture Control | Adjustable vent (open for crisp, closed for moist) |
| Interior Light | ON signal light visible through drawer front when closed |
| Rack Included | Yes, wire rack for double stacking |
| Exterior Material | Stainless steel |
| Interior Material | Painted or enameled surfaces |
| Power Supply | 120V, 60 Hz AC |
| Warranty | 1 year limited parts and labor |
| Safety Features | Anti-tip brace required; do not line with foil; use dry pot holders |
| Cleaning Instructions | Warm soapy water for painted surfaces; stainless steel cleaner for exterior; removable control knob for easy cleaning |
| Accessories Available | 27" Custom Panel Kit ZXD27B, 30" Custom Panel Kit ZXD30B, Wire Rack WB48X10045, Stainless Steel Cleaner |
| Repair Service | GE Factory Service or authorized servicers; call 800.444.1845 (USA) or 1.888.880.3030 (Canada) |
| Proofing Feature | Yes, for yeast dough (75–95°F) |
| Crisping Feature | Yes, for stale items; use LOW setting with vent open |
| Preheat Time | LOW: 8 min, MED: 15 min, HIGH: 20 min (not required for proofing) |
Frequently Asked Questions - ZJ7000SJSS Monogram
User questions about ZJ7000SJSS Monogram
0 question about this device. Answer the ones you know or ask your own.
Ask a new question about this device
Download the instructions for your Warming Drawer in PDF format for free! Find your manual ZJ7000SJSS - Monogram and take your electronic device back in hand. On this page are published all the documents necessary for the use of your device. ZJ7000SJSS by Monogram.
USER MANUAL ZJ7000SJSS Monogram
Electric Warming Drawer
Contents
Care and Cleaning
Painted or Enameled Surfaces 15
Rack....15
Stainless Steel 15
Control Knob 15
Consumer Services
Important Phone Numbers 8,9
Model and Serial Numbers 3
Before You Call For Service 16
Safety Instructions 4,5
Warranty 6,7
Warming Drawer
Features of Your Warming Drawer 10
Using the Warming Drawer 10-14
Moisture Selector 11
Rack....12
Proofing 13
Crisping 13
Consumer Information
| Electric Warming Drawer | ||
| Before using your warming drawer | Read this manual carefully. It is intended to help you operate and maintain your new warming drawer properly.Keep it handy for answers to your questions. | If you don't understand something or need more help, there is a list of toll-free consumer service numbers included in the back section of this manual.ORVisit our Website at: monogram.com |
| Write down the model and serial numbers | You can find them on a label located on the backside of the lower drawer front.These numbers are also on the Consumer Product Ownership Registration Card packed separately with your warming drawer. | Before sending in this card, please write these numbers here:Model NumberSerial NumberUse these numbers in any correspondence or service calls concerning your warming drawer. |
| Trouble-shooting tips | Before you request service, check the Before You Call For Service section in the back of this manual. | It lists causes of minor operating problems that you can correct yourself. |
| If you need service | To obtain service, see the Consumer Services page in the back of this guide.We're proud of our service and want you to be pleased. If for some reason you are not happy with the service you receive, here are two steps to follow for further help.For customers in the USA:FIRST, contact the people who serviced your appliance. Explain why you are not pleased. In most cases, this will solve the problem.NEXT, if you are still not pleased, write all the details—including your phone number—to:Manager, Customer RelationsGE AppliancesAppliance ParkLouisville, KY 40225 | For customers in Canada:FIRST, contact the people who serviced your appliance. Explain why you are not pleased. In most cases, this will solve the problem.NEXT, if you are still not pleased, write all the details—including your phone number—to:Manager, Consumer RelationsCamco Inc.1 Factory Lane, Suite 310Moncton, N.B. E1C 9M3 |
WARNING!
For your safety, the information in this manual must be followed to minimize the risk of fire or explosion, electric shock, or to prevent property damage, personal injury or loss of life.
▲ WARNING!—ANTI-TIP BRACE REQUIRED
All warming drawers can tip and injury could result if not properly installed.
To prevent accidental tipping of the warming drawer, attach it to the wall with an anti-tip brace as described in the installation instructions.
SAFETY PRECAUTIONS
When using your appliance, follow basic safety precautions, including the following:
- Use this appliance only for its intended purpose as described in this manual.
- Be sure your appliance is properly installed and grounded by a qualified technician in accordance with the provided installation instructions.
- Do not attempt to repair or replace any part of your warming drawer unless it is specifically recommended in this manual. All other servicing should be referred to a qualified technician.
- Before performing any service, unplug or disconnect the power supply at the household distribution panel by removing the fuse or switching off the circuit breaker.
-
Do not leave children alone—children should not be left alone or unattended in an area where an appliance is in use. They should never be allowed to sit or stand on any part of the appliance.
-
Be sure the warming drawer is securely installed in a cabinet that is firmly attached to the house structure.
- Never leave the drawer open when you are not watching the warming drawer.
- Always keep combustible wall covering, curtains or drapes a safe distance from your warming drawer.
- The purpose of the warming drawer is to hold hot cooked foods at serving temperature. (greater than 140°F) Bacteria will grow in food while it is below 140°F. Therefore, always start with hot food; cold food cannot be heated or cooked in the warming drawer.
READ AND SAVE THESE INSTRUCTIONS.
IMPORTANT SAFETY INSTRUCTIONS READ ALL INSTRUCTIONS BEFORE USING
SAFETY PRECAUTIONS
- CAUTION: Items of interest to children should not be stored in cabinets above the warming drawer; children climbing on the drawer to reach items could be seriously injured.
- Use only dry pot holders—moist or damp pot holders on hot surfaces may result in burns from steam. Do not let pot holders touch hot heating elements. Do not use a towel or other bulky cloth.
- For your safety, never use your appliance for warming or heating the room.
- Do not let cooking grease or other flammable materials accumulate in or near the warming drawer.
- Do not use water on grease fires. Never pick up a flaming pan. Turn the controls off.
Flame in the warming drawer can be smothered by closing the drawer or using a multi-purpose dry chemical or foam-type fire extinguisher.
- Do not touch the heating element or the interior surface of the warming drawer. These surfaces may be hot enough to burn.
REMEMBER: The inside surface of the warming drawer may be hot when the drawer is opened.
- Do not store or use combustible materials, gasoline or other flammable vapors and liquids in the vicinity of this or any other appliance.
- Use care when opening the drawer. Open the drawer a crack and let hot air or steam escape before removing or replacing food. Hot air or steam which escapes can cause burns to hands, face and/or eyes.
- Do not heat unopened food containers. Pressure could build up and the container could burst, causing an injury.
- Keep the vent unobstructed.
- Do not leave paper products, cooking utensils or food in the warming drawer when not in use, items may ignite.
- Clean only parts listed in the Care and Cleaning section.
- Do not use aluminum foil to line the drawer. Foil is an excellent heat insulator and will trap heat beneath it. This will upset the performance of the drawer and it could damage the interior finish.
- Wear proper apparel. Loose fitting or hanging garments should never be worn while using this appliance.
READ AND SAVE THESE INSTRUCTIONS.
YOUR MONOGRAM WARMING DRAWER WARRANTY Staple sales slip or cancelled check here. Proof of original purchase date is needed to obtain service under warranty.
WHAT IS COVERED
From the Date of the Original Purchase
LIMITED ONE-YEAR WARRANTY
For one year from date of original purchase, we will provide, free of charge, parts and service labor in your home to repair or replace any part of the warming drawer that fails because of a manufacturing defect.
product to an Authorized GE Service Location for service. In Alaska the warranty is the same except that it is LIMITED because you must pay to ship the product to the service shop or for the service technician's travel costs to your home.
This warranty is extended to the original purchaser and any succeeding owner for products purchased for ordinary home use in the 48 mainland states, Hawaii and Washington, D.C. If the product is located in an area where service by a GE Authorized Servicer is not available, you may be responsible for a trip charge or you may be required to bring the
All warranty service will be provided by our Factory Service Centers or by our authorized Customer Care ^® servicers during normal working hours.
Should your appliance need service, during warranty period or beyond, call 800.444.1845. Please have serial number and model number available when calling for service.
WHAT IS NOT COVERED
- Service trips to your home to teach you how to use the product.
- Replacement of house fuses or resetting of circuit breakers.
- Failure of the product if it is abused, misused, or used for other than the intended purpose or used commercially.
- Improper installation, delivery or maintenance.
If you have an installation problem, contact your dealer or installer. You are responsible for providing adequate electrical, gas, exhausting and other connecting facilities as described in the Installation Instructions provided with the product.
- Damage to the product caused by accident, fire, floods or acts of God.
- Incidental or consequential damage caused by possible defects with this appliance.
- Damage caused after delivery.
- Product not accessible to provide required service.
EXCLUSION OF IMPLIED WARRANTIES—Your sole and exclusive remedy is product repair as provided in this Limited Warranty. Any implied warranties, including the implied warranties of merchantability or fitness for a particular purpose, are limited to one year or the shortest period allowed by law.
Some states do not allow the exclusion or limitation of incidental or consequential damages, so the above limitation or exclusion may not apply to you. This warranty gives you specific legal rights, and you may also have other rights which vary from state to state.
To know what your legal rights are in your state, consult your local or state consumer affairs office or your state's Attorney General.
Warrantor: General Electric Company. If further help is needed concerning this warranty, write: Manager—Customer Relations, GE Appliances, Louisville, KY 40225
WHAT IS COVERED
From the Date of the Original Purchase
YOUR MONOGRAM WARMING DRAWER WARRANTY Staple sales slip or cancelled check here. Proof of original purchase date is needed to obtain service under warranty.
LIMITED ONE-YEAR WARRANTY
For one year from date of original purchase, we will provide, free of charge, parts and service labour in your home to repair or replace any part of the warming drawer that fails because of a manufacturing defect. This warranty is extended to the original purchaser and any succeeding owner for products purchased for ordinary home use in Canada. If the product is located in an area where service by a GE Authorized Servicer is not available, you may be responsible for a trip charge or you may be required to bring the product to an Authorized GE Service Location for service.
All warranty service will be provided by our Factory Service Centers or by our authorized Customer Care ^® servicers during normal working hours.
Should your appliance need service, during warranty period or beyond, call 1.888.880.3030. Please have serial number and model number available when calling for service.
WHAT IS NOT COVERED
- Service trips to your home to teach you how to use the product.
- Replacement of house fuses or resetting of circuit breakers.
- Failure of the product if it is abused, misused, or used for other than the intended purpose or used commercially.
- Improper installation, delivery or maintenance.
If you have an installation problem, contact your dealer or installer. You are responsible
for providing adequate electrical, gas, exhausting and other connecting facilities as described in the Installation Instructions provided with the product.
- Damage to the product caused by accident, fire, floods or acts of God.
- Incidental or consequential damage caused by possible defects with this appliance.
• Damage caused after delivery. - Product not accessible to provide required service.
EXCLUSION OF IMPLIED WARRANTIES—Your sole and exclusive remedy is product repair as provided in this Limited Warranty. Any implied warranties, including the implied warranties of merchantability or fitness for a particular purpose, are limited to one year or the shortest period allowed by law.
Some provinces do not allow the exclusion or limitation of incidental or consequential damages, so the above limitation or exclusion may not apply to you. This warranty gives you specific legal rights, and you may also have other rights which vary from province to province. To know what your legal rights are in your province, consult your local or provincial consumer affairs office.
Warrantor: Camco Inc. If further help is needed concerning this warranty, write: Manager, Consumer Relations, Camco Inc., 1 Factory Lane, Suite 310, Moncton, N.B. E1C 9M3.
With the purchase of your new Monogram appliance, receive the assurance that if you ever need information or assistance from GE, we'll be there. All you have to do is call—toll-free!
GE Answer Center®
In the USA: 800.626.2000
Whatever your question about any Monogram major appliance, GE Answer Center® information service is available to help. Your call—and your question—will be answered promptly and courteously. And you can call any time. GE Answer Center® service is open 24 hours a day, 7 days a week.
OR
Visit our Website at: GEAppliances.com
In Canada, call 1.888.880.3030.
In-Home Repair Service
In the USA: 800.444.1845
In Canada: 1.888.880.3030
A GE consumer service professional will provide expert repair service, scheduled at a time that's convenient for you. Many GE Consumer Service company-operated locations offer you service today or tomorrow, or at your con venience (7:00 a.m. to 7:00 p.m. week days, 9:00 a.m. to 2:00 p.m. Satur days). Our factory-trained technicians know your appliance inside and out—so most repairs can be handled in just one visit.
For Customers With Special Needs...
In the USA: 800.626.2000
GE offers Braille controls for a variety of GE appliances, and a brochure to assist in planning a barrier-free kitchen for persons with limited mobility.
Consumers with impaired hearing or speech who have access to a TDD or a conventional teletypewriter may call 800.TDD.GEAC (800.833.4322) to request information or service.
Service Contracts
In the USA: 800.626.2224
In Canada: 1.888.880.3030
You can have the secure feeling that GE Consumer Service will still be there after your warranty expires. Purchase a GE contract while your warranty is still in effect and you'll receive a substantial discount. With a multiple -year contract, you're assured of future service at today's prices.
Parts and Accessories
In the USA: 800.626.2002
In Canada: 1.888.880.3030
Individuals qualified to service their own appliances can have parts or accessories sent directly to their home. The GE parts system provides access to over 47,000 parts...and all GE Genuine Renewal Parts are fully warranted. VISA, MasterCard and Discover cards are accepted.
User maintenance instructions contained in this guide cover procedures intended to be performed by any user. Other servicing generally should be referred to qualified service personnel. Caution must be exercised, since improper servicing may cause unsafe operation.
If you received a damaged electric warming drawer
Immediately contact the dealer (or builder) that sold you the downdraft vent system.
Accessories
Looking For Something More?
GE offers a variety of accessories to improve your cooking and maintenance experiences!
To place an order visit us online at:
www.GEApplianceParts.com (U.S.) or www.GEAppliances.ca (Canada)
or call 800.626.2002 (U.S.) 800.661.1616 (Canada)
The following products and more are available:
Accessories
| 27" Wide Custom Panel Kit ZXD27B | |
| 30" Wide Custom Panel Kit ZXD30B | |
| 30" Monogram Pro Panel Kit ZXD9030P |
Parts
| Wire Rack WB48X10045 |
Cleaning Supplies
| CitruShine Stainless Steel Wipes WX10X10007 | |
| CERAMA BRYTE® Stainless Steel Appliance Cleaner PM10X311 | |
How to Remove Protective Shipping Film and Packaging Tape
Carefully grasp a corner of the protective shipping film with your fingers and slowly peel it from the appliance surface. Do not use any sharp items to remove the film. Remove all of the film before using the appliance for the first time.
To assure no damage is done to the finish of the product, the safest way to remove the adhesive from packaging tape on new appliances is an application of a household liquid dishwashing detergent. Apply with a soft cloth and allow to soak.
NOTE: The adhesive must be removed from all parts. It cannot be removed if it is baked on.
Design information
(Not all features are on all models. Appearance may vary.)
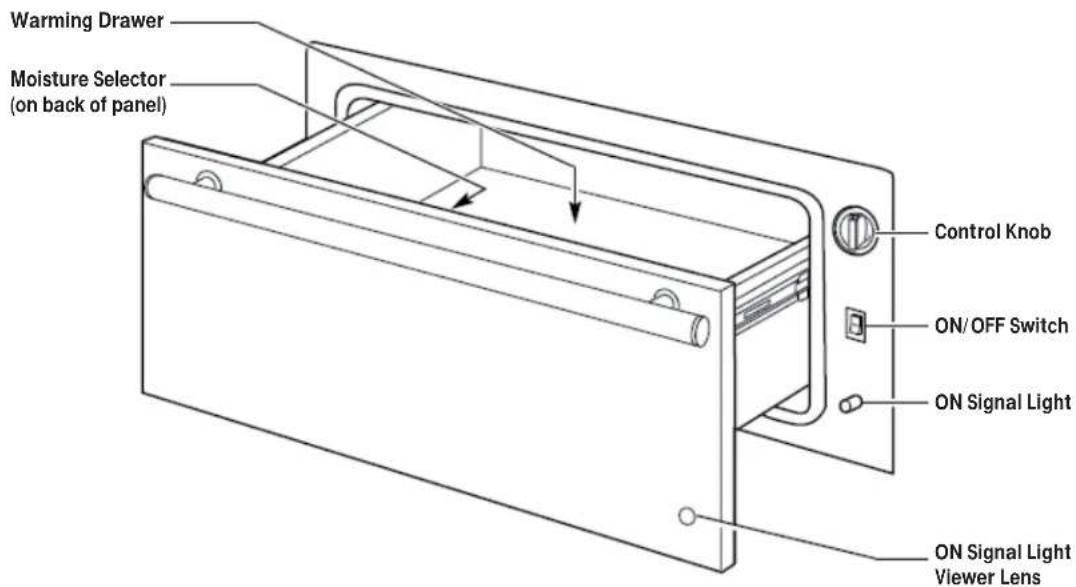
Control knob
The warming drawer controls are hidden with the drawer shut. Open the drawer. The controls are on the right side of the front frame.
To use the warming drawer, press the ON/OFF switch to the ON position.
Slide the moisture selector control to the open or closed setting. (See the Moisture Selector section.)
Turn the control knob clockwise to the desired setting.
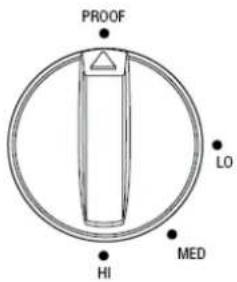
PROOF.....75–95°F. MED.....160–195°F.
LOW.... 140–160°F. HIGH.... 195–230°F.
ON signal light
The ON signal light is located below the ON/OFF switch and glows when the ON/OFF switch is in the ON position. It stays on until the ON/OFF switch is moved to the OFF position.
The ON signal light is visible through the light viewer in the drawer front panel when the drawer is closed. This is a reminder that the heat is on.
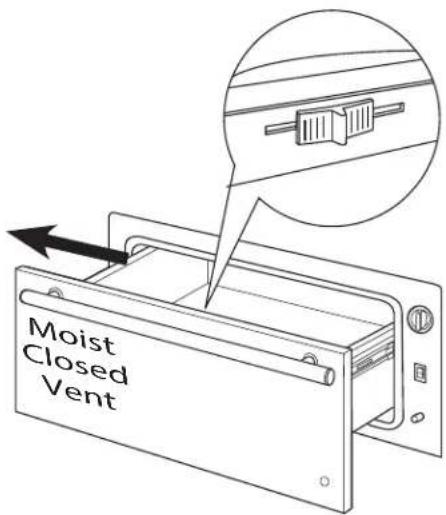
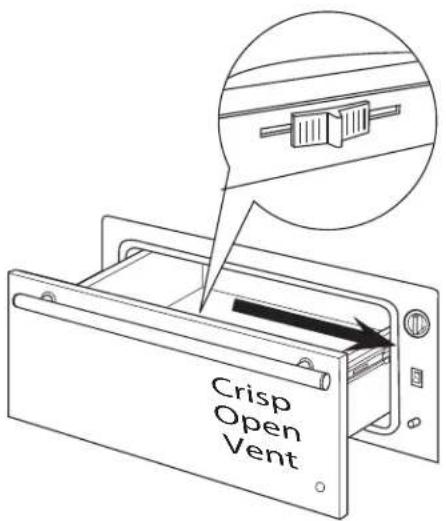
Moisture selector
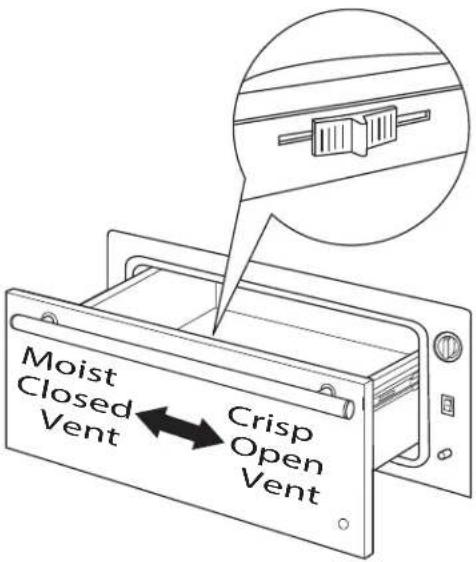
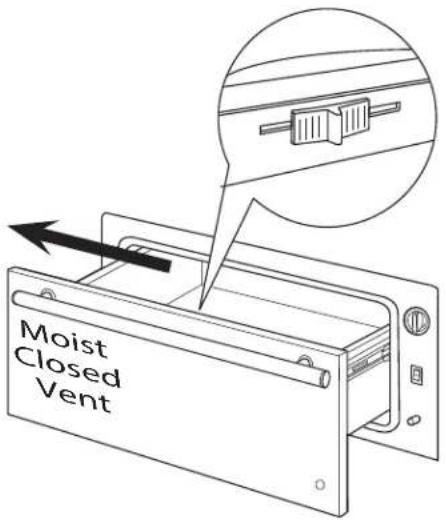
The moisture selector is located on the inside front of the drawer.
To keep foods moist, slide the moisture selector control away from the control knob. This closes the vent and seals the moisture inside the drawer. With the vent closed hot foods stay moist and soft.
In this setting condensation may occur around the inside edge of the drawer.
To keep foods crisp, slide the moisture selector control to the right towards the control knob. This opens the vents and allows the moisture to escape.
With the vents open, it is normal for moisture to collect on surfaces above the warming drawer.
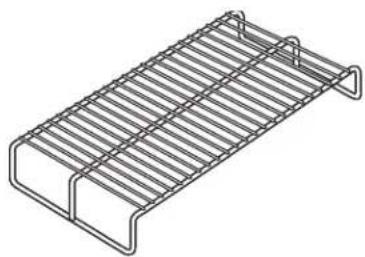
Rack
natural_image
Isometric line drawing of a rectangular metal grate or rack structure (no text or symbols)- Rack will fit from front to back.
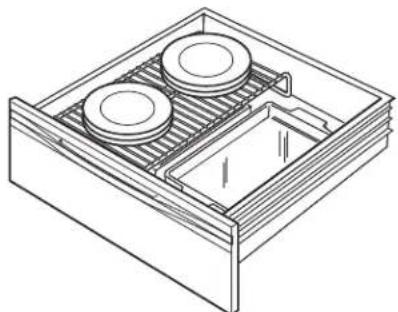
• Preheat with the rack in place. - Using the rack allows for double stacking of items.
natural_image
Isometric line drawing of a mechanical or architectural component with two circular components inside a rectangular frame (no text or symbols)Double stacking items with the rack in position.
When using the warming drawer...
The warming drawer will keep hot, cooked foods at serving temperature. Always start with hot food. Do not use to heat cold food other than proofing yeast dough, crisping crackers, chips or dry cereal.
Do not line the warming drawer with aluminum foil.
- Allow time for the drawer to be preheated: LOW 8 minutes MED 15 minutes HIGH 20 minutes
NOTE: It is not necessary to preheat the drawer for proofing.
- Food in heat-safe glass and glass ceramic utensils may need higher thermostat setting as compared to food in metal utensils.
-
Repeated opening of the drawer allows the hot air to escape and the food to cool. Allow extra time for temperature inside the drawer to stabilize after adding items.
-
With large loads it may be necessary to use a higher thermostat setting and cover some of the cooked food items.
- Food should be kept hot in its cooking container or transferred to a heat-safe serving dish.
- Aluminum foil may be used to cover food to prevent it from drying out.
CAUTION: Plastic containers or plastic wrap will melt if in direct contact with the drawer or a hot utensil. Melted plastic may not be removable and is not covered under your warranty.
- Remove serving spoons, etc., before placing containers in warming drawer.
To warm serving bowl and plates
To warm serving bowls and plates set the control on LOW.
- Use only heat-safe dishes.
-
Place the empty dishes on the rack to raise them off the bottom of the drawer. If you want hotter dishes or want to heat fine china, please check with the manufacturer of the dishes for their maximum heat tolerance.
-
Preheat empty serving dish while preheating the drawer.
- When holding hot, cooked foods and warming empty serving dishes at the same time, place the serving dishes on the high rack position and the food on the bottom of the drawer.
CAUTION: Dishes may be hot. Use pot holders or mitts when removing hot dishes.
To proof yeast bread dough
Yeast dough can be proofed in the warming drawer.
- Place your dish on the warming drawer bottom.
- You must always turn the control knob to LOW then immediately back to PROOF.
- Close the vent.
- Lightly oil the top of the dough in a bowl large enough to double the dough size. Cover with a cloth.
• Preheating not required for proofing. - Check the dough height in 40 minutes. Add time as needed. The dough should remain in the drawer until it has doubled in size and a slight depression remains when the surface is touched gently with a finger.
To crisp stale items
- Place food in low sided dishes or pans.
- Preheat on LOW setting and open the vent.
- Check crispness after 45 minutes. Add time as needed.
Temperature selection chart for crisp foods
To keep several different foods hot, set the temperature to the food needing the highest setting. Place the items needing the highest setting on the bottom of the drawer and items needing less heat on the rack.
Tips:
- Leave food uncovered.
- Do not use plastic containers or plastic wrap.
- Preheat prior to use according to recommended times.
Food Type Control Setting Moisture Selector Setting
| Bacon HIGH | OPEN | |
| Bread, hard rolls | MED | OPEN |
| Fried foods | HIGH | OPEN |
| Pies, two crusts | MED | OPEN |
| Pizza | HIGH | OPEN |
| Potatoes, baked | HIGH | OPEN |
| Tortilla Chips | LOW | OPEN |
Temperature selection chart for moist foods
To keep several different foods hot, set the temperature to the food needing the highest setting. Place the items needing the highest setting on the bottom of the drawer and items needing less heat on the rack.
Tips:
• Cover food with lid or aluminum foil.
- Do not put water in the warming drawer.
- Do not use plastic containers or plastic wrap.
- Preheat prior to use according to recommended times.
Food Type Control Setting Moisture Selector Setting
| Beef, medium and well done* MED | CLOSED | |
| Bread, soft rolls MED | CLOSED | |
| Casseroles MED | CLOSED | |
| Cooked cereal MED | CLOSED | |
| Eggs MED | CLOSED | |
| Fish, seafood MED | CLOSED | |
| Fruit MED | CLOSED | |
| Gravy, cream sauces MED | CLOSED | |
| Ham MED | CLOSED | |
| Lamb MED | CLOSED | |
| Pancakes, waffles HIGH | CLOSED | |
| Pies, one crust MED | CLOSED | |
| Pork | MED | CLOSED |
| Potatoes, mashed | MED | CLOSED |
| Poultry | HIGH | CLOSED |
| Vegetables | MED | CLOSED |
* USDA/FSIS recommends an internal temperature of 145°F. as the minimum doneness for beef. Use a portable meat thermometer to check internal temperatures.
Care and Cleaning
Electric Warming Drawer
| Be sure the controls are in the OFF position and all surfaces are cool before cleaning any part of the warming drawer. | ||
| Painted or Enameled Surfaces | Use soap and warm water to thoroughly clean. | |
| Rack | Clean the rack with detergent and water. After cleaning, rinse the rack with clean water and dry with a clean cloth. | 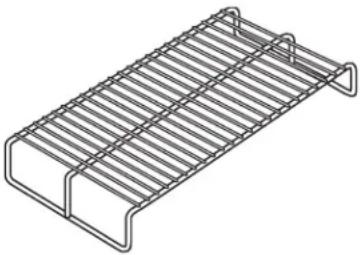 |
| Stainless steel | Do not use a steel wool pad; it will scratch the surface.To clean the stainless steel surface, use warm sudsy water or a stainless steel cleaner or polish. Always wipe the surface in the direction of the grain. Follow cleaner instructions for cleaning the stainless steel surface. | To inquire about purchasing stainless steel appliances cleaner or polish, or to find the location of a dealer nearest you, please call our toll-free number:National Parts Center 800.626.2002 (U.S.)888.880.3030 (Canada)GEAppliances.com (U.S.)www.GEAppliances.ca (Canada) |
| Control knob | The control knob may be removed for easier cleaning.Before removing the knob for cleaning, please note that it is in thePROOFposition.Wash the knob in soap and water or a vinegar and hot water solution but do not soak.Dry and replace the knob. | |
Save time and money!
Review the troubleshooting tips on this page first and you may not need to call for service.
| PROBLEM | POSSIBLE | CAUSE |
| WARMING DRAWER • A fuse in your home may be blown or the circuit breaker tripped.WILL NOT WORK Replace the fuse or reset the circuit breaker.Warming drawer not plugged in. Plug in.Warming drawer controls improperly set. See the Using the WarmingDrawer section. | ||
| DRAWER DOES NOT • Ball bearings are out of alignment. Fully extend the drawer and SLIDE SMOOTHLY push it all the way in. See the Care and Cleaning section.OR DRAGS • Drawer over-loaded or load unbalanced. Reduce weight to less than 50 pounds. Redistribute drawer contents. | ||
| EXCESSIVE • Liquid in warming drawer. Remove liquid.CONDENSATION• Uncovered foods. Cover food with lid or aluminum foil.Temperature setting too high. Reduce temperature setting.Incorrect Moisture Selector setting. Set the Moisture Selector to the open vent setting to allow venting. | ||
| NO HEAT IN THE PROOF SETTING | • Room temperature may prevent the thermostat from tripping on.Turn the knob to LOW then back to PROOF. | |
| FOOD DRIES OUT | • Moisture escaping. Cover food with lid or aluminum foil. | |
- Contents
- Care and Cleaning
- Consumer Services
- Warming Drawer
- WARNING!
- ▲ WARNING!—ANTI-TIP BRACE REQUIRED
- SAFETY PRECAUTIONS
- IMPORTANT SAFETY INSTRUCTIONS READ ALL INSTRUCTIONS BEFORE USING
- YOUR MONOGRAM WARMING DRAWER WARRANTY Staple sales slip or cancelled check here. Proof of original purchase date is needed to obtain service under warranty.
- WHAT IS COVERED
- LIMITED ONE-YEAR WARRANTY
- WHAT IS NOT COVERED
- With the purchase of your new Monogram appliance, receive the assurance that if you ever need information or assistance from GE, we'll be there. All you have to do is call—toll-free!
- Accessories
- Looking For Something More?
- Design information
- Control knob
- ON signal light
- Moisture selector
- Rack
- When using the warming drawer...
- Do not line the warming drawer with aluminum foil.
- CAUTION: Plastic containers or plastic wrap will melt if in direct contact with the drawer or a hot utensil. Melted plastic may not be removable and is not covered under your warranty.
- To warm serving bowl and plates
- CAUTION: Dishes may be hot. Use pot holders or mitts when removing hot dishes.
- To proof yeast bread dough
- To crisp stale items
- Temperature selection chart for crisp foods
- Tips:
- Temperature selection chart for moist foods
- Save time and money!
Brand : Monogram
Model : ZJ7000SJSS
Category : Warming Drawer