ACR-2 - Remote control AudioControl - Free user manual and instructions
Find the device manual for free ACR-2 AudioControl in PDF.


| Product Type | Remote Control |
| Brand | AudioControl |
| Model | ACR-2 |
| Compatible with | LCQ-1, The Epicenter® Plus |
| Mounting Options | Bracket or custom flush mount |
| Installation | Under dash or flush dashboard mount |
| LED Indicator | Yes, clearly visible |
| Control Functions | Volume, source selection (specific to processor) |
| Connection | Wired via included bracket or direct dash mount |
| Drill Hole Sizes (custom) | 9/32" (7 mm) for control, 3/32" (2.3 mm) for lock tab, 1/8" (3 mm) for LED |
| Dimensions | Not specified; compact size typical for dash mounting |
| Weight | Not specified; lightweight |
| Power Supply | Powered via vehicle (no battery required) |
| Manual Pages | 2 pages |
| Warranty | Not specified; typical AudioControl warranty applies |
Frequently Asked Questions - ACR-2 AudioControl
User questions about ACR-2 AudioControl
0 question about this device. Answer the ones you know or ask your own.
Ask a new question about this device
Download the instructions for your Remote control in PDF format for free! Find your manual ACR-2 - AudioControl and take your electronic device back in hand. On this page are published all the documents necessary for the use of your device. ACR-2 by AudioControl.
USER MANUAL ACR-2 AudioControl
Placement And Mounting of Optional Dash Remote:
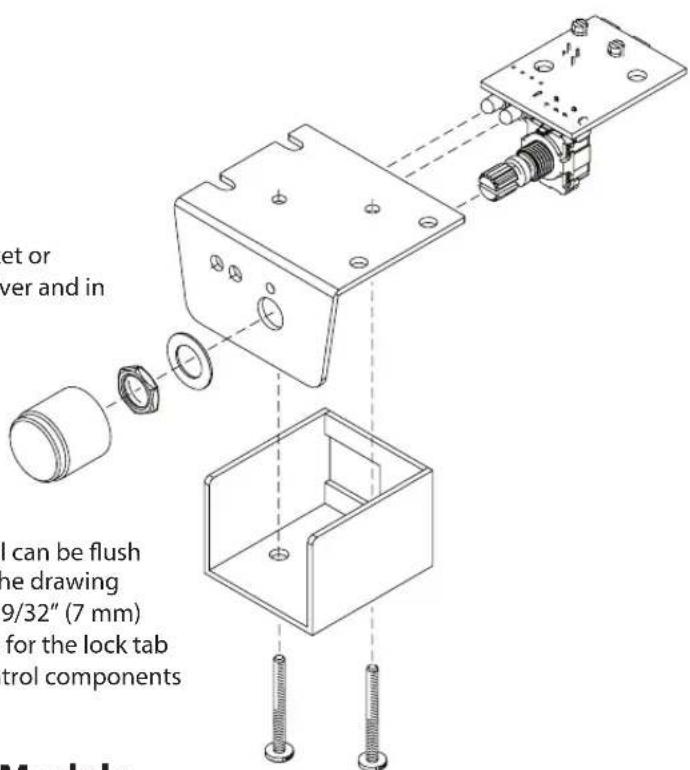
The dash control may be mounted under the dash using its own bracket or through a custom hole in the dash. It should be within reach of the driver and in a spot where the LED is plainly visible.
Bracket Installation: The dash control mounts with two screws, which attach to the underside of the dashboard. Slide under the dash and place the dash control in its mounting position, mark the two mounting holes, drill pilot holes, and secure with two screws.
Custom Installation: For that custom, finished look, the dash control can be flush mounted directly on the dash-board (or anywhere else). Referencing the drawing right, disassemble the dash control from the mounting bracket. Drill a 9/32" (7 mm) hole in the dashboard for the control along with a 3/32" (2.3 mm) hole for the lock tab and a 1/8" (3 mm) hole(s) for the LED holder. Reassemble the dash control components on the dashboard.
Available Models

ACR-1
COMPATIBLE WITH COMPATIBLE WITH COMPATIBLE WITH
LC2i™, LC6i™, LC7i™,
Overdrive™ Plus, Matrix™ Plus, 6XS, The Epicenter®, LC-4.800™

ACR-2
LCQ-1 ^TM ,
The Epicenter® Plus

ACR-3
22410 70th Ave West | Mountlake Terrace, WA 98043 USA
Phone 425-775-8461 | Fax 425-778-3166
www.audiocontrol.com
©2016 AudioControl. All rights reserved.
P/N 9120350 Rev B
Brand : AudioControl
Model : ACR-2
Category : Remote control