
KUDU03STBL3 - Dishwasher KITCHENAID - Free user manual and instructions
Find the device manual for free KUDU03STBL3 KITCHENAID in PDF.


| Product Type | Built-in dishwasher under counter |
| Brand | KitchenAid |
| Model | KUDU03STBL3 |
| Dimensions (H x W x D) | 85 x 60 x 60 cm |
| Net weight | 55 kg |
| Capacity | 14 place settings |
| Power supply | 220-240 V, 50 Hz, 10 A |
| Energy class | A+ |
| Water consumption per cycle | 9 L |
| Noise level | 44 dB(A) |
| Programs | 6 programs including ProWash, Intensive, Quick, Eco, Delicate, Rinse |
| Options | ProDry drying, Delayed start, Adjustable upper rack, Third rack |
| Tub material | Stainless steel |
| Main functions | ProWash for adaptive cleaning, ProDry for perfect drying, Soil sensor, Steam function |
| Maintenance and cleaning | Monthly cleaning of filter, door seal and wash arms; use of recommended cleaning product |
| Safety | Child lock, anti-flood protection, automatic shut-off in case of malfunction |
| Spare parts and repairability | Repairability index: 7.5/10; available parts (filters, arms, seals, pumps) |
| Warranty | 2 years parts and labor |
| Connectivity | Not connected |
| Certifications | CE, NF |
Frequently Asked Questions - KUDU03STBL3 KITCHENAID
User questions about KUDU03STBL3 KITCHENAID
0 question about this device. Answer the ones you know or ask your own.
Ask a new question about this device
Download the instructions for your Dishwasher in PDF format for free! Find your manual KUDU03STBL3 - KITCHENAID and take your electronic device back in hand. On this page are published all the documents necessary for the use of your device. KUDU03STBL3 by KITCHENAID.
USER MANUAL KUDU03STBL3 KITCHENAID
For questions about features, operation/performance, parts, accessories or service, call: 1-800-422-1230 or visit our website at
www.kitchenaid.com
In Canada, for assistance, installation or service, call: 1-800-807-6777 or visit our website at www.KitchenAid.ca
LAVE-VAISSELLE
PARTS AND FEATURES 3
START-UP 4
LOADING 5
CYCLES AND OPTIONS....12
SÉCURITÉ DU LAVE-VAISSELLE....16
PIÈCES ET CARACTÉRISTIQUES......17
MISE EN MARCHE....18
CHARGEMENT....19
PROGRAMMES ET OPTIONS....27


Your safety and the safety of others are very important.
We have provided many important safety messages in this manual and on your appliance. Always read and obey all safety messages.

This is the safety alert symbol.
This symbol alerts you to potential hazards that can kill or hurt you and others.
All safety messages will follow the safety alert symbol and either the word "DANGER" or "WARNING."
These words mean:
! DANGER
You can be killed or seriously injured if you don't immediately follow instructions.
WARNING
You can be killed or seriously injured if you don't follow instructions.
All safety messages will tell you what the potential hazard is, tell you how to reduce the chance of injury, and tell you what can happen if the instructions are not followed.
Before Using Your Dishwasher
⚠ WARNING

Tip Over Hazard
Do not use dishwasher until completely installed.
Do not push down on open door.
Doing so can result in serious injury or cuts.
WARNING

Electrical Shock Hazard
Electrically ground dishwasher.
Connect ground wire to green ground connector in terminal box.
Do not use an extension cord.
Failure to follow these instructions can result in death, fire, or electrical shock.
PARTS AND FEATURES
This manual covers several different models. The features on your dishwasher may vary from those shown below.
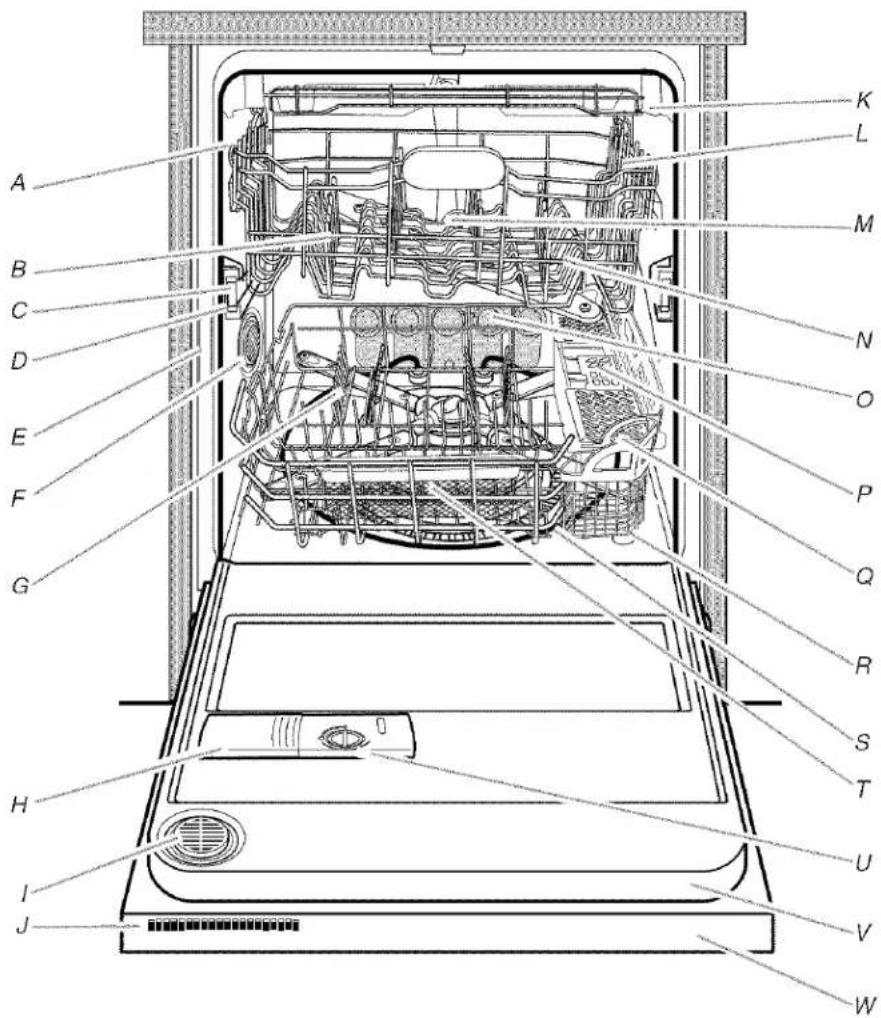
A. 2-Position mid level rack adjusters
B. FLEXI-FOLD DOWN™ flexible tines
C. Removable mid level rack
D. SATINGLIDE® Ultra rack
E. Model and serial number label
F. Water inlet opening (in tub wall)
G. Removable lower level rack inserts (two)
H. Detergent dispenser
I. Vent
J. Active vent
K. Removable culinary tool rack
L. SURE-HOLD® cup and stemware holder
M. Removable mid level rack inserts (two)
N. SURE-HOLD® light item clips
O. PROSCRUB® spray jets
P. Silverware basket
Q. CULINARY CADDY® utensil basket
R. Overfill protection float
S. Heating element
T. SURE-HOLD® small items mesh pouch
U. Rinse aid dispenser
V. WHISPER QUIET ^® sound insulation system
W. Control panel located on door
Control Panels
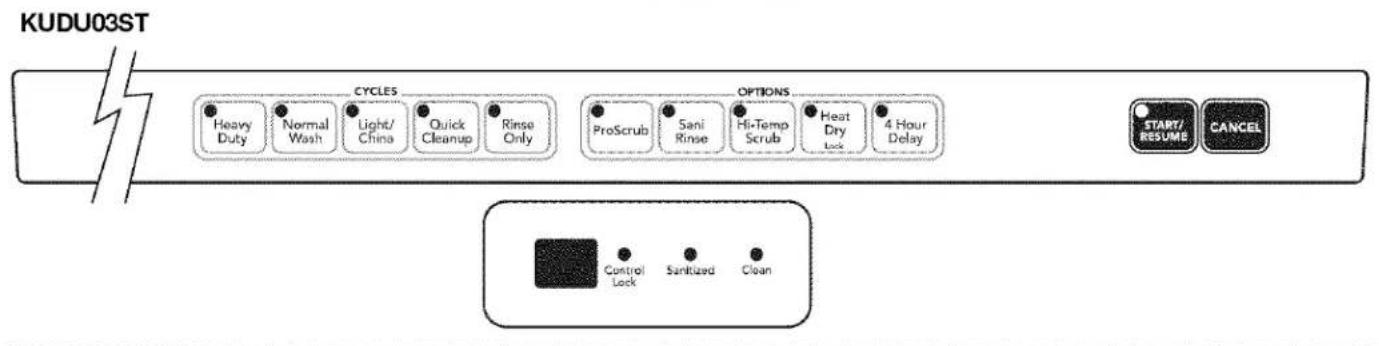

KUDU03FTPA

START-UP
Before using your dishwasher, remove all packaging materials. Read this entire Consumer Reference Guide, as well as the User Instructions. You will find important safety information and useful operating tips.
Using Your Dishwasher
For all models:
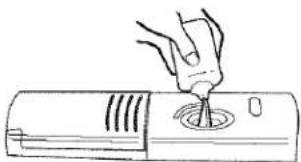
- Rinse aid is essential for good drying. Be sure to fill the dispenser before you use your new dishwasher. Each filling will last about 1 to 3 months depending on your usage.
natural_image
Line drawing of a hand using a screwdriver to press or install a cylindrical component (no text or symbols)-
Scrape large food soil and hard items (toothpicks or bones) from dishes. You do not need to prerinse your dishes.
-
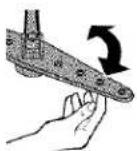
Properly load the dishwasher. (See "Loading.") Load dishes with space in between so water will reach the soiled surfaces. Make sure nothing keeps the spray arm(s) from spinning freely.
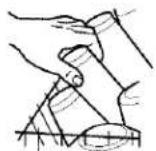
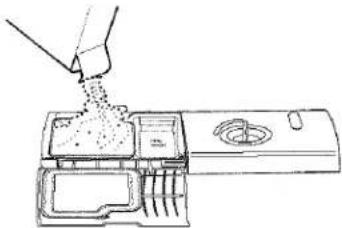
- Add detergent. Always use a high-quality brand detergent. (See "Dishwasher Use" in the User Instructions.)
natural_image
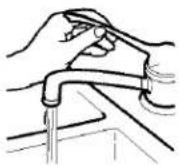
Line drawing of a hand pouring granular material into a multi-glass washing machine (no text or symbols)- Run hot water at the sink nearest your dishwasher until the water is hot. Turn off water.
- Press the desired cycle and option selections on the control panel. (See "Cycles and Options.")
- Press START/RESUME. Or press START/RESUME to repeat the same cycle and options as in the previous cycle. The selected cycle and option lights will glow.
IMPORTANT (For model KUDU03ST):
■ When the cycle starts, you will see a rotating pattern of lights in the display window indicating that the dishwasher is operating. This pattern will continue for up to 6 minutes while the multiple sensors check the incoming water temperature, rinse aid usage and soil level on dishes and cookware. The sensors then determine the ideal wash for your dish load.
After sensing is complete, the display will show the number of minutes left in the cycle and the cycle countdown will begin.
■ The cycle countdown pauses while the dishwasher heats the water to a set temperature. (See "Cycle Selections.")
8. Push door firmly closed within 3 seconds of pressing Start/Resume.
NOTE: If the dishwasher is not started within 30 seconds after selecting the cycle and options, it will revert to the last cycle and options completed.

LOADING
Culinary Tool Rack
The culinary tool rack is designed with 2 movable baskets to hold extra silverware, knives and cooking utensils.
Up position
Install the baskets in this up position when you have extra silverware and flatware to wash.
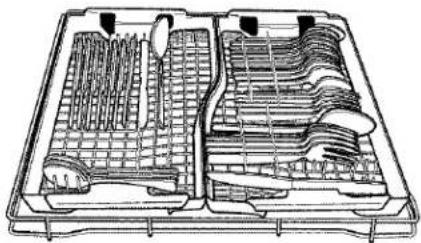
natural_image
Technical line drawing of a multi-compartment kitchen drawer with cutlery and utensils (no text or labels)Baskets installed in up position
Down position
Install the baskets in this down position when you have extra silverware, knives, or utensils requiring more room to wash.
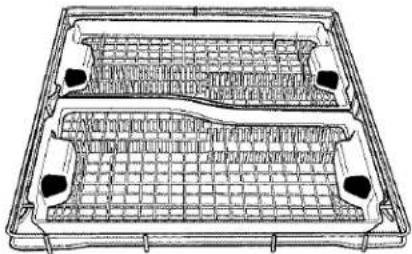
natural_image
Technical line drawing of a rectangular tray with internal grid structure and mounting holes (no text or symbols)Baskets installed in down position
IMPORTANT: When using the culinary tool baskets in the down position, the mid level rack must also be in the lowest position. Remove the front basket in the down position, when you are using the cup shelves or other tall items in the mid level rack for more room.
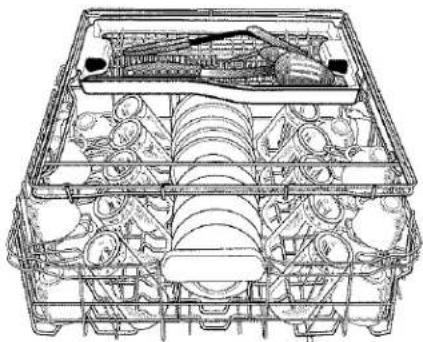
natural_image
Technical line drawing of a multi-tiered plastic tray with internal compartments and a central tool (no text or symbols)Front basket removed while using cup shelves in mid level rack
Removable culinary tool rack
The removable culinary tool rack allows you to wash larger items in the mid level rack.
IMPORTANT: Remove baskets prior to removing culinary tool rack from dishwasher.
To remove the rack
- To access track stops, pull the rack forward until it stops.
- Remove both baskets by lifting them out of the rack.
- To open track stops, flip the track stop to the outside of the track.
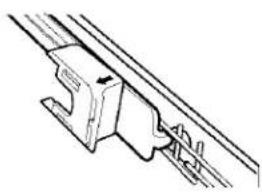
natural_image
Technical line drawing of a mechanical assembly or bracket (no text or symbols)Track stop closed
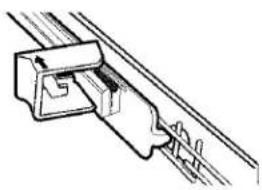
natural_image
Technical line drawing of a mechanical assembly or bracket (no text or symbols)Track stop open
- After opening both track stops, slide front wheels up and out of the slot in the track. Continue to pull rack forward in track and slide the back wheels up and out of the track.
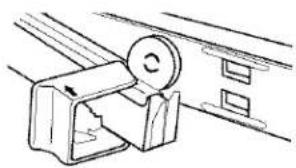
natural_image
Technical line drawing of a mechanical component with a circular feature and housing (no text or symbols)Remove front rack wheel.
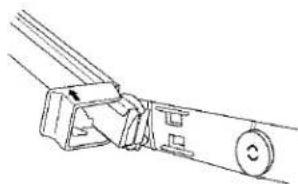
natural_image
Technical line drawing of a mechanical clamp or bracket assembly (no text or symbols)Remove back rack wheel.
- Close track stops.
- Slide rack tracks back into dishwasher.
To replace the rack
- Gently pull culinary tool rack tracks forward in dishwasher until they stop.
- To open track stops, flip the track stop to the outside of the track.
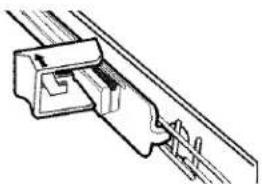
natural_image
Technical line drawing of a mechanical assembly with no visible text or symbols- Place the back rack rollers on each side of the culinary tool rack into the track slots and roll the rack back into the tracks.
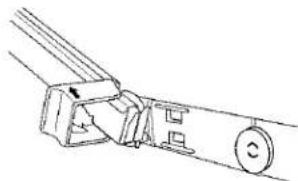
natural_image
Technical line drawing of a mechanical clamp or bracket assembly (no text or symbols)- Insert front rack rollers on each side of the rack into the track slots and slide rack partly back into the dishwasher.
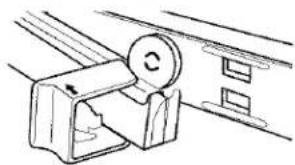
natural_image
Simple line drawing of a mechanical clamp or bracket with a circular component (no text or symbols)- Close track stops on both sides of rack.
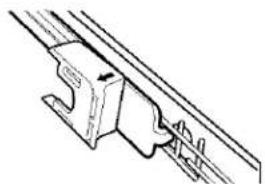
natural_image
Technical line drawing of a mechanical clamp or bracket assembly (no text or symbols)- Install baskets in the desired position. (See "Culinary Tool Rack.")
Mid Level Rack
The mid level rack is designed for cups, glasses, and smaller items. Many items, up to 9" (22 cm), fit in the mid level rack. (See recommended loading patterns shown.)
NOTE: The features on your dishwasher rack may vary from those in the drawings shown.
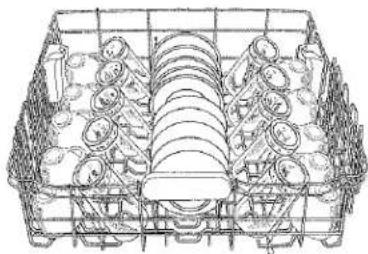
natural_image
Line drawing of a shopping basket filled with coins and bags (no text or symbols)10 place setting
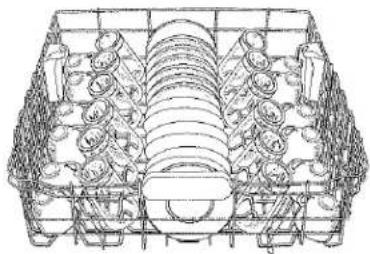
natural_image
Line drawing of a rectangular container filled with coins and fish, no text or symbols present12 place setting
■ Place items so open ends face down for cleaning and draining.
■ Load glasses and cups in mid level rack only. The lower level rack is not designed for glasses and cups. Damage can occur.
■ Place cups and glasses in the rows between tines. Placing them over the tines can lead to breakage and water spots.
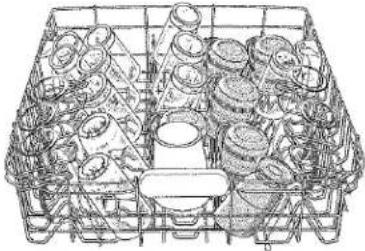
natural_image
Line drawing of a wire cage filled with various coins and plastic containers (no text or symbols)Cup and glass load
■ China, crystal, and other delicate items must not touch each other during dishwasher operation. Damage may occur.
- Load plastic items in the mid level rack only. Only plastic items marked "dishwasher safe" are recommended.
■ Load plastic items so the force of the spray does not move them during the cycle.
■ To avoid chipping, do not let stemware touch other items.
■ Small bowls, pans, and other utensils can be placed in the mid level rack. Load bowls in the center section for best stability.
Removable mid level rack inserts
Your dishwasher is shipped with 2 removable mid level rack inserts. (See illustration below.) The removable rack inserts allow you to adjust the rack for the type of load you are washing. This is useful when washing a variety of glassware and dishes.
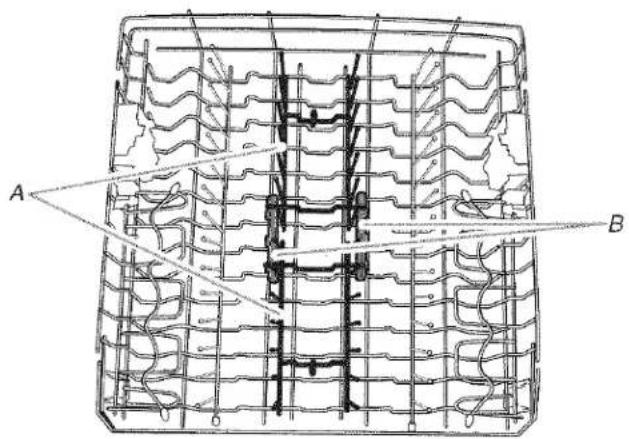
A. Removable rack inserts B. Insert holding clips
To remove inserts
- Lift up on the insert wire located toward the center of the rack to release the insert from the holding clips.
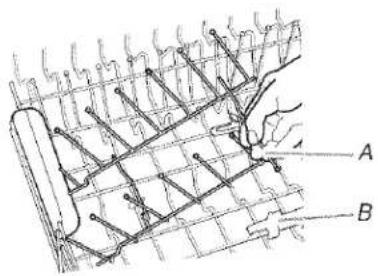
A. Lift removable insert wire to remove from holding clips. B. Holding clips
- Lift insert out of rack.
To install rack inserts
- Place the insert end legs under the front or back rack wire as shown below.
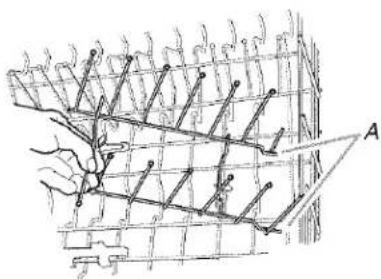
natural_image
Technical line drawing of a mechanical assembly with labeled component A (no text or symbols present)A. Insert legs
- Push down on the center insert wire until it slides into the holding clip on either side of the center in the bottom of the rack.
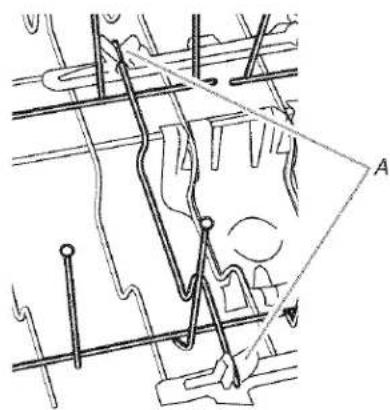
natural_image
Pure electrical circuit lines without any symbolsA. Insert holding clips
FLEXI-FOLD DOWN™ flexible tines
The row of tines on the left-hand and right-hand sides of the mid level rack can be adjusted to make room for a variety of dishes.
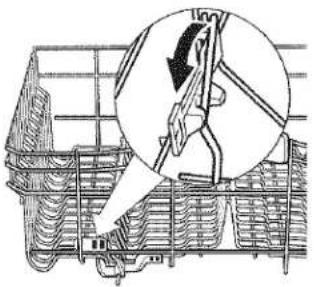
natural_image
Technical line drawing of a mechanical assembly with a magnified inset showing a component detail (no text or symbols)To adjust the flexible tines
- Grasp the tip of the tine that is in the tine holder.
- Gently push the tine out of the holder.
- Lay the tines down, toward the center of the rack.
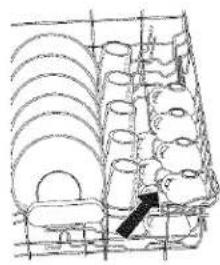
SURE-HOLD® cup and stemware holder
Fold down the extra shelf on the left-hand or right-hand side of the mid level rack to hold additional cups, stemware or long items such as utensils and spatulas.
NOTE: Remove the culinary tool basket(s) when washing tall stemware or other tall items in the mid level rack.
natural_image
Pure architectural or engineering line drawing of a building facade with circular elements and a central structure (no text or symbols)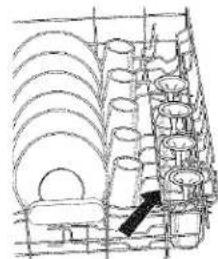
natural_image
Technical line drawing of a mechanical assembly with rollers and housing (no text or symbols)SURE-HOLD® light item clips
The light item clips hold lightweight plastic items such as cups, lids, or bowls in place during washing.
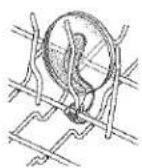
To use a clip
- Pull clip away from tine.
- Insert item between time and clip and release clip.
To move a clip
- Pull the clip up and off the tine.
- Reposition the clip on another time.
Adjustable 2-position mid level rack
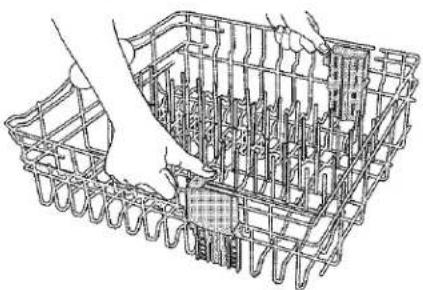
After removing the culinary tool rack (see "Removable culinary tool rack"), you can raise or lower the mid level rack to fit tall items in either the mid level or lower level rack. Raise the mid level rack to accommodate items up to 9" (22 cm) in the mid level rack and 13" (33 cm) in the lower level rack. Lower the mid level rack to accommodate items up to 11" (28 cm) in both the mid level and lower level racks. Adjusters are located on each side of the mid level rack.
IMPORTANT: If using the culinary tool baskets in the Down position, the mid level rack must also be in the lowest position.
natural_image
Technical line drawing of a mechanical assembly with spring-loaded components and internal structure (no text or symbols)To raise the rack
Press both rack adjusters and lift the rack until it is in the up position and level.
NOTE: The mid level rack adjusters must be level.
To lower the rack
Press both rack adjusters and slide the rack back to its lower position.
Removable mid level rack
The removable mid level rack allows you to wash larger items such as stock pots, roasters, and cookie sheets in the lower level rack.
IMPORTANT: Remove dishes prior to removing the mid level rack from dishwasher.
To remove the rack
- To access track stops, pull the rack forward until it stops and clicks into place.
- To open track stops, flip the track stop to the outside of the track.
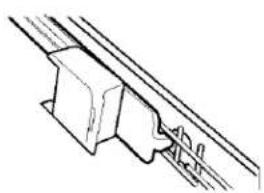
natural_image
Technical line drawing of a mechanical bracket assembly (no text or symbols)Track stop closed
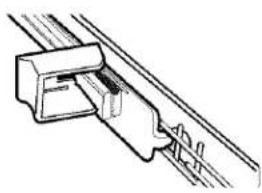
natural_image
Technical line drawing of a mechanical assembly or bracket (no text or symbols)Track stop open
- After opening both track stops, slide front wheels up and out of the slot in track. Continue to pull rack forward in track and slide the back wheels up and out of the track.
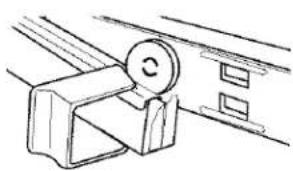
natural_image
Simple line drawing of a mechanical clamp or bracket with a circular knob (no text or symbols)Remove front rack wheel.
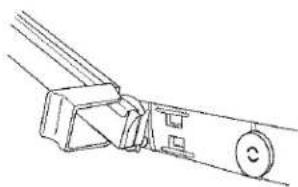
natural_image
Technical line drawing of a mechanical clamp or bracket assembly (no text or symbols)Remove back rack wheel.
- Close track stops.
- Slide rack tracks back into dishwasher.
To replace the rack
- Gently pull rack tracks forward in dishwasher until they stop and click into place.
- To open track stops, flip the track stop to the outside of the track.
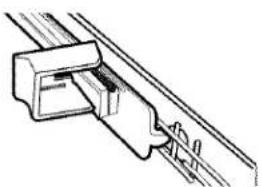
natural_image
Technical line drawing of a mechanical assembly or bracket (no text or symbols)- Place the back rack rollers on each side of the rack into the track slot and roll the rack back into the tracks.
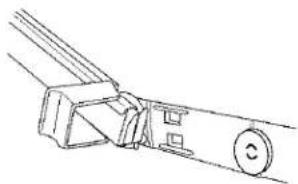
natural_image
Line drawing of a mechanical component with a circular button and lever mechanism (no text or symbols)- Insert front rack rollers on each side of the rack into the rack slots.
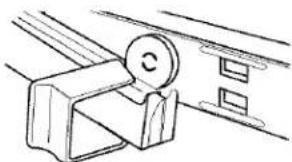
natural_image
Simple line drawing of a mechanical bracket with a circular component (no text or symbols)- Close track stops on both sides of rack.
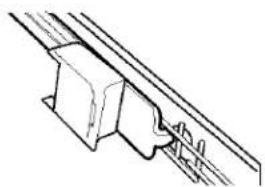
natural_image
Pure mechanical assembly diagram without any text, numbers, or symbols- Slide rack back into dishwasher.
Lower Level Rack
The lower level rack is designed for plates, pans, casseroles, and utensils. Many items, up to 13" (33 cm) tall, fit in the lower level rack. (See recommended loading patterns shown.)
NOTE: The features on your dishwasher rack may vary from those in the drawings shown.
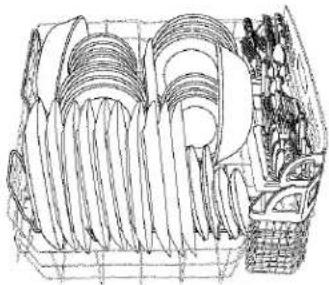
natural_image
Line drawing of a basket filled with sliced leaves, showing various shapes and shading (no text or symbols)10 place setting
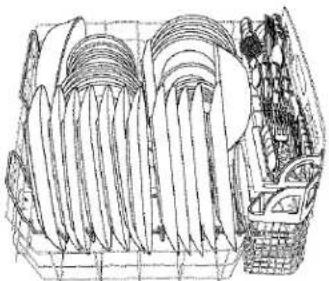
natural_image
Line drawing of a basket filled with leafy greens and leaves, no text or symbols present12 place setting
- Do not load glasses, cups, or plastic items in the lower level rack. Load small items in the lower level rack only if they are secured in place.
■ Load plates, soup bowls, etc., between tines.
■ Overlap the edges of plates for large loads.
- Load soup, cereal, and serving bowls in the rack in a variety of ways depending upon their size and shape. Load bowls securely between the rows of tines. Do not nest bowls because the spray will not reach all surfaces.
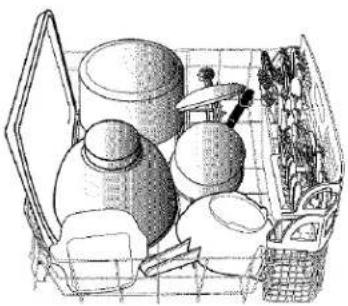
natural_image
Illustration of various household items including a box, jars, and woven basket (no text or symbols)Utensil load
- Load cookie sheets, cake pans, and other large items at the sides and back. Loading such items in front can keep the water spray from reaching the detergent dispenser.
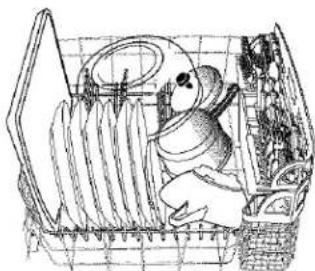
natural_image
Illustration of a person sitting in a woven basket with plastic sheets, no text or symbols presentMixed load
■ Secure heavily soiled cookware face down in the rack.
■ Make sure pot handles and other items do not stop rotation of the spray arm(s). The spray arm(s) must move freely.
■ Do not load items between the lower level rack and the side of the dishwasher tub because they might block the water inlet opening.
PROSCRUB ^® wash area
The PROSCRUB ^® wash area is located at the back of the lower level rack.
NOTE: You must select the PROSCRUB® wash option to utilize this wash feature. Do not face items toward the rear of the dishwasher if you are not using this wash option.
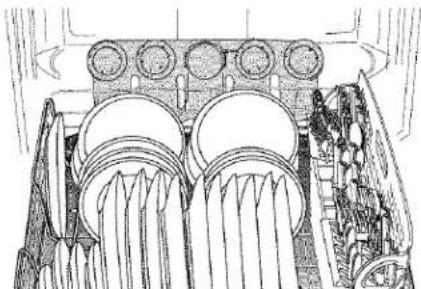
natural_image
Technical line drawing of a mechanical assembly with rollers and flanges (no text or symbols)PROSCRUB® wash area view in lower level rack (shown with rack pulled partially out of dishwasher)
- Load pans, casserole dishes, etc. in the back of the lower level rack with the soiled surfaces facing the PROSCRUB® spray jets. Make sure items do not interfere with the water feed tube or mid spray arm.
Tip items toward the rear of the dishwasher in the wider space between the rows of tines in the double removable rack insert to maximize coverage.
IMPORTANT: Only one row of items may face the PROSCRUB® spray jets. Stacking, overlapping, or nesting items will keep the PROSCRUB® spray jets from reaching all of the surfaces.
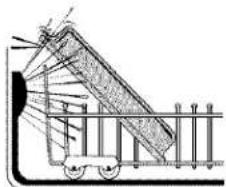
natural_image
Technical line drawing of a mechanical structure with wheels and supports (no text or symbols)PROSCRUB® wash area side view
Removable lower level rack inserts
Your dishwasher is shipped with 2 removable lower level rack inserts. (See illustration below.) The double and single removable rack inserts allow you to adjust the rack for the type of load you are washing. This is useful when washing a variety of dishes, pots and pans, or roasters.
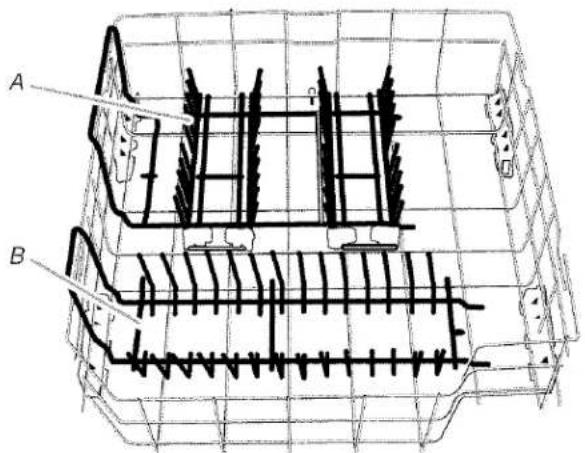
A. Double rack insert
B. Single rack insert
Double rack insert
The double rack insert allows you to wash a number of large plates, platters, and trays.
IMPORTANT: This insert must be used when using the PROSCRUB® wash option. All insert tines should be in the up position, and the dish should be placed in the open, middle section facing the PROSCRUB® spray jets.
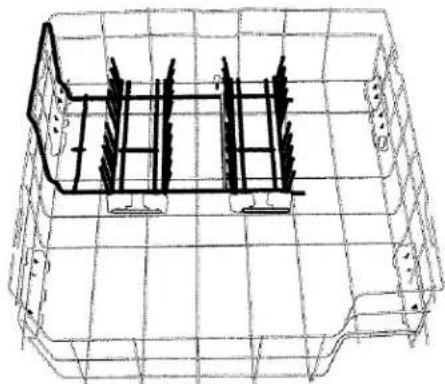
natural_image
Technical line drawing of a 3D structural framework with grid lines and support components (no text or symbols)The fold-down tines option on this insert gives you the flexibility to adjust your loading options for smaller plates and bowls to larger platters.
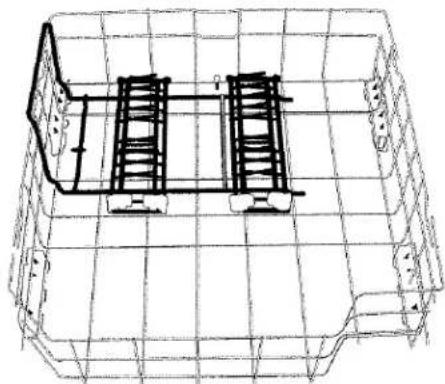
natural_image
Technical line drawing of a 3D wireframe model of a mechanical housing or enclosure (no text or symbols)Removing this insert allows you to wash larger items such as large mixing bowls, stock pots, and roasters.
Single rack insert
The single rack insert allows you to wash a number of medium-sized plates and bowls.
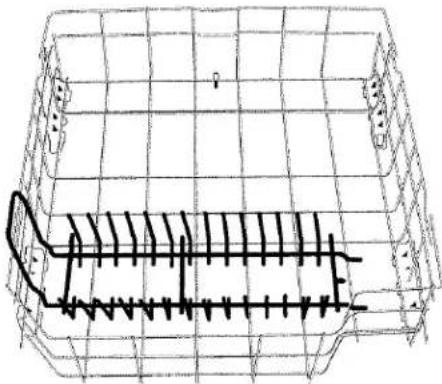
natural_image
Wireframe diagram of a container with internal structural lines (no text or symbols)To remove double and single inserts
- Pull handle out to the right and lift up to release.
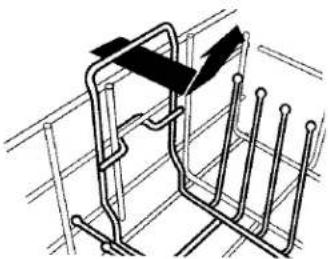
natural_image
Technical line drawing of a mechanical assembly with no visible text or symbols- Lift insert out of rack.
To install double insert
NOTE: It will be easier to install the inserts if you remove the silverware basket from the rack.
- Place the double insert end legs under the 3rd wire from the right as shown below.
IMPORTANT: Make sure that the curved wires, on the bottom of the insert, fit over the wires in the bottom of the rack.
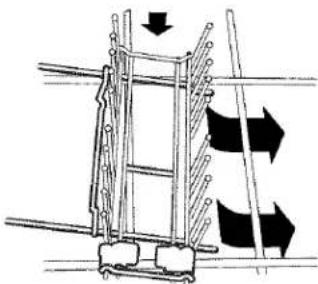
natural_image
Diagram of a ladder with directional arrows indicating movement or force (no text or symbols)- Push down on insert until handle fits against outer rack edge.
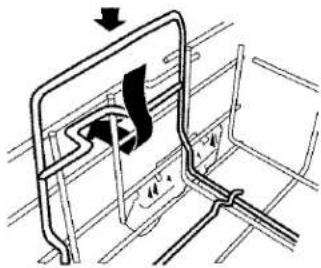
natural_image
Technical line drawing of a mechanical component with arrows indicating motion or assembly (no text or symbols)- When center tab under handle locks in under the middle side rack wire, the insert is in place. (See illustration.)
To install single insert
- Place the single insert end legs under the 2nd wire from the right as shown below.
IMPORTANT: Make sure the 3 hooks at the back of the insert are installed over the 2nd bottom rack wire from the front of the rack.
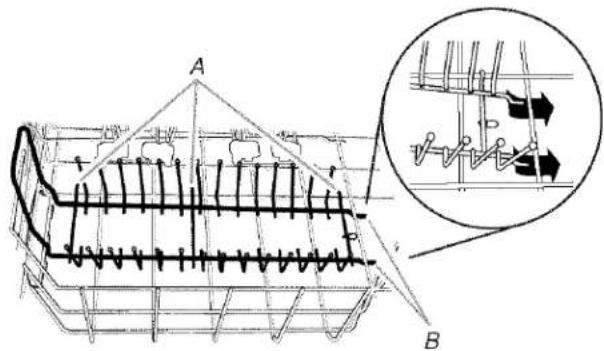
A. 3 insert hooks
B. Single insert end legs
- Push down on insert until handle fits against outer rack edge.
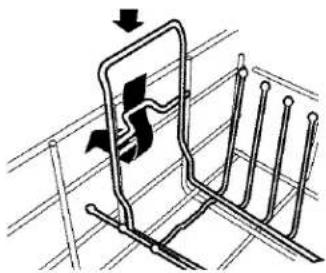
natural_image
Diagram of a mechanical component with arrows indicating motion, no text or symbols present- When center tab under handle locks in under the middle side rack wire, the insert is in place. (See illustration.)
CULINARY CADDY® utensil basket
Use the utensil basket to hold specialty cooking utensils (serving spoons, spatulas, and similar items), or overflow silverware items.
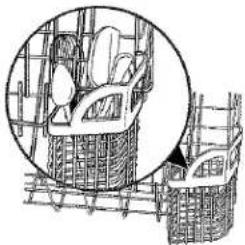
natural_image
Architectural line drawing of a construction site with scaffolding and a magnified inset showing structural details (no text or symbols)The basket hangs on the bottom rack in the right-hand corner. Load the basket while it is on the bottom rack or remove the basket for loading on a counter or table.
NOTE: Spin the spray arms. Be sure items in the basket do not stop the rotation of the spray arms.
SURE-HOLD ^® small items mesh pouch
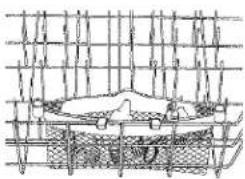
This pouch hangs on the front of the bottom rack. Use it to hold small items that could otherwise "fly" around inside the dishwasher during a cycle.
natural_image
Diagram of a grid structure with a central object and a label 'U' (no readable text or symbols)Silverware Basket
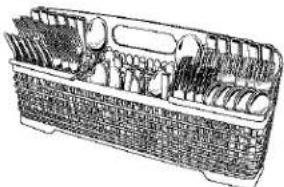
Load the silverware basket while it is in the bottom rack or take the basket out for loading on a counter or table. (See recommended loading pattern shown.)
IMPORTANT: Always load items (knives, skewers, etc.) pointing down.
- Load items with covers down, using the slots, to avoid silverware nesting.
natural_image
Line drawing of a woven basket containing various household appliances (no text or symbols)Place small items such as baby bottle caps, jar lids, corncob holders, etc., in the section(s) with hinged cover(s). Close the cover to hold small items in place.
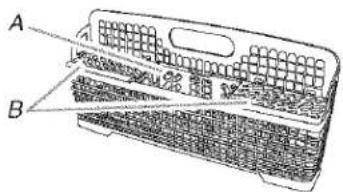
A. Center cover open
B. End covers closed
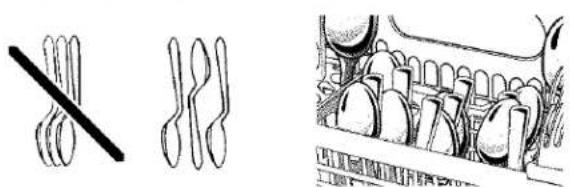
■ When covers are up, mix items in each section of the basket with some pointing up and some down to avoid nesting. Spray cannot reach nested items.
natural_image
Illustration of biological structures with no visible text or symbolsMix silverware to avoid nesting when the cover is up in the basket.
NOTES:
■ Do not load silver or silver-plated silverware with stainless steel. These metals can be damaged by contact with each other during washing.
■ Some foods (such as salt, vinegar, milk products, fruit juices, etc.) can pit or corrode silverware. Run a rinse cycle if you do not have a full load to wash immediately.
■ Unload or remove the basket before unloading the racks to avoid spilling water droplets on the silverware.
CYCLES AND OPTIONS
Cycle Selections
Select the wash cycle and options desired. Or press START/RESUME to repeat the same cycle and options as in the previous cycle.
NOTE: If the last cycle you completed was a rinse cycle, the dishwasher will run the last full wash cycle and options that you selected when you press Start/Resume.
If the power is off or the door is open for an extended period of time, the Start/Resume button memory will default to the Normal cycle with heated drying.
■ If you do not run the dishwasher daily, close the door to maintain memory.
A “●” shows what steps are in each cycle.
Temperatures indicate where extra heat is added.
Water usage is shown in U.S. gallons/liters.
This model meets the ENERGY STAR® guidelines for energy efficiency.
Cycle time includes dry time. An asterisk ( ^+ ) by the cycle time indicates the cycle time might be longer depending on the temperature of the water entering the dishwasher.
| Heavy Duty | ||||||
| Use this cycle for heavily soiled pots, pans, casseroles, regular tableware and hard** water conditions.[IMAGE] Use both detergent dispenser sections. | ||||||
| Pre-Wash | Main Wash | Rinse | Final Heated Rinse | Dry | Minimum Time (min) | Water Usage (gal/L) |
| ● | ●140°F*(60°C) | ● | ●140°F(60°C) | ● | 95* | 6.9-7.8/26-30 |
| Normal | ||||||
Use this cycle for loads with normal amounts of food soil. (The energy-usage label is based on this cycle.) During the main wash, the wash action will repeatedly pause for several seconds. Use both detergent dispenser sections. Use both detergent dispenser sections. | ||||||
| Pre-Wash | Main Wash | Pre-Rinset† | Final Heated Rinse | Dry | Minimum Time (min) | Water Usage (gal/L) |
| ● | ●105-140°F(40.6-60°C) | ●* | ●140°F(60°C) | ● | 77* | 3.9-7.1/14.7-27 |
| Light/China | ||||||
Use this cycle for lightly soiled and delicate loads. During the heated dry, the heating element cycles on and off. Use main detergent dispenser section. Use main detergent dispenser section. | ||||||
| Rinse | Main Wash | Pre-Rinset† | Final Heated Rinse | Dry | Minimum Time (min) | Water Usage (gal/L) |
| ● | 115°F*(46°C) | ●* | 135°F(57°C) | ● | 72° | 4.6-6.8/17-26 |
| Quick Clean Up | ||||||
Use this cycle for a quick wash to clean dishes prior to entertaining. Towel drying may be needed. Use main detergent dispenser section. Use main detergent dispenser section. | ||||||
| Rinse | Main Wash | Rinse | Final Heated Rinse | Dry | Minimum Time (min) | Water Usage (gal/L) |
| ● | ● | ● | ● | 30* | 6.9/26 | |
| Rinse Only | ||||||
Use this rinse cycle for rinsing dishes, glasses, and silverware that will not be washed right away. Do not use detergent with this cycle. Do not use detergent with this cycle. | ||||||
| Pre-Wash | Main Wash | Rinse | Final Heated Rinse | Dry | Time (min) | Water Usage (gal/L) |
| ● | 10 | 1.8/7 | ||||
†A small amount of water is run through the pump to remove soil particles between the main wash and final rinse.
*If the incoming water temperature is less than the recommended temperature or food soils are heavy, the cycle will automatically compensate by adding time, heat, and water as needed.
**Hard water is defined as 7 grains per U.S. gallon and above.
NOTE: The sensor in your dishwasher monitors the soil level. Cycle time and/or water usage can vary from the numbers above as the sensor adjusts the cycle for the best wash performance.
Canceling a Cycle
For Model KUDU03ST
Open the door slightly to stop the cycle. Wait for the spraying action to stop before opening the door to gain access to the control panel. Press CANCEL.
The display shows
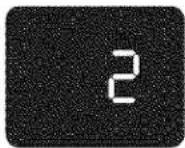
Your dishwasher starts a 2-minute drain (if needed). Let the dishwasher drain completely. The light turns off after 2 minutes.
NOTE: If your dishwasher does not need draining, the light turns off. Select a new cycle and options.
To stop the drain
You can press CANCEL again to stop the drain immediately. Be sure to drain the dishwasher before starting a new cycle.
To clear the indicators
Press CANCEL before starting the dishwasher to clear all options and cycles.
For Models KUDU03FT, KUDU03FTPA
- Open the door slightly to stop the cycle. Wait for the spraying action to stop before opening the door to gain access to the control panel.
- Press CANCEL. The Cancel light glows.
- Close the door firmly. The dishwasher starts a 2-minute drain (if needed). Let the dishwasher drain completely.
To stop the drain
Open the door and press CANCEL again. Be sure to drain the dishwasher before starting a new cycle.
To clear the indicators
Press CANCEL before starting the dishwasher to clear all options and cycles.
Changing a Cycle or Setting
For Model KUDU03ST
During the first minute of a cycle
- Open the door.
- Press a new cycle and/or options.
- Check the detergent dispensers. They must be filled properly for the new cycle. (See "Detergent Dispenser" in the User Instructions for more details.)
- Press START/RESUME.
- Close the door firmly within 3 seconds of pressing Start/Resume. The dishwasher resumes the new cycle and/or option after a 5-second pause.
After the first minute of a cycle
- Press CANCEL.
The display shows
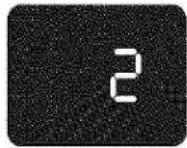
Your dishwasher starts a 2-minute drain (if needed). Let the dishwasher drain completely. The light turns off after 2 minutes.
NOTE: If your dishwasher does not need draining, the light turns off.
- Open the door.
- Select a new cycle and/or options.
- Check the detergent dispensers. They must be filled properly for the new cycle. (See "Detergent Dispenser" in the User Instructions for more details.)
- Press START/RESUME.
- Close the door firmly. The dishwasher resumes the new cycle and/or option after a 5-second pause.
For Models KUDU03FT, KUDU03FTPA
During the first minute of a cycle
- Open the door.
- Press a new cycle and/or options.
- Check the detergent dispensers. They must be filled properly for the new cycle. (See "Detergent Dispenser" in the User Instructions for more details.)
- Press START/RESUME.
- Close the door firmly within 3 seconds of pressing Start/Resume. The dishwasher resumes the new cycle and/or option after a 5-second pause.
After the first minute of a cycle
- Open the door slightly to stop the cycle. Wait for the spraying action to stop before opening the door to gain access to the control panel.
- Press CANCEL. The Cancel light glows.
-
Close the door. Your dishwasher starts a 2-minute drain (if needed). Let the dishwasher drain completely.
-
Open the door. Select a new cycle and/or options.
- Check the detergent dispensers. They must be filled properly for the new cycle. (See "Detergent Dispenser" in the User Instructions for more details.)
- Press START/RESUME.
- Close the door firmly within 3 seconds of pressing Start/Resume. The dishwasher resumes the new cycle and/or option after a 5-second pause.
Adding Items During a Cycle
You can add an item anytime before the main wash starts. Open the door and check the detergent dispenser. If the cover is still closed, you can add items.
To add items
- Open the door slightly to stop the cycle. Wait for the spraying action to stop before opening the door.
- Open the door. If the detergent dispenser cover is still closed, add the item.
- Press START/RESUME.
- Close the door firmly within 3 seconds of pressing Start/Resume. The dishwasher resumes the cycle after about a 5-second pause.
Option Selections
You can customize your cycles by pressing the options desired. If you change your mind, press the option again to turn off the option. Select a different option if desired.
You can change an option anytime before the selected option begins. For example, you can press HEAT DRY anytime before drying begins.
Press START/RESUME to repeat the same cycle and options as in the previous wash cycle.
NOTE: If the last cycle you completed was a rinse cycle, when you press Start/Resume, the dishwasher runs the last full wash cycle and options.
PROSCRUB® wash option
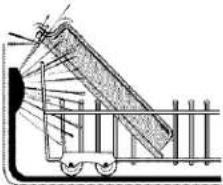
Select this option to activate the PROSCRUB ^® spray jets and provide intensified water spray to the back of the lower level rack. The PROSCRUB ^® wash option provides a concentrated wash action to pans, casseroles, etc. with tough food soil.
This option may add heat and wash time to the cycle.
NOTE: PROSCRUB® is an option with the Heavy Duty and Normal wash cycles.
IMPORTANT:
- Load pans, casserole dishes, etc. facing the PROSCRUB ^ spray jets in the back of the lower level rack. Tip items toward the rear of the dish rack to maximize coverage. Only one row of items may face the PROSCRUB ^ spray jets. Stacking, overlapping, or nesting items will keep the PROSCRUB ^ spray jets from reaching all of the surfaces.
■ Turn the PROSCRUB ^® wash option off if not loading items for this option.
natural_image
Technical line drawing of a mechanical device with a cart and ladder (no text or symbols)Side view of PROSCRUB ^® wash area
Hi-Temp Scrub
Select this option to heat the water during parts of the cycle, and add a rinse. Higher water temperatures and an extra rinse help clean tough soils. Hi-Temp Scrub, with the Heavy Duty cycle, heats the water in the main wash and the prewash. Hi-Temp Scrub, with the Normal cycle, raises the water temperature in the main wash.
This option adds heat, water, and wash time to a cycle.
NOTE: Hi-Temp Scrub is an option with the Heavy Duty and Normal cycles.
Sani Rinse
Select this option to raise the water temperature in the final rinse to approximately 155°F (68°C). The Sani Rinse option adds heat and time to the cycle. This high temperature rinse sanitizes your dishes and glassware in accordance with NSF/ANSI Standard 184 for Residential Dishwashers. Certified residential dishwashers are not intended for licensed food establishments.
NOTE: The Heavy Duty cycle automatically uses this option. Sani Rinse is an option with the Normal cycle. Only these sanitization cycles have been designed to meet the NSF/ANSI requirements.
Heat Dry
The Heat Dry option in combination with rinse aid will give you excellent drying results. The energy to use Heat Dry costs pennies per cycle. Heat Dry is on when the light is lit on the Heat Dry button. Be sure to load plastic items in the upper rack to avoid damage.
You may turn off the Heat Dry option by pressing HEAT DRY so that the light goes off. However, you will have items in your dish load that will not be dry at the end of the cycle.
NOTE: The Heat Dry option is used in all cycles except Rinse Only.
Control Lock
Use control lock to avoid unintended use of your dishwasher. You can also use the control lock feature to avoid unintended cycle or option changes during a cycle.
When Control Lock is lit, all buttons are disabled.
NOTES:
■ The dishwasher door can be opened while the controls are locked.
■ You can turn on the lock while the dishwasher is running.
To turn on the lock
Press and hold HEAT DRY for at least 4 seconds. The Control Lock light glows.
If you press any pad while your dishwasher is locked, the light flashes 3 times.
To turn off the lock
Press and hold HEAT DRY for at least 4 seconds. The Control Lock light turns off.
4 Hour Delay
Select this option to run your dishwasher at a later time or during off-peak hours. You can add items to the load anytime during the delay countdown. (See "Adding Items During a Cycle.") The delay countdown will not continue if the door is not closed firmly.
To delay the start (Model KUDU03ST)
- Open the door.
- Select a wash cycle and options. The selected cycle and option lights will glow.
- Press 4 HOUR DELAY. You will see
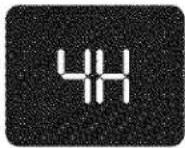
showing in the display. The 4 Hour Delay light will glow.
- Press START/RESUME. The Start/Resume light will glow.
- Close the door firmly.
NOTE: To cancel the delay, open the door and press 4 HOUR DELAY. To immediately start your dishwasher, press START/RESUME.
To delay the start (all other models)
- Open the door.
- Select a wash cycle and options. The selected cycle and option lights will glow.
- Press 4 HOUR DELAY. The 4 Hour Delay light will glow.
- Press START/RESUME.
- Close the door firmly within 3 seconds of pressing Start/Resume.
NOTE: To cancel the delay, open the door and press 4 HOUR DELAY. To immediately start your dishwasher, press START/RESUME and close the door firmly within 3 seconds.
Status Indicators
Sanitized
If you select the Sani Rinse option, Sanitized light glows when the Sani Rinse cycle is finished. If your dishwasher did not properly sanitize your dishes, the light flashes at the end of the cycle. This can happen if the cycle is interrupted. The light goes off when you open and close the door or press CANCEL.
Clean
The Clean light glows when a cycle is finished. The light turns off when you open and close the door or press CANCEL.
SÉCURITÉ DU LAVE-VAISSELLE

flowchart
graph LR
    A["KUDU03FT"] --> B["CYCLES"]
    B --> C["Heavy Duty"]
    B --> D["Normal Wash"]
    B --> E["Light/China"]
    B --> F["Quick Cleanup"]
    B --> G["Rinse Only"]
    H["OPTIONS"] --> I["ProScrub"]
    H --> J["Sani Rinse"]
    H --> K["Hi-Temp Scrub"]
    H --> L["Heat Dry Sink"]
    H --> M["4 Hour Delay"]
    N["START/RESUME"] --> O["CANCEL"]
    P["Washing"] --> Q["Drying"]
    R["Clean"] --> S["Sanitized"]
KUDU03FTPA

MISE EN MARCHE
natural_image
Line drawing of a hand using a tool to press or install a device with a circular button (no text or symbols)natural_image
Illustration showing two hands operating a mechanical device with a rotating knob (no text or symbols)natural_image
Line drawing of a hand pouring liquid into a multi-gas washing machine (no text or symbols)natural_image
Technical line drawing of a multi-box appliance with cutouts and internal compartments (no text or symbols)natural_image
Technical line drawing of a rectangular tray with internal grid structure and mounting points (no text or symbols)natural_image
Technical line drawing of a multi-level container filled with various items, no text or symbols presentnatural_image
Technical line drawing of a mechanical component or bracket assembly (no text or symbols)natural_image
Technical line drawing of a mechanical assembly with no visible text or symbolsnatural_image
Technical line drawing of a mechanical clamp or bracket assembly (no text or symbols)natural_image
Line drawing of a mechanical clamp or bracket with a circular component (no text or symbols)natural_image
Technical line drawing of a mechanical assembly or bracket (no text or symbols)natural_image
Technical line drawing of a mechanical clamp or bracket assembly (no text or symbols)natural_image
Line drawing of a mechanical clamp or bracket assembly (no text or symbols)natural_image
Technical line drawing of a mechanical clamp or bracket assembly (no text or symbols)natural_image
Line drawing of a basket filled with various items, no text or symbols presentnatural_image
Technical line drawing of a mechanical assembly with gears and housing (no text or symbols)natural_image
Line drawing of a wire cage filled with scattered coins (no text or symbols)natural_image
Technical line drawing of a mechanical or architectural structure with grid patterns and labeled point A (no readable text or symbols)A. Pieds de l'insertion
natural_image
Pure technical line drawing of a mechanical or electrical component without any text, numbers, or symbolsnatural_image
Technical line drawing of a mechanical assembly with a magnified inset showing a clamping tool (no text or symbols present)natural_image
Diagram of a container with multiple cylindrical tanks and a small container, no text or symbols present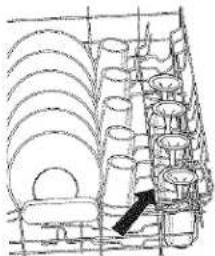
natural_image
Technical line drawing of a mechanical assembly with multiple cylindrical components and a black arrow indicating a specific part (no text or symbols present)natural_image
Technical line drawing of a mechanical component with internal structure (no text or symbols)natural_image
Technical line drawing of a mechanical component or bracket assembly (no text or symbols)natural_image
Technical line drawing of a mechanical assembly or bracket (no text or symbols)natural_image
Technical line drawing of a mechanical bracket with a circular component (no text or symbols)natural_image
Technical line drawing of a mechanical clamp or bracket assembly (no text or symbols)natural_image
Technical line drawing of a mechanical assembly with no visible text or symbolsnatural_image
Technical line drawing of a mechanical clamp or bracket assembly (no text or symbols)natural_image
Simple line drawing of a mechanical clamp or bracket with a circular knob (no text or symbols)natural_image
Technical line drawing of a mechanical assembly or bracket (no text or symbols)natural_image
Technical line drawing of a mechanical component with layered structure and internal components (no text or symbols)natural_image
Technical line drawing of a multi-layered mechanical or architectural component, possibly a conveyor or gear assembly (no text or symbols)natural_image
Illustration of various household items including a kettle, bottles, and a woven basket (no text or symbols)Charge d'ustensiles
natural_image
Illustration of a person cleaning a kitchen with a basket and plate (no text or symbols)Charge mixte
natural_image
Architectural line drawing of a column with circular components and structural elements (no text or symbols)natural_image
Diagram of a mechanical cart with a triangular load and railings, no visible text or symbolsnatural_image
Technical line drawing of a 3D structural framework with grid lines and support components (no text or symbols)natural_image
Technical line drawing of a 3D structural framework with grid lines and internal components (no text or symbols)natural_image
Technical line drawing of a wire mesh container with internal spring-like structure (no text or symbols)natural_image
Technical line drawing of a structural support frame with no visible text or symbolsnatural_image
Diagram of a ladder with directional arrows indicating movement or force (no text or symbols)natural_image
Technical line drawing of a mechanical assembly with no visible text or symbolsnatural_image
Diagram of a mechanical component with arrows indicating motion, no text or symbols presentnatural_image
Architectural sketch of a building interior with scaffolding and a circular inset showing a person (no text or symbols)natural_image
Diagram of a bird perched on a mesh fence with no visible text or symbolsPanier à couverts
natural_image
Illustration of a woven basket containing various kitchen utensils (no text or symbols)natural_image
Illustration of a mechanical assembly with gears and housing (no text or symbols)natural_image
Diagram of a mining cart with a conveyor belt and dust emission (no text or symbols)Sanitized/assainissement
- LAVE-VAISSELLE
- Your safety and the safety of others are very important.
- ! DANGER
- WARNING
- Before Using Your Dishwasher
- ⚠ WARNING
- PARTS AND FEATURES
- START-UP
- Using Your Dishwasher
- For all models:
- IMPORTANT (For model KUDU03ST):
- LOADING
- Culinary Tool Rack
- Up position
- Down position
- Removable culinary tool rack
- To remove the rack
- To replace the rack
- Mid Level Rack
- Removable mid level rack inserts
- To remove inserts
- To install rack inserts
- FLEXI-FOLD DOWN™ flexible tines
- To adjust the flexible tines
- SURE-HOLD® cup and stemware holder
- SURE-HOLD® light item clips
- To use a clip
- To move a clip
- Adjustable 2-position mid level rack
- To raise the rack
- To lower the rack
- Removable mid level rack
- Lower Level Rack
- PROSCRUB ® wash area
- Removable lower level rack inserts
- Double rack insert
- Single rack insert
- To remove double and single inserts
- To install double insert
- To install single insert
- CULINARY CADDY® utensil basket
- SURE-HOLD ® small items mesh pouch
- Silverware Basket
- NOTES:
- CYCLES AND OPTIONS
- Cycle Selections
- Canceling a Cycle
- For Model KUDU03ST
- To stop the drain
- To clear the indicators
- For Models KUDU03FT, KUDU03FTPA
- Changing a Cycle or Setting
- During the first minute of a cycle
- After the first minute of a cycle
- Adding Items During a Cycle
- To add items
- Option Selections
- PROSCRUB® wash option
- IMPORTANT:
- Hi-Temp Scrub
- Sani Rinse
- Heat Dry
- Control Lock
- To turn on the lock
- To turn off the lock
- Hour Delay
- To delay the start (Model KUDU03ST)
- To delay the start (all other models)
- Status Indicators
- Sanitized
- Clean
- SÉCURITÉ DU LAVE-VAISSELLE
- MISE EN MARCHE
- Panier à couverts
- Sanitized/assainissement
Brand : KITCHENAID
Model : KUDU03STBL3
Category : Dishwasher