KMT1255BS - Food processor BRANDT - Free user manual and instructions
Find the device manual for free KMT1255BS BRANDT in PDF.

User questions about KMT1255BS BRANDT
0 question about this device. Answer the ones you know or ask your own.
Ask a new question about this device
Download the instructions for your Food processor in PDF format for free! Find your manual KMT1255BS - BRANDT and take your electronic device back in hand. On this page are published all the documents necessary for the use of your device. KMT1255BS by BRANDT.
USER MANUAL KMT1255BS BRANDT
natural_image
Monochrome still life of pastries and macarons on a white surface, with a decorative floral design and teacup in the background (no text or symbols)MANUEL D'INSTRUCTION FR
INSTRUCTION MANUAL EN
natural_image
Modern kitchen appliance with a blender and digital display (no visible text or symbols)Chère Cliente, Cher Client,
flowchart
graph TD
    A["Start: Round-over mixing bowl"] --> B["Ordering a bowl with lid"]
    B --> C["Heating a bowl with lid"]
    C --> D["Heating a kitchen with lid"]
    D --> E["Heating a kitchen with lid"]
natural_image
Line drawings of a kitchen appliance showing three stages: mixing, pouring into a bowl, and adding a lid (no text or symbols)
Thank you for buying a BRANDT product and for your confidence in our company.
This product has been designed and manufactured for you considering your lifestyle and your requirements, so that it meets your expectations in the best way possible. We have invested it with our expertise, spirit of innovation and all the enthusiasm which has driven us for more than 60 years.
So that we are always able to satisfy your requirements as well as possible, our customer service is available, ready to listen and answer all your questions or suggestions.
You can also visit our website www.brandt.com where you will find our latest innovations as well as additional useful information.
BRANDT is happy to support you daily and hopes you will enjoy your purchase to the full.

Important: Before starting your machine, please installation and use carefully in order to familiarise yourself with how it operates quickly.
CONTENTS
1) FOR THE USER'S ATTENTION .... 19
a) Safety Instructions....19
b) Technical Data 21
c) Environmental Protection....21
2) INTRODUCTION TO YOUR MACHINE.... 22
a) General description of your kitchen machine 22
b) LCD Screen 24
a) Before Using for the First Time.... 25
b) Kitchen Machine....25
c) Blender 27
d) Meat mincer 28
e) Grater/Slicer 29
4) LOOKING AFTER AND CLEANING YOUR MACHINE.... 30
a) Cleaning the Machine 30
b) Storing the Machine 30
1) FOR THE USER'S ATTENTION

Keep these instructions with your machine. If you sell this machine to another person second-hand, make sure you give the new owner these instructions. Please read these instructions before installing and using your machine. They are written for your safety and that of others.
a) Safety Instructions
Installation and connection:
- This machine is for domestic use only. It may only be used in a covered, enclosed and heated environment such as a kitchen or any other room meeting the same specifications. The use of this product on communal or professional premises such as office break rooms or workshops, camping or hotel sites, etc., is not compliant with the intended use as defined by the manufacturer.
- Before connecting the machine, make sure the mains voltage corresponds with that indicated on the machine's rating plate.
- Before using this machine place it on a smooth, dry and stable surface.
-
This machine may be used by individuals with limited physical, sensorial or mental capacities or having insufficient experience or knowledge as long as they do so under supervision and have received safety instructions concerning machine usage. Such individuals must also fully understand the potential dangers.
-
This machine must not be used by children. Keep the machine and its power cable out of reach of children.
• Children should not play with the machine. - Precautions must be taken when handling the blender' sharp blades, when emptying the bowl or during cleaning.
- Never put your hands in the bowls when the machine is operating, or when connected to a power supply, because this can be dangerous and may cause injuries.
- It is potentially dangerous to leave the machine unattended when it is turned on or if it is operating when empty.
- The use of accessories that are not recommended by the manufacturer of the machine may cause danger or injuries.
- Stop the machine and disconnect the power supply before changing accessories or before approaching mobile parts during operation.
- WARNING: Make sure the machine is disconnected from the power supply before removing the blender from its base.
• Always disconnect the machine when unattended, and before assembling, dismantling or cleaning. - Never pull on the cord. Disconnect the machine by holding the plug.
-
If the power cable is damaged, it must be replaced by the manufacturer, its after-sales service or any other similarly qualified person to avoid any dangers.
-
Before cleaning, make sure the machine's power cable is unplugged. Allow the machine to cool before cleaning.
- To protect yourself from the risk of electric shock, do not, in any circumstances, immerse the base of the machine in water or other liquids.
- Do not use chemical products, steel wool or abrasive cleaners to clean the outside of the machine. This risks damaging it.
| Position | Utensil | Type of mixture | Duration |
| 1-3 or Pulse | Dough hook | Thick mixture (e.g. bread or pastry) | MAX: 6 min. |
| 4-6 or Pulse | Whisk Light | light mixture (cream, whisked egg whites) | MAX/2 min. |
| 1-4 or Pulse | Flat beater | Mixture of average weight (e.g. pancakes or spongy mixture) | MAX: 6 min. |
| 6 | Blender | - 2 min. |
b) Technical Data
| Model | KMT1255B* |
| Power supply 220~240 V/50 Hz | |
| Normal power 1200 W | |
| Bowl capacity 5.5 L | |
| Dimensions (HxWxD mm) H 357 x L 202 x D 370 mm | |
| Net weight 10.1 Kg | |
c) Environmental Protection
At the end of its life this product must not be discarded with household waste. It must be taken to a recycling centre or to your dealer. This makes it possible to avoid consequences resulting from inappropriate disposal that are harmful to health and the environment, and to recycle materials to save energy and significant resources.
A logo appears on the product reminding you not to discard it with household waste. For further information, contact your council offices or the shop where you bought this product.
2) INTRODUCTION TO YOUR MACHINE
a) General description of your kitchen machine
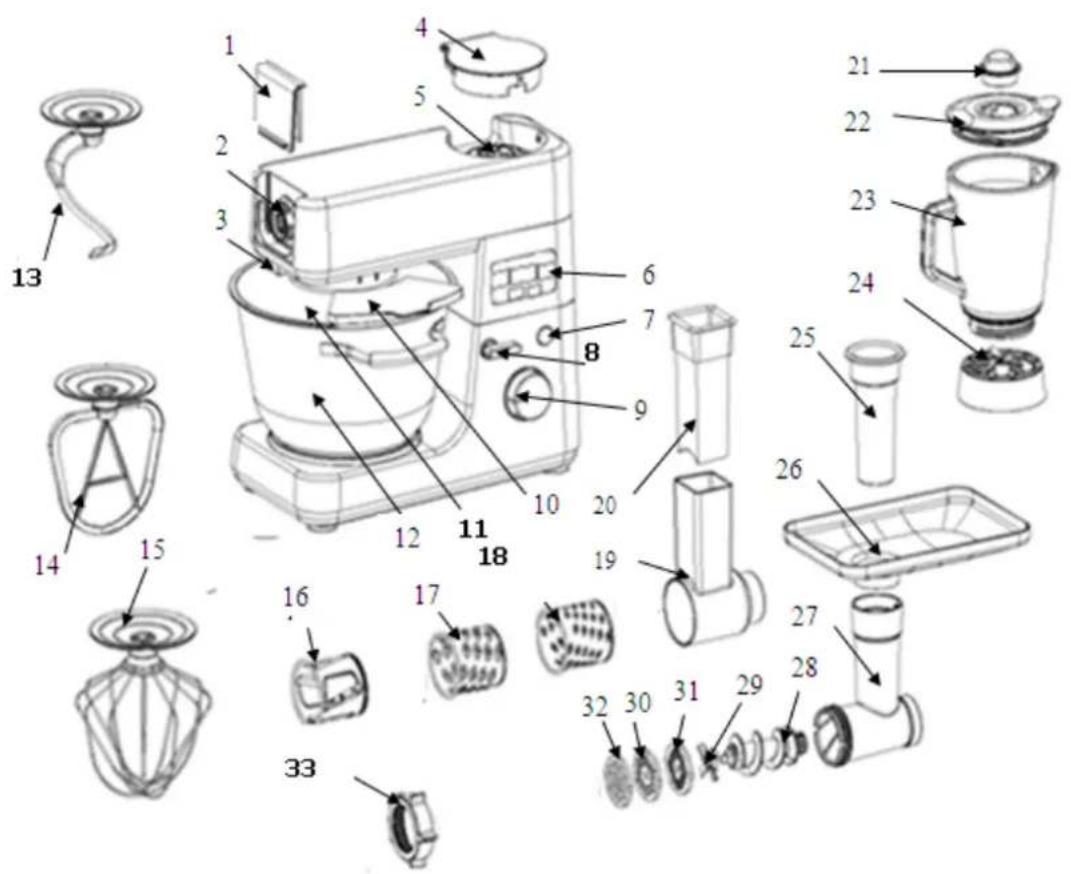
| 1 | Cover protecting the slow outlet |
| 2 | Slow outlet (slow speed) |
| 3 | Lever for attaching (and removing) accessories on the slow outlet |
| 4 | Cover protecting the fast outlet |
| 5 | Fast outlet (high speed) |
| 6 | LCD Screen |
| 7 | Pulse button |
| 8 | Button for raising the motor unit |
| 9 | Speed selector |
| 10 | Lid opening |
| 11 | Anti-splatter cover |
| 12 | Stainless steel bowl |
| 13 | Dough hook |
| 14 | Beater |
| 15 | Whisk |
| 16 | Vegetable slicer |
| 17 | Coarse greater |
| 18 | Medium grater |
| 19 | Box for storing graters |
| 20 | Pusher |
| 21 | Measuring cap |
| 22 | Lid |
| 23 | Glass jar |
| 24 | Base |
| 25 | Pusher |
| 26 | Mincer plate |
| 27 | Detachable mincer head |
| 28 | Endless screw |
| 29 | Stainless steel blade |
| 30 | Fine grater disk |
| 31 | Medium grater disk |
| 32 | Coarse grater disk |
| 33 | Nut |
b) LCD Screen
![A B [8:88] C D C OK E](/content/2026/05/1051349/images/83b12edc7c8c3fc983f6d46b6ee3cfeb8b1c3e001b3bbc9801fc9221c82b2f46.jpg)
A: Time display
The time can be adjusted from 1 second to 10 minutes. It is displayed by default in the format 0:00. It can be set in seconds. To set the time, simply press the - and + buttons located next to the display (corresponding to the letters B and C on the diagram above). To confirm, press the OK button (E).
Note: If the time has not been set by the user, the machine will count the time (0:01, 0:02, 0:03, etc.) and no longer count down (1:59, 1:58, 1:57, etc.)
B: Button for decreasing time
C: Button for increasing time
D: Reset: Return to zero/cancel
E: OK button
This button lets you confirm the time. Please note, the time is not confirmed automatically, you must press the OK button for it to be recorded.
a) Before Using for the First Time
- Before using this machine for the first time clean the motor unit with a damp cloth.
- Wash the bowls in hot soapy water.
- Dry a ll parts carefully.
Caution, if you use the kitchen machine without the blender, check that the cover protecting the fast outlet (4) is correctly fixed on the machine. Otherwise the machine will not operate: a safety system will prevent it. An error message is displayed on the screen.
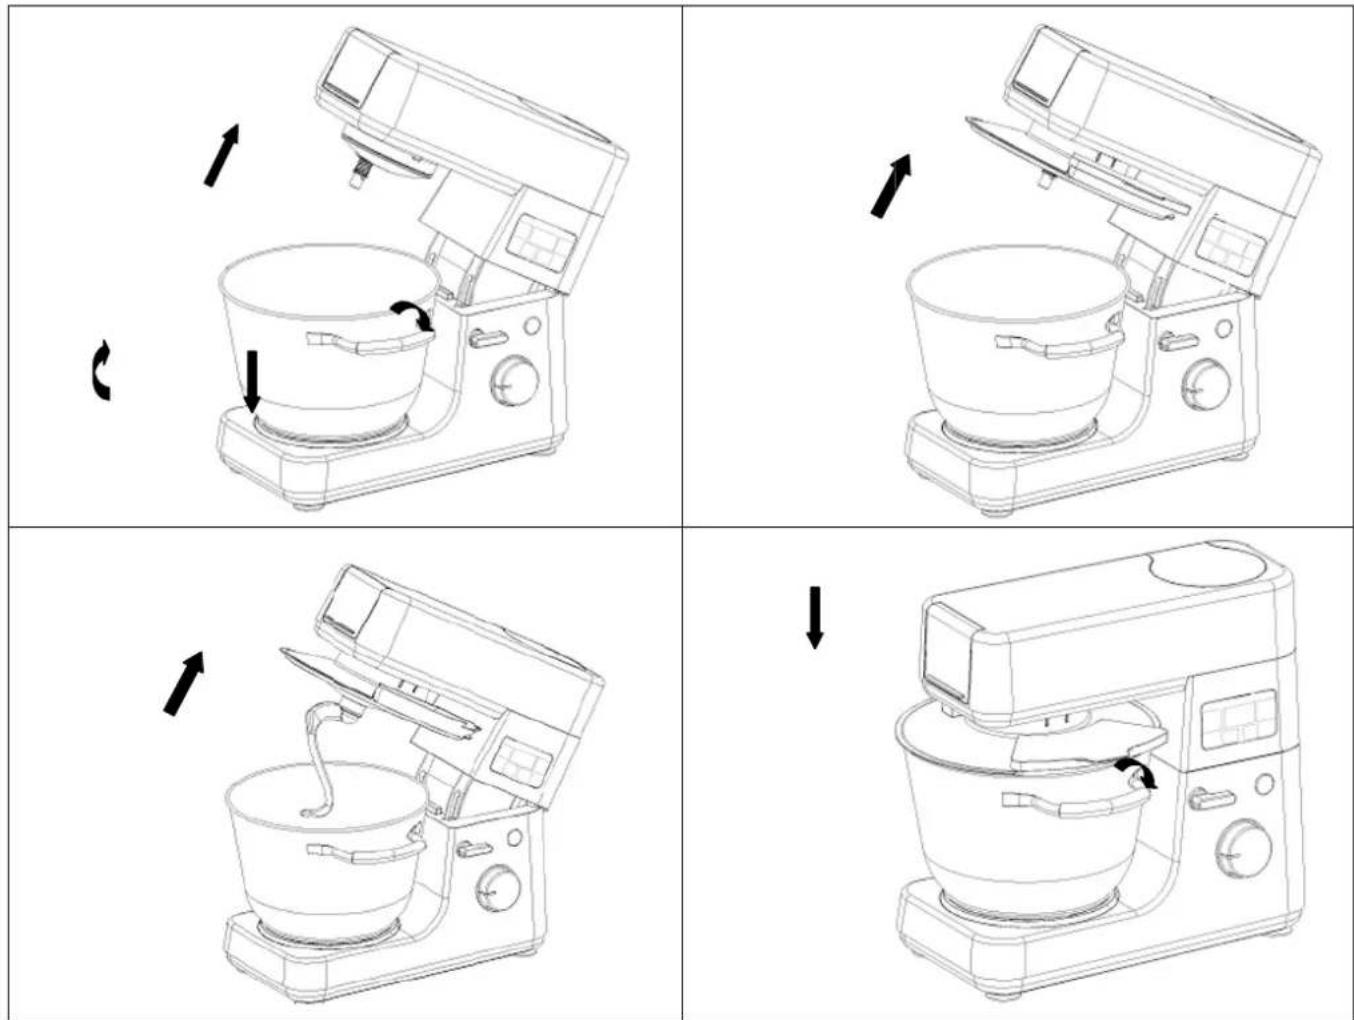
b) Kitchen Machine
flowchart
graph TD
    A["Step 1: Stopping with a bowl and lid"] --> B["Step 2: Cutting down the cup"]
    B --> C["Step 3: Baking in a kitchen appliance"]
    C --> D["Step 4: Clearing and cleaning of the kitchen"]
Plug in the machine.
- Press the button for raising the motor unit (8).
- Take the bowl off the machine and put the food into it. The maximum amount is 2 kg.
- Place the bowl in the location provided for it. Take care to lock it correctly.
- Put the required accessory (13), (14) or (15) on the drive shaft. Press the button for raising the motor unit (8) and lower the motor unit completely.
- Using the speed selector (9), choose a rotation speed between 1 and 8.
- To use the Pulse function press the Pulse button and hold it in this position for as long as required.
- You may adjust the mixing time for your preparation (see explanations part 2b) Time display). If you do not touch this function, the machine will count the time (0:01, 0:02, 0:03, etc.) instead of counting down (1:59, 1:58, 1:57, etc.).
- Once mixing has finished, press the button for raising the motor unit (8).
- To remove the accessories push them gently upwards and turn to the left.
- Remove the bowl.
- The mixture may now be removed from the bowl using a spatula.
- Unplug the machine.
- Clean the parts making up your kitchen machine referring to the "Cleaning" section.
Note: Stop the mixer if you see food collecting on the sides of the bowl. Remove this food using a spatula.
Using the machine for more than 10 minutes continuously is not recommended to prevent any risk of the motor overheating.
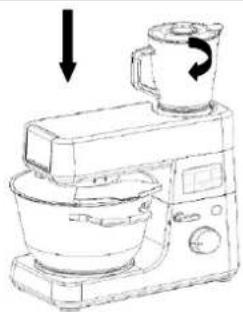
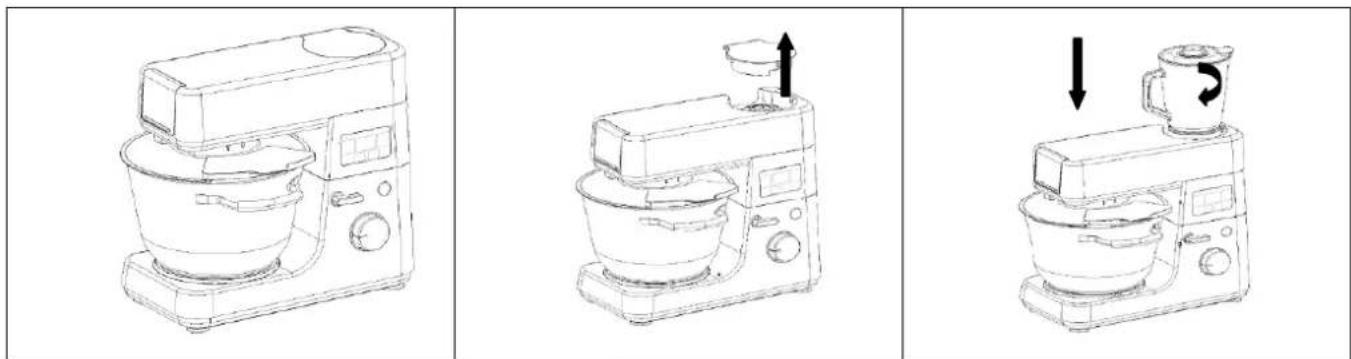
c) Blender
natural_image
Line drawings of a kitchen appliance with three different views: front, top, and side (no text or symbols)
Before using the blender refer to the safety instructions (Section 1.a.)

The blender may be used to mix preparations extremely finely. For example it can be used to makes soups, sauces, milk shakes, baby food, vegetables, fruit, purée, etc.). Cutting solid food into small bits before putting it in the blender is recommended.
- Remove the rear cover protecting the fast outlet (4)
- Place your food in the glass jar of the blender.
- Place the lid (22) and the cap (21) on the blender jar.
- Place the blender jar on its shaft and turn it clockwise until it locks.
- Plu g in your kitchen machine.
- Using the speed selector (9) choose the operating speed for the blender.
For correct use of the blender the speed selector should be on Position "8" or press the PULSE button.
Recommendations for use:
- The opening in the lid is for adding food whilst the blender is operating
- It may be necessary to turn the machine off during operation to move some food which is blocking the blades. However, for your safety take care to unplug the machine or place the cursor to Off and use a utensil to remove the food near the blade arms.
- Alwa ys keep your hand on the top of the blender when you use the machine.
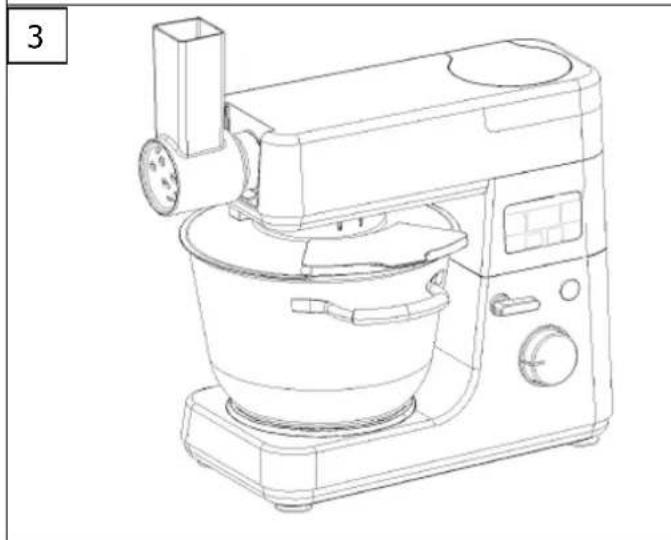
d) Meat mincer
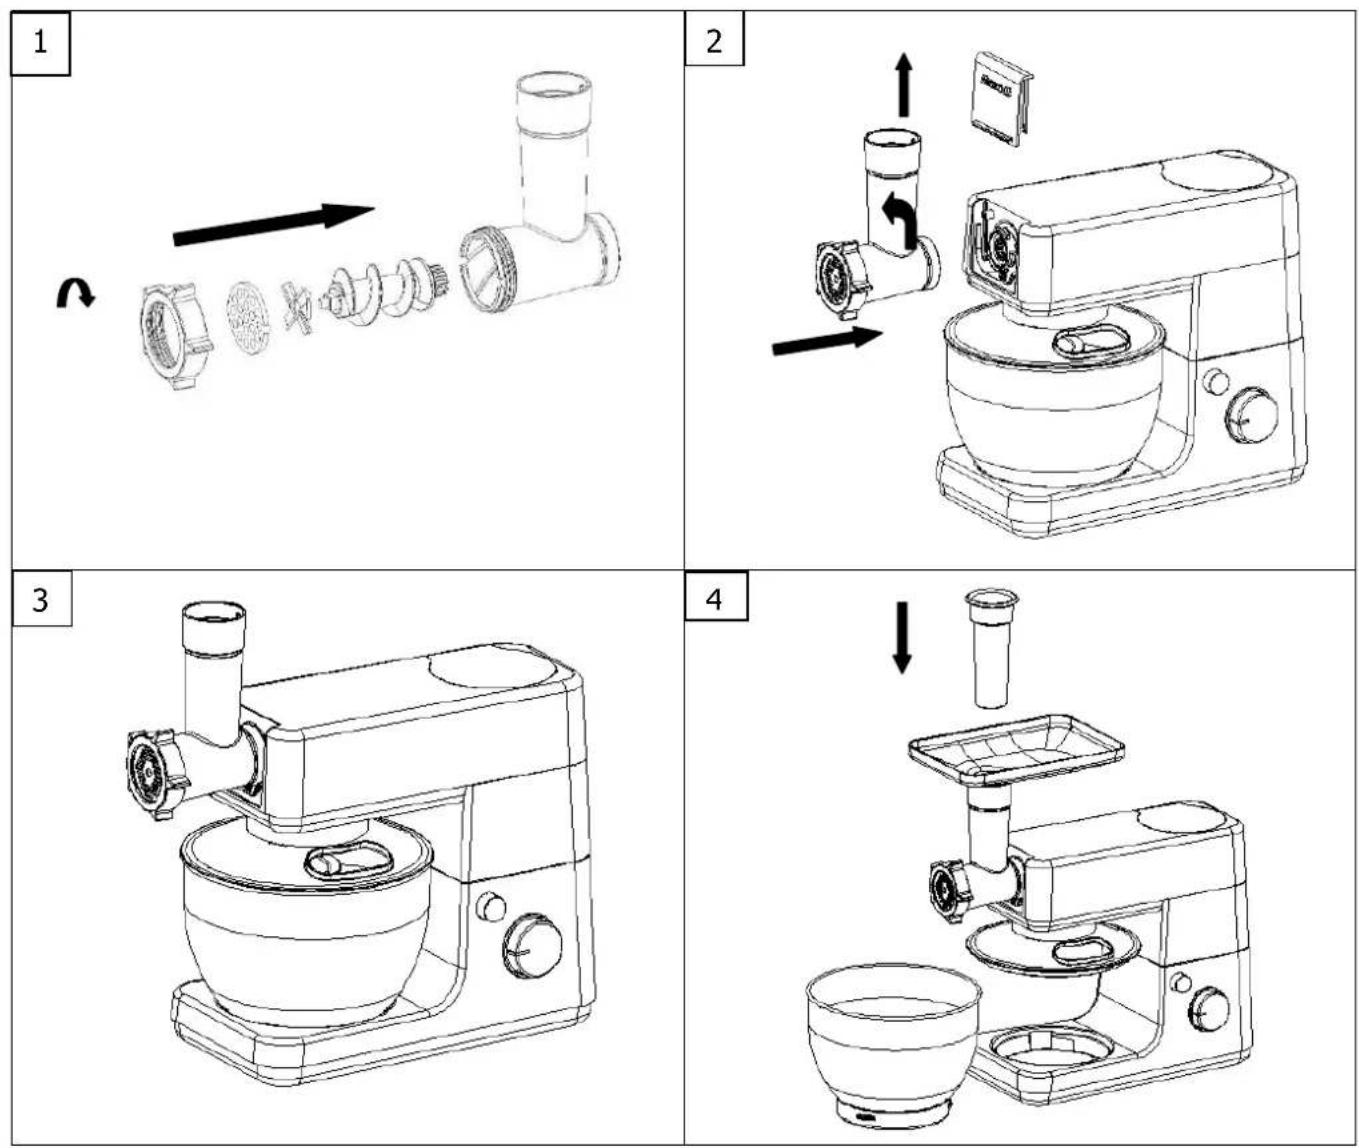
- Assembling the Accessory
- Ensure all the parts necessary for the meat mincer are assembled in the order shown in Diagram 1.
- Remove the cover protecting the front outlet (1).
- Fix the mincer head in the insert provided for this by tilting it slightly to the right (Diagram 2). Then turn it to the left. A slight "click" will then be heard indicating that the part is correctly fixed on the body of the machine.
- Assemble the plate on the mincer head (Diagram 4) and place a recipient beneath the mincer outlet to collect your preparation.
- Mince the meat.
- Prepare the food to be minced, making sure the bones, cartilage and nerves are removed. Cut in to pieces of about 2 cm x 2 cm to make this operation easier. If the food has been frozen ensure it is defrosted before inserting it into the machine.
- Plug in the machine.
- Place the speed selector on the required speed and then insert the food to be minced into the feed tube using the pusher. Put the food in bit by bit.
! Never put your fingers inside the tube!
- Once you have finished reposition the selector on Off and unplug the machine.
e) Grater/Slicer
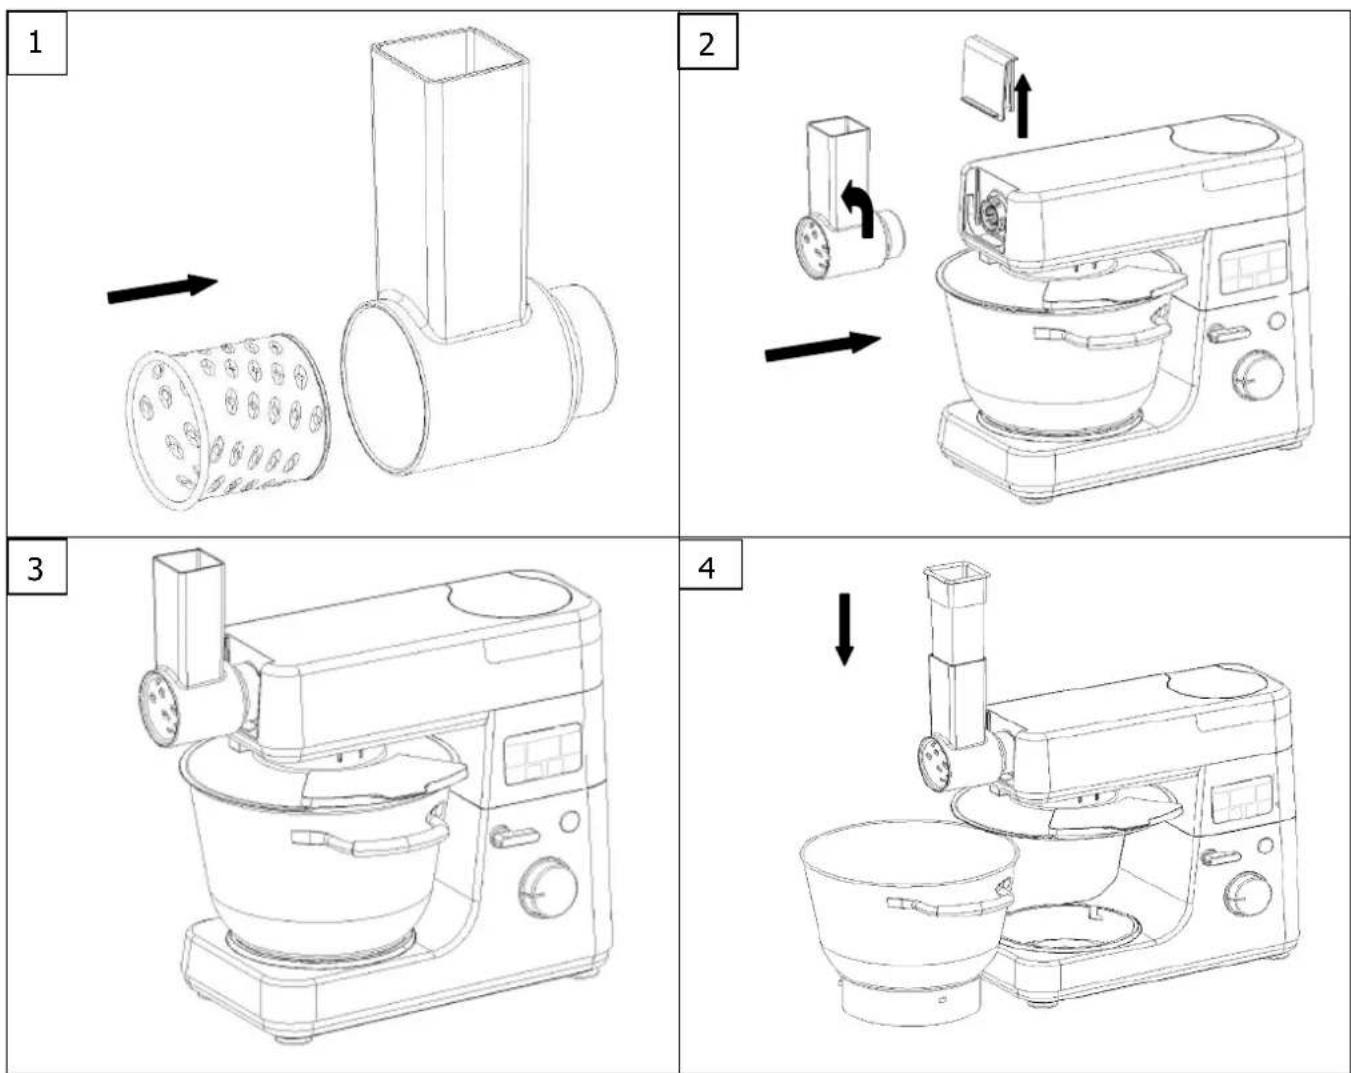
- Ensure all the parts necessary for the grater/slicer are assembled in the order shown in Diagram 1. Choose the accessory that suits you best from the slicing disk, the fine grater disk or the coarse grater disk.
- Remove the cover protecting the front outlet (Diagram 2).
- Then fit the grater/slicer onto your kitchen machine.
- Plug in your kitchen machine.
- Place a container under the Grater/Slicer accessory outlet to collect the food.
- Using the speed selector choose the operating speed.
- Place your food in the upper opening of your Grater/Slicer accessory and then if necessary push it using the pusher.
- Never touch the accessory with your fingers when it is working.
4) LOOKING AFTER AND CLEANING YOUR MACHINE
a) Cleaning the Machine

To avoid any danger:
- Unplug the machine before cleaning it.
- Never wash the motor unit in the dishwasher and never immerse it in water or rinse it under the tap.
- Clean all the parts of the machine in contact with food immediately after use to remove the food residues.
- Wash the detachable parts with a mixture of warm water and detergent.
- Clean the motor unit with a damp cloth.
- Allow all the parts which have been washed to dry before reassembling the machine.
b) Storing the Machine
After cleaning the parts dry them with a clean cloth. Assemble the parts and keep the machine in a dry place. Clean all the parts after each use.
flowchart
graph TD
    A["Step 1: Stopping with a bowl on a kitchen appliance"] --> B["Step 2: Cooling in a bowl with a lid, then dropping to a baking pan"]
    B --> C["Step 3: Baking in a kitchen appliance"]
    C --> D["Step 4: Drying in a kitchen appliance"]
natural_image
Line drawings of a kitchen appliance showing three stages: press, mixing bowl, and cooking pan (no text or symbols)
natural_image
Technical line drawing of a pipe fitting with a cylindrical component and a rectangular housing, showing an arrow indicating direction (no text or symbols)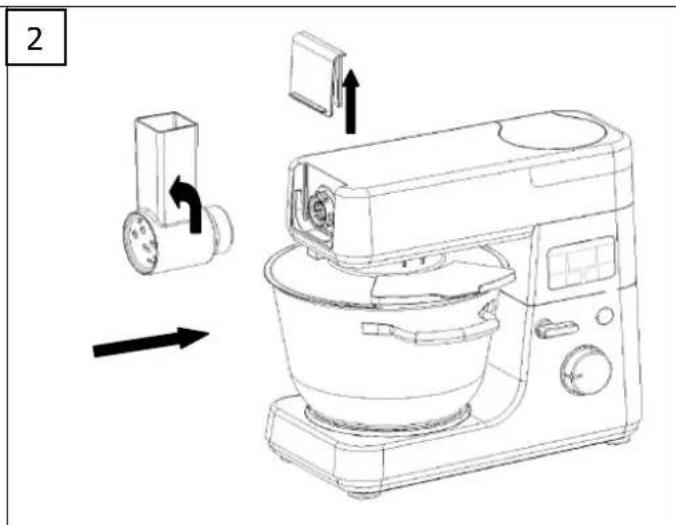
natural_image
Line drawing of a kitchen mixer with control panel and side-mounted fan (no text or symbols)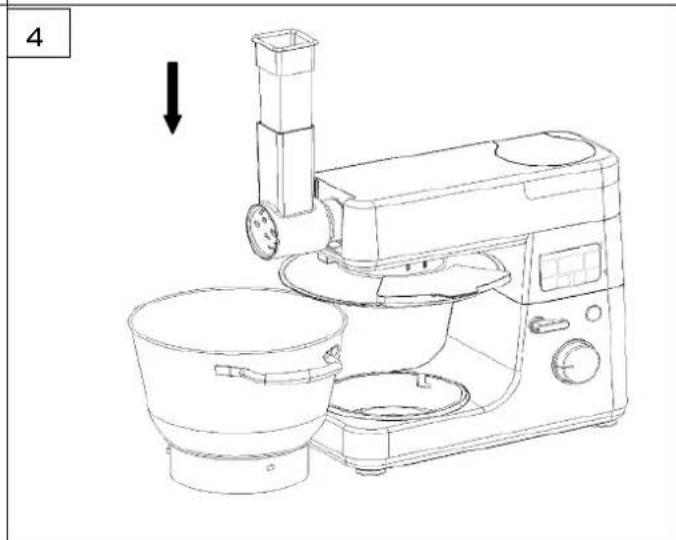
natural_image
Line drawing of a kitchen appliance with a side-mounted stand and control panel (no text or symbols)natural_image
Line drawing of a kitchen mixer with control panel and digital display (no text or symbols)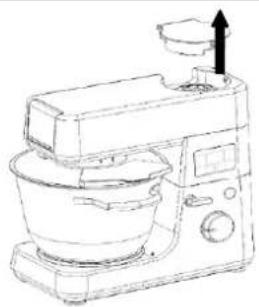
natural_image
Line drawing of a kitchen mixer with a side dish and upward arrow indicator (no text or symbols)