SOU-110V - Vacuum Sealer BRANDT - Free user manual and instructions
Find the device manual for free SOU-110V BRANDT in PDF.

User questions about SOU-110V BRANDT
0 question about this device. Answer the ones you know or ask your own.
Ask a new question about this device
Download the instructions for your Vacuum Sealer in PDF format for free! Find your manual SOU-110V - BRANDT and take your electronic device back in hand. On this page are published all the documents necessary for the use of your device. SOU-110V by BRANDT.
USER MANUAL SOU-110V BRANDT
natural_image
Two plastic bags with cartoon-style icons: one palm tree and one sun with flowers (no text or symbols)MANUEL D'INSTRUCTION FR
INSTRUCTION MANUAL EN
text_image
1 2 3 4 5 6 7 8 Sceller Stop Vider + ScellerThank you for buying a BRANDT product and for your confidence in our company.
This product has been designed and manufactured for you considering your lifestyle and your requirements, so that it meets your expectations in the best way possible. We have invested it with our expertise, spirit of innovation and all the enthusiasm which has driven us for more than 60 years.
So that we are always able to satisfy your requirements as well as possible, our customer service is available, ready to listen and answer all your questions or suggestions
You can also visit our website www.brandt.com where you will find our latest innovations as well as additional useful information.
BRANDT is happy to support you daily and hopes you will enjoy your purchase to the full.

Important: Before starting your machine, please read this guide for installation and use carefully in order to familiarise yourself with how it operates quickly.
CONTENTS
INTRODUCTION....14
1) FOR THE USER'S ATTENTION.... 14
a) Safety Instructions....14
b) Technical Data.... 17
c) Environmental Protection.... 17
2) PREPARATION OF YOUR MACHINE .... 17
a) Description of the Vacuum Sealer 17
b) Before Using for the First Time 18
a) Instructions for Use.... 18
b) Recommendations for Use....18
c) Rolls of bags.... 19
4) LOOKING AFTER AND CLEANING YOUR MACHINE 19
a) Cleaning the Vacuum Sealer 19
b) Storing your Vacuum Sealer.... 20
5) TROUBLESHOOTING 20
INTRODUCTION
The main function of the vacuum sealer is to store various foodstuffs for longer. This machine enables the freshness and flavour of food, and its usefulness, to be retained. Vacuum sealing keeps food up to five times longer than traditional storage methods.
This machine enables you to:
- Cook in advance and store individual or multiple portions.
- Prepare your picnic or your barbecue in advance and store it.
-
Eliminate freezer burn.
-
Pack food such as meat, fish, chicken, seafood and vegetables in order to freeze them or put them in the refrigerator.
• Pack dry food such as beans, peanuts, and cereals to keep them for longer.
This machine is ideal for packing individual portions for people concerned about their health and/or weight and for those on specific diets.
This system can also be used to store and protect other things such as valuable items like photos, important documents, stamps and collectors' books, jewels, cards, cartoons, etc. Or even ironmongery items such as screws, nails, bolts, medicines, dressings and other first aid equipment.
1) FOR THE USER'S ATTENTION

Keep these instructions with your machine. If you sell this machine to another person second-hand, make sure you give the new owner these instructions. Please read these instructions before installing and using your machine. They are written for your safety and that of others.
a) Safety Instructions
Installation and connection
- This machine is for domestic use only. It may only be used in a covered, enclosed and heated environment such as a kitchen or any other room meeting the same specifications.
- Having taken your product out of its packaging, check that the machine is in perfect condition and, in particular, that
the plug or the power cable is not damaged. If there is any doubt contact your dealer's after-sales service.
- Before connecting the machine make sure that the mains voltage corresponds to that indicated on the machine's rating plate.
- The use of adaptors and/or extension leads is not recommended. If these items prove to be indispensable, only use adaptors and extension leads compliant with the safety standards in force.
- This machine is not intended to be put into operation using an external timer or a separate remote control system.
- Before using this machine place it on a smooth, dry, stable surface.
- Keep the machine and its power cable out of reach of children under the age of 8.
- Children must be supervised to ensure they do not play with the machine.
During Use
- This machine is not intended to be used by people (including children) with reduced physical, sensory or mental capacities, or people with no experience or knowledge, unless they have the advantage of supervision or prior instructions about the use of the machine by someone responsible for their safety.
- This machine may be used by children aged 8 or over provided that they are supervised or instructed in using the machine completely safely and they understand the dangers incurred properly.
-
So as not to burn yourself never touch the welding bar when the machine is working.
-
Do not place the machine on or near a hot surface (wood burner, furnace, hob, hot oven, micro-wave, etc.)
- Do not leave the machine when it is turned on because it could be a source of danger.
- Never unplug the power cable when the machine is heating.
- Never pull the lead but disconnect the machine by holding the plug.
- The use of accessories not recommended by the manufacturer of the machine may cause danger or injuries.
Maintenance and cleaning
- Before cleaning ensure that the power cable for the machine is unplugged. Allow the machine to cool before cleaning.
- The power cable cannot be replaced. If the cable is damaged the machine should be discarded. This product is guaranteed by your distributor. For more details please refer to the guarantee conditions provided by the distributor.
- To protect yourself from the risk of electric shock, do not in any circumstances immerse the base of the machine in water or other liquids.
- Do not use chemical products, steel wool or abrasive cleaners to clean the outside of the machine. This risks damaging it.
- Cleaning and maintenance of the machine should not be carried out by children without supervision.
Non-compliant use
- Only use this machine for the purposes described in this manual.
- The manufacturer denies all responsibility in the event of non-compliant use.
- This machine is exclusively intended for domestic use in private dwellings. The use of this product in communal or professional premises such as rooms for breaks in offices or workshops, camping or hotel premises, does not represent compliant use as defined by the manufacturer.
- The operation of this vacuum packer is only guaranteed with the manufacturer's bags. Use only Brandt bags.
b) Technical Data
| Model | SOU-110V |
| Power supply | 220-240 V ~ 50 Hz |
| Consumption | 110 W |
| Capacity: | 9 l/min |
| Dimensions | 357*148*86.6 mm |
| Net weight | 1.4 kg |
c) Environmental Protection

At the end of its life this product must not be discarded with household waste. It must be taken to a recycling centre or to your dealer. This makes it possible to avoid consequences resulting from inappropriate disposal that are harmful to health and the environment, and to recycle materials to save energy and significant resources.
A logo appears on the product reminding you not to discard it with household waste. For further information, contact your council offices or the shop where you bought this product.
a) Description of the Vacuum Sealer
text_image
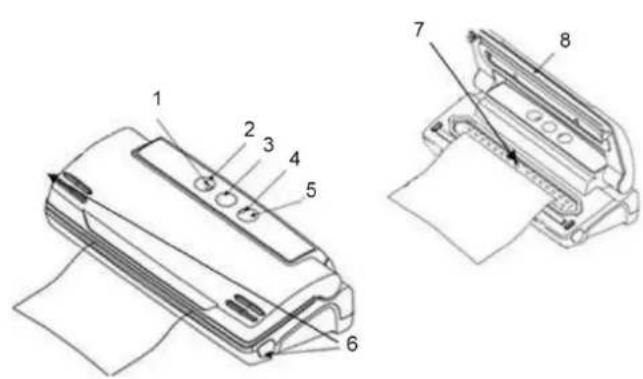
Technical diagram of a printer with numbered parts labeled 1 through 8, showing front and side views.- Welding indicator light
- Seal button
- STOP button
- Suction indicator light
- Vacuum+Seal button
- Locking button
- Pump
- Welding bar

flowchart
graph LR
    A["Sceller"] --> B["Stop"]
    B --> C["Vider + Sceller"]
b) Before Using for the First Time
Wash the parts. Refer to Section 4 - Looking After and Cleaning Your Machine
a) Instructions for Use
- Vacuum packaging
- To vacuum pack, place the items you wish to store inside the bag.
- Clean and straighten the open end of the bag. Make sure there are no bends or wrinkles on the end of the bag.
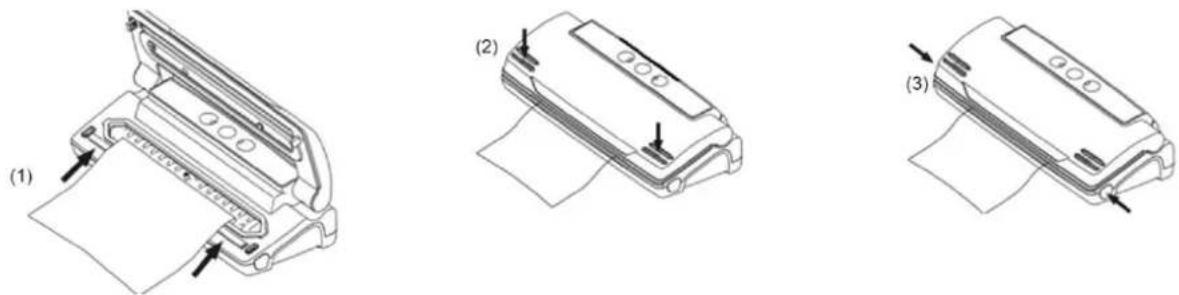
- The bag must be as flat as possible near the welding bar and folds must be removed. (Diagram 1)
- Close the cover and press forcefully on each side (where the two lines are drawn). Press until you hear two clicks. (Diagram 2)
- Press "Vacuum+Seal". Firstly the air in the bag will be sucked out (Vacuum+Seal light) and then the bag will be properly sealed (Seal light).
- Once the bag is sealed press the machine's two locking buttons. (Diagram 3)
natural_image
Three technical line drawings of printer designs with paper and print (no text or symbols)
If you want to control the placing under vacuum yourself, you can stop it at any time by pressing the STOP key.
2. Opening a sealed bag
Cut the end of the bag with a pair of scissors.
b) Recommendations for Use
-
Do not put too much in the bag. Leave enough length empty at the open end of the bag so that it can be placed on the suction plate.
-
Do not wet the open end of the bag. Wet bags can be difficult to seal.
-
Clean and arrange the open end of the bag before closing it. Make sure nothing has been left in the upper part and there are no impurities. Your bag must not be crumpled. (These things could prevent bags from being hermetically sealed)
- Do not leave too much air in the bag. Press on the bag to evacuate the excess air. Too much air increases the load on the pump and may cause insufficient motor power. The machine can then not empty all the air from the bag.
- Do not pack sharp objects such as fish bones or hard shellfish. Sharp items may penetrate and tear the bag.
- Fill 2/3 of a bag with water and close it without removing the air (Seal key). Freeze the bag. This will enable you to make blocks of ice using your vacuum sealer.
- Only sealing one bag a minute before allowing the machine to rest is recommended.
- If the bag is not emptied sufficiently the evacuation process will stop automatically after 30 seconds. In this situation please refer to Chapter 8, Troubleshooting.
c) Rolls of bags
Brandt rolls of bags are sold separately so that you can choose the size you want. To seal your bag yourself, follow the instructions below.
- Unroll the bag and place one end on the top of the black rubber strip and then close the cover. (See Diagram 1)
- Press on the front pushing on the two sides and using both hands until you hear two clicks. (See Diagram 2)
- Press the "Seal" button on the vacuum packer and the red light will come on.
- When the LED light disappears the bag will be sealed.
- Press the two locking buttons (see Diagram 3) to release the roll.
- Take out the roll of bags and cut it to the length desired.

The operation of this vacuum packager is only guaranteed with the manufacturer's bags.
4) LOOKING AFTER AND CLEANING YOUR MACHINE
a) Cleaning the Vacuum Sealer
- Wash your hands before cleaning the machine and the accessories.
- Check that the machine is unplugged before cleaning it.
- Clean the external surfaces of the machine with a damp cloth (without detergent) before and after use.
- Do not use solvents or abrasive products for cleaning.
- Do not immerse the machine in water to clean it.

Check that the machine is unplugged before cleaning it. If a liquid is accidentally spread on any part of the machine, do not plug it in and do not try and re-use it. Contact the approved Technical Department or the distributor.
b) Storing your Vacuum Sealer
Store your machine in a safe place out of reach of children. In order to preserve the service life of the seals, we recommend that you do not clip the cover when the machine is not in operation.
5) TROUBLESHOOTING
Measures to be taken if there is a problem with the product:
| The machine does not work | Make sure the machine is plugged in. Check the electric socket by plugging another machine into it. Check whether the lead or plug are damaged. If so do not plug the machine in. |
| The machine does not create a complete vacuum inside the bags | The open end of the bag must be completely introduced into the vacuum chamber. Check whether there are impurities on the welding bar and the seals. Clean them and put them back in the right position. The bag may have a hole in it. To check, seal the bag with a little air inside. Immerse the bag in water and squeeze it. Bubbles indicate a leak. Reweld it or us another bag. |
| The bags are not sealed correctly. | This may be due to the welding bar overheating or the bag melting. Open the cover and allow the welding bar to cool for several minutes. |
| The bag does not maintain the vacuum after welding | This may be due to a leak linked to wrinkles, or the presence of crumbs, fats or liquids. Open the bag, clean the top part of it and remove all foreign bodies from the welding bar before welding again. |