
TI2SLIM - Cooker BRANDT - Free user manual and instructions
Find the device manual for free TI2SLIM BRANDT in PDF.


| Product type | Cooker |
| Brand | Brandt |
| Model | TI2SLIM |
| Width | 60 cm |
| Height | 85 cm |
| Depth | 60 cm |
| Weight | 50 kg |
| Power supply | Mixed (gas for hob, electric for oven) |
| Gas type | Natural gas (G20) or butane/propane (G30/G31) |
| Number of burners | 4 gas burners |
| Oven type | Static electric oven |
| Oven volume | 65 L |
| Pyrolytic cleaning function | No |
| Ignition | Integrated electric ignition |
| Child safety | Yes (control lock) |
| Oven lighting | Yes |
| Oven thermostat | Adjustable thermostat from 50°C to 250°C |
| Hob material | Enameled steel |
| Maintenance and cleaning | Clean the burners and hob with a damp cloth and mild soap. Oven can be cleaned by hand. |
| Spare parts and repairability | Parts available on the Brandt website or from customer service. |
Frequently Asked Questions - TI2SLIM BRANDT
User questions about TI2SLIM BRANDT
0 question about this device. Answer the ones you know or ask your own.
Ask a new question about this device
Download the instructions for your Cooker in PDF format for free! Find your manual TI2SLIM - BRANDT and take your electronic device back in hand. On this page are published all the documents necessary for the use of your device. TI2SLIM by BRANDT.
USER MANUAL TI2SLIM BRANDT
natural_image
Black-and-white photo of a plate of pasta with cheese and garnish, accompanied by decorative paper cutouts and a small leaf branch (no text or symbols)MANUEL D'INSTRUCTION FR
INSTRUCTION MANUAL EN
Thank you for buying a BRANDT product and for your confidence in our company.
This product has been designed and manufactured for you considering your lifestyle and your requirements, so that it meets your expectations in the best way possible. We have invested it with our expertise, spirit of innovation and all the enthusiasm which has driven us for more than 60 years.
So that we are always able to satisfy your requirements as well as possible, our customer service is available, ready to listen and answer all your questions or suggestions
You can also visit our website www.brandt.com where you will find our latest innovations as well as additional useful information.
BRANDT is happy to support you daily and hopes you will enjoy your purchase to the full.

Important: Before starting your machine, please read this guide for installation and use carefully in order to familiarise yourself with how it operates quickly.
CONTENTS
1) FOR THE USER'S ATTENTION.... 17
a) Safety Instructions.... 17
b) Technical Data....20
c) Environmental Protection....20
2) INTRODUCTION TO YOUR MACHINE 21
a) Description of Your Induction Cooker Control Panel.... 21
b) Before Using for the First Time 22
c) Compatible and Incompatible Pans 22
d) The Safety Pack.... 22
a) Description of the Control Panel....23
b) Starting the Machine....23
c) Using the Functions.... 24
d) Stopping the Machine.... 25
4) LOOKING AFTER YOUR MACHINE AND DEALING WITH FAULTS 25
a) Cleaning the Machine 25
b) Troubleshooting.... 26
1) FOR THE USER'S ATTENTION

Keep these instructions with your machine. If you see this machine to another person second-hand, make sure you give the new owner these instructions. Please read these instructions before installing and using your machine. They are written for your safety and that others.
a) Safety Instructions
IMPORTANT SAFETY INSTRUCTIONS TO BE READ CAREFULLY AND KEPT FOR A SUBSEQUENT USER
General information
This machine is only intended for domestic use for cooking and reheating food and liquids. Only use this machine for the purposes described in the manual. It may only be used in a covered, enclosed and heated environment such as a kitchen or any other room meeting the same specifications. The manufacturer denies all responsibility in the event of inappropriate use.
- After removing your product from its packaging check that the machine is in perfect condition and, in particular, that the plug or the power supply lead are not damaged. If there is any doubt contact your dealer's after-sales service.
- Children younger than the age of 8 must be kept away unless they are continually supervised.
• Children must not play with the machine. - Keep the machine and its power cable out of reach of children under the age of 8.
Safety Instructions for Installing the Machine

Install or place this cooker as the installation instructions recommend.
See the 'INTRODUCTION TO YOUR MACHINE' section.
- This machine must not be placed on furniture.
- Do not obstruct your machine's air inlets.
- If this machine is covered or in contact with a flammable material including curtains, drapes and similar items, there is a fire risk when it is working.
- Keep the power cable away from the hot surface.
- This machine is not intended to be put into operation using an external timer or a separate remote control system.
Safety Instructions for Using the Machine

The machine and its accessible parts may become hot during use. Young children should be kept away.
- This machine may be used by children aged 8 or older, and also by people with reduced physical, sensory or mental capacities if they are correctly supervised OR after having given them the necessary information concerning the use of the machine, so that they are aware of the dangers.
- The accessible parts of this machine may become hot when it is operating.
- Make sure that the pans used are compatible with use on an induction hob.
- Precautions must be taken when handling saucepans to avoid burns.
- Metal objects such as knives, forks, spoons and lids must not be placed on the heating plate as they may become hot.
• After use the cooking area is hot. To avoid burning yourself touching the cooking area is not recommended.
- If the surface is cracked turn off the machine to prevent a probable electric shock.
Safety Instructions for Cleaning the Machine

Turn off the plate and unplug the power cable before cleaning.

Lack of maintenance for the hob may lead to deterioration of the surface and thus damage to the machine.
- Cleaning and maintenance of the machine should not be carried out by children unless they are supervised.
- This machine must be cleaned regularly and all food residues removed.
- Do not use an abrasive sponge or metal scraper to clean the ceramic plate because they might scratch the surface, which could then cause the glass to crack.
- For your safety a steam cleaner must not be used.
- The power cable cannot be replaced. If the cable is damaged the machine should be discarded. This product is guaranteed by your distributor. For more details please refer to the guarantee conditions provided by the distributor.
Non-compliant use
The manufacturer denies all responsibility in the event of non-compliant use. This machine is exclusively intended for the use described in the manual. Take into account the general and safety recommendations listed in this chapter.
- This induction hob is not intended for outdoor use.
- This induction cooker is only intended for domestic use in private dwellings. The use of this product in communal or professional premises such as rooms for breaks, workshops, camping or hotel premises, etc. does not represent compliant use as defined by the manufacturer.
b) Technical Data
| Model | TI2SLIM |
| Voltage/Frequency | 220-240V— 50/60Hz |
| Power | 2000W + 1400W |
| Net weight | 4.9 Kg |
| Dimensions mm (HxWxD) | 45 x 600 x 380mm |
Eco Design Information/Product Data Sheet
| Symbol | Value | Unit | |
| Brand | Brandt | ||
| Model | TI2SLIM | ||
| Type of plate | Portable | ||
| Heating technology | Induction | ||
| Number of heating zones | 2 | - | |
| Diameter of the useful heating surface (single or right-hand zone) | 19.0 | cm | |
| Diameter of the useful heating surface (left-hand zone) | 19.0 | cm | |
| Energy consumption per heating zone (single or right-hand zone) | EC_zone | 185.50 | Wh/kg water |
| Energy consumption per heating zone (left-hand zone) | EC_zone | 188.50 | Wh/kg water |
| Energy consumption of the hob | EC_hob | 187.00 | Wh/kg water |
c) Environmental Protection

At the end of its life this product must not be discarded with household waste. It must be taken to a recycling centre or to your dealer. This makes it possible to avoid consequences resulting from inappropriate disposal that are harmful to health a the environment, and to recycle materials to save energy and significant resources.
A logo appears on the product reminding you not to discard it with household waste. For further information, contact your council offices or the shop where you bought this product.

Energy saving advice
Cook with a well-fitting lid to save energy. If you use a glass lid you can cook perfectly.
2) INTRODUCTION TO YOUR MACHINE
a) Description of Your Induction Cooker Control Panel

Control Panel

- "Keep Warm" (Maintien au chaud) Function
- Simmering Function
- Timer
- Frying Function
-
Boiling Function
-
Boost Function
- On/Off
- Increase the power/time
- Reduce the power/time
- Locking the keyboard
b) Before Using for the First Time
- Unpack the machine and remove all the paper and plastic. Makes sure no pieces of packaging remain on the parts of the machine.
- Before using the induction cooker for the first time, it is wise to ensure that it is at least 10 centimetres from all walls, partitions or flammable materials (curtains, drapes, etc.).
- Then plug the cooker into a 10 ampere (minimum) earthed socket. If the use of an extension lead proves to be indispensable make sure that it is in good condition and compliant. Your machine must rest on a clean, horizontal, flat, stable surface that is heat-resistant, Do not move the machine when it is operating.
- When using the machine you may hear a slight noise which is due to a very slight vibration of the pan at high frequency. This is normal and is not a source of danger.
c) Compatible and Incompatible Pans
Compatible pans must be used. In order to determine whether your pans are compatible or not you just need to use a magnet. If the magnet sticks to the bottom of the pan this means that your pan is compatible with induction cookers.
You can also refer to the diagram below showing compatible pans:
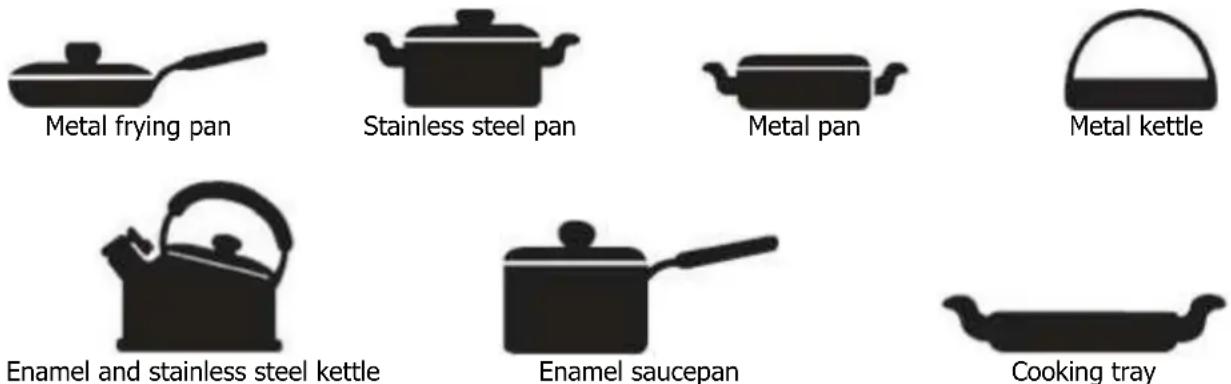
The compatibility of these pans refers to tests performed on pans containing stainless steel 430 with a base of 180 +/- 10 mm. Other cooking utensils do not guarantee results of equivalent quality.
Pans in aluminium, copper, ceramic, glass or aluminium alloy must not be used with this machine, as well as those with a diameter of less than 12 cm or more than 26 cm.
This machine can in fact take saucepans with a diameter of between 12 and 26 cm.
d) The Safety Pack
The machine has a complete safety pack:
- Warning about the plate temperature: if the screen shows "L" the plate is cold and if it shows "H" it is hot.
-
Anti-overheating system. If the temperature inside the machine is too high, it will stop heating.
-
Protection against over-current or voltage anomalies. When the voltage is abnormal or when the current is cut abruptly the induction cooker will stop to avoid any damage. Once the problems have been dealt with the induction cooker will function normally again.
- The pan detection system. If a pan is removed whilst the machine is in operation the machine will stop heating. After that it will go on standby.
- Automatic switch-off. When the timer reaches the end of the time set the machine will stop automatically until the user turns on the timer again. Similarly the machine will turn off automatically if a dish being cooked has been forgotten for a long time.
- Locking the controls (10). This key makes it possible to lock all the controls to simplify cleaning and also to protect children from any risk.
a) Description of the Control Panel
• The control keys are touch-sensitive. There is no need to apply pressure.
• Use the base of your finger and not the tip as shown in the pictures below.

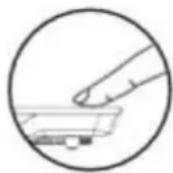
- Push the slider with your finger to increase or decrease the power,
- You will hear a beep each time an action is recorded.
- The control panel must always be clean, dry and not covered by an object or a fabric. Even a fine film of water may create malfunctions.
b) Starting the Machine
After having turned the machine on the audible alarm sounds and the screen displays "L" (cold) or "H" (hot), indicating that the temperature of the induction plate is less than or higher than 60°C. Then press the Start/Stop key (7). The screen displays ----" meaning that the machine is on standby and ready to be programmed. You can now use your induction plate.
Just press the + or - keys on your machine to select the desired power or use the slider directly by sliding your finger from left to right or vice versa.
Never place an empty pan on the machine when it is in operation.
Note:
Once the machine is ready to be used, and if you don't press any other key during the next 30 seconds, it will turn off automatically after 60 seconds for safety reasons. The screen will show "L" meaning that the machine's temperature is less than 60^ and is turned off.
In the same way if you place an incompatible pan on the plate the screen will show "E1" and a beep will be heard. The machine will turn off automatically in the next 30 seconds.
c) Using the Functions
- Simmering Function

To use this function press the Simmering key (2). An indicator light comes on above the key. The heating power is adjusted to 2 by default. Pressing the +/- keys deactivates the mode.

- Frying Function
To use this function press the Frying key (4). An indicator light comes on above the key. The heating power is adjusted to 6 by default. Pressing the +/- keys deactivates the mode.
- Boiling Function

This function enables you to boil water. To use this function press the Boiling key (5). An indicator light comes on above the key. The heating power is adjusted to 10 by default. After about 7 minutes it turns itself down to 8 automatically. For this mode the heating time is set to 15 minutes. Pressing the +/- keys deactivates the mode.
Note: To avoid any risk of boiling over do not fill your pan to more than three quarters full.
- Boost Function

The Boost key (6) makes it possible to put the machine on full power for 10 minutes and then maintain a maximum power level without the machine or the cooking utensil overheating. An indicator light comes on above the key. Pressing the +/- keys deactivates the mode.
To keep your preparation at service temperature press the Maintien au chaud (Keep Warm) key (1). An indicator light comes on above the key. The machine will automatically adjust itself to the minimum power 1 and will stop after 120 minutes. To adjust the power again press the +/- keys.
- Timer

In order to use the timer just select a cooking mode and then press the Timer key (3). An indicator light comes on above the key. The digital screen will then show "00:00". Within 4 seconds press the +/- keys to adjust the cooking time. Each press increases or decreases the time by 1 minute. If you hold down the key the time will increase or decrease by 10 minute increments. The timer can be adjusted from 1 minute to 180 minutes. Once the time has elapsed the digital screen will display "H" and a beep will be heard. The system will stop automatically. To change the time during use press the Timer key (3) again and then press the +/- keys. To stop the timer press the Timer key (3) for several seconds. The timer light will go out.
- Locking function

To lock all the control keys during cooking press the locking key (10). The "Lo" indicator will appear on the screen.
In this situation only the Start/Stop key (7) can be used to turn off the machine. If you press the Start/Stop key (7) in locking mode the screen will display "L" or "H" meaning that your machine is turned off. To unlock the controls press the Start/Stop key (7) again and then press the locking key for 3 seconds.
d) Stopping the Machine
After use the electric plate will be hot, the audible alarm sounds and the "H" indicator flashes on the screen. To turn of the machine press the Start/Stop key (7) and then unplug it.
For information, you can refer to the following table to find the heating level relating to each number on your control panel.
| Level | 1 | 2 | 3 | 4 | 5 | 6 | 7 | 8 | 9 | 10 |
| Wattage left side(W) | 120 | 300 | 500 | 800 | 1000 | 1200 | 1400 | 1600 | 1800 | 2000 |
| Wattage right side (W) | 120 | 200 | 400 | 500 | 700 | 900 | 1000 | 1100 | 1300 | 1400 |
4) LOOKING AFTER YOUR MACHINE AND DEALING WITH FAULTS
a) Cleaning the Machine
Ensure the machine is off and unplugged before cleaning.

Carry out cleaning when the ceramic plate has cooled down.
About the vitroceramic plate and the control panel
- Lightly soiled: clean with a soft, damp cloth
- Soiled with fat: clean with a soft, damp cloth with a little toothpaste or neutral detergent until the residues are removed.
• Do not use an abrasive, flammable, acid or alkaline cleaning liquid

Note: When cleaning never clean with surface of the hob with a stiff brush.
About the air inlet and the air vent
After a long period of use dust and other dirt may accumulate in the air inlet or the air vent. The body of the induction cooker should be cleaned carefully with a clean, dry cloth. The dust around the air inlet and the air vent must be cleaned with a supple brush or a cleaner.

Note: Do not immerse the induction cooker in water and do not clean it with a steam cleaner.
b) Troubleshooting
Below you will find the inspections recommended for the defects encountered most often:

Do not dismantle the machine yourself to avoid any danger or deterioration of the induction cooker.
| Problems | Points to be checked | |
| After plugging the machine in the indicator for the Start/Stop key does not light up and there is no display on the screen. | Check the machine is correctly connected to the electric socket.Check that the switch, the plug and the fuse are in good condition. | |
| The Start/Stop key indicator light comes on but heating does not start. | Make sure that the pans are compliant with use on induction hobs.Make sure that the pans are correctly placed on the induction hob.Call an engineer. | |
| The machine stops heating abruptly when it is operating. | Let the machine cool.Clear the air inlet and outlet.Adjust the timer again.Refer to the fault codes below. | |
| Display of error codes | E0 | The machine circuits are defective |
| E1 | The induction cooker has not detected a pan or the pans on the induction cooker are not compatible | |
| E2 | The induction cooker has overheated | |
| E3 | The voltage is too high | |
| E4 | The voltage is too low | |
| E5, E6 | Short-circuit | |
| E1-E3-E4 | Inspect the product to resolve the problem before any other approach | |
| E0-E2-E5-E6 | Contact Customer Service | |
natural_image
Silhouette of a cooking pot with a lid and handle (no text or symbols)Cacerola de esmalte

Placa de cocción
natural_image
Silhouette of a cooking pot with a lid and handle (no text or symbols)



- CONTENTS
- 1) FOR THE USER'S ATTENTION.... 17
- 2) INTRODUCTION TO YOUR MACHINE 21
- 4) LOOKING AFTER YOUR MACHINE AND DEALING WITH FAULTS 25
- 1) FOR THE USER'S ATTENTION
- a) Safety Instructions
- General information
- Safety Instructions for Installing the Machine
- Safety Instructions for Using the Machine
- Safety Instructions for Cleaning the Machine
- Non-compliant use
- b) Technical Data
- Eco Design Information/Product Data Sheet
- c) Environmental Protection
- 2) INTRODUCTION TO YOUR MACHINE
- b) Before Using for the First Time
- c) Compatible and Incompatible Pans
- d) The Safety Pack
- a) Description of the Control Panel
- b) Starting the Machine
- Never place an empty pan on the machine when it is in operation.
- Note:
- c) Using the Functions
- - Simmering Function
- - Frying Function
- - Boiling Function
- - Boost Function
- - Timer
- - Locking function
- d) Stopping the Machine
- 4) LOOKING AFTER YOUR MACHINE AND DEALING WITH FAULTS
- a) Cleaning the Machine
- About the vitroceramic plate and the control panel
- About the air inlet and the air vent
- b) Troubleshooting
Brand : BRANDT
Model : TI2SLIM
Category : Cooker