F6423 - Watch FESTINA - Free user manual and instructions
Find the device manual for free F6423 FESTINA in PDF.

User questions about F6423 FESTINA
0 question about this device. Answer the ones you know or ask your own.
Ask a new question about this device
Download the instructions for your Watch in PDF format for free! Find your manual F6423 - FESTINA and take your electronic device back in hand. On this page are published all the documents necessary for the use of your device. F6423 by FESTINA.
USER MANUAL F6423 FESTINA
This combination watch can display the time in 30 cities of the world with a simple operation. In addition to the time displayed in the analog section, the times in 30 cities can be displayed in sequence in the digital section. The time displayed in analog and digital can be easily switched. This watch is a useful tool for various purposes, such as on the international business scene and when traveling.
Names and Functions
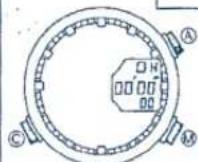
Fold out the watch diagram at the beginning of this instruction manual and refer to the location of the parts.
Names of Parts :
[1] Minute hand
[2] Hour hand
[3] UTC time indicator (Displays Coordinated Universal Time in hours and minutes.)
[4] Mode hand (Shows the mode selected with the Ⓜ button.)
[5] 24-hour hand
[6] Displays the name of the city for which the time is displayed in the digital section [7].
[7] Displays the time or calendar.
[8] Displays the functions of the Ⓐ button.
[9] Displays the functions of the Ⓜ button.
[10] Displays the functions of the Ⓑ button.
[11] Displays the functions of the © button.
Contents
Names of Parts 2
Main Functions 4.5
Changing Modes 6.7
The Time Difference Between the Cities Indicated
by this Watch and Greenwich Mean Time (UTC) 8.9
Examples of Using this Watch 10 - 11
Using the Zone Setting Function 12
Adjusting the Time 13
Adjusting the Calendar 14
Using the Alarm 15
Using the Chronograph 16
Using the Timer 18
Convenient Functions: 20-22
■ When the hands of the analog section cover the digital section, making the
time in the digital difficult to read utilize, hand retractor function.
■ When the watch displays something improperly and a malfunction is
suspected, perform all reset.
Using the Register Ring 23-26
To Keep Your Watch In Good Condition 27-30
Specifications 31
Main Functions
- Displaying the Time In 30 Cities of the World
The Coordinated Universal Time (UTC) and the time in 30 cities of the world can easily be displayed.
Operation:
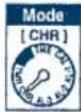
Press the Ⓧ button to move the mode hand to [TME]. The name of and time in a city will be displayed at [6] and [7] and change in sequence each time the Ⓧ (UP) or ⭇ (DOWN) button is pressed.
● The time in the analog and digital sections can be switched.
Operation:
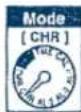
Press the Ⓐ button to move the mode hand to either [TME] or [CAL]. Press the Ⓐ and Ⓐ buttons simultaneously to switch time between the analog and digital section.
- Displaying the Calendar in 30 cities of the World
The calendar in 30 cities of the world can easily be displayed.
Operation:
Press the Ⓧ button to move the mode hand to [CAL]. The name of and calendar for a city will be displayed in [6] and [7] and change in sequence each time the Ⓧ (UP) or Ⓧ (DOWN) button is pressed.
3.Three Alarma
The watch has three alarms, each with a different tone. Each alarm can be set for the time in any one of thirty cities. See "Using the Alarm" for details.
4.Chronograph
The time can be measured up to 23 hours, 59 minutes, 59 seconds and 99 hundreds of a second, displayed in increments as small as one-hundredth of a second (1/100 sec). See "Using the Chronograph" for details.
- Timer
The countdown timer can be set from 1 to 60 minutes in increments of 1 minute. See "Using the Timer" for details.
6.Zone Setting
The time display can be programmed so that only the desired cities are displayed. Using the zone setting function allows you to display the desired time and calendar for a city more efficiently. See "Using the Zone Setting function" for details.
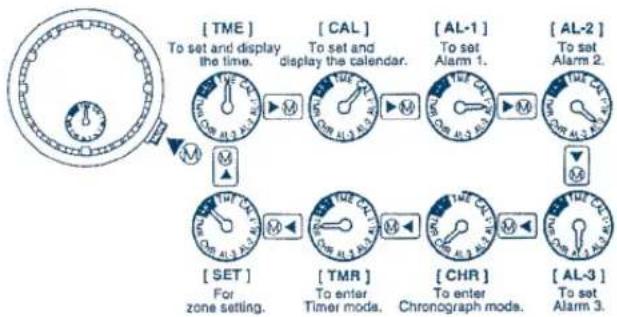
Changing Modes
The mode changes each time the Ⓜ button is pressed. The current mode during operation can be confirmed with the mode hand [4].
The modes change in the following sequence: [TME] → [CAL] → [AL-1] → [AL-2] → [AL-3] → [CHR] → [TMR] →[SET]
flowchart
graph TD
    A["To set and display the time."] --> B["CAL"]
    B --> C["AL-1"]
    C --> D["AL-2"]
    D --> E["AL-3"]
    E --> F["CHR"]
    F --> G["TMR"]
    G --> H["SET"]
    H --> I["Al-1."]
    I --> J["AL-2."]
    J --> K["AL-3."]
    style A fill:#f9f,stroke:#333
    style B fill:#ccf,stroke:#333
    style C fill:#cfc,stroke:#333
    style D fill:#fcc,stroke:#333
    style E fill:#cff,stroke:#333
    style F fill:#ffc,stroke:#333
    style G fill:#cfc,stroke:#333
    style H fill:#fcc,stroke:#333
    style I fill:#cfc,stroke:#333
    style J fill:#fcc,stroke:#333
    style K fill:#cfc,stroke:#333
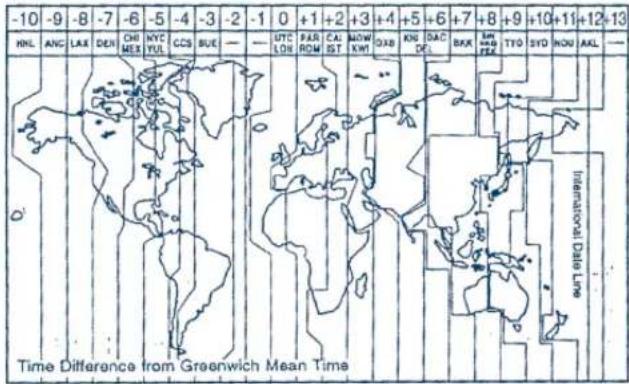
The Time Difference Between the Cities Indicated by this Watch and Greenwich Mean Time
| City code | City | Time difference | City code | City | Time difference | City code | City | Time difference |
| UTC | Coordinated Universal Time | ±0 | ||||||
| LON | London | ±0 | DAC | Daoca | +8 | ANC | Anchorage | -9 |
| PAR | Paris | +1 | BKK | Bangkok | +7 | LAX | Los Angeles | -6 |
| ROM | Rome | +1 | SIN | Singapore | +8 | DEN | Denver | -7 |
| CAI | Cairo | +2 | HKG | Hong Kong | +8 | CHI | Chicago | -6 |
| IST | Istanbul | +2 | PEK | Peking | +8 | MEX | Mexico City | -6 |
| MOW | Moscow | +3 | TYO | Tokyo | +9 | NYC | New York | -5 |
| KWI | Kuwait | +3 | SYD | Sydney | +10 | YUL | Montreal | -5 |
| DXB | Dubai | +4 | NOU | Noumela | +11 | CCS | Caracas | -4 |
| KHI | Karachi | +5 | AKL | Auckland | +12 | RIO | Rio de Janeiro | -3 |
| DEL | New Delhi | +5.5 | HNL | Honolulu | -10 | BUE | Buenos Aires | -3 |
![Examples of Using this Watch The times in 30 cities of the world are displayed with a simple button operation. It's easy to display the time! Press the @ button to enter [TME] mode. [TME] The name of and time in a city will be displayed at [6] and [7] each time either the (UP) or (DOWN) button is pressed. LON 12:00 00 PAR 13:00 00 .....](/content/2026/05/1051032/images/1601060c5b9ee8b965d7e2fc2275d756d26094deed91040cadfaec2cadd403bf.jpg)
The time in the analog and digital sections can be easily switched. Example: Visiting London from New York
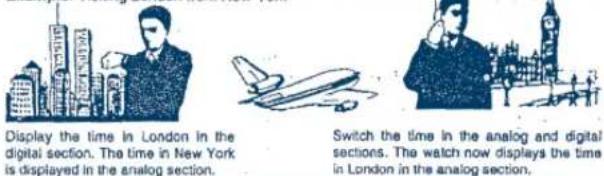
Switching time between analog and digital is very simple.
![Press the [TME] [ &] button to enter either [TME] or [CAL] mode. [ CAL ] Press the A and C buttons simultaneously. The time displayed by the analog section automatically changes to the time that was previously displayed in the digital section. The time that was displayed by the analog section will now be displayed in the digital section.](/content/2026/05/1051032/images/658cae50ebc639742189c6d271ee3d0f782a88bd7d72583cc1850f5b8b0fc83b.jpg)
Using the Zone Setting Function This page should be read with the watch diagram, at the beginning of this manual, folded out to refer to the location of the parts.
This watch can display the time in 30 cities of the world in sequence. Using the zone setting function allows you to skip the cities you do not wish displayed.
[Preparation for zone setting]
Press the Ⓜ (MODE) button to move the mode hand to [SET]. (At this point, the cities to be displayed or to be skipped can be confirmed by using either the Ⓐ [UP] or © [DOWN] button.)
[ Zone setting--Display/No Display ]
1.Pull the Ⓜ (MODE) button out to the setting position.
-
Use the Ⓐ (UP) button to select the cities.
-
Use the Ⓐ (SET) button to select either SET (display the time) or OFF (do not display the time).
-
Use the © (SET) button to select daylight-saving time ON or OFF.
5.Push the Ⓜ (MODE) button in to its normal position. Zone setting is now completed.
- Press the Ⓜ (MODE) button to return the mode hand to [TME].
Adjusting the Time This page should be read with the watch diagram, at the beginning of this manual, folded out to refer to the location of the parts.
Adjusting the time for one of the 30 cities will automatically adjust the time for the remaining cities according to the time differences.
![FESTINA F6423 - [Preparation for zone setting] - 1](/content/2026/05/1051032/images/6c53bf906afc7e4ee4b3d8715105271a136797a6334fff9c628fc46d7bad8546.jpg)
[Preparation for time adjustment]
-
Press the Ⓜ (MODE) button to move the mode hand to [TIME].
-
Press either the Ⓐ (UP) or Ⓒ (DOWN)
button to move to the desired city. The
name of the city will be displayed at [6].
![FESTINA F6423 - [Preparation for time adjustment] - 1](/content/2026/05/1051032/images/a21b29d401ad499210f31f9ba97d110d6a734650c6fcd7880eb075bf24efbfbc.jpg)
.City name
Example:
NYC(New York)
[Time adjustment]
-
Pull the Ⓐ (MODE) button cut to the setting position. The time is displayed in the digital section with the hours, minutes and seconds blinking.(At this point, daylight-saving time ON/OFF can be selected by pressing the Ⓐ (SET) button.)
-
Press the Ⓐ (SELECT) button. The desired segment
of hours, minutes or seconds will blink in sequence. The segments blink in the following sequence: [Hours, minutes and seconds] → [seconds] → [minutes] → [hours] → [Switching between 12- and 24-hour systems] → [Hours, minutes and seconds] 3. Use the © (SET) button to adjust the blinking segment.
- Push the Ⓜ (MODE) button in to its normal position. Time adjustment is now completed.
Adjusting the Calendar This page should be read with the watch diagram, at the beginning of this manual, folded out to refer to the location of the parts.
Adjusting the calendar for one of the 30 cities will automatically adjust the calendar for the remaining cities, according to the time differences.
![FESTINA F6423 - [Preparation for time adjustment] - 2](/content/2026/05/1051032/images/de446d8d131cca2f25585108711f2762e096ae2752b7a368f4f3869632d6d5b2.jpg)
[Preparation for calendar adjustment]
- Press the Ⓜ (MODE) button to move
the mode hand to [CAL].
- Press either the Ⓐ (UP) or Ⓒ (DOWN)
button to select the desired city.
![FESTINA F6423 - [Preparation for calendar adjustment] - 1](/content/2026/05/1051032/images/702c897b88e45660cc78308c0d8db3deab2d32a8d08c43a7a2aa0128372a5f17.jpg)
City name
Example:
NYC (New York)
[Calendar adjustment]
-
Pull the Ⓧ (MODE) button out to the setting position. The day of the week (MO, TU, etc.) displayed in the digital section disappears and the month number starts blinking.
-
Press the Ⓐ (SELECT) button, The desired segment of the date will blink in sequence.
The segments blink in the following sequence:[Month] → [date] → [year] → [month] 3. Use the © (SET) button to adjust the blinking segment.
4.Push the Ⓜ (MODE) button in to its normal position. Calendar adjustment is now completed.
*There is no need to adjust the day of the week since it is corrected automatically.
![FESTINA F6423 - [Calendar adjustment] - 1](/content/2026/05/1051032/images/100b5ce3d8396365b7c7de451a09b98b92835e85a7d20e6e365a3275284c70b1.jpg)
Using the Alarm This page should be read with the watch diagram, at the beginning of this manual, folded out to refer to the location of the parts.
The operation of Alarms 1[AL-1], 2[AL-2] and 3[AL-3] are the same; only their tones are different. Once an alarm is set, it sounds at the same time every day until it is canceled (set to OFF).
![FESTINA F6423 - [Calendar adjustment] - 2](/content/2026/05/1051032/images/7d73639df8b7572fd7edc32da8bdf60f03c75f6700721f1d1ba0a6f460b49475.jpg)
[Preparation for alarm setting]……Example: Setting AL-1
- Press the Ⓜ (MODE) button to move
the mode hand to [AL-1].
- Press either the Ⓐ (UP) or Ⓒ (DOWN)
button to select the desired city.
![FESTINA F6423 - [Calendar adjustment] - 3](/content/2026/05/1051032/images/913b784b1646c2c4c0e0548fc723eb7d25a01182ed5b1f8f996b525ade1a1c04.jpg)
City name
Example: NYC (New York)
NYC (NEW YORK)
[Alarm setting]
-
Pull the Ⓜ (MODE) button out to the setting position.
-
Press the Ⓐ (SELECT) button, The desired
segment of the time will blink in sequence.
The segments blink in the following sequence:
[Alarm ON/OFF] → [hours] → [minutes] → [alarm ON/OFF]
- Use the © (SET) button to adjust the blinking segment.
4.Push the Ⓜ (MODE) button in to its normal position.
Alarm adjustment is now completed.
- Press the Ⓜ (MODE) button to return the mode hand to [TME].
*To turn the alarm off, press either the Ⓐ, Ⓗ, Ⓒ or Ⓜ button.
Using the Chronograph
This page should be read with the watch
diagram, at the beginning of this manual,
folded out to refer to the location of the parts.
In addition to the normal function of measuring the time from a starting to a stopping point, this chronograph has a split time function that enables you to measure elapsed time at any point from start to finish.
[Preparation for using the chronograph]
Press the Ⓜ (MODE) button to move the mode hand to [CHR].
[Using the chronograph - 1]
- Pressing the Ⓐ (START) button starts time
measurement.
-
Pressing the Ⓐ (STOP) button stops time measurement.
-
Pressing the © (RESET) button returns the displayed numbers
to zeros.
[Using the chronograph - 2]
-
Pressing the Ⓐ (START) button starts time measurement.
-
Pressing the © (SPLIT) button displays the elapsed time for 10 seconds.
(This function is useful in measuring elapsed time upon passing a point
during a marathon, etc.)
-
Pressing the Ⓐ (STOP) button stops time measurement.
-
Pressing the © (RESET) button returns the displayed numbers to zeros.

Operating the Chronograph
Press the Ⓜ (MODE) button to move the mode hand to [CHR].
Press the indicated button.
Normal operation

Display split time


Start

Split time

Stop

Reset

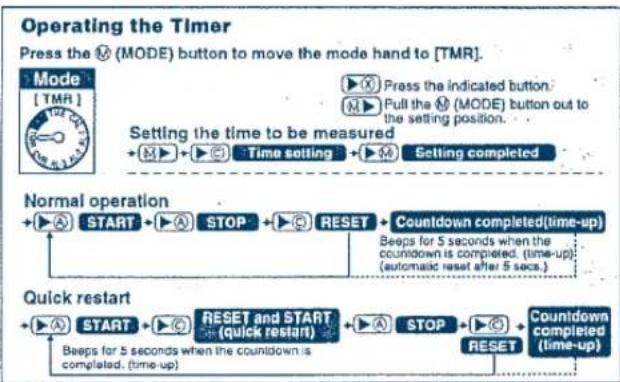
Using the Timer This page should be read with the watch diagram, at the beginning of this manual, folded out to refer to the location of the parts.
The timer can be set from 1 to 60 minutes in increments of 1 minute.
[Preparation for using the timer]
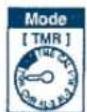
- Press the Ⓜ (MODE) button to move the mode hand to [TMR].
2.Pull the Ⓜ (MODE) button out to the setting position.
- Use the © (SET) button to set the time for the timer.
4.Push the Ⓜ (MODE) button in to its normal position.
Now timer setting is completed.
[Using the timer - 1]
- Pressing the Ⓐ (START) button starts the countdown. (When the set time has expired (time-up), the watch beeps for 5 seconds.)
-
Pressing the Ⓐ (STOP) button stops the countdown.
-
Pressing the © (RESET) button resets the timer back to the set time.
[Using the timer - 2]
-
Pressing the Ⓐ (START) button starts the countdown.
-
Pressing the Ⓐ button resets the timer back to the set time and restarts the countdown again. (This function is useful in restarting the countdown quickly.)
-
Pressing the Ⓐ (STOP) button stops the countdown.
-
Pressing the © (RESET) button resets the timer back to the set time.

(Example:Set for 12 min)
flowchart
graph TD
    A["Mode (TMR)"] --> B["Setting the time to be measured"]
    B --> C["Time setting"]
    C --> D["Setting completed"]

    E["Normal operation"] --> F["START"]
    F --> G["STOP"]
    G --> H["RESET"]
    H --> I["Countdown completed(time-up)"]
    I --> J["Beeps for 5 seconds when the countdown is completed. (time-up) (automatic reset after 5 secs.)"]

    K["Quick restart"] --> L["START"]
    L --> M["RESET and START (quick restart)"]
    M --> N["STOP"]
    N --> O["RESET"]
    O --> P["Countdown completed (time-up)"]
    P --> Q["Beeps for 5 seconds when the countdown is completed. (time-up)"]
Convenient Functions This page should be read with the watch diagram, at the beginning of this manual, folded out to refer to the location of the parts.
■ When the hands of the analog section cover the digital section, making the time in digital difficult to read, utilize the -
Hand-retractor function:
Use this function to retract the hour and minute hands of the analog section to the 12 o'clock position.
[Operation]
Hold the Ⓑ button down for more than 2 seconds and then release it when *H.R.* blinks in [10].
*During Hand-Retractor mode, the minute hand of the UTC time at [3] goes back and forth by 1 minute (-1 minute ◀▶+1 minute), and *H.R.* displayed at [10] blinks.
[Canceling Hand-Retractor mode]
Pressing the Ⓑ button again cancels Hand-Retractor mode.
(H.R.: Abbreviation of Hand-Retractor)
■ When the watch displays something improperly and a malfunction is suspected, perform –
ALL RESET and zero positioning:
When the watch displays something improperly and a malfunction is suspected, perform ALL RESET and zero positioning, then readjust the time, calendar and other modes.
[ALL RESET]
This function can be operated from any mode.
- Pull the Ⓜ (MODE) button out to the setting position.
2.Hold down the A, B and C buttons simultaneously for more than 2 seconds then release them. (All digital segments will light up. Immediately reset to the zero position.)
[Zero positioning]
-
Pressing the Ⓑ button resets all segments in the digital section to zeros.
-
The digital display changes in the sequence of UTC → HR → MIN each time the Ⓑ button is pressed.
UTC: For zero positioning of the UTC time display
HR: For zero positioning of the hour hand and 24-hour hand MIN: For zero positioning of the minute hand
- Pressing the Ⓐ (UP) button turns each hand clockwise. Pressing the Ⓐ (DOWN) button turns each hand counterclockwise. Align all hands to the 12 o'clock position.
- When the Ⓜ (MODE) button is pushed back in to its normal position, the watch beeps and at the same time the hands start moving. ALL RESET and zero positioning are now completed.
- Set the time, calendar and other modes.
*Zero positioning can also be done in Chronograph mode.
- Press the Ⓜ (MODE) button to align the mode hand to [CHR].
2.Pull the Ⓜ (MODE) button to its outward position. - The digital display segments change in the sequence of UTC → HR → MIN each time the Ⓑ button is pressed.
UTC: For zero positioning of the UTC time display
HR: For zero positioning of the hour hand and the 24-hour hand MIN: For zero positioning of the minute hand
- Pressing the Ⓐ (UP) button turns each hand clockwise. Pressing the Ⓐ (DOWN) button turns each hand counterclockwise. Align all hands to the 12 o'clock position.
- When the Ⓜ (MODE) button is pushed back in to its normal position, the watch beeps and at the same time the hands start moving. Zero positioning is now completed.
- Set the time, calendar and other modes.
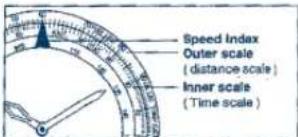
Using the Register Ring
[Calculation function]
Note the following points when using this function. Use the calculation function of this watch only as a guide Scales like these cannot place a decimal point for you
A. Navigational calculation
1) Time required
Example: Obtain the time required for the flight of an aircraft at 180 knots for
450 hautical miles
Answer: Align "18" on the outer scale with the SPEED INDEX (▲) on the inner scale. Then, "45" on the outer scale corresponds to "2:30" on the inner scale (time scale). Thus, the time required for the flight is 2 hours and 30 minutes
2)Knots (air speed)
Example: Obtain the knots (air speed) for 240 nautical miles with a flight time of 1 hour and 20 minutes.
Answer: Align '24" on the outer scale with "1:20" on the inner scale (time scale). Then the SPEED INDEX (▲) on the inner scale corresponds to "18" on the outer scale. Thus the air speed for the flight is 180 knots
3) Flight distance
Example: Obtain the air distance when the air speed is 210 knots and the flight time is 40 minutes.
Answer: Align "21" on the outer scale with the SPEED INDEX (▲) on the inner scale. Then, "40" on the inner scale corresponds to "14" on the outer scale. Thus, the air distance of the flight is 140 nautical miles.
4)Rate of fuel consumption
Example: Obtain the rate of fuel consumption (gallons/hour) when the flight time is 30 minutes and the fuel consumption is 120 gallons.
Answer: Align "12" on the outer scale with "30" on the inner scale. Then, the SPEED INDEX (▲) on the inner scale corresponds to "24" on the outer scale. Thus, the fuel consumption is 240 gallons per hour
5)Fuel consumption
Example: Obtain the fuel consumption required for a flight when the fuel consumption is 250 gallons per hour and the flight time is 6 hours.
Answer: Align "25" on the outer scale with the SPEED INDEX (▲) on the inner scale. Then, "6:00" on the inner scale (time scale) corresponds to "15" on the outer scale. Thus, the fuel consumption is 1.500 gallons
6)Estimated flight time
Example: Obtain the estimated flight time when the fuel consumption is 220 gallons per hour and the aircraft has 550 gallons of fuel.
Answer: Align "22" on the outer scale with the SPEED INDEX (▲) on the inner scale. Then, "55" on the outer scale corresponds to "2:30" on the inner scale (time scale). Thus, the estimated flight time is 2 hours and 30 minutes
7) Difference in altitude
the difference in altitude can be obtained from the rate of descent and the descent time. Example: Obtain the difference in altitude when an aircraft continues descending for 23 minutes at a rate of 250 feet per minute.
Answer: Align '25' on the outer scale with "10" on the inner scale. Then, "23" on the inner scale corresponds to "57 5" on the outer scale. Thus, the difference in altitude is 5,750 feet
8)Rate of climb (or descent)
The rate of climb (or descent) can be obtained from the time required to reach an altitude. Example: Obtain the rate of climb when an aircraft reaches an altitude of 7500 feet after climbing for 16 minutes.
Answer: Align '75' on the outer scale with '16' on the inner scale. Then, '10' on the inner scale corresponds to '47' on the outer scale. Thus, the rate of climb is 470 feet.
9)Time of climb (or descent)
The time required for climb can be obtained from the altitude to be reached and the rate of climb (or descent).
Example: Obtain the time of climb when an aircraft is to climb to 6,300 feet at a rate of 550 feet per minute.
Answer: Align "55" on the outer scale with '10' on the inner scale. Then, '63' on the outer scale corresponds to "11.5" on the inner scale. Thus, the time of climb is 11 minutes and 30 seconds.
10)Conversion
Example: Convert 30 statute miles into nautical miles and kilometers. Operation: Align "30" on the outer scale with STAT (▲) on the inner scale. Then, NAUT (▲) on the inner scale corresponds to "26" nautical miles on the inner scale and "12 km" (s) on the inner scale corresponds to "48.2" km on the outer scale
B.General Calculation Functions
1) Multiplication
Example: 20 x 15
Operation: Align "20" on the outer scale with '10' on the inner scale. Then, '15' on the inner scale corresponds to '30' on the outer scale. Take into account the position of the decimal point and add one zero to obtain 300. Note that with the scales of this watch, the position of the decimal point cannot be obtained.
2)Division
Example: 250 / 20
Operation: Align '25' on the outer scale with '20' on the inner scale. Then, '10' on the inner scale corresponds to "12.5" on the outer scale. Take into account the position of the decimal point to obtain 12.5
3)Proportion
Example: 30/20 = 60/x
Operation: Align '30' on the outer scale with '20' on the inner scale. Then, '60' on the outer scale corresponds to "40" on the inner scale. At this point the proportion for every value on the inner and outer scales is 30:20.
4) Square root
Example: Square root of 225
Operation: Turn the outer scale slowly and find a value that corresponds to both '22.5' on the outer scale and "10" on the inner scale. In this example, "22.5" on the outer scale corresponds to "15" on the inner scale and "10" on the inner scale corresponds to "15" on the outer scale. Thus, the answer is 15
To Keep Your Watch in Good Condition
| Name | Specifications | Display | Examples | ||||
| Dial | Case | Temporary spray from washing face,rain etc. | Kitchen-wet,seimming car washing,youring water-sipping etc. | Skin diving(Diving without air tanks) | Scuba diving(Diving with air tanks) | ||
| Non-water-resistant | — | — | — | NO | NO | NO | NO |
| Water-resistant for daily use | Hydro-resistant to 2 sulphurine | No indication | WATER RESIST(ANT) | OK | NO | NO | NO |
| Reinforced water-resistance for daily use | Water-resistant to 3 sulphurine; Water-resistant 1000 sulphurines | WATER RESIST(WATER RESIST ANT) or no indication | WATER RESIST(ANT) | OK | OK | NO | NO |
| OK | OK | OK | NO | ||||
Water resistance
*To prevent water from coming into contact with the internal mechanism of the watch, never pull the crown out when the watch is wet
"If your water-resistant watch is exposed to salt water or significant amounts of sweat, rinse it in clean water and dry thoroughly
* Exposure to water will diminish the durability of most types of leather bands.
*The internal parts of the watch may hold some moisture. If the external temperature is lower than that inside the watch, the crystal may get fogged up.
Temporary fogging does not pose a problem. If it persists for a prolonged period we recommend that you have your watch checked by your authorized dealer or a Citizen Service Center.
Temperature
Avoid exposing the watch to direct sunlight or leaving it in an extremely hot or cold location for prolonged periods
This will cause malfunctioning and shorten the life of the power cell.
*This may cause your watch to gain or lose time and affect its other functions
Shock
*This watch will withstand bumps and jars normally incurred in daily use or while playing noncontact sports such as golf
* Dropping the watch on a hard floor or otherwise applying shock to it may cause malfunction or damage.
Magnetic Fields
This watch is antimagnetic up to 60 gauss and will not be affected by the magnetic fields produced by ordinary
household electrical appliances. If used in the immediate vicinity of strong magnetism, however, the functions of the watch may temporarily be affected
Static electricity
The integrated circuits used in the watch are sensitive to static electricity. If exposed to intense static electricity the display may be adversely affected
Chemicals and Gases
Avoid wearing the watch in the presence of strong chemicals or gases. If the watch comes in contact with solvents such as thinner and benzine or products containing materials such as gasoline polish
detergent or adhesive, its components may discolor, dissolve or crack. Be especially careful to avoid chemicals. The watchcase and band may become discolored if they come in contact with mercury such as from a broken thermometer.
Keep Your Watch Clean
When the watch has been worn for a prolonged period, pulling the crown out may become difficult because of dirt and dust caught between the crown and the watch case. To help prevent this from happening, rotate the crown back and forth occasionally while it is in the normal position
Wipe off any moisture that adheres to the case, crystal and band with a soft, clean cloth. Dirt left on the case or
band may cause a skin rash
A watchband will easily become soiled with dust and perspiration, as it is in direct contact with the skin. Even a stainless steel or gold-plated band may begin to corrode if it has not been cleaned for a prolonged period.
Mesh bands have very fine mesh. They will lose their "flexibility" if they are left soiled for a prolonged period
A metal watchband should be cleaned periodically to keep it looking beautiful. To clean your metal watchband, wash it with a brush in mild, soapy water rinse and wipe thoroughly with a soft, absorbent cloth. Make sure that all water is removed. Take care to prevent any water from entering your watch during washing.
Be sure to keep the power cells out of reach of infants and small children.
Should accidental ingestion occur, consult a doctor at once.
Specifications
Model: Combination Watch Navihawk
Quartz oscillation frequency: 32,768 Hz
(Hz = Oscillations in 1 second)
Accuracy of time measurement (under normal temperature range):
±20 seconds/month
Timepiece operational temperature range:0°C to 55°C
(32°F to 131°F)
Functions: Time (hours and minutes), Calendar (year, month, date
and day of the week), Alarm modes (1 2 and 3)
Chronograph mode, Timer mode
and Zone Setting mode
Power cell: Power cell No. 280-44 (Power cell code:SR 927W)
Life of the power cell: Approx 3 years after installing a new power cell
Specifications are subject to change without prior notice for product improvement

By virtue of the regulations pursuant to the handling of waste products deriving from electronic and electrical equipment, end of lifecycle watch making products must be selectively collected for processing. You may therefore dispose of your quartz watch making products at any of our retail outlets or any other authorized collection point. The selective collection, processing, rating and recycling of these products helps contribute to safeguarding the environment and protecting our health.